 03-31-2020, 03:56 PM
|
#1
|
 |
Junior Member
|
|
Join Date: Sep 2018
Location: Alamogordo, NM
Posts: 20
|
|
|
Junior Member
Join Date: Sep 2018
Location: Alamogordo, NM
Posts: 20
|
Ctullu - Build Thread
First off, thanks for viewing my thread!
Second, some background before we start. I bought a Silver 2004 4runner SR5 a few years ago with the plan on making it into a decent overland/off-road build. Right after I bought the thing I crashed my other car, so the 4Runner has been my daily driver since then (I know you are dying to know, no injuries from the crash, just some body damage to my Carolla). However, this didn't deter us from adventuring. I started saving my pennies for the next couple of years to build the 4Runner.
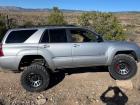
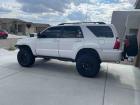
Ok, now for the build! The first two pictures are in stock form.
The first thing I did was install a new head unit with Wireless Apple CarPlay and Android Auto. After some research, I settled on the JVC KW-M855BW, a 6.8" touch screen head unit with wireless CarPlay and Android Auto. I initially was looking for something like this to use with a connected device, such as a phone, for using off-grid GPS ability. With Gaia GPS now working with CarPlay this has been great. It did take some investigating to find the speed sensor wire (Pink one in case anyone is also trying to do this) to tap into (Required for the wireless functionality to work with CarPlay). After some time I tapped into the pink wire here (this picture was a temporary solution to see if it worked after I verified functionality I soldered and used heat shrink over the wiring harness).
Around the same time as the radio install, I needed some new brakes so I got some PowerStop Z36 brakes (Rotors and all). One reason I decided to do the brakes is that I was getting the steering wheel wobble when braking. Rotors seemed straight, and couldn't quite figure out the issue, so I just replaced everything.
That did me in for a while, then I saved enough for the lift, tires, and wheels. After a couple weeks of research I settled on Vision Nemesis wheels, wrapped with some 285/70R17 Milestar Patagonia MTs. For the lift, I wanted something that could withstand many hours of constant use on a trail, so I wanted a remote reservoir shock. That narrowed down my search substantially. I also wanted an "All-in-one" package, designed to fit my particular model 4Runner. I settled on an Icon lift kit with CDCV shocks, and after the Black Friday discount, it came in substantially cheaper than MSRP. Overall, I have about 3" of lift with 33" tires. This lift was installed last weekend with the Wheels and Tires (The Lift has been in my Garage for a few months now, but due to my work schedule I didn't really have time to install it). I had to do some minor trimming of the fender liner. I removed the mud flaps a few weeks ago in preparation as well. I did some highway driving, neighborhood driving, then some light offroading to see how it performs. The difference is huge, smaller rocks (10" or smaller) are barely even felt now. Here are a few pics:
After the light off-road trip, I also decided that before hitting any Jeep trails I should do a body mount chop since there is rubbing in there when at full compression with the wheel turned to one side of the other. Other than that, it is a huge upgrade to the vehicle, we will see how the gas tank likes this though.
Also, just to test the Stock 4Runner off-road ability I went out with a local Jeep group for a trail ride. All stock, I only had to bypass two obstacles due to approach angles (straight verticle walls). Here is a pic after the trail, the Jeep next to the 4Runner is running 44" tires, owned by a co-worker of mine.
Last edited by Ctullu; 06-05-2020 at 12:58 AM.
|

|
 Reply With Quote Reply With Quote
|
|
06-05-2020, 12:19 AM
|
#2
|
|
Junior Member
|
|
Join Date: Sep 2018
Location: Alamogordo, NM
Posts: 20
|
|
|
Junior Member
Join Date: Sep 2018
Location: Alamogordo, NM
Posts: 20
|
Build Updates
I finally got some work done on my build. I started with buying a Coastal Offroad DIY bumper kit, without the swingarm (I figured I could save a few bucks and build the tire carrier myself). The bumper build was a process for me, as I didn't have a lot of time each day to work on it. On a Saturday a friend came by and helped out, but I ran out of gas in the welder (which he didn't realize, and continued to weld). Needless to say, the grinding to remove the porosity was fun.
Finally, I finished the rear bumper welding and grinding to look good (The bumper is welded inside and out on pretty much all the joints). Then we tackled the swing arms. I used 1.5" DOM tubing (1/4 wall) for the hinge housing and bored it out to get a good press fit with some high strength oil embedded bearings from McMaster, and used a 3/4" grade 8 bolt as the pivot. I also added some zerk fittings for greasing the hinge. I made the brackets out of 1/4" plate and cut slots in the bumper to press the 1/4" plate through, and welded it inside and out, on the top and bottom of each piece. After test fitting and getting everything working the way I liked, I took it all apart and prepped for paint.
I tested several paints and bed liners on some scrap pieces I had. I settled on Krylon spray-on bed liner, sprayed over some self-etching primer. The look was good and the durability was adequate. Touch-ups will be cheap, as it's only $5 a can wat Wal-Mart Before priming I wiped down the bumper, cleaned with mild detergent, then wiped it down with acetone and a clean rag. I laid on the primer and followed up with the bed liner. If you use this bed liner, give yourself about 20" between your surface the spray can, otherwise it tends to get a funky, globby-like texture. I laid on 4 coats of the liner, and let it dry for a few days. I finished it with a couple of coats of semi-gloss clear to help resist UV fade and let the dirt wash off a bit easier. The final result was pretty nice.
|
|
|
Reply With Quote
|
|
06-06-2020, 11:32 PM
|
#3
|
|
Junior Member
|
|
Join Date: Sep 2018
Location: Alamogordo, NM
Posts: 20
|
|
|
Junior Member
Join Date: Sep 2018
Location: Alamogordo, NM
Posts: 20
|
Build Updates!
So, I spent most of the day working on the electronics. I don't have much in the way of pics, but I will update that later. I wired up a 6 circuit fused relay panel and fed all the control wires (negatively switched) through the firewall. I also added in my radio, it's a Wouxun KG-UV980P Quad-band radio. While not really legal, you can unlock this to work with GMRS and CB, but I have a Cobra CB and a Boafeng GMRS unit in case I need to use those anyway. I used LMR400 antenna cable, and boy was it fun trying to feed it through the existing grommet on the firewall. The grommet was underneath the already installed relay panel that I build, which was a pain to install itself but came out really good. I mounted the antenna to the antenna holes in the ARB bumper.
I also wired in a 300A solenoid into the relay setup for my winch and tested everything out and it all works like a charm. I used the CH4X4 custom switches that fit in the factory switch locations (I just removed the blanks). All I have left to do is install the faceplate for the radio, but I'm not entirely sure where I want to put it, maybe above the cupholders in the little swing out cubby (cut a hole in the face to make room for the radio faceplate?) Other options are on the side of the center console or above the stereo on the dash area, but I like the incognito aspect of having it mounted lower. 
I will update with pics once I take some. Once I get the pics on here if anyone wants specs for the relay panel I can update with dimensions and stuff.
My next project is bolt-on rock sliders, but still debating on which to go with.
__________________
2004 SR5 with 195K miles.
Icon Lift, 33" Patagonia MT tires, ARB Bullbar, Coastal Offroad rear bumper.
Ctullu's Build Threadl |
|
|
Reply With Quote
|
|
06-07-2020, 07:32 AM
|
#4
|
 |
Senior Member
|
|
Join Date: May 2014
Location: Rio Rancho, New Mexico
Posts: 2,052
|
|
|
Senior Member
Join Date: May 2014
Location: Rio Rancho, New Mexico
Posts: 2,052
|
|
|
|
Reply With Quote
|
|
11-01-2020, 02:04 PM
|
#5
|
|
Junior Member
|
|
Join Date: Sep 2018
Location: Alamogordo, NM
Posts: 20
|
|
|
Junior Member
Join Date: Sep 2018
Location: Alamogordo, NM
Posts: 20
|
 New issue
I have been noticing an issue since I installed my relay box. When powering off equipment with the relay switches in the cab, a pop comes through the speakers, and sometimes the sound through the stereo system will be distorted or stop all together when this happens. This includes when I move from park to drive (not sure if this is due to the backup camera powering on and off as I roll though reverse, or from the reverse lights themselves). It doesnt seem to be causing any other issues, its more annoying that anything.
Any ideas?
__________________
2004 SR5 with 195K miles.
Icon Lift, 33" Patagonia MT tires, ARB Bullbar, Coastal Offroad rear bumper.
Ctullu's Build Threadl |
|
|
Reply With Quote
|
|
06-19-2022, 01:34 PM
|
#6
|
|
Junior Member
|
|
Join Date: Sep 2018
Location: Alamogordo, NM
Posts: 20
|
|
|
Junior Member
Join Date: Sep 2018
Location: Alamogordo, NM
Posts: 20
|
Rock Sliders Installed
I received my Cali Raised sliders recently, painted them up and got them installed finally. I really like the look, and I have much more confidence when tackling larger rocks/drop offs now.
I will add pics soon, I recently notice some scraping up front so I am going to remove the front shocks and Jack up the control arms to mark any areas to trim up. I might do that tonight and go for a test run tomorrow to see how it holds up and get some updated pics.
Also, I have noticed that under full compression the tires just barely scrape on the ARB bumper under panels. I might trip those up as well.
I will report back soon with pics!
__________________
2004 SR5 with 195K miles.
Icon Lift, 33" Patagonia MT tires, ARB Bullbar, Coastal Offroad rear bumper.
Ctullu's Build Threadl |
|
|
Reply With Quote
|
|
06-19-2022, 02:27 PM
|
#7
|
 |
Elite Member
|
|
Join Date: Feb 2011
Location: Bend, OR
Posts: 9,902
|
|
|
Elite Member
Join Date: Feb 2011
Location: Bend, OR
Posts: 9,902
|
I am deeply saddened by the lack of tendrils, tentacles, and eldritch features on your build. 
Otherwise looking good! keep up the great work! 
|
|
|
Reply With Quote
|
|
06-20-2022, 06:07 PM
|
#8
|
 |
Member
|
|
Join Date: Nov 2011
Location: Rocky Mount, NC
Age: 49
Posts: 472
Real Name: Bob
|
|
|
Member
Join Date: Nov 2011
Location: Rocky Mount, NC
Age: 49
Posts: 472
Real Name: Bob
|
Quote:
Originally Posted by BlackWorksInc

I am deeply saddened by the lack of tendrils, tentacles, and eldritch features on your build.
Otherwise looking good! keep up the great work! |
LOL. well, of course he can't put all that on because none of us could look at it and not go insane!! The Great Olde Ones would still approve, I think. He needs a Miskatonic U. sticker, though
__________________
2008 SR5 4WD (@280k!!)
|
|
|
Reply With Quote
|
|
06-18-2023, 04:02 PM
|
#9
|
|
Junior Member
|
|
Join Date: Sep 2018
Location: Alamogordo, NM
Posts: 20
|
|
|
Junior Member
Join Date: Sep 2018
Location: Alamogordo, NM
Posts: 20
|
Lol, You might be right about the Maskatonic University sticker. Maybe I'll throw one on somewhere.
__________________
2004 SR5 with 195K miles.
Icon Lift, 33" Patagonia MT tires, ARB Bullbar, Coastal Offroad rear bumper.
Ctullu's Build Threadl |
|
|
Reply With Quote
|
|
06-18-2023, 04:03 PM
|
#10
|
|
Junior Member
|
|
Join Date: Sep 2018
Location: Alamogordo, NM
Posts: 20
|
|
|
Junior Member
Join Date: Sep 2018
Location: Alamogordo, NM
Posts: 20
|
Build Update - June 2023
For a build update, I've thrown on a Gobi Ranger roof rack and some KC Hilites Gravity Pro 6 lights up front. A buddy has a 5th gen build with some Diode Dynamics SS2s on the sides and rear that really help with nighttime visibility in the wilderness or at camp. I might do something similar. I've also got an ARB Safari Snorkel I need to throw on. I just received the hole saws to do it right, but am apprehensive about drilling into my A-pillar. I also purchase a cyclone pre-cleaner that I am still waiting to get delivered.
As a follow-up to the tire rub issue, I think a different offset wheel is what I really need. Something that is close to factory would be ideal. I think that would completely solve my issue and might even allow 35s to fit with a bit of trimming.
I might head out this afternoon and get a few pics to throw up here.
__________________
2004 SR5 with 195K miles.
Icon Lift, 33" Patagonia MT tires, ARB Bullbar, Coastal Offroad rear bumper.
Ctullu's Build Threadl |
|
|
Reply With Quote
|
| Thread Tools |
|
|
| Display Modes |
Rate This Thread |
 Linear Mode Linear Mode
|
|
 Posting Rules
|
You may not post new threads
You may not post replies
You may not post attachments
You may not edit your posts
HTML code is On
|
|
|
|


