 07-20-2021, 08:39 PM
|
#31
|
 |
Member
|
|
Join Date: Jun 2021
Location: North Carolina
Posts: 243
|
|
|
Member
Join Date: Jun 2021
Location: North Carolina
Posts: 243
|
Quote:
Originally Posted by Flesh Eater

Loosen the front cam bolts on the LCA by the bolt head, not the nut. I had to cut my rear bolts off as well as the LCA arm itself.
Man, trans lines are usually one bolt on the trans and just disconnect up front. Super easy. Like I said, working them up front is tricky.
|
Honestly the trans lines did look easy. I just didnt have the time to get to it because its my DD. All the other stuff isnt pressing so hopefully I can get to most of it.
Sent from my iPhone using Tapatalk
|

|
 Reply With Quote Reply With Quote
|
|
07-20-2021, 08:41 PM
|
#32
|
|
Member
|
|
Join Date: Jun 2021
Location: North Carolina
Posts: 243
|
|
|
Member
Join Date: Jun 2021
Location: North Carolina
Posts: 243
|
Quote:
Originally Posted by y=mx+b
With these prices, I'm going to side with they're probably gouging you and most of the services probably not needed. For example, at 210-230k miles, all of my ball joints, bushings, and all suspension was in worn but still decent condition and passed inspection without issue. I only started replacing stuff when my cam bolts seized and that snowballed into suspension stuff for offroading. But for regular road use, everything was fine.
I've got a writeup on rebuilding the LCAs if you take that route, but it is a decent amount of work. The writeup covers everything from removal of arms by sawzall and all parts/tools needed, so applicable to the straight LCA replacement option too
Whiteline Lower Control Arm Bushing Tutorial (120+ Pictures)
I'm working on writeup for suspension and UCA install, not sure ETA on that, but I already have lots of pictures and info from my replacement
These are price guestimates off the top of my head for just part costs if you want to purchase yourself. Don't hold me to these, just throwing them out to give you an idea of part costs:
LCAs
OEM (McGeorge Online usually best prices, but shop around): $700-900
SuperPro Poly bushing LCA: $670
1A Auto (Cheapies to get by): $200
Time: 0.5-1 day to replace at home
Alignment HW
OEM: $150
MOOG: $50 maybe (These are trash though, get OEM)
Time: Included with LCA time
UCAs:
OEM: Not sure, but I'll look
JBA Factory Replacement or High Caster (For lifted): $450ish
SPC Adjustable (helpful for custom alignment after lift and larger tires): $630
Apache Offroad (For lifted): $550
5th gen takeoffs (lot of 5th gen guys take them off with low mileage and lift right away): $50-100
Time: 0.5-1 day to replace at home
Suspension:
KYB (Stock Replacement): $300ish I think
Dobinsons (Lift or I believe there are some stock replacement): $800-1000
5th gen takeoffs (lot of 5th gen guys take them off with low mileage and lift right away): $100-200
Time: 2-3 days. For me I needed to replace flex brake lines for longer rear shocks which snowballed into replacing hard lines all the way back so it took 4 days
Alignement
Firestone Lifetime: $200
This one I would recommend taking to a shop if you're still learning car mechanics. I'd even check with the dealer on their pricing, since $1000 is a lot of cash, even a stealership might be cheaper. Also look for an independent Toyota/Lexus mechanic and get their opinion
This job isn't too terrible, don't even need to drop the tank. I disagree with the other commenter, don't do the fuel pump. You are not halfway to its replacement with just the straps. Heavily apply penetrating fluid (I like 50/50 acetone/ATF) to all the bolts and use an impact. I didn't break any and mine were crusty AF
Fuel Tank Strap Replacement Tutorial (60+ Pictures)
Part Cost: $50-75
Time: 1-2 days
These aren't really critical for your vehicle to run/be safe, definitely not needed. Stock skids do provide minimal protection against road debris and such, so they are helpful in some regards. Off road skid plates of course provide more protection
The cheapest one I can think of its the LFD Offroad skid for $180 + $50 shipping (or pickup in NC)
Time to to straight replace: 1hr
If broken bolts: 1-2 days
On the broken bolts note, I would not bother with screw extractors or drill and retap. This is what I did and wasted a lot of time. The retapped holes eventually loosened up some pieces of broken bolt and the new hole isn't perfectly in the center, so they don't hole. Either weld a washer then a nut onto the bolt stump or drill out completely and rivnut
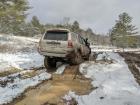
This one I would also look into taking to a professional to get it taken care of right. As mentioned, they'll cut all the rusty section out, then weld in good metal. |
Thanks for taking the time to write up a very helpful reply. I think I can do the non urgent stuff. May be posting a lot here along the way LoL
I really appreciate the links and info
Sent from my iPhone using Tapatalk
|
|
|
Reply With Quote
|
|
07-20-2021, 08:44 PM
|
#33
|
|
Member
|
|
Join Date: Jun 2021
Location: North Carolina
Posts: 243
|
|
|
Member
Join Date: Jun 2021
Location: North Carolina
Posts: 243
|
Quote:
Originally Posted by firebirdguy
yeah that rust hole will need patched by cutting out the area until its solid metal then welding in a new piece.. but i still dont see $1000 worth or time/materials there. a few hours at $100/hr shop rate & 20 bucks worth of metal is all that should be required based on that pic... but ya never know how far they have to cut out until solid metal. again, check with some other shops, or shops more geared towards frame/suspension repair or off roading/trucks.
the A arms might need new bushings &/or ball joints if they are whats causing the squeaks/clunk but new bushings are very cheap & not difficult to replace by a shop with a press. most just buy new loaded arms from reputable aftermarket companies like moog, then its just unbolt & replace, cant see how either option would cost anywhere near $3800, even half that seems outrageous for the work thats required for that job. should be able to just call a few other shops & ask for a quote to replace the bushings & bj's or the entire arm & ask if you can bring in your own parts, so just ask for the labor rate, then buy loaded arms from napa or rock auto etc or just the bushings & bj's.
just an FYI, i have an 08 sport with 151k miles & the A-arms, baljoints/bushings are fine, just had it aligned after i replaced front & rear shocks with KYBs, cam bolts werent stuck & everything else has another 50-100k miles on it easily. i did have a clunk over bigger bumps or pot holes etc & it was the front sway bar bushings causing it... & worn out shocks. this is on a midwestern 4runner that sees lots of winter road salt etc.
best of luck getting the work done for better more fair prices. & the shops good reputation or not, those are rip off prices based on the labor time & cost of parts. if you have some time, youtube has all kinds of vids showing this work, the shocks & arms are really not difficult & no special tools are needed aside from a torque wrench for final tightening & maybe a bigger metric socket than the average guy might have.
|
Yea I agree, I mean I know everything is expensive these days but that seemed a bit much. I think its a good idea to check bushings first. Maybe I can at least buy some time.
Sent from my iPhone using Tapatalk
|
|
|
Reply With Quote
|
|
07-20-2021, 09:17 PM
|
#34
|
 |
Senior Member
|
|
Join Date: Sep 2019
Location: Lafayette, IN
Posts: 1,032
|
|
|
Senior Member
Join Date: Sep 2019
Location: Lafayette, IN
Posts: 1,032
|
Quote:
Originally Posted by Flesh Eater
You can change these straps without dropping the tank? Sweet.
Ive done a lot of gas tanks. Only other one that I could do without dropping the tank was maybe my 87 XJ. Both of my full size Chevys the whole tank had to come down and it was still a pain.
|
Yeah I can see if the whole tank had to come out, then almost to the fuel pump. I did it with the tank in place. I just supported it by running ratchet straps between the skid and tank to act as temporary straps. Tank was sitting on skid in the back, but was able to find path to push strap through, just have to try several directions with the loose/non-hook end of the strap. Then dropped the skid and replaced the straps with tank in place
|
|
|
Reply With Quote
|
|
07-20-2021, 09:31 PM
|
#35
|
|
Member
|
|
Join Date: Mar 2021
Posts: 161
|
|
|
Member
Join Date: Mar 2021
Posts: 161
|
Quote:
Originally Posted by y=mx+b
Yeah I can see if the whole tank had to come out, then almost to the fuel pump. I did it with the tank in place. I just supported it by running ratchet straps between the skid and tank to act as temporary straps. Tank was sitting on skid in the back, but was able to find path to push strap through, just have to try several directions with the loose/non-hook end of the strap. Then dropped the skid and replaced the straps with tank in place
|
Sweet. Good to know.
BUT...the OP did say he got this from Ohio. One known issue in this rust belt is the metal lines on top of the fuel pump rusting through. Could he worth checking. At least try to wiggle an arm up in there with a phone and camera running to check them.
__________________
2008 SR5 4Runner V6 4WD
|
|
|
Reply With Quote
|
|
07-21-2021, 11:45 AM
|
#36
|
|
Member
|
|
Join Date: Jun 2021
Location: North Carolina
Posts: 243
|
|
|
Member
Join Date: Jun 2021
Location: North Carolina
Posts: 243
|
Quote:
Originally Posted by Flesh Eater
Sweet. Good to know.
BUT...the OP did say he got this from Ohio. One known issue in this rust belt is the metal lines on top of the fuel pump rusting through. Could he worth checking. At least try to wiggle an arm up in there with a phone and camera running to check them.
|
I can get a decent look at the top of the fuel tank. I will double check this.
|
|
|
Reply With Quote
|
|
07-24-2021, 07:19 PM
|
#37
|
|
Member
|
|
Join Date: Jun 2021
Location: North Carolina
Posts: 243
|
|
|
Member
Join Date: Jun 2021
Location: North Carolina
Posts: 243
|
Quote:
Originally Posted by bootown
These really need replaced? Let's see some pics.
You can do shocks/struts yourself. The trans lines not sure but can't be that hard. Rusted bolts are probably the only hard part. You want to do whatever you can to avoid snapping bolts.
Hit the bolts with penetrating lubricant multiple days in a row. Then get yourself a torch. I just went through a snapped skid bolt last weekend. PITA but got it done and retapped. Get anti-seize on the new bolts.
Yup, decide on the first project to tackle. Search the forums and youtube. Don't be afraid to ask for tips before starting something. Pictures of the rust severity on the particular project can be helpful to give the best advice. Sometimes the right tool or right strategy makes all the difference. No stupid questions possible. My favorite way to search is to put this into a google search box (ex. replace transmission lines):
site: 4th Gen T4Rs - Toyota 4Runner Forum - Largest 4Runner Forum transmission lines |


Sent from my iPhone using Tapatalk
|
|
|
Reply With Quote
|
|
07-24-2021, 08:42 PM
|
#38
|
|
Member
|
|
Join Date: Mar 2021
Posts: 161
|
|
|
Member
Join Date: Mar 2021
Posts: 161
|
Quote:
Originally Posted by Toystory2
Sent from my iPhone using Tapatalk
|
If there is no play in that ball joint they look okay. Enough for a DD anyways.
Only other reason to replace them is if the inside bushings are worn and an alignment is off.
__________________
2008 SR5 4Runner V6 4WD
|
|
|
Reply With Quote
|
|
07-25-2021, 09:41 AM
|
#39
|
 |
Member
|
|
Join Date: Oct 2008
Location: moon
Posts: 193
|
|
|
Member
Join Date: Oct 2008
Location: moon
Posts: 193
|
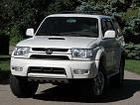
Hard to see the back half of the upper control arm but other than someone spraying something near the front bushing they seem to look fine. Not really even that rusty. Can't see much of the LCA but also probably fine. These just aren't parts that really need replaced. Bushings may wear out. I've never had to replace the UCA and LCA on a Toyota (or the bushings). I replaced the upper ball joints on a 300k Sequoia and realized after I had them popped free from the UCA, the UBJ's were almost as tight as the brand new ones I had ready to replace them with.
Do yourself a favor and don't ever let whatever shop quoted you all that stuff touch your car again.
|
|
|
Reply With Quote
|
|
07-25-2021, 09:50 AM
|
#40
|
 |
Member
|
|
Join Date: May 2009
Location: bradford,ma
Age: 54
Posts: 803
Real Name: brian
|
|
|
Member
Join Date: May 2009
Location: bradford,ma
Age: 54
Posts: 803
Real Name: brian
|
My advise is go to a parts store and get a needle grease fitting for the end of the grease gun. Poke a hole in each rubber boot and put some grease in each ball joint, tie rod etc. It will make a huge difference.
The fittings are between $3-5.00.
This is what it looks like:
Google Image Result
__________________
'08 4Runner Limited V8 Shadow Mica: Sport hood, bilstein 6112's, 5160's, b12 coils, Gibson cat back, 4runner XSP rims, Michelin X LT AS 275/55-20
'06 4Runner Limited V8 Salsa Red: bilstein 6112, 5160, Wheeler T12's, 4Runner XP wheels, Michelin AT2 275/55/20, Magnaflow Exhaust,, Powerstop brakes, sport hood
RIP.....'08 4Runner Limited V6: white, bilstein 6112s, 5160s, b12 , powerstop brakes, nav, TRD cat back, 4Runner XP rims, Michelin Defender LTX 275/55-20, sport hood
Last edited by inscarguy; 07-25-2021 at 09:52 AM.
|
|
|
Reply With Quote
|
|
07-25-2021, 01:15 PM
|
#41
|
|
Member
|
|
Join Date: Jun 2021
Location: North Carolina
Posts: 243
|
|
|
Member
Join Date: Jun 2021
Location: North Carolina
Posts: 243
|
Quote:
Originally Posted by bootown
Hard to see the back half of the upper control arm but other than someone spraying something near the front bushing they seem to look fine. Not really even that rusty. Can't see much of the LCA but also probably fine. These just aren't parts that really need replaced. Bushings may wear out. I've never had to replace the UCA and LCA on a Toyota (or the bushings). I replaced the upper ball joints on a 300k Sequoia and realized after I had them popped free from the UCA, the UBJ's were almost as tight as the brand new ones I had ready to replace them with.
Do yourself a favor and don't ever let whatever shop quoted you all that stuff touch your car again.
|
Ill get a better pic and the LCAs but I think youre right. The bushings look tired but the CAs themselves appear to be good. Isnt about the same amount of work to replace the bushings as it would be to replace the CAs?
Sent from my iPhone using Tapatalk
|
|
|
Reply With Quote
|
|
07-25-2021, 01:15 PM
|
#42
|
|
Member
|
|
Join Date: Jun 2021
Location: North Carolina
Posts: 243
|
|
|
Member
Join Date: Jun 2021
Location: North Carolina
Posts: 243
|
Quote:
Originally Posted by inscarguy
My advise is go to a parts store and get a needle grease fitting for the end of the grease gun. Poke a hole in each rubber boot and put some grease in each ball joint, tie rod etc. It will make a huge difference.
The fittings are between $3-5.00.
This is what it looks like:
Google Image Result |
Haha now this I can do! What type of grease do you recommend?
Sent from my iPhone using Tapatalk
|
|
|
Reply With Quote
|
|
07-25-2021, 01:21 PM
|
#43
|
|
Member
|
|
Join Date: Jun 2021
Location: North Carolina
Posts: 243
|
|
|
Member
Join Date: Jun 2021
Location: North Carolina
Posts: 243
|
Quote:
Originally Posted by Flesh Eater
If there is no play in that ball joint they look okay. Enough for a DD anyways.
Only other reason to replace them is if the inside bushings are worn and an alignment is off.
|
Thanks. Ill make sure to check for any play. The o my thing that looks bad is the bushings but Im no expert.
Sent from my iPhone using Tapatalk
|
|
|
Reply With Quote
|
|
07-26-2021, 10:37 AM
|
#44
|
|
Member
|
|
Join Date: Oct 2020
Location: Denver, CO
Posts: 107
|
|
|
Member
Join Date: Oct 2020
Location: Denver, CO
Posts: 107
|
Quote:
Originally Posted by Toystory2
Haha now this I can do! What type of grease do you recommend?
Sent from my iPhone using Tapatalk
|
Toyota specifies unique greases for the inner and outer cvs, and you can go this route, but in my experience you can use a grease specified for CVs, such as NLGI#2. I use redline CV-2 on my Runner, GMC dmax and other vehicles.
Also with the needle grease injector, you can remove the small clamp and slip it under the boot to inject without puncturing the boot. Depending on what you want to do, you could remove the boot clamps and get the old stuff out, put new worm drive clamps on, then inject. Not a bad way to go if the boots are still in working order.
|
|
|
Reply With Quote
|
|
07-26-2021, 10:54 AM
|
#45
|
|
Member
|
|
Join Date: Sep 2018
Location: iowa
Posts: 905
|
|
|
Member
Join Date: Sep 2018
Location: iowa
Posts: 905
|
Quote:
Originally Posted by triethylborane
Toyota specifies unique greases for the inner and outer cvs, and you can go this route, but in my experience you can use a grease specified for CVs, such as NLGI#2. I use redline CV-2 on my Runner, GMC dmax and other vehicles.
Also with the needle grease injector, you can remove the small clamp and slip it under the boot to inject without puncturing the boot. Depending on what you want to do, you could remove the boot clamps and get the old stuff out, put new worm drive clamps on, then inject. Not a bad way to go if the boots are still in working order.
|
pretty sure hes just considering greasing the ball joints & tie rods etc with the needle, no mention of doing or needing to do CV boots.
@ Toystory2
for the ball joints etc any normal chassis grease will work, dont need to use a special CV boot grease for the suspension components. & looking at the pics, the CA busings dont look too bad at all, i dont see any major cracking or dry rotting, not sure what is sprayed on them or why, but IMO the arms & bushings have a lot of life left in them... the old saying of " if it ain't broke dont fix it" applies here.
& as mentioned above, dont ever go back to that shop or pay those kinds of prices for what is pretty basic work... shops/owners like that should be shut down & arrested for theft! if you were a women or guy that didnt know better they would rob you blind & thats what they do to unknowing customers on a daily basis! & dealerships are just as bad or worse.
Last edited by firebirdguy; 07-27-2021 at 11:06 AM.
|
|
|
Reply With Quote
|
| Thread Tools |
|
|
| Display Modes |
Rate This Thread |
 Linear Mode Linear Mode
|
|
 Posting Rules
|
You may not post new threads
You may not post replies
You may not post attachments
You may not edit your posts
HTML code is On
|
|
|
|


