 09-03-2021, 12:19 PM
|
#1
|
 |
Member
|
|
Join Date: Jun 2021
Location: North Carolina
Posts: 243
|
|
|
Member
Join Date: Jun 2021
Location: North Carolina
Posts: 243
|
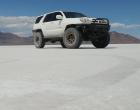
First big DIY for a beginner
Happy Friday everyone.
I am more or less a weekend wrencher whos willing to learn more instead of paying big bucks to a shop.
My plan is to replace upper and lower control arms, as well and front and rear shocks. Optimistically want to have it all done by Monday evening.
I wanted to go ahead and start this thread now because Im sure Ill be crying for help.
My biggest concern is the LCAs, and messing up the alignment.
I am considering buying the SPC alignment cam bolts from Auto Zone. I know I need to mark the plate and the frame to make sure the new bolts go into the same place. Is there anything else to be aware of?
Also if you have any other tips to share with a beginner on replacing upper or lower arms and shocks, I would greatly appreciate it.
Going to Harbor Freight to get a few more tools and plan to get started this evening or in the morning.
Replacement parts are 1A auto arms and KYB shocks.
Thanks in advance!
Sent from my iPhone using Tapatalk
|

|
 Reply With Quote Reply With Quote
|
|
09-03-2021, 12:26 PM
|
#2
|
 |
Senior Member
|
|
Join Date: Sep 2015
Location: Kansas
Age: 28
Posts: 4,305
|
|
|
Senior Member
Join Date: Sep 2015
Location: Kansas
Age: 28
Posts: 4,305
|
Hopefully you have access to a sawzall, the biggest time increaser for this job IMO is finding the LCA bolts are seized. Running to the store for parts, and having to cut out the old stuff. On my rust-free 4Runner I had to cut out 1 of mine.
__________________
2005 4R Sport 4WD "The last of the V8s!" - Custom TIG'd SS Dual Exhaust - King 2.5" +2 LT. - ARB Front & Rear - 37's - Dana 60 - Build Thread
2005 Tundra 2WD Regular Cab V8 - Chopped Frame - Short Bed Swap
1977 Celica Liftback - LFX Swap - Build Thread

|
|
|
Reply With Quote
|
|
09-03-2021, 12:51 PM
|
#3
|
 |
Member
|
|
Join Date: Nov 2011
Location: Eastern, NC
Age: 49
Posts: 474
Real Name: Bob
|
|
|
Member
Join Date: Nov 2011
Location: Eastern, NC
Age: 49
Posts: 474
Real Name: Bob
|
Are your front coil overs pre-assembled? That makes installing the fronts easy. If not, you can assemble them using your floor jack. There's a thread on that. Its not bad.
Pay attention to which front spring was drivers vs passenger side. Driver's side is slightly longer, but it's not super obvious. There are two paint marks on each.
Try to orient the end of the spring where it is on the original. Not sure if it really makes a difference. Oh, make sure the spring seat on the front shock (Bilsteins??) isn't upside down. Someone did that once and they were surprised how high their front end was when they got finished.
The original rear shock will probably have to be cut off. The upper half just spun when I tried to loosen the top nut. Most aftermarkets have a nut welded to the top so a second wrench will allow easy removal.
I haven't yet done my control arms, but the long bolt on the uppers can be funny getting room to remove and install. Supposedly, there's a small portion of sheet metal that needs to be bent to allow room, and I think it's tight on the driver's side because of the battery. Total chaos has an older YT video of replacing UCA's on a 2nd gen taco. Same as ours.
Where in NC?
__________________
2008 SR5 4WD
|
|
|
Reply With Quote
|
|
09-03-2021, 02:36 PM
|
#5
|
|
Member
|
|
Join Date: Jun 2021
Location: North Carolina
Posts: 243
|
|
|
Member
Join Date: Jun 2021
Location: North Carolina
Posts: 243
|

Quote:
Originally Posted by bob3dsf

Are your front coil overs pre-assembled? That makes installing the fronts easy. If not, you can assemble them using your floor jack. There's a thread on that. Its not bad.
Pay attention to which front spring was drivers vs passenger side. Driver's side is slightly longer, but it's not super obvious. There are two paint marks on each.
Try to orient the end of the spring where it is on the original. Not sure if it really makes a difference. Oh, make sure the spring seat on the front shock (Bilsteins??) isn't upside down. Someone did that once and they were surprised how high their front end was when they got finished.
The original rear shock will probably have to be cut off. The upper half just spun when I tried to loosen the top nut. Most aftermarkets have a nut welded to the top so a second wrench will allow easy removal.
I haven't yet done my control arms, but the long bolt on the uppers can be funny getting room to remove and install. Supposedly, there's a small portion of sheet metal that needs to be bent to allow room, and I think it's tight on the driver's side because of the battery. Total chaos has an older YT video of replacing UCA's on a 2nd gen taco. Same as ours.
Where in NC?
|
Yep, made sure to buy the shocks preassembled with coil. Thanks for the reminder about the orientation of the shocks.
That is absolutely hilarious about the upside down shock 😂 that is totally something I would do.
I appreciate it! I am in the western mountains of NC
what bout you?
|
|
|
Reply With Quote
|
|
09-03-2021, 02:36 PM
|
#6
|
|
Member
|
|
Join Date: Jun 2021
Location: North Carolina
Posts: 243
|
|
|
Member
Join Date: Jun 2021
Location: North Carolina
Posts: 243
|
Quote:
Originally Posted by Tironeous
|
That is much appreciated! It is sometimes hard to find just the right videos. I’ll try to update this thread as I go along so you guys can learn from my mistakes lol
|
|
|
Reply With Quote
|
|
09-03-2021, 02:39 PM
|
#7
|
|
Member
|
|
Join Date: Jun 2021
Location: North Carolina
Posts: 243
|
|
|
Member
Join Date: Jun 2021
Location: North Carolina
Posts: 243
|
Quote:
Originally Posted by Inv4drZm
Hopefully you have access to a sawzall, the biggest time increaser for this job IMO is finding the LCA bolts are seized. Running to the store for parts, and having to cut out the old stuff. On my rust-free 4Runner I had to cut out 1 of mine.
|
I am preparing to buy a saw with carbonite blades
nearly everything video and write up Ive seen had the cam bolts seized. I am trying to get everything this afternoon, but Im sure Ill forget something: )
|
|
|
Reply With Quote
|
|
09-04-2021, 03:48 PM
|
#8
|
|
Member
|
|
Join Date: Jun 2021
Location: North Carolina
Posts: 243
|
|
|
Member
Join Date: Jun 2021
Location: North Carolina
Posts: 243
|

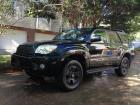
Ran into this little 12 mm bolt on the ABS bracket
any tips? I cant even get a 12 mm socket on it.
Sent from my iPhone using Tapatalk
|
|
|
Reply With Quote
|
|
09-04-2021, 05:13 PM
|
#9
|
|
Senior Member
|
|
Join Date: Nov 2016
Location: South Carolina
Posts: 4,678
Real Name: Skip
|
|
|
Senior Member
Join Date: Nov 2016
Location: South Carolina
Posts: 4,678
Real Name: Skip
|
Try and remove as much of the rust as you can from the head of the bolt using picks, screwdriver and wire brush, etc. then apply some heat with a propane torch to the bolt being careful of not overheating any brake lines, etc., then tap a 6 point socket onto the head with a hammer and then try to remove it, if it does turn a little bit then tighten it some and then try to loosen it some more then tightening it, rinse and repeat until it's removed and throughout this process spray it with a good penetrating oil, what you're trying to do by loosening and then tightening it is to break up some of the rust in the threads and flushing it out with the penetrating oil, you very well may end up breaking the bolt if the rust is as bad as it looks but the way I described above is the only way I can advise you to possibly get it removed.
It's important that you use a 6 point socket on bolts and nuts that are as rusty as that one because they have more surface contact with the hex head of fastener, a 12 point socket will usually round the head of the bolt/nut when they're that rusty.
If the socket slips and rounds off the head then the only thing you can use then would be most likely a pair of Vise-grips.
Edit: Anytime when using a propane torch working vehicles be sure to have a fire extinguisher handy in case something that catches on fire and gets out of control you can put the fire out before it does a lot of damage.
__________________
2004 Limited V8
Last edited by AuSeeker; 09-04-2021 at 05:43 PM.
|
|
|
Reply With Quote
|
|
09-04-2021, 07:38 PM
|
#10
|
|
Member
|
|
Join Date: Jun 2021
Location: North Carolina
Posts: 243
|
|
|
Member
Join Date: Jun 2021
Location: North Carolina
Posts: 243
|
Quote:
Originally Posted by AuSeeker
Try and remove as much of the rust as you can from the head of the bolt using picks, screwdriver and wire brush, etc. then apply some heat with a propane torch to the bolt being careful of not overheating any brake lines, etc., then tap a 6 point socket onto the head with a hammer and then try to remove it, if it does turn a little bit then tighten it some and then try to loosen it some more then tightening it, rinse and repeat until it's removed and throughout this process spray it with a good penetrating oil, what you're trying to do by loosening and then tightening it is to break up some of the rust in the threads and flushing it out with the penetrating oil, you very well may end up breaking the bolt if the rust is as bad as it looks but the way I described above is the only way I can advise you to possibly get it removed.
It's important that you use a 6 point socket on bolts and nuts that are as rusty as that one because they have more surface contact with the hex head of fastener, a 12 point socket will usually round the head of the bolt/nut when they're that rusty.
If the socket slips and rounds off the head then the only thing you can use then would be most likely a pair of Vise-grips.
Edit: Anytime when using a propane torch working vehicles be sure to have a fire extinguisher handy in case something that catches on fire and gets out of control you can put the fire out before it does a lot of damage.
|
How long do you wanna heat it? I did about 30 seconds. Cant get a socket to stay on. Vice grips dont want to work either. I am thinking about drilling or using a nut splitter. Stinks that one little bolt has got this project at a standstill. I cant get to the UCA bolt without removing this abs bracket.
Sent from my iPhone using Tapatalk
|
|
|
Reply With Quote
|
|
09-04-2021, 07:58 PM
|
#11
|
|
Senior Member
|
|
Join Date: Nov 2016
Location: South Carolina
Posts: 4,678
Real Name: Skip
|
|
|
Senior Member
Join Date: Nov 2016
Location: South Carolina
Posts: 4,678
Real Name: Skip
|
Quote:
Originally Posted by Toystory2
How long do you wanna heat it? I did about 30 seconds. Can’t get a socket to stay on. Vice grips don’t want to work either. I am thinking about drilling or using a nut splitter. Stinks that one little bolt has got this project at a standstill. I can’t get to the UCA bolt without removing this abs bracket.
Sent from my iPhone using Tapatalk
|
You can heat it until it's glowing red IF there's not anything else that's going to be an issue when getting it that hot, usually the hotter you can get it the better to help loosen the rust, just an FYI the area you want to heat is the area with the hole, not the bolt itself, what you're trying to do is expand the hole to loosen it's grip on the bolt.
If heat doesn't help then I would go with removing the head of the bolt however you can, drill it, grind it, cutting torch, etc., a "nut splitter" will only work on a nut, it won't do anything on removing a bolt head but deform it.
__________________
2004 Limited V8
Last edited by AuSeeker; 09-04-2021 at 08:01 PM.
|
|
|
Reply With Quote
|
|
09-04-2021, 08:19 PM
|
#12
|
|
Member
|
|
Join Date: Jun 2021
Location: North Carolina
Posts: 243
|
|
|
Member
Join Date: Jun 2021
Location: North Carolina
Posts: 243
|
Quote:
Originally Posted by AuSeeker
You can heat it until it's glowing red IF there's not anything else that's going to be an issue when getting it that hot, usually the hotter you can get it the better to help loosen the rust, just an FYI the area you want to heat is the area with the hole, not the bolt itself, what you're trying to do is expand the hole to loosen it's grip on the bolt.
If heat doesn't help then I would go with removing the head of the bolt however you can, drill it, grind it, cutting torch, etc., a "nut splitter" will only work on a nut, it won't do anything on removing a bolt head but deform it.
|
Okay, I appreciate the advice.
I was trying to heat the bolt itself and not so much the hole. Ill try that again tomorrow. But should I even bother since I am struggling to get a tool on the bolt head?
I couldnt tell if there was a nut on there or not, its so mangled lol.
Any preference when it comes to drilling, grinding, or cutting torch?
Sent from my iPhone using Tapatalk
|
|
|
Reply With Quote
|
|
09-04-2021, 08:35 PM
|
#13
|
|
Senior Member
|
|
Join Date: Nov 2016
Location: South Carolina
Posts: 4,678
Real Name: Skip
|
|
|
Senior Member
Join Date: Nov 2016
Location: South Carolina
Posts: 4,678
Real Name: Skip
|
Quote:
Originally Posted by Toystory2
Okay, I appreciate the advice.
I was trying to heat the bolt itself and not so much the hole. I’ll try that again tomorrow. But should I even bother since I am struggling to get a tool on the bolt head?
I couldn’t tell if there was a nut on there or not, it’s so mangled lol.
Any preference when it comes to drilling, grinding, or cutting torch?
Sent from my iPhone using Tapatalk
|
From your photo it does look to be a bolt, but not seeing in person I could be wrong but I don't think so.
If you can get at it with a drill that would be the fastest, drill in the center of the head with a bit that's as big or bigger than the diameter of the threaded portion of the bolt, once you drill through the depth of the head of the bolt it should pop off if not hit it with a hammer and chisel to pop it off, later you will need to drill out the rest of the threaded part and then run a tap to re-thread/clean out the hole, use a bit slightly smaller then the threaded part.
__________________
2004 Limited V8
Last edited by AuSeeker; 09-04-2021 at 08:39 PM.
|
|
|
Reply With Quote
|
|
09-04-2021, 09:39 PM
|
#14
|
 |
Member
|
|
Join Date: Jan 2019
Location: Central NY
Posts: 795
|
|
|
Member
Join Date: Jan 2019
Location: Central NY
Posts: 795
|
So the biggest problem is that you cant get a socket to stay on?
You may want to try like a stripped head bolt remover - they have sets you can get for $10 or so
Otherwise could try seeing you can hammer on a 7/16 socket or 11 mm socket
Once you get the socket on again go gently tighten loosen etc otherwise you may break the head off and youll have to drill anyhow
You can also see if you can jiggle the bracket under the bolt back and forth to see if itll loosen anything
Good luck. If youre on Facebook consider joining the Carolina off road 4r group - lots of members and can likely find someone to help if needed
__________________
2008 SR5 4WD Black. Bilstein 5100, 5th gen coils/ rear springs. 255 80 17 AT for everyday use. Victory Sliders. Victory Front bumper with winch/ lightbar. headunit upgrade. Back up camera install. Expert at replacement rear hatches
All you need to go off road is to be willing to get some scrapes and dents along the way
|
|
|
Reply With Quote
|
|
09-05-2021, 01:57 PM
|
#15
|
|
Member
|
|
Join Date: Jun 2021
Location: North Carolina
Posts: 243
|
|
|
Member
Join Date: Jun 2021
Location: North Carolina
Posts: 243
|
Quote:
Originally Posted by Syr4RinNC
So the biggest problem is that you cant get a socket to stay on?
You may want to try like a stripped head bolt remover - they have sets you can get for $10 or so
Otherwise could try seeing you can hammer on a 7/16 socket or 11 mm socket
Once you get the socket on again go gently tighten loosen etc otherwise you may break the head off and youll have to drill anyhow
You can also see if you can jiggle the bracket under the bolt back and forth to see if itll loosen anything
Good luck. If youre on Facebook consider joining the Carolina off road 4r group - lots of members and can likely find someone to help if needed
|
Yea cant get any socket to stay on, even the Irwin bolt grip wont. Theres not enough bolt head left. I will try moving the bracket and see if anything move. Thanks for the tip about the FB group!
|
|
|
Reply With Quote
|
 Posting Rules
|
You may not post new threads
You may not post replies
You may not post attachments
You may not edit your posts
HTML code is On
|
|
|
|


 Linear Mode


