 07-02-2007, 04:24 PM
|
#1
|
|
Member
|
|
Join Date: Aug 2006
Location: San Pedro Ca
Age: 54
Posts: 468
|
|
|
Member
Join Date: Aug 2006
Location: San Pedro Ca
Age: 54
Posts: 468
|
Replacing Side Molding on 4th Gen 06
Anyone know how the body molding is attached to the body? Is it just clips and adhesive or are there nuts that need to be loosened from the inside of the body panel? Mine is scratched and it is actually cheaper to buy it already painted than it is to take to a body shop
|

|
 Reply With Quote Reply With Quote
|
|
07-02-2007, 04:31 PM
|
#2
|
|
Member
|
|
Join Date: Nov 2004
Posts: 121
|
|
|
Member
Join Date: Nov 2004
Posts: 121
|
Re: Replacing Side Molding on 4th Gen 06
Quote:
Originally posted by JP4RNR
Anyone know how the body molding is attached to the body? Is it just clips and adhesive or are there nuts that need to be loosened from the inside of the body panel? Mine is scratched and it is actually cheaper to buy it already painted than it is to take to a body shop
|
There are 7 or 8 clips and one bolt which is
at the lower corder of the door covered by black plastic.
Remove the bolt and carefully pull the molding to unclip it.
How much did you get charged for molding?
|
|
|
Reply With Quote
|
|
07-02-2007, 10:06 PM
|
#3
|
|
Member
|
|
Join Date: Aug 2006
Location: San Pedro Ca
Age: 54
Posts: 468
|
|
|
Member
Join Date: Aug 2006
Location: San Pedro Ca
Age: 54
Posts: 468
|
Re: Re: Replacing Side Molding on 4th Gen 06
Quote:
|
How much did you get charged for molding?
|
It was the rear left quarter panel molding. It lists for 150.00 from my local Toyota Dealer but I got it for 50 bucks less at 1stToyotaparts.com online for $100.14.
Does the left rear quarter panel molding have a bolt?
|
|
|
Reply With Quote
|
|
07-02-2007, 10:30 PM
|
#4
|
|
Member
|
|
Join Date: Nov 2004
Posts: 121
|
|
|
Member
Join Date: Nov 2004
Posts: 121
|
Re: Re: Re: Replacing Side Molding on 4th Gen 06
Quote:
Originally posted by JP4RNR
It was the rear left quarter panel molding. It lists for 150.00 from my local Toyota Dealer but I got it for 50 bucks less at 1stToyotaparts.com online for $100.14.
Does the left rear quarter panel molding have a bolt?
|
I am not that sure about the rear part. As far as I know there is one bolt or metallic clip on the corner as well.
|
|
|
Reply With Quote
|
|
01-20-2011, 10:01 PM
|
#5
|
|
Member
|
|
Join Date: Nov 2010
Location: NE US
Posts: 305
|
|
|
Member
Join Date: Nov 2010
Location: NE US
Posts: 305
|
Quote:
Originally Posted by T133

There are 7 or 8 clips and one bolt which is
at the lower corder of the door covered by black plastic.
Remove the bolt and carefully pull the molding to unclip it.
How much did you get charged for molding?
|
I found this old thread, so I'm resurrecting it rather than start a new one. My left front molding is loose in the forward section of it. The parts counter sold me some clips and warned me there was a bolt (or bolts) behind the molding also. How do I get to the nut/bolt to remove the molding to install new clips? Or is there another way I should be going about installing new clips into the front section of the molding? I saw a diagram on here, but that didn't answer my questions unfortunately. Any help would be appreciated, I'm hoping to not have to pay a body shop to do this, but I don't want to damage anything.
Thanks!
|
|
|
Reply With Quote
|
|
02-07-2011, 03:02 PM
|
#6
|
|
Member
|
|
Join Date: Jul 2010
Location: DSM
Posts: 81
|
|
|
Member
Join Date: Jul 2010
Location: DSM
Posts: 81
|
Anyone have more info for JpAdct ??
|
|
|
Reply With Quote
|
|
02-07-2011, 05:07 PM
|
#7
|
|
Member
|
|
Join Date: Jan 2008
Location: Ankara, Turkey
Posts: 493
|
|
|
Member
Join Date: Jan 2008
Location: Ankara, Turkey
Posts: 493
|
I pulled both of my fronts to have them repainted. First let me tell you it was a PITA!
It's been a while but you need to pull/remove the fender liner. That will help you to get at the back of the clips. Here are some pictures I took of the job. The last pic is labeled. And yes on the passenger side those are the clips/mount that busted off trying to remove it. Fixed them with JBL per the body shop and they seem fine now.
Edit: Just realized that you have an '06. Not sure how different the mounting is in the '04 but I'm guessing very similar.
__________________
2004 4Runner SR5 SR5 - V6, 4X4, Moonroof , JBL, Leather, Stratosphere Mica
Installed Mods: Spoiler, HIR bulbs, Kenwood DNX6960 Nav, Back Window Up with Remote Mod, Rear Camera, LED Tails, Key Reminder Disable, OEM Automatic Headlights, Rear USB Ports, Seat Heaters, Aftermarket Third Row, Heated Side View Mirror
Locations: VA
|
|
|
Reply With Quote
|
|
08-03-2015, 11:22 PM
|
#8
|
|
Junior Member
|
|
Join Date: Jul 2015
Location: Midland, Tx
Age: 36
Posts: 20
|
|
|
Junior Member
Join Date: Jul 2015
Location: Midland, Tx
Age: 36
Posts: 20
|
This helps alot. Going to be removing my passenger side flare to trim it to fit a tlc80 snorkel kit. Everything seems to line up beside a little bit of the flare. Thanks for the pics for guidance.
|
|
|
Reply With Quote
|
|
08-04-2015, 06:17 AM
|
#9
|
 |
Member
|
|
Join Date: Jan 2013
Location: Texas
Posts: 565
|
|
|
Member
Join Date: Jan 2013
Location: Texas
Posts: 565
|
Quote:
Originally Posted by JosiahRafter
This helps alot. Going to be removing my passenger side flare to trim it to fit a tlc80 snorkel kit. Everything seems to line up beside a little bit of the flare. Thanks for the pics for guidance.
|
Please post pics of the process and end result. I'm sure quite a few 4th gen owners are tired of waiting for a snorkel and considered either a Tacoma or LC80 snorkel.. 
__________________
.................................................. ........................................... 04 4runner Sport Edition V8 4WD // X-REAS removed // Bilstein 5100s // Fj Cruiser coils // Interior LEDs // gshadow325 12V charger mod // Undercarriage LEDs // Back-up lighting // onboard 12v air compressor // 255/75/17 Duratracs // Homemade load bars // Smittybilt roof rack(when needed)
2016 T4R Trail Edition
2017 Civic Si
04 4runner Sport Edition V8 4WD // X-REAS removed // Bilstein 5100s // Fj Cruiser coils // Interior LEDs // gshadow325 12V charger mod // Undercarriage LEDs // Back-up lighting // onboard 12v air compressor // 255/75/17 Duratracs // Homemade load bars // Smittybilt roof rack(when needed)
2016 T4R Trail Edition
2017 Civic Si
|
|
|
Reply With Quote
|
|
01-14-2017, 12:48 AM
|
#10
|
|
Junior Member
|
|
Join Date: Jan 2017
Posts: 2
|
|
|
Junior Member
Join Date: Jan 2017
Posts: 2
|
New to 4Runner here, just picked up a 2003 for running to the local home improvement store 
Quick question. I am tempted to repaint the plastic body panels because they all look like crap (early 2003 unpainted). From what I am reading here, it doesn't seem to be worth the effort but I did find several clips broken and some panels are not very secure. Does anyone know where I can buy the plastic clips, and also if it's possible just to replace some clips selectively without taking off the whole panel?
Thanks.
Last edited by glee719; 01-14-2017 at 01:48 AM.
|
|
|
Reply With Quote
|
|
01-14-2017, 07:09 AM
|
#11
|
|
Member
|
|
Join Date: Jul 2012
Location: Boston, MA
Posts: 754
|
|
|
Member
Join Date: Jul 2012
Location: Boston, MA
Posts: 754
|
Glad to see these instructions. I am about to take apart ALL my rocker panels and wheel arch moldings and sand and paint them. I got factory spray paint and clear coat ready to go.
Can someone share any instructions on how the door rocker panels come apart? Just clips or are there any bolts? If bolts, I have to take apart the inside panel of the door to access the bolts?
Some pics would be very very helpful, thanks so much in advance.
__________________
GONE - 08 T4R - 4" Lift with OME 885/895 & Bilstein 5100s, Toytec top-out spacer, Daystar 2" spacer, 1.5" Body Lift, 275x65x20 Duratracs (34.1"), Light Racing UCAs, Spidertrax, Toytec Diff Drop, 5th gen brake upgrade, SS brake lines, Budbuilt 5 piece skid kit, CBI sliders, Avid light bar, Hella 500ff with HID conversion, Curt front hitch receiver, ARB Awning, Uniden/Comet CB, Rostra seat heaters, Dynamatted interior
Corvette C7 Z51 | Ford Raptor | Aprilia RS250 | Aprilia RSV4 | Ducati 848 Corse
|
|
|
Reply With Quote
|
|
02-18-2017, 03:50 PM
|
#12
|
|
Junior Member
|
|
Join Date: Oct 2015
Location: Auburn, AL
Age: 34
Posts: 3
Real Name: Jacob
|
|
|
Junior Member
Join Date: Oct 2015
Location: Auburn, AL
Age: 34
Posts: 3
Real Name: Jacob
|
As I'm typing this, I'm currently in the process of removing the fender flares on my 2005. Afterwards, I'll be removing the trim panels on all four doors. The two fender flares on the front are a pain in the ass to remove without breaking any clips. I happened to get a hold of the factory service manual for the 2005 model year. The trim pieces on the front doors don't seem all that hard to remove as they're held on with clips just like the fender flares. You'll have to remove the door panels to get to the clips. The trim pieces on the back doors are held on by clips as well as three rivets. Here are the PDF's. Good luck!
__________________
'05 Toyota 4Runner V8 LTD
Last edited by RTJacob; 02-18-2017 at 07:51 PM.
|
|
|
Reply With Quote
|
|
02-18-2017, 07:31 PM
|
#13
|
|
Senior Member
|
|
Join Date: Nov 2016
Location: South Carolina
Posts: 4,649
Real Name: Skip
|
|
|
Senior Member
Join Date: Nov 2016
Location: South Carolina
Posts: 4,649
Real Name: Skip
|
Thanks for the PDFs, good to have!
__________________
2004 Limited V8
|
|
|
Reply With Quote
|
|
08-26-2017, 06:42 AM
|
#14
|
|
Junior Member
|
|
Join Date: Sep 2015
Location: Reston, VA
Age: 55
Posts: 21
|
|
|
Junior Member
Join Date: Sep 2015
Location: Reston, VA
Age: 55
Posts: 21
|
I broke all my clips when I removed my moulding. I removed all the broken old clips and bought a set of new clips from the Toyota dealer. I was removing the moulding to repair and paint it after it got a nasty scrape.
When reinstalling the moulding, do I put the new clips in the body and snap the moulding onto the clips, or do I put the clips in the moulding and snap it onto the body?
Thanks
__________________
2007 4Runner SR5 V8 4WD
|
|
|
Reply With Quote
|
|
08-26-2017, 10:21 AM
|
#15
|
|
Junior Member
|
|
Join Date: Sep 2015
Location: Reston, VA
Age: 55
Posts: 21
|
|
|
Junior Member
Join Date: Sep 2015
Location: Reston, VA
Age: 55
Posts: 21
|
This is the body trim moulding (over the right rear wheel) that I pulled off, body-filled, primered, re-painted, and clear coated.
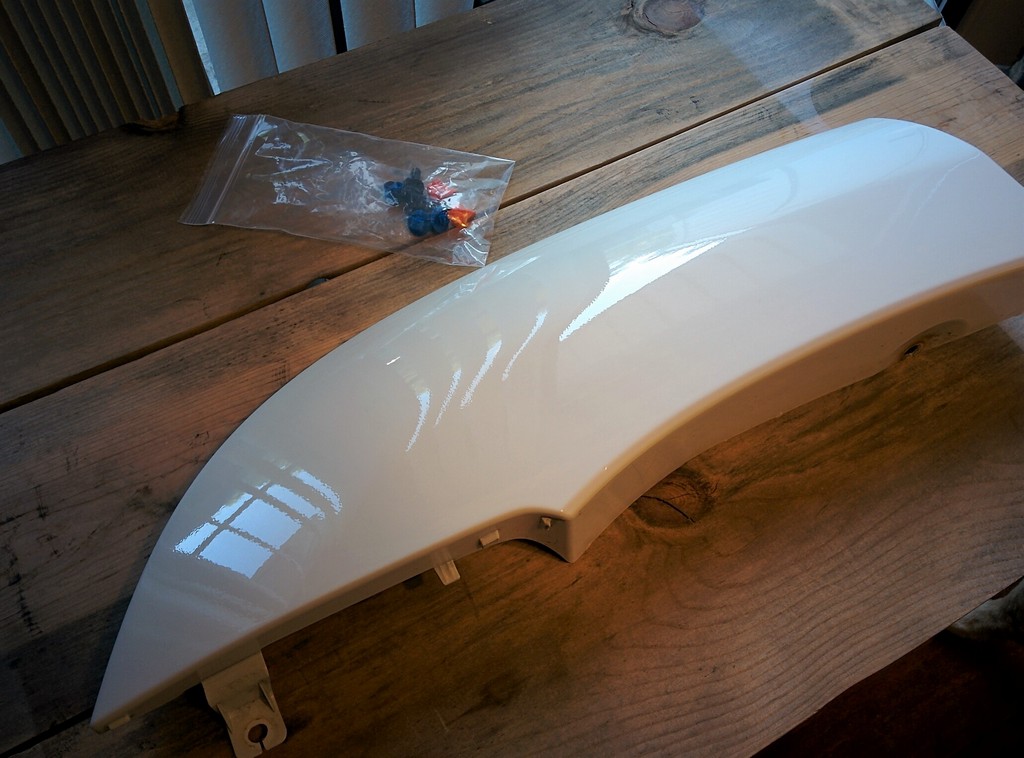
My first attempt at paint and clear. There's a bit of orange peel as you can see in the reflection, but it looks better in-person and I can probably sand it with 3000 grit and buff and polish it. It looks 1000x time better than it did before, it had a deep 4-inch gash running vertically down it.
I used Dupli Color spray can for the base paint (3 coats) and USC 2K spray can (4 coats) for the clear top coat.
I'm ready to mount it back on my 4Runner, but just need to know if I put the clips on the moulding and snap it onto the body, or put the clips on the body and snap the moulding onto the body. Any idea?
__________________
2007 4Runner SR5 V8 4WD
|
|
|
Reply With Quote
|
 Posting Rules
|
You may not post new threads
You may not post replies
You may not post attachments
You may not edit your posts
HTML code is On
|
|
|
|


 Linear Mode


