 02-01-2010, 03:19 PM
|
#31
|
 |
Senior Member
|
|
Join Date: Jul 2007
Location: NY
Posts: 1,473
|
|
|
Senior Member
Join Date: Jul 2007
Location: NY
Posts: 1,473
|
Quote:
Originally Posted by ZandT4R

Another idea is to swap the leds and see if the driver side fires slower...
|
I think you are on the right track, sounds like a bad led. After trying the swap to see if the driver side fires slower, try replacing it with a known good led from the doors and see if the issue goes away completely.
|

|
 Reply With Quote Reply With Quote
|
|
02-01-2010, 04:11 PM
|
#32
|
 |
Member
|
|
Join Date: Jul 2007
Location: Houston, Texas
Age: 41
Posts: 166
|
|
|
Member
Join Date: Jul 2007
Location: Houston, Texas
Age: 41
Posts: 166
|
Thanks for the response. I will post findings tonight.
I'm guessing yours does not act as mine does?
__________________
2007 4Runner Sport Edition V8 4x2 - Salsa Red Pearl
2.5/1.5 Daystar Lift
265/70/17 Revo's/Spidertrax/Graphite Sequoia Wheels
DDM 55w 5000K HID lows, Hoen Endurance Fogs
|
|
|
Reply With Quote
|
|
02-01-2010, 10:35 PM
|
#33
|
|
Member
|
|
Join Date: Jul 2007
Location: Houston, Texas
Age: 41
Posts: 166
|
|
|
Member
Join Date: Jul 2007
Location: Houston, Texas
Age: 41
Posts: 166
|
Turned out to be the bulb itself. I swapped the map lights with the rear door lights for now until I can get the switched out by v-leds. One has a loose heat sink and one flickers....glad they have a good warranty!
__________________
2007 4Runner Sport Edition V8 4x2 - Salsa Red Pearl
2.5/1.5 Daystar Lift
265/70/17 Revo's/Spidertrax/Graphite Sequoia Wheels
DDM 55w 5000K HID lows, Hoen Endurance Fogs
|
|
|
Reply With Quote
|
|
08-17-2012, 12:15 AM
|
#34
|
 |
Member
|
|
Join Date: Oct 2009
Location: Kirkland, WA
Posts: 255
|
|
|
Member
Join Date: Oct 2009
Location: Kirkland, WA
Posts: 255
|
Hello all, I just completed this mod and everything went smoothly. However the map light console is much looser than when I took it off. Did I bend a clip? If so, does anyone have a part number for those? I might just epoxy it to the head liner.
|
|
|
Reply With Quote
|
|
08-17-2012, 06:49 AM
|
#35
|
 |
Elite Member
|
|
Join Date: Sep 2005
Location: Oakland CA
Age: 36
Posts: 5,063
|
|
|
Elite Member
Join Date: Sep 2005
Location: Oakland CA
Age: 36
Posts: 5,063
|
U got to push it up harder, your going to hear a deep click/ pop.
__________________
Pioneer DEH-80PRS,Rockford Fosgate T600-2,Hertz ML 1650.3(2 pairs),T400-2,Hertz ML 280.3(2 pairs),T1000-1bdcp,(2)JL Audio 12W6v3, Mechman 240a HO Alternator, Dual Northstar 31m,Borla Dual Exhaust,AFE Magnumforce intake.Enkei WT-4 Michelin Defender LTX 275/55R20. retrofitted S2000 projectors,Philips 85122 White Vision,Morimoto 5Five Ballast.Diode Dynamics SS3 Yellow Fog Sport.2 pairs of Hella Supertones.Full led conversion on interior and exterior.HAWK Talon Rotors and LTS pads F+R,Stoptech stainless steel lines F+R.Bilstein 5100 @0.85, MOOG FJ Springs front,Bilstein B12 36-281824 rear .
|
|
|
Reply With Quote
|
|
12-09-2012, 06:53 PM
|
#36
|
|
Junior Member
|
|
Join Date: Oct 2012
Location: Nevada
Posts: 18
|
|
|
Junior Member
Join Date: Oct 2012
Location: Nevada
Posts: 18
|
I just finished doing this mod, so glad it ended up working once I was done! I even used the same switch. Thanks a lot for this write up!!

|
|
|
Reply With Quote
|
|
08-19-2013, 08:44 PM
|
#37
|
 |
Senior Member
|
|
Join Date: Dec 2011
Location: Glen Allen/Richmond VA
Age: 32
Posts: 2,378
|
|
|
Senior Member
Join Date: Dec 2011
Location: Glen Allen/Richmond VA
Age: 32
Posts: 2,378
|
just did this mod in my limited and tapped into the running board wires.
so anyone with a limited with running board lights its the easiest way to do it. did this mod without a switch
__________________
Budget Build,5100's with tacoma/fj coils, CBI Offroad Front mount hitch, MY MAP LIGHT MOD How to: A/C in console
09 limited Titanium Metallic ,stock, color matched emblems, LED interior lights, winjet fog lights, LED foot well lights,HCF mod, fumoto f-103 oil valve, anytime backup-camera mod.
|
|
|
Reply With Quote
|
|
09-27-2013, 11:14 PM
|
#38
|
 |
Member
|
|
Join Date: Jun 2012
Location: Minneapolis, MN
Posts: 153
|
|
|
Member
Join Date: Jun 2012
Location: Minneapolis, MN
Posts: 153
|
Help...
I would love some input on this one....
I did the mod using the "A" pillar cut in. My problem is that when my 4r is unlocked all the interior lights go on and don't shut off. Opening and closing a door doesn't do it either. It has to be locked for the lights to go off. 
__________________
-Ben
2006 Sr5 V6 4x4. DS 2.5/1.5, Waag brush & rear bumper guards, Vsc off mod, fog light mod, key & seat belt reminder disabled, weather techs.
|
|
|
Reply With Quote
|
|
09-27-2013, 11:40 PM
|
#39
|
|
Senior Member
|
|
Join Date: Dec 2011
Location: Glen Allen/Richmond VA
Age: 32
Posts: 2,378
|
|
|
Senior Member
Join Date: Dec 2011
Location: Glen Allen/Richmond VA
Age: 32
Posts: 2,378
|
Quote:
Originally Posted by bvc
I would love some input on this one....
I did the mod using the "A" pillar cut in. My problem is that when my 4r is unlocked all the interior lights go on and don't shut off. Opening and closing a door doesn't do it either. It has to be locked for the lights to go off. |
put the truck in gear and it should turn off
__________________
Budget Build,5100's with tacoma/fj coils, CBI Offroad Front mount hitch, MY MAP LIGHT MOD How to: A/C in console
09 limited Titanium Metallic ,stock, color matched emblems, LED interior lights, winjet fog lights, LED foot well lights,HCF mod, fumoto f-103 oil valve, anytime backup-camera mod.
|
|
|
Reply With Quote
|
|
04-08-2014, 04:20 PM
|
#40
|
 |
Member
|
|
Join Date: Mar 2011
Location: Kansas City, MO
Posts: 748
|
|
|
Member
Join Date: Mar 2011
Location: Kansas City, MO
Posts: 748
|
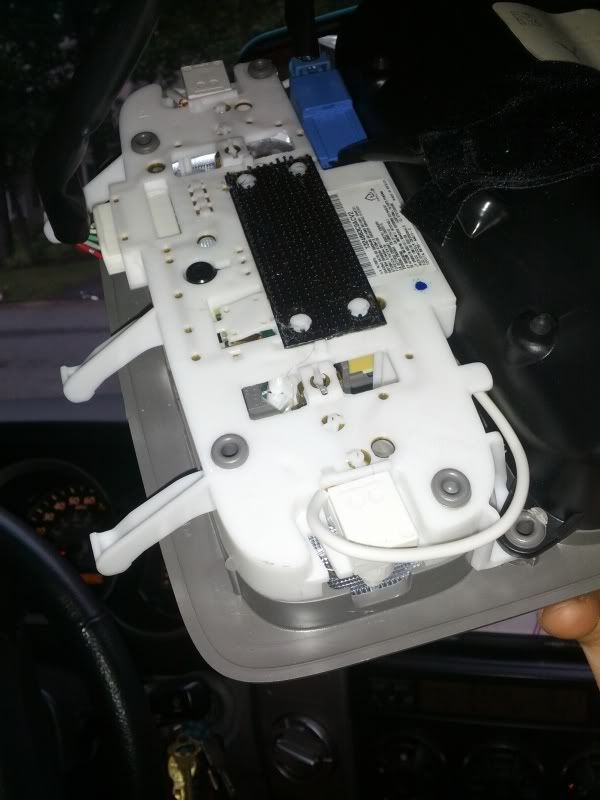
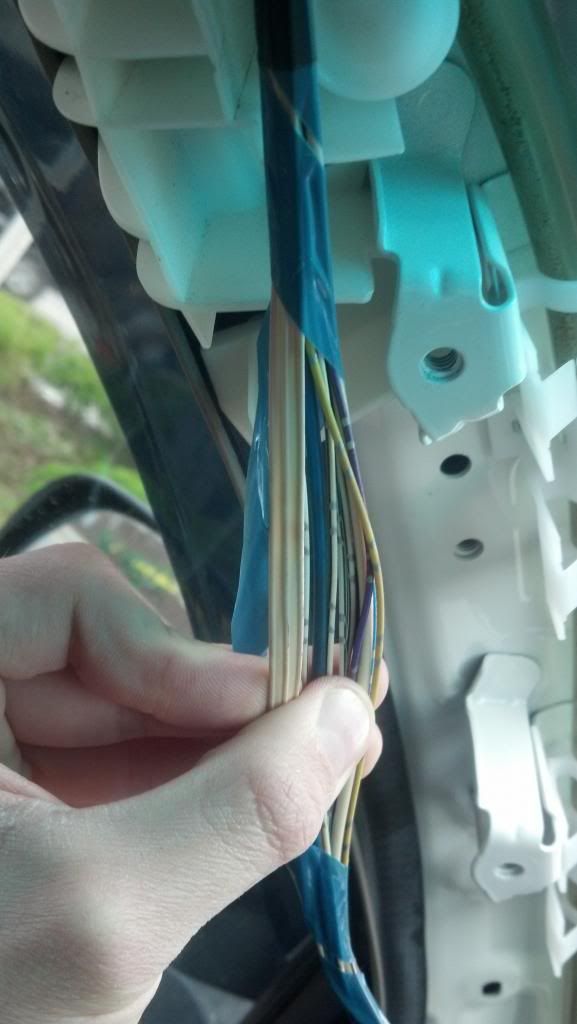
Can someone confirm this is the correct ribbon to tap into from the a pillar? The white ribbon. Is it the narrow middle wire?
__________________
2004 SR5 V8 4WD White - Full LED Swap - Pioneer BT Stereo - Lite Racing UCAs - Toytec Bilstein 5100 Front 3"
Superflex Rear 2"- Spidertrax 1.5" - 255/75r17 Destination AT - SS Brake Lines - Prothane Bushings - SE Brake Upgrade - Full Synthetic

1994 SR5 V6 4WD Black - Bilstein HDs - OME 900 - 31" Destination AT
|
|
|
Reply With Quote
|
|
04-08-2014, 05:36 PM
|
#41
|
 |
Member
|
|
Join Date: Jan 2012
Location: Denver, CO
Posts: 434
|
|
|
Member
Join Date: Jan 2012
Location: Denver, CO
Posts: 434
|
Quote:
Originally Posted by Dylan
Can someone confirm this is the correct ribbon to tap into from the a pillar? The white ribbon. Is it the narrow middle wire?
|
Yes. Tap into the middle wire on that ribbon.
__________________
2016 Trail Premium Tires and sliders and some interior mods...
2005 SR5 Silver mod list
FOR SALE: Rear Diff Breather Fitting; 4th Gen Center Diff Switch w/ pigtails
|
|
|
Reply With Quote
|
|
04-08-2014, 08:20 PM
|
#42
|
|
Member
|
|
Join Date: Mar 2011
Location: Kansas City, MO
Posts: 748
|
|
|
Member
Join Date: Mar 2011
Location: Kansas City, MO
Posts: 748
|
Quote:
Originally Posted by sigepbiker
Yes. Tap into the middle wire on that ribbon.
|
Awesome, thanks man. It works.
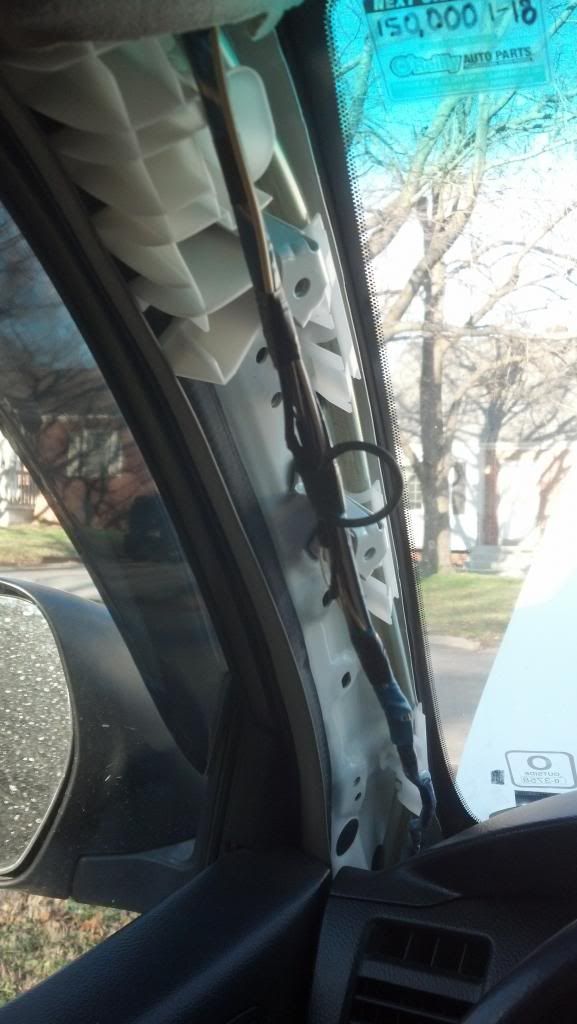
Here's some other pics which cover how to do this by tapping into the A pillar, the second method J.A. lists. I didn't want to mess with pulling the dash. Additionally I do not have lights on my running board to tap into, but I do have a sunroof so it was quite simple.
Switches are wired with 18 awg wire into the open socket.
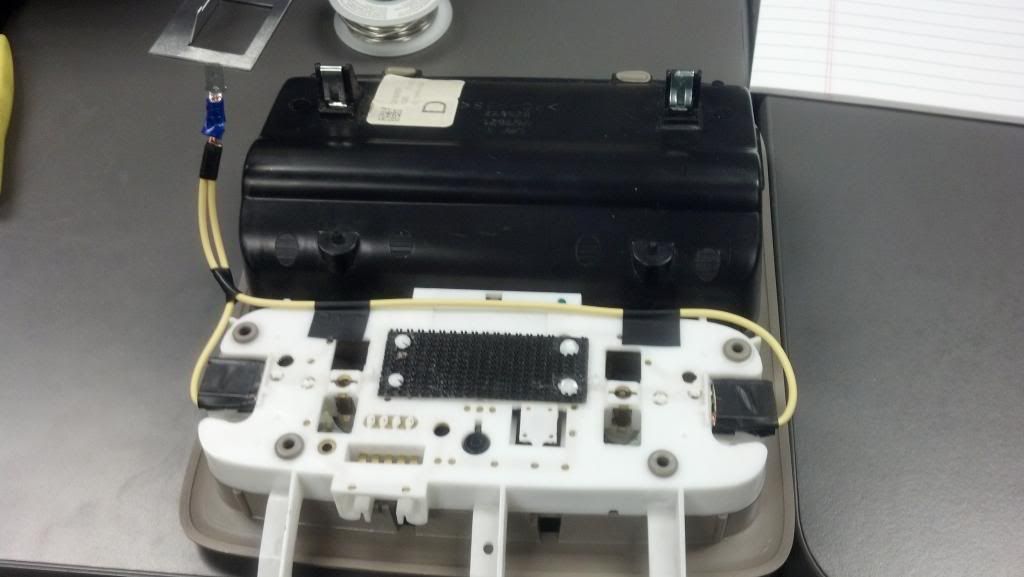
Male and Female ends for easy removal.
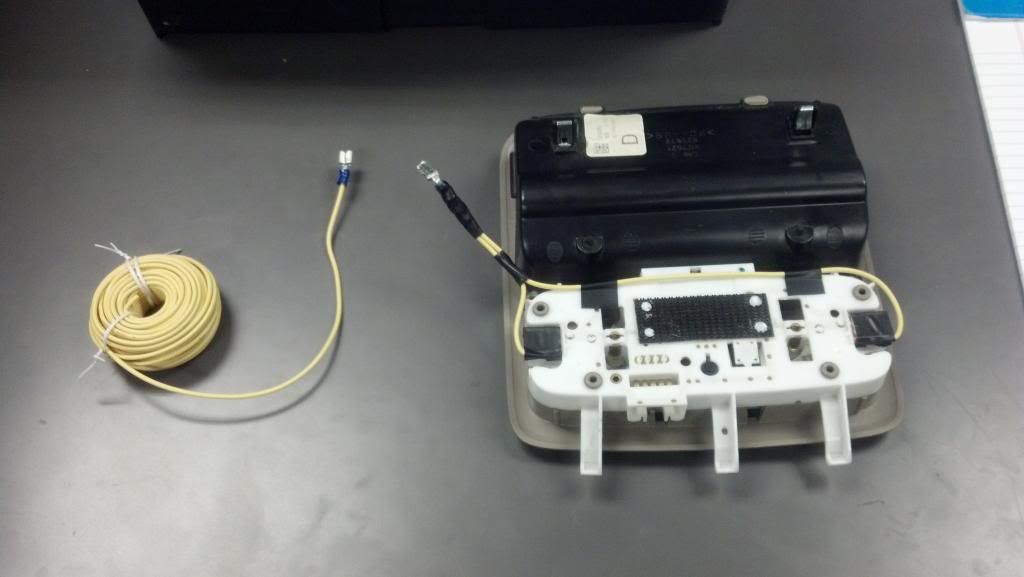
White ribbon in the left side A-pillar. The Middle wire is the one to tap.
I snipped the wire then used an extension of 18 awg so it could connect with the wire from the map light.
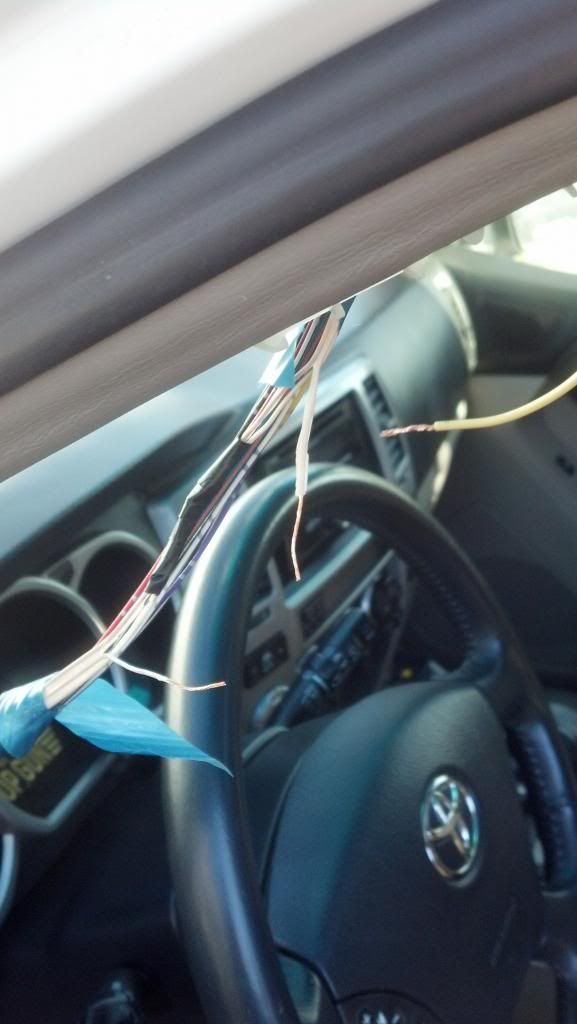
Next I soldered the wires and then heat shrunk them.
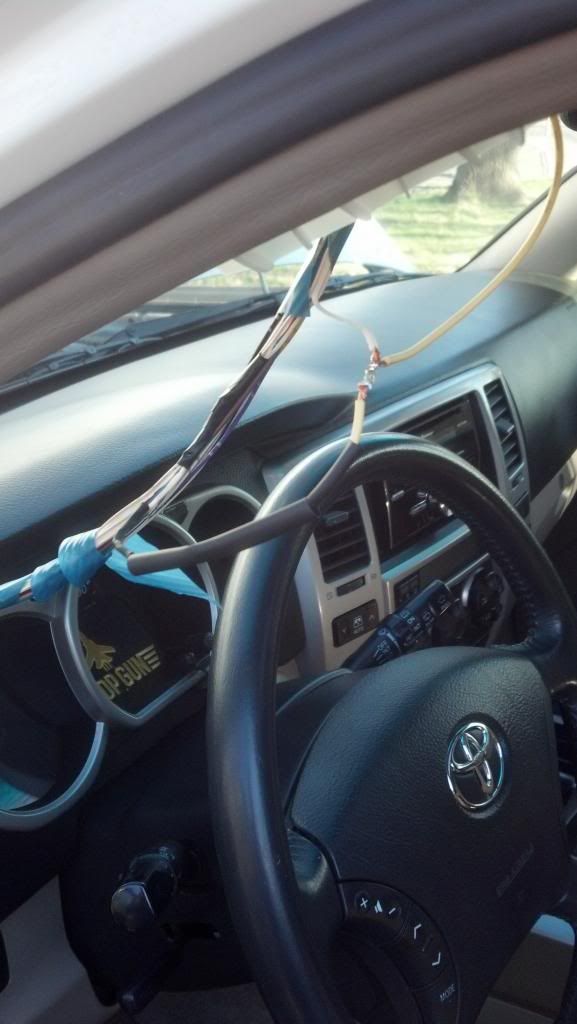
Tuck it all back in, button it up. Bingo. Now the map light works with the doors.
__________________
2004 SR5 V8 4WD White - Full LED Swap - Pioneer BT Stereo - Lite Racing UCAs - Toytec Bilstein 5100 Front 3"
Superflex Rear 2"- Spidertrax 1.5" - 255/75r17 Destination AT - SS Brake Lines - Prothane Bushings - SE Brake Upgrade - Full Synthetic
1994 SR5 V6 4WD Black - Bilstein HDs - OME 900 - 31" Destination AT
Last edited by Dylan; 04-08-2014 at 11:12 PM.
|
|
|
Reply With Quote
|
|
08-01-2014, 03:35 PM
|
#43
|
|
Member
|
|
Join Date: Jan 2011
Location: Nevada
Posts: 30
|
|
|
Member
Join Date: Jan 2011
Location: Nevada
Posts: 30
|
Question
I'm excited, I'm gonna be tackling this tonight along with my LED lights that just got in.
I just want to check but I can still use the map lights as strictly map lights? IE-in the car while it's running and all the doors closed and I need to look at a map while driving. I'll still be able to turn the map lights on like normal?
Also another question.... I was looking at OP's switch he used, a double throw. I'm just thinking but shouldn't I be able to wire in all the dome lights to one side of the switch and the map light mod to the other side of the switch?
So for example like in my Silverado I can turn all the dome lights on at any time with a flick of a switch. Shouldn't I be able to do the same? I know it can be done but for those that have done similar mods would it be worth it? or extremely time consuming?
Either way i'll probably end up doing it I'm just looking for opinions and advice or some helpful threads elsewhere.
|
|
|
Reply With Quote
|
|
08-02-2014, 10:04 AM
|
#44
|
 |
Member
|
|
Join Date: Jan 2014
Location: Sister Bay, WI
Posts: 986
|
|
|
Member
Join Date: Jan 2014
Location: Sister Bay, WI
Posts: 986
|
This write up helped a ton.
Thanks!!!

__________________
2022 LUNAR ROCK TRAIL SPECIAL EDITION
2010 MAGNETIC GREY SR5 PREMIUM
2004 V6 WHITE 4RUNNER SPORT
1995 V6 3.0 BLACK 4RUNNER 4X4 (Retired)
4th & 5th Gen UCA Install Thread
|
|
|
Reply With Quote
|
|
05-21-2015, 01:05 PM
|
#45
|
|
Junior Member
|
|
Join Date: Apr 2015
Location: NC
Posts: 6
|
|
|
Junior Member
Join Date: Apr 2015
Location: NC
Posts: 6
|
Great Write Up
I used this to help me out today and it made things much easier! I did not want to take much of my car apart as it was raining out so instead of doing the a pillar or tapping into the ecu I used the dome light just behind the front seats. I thought it would be difficult to snake the wire through and around the sunroof, but it took less than 5 minutes. I used a multi meter to find that the middle wire to this dome light went hot when the doors were open. The connector at the dome light is easily tapped into without requiring any extra hardware. It is a gate style so you can simply flip it open, add your accessory wire and close it and you have power! I've included a picture below to help visualize this. Also, all you really need for this is about 4 feet of 18 gauge wire, one bullet style connector, and some electrical tape.Thanks so much J.A.!!
|
|
|
Reply With Quote
|
| Thread Tools |
|
|
| Display Modes |
Rate This Thread |
 Linear Mode Linear Mode
|
|
 Posting Rules
|
You may not post new threads
You may not post replies
You may not post attachments
You may not edit your posts
HTML code is On
|
|
|
|


