 03-04-2011, 11:42 AM
|
#46
|
 |
Senior Member
|
|
Join Date: Dec 2010
Location: Tucson, AZ
Age: 34
Posts: 1,058
|
|
|
Senior Member
Join Date: Dec 2010
Location: Tucson, AZ
Age: 34
Posts: 1,058
|
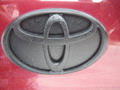
blacked out emblems
sooo. after all the plasti-dip talk on here i decided to give it a whirl. i cleaned and masked off my emblems and sprayed em. now, people said it was easy, and for the most part it was. but i had a REALLY hard time getting the small pieces off the truck (inside the R and 5). the only thing i had small enough to fit in there was a blade, and i didnt want to scratch the paint.
i ended up taking off the 2 sr5 emblems and i kept the "toyota" and the "4runner" on the hatch, they came out pretty well. it was a pretty warm and toasty day so i just took my door removal tool, slid it under the emblem and pryed it off. so far im liking the debadged sr5. but i want to keep the hatchs on. i have too much pride that its a 4runner and i want to flaunt it. so i might take some measurements, or make a stencil, so i can take the hatch emblems off and paint them with real paint. i just know its going to be the biggest hassle to put em back on, im not worried about getting them to stick but alignment.
pics will be up tonight.
__________________
2004 4Runner SR5 V6 2wd
My Build/Mod/Repair Thread
My Beauty Shots

|

|
 Reply With Quote Reply With Quote
|
|
03-05-2011, 07:52 PM
|
#48
|
 |
Senior Member
|
|
Join Date: Mar 2010
Location: San Antonio, TX
Age: 39
Posts: 3,908
Real Name: Matt
|
|
|
Senior Member
Join Date: Mar 2010
Location: San Antonio, TX
Age: 39
Posts: 3,908
Real Name: Matt
|
Nice 
To keep mine straight, I outlined the outside edges of the overall emblem with masking tape. Then I pulled mine off using a heat gun (or hair dryer if you don't have a heat gun) and my fingernails. I left the remaining adhesive on the car and painted the emblems. Then I reheated each letter as well as the adhesive on the car until I saw it bubble a little so I knew it was soft. Then I just placed the letters directly back over the adhesive, lining the top and bottom up with the masking tape.
I used to have pics but looks like they got deleted.
You know what would look even better? Black headlights! 
|
|
|
Reply With Quote
|
|
03-05-2011, 07:59 PM
|
#49
|
|
Senior Member
|
|
Join Date: Dec 2010
Location: Tucson, AZ
Age: 34
Posts: 1,058
|
|
|
Senior Member
Join Date: Dec 2010
Location: Tucson, AZ
Age: 34
Posts: 1,058
|
Quote:
Originally Posted by gaterose

Nice
You know what would look even better? Black headlights! |
ahahaha im working on that.
and thats exactly what my idea is. to leave the adhesive on there, as a placement guide.
__________________
2004 4Runner SR5 V6 2wd
My Build/Mod/Repair Thread
My Beauty Shots
|
|
|
Reply With Quote
|
|
03-05-2011, 08:03 PM
|
#50
|
|
Senior Member
|
|
Join Date: Mar 2010
Location: San Antonio, TX
Age: 39
Posts: 3,908
Real Name: Matt
|
|
|
Senior Member
Join Date: Mar 2010
Location: San Antonio, TX
Age: 39
Posts: 3,908
Real Name: Matt
|
Make sure you use the tape outline too, when you're sticking the letters back on the adhesive it's hard to make them all perfectly on the same line and not "twisty" without an external outline
|
|
|
Reply With Quote
|
|
03-10-2011, 01:17 PM
|
#51
|
 |
Senior Member
|
|
Join Date: Jul 2009
Posts: 4,984
|
|
|
Senior Member
Join Date: Jul 2009
Posts: 4,984
|
Did you spray the emblems while they were on the car? I wanna do this, and use my plastidip.
|
|
|
Reply With Quote
|
|
03-10-2011, 01:34 PM
|
#52
|
|
Senior Member
|
|
Join Date: Dec 2010
Location: Tucson, AZ
Age: 34
Posts: 1,058
|
|
|
Senior Member
Join Date: Dec 2010
Location: Tucson, AZ
Age: 34
Posts: 1,058
|
Quote:
Originally Posted by JohnsD90
Did you spray the emblems while they were on the car? I wanna do this, and use my plastidip.
|
yeah, tape em off like in the first pic. and spray away. theres a gap between the emblem and the runner itself, so it will peel right off the runner without taking it off the emblems. just peel slowly.
__________________
2004 4Runner SR5 V6 2wd
My Build/Mod/Repair Thread
My Beauty Shots
|
|
|
Reply With Quote
|
|
03-21-2011, 10:25 AM
|
#53
|
 |
Member
|
|
Join Date: Mar 2011
Location: NE Florida
Posts: 248
|
|
|
Member
Join Date: Mar 2011
Location: NE Florida
Posts: 248
|
Great mods. Thanks for the pics and detailed descriptions!
|
|
|
Reply With Quote
|
|
03-21-2011, 08:16 PM
|
#54
|
|
Senior Member
|
|
Join Date: Dec 2010
Location: Tucson, AZ
Age: 34
Posts: 1,058
|
|
|
Senior Member
Join Date: Dec 2010
Location: Tucson, AZ
Age: 34
Posts: 1,058
|
Quote:
Originally Posted by GladeRunner
Great mods. Thanks for the pics and detailed descriptions!
|
haha anytime!
__________________
2004 4Runner SR5 V6 2wd
My Build/Mod/Repair Thread
My Beauty Shots
|
|
|
Reply With Quote
|
|
03-21-2011, 08:22 PM
|
#55
|
|
Senior Member
|
|
Join Date: Dec 2010
Location: Tucson, AZ
Age: 34
Posts: 1,058
|
|
|
Senior Member
Join Date: Dec 2010
Location: Tucson, AZ
Age: 34
Posts: 1,058
|
New headlights from Gaterose
purchased black headlights from Gaterose, and they are awesome!
it was cold. windy, and wet. but that didnt stop me from putting them in the second they arrived.
this is the thread i used as a guide to taking off my headlights.
another blacked out headlight thread...DIY lots of pics.
as for that PIA bolt in the back... well that didnt go back on. maybe one day. but i plan on doing my fogs soon so i decided ill just take my headlights off again to get to them easier. heeeere are the pics!


THANKS AGAIN GATEROSE!
__________________
2004 4Runner SR5 V6 2wd
My Build/Mod/Repair Thread
My Beauty Shots
|
|
|
Reply With Quote
|
|
03-23-2011, 11:48 AM
|
#56
|
|
Senior Member
|
|
Join Date: Dec 2010
Location: Tucson, AZ
Age: 34
Posts: 1,058
|
|
|
Senior Member
Join Date: Dec 2010
Location: Tucson, AZ
Age: 34
Posts: 1,058
|
Hit 110,000
today while driving to willcox for work (95 miles one way) i hit this magical number.
the only things needed to be done right now are
rear brakes
tune up
trany and brake flush.
i love it.

__________________
2004 4Runner SR5 V6 2wd
My Build/Mod/Repair Thread
My Beauty Shots
|
|
|
Reply With Quote
|
|
03-26-2011, 07:24 PM
|
#57
|
|
Member
|
|
Join Date: Mar 2006
Location: Cville
Posts: 299
|
|
|
Member
Join Date: Mar 2006
Location: Cville
Posts: 299
|
Nice! I cant wait to see what it loos like when you paint your interior panels black!
__________________
2021 TRD Pro, MGM
|
|
|
Reply With Quote
|
|
03-26-2011, 07:50 PM
|
#58
|
|
Senior Member
|
|
Join Date: Dec 2010
Location: Tucson, AZ
Age: 34
Posts: 1,058
|
|
|
Senior Member
Join Date: Dec 2010
Location: Tucson, AZ
Age: 34
Posts: 1,058
|
Quote:
Originally Posted by Jrunr
Nice! I cant wait to see what it loos like when you paint your interior panels black!
|
haha yeah im working on it, the trouble is finding a paint that is going to stick. i used the krylon fusion on my footwells, but they are chipping kinda easy on the driver side for as much as i drag my feet on them. hmmm.
__________________
2004 4Runner SR5 V6 2wd
My Build/Mod/Repair Thread
My Beauty Shots
|
|
|
Reply With Quote
|
|
03-26-2011, 08:52 PM
|
#59
|
|
Senior Member
|
|
Join Date: Mar 2010
Location: San Antonio, TX
Age: 39
Posts: 3,908
Real Name: Matt
|
|
|
Senior Member
Join Date: Mar 2010
Location: San Antonio, TX
Age: 39
Posts: 3,908
Real Name: Matt
|
DupliColor Vinyl & Fabric Coating works well on interior plastics, has lasted 6 or 7 years on my Z71.
There is also SEM Color Coat, I've heard it's better but it is also more expensive.
|
|
|
Reply With Quote
|
|
03-27-2011, 01:17 AM
|
#60
|
|
Senior Member
|
|
Join Date: Dec 2010
Location: Tucson, AZ
Age: 34
Posts: 1,058
|
|
|
Senior Member
Join Date: Dec 2010
Location: Tucson, AZ
Age: 34
Posts: 1,058
|
ive thought about hurculiner it, but i dont like the texture of it. i have the vinyl and fabric spray. it comes out really thin. i might give it a try. thats what i used on my mats, and it rubs off easy. but on a hard surface might be better.
__________________
2004 4Runner SR5 V6 2wd
My Build/Mod/Repair Thread
My Beauty Shots
|
|
|
Reply With Quote
|
 Posting Rules
|
You may not post new threads
You may not post replies
You may not post attachments
You may not edit your posts
HTML code is On
|
|
|
|


 also, as an update to the spray dyed carpet mats, all of them are holding up really well, except the driver side. right where my heel rests, has faded/ worn off. so i am going to give it a second spray and see how it holds. its still blackish, more like a dark gray... so hmmm.

 Linear Mode


