 06-28-2019, 02:30 AM
|
#38806
|
|
Member
|
|
Join Date: Jun 2017
Location: Montana
Posts: 225
|
|
|
Member
Join Date: Jun 2017
Location: Montana
Posts: 225
|
Quote:
Originally Posted by Ray Dunakin

Fixed a lingering problem caused by a small mishap last year:

I can pop it back in place but it doesn't stay put very long, and I'm always worried it'll catch on something when I'm off-road. The cost to have it repaired is astronomical. So I came up with my own solution, using stainless steel sheet metal screws and washers:


It's not perfect but it works, and I like the way it looks -- kind of looks "tough". 
. |
...Hey, Ray!....put identical ones on the opposite fender...and it will look like it came that way from the factory!...  
|

|
 Reply With Quote Reply With Quote
|
|
06-28-2019, 09:34 AM
|
#38807
|
 |
Member
|
|
Join Date: Feb 2019
Location: Ponte Vedra Beach, FL
Posts: 39
|
|
|
Member
Join Date: Feb 2019
Location: Ponte Vedra Beach, FL
Posts: 39
|
Quote:
Originally Posted by austinquick
Does your sunroof still open properly or did you move the crossbars?
|
My sunroof slides open fine. When I TILT it up it looks like it's touching the crossbar, but I don't know for sure... I need to loosen up the crossbar and watch it from the outside to be sure. I'll get back to you.
__________________
2016 Nautie Blue SR5P (w/3rd Row): Toytec Ultimate lift, SCS Ray10, Cooper S/T MAXX, TRD Bro grill, Victory 4x4 full rack, Victory 4x4 hatch ladder, Extreme LED X6 Amber/White Light Bar, Baja Squadron floods, Kicker WRX Tweeters, Odyssey Group 24 battery, Canadian split rear cargo mat, Ham:Yaesu FTM-400XDR, CB:Uniden Pro520XL, Recon: DJI Mavic2 Pro, DDR GSD
|
|
|
Reply With Quote
|
|
06-28-2019, 11:58 AM
|
#38808
|
 |
Member
|
|
Join Date: Apr 2018
Location: Sugar Land Tx
Posts: 54
|
|
|
Member
Join Date: Apr 2018
Location: Sugar Land Tx
Posts: 54
|
Installed a new light bar. BD XL Sports high speed spots! love the way it turned out.
|
|
|
Reply With Quote
|
|
06-28-2019, 12:51 PM
|
#38809
|
|
Banned
|
|
Join Date: Nov 2017
Location: Bay Area, CA
Posts: 2,247
Real Name: Mark
|
|
|
Banned
Join Date: Nov 2017
Location: Bay Area, CA
Posts: 2,247
Real Name: Mark
|
Quote:
Originally Posted by Ray Dunakin
Fixed a lingering problem caused by a small mishap last year:
I can pop it back in place but it doesn't stay put very long, and I'm always worried it'll catch on something when I'm off-road. The cost to have it repaired is astronomical. So I came up with my own solution, using stainless steel sheet metal screws and washers:
It's not perfect but it works, and I like the way it looks -- kind of looks "tough".
. |
I have a similar problem, but not as severe. I had a little bump and the section popped out. I didnt examine it closely, just pushed it back in and the area by the tire snapped into place. But the section by the tail light still protrudes a little. Does anyone know how this trim actually clips in? Any more detailed photos of the clip system? Thx.
|
|
|
Reply With Quote
|
|
06-28-2019, 02:08 PM
|
#38810
|
|
Junior Member
|
|
Join Date: Apr 2016
Location: Stratford, CT
Posts: 16
|
|
|
Junior Member
Join Date: Apr 2016
Location: Stratford, CT
Posts: 16
|
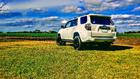
Hey everyone. So, longtime lurker but I read lots of your posts and have picked up tons of hints and mods. I appreciate all of you.
So I installed an Icon Stage 2 lift in my Silver 2016 Trail Premium with KDSS. I also installed a one inch body lift. This is almost the same route I took with my 2000 4Runner although I had added the Toyota supercharger and a bunch of URD mods. I kept that truck for 16 years and hated seeing it leave my driveway. I do, however, love my 5th gen. Finally had my 295/70/17 Nitto Ridge Grapplers and Icon Rebound wheels installed and an alignment performed. Previous to this, I did do a body mount chop moved the front inner fender liners forward, removed the front mud guards and trimmed the front fenders inside the wheel wells just a bit. They got my truck all aligned at 4.30 caster and it drives just awesome. I was a bit worried about rubbing but to my surprise I have had absolutely zero rub on road (and I have tried like hell in forward and reverse with the wheel locked). Keep in mind I have not taken the truck off road yet and I do assume when stuffed, I will get some rubbing but with 295s I couldn't be happier with the road manners and lack of rubbing. The Nittos, for being fairly aggressive are surprisingly quiet on road.
So, as far as KDSS. I have read everything I could about lifting a 5th gen with it. I did, and you absolutely can install the front coilovers without disconnecting the KDSS at all. I did my install with jack stands, on the ground in a driveway. Driver's side was simple with some jack pressure on the opposite side under the KDSS bar. Passenger side was a bit more difficult but simply required a jack under the KDSS boot and a fat guy with a bar to wedge down the lca. I did ucas as well so those obviously should be at least disconnected.
In the rear, which was much simpler, I only disconnected the KDSS on the passenger side. Springs and shocks went in without much effort and reattaching the KDSS on one side was a piece of cake. Many ways to do the same thing. Not saying mine is the best but it certainly can be done. If you feel like disconnecting the KDSS completely in front is the better option, have at it. Just telling you how I did it.
Icon Rebound wheels are 17 x8.5 with 0 offset and 4.75in backspace. These put the 295s maybe just a tad outside the wheel wells but I think it looks great. I do think the body lift may have helped just a bit with rubbing issues but 1in is fairly easy and I like the look better.
Other additions to the 4Runner are as follows:
Tinted windows
Painted the silver roof rails black
Black out tail lights from Unique Style Racing
TRD Pro Emblems
TRD grill and black front and rear bumper valances
2019 TRD Pro black hood scoop insert
Blackout 4Runner letters on rear hatch
K&N performance air filter
"Raptor" lights in grill
HID low beams
LED fogs
LED rear turn signals
Libberway Red D rings on front
Agency 6 Red Shackle Block and D ring
Lamin-X yellow fog light film
Green Lane Offroad aluminum front skid plate
Nfab Nerf bars - To be replaced by sliders
Antman's rear bumper cup holder mod
Salex center console and glove compartment organizer
Center console tray
OEM bug guard
Weathertech floor mats
Husky rear mat
Weathertech rain guards
I do have a 32in LED light bar to be mounted behind the grill. Just crafting some brackets for it.
Ordered or to be ordered:
Ellis Precision pewter shift knob set with TRD logo
Pedal Commander or Sprint Booster
Toyota OEM red brake caliper covers with white TRD decals
I am sure there are more to come.
Thanks again for all of you who have posted your experience and documented your installs. Extremely helpful. And if you are on the fence about doing something like a lift yourself but have the room and the tools, I say go for it. Nothing better than wrenching on your own vehicle plus you learn a ton. A realize everybody doesn't have that option. Thank you guys again,
Rob (Primo)
Ok, here are some crappy pics of my dirty 4Runner:
Last edited by Primo; 07-03-2019 at 02:34 PM.
|
|
|
Reply With Quote
|
|
06-28-2019, 03:24 PM
|
#38811
|
|
Banned
|
|
Join Date: Mar 2018
Location: Arizona
Posts: 1,612
Real Name: Tobias Fünke
|
|
|
Banned
Join Date: Mar 2018
Location: Arizona
Posts: 1,612
Real Name: Tobias Fünke
|
Quote:
Originally Posted by ElectroBoy
I have a similar problem, but not as severe. I had a little bump and the section popped out. I didn’t examine it closely, just pushed it back in and the area by the tire snapped into place. But the section by the tail light still protrudes a little. Does anyone know how this trim actually clips in? Any more detailed photos of the clip system? Thx.
|
That sliver of plastic sticking out of the bumper plastic (in the circled area) snaps into the black plastic piece attached to the rear quarter of the truck. It will make sense if you follow my instructions.
That particular tab is flimsy and if you look at it closely you will see it's bent down. Happend to me when I took mine off to run breather lines.
Undo that half the bumper to the centerline of the cargo area. That will allow you to access the tab. Do your best to bend that tab back up into place. Then working from the centerline of the cargo area to the fender start fastening the bumper down. When you get to that tab slowly help guide it into it's little slot on the fender and then you can press/snap it back in. Pop, Snap, and screw the rest of the bumper together and you're good.
Last edited by Mutant138; 06-28-2019 at 03:33 PM.
|
|
|
Reply With Quote
|
|
06-28-2019, 03:32 PM
|
#38812
|
|
Banned
|
|
Join Date: Mar 2018
Location: Arizona
Posts: 1,612
Real Name: Tobias Fünke
|
|
|
Banned
Join Date: Mar 2018
Location: Arizona
Posts: 1,612
Real Name: Tobias Fünke
|
Quote:
Originally Posted by OstaraHTX
Installed a new light bar. BD XL Sports high speed spots! love the way it turned out.
|
Anyone in front of that setup while it's on...

|
|
|
Reply With Quote
|
|
06-28-2019, 03:46 PM
|
#38813
|
 |
Member
|
|
Join Date: Nov 2017
Location: Phoenix, Arizona
Posts: 285
|
|
|
Member
Join Date: Nov 2017
Location: Phoenix, Arizona
Posts: 285
|
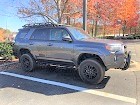
Installed some new suspension in the front 
Sent from my iPhone using Tapatalk
|
|
|
Reply With Quote
|
|
06-28-2019, 04:45 PM
|
#38814
|
|
Member
|
|
Join Date: Mar 2019
Location: Portland, Oregon
Posts: 33
|
|
|
Member
Join Date: Mar 2019
Location: Portland, Oregon
Posts: 33
|
Quote:
Originally Posted by PVB'Runner
My sunroof slides open fine. When I TILT it up it looks like it's touching the crossbar, but I don't know for sure... I need to loosen up the crossbar and watch it from the outside to be sure. I'll get back to you.
|
Good info, I appreciate it! I figure if it does touch, I'd just ditch that one bar.
|
|
|
Reply With Quote
|
|
06-28-2019, 04:48 PM
|
#38815
|
|
Member
|
|
Join Date: Mar 2019
Location: Portland, Oregon
Posts: 33
|
|
|
Member
Join Date: Mar 2019
Location: Portland, Oregon
Posts: 33
|
Quote:
Originally Posted by OstaraHTX
Installed a new light bar. BD XL Sports high speed spots! love the way it turned out.
|
That looks beautiful 
|
|
|
Reply With Quote
|
|
06-29-2019, 12:40 PM
|
#38816
|
|
Member
|
|
Join Date: Mar 2012
Location: Kansas City, KS
Posts: 136
|
|
|
Member
Join Date: Mar 2012
Location: Kansas City, KS
Posts: 136
|
Installed sliders
RSG slider install.
__________________
2019 TRD OR Premium. Dobinsons extended travel, Goodyear dura-trac 255/75's, pro wheels, sliders.
|
|
|
Reply With Quote
|
|
06-29-2019, 06:23 PM
|
#38817
|
|
Junior Member
|
|
Join Date: Apr 2019
Posts: 29
|
|
|
Junior Member
Join Date: Apr 2019
Posts: 29
|

Long story short. Got bored at work and made myself a Velcro patch.
|
|
|
Reply With Quote
|
|
06-29-2019, 06:50 PM
|
#38818
|
 |
Member
|
|
Join Date: Feb 2019
Location: Hawaii
Posts: 309
|
|
|
Member
Join Date: Feb 2019
Location: Hawaii
Posts: 309
|
Sway bar bushing upgrade and TRD CAI
Upgraded to greaseable Poly Sway Ba Bushing for front and rear and added a TRD CAI.
Not only can I corner like it's "ON RAILS" but I can go 0-60 in less than 5 minutes!
__________________
2019 SR5 Premium 2WD - TRD PRO Front Struts & Coils w/ Toytec 1" Perch Spacer / Dobinson's C59-505 Rear Springs / ICON VS 2.0 Rear Shocks / TRD PRO Grill & Valences/ TRD CAI /URD MAF Calibrator / TRD PRO Wheels / BFG KO2 275 70 17
Last edited by hwnrunner; 06-29-2019 at 06:56 PM.
|
|
|
Reply With Quote
|
|
06-29-2019, 11:00 PM
|
#38819
|
|
Junior Member
|
|
Join Date: Mar 2018
Location: Fairbanks, AK
Posts: 11
|
|
|
Junior Member
Join Date: Mar 2018
Location: Fairbanks, AK
Posts: 11
|
Got bored, had a few minutes between beers & chores so I dipped my hubcaps. 
Sent from my SM-N960U using Tapatalk
|
|
|
Reply With Quote
|
|
06-30-2019, 09:07 AM
|
#38820
|
 |
Junior Member
|
|
Join Date: Jun 2019
Location: GA
Posts: 22
|
|
|
Junior Member
Join Date: Jun 2019
Location: GA
Posts: 22
|
3 lift
|
|
|
Reply With Quote
|
 Posting Rules
|
You may not post new threads
You may not post replies
You may not post attachments
You may not edit your posts
HTML code is On
|
|
|
|


 Linear Mode


