 01-22-2016, 12:23 AM
|
#61
|
 |
Senior Member
|
|
Join Date: May 2009
Location: SF Bay Area, CA
Posts: 1,345
|
|
|
Senior Member
Join Date: May 2009
Location: SF Bay Area, CA
Posts: 1,345
|
Quote:
Originally Posted by MTN4RNR

Moving to a different roof rack?
@ weeeee
|
Thinking about it if someone buys it 
__________________
IG @go.xplre
|

|
 Reply With Quote Reply With Quote
|
|
01-24-2016, 04:24 PM
|
#62
|
|
Junior Member
|
|
Join Date: Nov 2015
Location: Grass Valley, CA
Posts: 14
|
|
|
Junior Member
Join Date: Nov 2015
Location: Grass Valley, CA
Posts: 14
|
Quote:
Originally Posted by weeeee
I'm riding on the 4th notch also.
They aligned ok. Caster was a little off because I tried to push it as high as possible (OEM is zero, I was shooting for roughly 2 degrees), but my toe and camber were spot on OEM specs. I think if I played with it a little more (or had caster set to 0) it would've been fine.
With a lift at 2.5", I'd recommend getting UCAs if you want to get better steering feedback because the increased caster will give you better straight line tracking and stability especially at highway speeds. I'm planning on getting UCAs soon.
|
Do you happen to have any more side profile pics you can post up?
I just received my Light Racing UCA's and am getting ready to install my lift. I'm debating between the 4th or 5th clip in the front.
I'll be running Bilstein 6112 in front with the 5160's in the rear along with the Toytec superflex springs. I've got the TRD wheels with the BFG KO2's 275/70/17 sizing. I'd like about a 1/2 to 3/4 inch rake in the rear but not quite sure where it will end up running in the 5th notch.
Have you thought about going to the 5th notch up front?
__________________
2014 Classic Silver Limited / Black TRD Pro Wheels/ 275/70/17 BFG KO2
2016 Classic Silver Limited
|
|
|
Reply With Quote
|
|
01-24-2016, 04:40 PM
|
#63
|
 |
Member
|
|
Join Date: Aug 2014
Location: San Jose, Ca
Posts: 232
Real Name: Ben
|
|
|
Member
Join Date: Aug 2014
Location: San Jose, Ca
Posts: 232
Real Name: Ben
|
@ weeeee
Good meeting you today and thanks for the cubby swap! Nice Pro man!
__________________
2014 TEP - ICON 2.5 Remote Reservoirs - Metal Tech Sliders - Overland Drawers - Gobi Stealth Rack - OG 40" Curved Light Bar - Rigids All Around - Endless Horizons Hybrid Winch Bumper - WARN 8000 - SW Dual Batteries - Rotopax - CVT Mt. Bailey w/ Annex-

|
|
|
Reply With Quote
|
|
01-25-2016, 01:42 AM
|
#64
|
|
Senior Member
|
|
Join Date: May 2009
Location: SF Bay Area, CA
Posts: 1,345
|
|
|
Senior Member
Join Date: May 2009
Location: SF Bay Area, CA
Posts: 1,345
|
Quote:
Originally Posted by esa31.8t
Do you happen to have any more side profile pics you can post up?
I just received my Light Racing UCA's and am getting ready to install my lift. I'm debating between the 4th or 5th clip in the front.
I'll be running Bilstein 6112 in front with the 5160's in the rear along with the Toytec superflex springs. I've got the TRD wheels with the BFG KO2's 275/70/17 sizing. I'd like about a 1/2 to 3/4 inch rake in the rear but not quite sure where it will end up running in the 5th notch.
Have you thought about going to the 5th notch up front?
|
You should be fine with either one. Honestly if you're sticking with 275 I'd keep it on the 3rd or 4th notch- just my personal preference because of the wheel gap. I think
@ Saker
is running this setup and it looks awesome.
I haven't thought about cranking it all the way up yet. I get pretty good clearance with my 34s and the CV angles are pretty good so I'll probably leave it alone.
I'll post up some side profile pics when I get a chance.
Quote:
Originally Posted by transworldmoto
@ weeeee
Good meeting you today and thanks for the cubby swap! Nice Pro man! |
Thanks man! Glad I could help you out (you probably helped me save some time too, lol). I'll catch you on the TW forums. Good luck with buyers for everything else!
__________________
IG @go.xplre
|
|
|
Reply With Quote
|
|
01-25-2016, 04:17 AM
|
#65
|
 |
Senior Member
|
|
Join Date: Dec 2013
Location: Near Baton Rouge, LA
Age: 70
Posts: 4,062
|
|
|
Senior Member
Join Date: Dec 2013
Location: Near Baton Rouge, LA
Age: 70
Posts: 4,062
|
Quote:
Originally Posted by esa31.8t
Do you happen to have any more side profile pics you can post up?
I just received my Light Racing UCA's and am getting ready to install my lift. I'm debating between the 4th or 5th clip in the front.
I'll be running Bilstein 6112 in front with the 5160's in the rear along with the Toytec superflex springs. I've got the TRD wheels with the BFG KO2's 275/70/17 sizing. I'd like about a 1/2 to 3/4 inch rake in the rear but not quite sure where it will end up running in the 5th notch.
Have you thought about going to the 5th notch up front?
|
Quote:
Originally Posted by weeeee
You should be fine with either one. Honestly if you're sticking with 275 I'd keep it on the 3rd or 4th notch- just my personal preference because of the wheel gap. I think
@ Saker
is running this setup and it looks awesome.
I haven't thought about cranking it all the way up yet. I get pretty good clearance with my 34s and the CV angles are pretty good so I'll probably leave it alone.
I'll post up some side profile pics when I get a chance.
Thanks man! Glad I could help you out (you probably helped me save some time too, lol). I'll catch you on the TW forums. Good luck with buyers for everything else! |
@ esa31.8t
&
@ weeeee
,
I am running my 6112's on the middle circlip groove 5160's rear with stock springs and 265-70-17 KO2's for shoes.
That leveled my T4R.

hope this helps!
__________________
Best Regards,
Saker
 2021 T4R *MIDNIGHT BLACK METALLIC* TRD OFF ROAD PREMIUM 4X4| Sakers Ebony Build | Sakers Previous 2014 Midnight Build | Scuba Mod | LED LIGHT BAR INSTALL | Saker's EBRs Photos Updated 05-21-16| Saker's Previous 2013 FJ TT/SE
|
|
|
Reply With Quote
|
|
03-22-2016, 10:42 PM
|
#66
|
|
Senior Member
|
|
Join Date: May 2009
Location: SF Bay Area, CA
Posts: 1,345
|
|
|
Senior Member
Join Date: May 2009
Location: SF Bay Area, CA
Posts: 1,345
|
Electrical/Solar Setup
I've been lagging pretty bad on updating this with some recent additions on account of getting this all ready quickly between work and a big camping trip that we took. I just finished up a big electrical project to keep up with my solar setup, fridge, and just to keep things clean for upcoming electrical mods.
First, I purchased a new Odyssey Group 31M to replace my regular starting battery. I opted to go with a single battery setup vs. a dual battery setup specifically to keep things simple. I also plan on supplementing this with a solar panel to keep juice flowing to the Indel-B fridge I just picked up.
Odyssey Group 31 Battery Install (in factory tray)
I started out by disconnecting the factory battery cables and removing the OEM battery

Since the new Odyssey is a bit larger, I needed to trim a portion from the OEM battery tray

Muscle the new Odyssey in- looks a little like this

Needed to purchase some Mil-Spec terminals and mated them to the factory terminals. Buttoned everything up.

DISCLAIMER:
When performing this mod, it is important to note that the OEM alternator is not rated high enough to charge the Odyssey to 100% charge. Battery lifespan may suffer if you do not fully charge the Odyssey on a Battery Tender or something similar every so often.
__________________
IG @go.xplre
|
|
|
Reply With Quote
|
|
03-22-2016, 10:48 PM
|
#67
|
 |
Senior Member
|
|
Join Date: Nov 2009
Location: Beacon NY
Posts: 3,678
Real Name: Patrick
|
|
|
Senior Member
Join Date: Nov 2009
Location: Beacon NY
Posts: 3,678
Real Name: Patrick
|
Quote:
Originally Posted by weeeee
Electrical/Solar Setup
I've been lagging pretty bad on updating this with some recent additions on account of getting this all ready quickly between work and a big camping trip that we took. I just finished up a big electrical project to keep up with my solar setup, fridge, and just to keep things clean for upcoming electrical mods.
First, I purchased a new Odyssey Group 31M to replace my regular starting battery. I opted to go with a single battery setup vs. a dual battery setup specifically to keep things simple. I also plan on supplementing this with a solar panel to keep juice flowing to the Indel-B fridge I just picked up.
Odyssey Group 31 Battery Install (in factory tray)
I started out by disconnecting the factory battery cables and removing the OEM battery
Since the new Odyssey is a bit larger, I needed to trim a portion from the OEM battery tray
Muscle the new Odyssey in- looks a little like this
Needed to purchase some Mil-Spec terminals and mated them to the factory terminals. Buttoned everything up.
DISCLAIMER:
When performing this mod, it is important to note that the OEM alternator is not rated high enough to charge the Odyssey to 100% charge. Battery lifespan may suffer if you do not fully charge the Odyssey on a Battery Tender or something similar every so often.
|
I recommend installing a NoCo 10 amp charger under the hood...pretty cheap, does a great job..
NOCO Genius GEN1 10 Amp 1-Bank Waterproof Smart On-Board Battery Charger https://www.amazon.com/dp/B003JSHQW0..._CoG8wbFM1F45H
__________________
White 2016 TEP .....My ROAM Truck Build....... My ROAM trailer Build |
|
|
Reply With Quote
|
|
03-22-2016, 10:49 PM
|
#68
|
|
Senior Member
|
|
Join Date: May 2009
Location: SF Bay Area, CA
Posts: 1,345
|
|
|
Senior Member
Join Date: May 2009
Location: SF Bay Area, CA
Posts: 1,345
|
Electrical/Solar Setup (continued)
Bussman Fuse Box install
I opted to go with a Bussman Fuse Box setup instead of a Blue Sea fusebox because of the weather sealing and the additional relays. I ordered a pre-made kit from Tacomapros, complete with a Bussman 90A relay, switchbacks (to make wiring in the OTRATTW switches a little easier), and an aluminum plate to hold it all down.
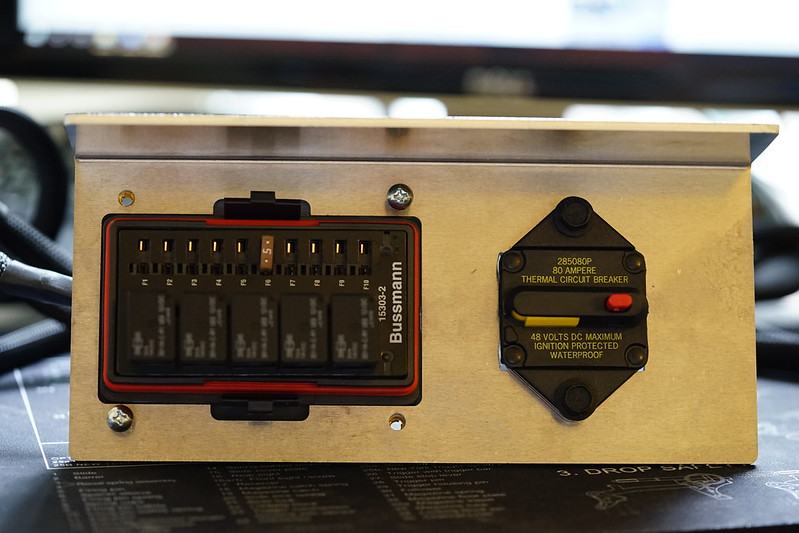

Mounting it all up and drilling holes

Running the cabin harness (which contains the switchback harness to the OTRATTW switches) through the main harness firewall pass-through

Back side of the main harness pass-through- this is where it exits into the interior

Tie it all back into the mil-spec battery terminals on the Odyssey and you're done!

Plugged into the OTRATTW switches

__________________
IG @go.xplre
Last edited by weeeee; 03-22-2016 at 11:58 PM.
|
|
|
Reply With Quote
|
|
03-22-2016, 10:50 PM
|
#69
|
|
Senior Member
|
|
Join Date: May 2009
Location: SF Bay Area, CA
Posts: 1,345
|
|
|
Senior Member
Join Date: May 2009
Location: SF Bay Area, CA
Posts: 1,345
|
Electrical/Solar Setup (continued)
National Luna Battery Monitor
Since I have everything running off a single battery, I wanted to make sure that I wasn't left stranded should my battery drop below starting voltage. Even though the Indel-B fridges come with a settable low voltage cutoff, this was just some added insurance to prevent coming back to a dead battery. The National Luna Single Battery Monitor comes with a low voltage alarm and a voltmeter that shows battery charge.
I decided to mount this in the panel next to the factory jack in the trunk.


 Adventure Trailers Solar Plug
Also, in preparation for my solar setup, I sourced a solar plug from Adventure Trailers to tie in to the Odyssey battery. Since the panel I'm running has a solar charge controller mounted directly to the panel itself, I can plug it straight into the AT Solar Plug. Also, since it has SAE connectors, I can use it to plug a Battery Tender directly to the battery. I mounted this in the plastic trim on the drivers side windshield.
Started by drilling a hole in the panel

Squeezed some marine sealant on it for added waterproofing

Stainless self tapping hardware

Mounted


When needed, I can simply plug in the solar panel to the AT Solar Plug


__________________
IG @go.xplre
Last edited by weeeee; 03-23-2016 at 11:08 AM.
|
|
|
Reply With Quote
|
|
03-22-2016, 11:54 PM
|
#70
|
 |
Senior Member
|
|
Join Date: Aug 2015
Location: Central Oregon
Posts: 1,641
Real Name: Max
|
|
|
Senior Member
Join Date: Aug 2015
Location: Central Oregon
Posts: 1,641
Real Name: Max
|
Looking good Victor! Glad to see things out of boxes and on your rig 
|
|
|
Reply With Quote
|
|
03-23-2016, 01:07 AM
|
#71
|
|
Senior Member
|
|
Join Date: May 2009
Location: SF Bay Area, CA
Posts: 1,345
|
|
|
Senior Member
Join Date: May 2009
Location: SF Bay Area, CA
Posts: 1,345
|
Quote:
Originally Posted by Titanpat57
|
Thanks for the link- that looks a lot slimmer than the Battery Tender. I might have to try it out.
Quote:
Originally Posted by MTN4RNR
Looking good Victor! Glad to see things out of boxes and on your rig |
Yep, it feels good to finally get everything on the rig. See you around!
__________________
IG @go.xplre
|
|
|
Reply With Quote
|
|
03-23-2016, 01:12 AM
|
#72
|
|
Senior Member
|
|
Join Date: May 2009
Location: SF Bay Area, CA
Posts: 1,345
|
|
|
Senior Member
Join Date: May 2009
Location: SF Bay Area, CA
Posts: 1,345
|
__________________
IG @go.xplre
|
|
|
Reply With Quote
|
|
03-23-2016, 01:55 AM
|
#73
|
|
Senior Member
|
|
Join Date: Aug 2015
Location: Central Oregon
Posts: 1,641
Real Name: Max
|
|
|
Senior Member
Join Date: Aug 2015
Location: Central Oregon
Posts: 1,641
Real Name: Max
|
Quote:
Originally Posted by weeeee
No Loss Valve Stem Caps
Ended up installing the easiest mod ever. If you air up/down frequently or hit the trails, these things are genius.
|
Source? These are gold!
|
|
|
Reply With Quote
|
|
03-23-2016, 02:05 AM
|
#74
|
|
Senior Member
|
|
Join Date: May 2009
Location: SF Bay Area, CA
Posts: 1,345
|
|
|
Senior Member
Join Date: May 2009
Location: SF Bay Area, CA
Posts: 1,345
|
Quote:
Originally Posted by MTN4RNR
Source? These are gold!
|
NoLoss Valve Caps - Sierra Expeditions
Make sure you get the plastic ones for TPMS. Shipping is a little unreasonable if you buy them without anything else but you can try giving them a ring and asking for different shipping method. I ended up buying some other stuff through them so the shipping cost wasn't bad.
__________________
IG @go.xplre
|
|
|
Reply With Quote
|
|
03-23-2016, 07:53 AM
|
#75
|
|
Junior Member
|
|
Join Date: Nov 2011
Location: Virginia Beach, VA
Posts: 27
|
|
|
Junior Member
Join Date: Nov 2011
Location: Virginia Beach, VA
Posts: 27
|
Sub'd
__________________
2014 Nautical Blue Trail Premium with KDSS. REVTEC 3/2 lift, blue LED strip in footwell, interior LED's.
|
|
|
Reply With Quote
|
 Posting Rules
|
You may not post new threads
You may not post replies
You may not post attachments
You may not edit your posts
HTML code is On
|
|
|
|


 Linear Mode


