 08-25-2012, 11:47 AM
|
#1
|
|
Member
|
|
Join Date: Jan 2012
Location: Salem, Ma
Posts: 153
|
|
|
Member
Join Date: Jan 2012
Location: Salem, Ma
Posts: 153
|
EMERGENCY Lift Help
So I was going to install the easy Daystar lift. They are just the spacer that sit on top of the springs / coils.
I was following the directions and now find myself in possibly a world of trouble.
Where I am now:
The swaybar is disconnected on both sides where it attaches to the spindle.
Most of the brake lines holder brackets are disconnected on the driver side.
The 3 nuts are all off the top of the spring are off on the driver side.
The bottom shock nut and bolt is off on the driver side.
The upper balljoint that connects the upper control arm to the spindle just came undone on the driver side.
When the balljoint first let go, there was nothing underneath the spindle - so it kind of fell, I held it long enough to get a jack underneath the brake disc.
So that's where I am.
The bottom of the shock is sitting outside of it's perch, the top of the shock is down, but still in the tower and the whole thing is stuck.
I'm afraid of letting the jack down because I don't know if the cv joint will just pull out or what? Also it seems like there is a LOT of tension on the brake lines so I don't know if it would even come down any further were the jack not there. I turned the whole thing back so that there is as little as possible - but there is still a lot.
Will the CV Joint just pull out if I let it down? I don't want to have to deal with that or a ripped boot. I can't get the shock to go back up in the perch and abort the whole thing and I cant get it out to put the spacer on. WTF.
HELP!!! What do I do?!
|

|
 Reply With Quote Reply With Quote
|
|
08-25-2012, 11:55 AM
|
#2
|
|
Member
|
|
Join Date: Mar 2011
Location: Austin, TX
Posts: 283
|
|
|
Member
Join Date: Mar 2011
Location: Austin, TX
Posts: 283
|
If I understand correctly, you need to get the shock out. At the same time you're concerned because the brake line is pulled tight.
Follow the brake line up and disconnect the first bolt that holds the brake line to the frame. This will give you even more slack and will make you feel better. I honestly believe it's not possible to tear the front brake line while working on the front suspension, even if you let the control arms droop completely.
You might be thinking the cable on top of the upper control arm is the brake line, but that's actually the ABS wire. You CAN tear that if there's too much tension. Disconnecting it from the upper control arm and pulling it toward the rear of the vehicle should give you plenty of room to work in.
In order to get the shock out, you'll need the lower control arm as low as it can go - that means removing the jack. If the front shock is fully disconnected, and it sounds like it is, just give it a good whack from behind/angle with a rubber mallet. It's probably seated pretty well in there. You can yank it out too, but it's easier if you unbind it first with the rubber mallet. You'll need to get the lower part unseated, then it will slide down and away from the vehicle.
There are lots of pictures on this forum too to help. I frequently paused during my lift install(s) and consulted images/help.
__________________
2011 4Runner Limited Blizzard Pearl, Trail Edition body conversion, IBS dual battery
Shrockworks bumper, Warn M8000 w/ AmSteel Blue orange line and Viking safety thimble
Icon ext. travel remote reservoir w/ 700lb Eibach, Total Chaos UCA
Konig Countersteer Type X, Cooper STT 285/70/17
Shrockworks stainless steel skids, MetalTech OPOR sliders, Gobi rack & ladder
|
|
|
Reply With Quote
|
|
08-25-2012, 06:06 PM
|
#3
|
|
Member
|
|
Join Date: Jan 2012
Location: Salem, Ma
Posts: 153
|
|
|
Member
Join Date: Jan 2012
Location: Salem, Ma
Posts: 153
|
Well, 6.5 hours later it's done. The rear - the rear is a piece of cake. It took me a 30-45 minutes to do the entire rear - from the time I loosened the first lug nut to the time I tightened the last one down. I followed the directions.
For the front. Woah. It's a serious pain. I removed the upper ball joint to do mine. It should be noted that I started by disconnecting the lower control arm from the spindle - but I couldn't get enough clearance, so I bolted that back up and went to the ball joint.
For the life of me I could not get the coil out past around the disconnected sway bar. I ended up pulling the skid and the sway bar completely out from underneath the truck. After that, it came out easy enough, but re-installation was tough.
The top went right in, but the bottom wouldn't get in the seat. I ended up pushing down on the spindle as hard as I could any my girlfriend pushed up and in and was able to get it reseated.
Now would be a good time to mention, I have the best girlfriend in the world. She is 90lbs of Asian and has been able to handle anything I've ever thrown at her.
Once it was reseated, it was a piece of cake. I'll get some photos up tomorrow. Anyone who manages to do this lift by themselves, you're a better man than I, oh masterful legendary mechanics of old.
That being said, if you're going to do a lift, you should definitely do it yourself. I've done a dozen on Jeep Cherokees (my old vehicle of choice) but it was a learning experience even for me - a valuable one.
|
|
|
Reply With Quote
|
|
08-25-2012, 07:31 PM
|
#4
|
|
Senior Member
|
|
Join Date: Jan 2010
Location: Central FL
Posts: 1,325
|
|
|
Senior Member
Join Date: Jan 2010
Location: Central FL
Posts: 1,325
|
Kudos to you. Braver man than I. If I got caught in your situation, I would be calling a tow truck to my nearest 4wd shop. Good job. Be safe.
__________________
2010 Salsa Red SR5, Black Power Leather Seats, Sliding Rear Cargo Deck, Luggage Rack Cross Bars, Black Pin Stripes, Black Body Side Moldings, Front and Rear 120v outlets, Husky Floor and Cargo Mats, Wade Window Vents, Autovent Shade Bug deflector II, Modified Trailer Electrical Connection, Rear View Camera, Michelin LTX M/S2 285/70/17, Load Range D, OEM Hood Insulator. Blacked out front emblem, front, rear and side chrome strips, Blacked out and modified rear emblem, luggage rack and black OEM door handles.
|
|
|
Reply With Quote
|
|
08-25-2012, 09:19 PM
|
#5
|
 |
Senior Member
|
|
Join Date: Oct 2011
Location: Atlanta, Georgia
Posts: 1,757
Real Name: Allen
|
|
|
Senior Member
Join Date: Oct 2011
Location: Atlanta, Georgia
Posts: 1,757
Real Name: Allen
|
Quote:
Originally Posted by jnance50

Well, 6.5 hours later it's done. The rear - the rear is a piece of cake. It took me a 30-45 minutes to do the entire rear - from the time I loosened the first lug nut to the time I tightened the last one down. I followed the directions.
For the front. Woah. It's a serious pain. I removed the upper ball joint to do mine. It should be noted that I started by disconnecting the lower control arm from the spindle - but I couldn't get enough clearance, so I bolted that back up and went to the ball joint.
For the life of me I could not get the coil out past around the disconnected sway bar. I ended up pulling the skid and the sway bar completely out from underneath the truck. After that, it came out easy enough, but re-installation was tough.
The top went right in, but the bottom wouldn't get in the seat. I ended up pushing down on the spindle as hard as I could any my girlfriend pushed up and in and was able to get it reseated.
Now would be a good time to mention, I have the best girlfriend in the world. She is 90lbs of Asian and has been able to handle anything I've ever thrown at her.
Once it was reseated, it was a piece of cake. I'll get some photos up tomorrow. Anyone who manages to do this lift by themselves, you're a better man than I, oh masterful legendary mechanics of old.
That being said, if you're going to do a lift, you should definitely do it yourself. I've done a dozen on Jeep Cherokees (my old vehicle of choice) but it was a learning experience even for me - a valuable one.
|
You throw things at your girlfriend?!   
__________________
2003 Toyota 4Runner SR5 iForce 4.7L V8 2WD Natural White With Plastic Bumper Cladding, Everything Completely Stock.
Owned since 10/3/11
90,000 Miles and counting!

|
|
|
Reply With Quote
|
|
08-25-2012, 11:46 PM
|
#6
|
 |
Senior Member
|
|
Join Date: Jan 2012
Location: Fruita, CO
Age: 43
Posts: 3,984
|
|
|
Senior Member
Join Date: Jan 2012
Location: Fruita, CO
Age: 43
Posts: 3,984
|

The correct tools make almost any job easy. Spring compressor + air ratchet = 
Last edited by Jeremy556; 08-25-2012 at 11:51 PM.
|
|
|
Reply With Quote
|
|
08-26-2012, 01:29 AM
|
#7
|
 |
Senior Member
|
|
Join Date: May 2011
Location: Canton, Georgia
Posts: 1,170
Real Name: Spencer
|
|
|
Senior Member
Join Date: May 2011
Location: Canton, Georgia
Posts: 1,170
Real Name: Spencer
|
Quote:
Originally Posted by Jeremy556
The correct tools make almost any job easy. Spring compressor + air ratchet = |
Exactly how I did my spacer lift! Also used one of my cousins Jeep to lift it.
__________________
2011 TE
|
|
|
Reply With Quote
|
|
08-26-2012, 03:42 AM
|
#8
|
 |
Senior Member
|
|
Join Date: Apr 2007
Location: Boulder, CO
Posts: 1,201
|
|
|
Senior Member
Join Date: Apr 2007
Location: Boulder, CO
Posts: 1,201
|
Quote:
Originally Posted by jnance50
Now would be a good time to mention, I have the best girlfriend in the world. She is 90lbs of Asian and has been able to handle anything I've ever thrown at her.
|
Sounds like you need to take her out for an extra special dinner!!!
__________________
This space for rent.
|
|
|
Reply With Quote
|
|
08-26-2012, 08:28 AM
|
#9
|
|
Member
|
|
Join Date: Jan 2012
Location: Salem, Ma
Posts: 153
|
|
|
Member
Join Date: Jan 2012
Location: Salem, Ma
Posts: 153
|
Actually, this wouldn't have helped me any - I do own a pair of coil compressors. The rear are the plain coils like this and they came out super easy without them.
The front are struts, and the lift I did are the spacers that sit on top - not preload spacers - so I never disassembled them. Even if I'd compressed the coil on the strut, I'd still have been left with the problem of getting the shock on the inside of the coil out.
Quote:
Originally Posted by Jeremy556
The correct tools make almost any job easy. Spring compressor + air ratchet = |
|
|
|
Reply With Quote
|
|
08-26-2012, 04:15 PM
|
#10
|
|
Member
|
|
Join Date: Jul 2012
Location: Atlanta
Posts: 51
|
|
|
Member
Join Date: Jul 2012
Location: Atlanta
Posts: 51
|
I'm DYING here
I just spent 6 hours in the blazing sun this morning working on getting this daystar 2.5/1.5 done. After 6 hours I have NOTHING to show for it other than being able to pull the front apart a lot faster now. I took everything apart, wiggled the strut out of its perch, and installed the front daystar spacer. I CANNOT FIGURE OUT HOW TO GET IT BACK IN THE TOWER WITHOUT RIPPING EITHER THE XREAS OR THE BRAKE LINE ON THE LEFT. I have spent another few hours trying to figure it our and searching here and in toyo120 but I still cannot figure it out. I eventually put everything back together and just left frustrated. How the heck do I get the strut back in the perch after adding the spacer on top? I even rented coil compressors despite the fact that supposedly you don't need them for this, and I still couldnt make it work. Maybe I didnt compress the srpings enough? That being said, I shouldnt have to use them in the first place, its just a topput spacer!
I am at a loss, but I still refuse to pay 4 Wheel Parts $380 to do this. ANY SUGGESTIONS?
If you live in Atlanta and want to show me how to do this, I would be willing to pay you AND provide the beer.
__________________
2010 Limited / FN BFD 18x9 / Cooper ATP 265/70/18 / Daystar 2.5/1.5 / Rhino Lined Cargo Area / WeatherTech Digital / Various Plasti-Dipped Parts / More Ideas than Finances
I really enjoy this truck and this board, so thanks to everyone who contributes. I would not be able to do many of these things without T4R.org knowledge and help.
Last edited by TThompson; 08-26-2012 at 05:28 PM.
|
|
|
Reply With Quote
|
|
08-26-2012, 08:35 PM
|
#11
|
|
Member
|
|
Join Date: Jan 2012
Location: Salem, Ma
Posts: 153
|
|
|
Member
Join Date: Jan 2012
Location: Salem, Ma
Posts: 153
|
Hahaha I know the feeling. If I still lived in AL I would come give you a hand. I'll PM you my number, give me a call when you go to do it and I can at least coach you through parts. This sounds ALOT harder than it actually is once you know what you're doing.
However, I will say that this is a Trail - I did not need to deal with XREAS.
After much trial and error, this is what I did and got it to work. Note that I did steps 1 through 4 on both sides at the same time - then went to steps 6 up on one side, then the other. Coil compressors not needed.
1. Disconnect the swaybar where it hooks into knuckle - 17mm.
2. Disconnect the 4 hose/wire attachment brackets. Just follow starting on the knuckle just behind the brake and go up. They're all 10mm - 12mm, the last one and most important is way up on top of the upper control arm, nearly on the frame.
3. Remove the lower strut nut / bolt /washer - 19mm. The nut is easy to get off, use a small punch and a mallet and lightly tap the bolt out.
4. Remove the 3 or 4 14mm top nuts on the strut. Not the center larger one, and be aware there is one around back - a ratcheting wrench is almost necessary.
5. I removed my entire sway bar from the truck. If you decide to do this, it dramatically increases clearance and is easy to do. If you decide, remove the plastic cover attached to the bumper to the skid plate. They're 3 or 4 either 10 or 12 mm with a pop rivet in the center. Then remove the skid - again 4 14 or 17mm. Under that there are two radiator / bumper supports 4 14 or 17mm bolts. Once that's off, it's just 4 14mm bolts holding it to the frame. This sounds like a lot, but it takes less that 10-15 minutes and makes your life much easier.
6. Remove the upper ball joint by releasing the clipping pin on the castle nut with a screw driver and remove the castle nut - 19mm. There is a flat spot on the spindle right above the nut was, on the side not the top. Whack that with a mallet 5-10 times and the spindle will drop from the ball joint- you won't that that it will, but it will.
7. Once that was off, I was able to hold the spindle upright and press straight down on the control arm and the entire strut came right out. To get it back in, seat the top and it's bolts first (you should be able to lightly put on 3 nuts) and then you need another set of hands. One of you lift the spindle up and press straight down on the control arm with it while the other person pushes the strut up and into the lower seat.
Quote:
Originally Posted by TThompson
I just spent 6 hours in the blazing sun this morning working on getting this daystar 2.5/1.5 done. After 6 hours I have NOTHING to show for it other than being able to pull the front apart a lot faster now. I took everything apart, wiggled the strut out of its perch, and installed the front daystar spacer. I CANNOT FIGURE OUT HOW TO GET IT BACK IN THE TOWER WITHOUT RIPPING EITHER THE XREAS OR THE BRAKE LINE ON THE LEFT. I have spent another few hours trying to figure it our and searching here and in toyo120 but I still cannot figure it out. I eventually put everything back together and just left frustrated. How the heck do I get the strut back in the perch after adding the spacer on top? I even rented coil compressors despite the fact that supposedly you don't need them for this, and I still couldnt make it work. Maybe I didnt compress the srpings enough? That being said, I shouldnt have to use them in the first place, its just a topput spacer!
I am at a loss, but I still refuse to pay 4 Wheel Parts $380 to do this. ANY SUGGESTIONS?
If you live in Atlanta and want to show me how to do this, I would be willing to pay you AND provide the beer.
|
Last edited by jnance50; 08-26-2012 at 08:45 PM.
|
|
|
Reply With Quote
|
|
08-26-2012, 09:40 PM
|
#12
|
|
Member
|
|
Join Date: Jul 2012
Location: Atlanta
Posts: 51
|
|
|
Member
Join Date: Jul 2012
Location: Atlanta
Posts: 51
|
I went all the way to step 7 without any problems. It might be thr XREAS lines, but I just don't have enough room to seat the bottom of the strut once I have the top seated. I can't push down on the lower A arm enough bc of the lines. I took off the bolts that hold the lines in place to give some extra slack and even bent the hard lines a bit but still no luck. Once I get the top seated with the spacer and the extended bolts I just cannot figure out how to get the bottom of the strut to sit back in its perch. I will say that I didn't remove the sway bar, just disconnected it. But that doesn't seem to be the problem I was having anyway. Perhaps next time I will attempt to remove that as well?
__________________
2010 Limited / FN BFD 18x9 / Cooper ATP 265/70/18 / Daystar 2.5/1.5 / Rhino Lined Cargo Area / WeatherTech Digital / Various Plasti-Dipped Parts / More Ideas than Finances
I really enjoy this truck and this board, so thanks to everyone who contributes. I would not be able to do many of these things without T4R.org knowledge and help.
|
|
|
Reply With Quote
|
|
08-26-2012, 10:07 PM
|
#13
|
|
Member
|
|
Join Date: Jan 2012
Location: Salem, Ma
Posts: 153
|
|
|
Member
Join Date: Jan 2012
Location: Salem, Ma
Posts: 153
|
It made it much easier on mine, not having to work around it.
Also, make sure you're inserting it from the front of the truck, not the rear.
When you go to put it in place, put the bottom of the strut between the control arm and tie rod, then lift the top straight up into the coil seat and put the bolts through the holes at the top. Put your top nuts on finger tight and the bottom of your strut should be resting right in front of it's coil seat.
At that point, lift the knuckle up where it would normally be oriented were it attached to the ball joint and press straight down on it HARD to push the lower control arm down JUST ENOUGH that someone can shove the bottom of the strut into its perch.
Make SURE that you've got the uppermost line retainer undone. It's ontop of the upper control arm, way up there, nearly on the frame. This last bolt holds a lot of tension on the line.
Also, wait or Google XREAS lift installs (4th gen is VERY similar to our suspension setup) and maybe there is something special for you.
|
|
|
Reply With Quote
|
|
08-26-2012, 10:21 PM
|
#14
|
|
Member
|
|
Join Date: Jan 2012
Location: Salem, Ma
Posts: 153
|
|
|
Member
Join Date: Jan 2012
Location: Salem, Ma
Posts: 153
|
Found this for you:
OME Install - no spring compressor - Toyota 120 Platforms Forum
With this method, all the lines stay in place on the knuckle, they won't stretch at all - you're unbolting the lower control arm from the knuckle INSTEAD of the upper control arm ball joint - there should be no lines limiting you then.
Note that for our lift skip taking off the top nut, washer, and rubber bushing of the strut - that is for a compression lift. You only want to remove the 3 or 4 14mm bolts from the top.
You WILL still need a separate set of hands to press down on the lower control arm, but at least this keeps you from limiting yourself because of the lines.
|
|
|
Reply With Quote
|
|
08-27-2012, 06:15 PM
|
#15
|
|
Member
|
|
Join Date: Jan 2012
Location: Salem, Ma
Posts: 153
|
|
|
Member
Join Date: Jan 2012
Location: Salem, Ma
Posts: 153
|
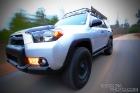
A little inspiration, here's mine done:


|
|
|
Reply With Quote
|
 Posting Rules
|
You may not post new threads
You may not post replies
You may not post attachments
You may not edit your posts
HTML code is On
|
|
|
|


 Linear Mode


