 06-08-2013, 07:13 PM
|
#1
|
|
Junior Member
|
|
Join Date: Oct 2010
Location: Boise, ID
Posts: 17
|
|
|
Junior Member
Join Date: Oct 2010
Location: Boise, ID
Posts: 17
|
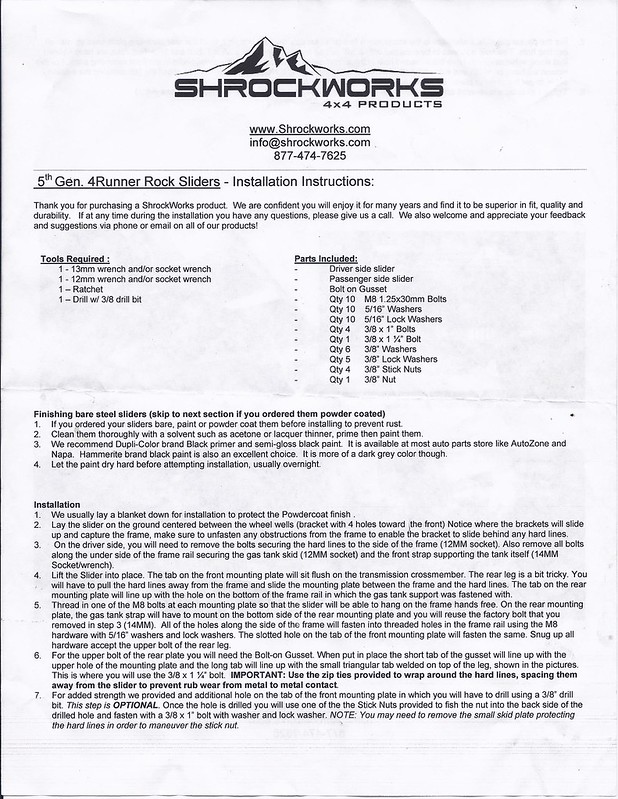
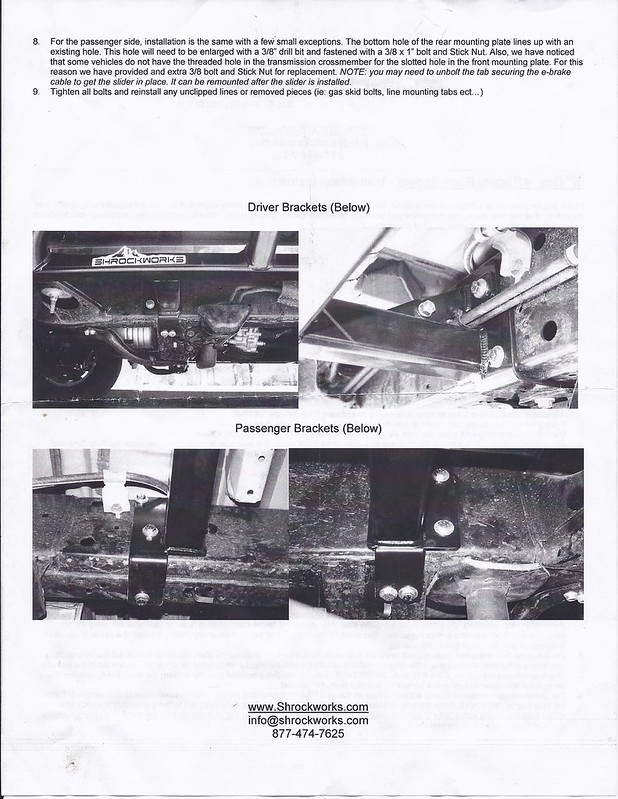
Shrockworks rock slider install instructions
After ordering in January my sliders finally arrived. I opened them this afternoon and they look great; can't wait to get them on. Unfortunately there are no instructions whatsoever. Does anyone have instructions they could post/fwd? I've searched the threads and noted where people have gotten hung up, but would still like to get the overview on this bag of parts before getting started. I also checked my email, and nothing from Shrockworks there.
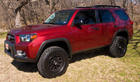
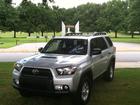
I'm mounting on a 2011 Trail Edition.
Thanks!
|

|
 Reply With Quote Reply With Quote
|
|
06-08-2013, 08:21 PM
|
#2
|
|
Senior Member
|
|
Join Date: Aug 2010
Location: Carmel, IN
Posts: 2,765
|
|
|
Senior Member
Join Date: Aug 2010
Location: Carmel, IN
Posts: 2,765
|
Not a whole lot of complexity in installing them. Make sure you secure the bottom bolts first to make sure the slider sits snug to the frame.
Check my build thread and I'll check for the SW instructions when I get home.
Okki
__________________
Okki's Build Thread - 2010 Limited: Shrockworks Rock Rails & Full Skids, Gobi Rack, OPT7 LED Roof LIGHT Bar, Rigid E-Series Bumper Light Bar, Hella Horns, Auxiliary Fuse Box, Cobra ST75, TRD Rims, Discoverer ATP LT265/70R17, Rotopax, ARB Twin Compressor, Cargo Area Pressure Gauge and Chuck, Icon billet trailing- and A-arms, Dobinsons Shocks/Coils, Fumuto Oil Valve, Northstar Group 31M, CBI Front & Rear Bumpers !!!
========================================
 Any time...Anywhere.. My cat can take you.
|
|
|
Reply With Quote
|
|
06-08-2013, 09:01 PM
|
#3
|
 |
Member
|
|
Join Date: Mar 2012
Location: Dallas (Carrollton), TX
Posts: 459
Real Name: Rick
|
|
|
Member
Join Date: Mar 2012
Location: Dallas (Carrollton), TX
Posts: 459
Real Name: Rick
|
I have a '12 Trail and just installed mine. The instructions aren't that complicated. The mounts with 4 holes got toward the front. On the driver side you'll need to pull the 4 bolts holding the fuel tank skid and then pull the the one bolt holding the front fuel tank strap. The fuel tank will then droop, so a jack is helpful to hold it up. The slider mount goes between the frame and the fuel tank strap and you'll re-use the bolt. The passenger side is pretty straight forward. I did have to drill one hole on the front passenger side.
I had to use most of the stick nuts since most of the holes didn't have threaded inserts. My TE doesn't have KDSS so I don't know if there are any differences. Fell free to PM me with questions and I an talk you through it. It took my son and I about an hour to install.
__________________
2012 Trail Edition, Salsa Red, MetalTech (Icon) Long Travel Rear, Panhard Relocation Bracket, Radflo 2.5" Extended Travel Front, LR UCA's, 17x9 XD wheels, Cooper S/T Maxx 285/75-17's (34"), 4.56 Gears, Wet Okoles, Weather Tech FLoor Covers, Canvasback Cargo Covers, Shrockworks Sliders, BudBuilt Hidden Winch w/ Warn 9.5ti, On-Board Air (using sliders as air tanks), Rigid D2's, RCI Skids, Body Mount Chop, Console Vault.
|
|
|
Reply With Quote
|
|
06-08-2013, 09:34 PM
|
#4
|
|
Junior Member
|
|
Join Date: Oct 2010
Location: Boise, ID
Posts: 17
|
|
|
Junior Member
Join Date: Oct 2010
Location: Boise, ID
Posts: 17
|
Thanks guys for the quick reply. That's really the high level I was looking for. Will let you know how it goes tomorrow!
|
|
|
Reply With Quote
|
|
06-08-2013, 10:10 PM
|
#5
|
 |
Senior Member
|
|
Join Date: May 2004
Location: KC
Posts: 3,225
|
|
|
Senior Member
Join Date: May 2004
Location: KC
Posts: 3,225
|
There are instructions. Open second brown envelope ( the one that looks new and empty).

Last edited by <<<<; 06-08-2013 at 10:12 PM.
|
|
|
Reply With Quote
|
|
06-08-2013, 11:07 PM
|
#6
|
|
Member
|
|
Join Date: Apr 2011
Location: SF
Posts: 100
|
|
|
Member
Join Date: Apr 2011
Location: SF
Posts: 100
|
Not sure if they've "fixed" the sticknuts, but this thread might help a little. Never mind the title, I couldn't update it:
Shrockworks install fail: 2011 TE
|
|
|
Reply With Quote
|
|
06-09-2013, 03:37 PM
|
#7
|
|
Senior Member
|
|
Join Date: Aug 2010
Location: Carmel, IN
Posts: 2,765
|
|
|
Senior Member
Join Date: Aug 2010
Location: Carmel, IN
Posts: 2,765
|
Quote:
Originally Posted by coletrain09

After ordering in January my sliders finally arrived. I opened them this afternoon and they look great; can't wait to get them on. Unfortunately there are no instructions whatsoever. Does anyone have instructions they could post/fwd? I've searched the threads and noted where people have gotten hung up, but would still like to get the overview on this bag of parts before getting started. I also checked my email, and nothing from Shrockworks there.
I'm mounting on a 2011 Trail Edition.
Thanks!
|
And here are the instructions as promised:
Okki
__________________
Okki's Build Thread - 2010 Limited: Shrockworks Rock Rails & Full Skids, Gobi Rack, OPT7 LED Roof LIGHT Bar, Rigid E-Series Bumper Light Bar, Hella Horns, Auxiliary Fuse Box, Cobra ST75, TRD Rims, Discoverer ATP LT265/70R17, Rotopax, ARB Twin Compressor, Cargo Area Pressure Gauge and Chuck, Icon billet trailing- and A-arms, Dobinsons Shocks/Coils, Fumuto Oil Valve, Northstar Group 31M, CBI Front & Rear Bumpers !!!
========================================
Any time...Anywhere.. My cat can take you.
|
|
|
Reply With Quote
|
|
06-15-2013, 10:37 AM
|
#8
|
|
Junior Member
|
|
Join Date: Oct 2010
Location: Boise, ID
Posts: 17
|
|
|
Junior Member
Join Date: Oct 2010
Location: Boise, ID
Posts: 17
|
I installed the DS last night. On the DS front bottom bracket the angle did not match up to the frame. There's ~ 0.5 in gap between the bracket and the threaded hole in the frame. Has anyone else experienced this? Would I be fine to leave this un-attached?
|
|
|
Reply With Quote
|
|
06-15-2013, 12:57 PM
|
#9
|
|
Member
|
|
Join Date: Mar 2012
Location: Dallas (Carrollton), TX
Posts: 459
Real Name: Rick
|
|
|
Member
Join Date: Mar 2012
Location: Dallas (Carrollton), TX
Posts: 459
Real Name: Rick
|
I had the same issue, but on the passenger side. Once you get the bolt in there it will pull up flush as you tighten it down. I had to get buy a bolt 1/4" longer to reach the threads. I don't recommend leaving it un-attached. That's one of the points that will be holding the weight of the vehicle if you drop it on the rocks.
__________________
2012 Trail Edition, Salsa Red, MetalTech (Icon) Long Travel Rear, Panhard Relocation Bracket, Radflo 2.5" Extended Travel Front, LR UCA's, 17x9 XD wheels, Cooper S/T Maxx 285/75-17's (34"), 4.56 Gears, Wet Okoles, Weather Tech FLoor Covers, Canvasback Cargo Covers, Shrockworks Sliders, BudBuilt Hidden Winch w/ Warn 9.5ti, On-Board Air (using sliders as air tanks), Rigid D2's, RCI Skids, Body Mount Chop, Console Vault.
|
|
|
Reply With Quote
|
|
06-15-2013, 04:23 PM
|
#10
|
 |
Junior Member
|
|
Join Date: Apr 2013
Location: Fort Richardon Alaska
Posts: 10
Real Name: Lyle Effio
|
|
|
Junior Member
Join Date: Apr 2013
Location: Fort Richardon Alaska
Posts: 10
Real Name: Lyle Effio
|
got mine shipped to me in UTAH on my way to Alaska
was an easy install, all was simple until I found out I put in the long bolt in the passenger side and needed it for the gas tank. Crap had to go through each bolt to find out which one it was and of course it was the last one I looked at. Might as well done the install twice but was great practice and not once was I mad since I was so happy to get these bad boys on.
|
|
|
Reply With Quote
|
|
06-15-2013, 05:15 PM
|
#11
|
 |
Senior Member
|
|
Join Date: Aug 2011
Location: Colorado Springs
Age: 68
Posts: 1,260
Real Name: Bill
|
|
|
Senior Member
Join Date: Aug 2011
Location: Colorado Springs
Age: 68
Posts: 1,260
Real Name: Bill
|
Shrockworks changed the design from the 4th Gen. The 4th Gens have a bolt at the top of the bracket that goes across the frame. It is a very tight fit.
There is a clearance issue on those too. Where the front bracket goes the bottom of the frame has a lot of over weld on it. This causes the bracket to not clear the top of the frame. The fix is to grind down the weld enough to allow the bracket to clear the top of the frame. It does not take much and has no impact on the strength of the frame.
The 5th Gen seem to be a easier install. Wonder if they support the frame enough to lift the vehicle with the slider? You can do that with the 4th gens.
__________________
I pledge allegiance to the flag of the United States of America, and to the republic for which it stands, one nation under God, indivisible, with liberty and justice for all.
|
|
|
Reply With Quote
|
|
06-15-2013, 05:40 PM
|
#12
|
|
Senior Member
|
|
Join Date: Aug 2010
Location: Carmel, IN
Posts: 2,765
|
|
|
Senior Member
Join Date: Aug 2010
Location: Carmel, IN
Posts: 2,765
|
Quote:
Originally Posted by Desert Fox
Shrockworks changed the design from the 4th Gen. The 4th Gens have a bolt at the top of the bracket that goes across the frame. It is a very tight fit.
There is a clearance issue on those too. Where the front bracket goes the bottom of the frame has a lot of over weld on it. This causes the bracket to not clear the top of the frame. The fix is to grind down the weld enough to allow the bracket to clear the top of the frame. It does not take much and has no impact on the strength of the frame.
The 5th Gen seem to be a easier install. Wonder if they support the frame enough to lift the vehicle with the slider? You can do that with the 4th gens.
|
[IMG] [/IMG]
Why yes.. you can lift the truck by the slider.
Okki
__________________
Okki's Build Thread - 2010 Limited: Shrockworks Rock Rails & Full Skids, Gobi Rack, OPT7 LED Roof LIGHT Bar, Rigid E-Series Bumper Light Bar, Hella Horns, Auxiliary Fuse Box, Cobra ST75, TRD Rims, Discoverer ATP LT265/70R17, Rotopax, ARB Twin Compressor, Cargo Area Pressure Gauge and Chuck, Icon billet trailing- and A-arms, Dobinsons Shocks/Coils, Fumuto Oil Valve, Northstar Group 31M, CBI Front & Rear Bumpers !!!
========================================
Any time...Anywhere.. My cat can take you.
|
|
|
Reply With Quote
|
|
06-16-2013, 12:37 AM
|
#13
|
 |
Member
|
|
Join Date: Mar 2012
Location: United States
Posts: 33
|
|
|
Member
Join Date: Mar 2012
Location: United States
Posts: 33
|
Quote:
Originally Posted by trail ranger
...had to go through each bolt to find out which one it was and of course it was the last one I looked at.
|
Haha, I have always wondered where this general expression came from.
Of course it was the last one you checked/last place you thought to look—why would anyone keep looking after finding what they were searching for?
That said, did you mean it ended up being the last possibility? I hate when searches end up that way.
|
|
|
Reply With Quote
|
|
06-16-2013, 04:24 PM
|
#14
|
|
Member
|
|
Join Date: Sep 2012
Location: Pittsburgh PA
Posts: 109
|
|
|
Member
Join Date: Sep 2012
Location: Pittsburgh PA
Posts: 109
|
'Stick nuts' ends up having a double meaning here.....no, not that kind of double meaning. In addition to nut-on-a-stick, there seemed to be a lot of crud on the threads. We found that running a tap through the nut prior to use made making the connections about 75% easier. Clears out the rust and gunk from brazing.
__________________
2013 Gen5 TE Shoreline Blue [relatively stock....a little PlastiDip, 275-70-17, HuskyLiners, AMI Big Stick, Weather Tech side window deflectors, some window tint, and Shrockworks sliders]
1997 Gen3 SR5 White [best vehicle I ever owned]
1987 Gen1 Black 22RE [gateway drug to lifetime T4R addiction]
Seems like I skip generations....looking forward to Gen7
|
|
|
Reply With Quote
|
|
11-23-2014, 04:26 AM
|
#15
|
|
Member
|
|
Join Date: Jul 2014
Location: Oregon
Posts: 121
|
|
|
Member
Join Date: Jul 2014
Location: Oregon
Posts: 121
|
Just got my shockworks slider this week and installed them. Question.. How important is the gusset on the drivers side? (step 6: in the instructions) Do we really need it? I don't have any lines that run through there like the illustrations.
Last edited by Nocturtle; 11-23-2014 at 04:28 AM.
|
|
|
Reply With Quote
|
 Posting Rules
|
You may not post new threads
You may not post replies
You may not post attachments
You may not edit your posts
HTML code is On
|
|
|
|


 Linear Mode


