06-25-2014, 10:00 PM
|
#46
|
 |
Member
|
|
Join Date: Oct 2013
Location: Katy, TX
Posts: 457
Real Name: Kevin
|
|
|
Member
Join Date: Oct 2013
Location: Katy, TX
Posts: 457
Real Name: Kevin
|
Quote:
Originally Posted by FloridaOccifer

Thank you.
I measured around the light and I have decided my next project will be a "faceplate" with cut out that will surround the light and attach to the factory grill. I am going to attempt the same look that RBP has with their grill & LED combo.
I am already hunting for material... stay tuned
|
Or... you could get something like this.....
|

|
 Reply With Quote Reply With Quote
|
|
06-25-2014, 10:33 PM
|
#47
|
 |
Member
|
|
Join Date: Feb 2014
Location: Spring Hill, FL
Age: 51
Posts: 62
|
|
|
Member
Join Date: Feb 2014
Location: Spring Hill, FL
Age: 51
Posts: 62
|
Hmm. No thanks
|
|
|
Reply With Quote
|
|
07-06-2014, 12:30 PM
|
#49
|
|
Member
|
|
Join Date: Feb 2014
Location: Spring Hill, FL
Age: 51
Posts: 62
|
|
|
Member
Join Date: Feb 2014
Location: Spring Hill, FL
Age: 51
Posts: 62
|
|
|
|
Reply With Quote
|
|
07-06-2014, 03:52 PM
|
#50
|
 |
Senior Member
|
|
Join Date: Dec 2013
Location: Near Baton Rouge, LA
Age: 70
Posts: 4,059
|
|
|
Senior Member
Join Date: Dec 2013
Location: Near Baton Rouge, LA
Age: 70
Posts: 4,059
|
Quote:
Originally Posted by FloridaOccifer
|
Looking good FloridaOccifer !
I have a simple design at the waterjet shop as we speak just large enough to cover the opening I cut in the grill, but let the light reflectors do thier jobs.
Either 1/16" or 1/8" thick rectangular window (so to speak) that when finished will be duracoated black, I already have some #10-32 stainless button head sockets screws & stainless nylon insert nuts to fasten it with.
__________________
Best Regards,
Saker
 2021 T4R *MIDNIGHT BLACK METALLIC* TRD OFF ROAD PREMIUM 4X4| Sakers Ebony Build | Sakers Previous 2014 Midnight Build | Scuba Mod | LED LIGHT BAR INSTALL | Saker's EBRs Photos Updated 05-21-16| Saker's Previous 2013 FJ TT/SE
|
|
|
Reply With Quote
|
|
07-07-2014, 07:34 AM
|
#51
|
|
Member
|
|
Join Date: Feb 2014
Location: Spring Hill, FL
Age: 51
Posts: 62
|
|
|
Member
Join Date: Feb 2014
Location: Spring Hill, FL
Age: 51
Posts: 62
|
Quote:
Originally Posted by Saker
I hope this isn't a bot highjacking the thread with only an advertisement and nothing constructive to add!
¡¡¡ Just don't need any advertisement in this install thread !!!
|
That was odd.
Ok, back on topic, thank you first and foremost...
I am 9mm over on my cut to the drivers side and I am trying to straighten my lines (it appears a rotozip is great but wiggles like a greasy pissed off python while cutting this steel). Hopefully I will get some time this week to trim, straighten and paint. Guess I now have time to look for fasteners too 
Can't wait to see yours! I was looking for a CNC or waterjet shop locally but I was quoted $100 and up for this simple piece.
|
|
|
Reply With Quote
|
|
07-07-2014, 09:25 AM
|
#52
|
|
Senior Member
|
|
Join Date: Dec 2013
Location: Near Baton Rouge, LA
Age: 70
Posts: 4,059
|
|
|
Senior Member
Join Date: Dec 2013
Location: Near Baton Rouge, LA
Age: 70
Posts: 4,059
|
Quote:
Originally Posted by FloridaOccifer
That was odd.
Ok, back on topic, thank you first and foremost...
I am 9mm over on my cut to the drivers side and I am trying to straighten my lines (it appears a rotozip is great but wiggles like a greasy pissed off python while cutting this steel). Hopefully I will get some time this week to trim, straighten and paint. Guess I now have time to look for fasteners too
Can't wait to see yours! I was looking for a CNC or waterjet shop locally but I was quoted $100 and up for this simple piece. |
@FloridaOccifer
Where did you get that material, what is it?
That is why I went to a shop....I would have probably made it look like it has waves in it. The material alone would have cost $20 to the house, then the cutting. The shop is doing it for $50 plug giving me some drop pieces for the back side.
Already have my fasteners from Fastenal as pictured. Will cut to length as needed. Makes a nice clean job! IMHO
__________________
Best Regards,
Saker
2021 T4R *MIDNIGHT BLACK METALLIC* TRD OFF ROAD PREMIUM 4X4| Sakers Ebony Build | Sakers Previous 2014 Midnight Build | Scuba Mod | LED LIGHT BAR INSTALL | Saker's EBRs Photos Updated 05-21-16| Saker's Previous 2013 FJ TT/SE
Last edited by Saker; 07-07-2014 at 09:30 AM.
|
|
|
Reply With Quote
|
|
07-07-2014, 09:48 AM
|
#53
|
|
Member
|
|
Join Date: Feb 2014
Location: Spring Hill, FL
Age: 51
Posts: 62
|
|
|
Member
Join Date: Feb 2014
Location: Spring Hill, FL
Age: 51
Posts: 62
|
Quote:
Originally Posted by Saker
@FloridaOccifer
Where did you get that material, what is it?
That is why I went to a shop....I would have probably made it look like it has waves in it. The material alone would have cost $20 to the house, then the cutting. The shop is doing it for $50 plug giving me some drop pieces for the back side.
Already have my fasteners from Fastenal as pictured. Will cut to length as needed. Makes a nice clean job! IMHO
|
To be honest, I would have easily paid the $50 as well. I enjoy doing things myself but at the same time the price you are being offered is MUCH better than mine.
I was able to "acquire" a sheet (5'x2') 2mm steel from an office complex. It was being used as a privacy filter for a cubicle. The material is robust and should hold up quite well after all is said and done... hopefully
|
|
|
Reply With Quote
|
|
07-07-2014, 10:25 AM
|
#54
|
|
Senior Member
|
|
Join Date: Dec 2013
Location: Near Baton Rouge, LA
Age: 70
Posts: 4,059
|
|
|
Senior Member
Join Date: Dec 2013
Location: Near Baton Rouge, LA
Age: 70
Posts: 4,059
|
Quote:
Originally Posted by FloridaOccifer
To be honest, I would have easily paid the $50 as well. I enjoy doing things myself but at the same time the price you are being offered is MUCH better than mine.
I was able to "acquire" a sheet (5'x2') 2mm steel from an office complex. It was being used as a privacy filter for a cubicle. The material is robust and should hold up quite well after all is said and done... hopefully
|
That's where I saw that kind of material.
Should look really nice either in plastidip or bedliner coated!
__________________
Best Regards,
Saker
2021 T4R *MIDNIGHT BLACK METALLIC* TRD OFF ROAD PREMIUM 4X4| Sakers Ebony Build | Sakers Previous 2014 Midnight Build | Scuba Mod | LED LIGHT BAR INSTALL | Saker's EBRs Photos Updated 05-21-16| Saker's Previous 2013 FJ TT/SE
|
|
|
Reply With Quote
|
|
07-09-2014, 08:05 PM
|
#56
|
|
Member
|
|
Join Date: Feb 2014
Location: Spring Hill, FL
Age: 51
Posts: 62
|
|
|
Member
Join Date: Feb 2014
Location: Spring Hill, FL
Age: 51
Posts: 62
|
Quote:
Originally Posted by Saker
TEASER
More work to do, will update thread!
|
Oh thats fancy! 
|
|
|
Reply With Quote
|
|
07-12-2014, 06:34 PM
|
#58
|
|
Member
|
|
Join Date: Feb 2014
Location: Spring Hill, FL
Age: 51
Posts: 62
|
|
|
Member
Join Date: Feb 2014
Location: Spring Hill, FL
Age: 51
Posts: 62
|
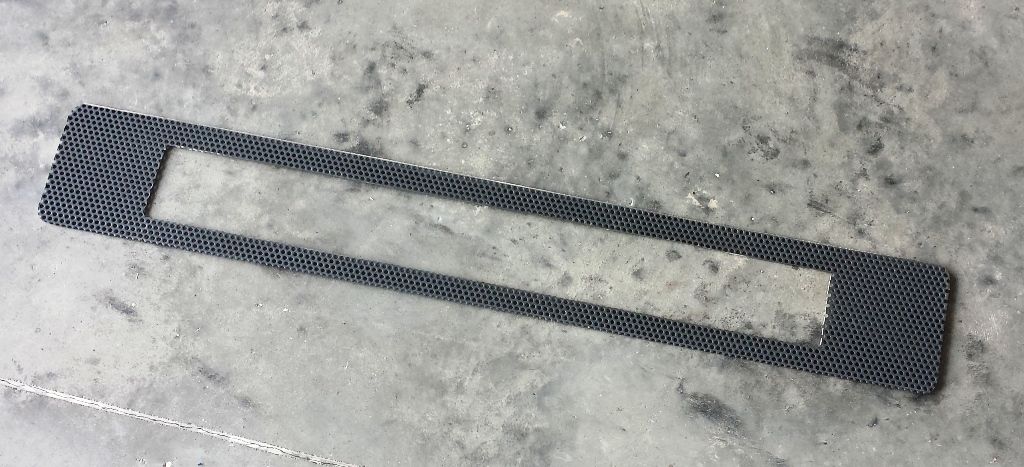
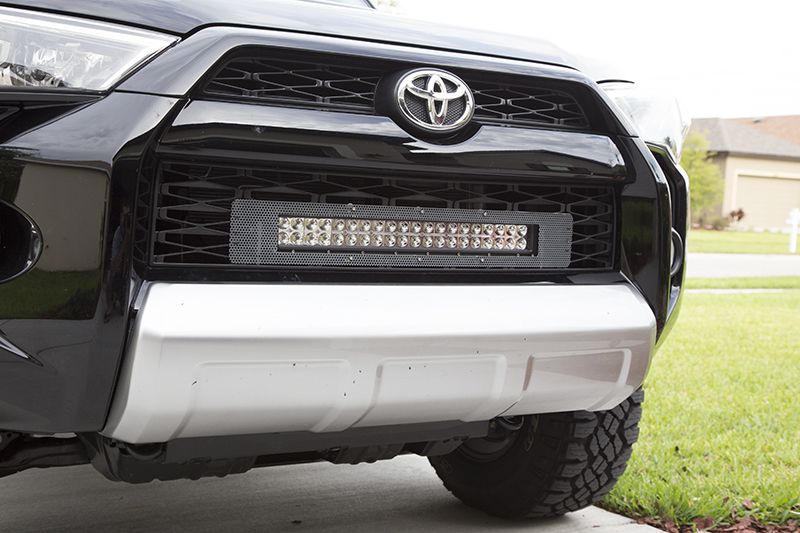
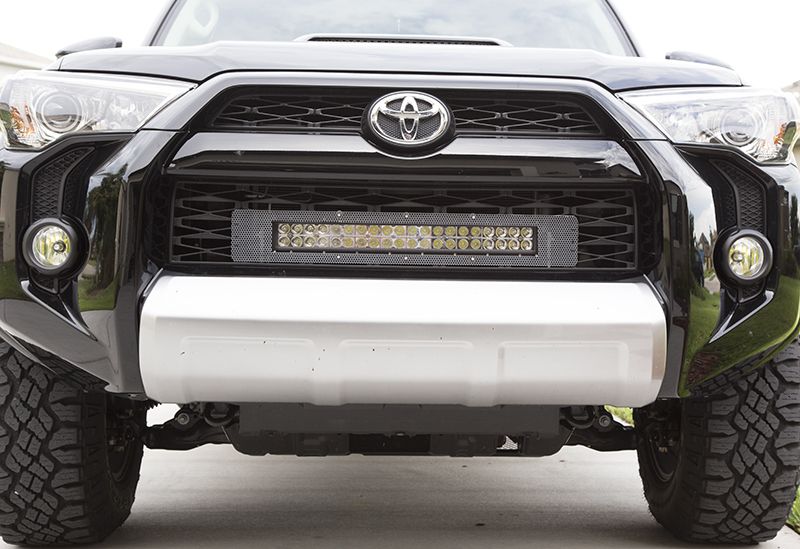
Ok. A few more hours on the grinder and the final cut has been completed.
I have been able to secure the top and bottom using stainless hex fasteners with fender washers and lock nuts on the back. I am still trying to figure out what to do on the sides though. As of this time I still need to coat (bed liner) the trim and work on the side fasteners. So far I am pleased with the look.
|
|
|
Reply With Quote
|
|
07-12-2014, 10:28 PM
|
#59
|
|
Senior Member
|
|
Join Date: Dec 2013
Location: Near Baton Rouge, LA
Age: 70
Posts: 4,059
|
|
|
Senior Member
Join Date: Dec 2013
Location: Near Baton Rouge, LA
Age: 70
Posts: 4,059
|
Quote:
Originally Posted by FloridaOccifer
Ok. A few more hours on the grinder and the final cut has been completed.
I have been able to secure the top and bottom using stainless hex fasteners with fender washers and lock nuts on the back. I am still trying to figure out what to do on the sides though. As of this time I still need to coat (bed liner) the trim and work on the side fasteners. So far I am pleased with the look.
|
Looking nice!
Are you actually going to need fasteners on the sides, or can you have someone put a slight roll to the piece so it conforms to the grill contour?
__________________________________________
Took mine to have it Duracoated today!
Results to follow
Best Regards,
__________________
Best Regards,
Saker
2021 T4R *MIDNIGHT BLACK METALLIC* TRD OFF ROAD PREMIUM 4X4| Sakers Ebony Build | Sakers Previous 2014 Midnight Build | Scuba Mod | LED LIGHT BAR INSTALL | Saker's EBRs Photos Updated 05-21-16| Saker's Previous 2013 FJ TT/SE
|
|
|
Reply With Quote
|
|
07-13-2014, 04:08 PM
|
#60
|
|
Member
|
|
Join Date: Oct 2013
Location: Katy, TX
Posts: 457
Real Name: Kevin
|
|
|
Member
Join Date: Oct 2013
Location: Katy, TX
Posts: 457
Real Name: Kevin
|
Quote:
Originally Posted by Saker
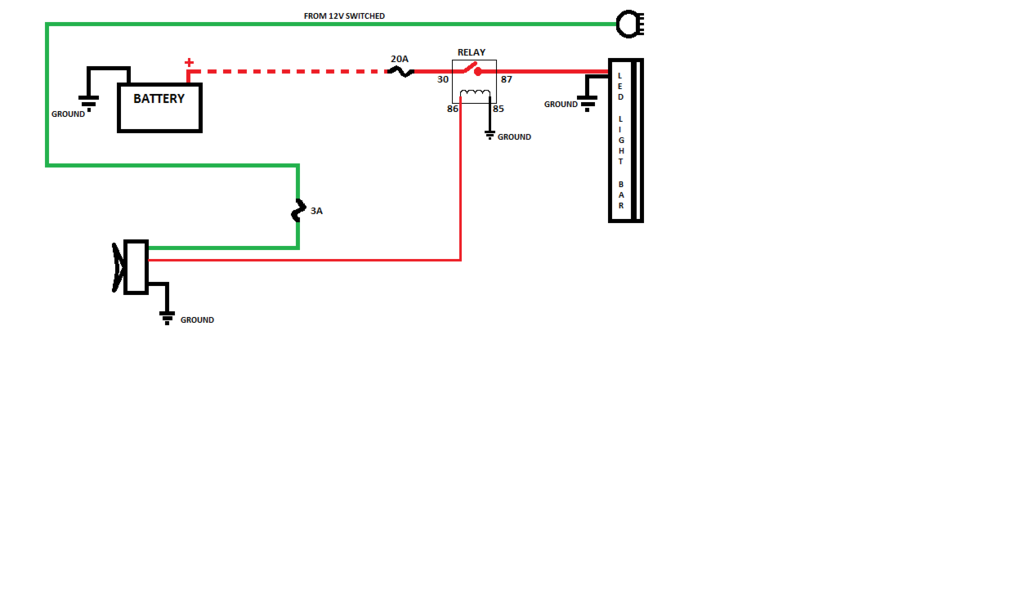
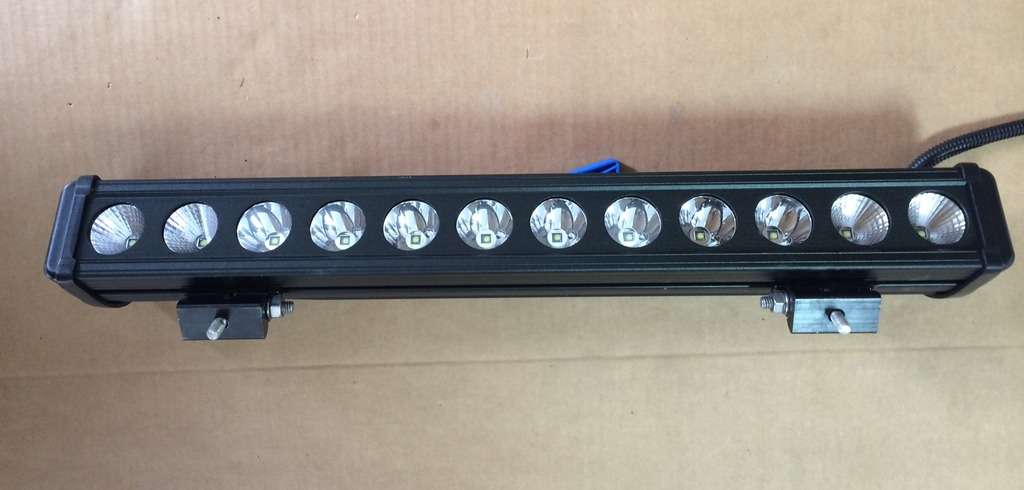
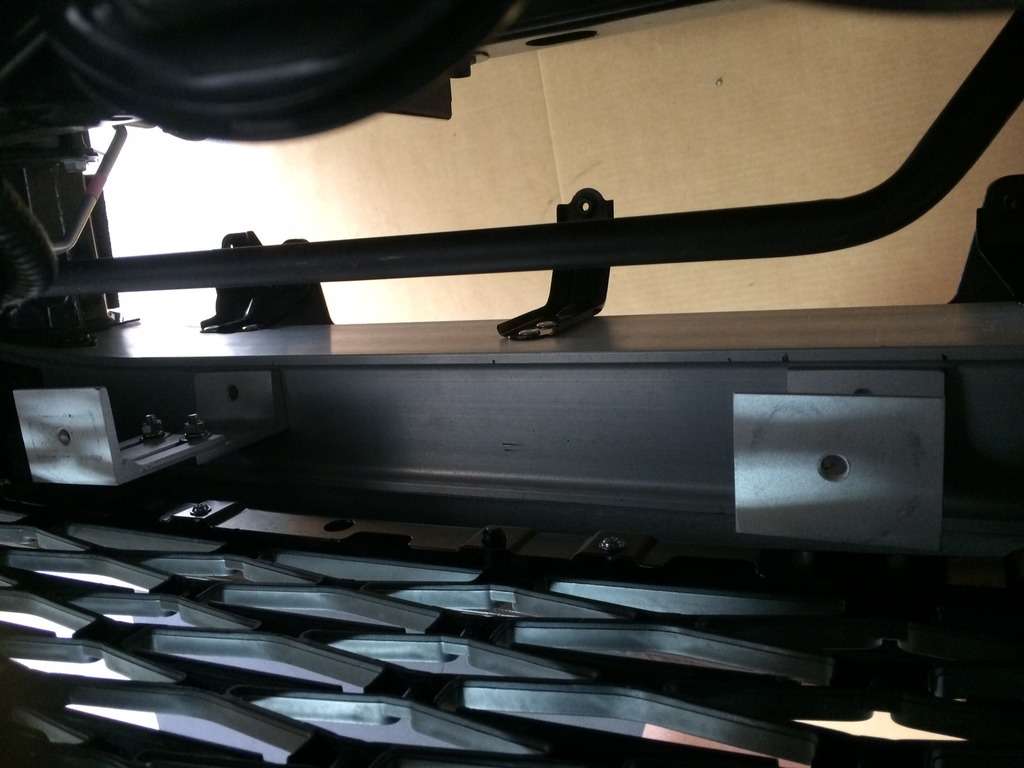
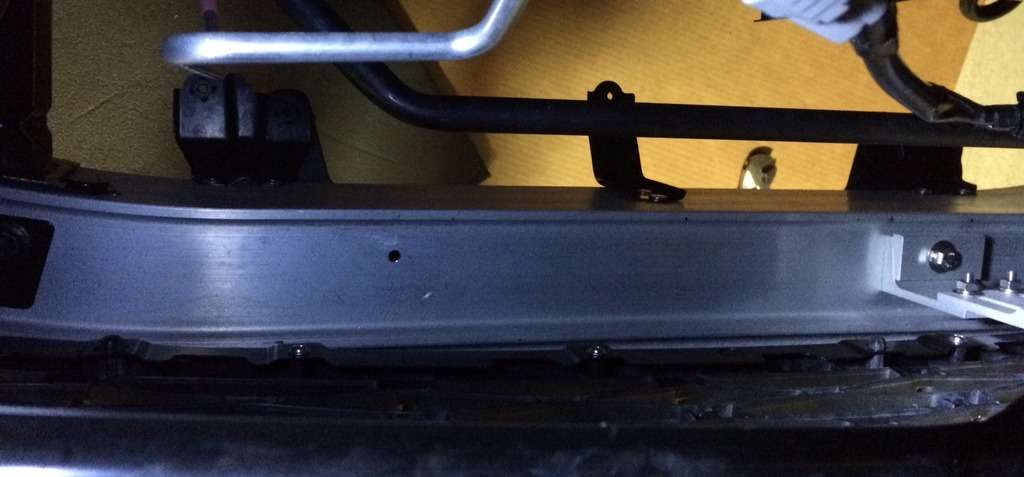
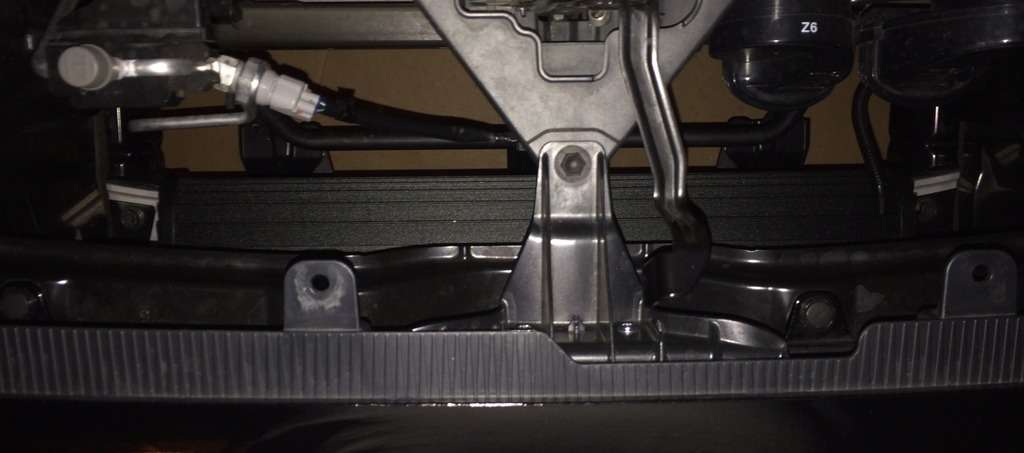
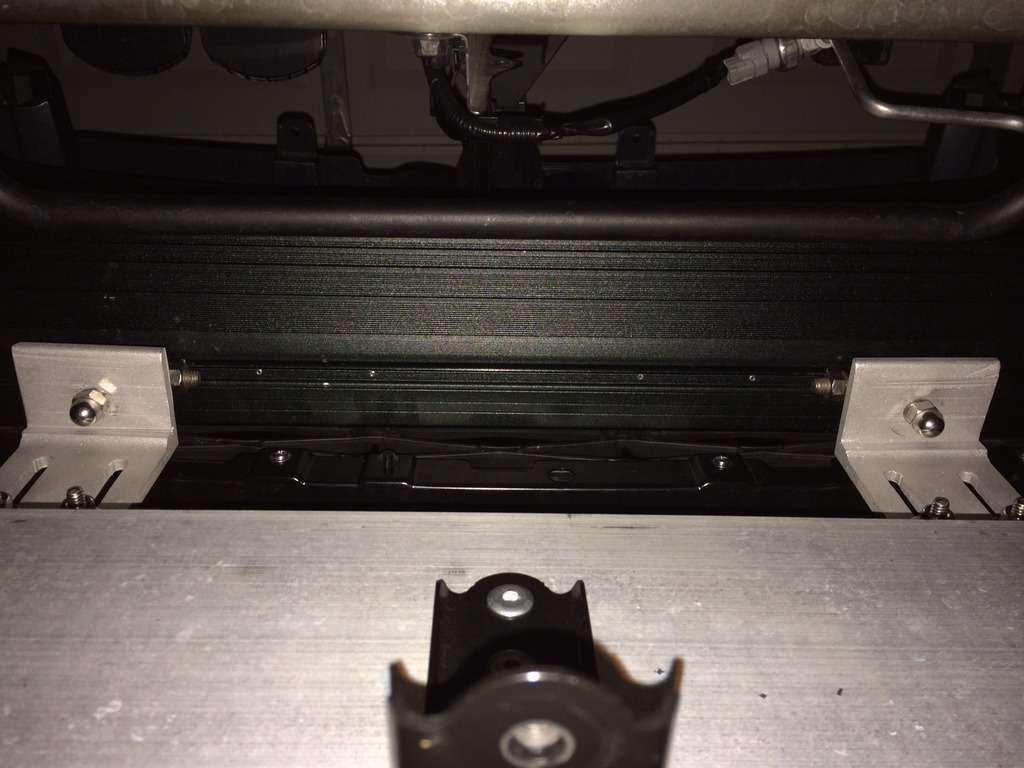
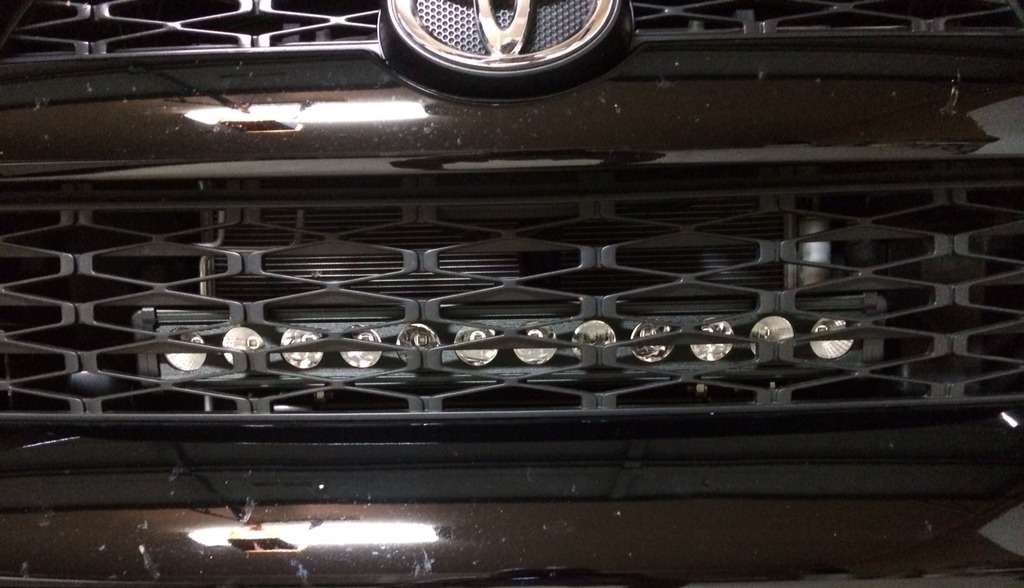
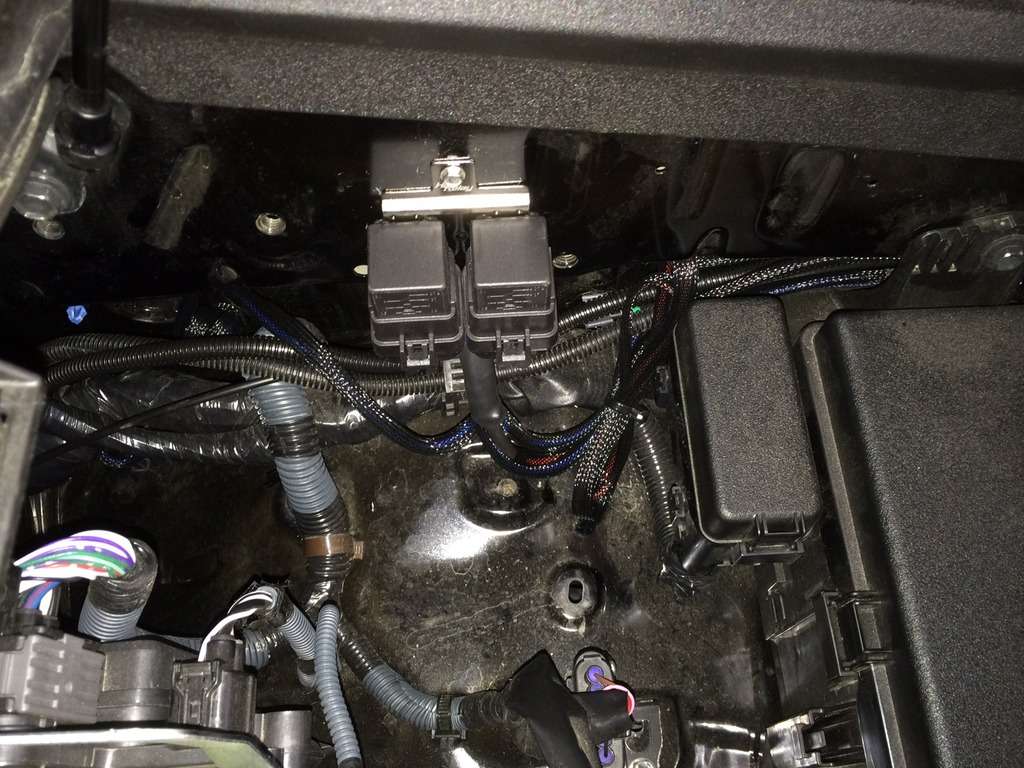
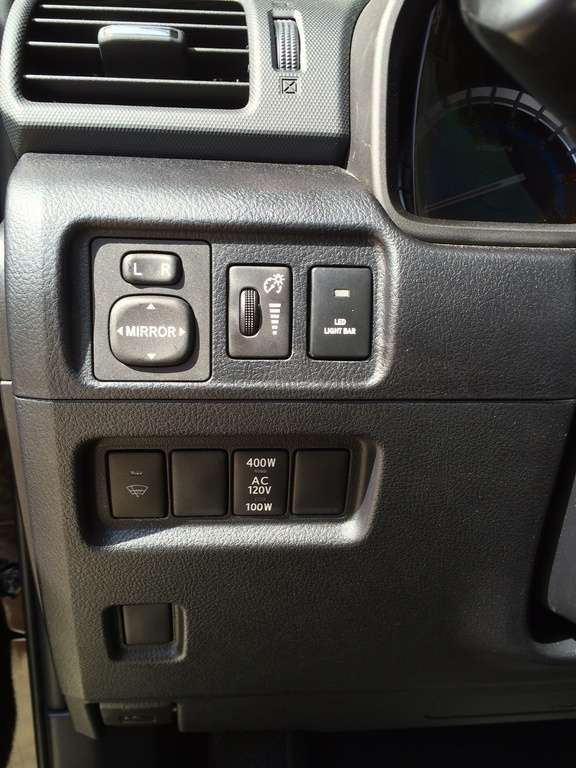
LED LIGHT BAR INSTALL
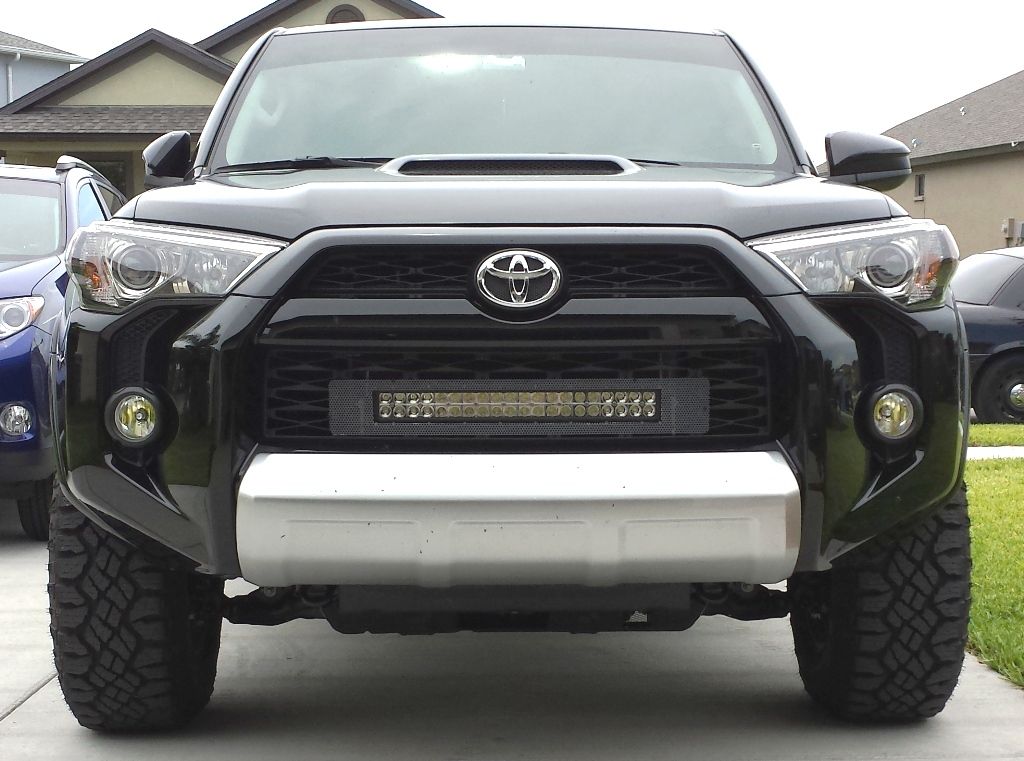
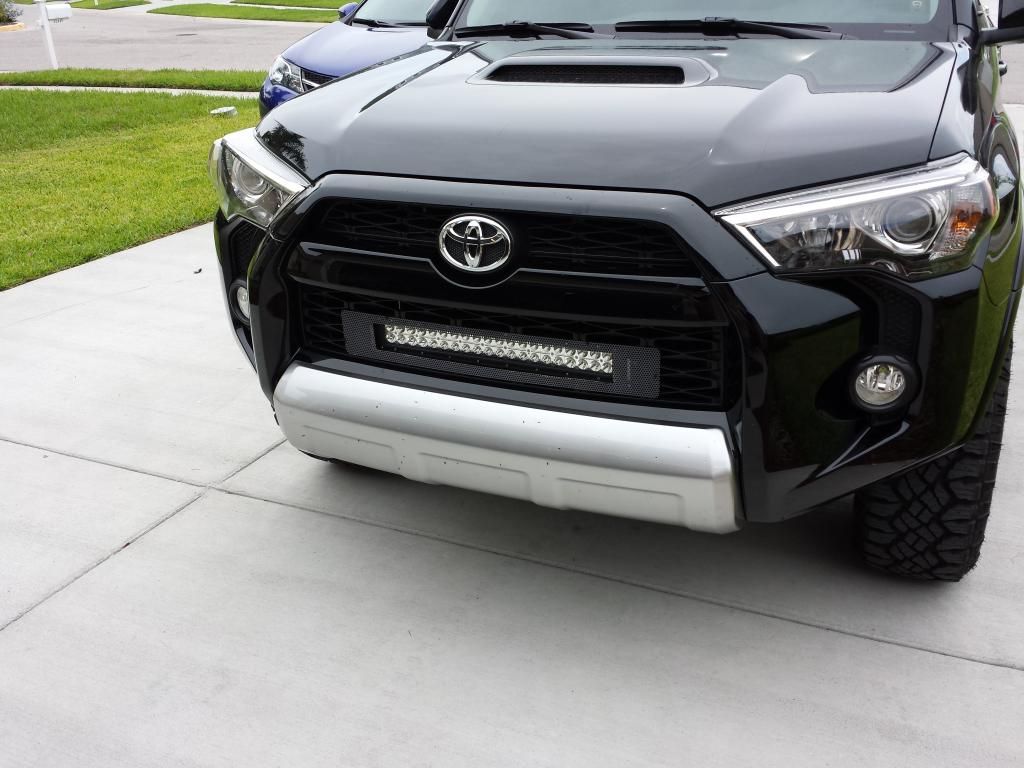
The purpose of this write-up is to help people that are interested in installing a light bar behind the grill of their 2014 Toyota 4Runner. I will list the parts used as well as pictures.
For the cleanest install, I'd recommend a full relay harness. TRS makes a nice one, and it's actually got two relays which might be nice if you want to add another light in the future.
HD Relay: H1/H3 - Wire Harnesses - Components
To make things easy, I'd also get these and I'll explain why later:
9006 Extension Cords - Accessories from The Retrofit Source
If you go with a relay harness like the one above, you'll simply connect the power connector to the battery, connect the ground connector to a ground, run the light plugs towards the light in the grill and connect the switch wire to the signal wire in the relay harness. The first three are very easy, the last one takes a bit more work.
In this case, the relay harness has an H1/H3 and you won't need that, so you can cut that connector off. When you cut that connector off, the wire left (orange insulated wire) is where you'll connect the switch wire to. Of course, you'll need to extend that wire from the switch to wherever you mount the relay harness. The other wire (black insulated wire) is a ground wire that will need a terminal.
Now, you'll need to connect a wire from the high beam or fuse to the trigger wire on the switch to provide it with power. This is the questionable part. By connecting to a fuse, you'll have to hit the switch every time you want to turn the lights on. Honestly, it's a pain in the butt if you plan on using your lights on back roads at night. Connecting to the high beam is much more convenient since you can leave the switch on and every time you turn the high beams on, the eBay bar will light up without having to hit the switch. Very handy. If you choose to connect the eBay bar to a fuse and not the high beams, you have two choices. One, you connect it to a fuse that's always hot. Two, you connect to a fuse that is only on when the ignition is on. The advantage of the first option is that you can turn the light on any time, whether the truck is on or off. That's also the disadvantage because it's easy to accidentally leave on. I'm going to suggest you run the trigger wire on the switch to the driver's side headlight and connect it to the high beam wire. (Don't forget to install a Mini Waterproof 3 or 5 Amp In Line Standard Blade Type Fuse Holder on this circuit!) This should work whether you have the DRL or not.
This should give you an operational switch, an operation harness and the only thing left is to connect the light to the relay harness. This is where those 9006 extension cords come in. Plug those extensions into the end of the relay harness at the light, cutoff the part you don't need and splice your light's wires into that extension cord. Basically, it'll leave you with a nice clean plug so it's easy to remove the light in the future.
I'd do all of this in a few stages. You'll need two provide two wires of your own, so you can simply use a speaker wire or something like that that already has two wires in it. They're both going to the switch on one end, and close to the headlight on the other. Run that wire first, through an existing rubber grommet on the firewall near the master cylinder. Do the switch next. Relay harness after that. Attach the lights. Fire it up and make sure everything works. Finally, clean up the wiring, make it pretty, attach the relay where you want it and enjoy the lighting.
Things you'll need:
The switch. Mine came from AirOnBoard USA
TOYOTA 4RUNNER Replacement Switches -Air On Board
The relay harness I linked to, or something like it.
A length of wire as discussed. I used 18-2 gauge stranded speaker wire.
At least three 18-22 gauge t-taps (one at headlight, one at illumination wire on existing switch in dash) A few extra won't hurt since those things are temperamental at best.
Butt connectors, at least 5 for the new switch ( (1)ground, (2)power and (2)trigger wire (solder and heat shrink tubing is preferred if you're capable)
Mini Waterproof Amp In Line Standard Blade Type Fuse Holder (comes with a 10 or 20 amp fuse change to a 3 or 5 amp) This goes on the trigger circuit!
I hope this help someone wanting to install something similar!
Simple Aux Light Wiring Dia
 Upper Access Cover - Removed
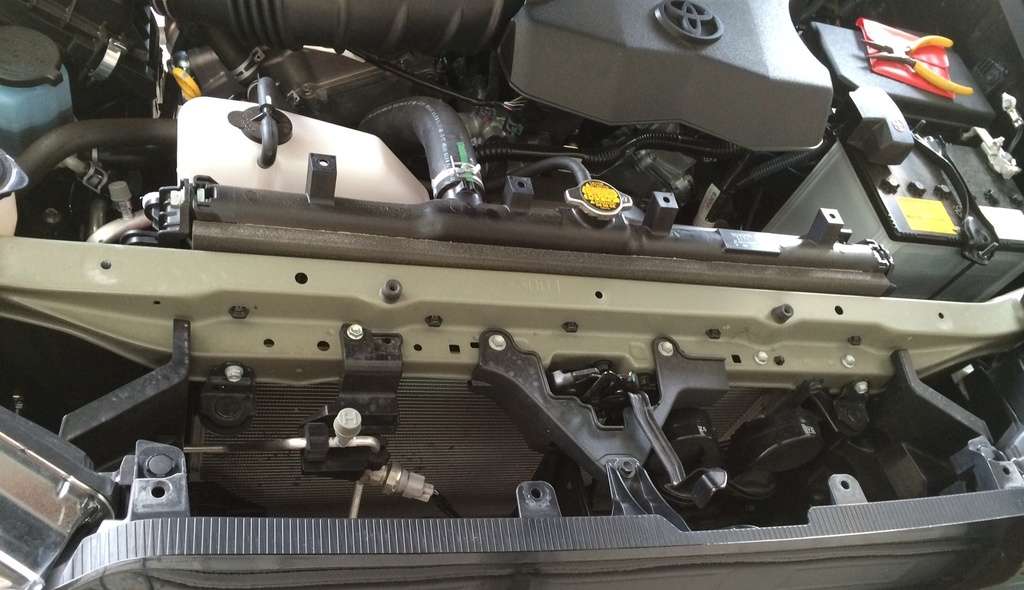 Lower Access Cover - Removed
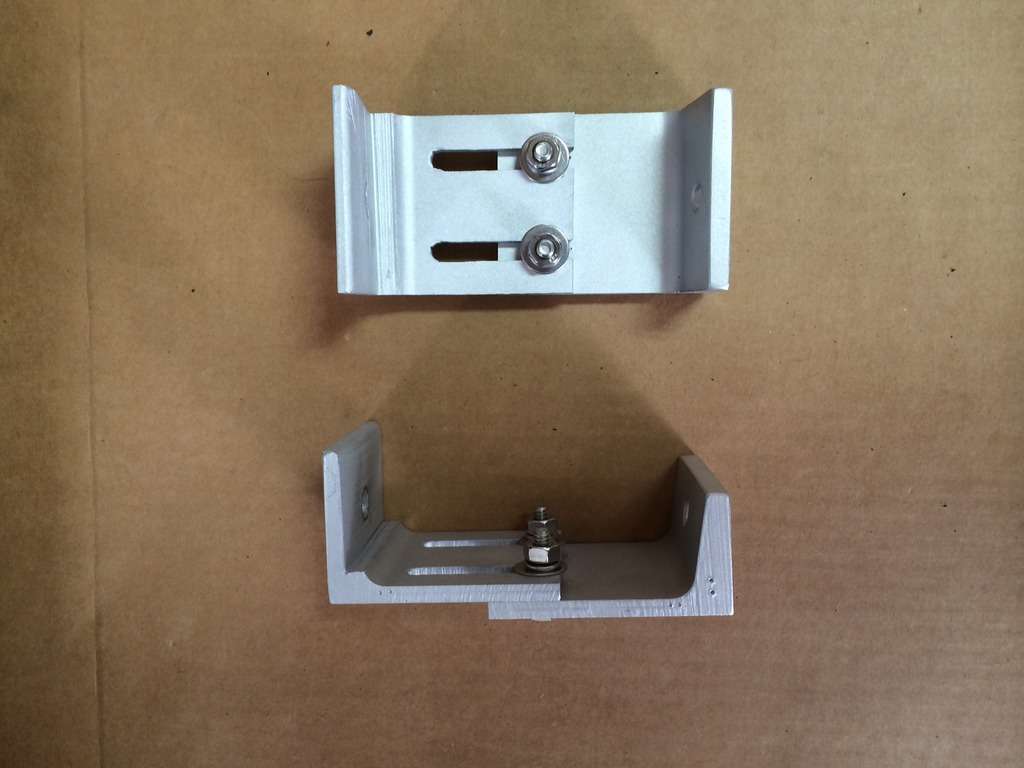
 Aluminum Brackets Fabricated
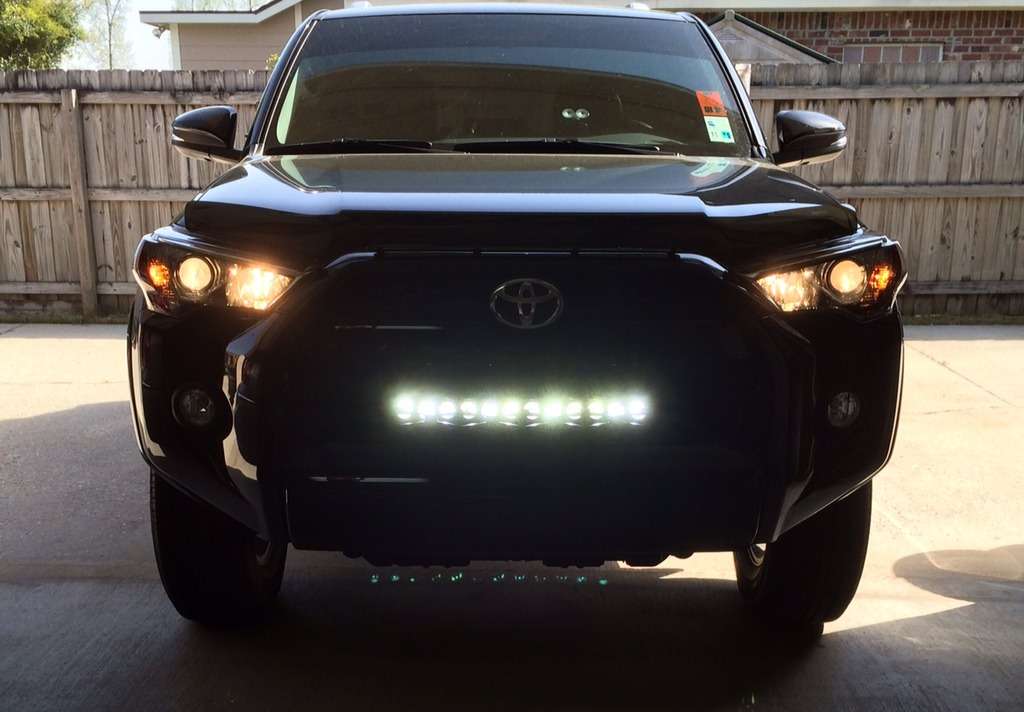
 eBay 22inch 120 Watt LED Light Bar
 Positioning Brackets
 Bumper Drilled and Tapped for Brackets
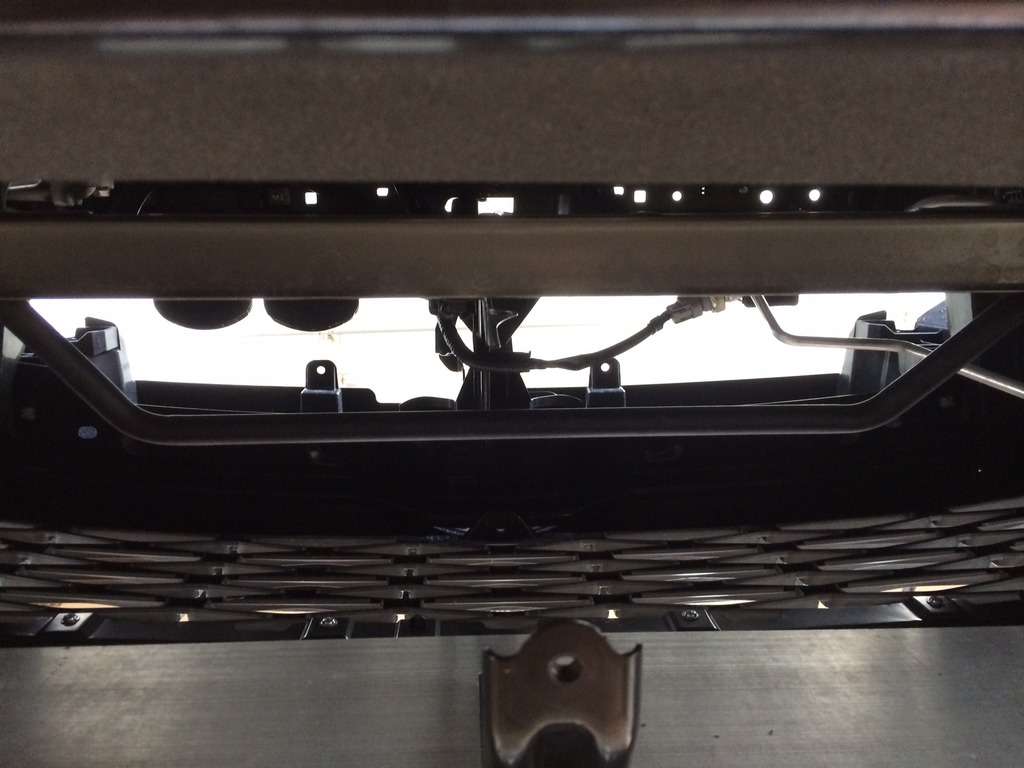
 LED Light Bar Mounted
 LED Light Bar Mounted Underside View
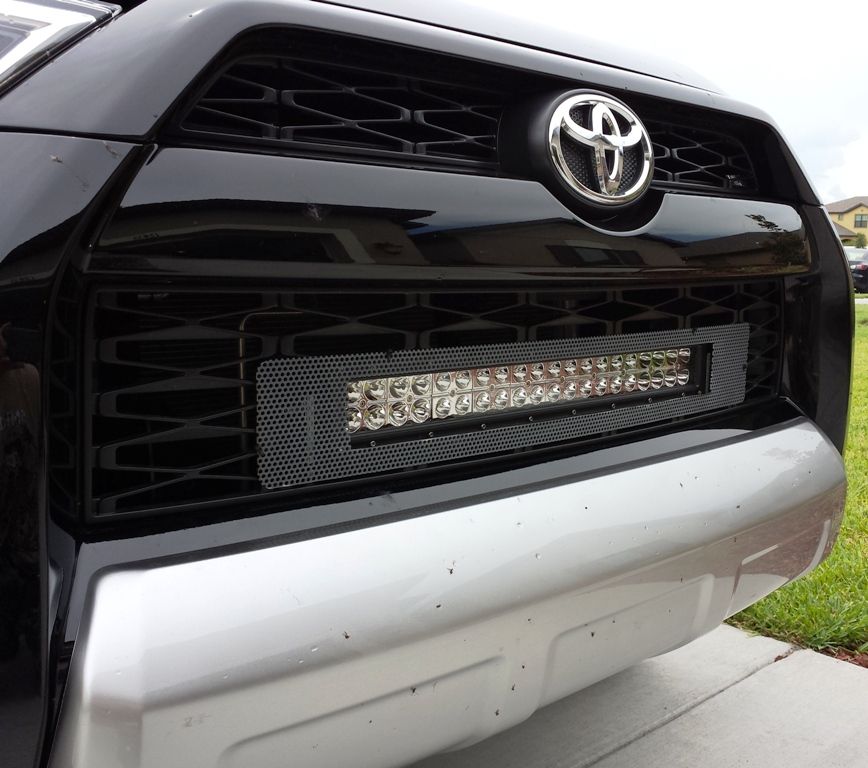
 LED Light Bar Mounted Grill View
 Wiring Harness and Relays Installed
 LED Light Bar Trigger Wire Connected to High Beam Wire
 LED Light Bar Switch Wired Up
(Obviously, the blue/white wire will be run thru the switch hole and connected back to the T-tap)
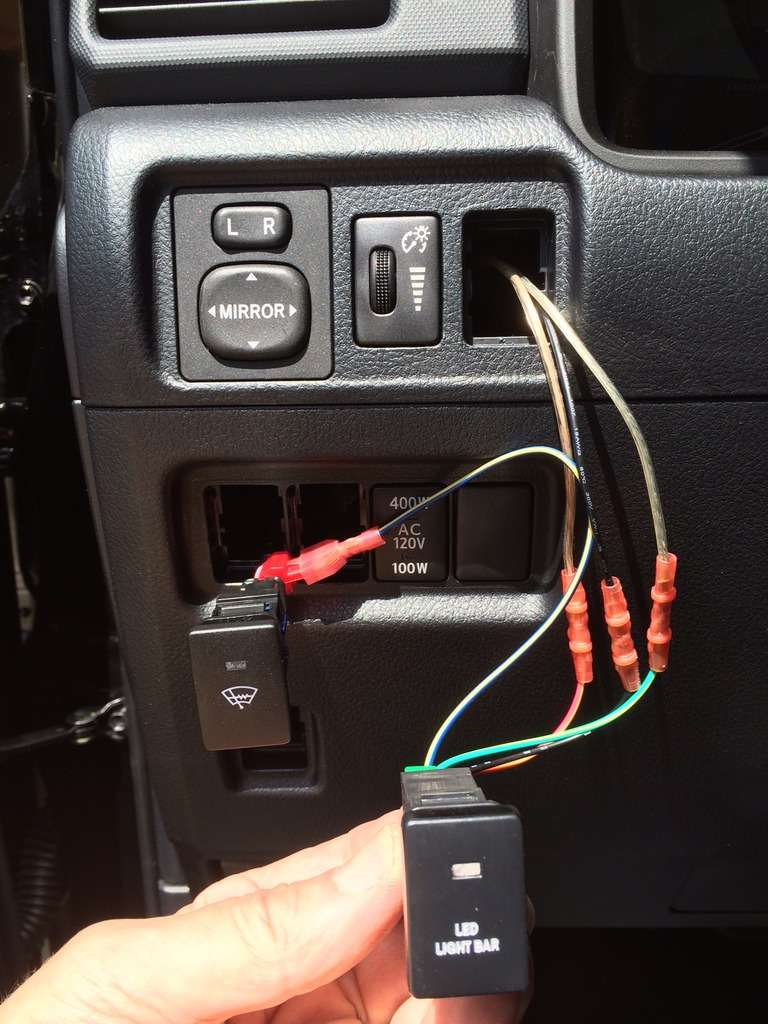 LED Light Bar Switch
 LED Light Bar_1
 LED Light Bar_2
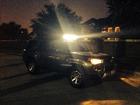
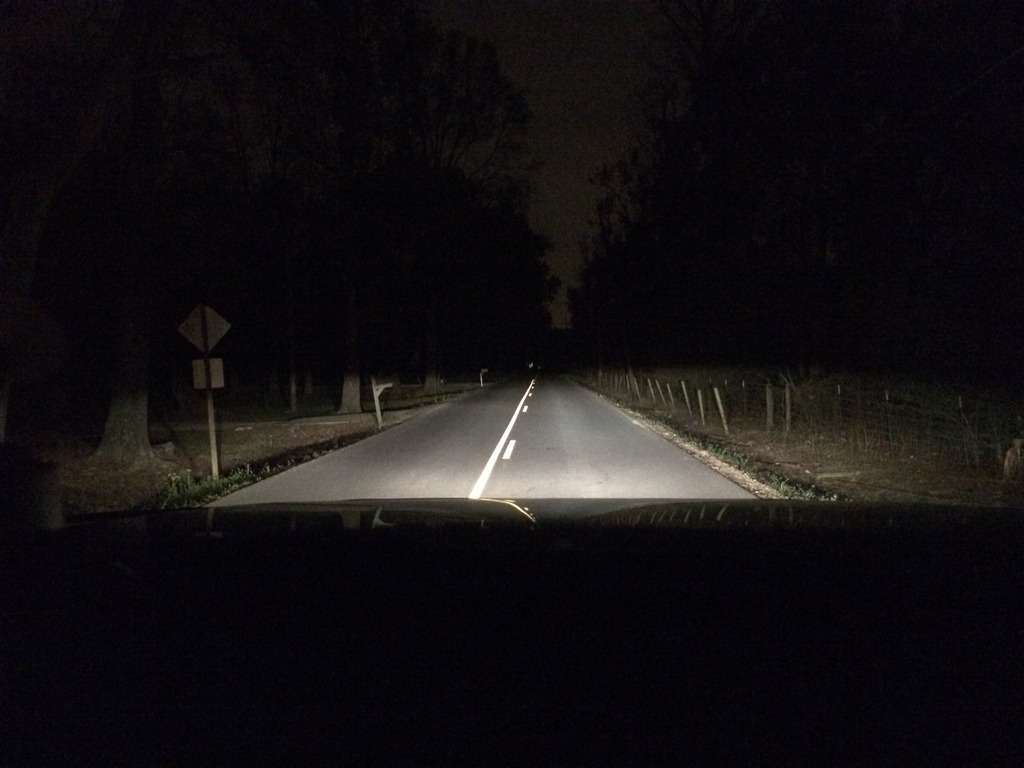
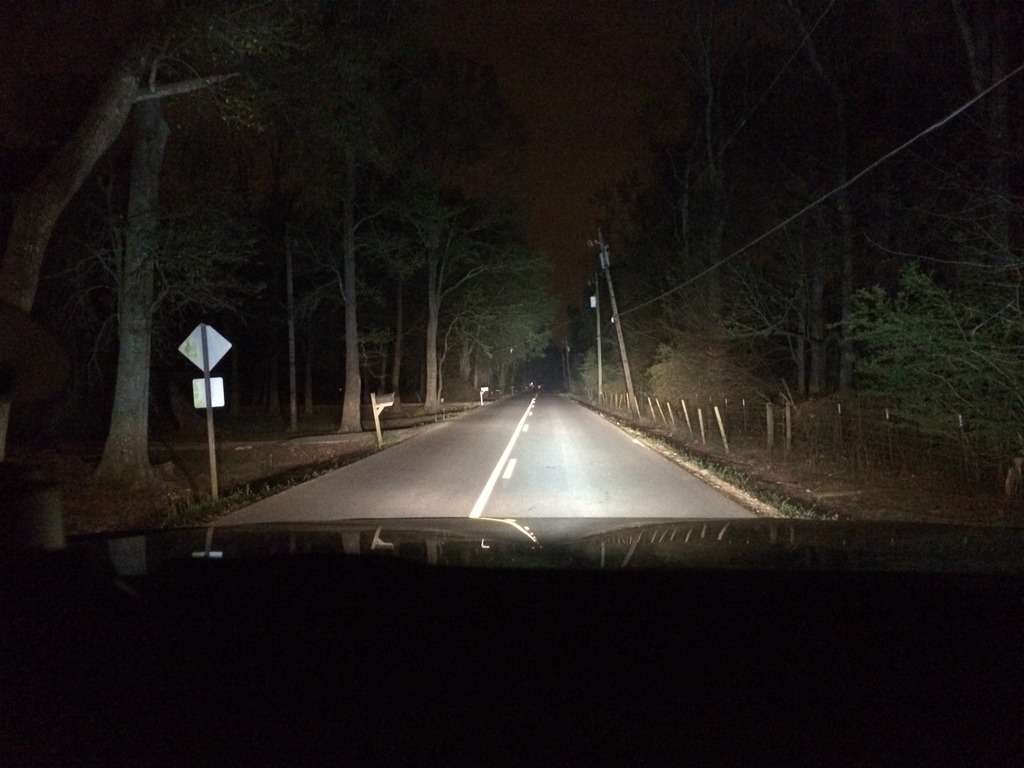
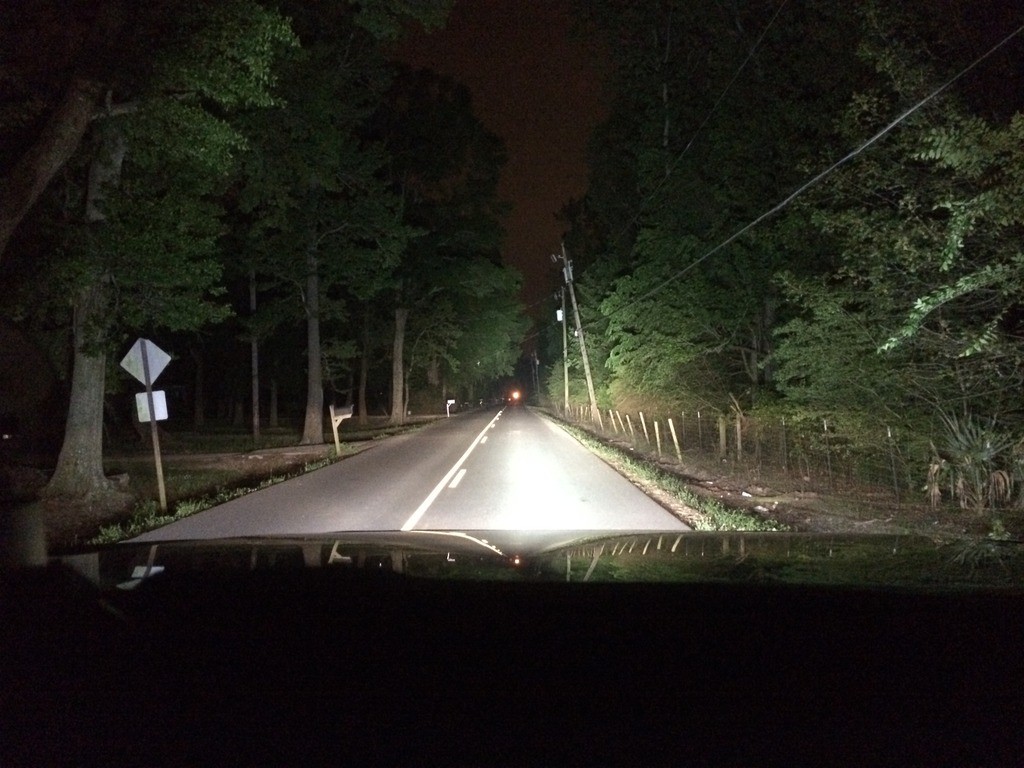
 As requested, Light Output Pics Added
Low Beams
As requested, Light Output Pics Added
Low Beams
 Low and High Beams
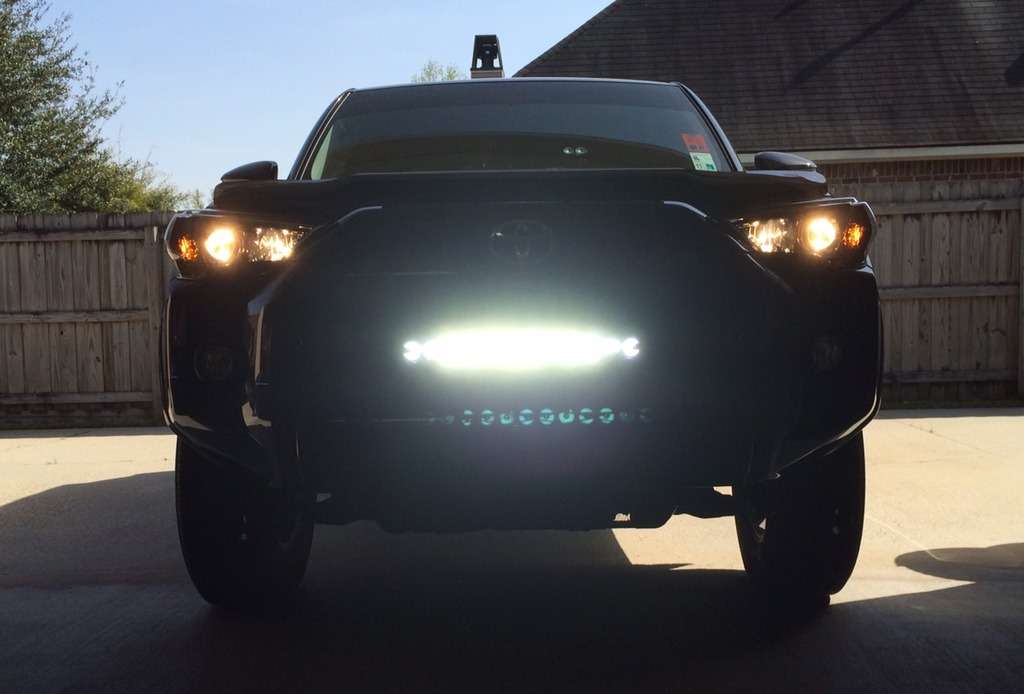
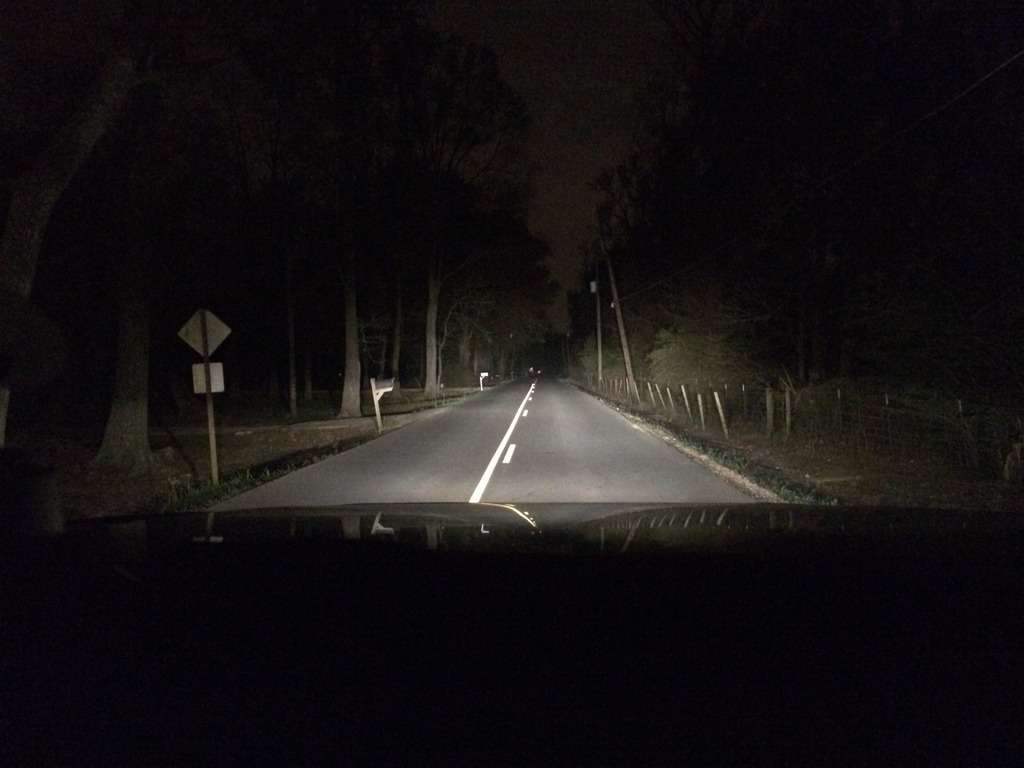 Full Beams with LED Light Bar
(Keep in mind, output is partially blocked by grill, haven't decided whether to cut it or not!)
 Picture after the grill opened up!
Huge Difference!
|
@ Saker
- what are you tapping the blue wire out of your LED switch into on the switch next to it (the wiper warmer switch)?
|
|
|
Reply With Quote
|
| Thread Tools |
|
|
| Display Modes |
Rate This Thread |
 Linear Mode Linear Mode
|
|
 Posting Rules
|
You may not post new threads
You may not post replies
You may not post attachments
You may not edit your posts
HTML code is On
|
|
|
|