 04-05-2014, 11:39 PM
|
#1
|
|
Member
|
|
Join Date: Apr 2014
Location: Colorado
Age: 40
Posts: 63
|
|
|
Member
Join Date: Apr 2014
Location: Colorado
Age: 40
Posts: 63
|
2014 Limited Stormtrooper Plastidip Chrome Delete
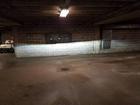
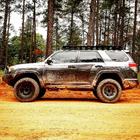
Hey all, it's Easy here, long time lurker first time poster. I know it's almost sacrelgious to start a new thread for my first post but I have have done plenty of searches and have not seen a 2014 Limited 4Runner Stormtrooper/plastidip thread as of yet.
I finally bit the bullet and took adavantage of Colorado's fine weather and decided to Plastidip/chrome delete my Blizzard Pearl 4Runner.
After a lot of prep work I was finally ready.

After what seemed far too long I was ready to plastidip... Which was already started above.
Here are the end results:
Lessons learned;
-Sharpie does not cover mess-ups, in fact it does quite the opposite and lifts up the Plastidip. I only ran into this issue in one spot, I might try to cover it up tomorrow.
-No need to mask very close, 1" - 2" would be perfect, the stuff really does peel right off where you want it to.
-Clean up is easy, budget yourself about 3 hours for the painting process and for drying time between coats.
-The longer the plastidip dries, the easier it is to rub off stubborn areas.


And here is the mess up

I am really wanting to Plastidip the Toyota and 4Runner Emblem white with a pearlizer finish or possibly the same green as the tape I used to mask it. Do any of you have any sugestions as to how to Plastidip on top of other Plastidip? I have heard tire shine works but would like to get your opinions on the matter.
BTW... After this mod, all the guys look at you like they want to kick your ass and the ladies look at you like they want to f*#k you.  
Till next time... Easy out
Last edited by EasyAndy; 05-05-2017 at 02:08 PM.
Reason: Resized Images
|

|
 Reply With Quote Reply With Quote
|
|
04-05-2014, 11:50 PM
|
#2
|
 |
Senior Member
|
|
Join Date: Dec 2012
Location: NorCal
Posts: 1,876
Real Name: Ben
|
|
|
Senior Member
Join Date: Dec 2012
Location: NorCal
Posts: 1,876
Real Name: Ben
|
I think it is much improved without all that nasty chrome! I'm glad to see the LE can be made to look less funky! Nice job!
__________________
2013 LE, All Pro +2 LT Front, CVJ axles, King shocks, Califab rear links, Hutchinson beadlocks, Nitto Trail Grappler 35x12.5x17, 4x4 Labs rear bumper and front bumper and sliders, tints, Bajarack, RCI skids, 4.56 gears and ARB lockers/Compressor, Rigid Lights, Rydeen 360 camera system, KK6JZH...Keeping it mild Build & Pics
|
|
|
Reply With Quote
|
|
04-06-2014, 01:04 AM
|
#3
|
|
Senior Member
|
|
Join Date: Jan 2011
Location: Columbus, OH
Posts: 3,003
Real Name: Nathan
|
|
|
Senior Member
Join Date: Jan 2011
Location: Columbus, OH
Posts: 3,003
Real Name: Nathan
|
Quote:
Originally Posted by EasyAndy

I am really wanting to Plastidip the Toyota and 4Runner Emblem white with a pearlizer finish or possibly the same green as the tape I used to mask it. Do any of you have any sugestions as to how to Plastidip on top of other Plastidip? I have heard tire shine works but would like to get your opinions on the matter.
BTW... After this mod, all the guys look at you like they want to kick your ass and the ladies look at you like they want to f*#k you.
Till next time... Easy out |
Here is a link that may help... Not sure if this is what you are talking about, but it looks good.
JRWARD's StormTrooper ***2014 Build Thread***
|
|
|
Reply With Quote
|
|
04-06-2014, 08:35 AM
|
#4
|
 |
Elite Member
|
|
Join Date: Mar 2010
Location: Illinois
Posts: 6,046
Real Name: Um, Phil?
|
|
|
Elite Member
Join Date: Mar 2010
Location: Illinois
Posts: 6,046
Real Name: Um, Phil?
|
Very nice, I've always liked this look. Now, about that roof rack ....
__________________
2010 Blizzard Pearl SR5/P - traded
2018 Superwhite SR5/P ... IS350 retrofit.
|
|
|
Reply With Quote
|
|
04-06-2014, 11:08 AM
|
#5
|
|
Member
|
|
Join Date: Apr 2014
Location: Colorado
Age: 40
Posts: 63
|
|
|
Member
Join Date: Apr 2014
Location: Colorado
Age: 40
Posts: 63
|
Quote:
Originally Posted by TOY2G
|
This is exactly the look i am going for, that thread is what got me started down this road, but the Trail addition already has a factory painted back plate so all jrwards had to do was Plastidip one color. I am specifically trying to paint a different color of Plastidip on top of the black Plastidip. Surprisingly hard thing to google for as I have not ben able to find anything concrete. I am hesitant to mask off the areas that I don't want to Plastidip as i don't want to masking tape to pull up the original Plastidip afterwards, not to mention it would be an absolute pain to mask off such a detailed area. If anyone of you have heard of a way I would be much appreciative for a solution.
Quote:
Originally Posted by philsey
Very nice, I've always liked this look. Now, about that roof rack ....
|
I know, I really wanted to tackle the roof rack yesterday but after I started I figured I would be much easier to completely remove and Plastidip on the ground. Does the front plastic piece come off a simply as the back when installing cross bars? I read something yesterday about a roof rack delete kit from toyota, any idea how much this costs? I will definitely want the roof rack next winter for skiing but do not really have a use for it in the summer. Is the entire roof rack fairly easy to remove?
|
|
|
Reply With Quote
|
|
04-06-2014, 11:34 AM
|
#6
|
 |
Senior Member
|
|
Join Date: Feb 2011
Location: Tulsa, OK
Posts: 1,964
|
|
|
Senior Member
Join Date: Feb 2011
Location: Tulsa, OK
Posts: 1,964
|
Quote:
Originally Posted by EasyAndy
BTW... After this mod, all the guys look at you like they want to kick your ass and the ladies look at you like they want to f*#k you. |
You mean that's not normal? 
__________________
2011 SR-5 4x4 w/ TE-conversion:[B] Old Man Emu lift, Light Racing UCAs, ARB skids, Shrockworks step-sliders, Shrockworks front bumper, Custom rear bumper/swingout, Gobi Stealth, ARB awning, ARB compressor, ARB rear locker, Rigid Duallys, Warn M8000, MR301s, Mickey Thompson MTZ, FTS snorkel,
The Overland Adventures @kccarguy Instagram
|
|
|
Reply With Quote
|
|
04-22-2014, 04:00 PM
|
#7
|
 |
Elite Member
|
|
Join Date: Sep 2011
Location: SOCAL OC
Posts: 5,184
Real Name: Danny
|
|
|
Elite Member
Join Date: Sep 2011
Location: SOCAL OC
Posts: 5,184
Real Name: Danny
|
I somehow missed this post... Very nicely done with the Plasti Dip.. It looks a 1000 times better... Good job! 
__________________
2010 LE > TE Conversion, Fox 2.5 DSC Front W/ Camburg BJ UCA's Fox 2.5 Resi rear W/ Icons. Method 701's, Cooper S/T Maxx 285/70/17. Shrockworks sliders. LLama Tales  Dual Battery Thread
|
|
|
Reply With Quote
|
|
04-22-2014, 04:20 PM
|
#8
|
 |
Member
|
|
Join Date: Dec 2013
Location: Bay Area, CA
Age: 45
Posts: 387
|
|
|
Member
Join Date: Dec 2013
Location: Bay Area, CA
Age: 45
Posts: 387
|
looks 100 times better ;-0
|
|
|
Reply With Quote
|
|
05-05-2014, 12:30 PM
|
#9
|
|
Member
|
|
Join Date: Apr 2014
Location: Colorado
Age: 40
Posts: 63
|
|
|
Member
Join Date: Apr 2014
Location: Colorado
Age: 40
Posts: 63
|
Quote:
Originally Posted by philsey
Very nice, I've always liked this look. Now, about that roof rack ....
|
Finally had some time this weekend to Plasti-dip my roof rack and color match my front emblem. The roof rack was a breeze to remove thanks to these two threads.
How to install roof rack crossbars
DIY: Roof Rack Delete (w/ pics)
I used the bike tire remover technique and the whole assembly was off in 10 mins. As far as sliding the cross bars back into place after plasti-dipping I would recommend using some sort of lubricant so they don't tear up the finished work. I used Vaseline and it worked great.
I attempted to color match the "4Runner" and front emblem to Blizzard Pearl, and had success with the latter. I was able to match the color almost identically by doing a layering technique of white Plasti-dip and the pearlizer Plasti-dip. I first laid down three coats of white then alternated with the pearlizer for every other layer until about 10 coats.
I self tested a few methods to keep Plasti-dip from sticking to itself, to dip the "4Runner" emblem. The best method was again Vaseline. Others attempted were tire shine and white lithium grease. My initial thought was to tape off and cover the whole area with Vaseline and remove the old Plasti-dip from the letters and then re-dip. Well the whole thing was a big mess and it turns out the once the Vaseline is on Plasti-dip it does not remove quite as easily because your fingers are a greasy mess. In the end I had to remove the whole thing and re-dip black. I might attempt to tape the whole thing off and dip the letters but to be honest I am getting quite fed up with putting make-up on my car after so many hours. All in all I am happy with how everything turned out, and will post again if I do have success with the "4runner" emblem.


Last edited by EasyAndy; 05-05-2017 at 02:09 PM.
|
|
|
Reply With Quote
|
|
05-05-2014, 12:48 PM
|
#10
|
|
Banned
|
|
Join Date: Apr 2012
Location: Florida
Posts: 2,355
|
|
|
Banned
Join Date: Apr 2012
Location: Florida
Posts: 2,355
|
I like the look better but I would be concerned about durability especially the handles.... anyway I think the huge front chrome piece would look better color matched white. Thumbs up for doing it
|
|
|
Reply With Quote
|
|
05-05-2014, 12:55 PM
|
#11
|
|
Senior Member
|
|
Join Date: Dec 2012
Location: NorCal
Posts: 1,876
Real Name: Ben
|
|
|
Senior Member
Join Date: Dec 2012
Location: NorCal
Posts: 1,876
Real Name: Ben
|
Great idea on the white! Now that the OP is probably feeling good about the handles, take off the dip, redo with Krylon Fusion flat black. Holds up so much better and not much more difficult to apply (just need to do a nice tight tape/playing card job and it is much more durable and you can touch it up easily.
__________________
2013 LE, All Pro +2 LT Front, CVJ axles, King shocks, Califab rear links, Hutchinson beadlocks, Nitto Trail Grappler 35x12.5x17, 4x4 Labs rear bumper and front bumper and sliders, tints, Bajarack, RCI skids, 4.56 gears and ARB lockers/Compressor, Rigid Lights, Rydeen 360 camera system, KK6JZH...Keeping it mild Build & Pics
|
|
|
Reply With Quote
|
|
05-05-2014, 05:46 PM
|
#12
|
 |
Junior Member
|
|
Join Date: Mar 2014
Location: Oklahoma City
Posts: 12
|
|
|
Junior Member
Join Date: Mar 2014
Location: Oklahoma City
Posts: 12
|
I had the same problem when I plasti-dipped my roof rack. The cross bars tore it up in a few locations but I found it was pretty easy to just put a few more coats on where it ripped. And it isn't visible from the ground anyway. The roof rack looks so much better after being dipped.
I am planning on doing my handles and wheels in the next week or so. How are the handles holding up? Was it difficult to get plasti-dip on the back side of them?
|
|
|
Reply With Quote
|
|
05-06-2014, 10:19 PM
|
#13
|
|
Member
|
|
Join Date: Apr 2014
Location: Colorado
Age: 40
Posts: 63
|
|
|
Member
Join Date: Apr 2014
Location: Colorado
Age: 40
Posts: 63
|
Quote:
Originally Posted by Archicam
I had the same problem when I plasti-dipped my roof rack. The cross bars tore it up in a few locations but I found it was pretty easy to just put a few more coats on where it ripped. And it isn't visible from the ground anyway. The roof rack looks so much better after being dipped.
I am planning on doing my handles and wheels in the next week or so. How are the handles holding up? Was it difficult to get plasti-dip on the back side of them?
|
Everything is holding up surprisingly well actually, but painting on the back side of the handles was not too easy. I ended up pealing the top section of them because of it. The area that gets the most wear is the chrome strip on the rocker panel. People's feet drag across it quite often, mine included, but the worst offender would be my girl and her heals. Here are some pics of the wear spots. Best of luck with your dipping.


|
|
|
Reply With Quote
|
|
05-11-2014, 08:10 PM
|
#14
|
|
Member
|
|
Join Date: Apr 2014
Location: Colorado
Age: 40
Posts: 63
|
|
|
Member
Join Date: Apr 2014
Location: Colorado
Age: 40
Posts: 63
|
Last edited by EasyAndy; 05-05-2017 at 02:10 PM.
|
|
|
Reply With Quote
|
|
07-17-2014, 07:15 PM
|
#15
|
 |
Senior Member
|
|
Join Date: Jul 2014
Location: Abingdon, MD
Posts: 1,185
Real Name: Corey Jane
|
|
|
Senior Member
Join Date: Jul 2014
Location: Abingdon, MD
Posts: 1,185
Real Name: Corey Jane
|
That looks killer! I am looking forward to doing my Grey 2013. I am glad to see the side pieces are holding up well as that's by far the most wear and tear on my runner. VERY nice job.
|
|
|
Reply With Quote
|
 Posting Rules
|
You may not post new threads
You may not post replies
You may not post attachments
You may not edit your posts
HTML code is On
|
|
|
|


 Linear Mode


