 03-22-2016, 11:02 PM
|
#1
|
|
Junior Member
|
|
Join Date: Mar 2016
Location: Whitefish, MT
Posts: 22
|
|
|
Junior Member
Join Date: Mar 2016
Location: Whitefish, MT
Posts: 22
|
Yet Another 5th Gen Sleeping Platform
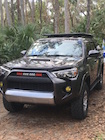
So. Long story short. A friend and I decided that we're going to road trip to Baja in a couple of weeks, and I decided to build a sleeping platform to make the back of the 4Runner more comfortable (I've "slept" there a couple of times before), and to reduce the need to move a bunch of stuff around every night when it's time for bed. I think this is the first time I've ever successfully constructed anything, and I have a lot of people on this forum to thank for making it happen so easily.
Here's how I went about making a sleeping platform. I took all of the measurements beforehand and headed to The Home Depot. Initially my plan was to make a 72" long by 50" wide sleeping platform. I hit a snag in this plan, or maybe in my wallet, when I realized that plywood comes in 48" wide boards. Not to worry, I altered my plan while shopping to create a 72" long by 48" wide platform, because who would really miss the two inches?
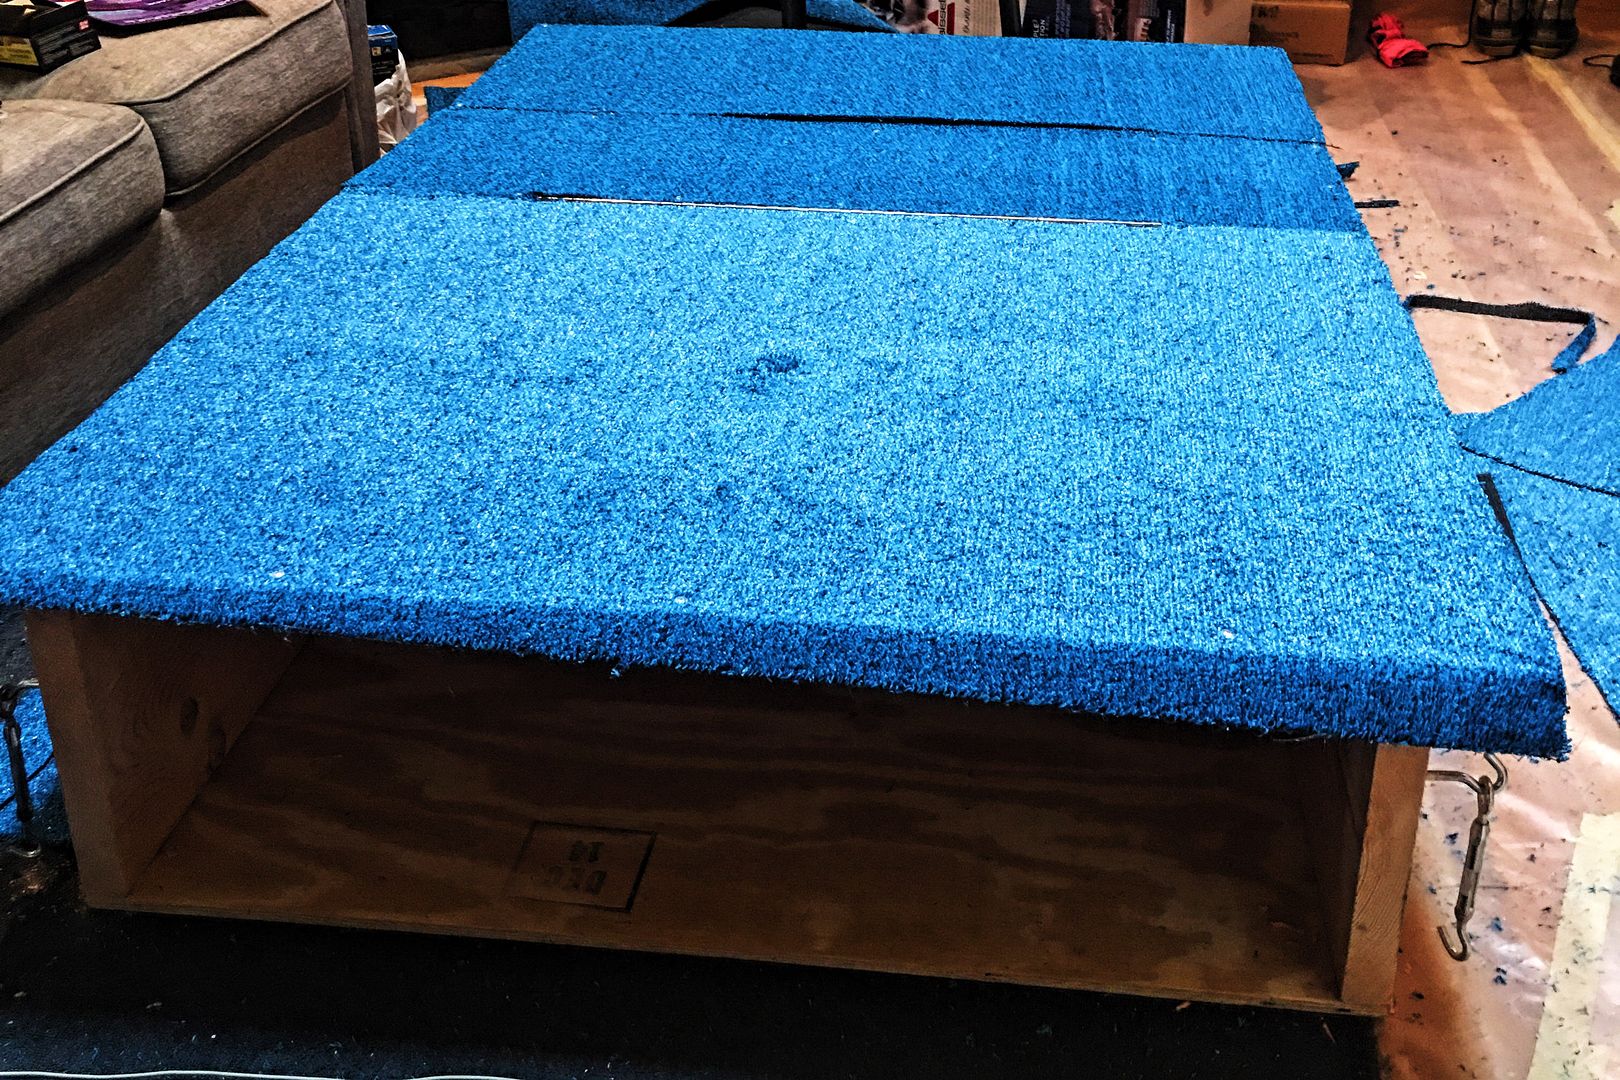
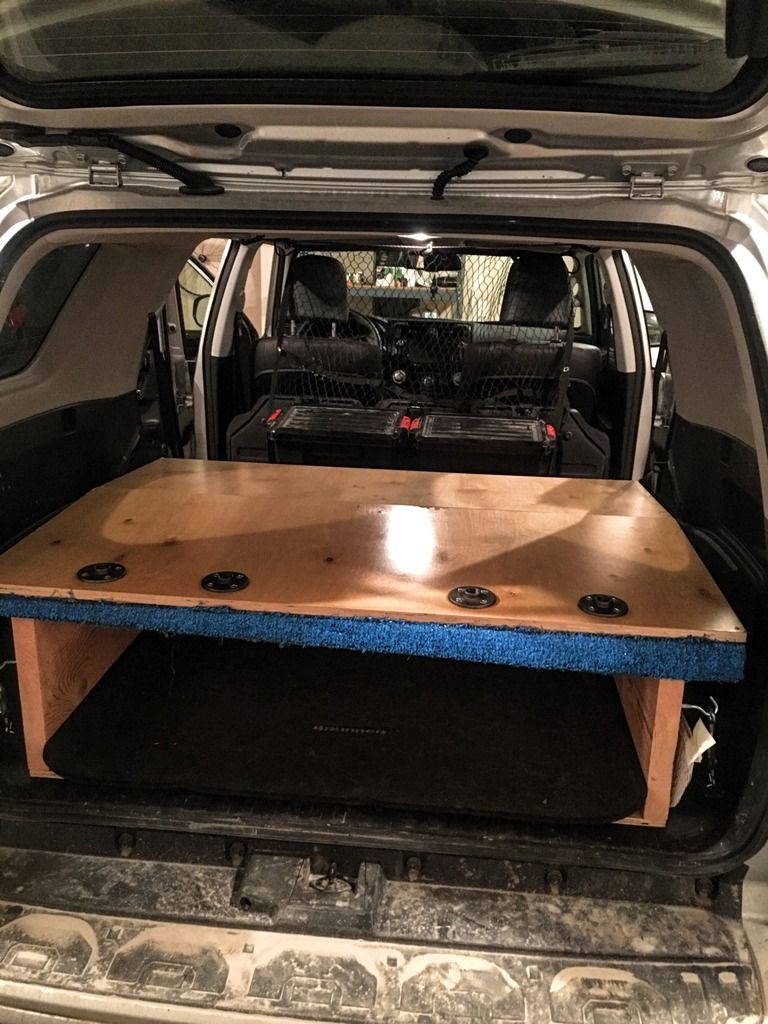
Lumber wise, I ended up buying one 3/4" think plywood board for the top surface, one 5/8" thick 4' x 4' plywood board for the base surface, and one 2" x 12" x 10' board to create the supporting structure. I also purchased some indoor/outdoor carpet to cover the surface and a few other miscellaneous items that I needed.
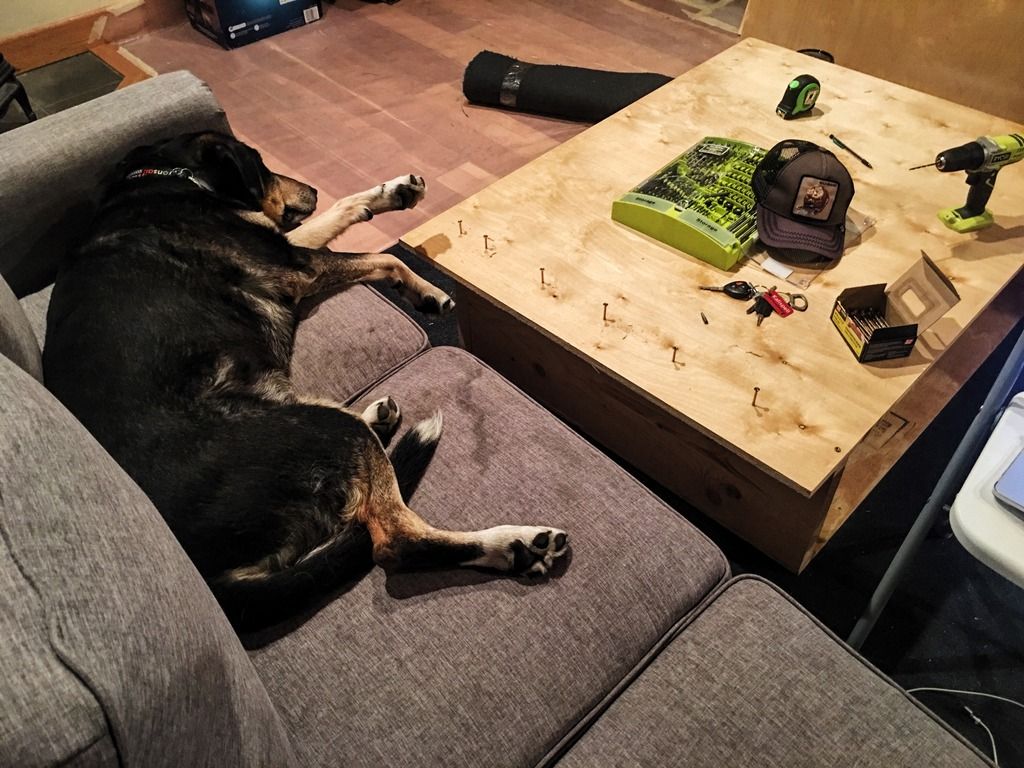
So let's get started. My dog was unimpressed with my construction efforts initially.
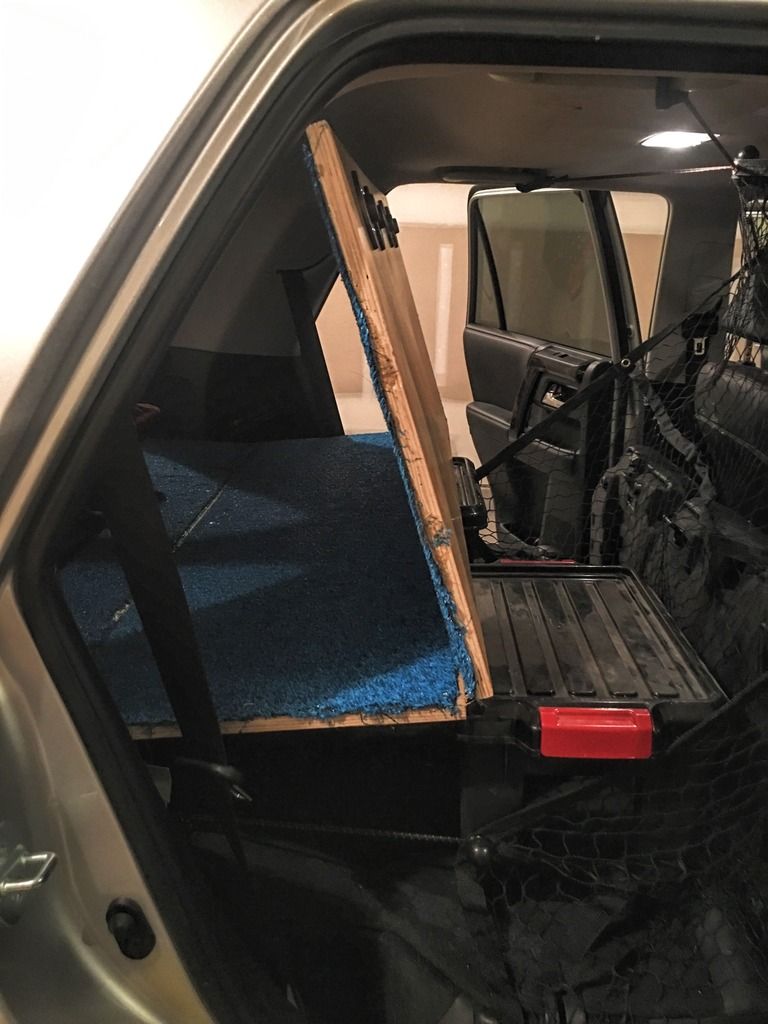
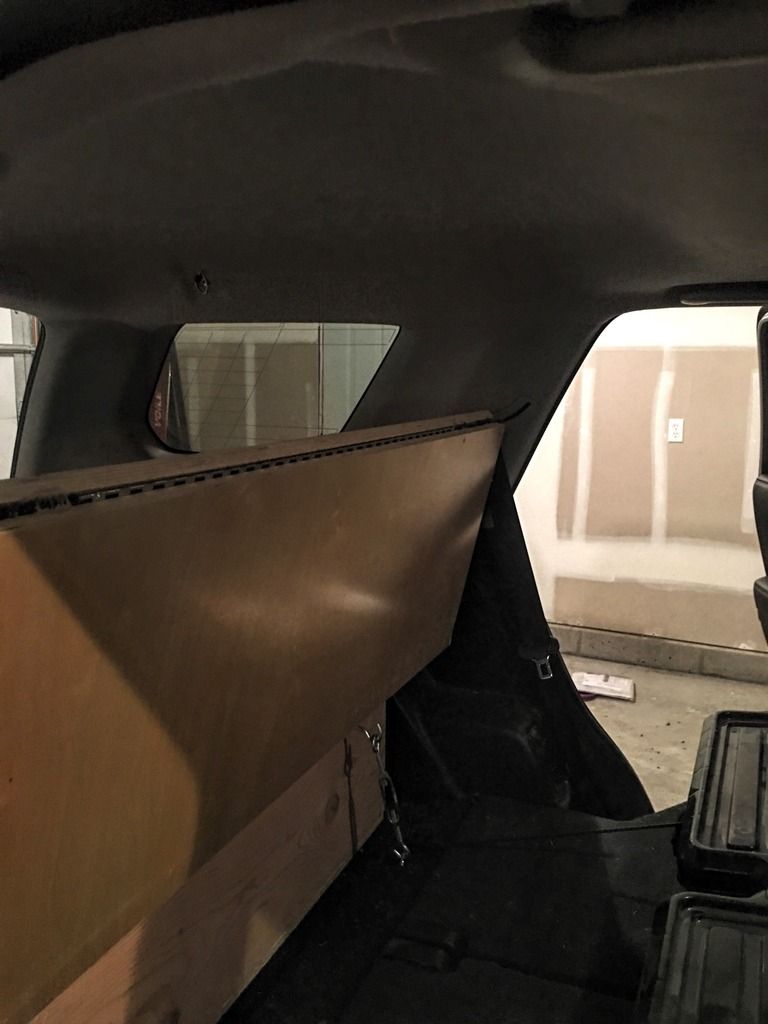
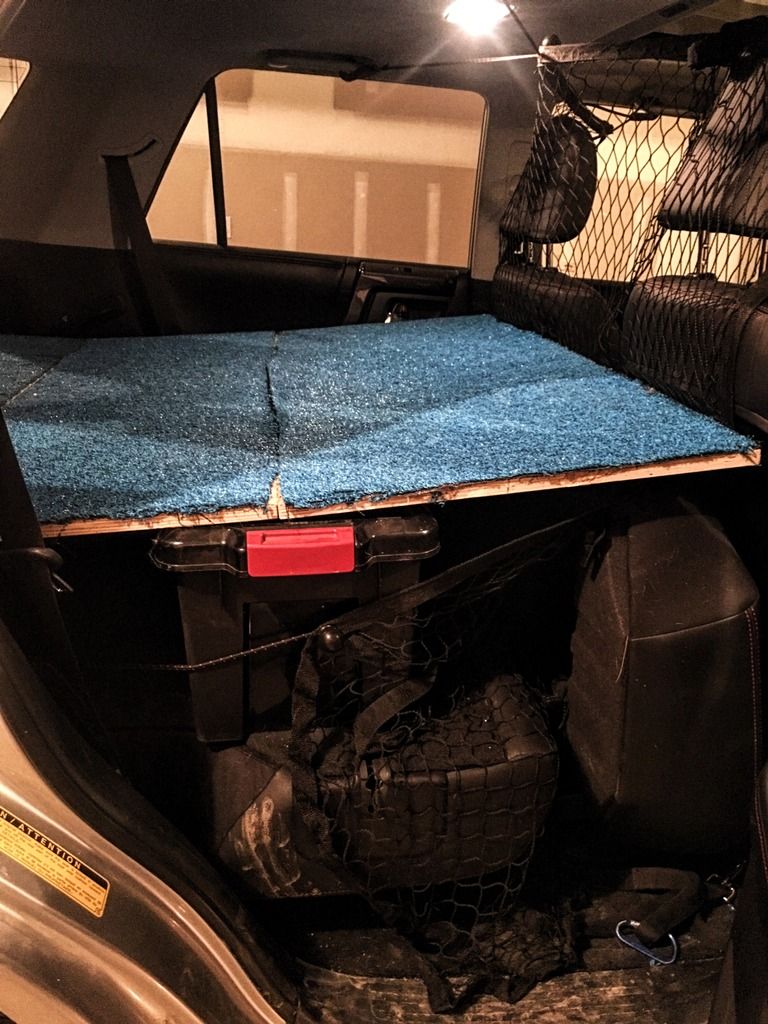
But alas, I persevered, and here is the final result. I opted for one piece that encompassed the entire rear cargo area (including storage underneath) and a bifold section over the rear seats so that it could fold back onto it self, thus leaving the rear seats usable.
Fully assembled, outside of the 4Runner:
Fully assembled, inside of the 4Runner: 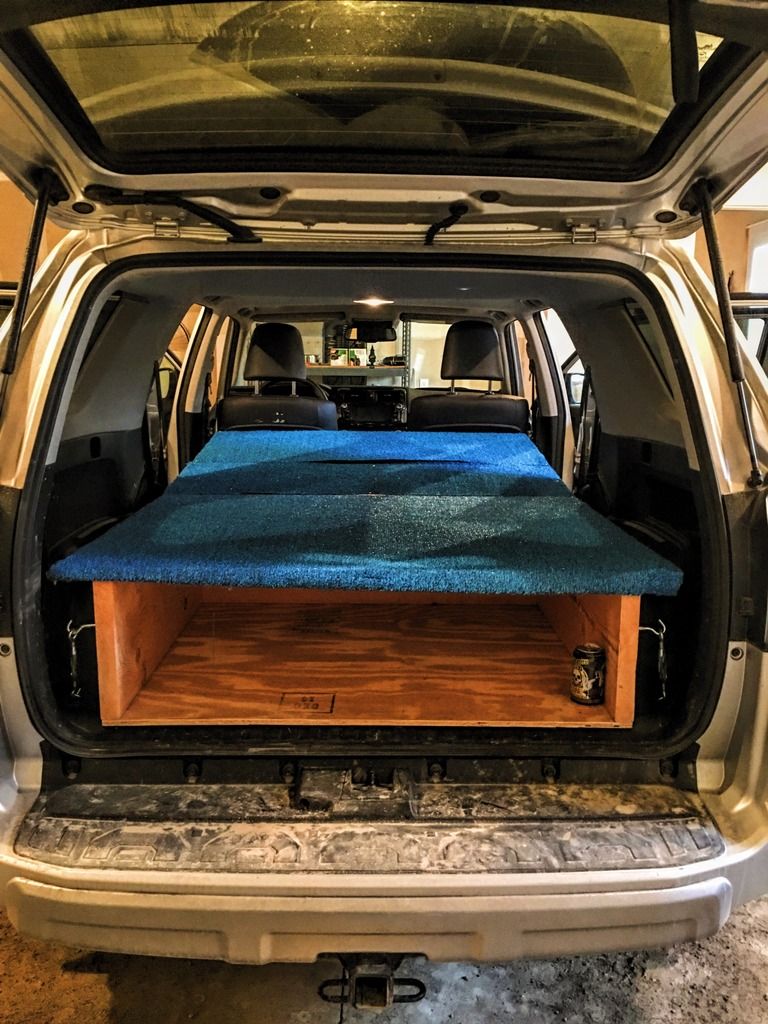
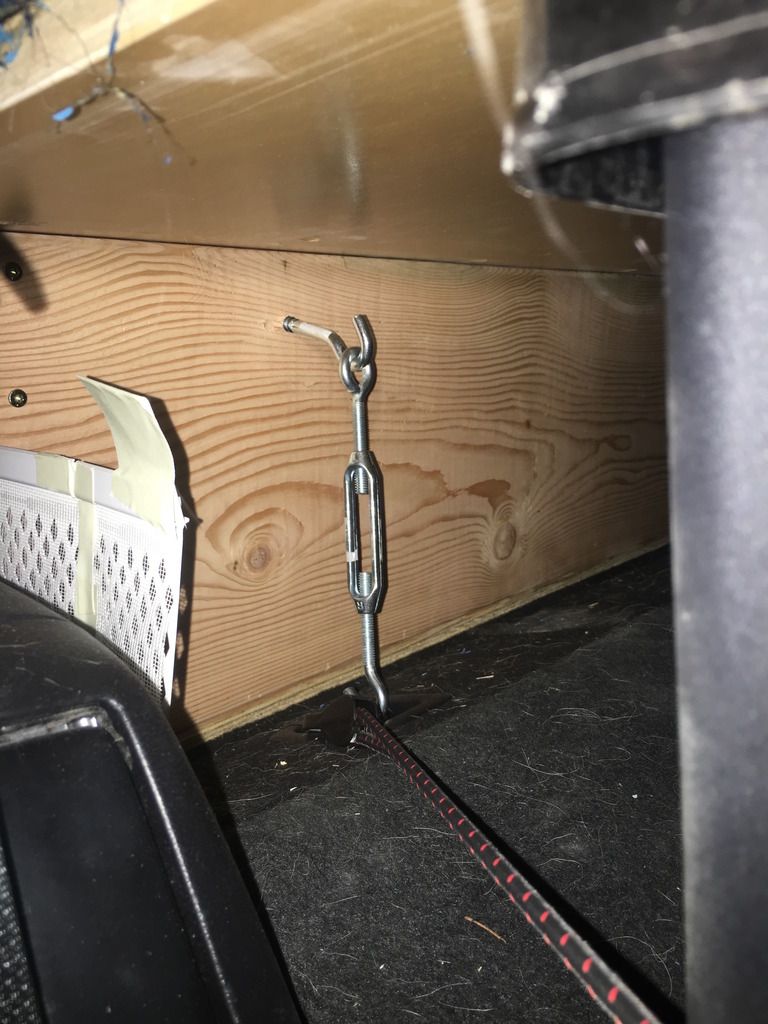
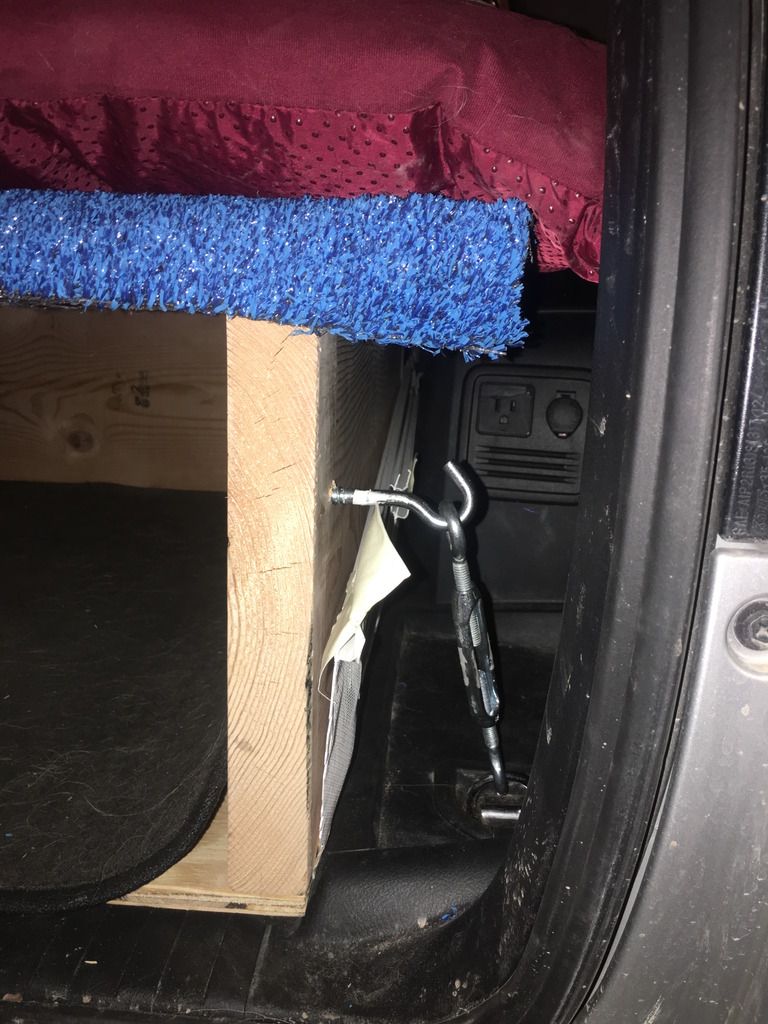
Utilized the tie downs in the rear cargo area to secure the platform:
Pictures of the bifold mechanism, supports, and platform in "back seats usable mode:"
Here's what I'm using to support the middle joints (20qt): http://www.containerstore.com/s/gara...uctId=10027414. I figure these will be used for dog food storage. The platform is perfectly stable with 2 of these, though I might need 3 for dog food on a 2 week long Baja adventure. Will update when I find out. The far end is currently supported by the seat bottoms resulting in a slight upslope. However, I did also create 4 metal supports that can support the far end if I remove the seat bottoms. Will update on how this works when I try it.
Here's a photo of it loaded up with equipment. Cooking and camp supplies below, water supply above: 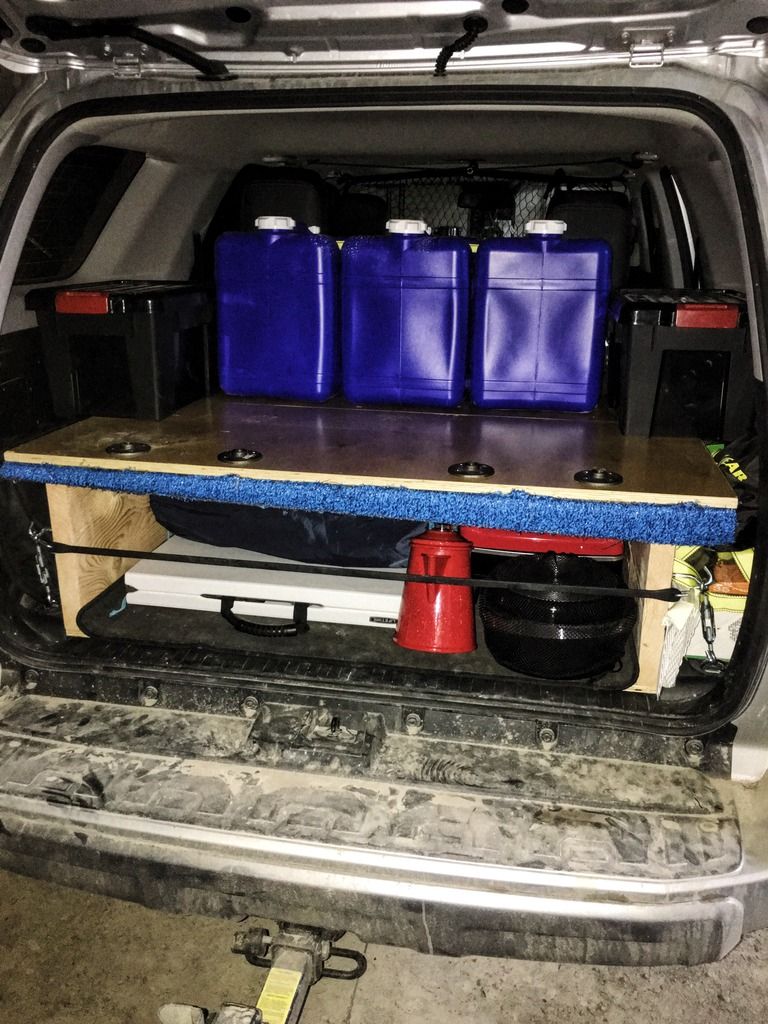
One of a few tests runs prior to getting lost in Mexico: 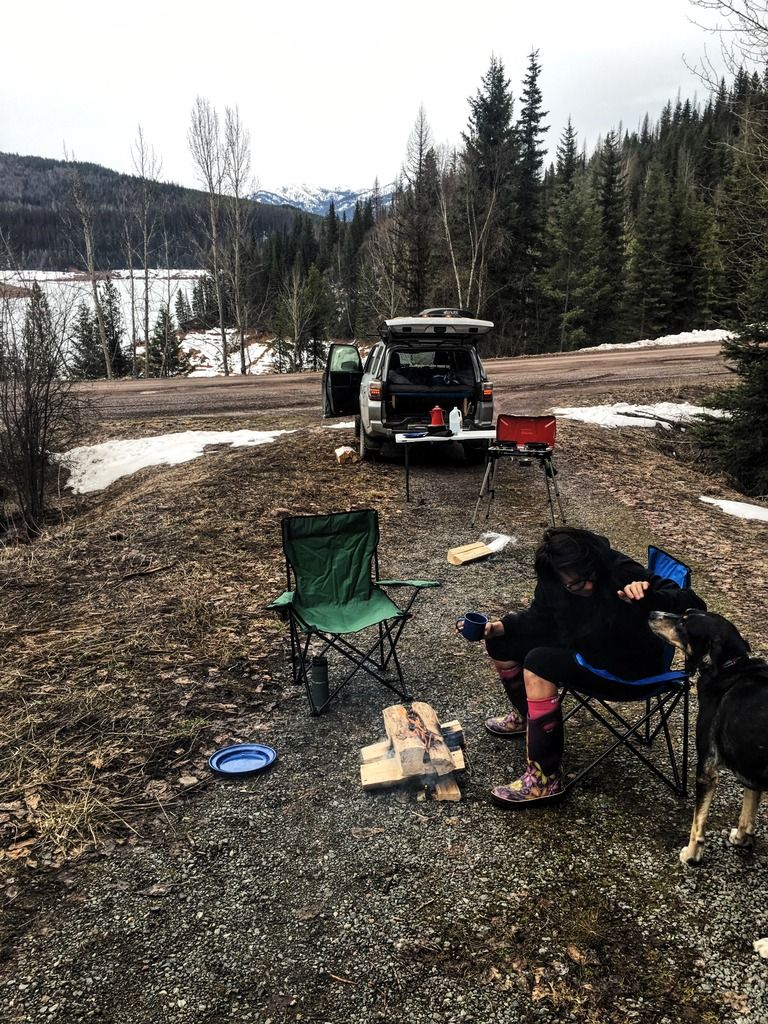
Jane approves: 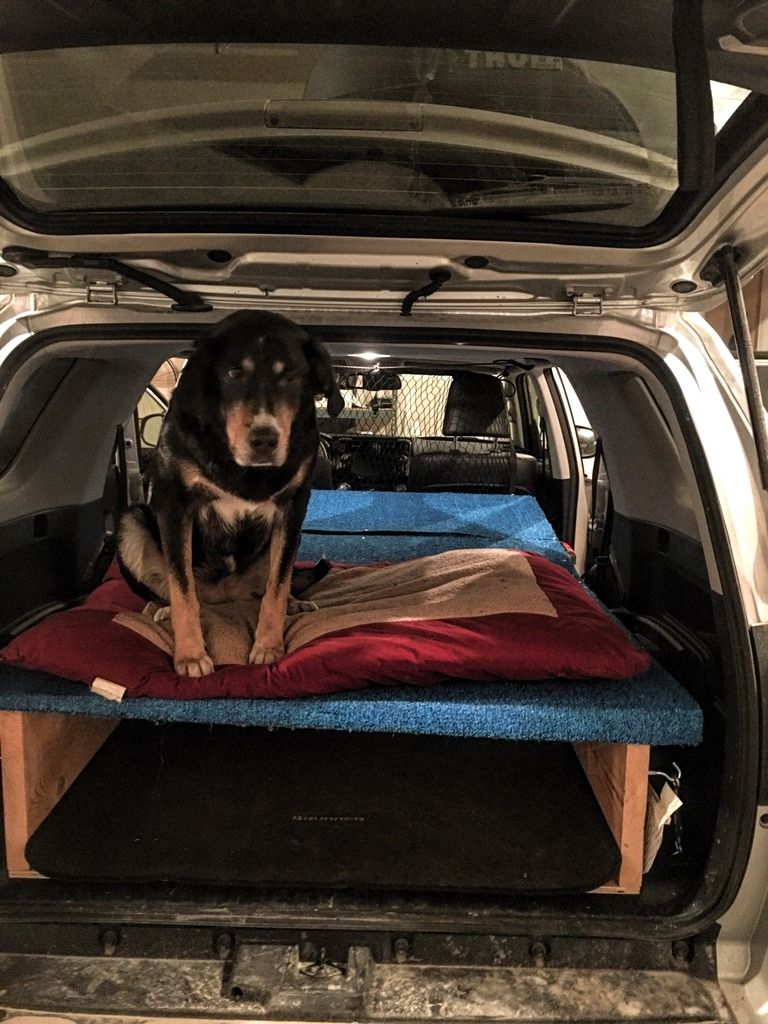
I put this together in a day and about $200. If you have any specific questions about anything feel free to reach out to me. Two of these ( https://www.rei.com/product/870757/r...g-sleeping-pad) complete the bed. Got a killer deal on them and only paid ~$87 for both of them. So I guess that makes the entire sleeping platform cost about $287. There's still ample storage on the side for smaller items, and I'm very happy with the build so far. Will update with pics from Baja when I have them.
Last edited by daDrumpf; 03-22-2016 at 11:58 PM.
|

|
 Reply With Quote Reply With Quote
|
|
03-22-2016, 11:07 PM
|
#2
|
|
Senior Member
|
|
Join Date: Sep 2008
Location: Denver,CO
Posts: 1,401
Real Name: Bob/Buckwheat
|
|
|
Senior Member
Join Date: Sep 2008
Location: Denver,CO
Posts: 1,401
Real Name: Bob/Buckwheat
|
Bro - don't know if it's just my computer, but I only see the very last (your dog).
__________________
"I speak three languages and liberal ain't one of them."
|
|
|
Reply With Quote
|
|
03-22-2016, 11:15 PM
|
#3
|
|
Junior Member
|
|
Join Date: Mar 2016
Location: Whitefish, MT
Posts: 22
|
|
|
Junior Member
Join Date: Mar 2016
Location: Whitefish, MT
Posts: 22
|
Quote:
Originally Posted by Blitzkrieg

Bro - don't know if it's just my computer, but I only see the very last (your dog).
|
Don't think it's just you. Working on the images.
EDIT: Photos are now live.
Last edited by daDrumpf; 03-22-2016 at 11:42 PM.
|
|
|
Reply With Quote
|
|
03-23-2016, 12:05 AM
|
#4
|
 |
Member
|
|
Join Date: Nov 2014
Posts: 470
|
|
|
Member
Join Date: Nov 2014
Posts: 470
|
Credit for doing the work yourself, but the size timber used is excessive. You now lose weight opportunities in other areas. Just my opinion.
__________________
Car History from 1st to Present: -1997 Mustang V6 (Sold); -1999 Chevrolet Blazer (Sold); -2001 Chevrolet Silverado Z71 (Sold); -1999 Chevrolet Z28 Camaro (Sold  ); 1982 Jeep CJ-7; 2014 Trail 4Runner
The creator of the "TRAIL" badge
http://www.toyota-4runner.org/5th-ge...blem-made.html
|
|
|
Reply With Quote
|
|
03-23-2016, 08:54 AM
|
#5
|
|
Junior Member
|
|
Join Date: Mar 2016
Location: Whitefish, MT
Posts: 22
|
|
|
Junior Member
Join Date: Mar 2016
Location: Whitefish, MT
Posts: 22
|
I don't disagree with you, I probably could have gotten away with less and still had something super stable. I can't imagine it weighs much more than 100 pounds since my 140 pound cyclist self was able to put it in place alone. But yeah, thinner boards would have made a big difference, though I was looking for the 12" height.
|
|
|
Reply With Quote
|
|
03-23-2016, 10:51 AM
|
#6
|
|
Member
|
|
Join Date: Dec 2015
Posts: 110
|
|
|
Member
Join Date: Dec 2015
Posts: 110
|
Quote:
Originally Posted by On Point
Credit for doing the work yourself, but the size timber used is excessive. You now lose weight opportunities in other areas. Just my opinion.
|
What sizes would you recommend to cut down on weight? I need to built something like this too.
|
|
|
Reply With Quote
|
|
03-23-2016, 11:57 AM
|
#7
|
 |
Senior Member
|
|
Join Date: Oct 2014
Location: Pasadena, CA
Posts: 1,433
Real Name: Dave
|
|
|
Senior Member
Join Date: Oct 2014
Location: Pasadena, CA
Posts: 1,433
Real Name: Dave
|
Sleeping platform
In general I like the height and length. The 3/4" plywood is right for the top platform. The sides could have been 1x12 if you had a gusset brace or angled wedge of wood on the sides, secured to the underside of the 3/4 plywood with the right hardware. I think the turnbuckles could have been simplified to allow easier access to the sides using a piece of angle iron on the sides of the box or the right bracket.
For camping trips I usually carry just two people in the car. By the time you add food boxes, a cooler, a lantern, your personal gear, tents, cameras, maps, books and other gear, the top will be full. I take out the back seats for camping. It frees up a lot of storage space and allows me to put heavy stuff like water and the ice chest on the floor behind the front seats. Where you have them now raises your center of gravity and it will come right through that netting in an accident. What about recovery gear? You have to be able to get yourself out of the sand in Baja.
I can't be sure but it looks like the platform is not flat at the front two folding panels. With the seats out you could easily use legs to support the corners and get it flat.
These are just some ideas to help make it lighter and provide more room. Your project is good inspiration.
Have fun. If you get to Loreto go up in the mountains to see the church and farming town of San Javier. Loreto has the oldest mission in the chain of missions along the Pacific coast.
__________________
2015 T4R Trail Edition w/KDSS. Baja Rack flat utility rack, Baja Rack ladder, WeatherTech floor mats, Demello rock sliders. RCI skid plates, Falken AT3W LT285/70R17 tires, ICON Stage 7 tubular 2" extended travel lift, ICON Rebound 17x8.5" 0 offset alloy wheels, Baxter Performance remote oil filter adapter. Side exit exhaust, 2nd recovery hook on rear frame corner, DIY wheel well liners with 1/4" neoprene rubber. 

|
|
|
Reply With Quote
|
|
03-23-2016, 02:52 PM
|
#8
|
 |
Junior Member
|
|
Join Date: Mar 2016
Location: Huntington Beach
Posts: 14
|
|
|
Junior Member
Join Date: Mar 2016
Location: Huntington Beach
Posts: 14
|
I like it...this gives me some ideas for doing the same in my truck. Thanks for sharing.
|
|
|
Reply With Quote
|
|
03-23-2016, 03:20 PM
|
#9
|
|
Junior Member
|
|
Join Date: Mar 2016
Location: Whitefish, MT
Posts: 22
|
|
|
Junior Member
Join Date: Mar 2016
Location: Whitefish, MT
Posts: 22
|
Quote:
Originally Posted by DesertCanyons
In general I like the height and length. The 3/4" plywood is right for the top platform. The sides could have been 1x12 if you had a gusset brace or angled wedge of wood on the sides, secured to the underside of the 3/4 plywood with the right hardware. I think the turnbuckles could have been simplified to allow easier access to the sides using a piece of angle iron on the sides of the box or the right bracket.
For camping trips I usually carry just two people in the car. By the time you add food boxes, a cooler, a lantern, your personal gear, tents, cameras, maps, books and other gear, the top will be full. I take out the back seats for camping. It frees up a lot of storage space and allows me to put heavy stuff like water and the ice chest on the floor behind the front seats. Where you have them now raises your center of gravity and it will come right through that netting in an accident. What about recovery gear? You have to be able to get yourself out of the sand in Baja.
I can't be sure but it looks like the platform is not flat at the front two folding panels. With the seats out you could easily use legs to support the corners and get it flat.
These are just some ideas to help make it lighter and provide more room. Your project is good inspiration.
Have fun. If you get to Loreto go up in the mountains to see the church and farming town of San Javier. Loreto has the oldest mission in the chain of missions along the Pacific coast.
|
I'm definitely considering removing the seat bottoms at the least for this upcoming trip. You're right, it doesn't sit flat when it's supported by the seat bottoms, but the angle isn't repulsive and I'm still able to sleep easily. I sleep with my head toward the rear hatch because there's more headroom there than on the other end. I just kind of lucked out in that I had these plastic containers lying around that were the perfect size to support the middle, with the seat backs in at least. I'll need to take dog food on any trip I go on, so I think that's a fairly good solution and combination for my particular circumstance.
Good point about the water and stuff in the cargo area. You can't really tell from the picture, but I'm able to ratchet it down where it is for travel purposes. Will definitely see if it fits on the floor with the seat bottoms removed. I'm not terribly concerned about it flying forward in an accident. The netting is also just to keep my shedding and sometimes muddy dog out of the front seat on a daily basis. It'll be removed for this and any other long trip where dirt is inevitable anyway. Thanks for the tips.
@ Dude
there isn't much headroom, but I think that's inevitable. I think it's less than 20" after the mats are in place, but I don't quite remember. Luckily, I'm 5'8" and it doesn't bother me too much. Getting in and out is awkward too, but doable. I grab my roof cross bar and interior handle to help out.
Last edited by daDrumpf; 03-23-2016 at 03:23 PM.
|
|
|
Reply With Quote
|
|
03-23-2016, 07:48 PM
|
#10
|
 |
Member
|
|
Join Date: Sep 2012
Location: Calgary, AB. Canada
Posts: 472
Real Name: Pat
|
|
|
Member
Join Date: Sep 2012
Location: Calgary, AB. Canada
Posts: 472
Real Name: Pat
|
Heya OP,
If you're interested, have a look at the link below. I did some similar tie downs on my cargo drawer a while back, but used some nuts and wide washers to get the ring as close as possible to the side of the box to decrease the leverage and increase the surface area of the load bearing components ,so you can really tighten that sucker down. This box DOES NOT move!
Ol'Bad's '11 SR5 Build Thread and Offroading Journal
__________________
2011 Mag Grey SR5 Build & Pics / Front: Walker Evans 2.5" C.O's, AllPro UCA's, TC Spindle Gussets / Rear: Icon 2.0 LT w full MetalTech HD Rear LT Setup, Skyjacker sway links/ Odyssey 34R-PC1500 / Cooper STT Pro LT295 70 R17 E / CountersteerX's / Baja Flat Rack, HighliftX, CVT Mt.Shasta / BudBuilt bumpouts & Aluminum Skids / 10lb PowerTank / ARB Breathers(F&Rdiff,Tcase,Trans) / Shrockworks Front Bumper / Superwinch Talon 9.5 w Viking synthetic / Radio: Yaesu FTM-400DR, Comet 2x4, SBB1,SBB5,SBB7. AND NO FRONT F*CKING SWAYBAR!!!
VE6TXS
|
|
|
Reply With Quote
|
|
03-23-2016, 08:14 PM
|
#11
|
 |
Member
|
|
Join Date: Mar 2014
Location: Knoxville, TN
Posts: 384
|
|
|
Member
Join Date: Mar 2014
Location: Knoxville, TN
Posts: 384
|
The electric blue astroturf complements the black leather interior nicely 
__________________
2016 SR5 4WD. BFG KO2 275/70R17. FJ TRD Bilsteins + Wheelers 1.25" preload spacers + Eibach rear springs.
|
|
|
Reply With Quote
|
|
03-23-2016, 11:16 PM
|
#12
|
 |
Senior Member
|
|
Join Date: Jan 2012
Location: the meadows n the desert
Age: 73
Posts: 3,160
Real Name: Mike
|
|
|
Senior Member
Join Date: Jan 2012
Location: the meadows n the desert
Age: 73
Posts: 3,160
Real Name: Mike
|
Only relevant question how'd you sleep ?
__________________
  2011 SR5 Mgm 4x4 alpharex pro headlights & depo black tail lights level 8 trackers wheels & p285/70/17 cooper at3s, 6112s all around set 2.5 rear rancho spacer 11/4, FJ coils TRD intake.w/afe-dry filter  Urd y-pipe flowmaster super70ii TE roofrails! 2014 Sr5 Superwhite Bils 6112s/eibach 2.5 /1 "rear springs 285s Cooper at3 ms on fj pc-d satin black, Urd y-pipe/Flow delta 50 muffler/all interior led lights & low beams sealights h7 led with laminx yellow fogs & oldreds puddle harness w/2010-13 mirrors
|
|
|
Reply With Quote
|
|
03-24-2016, 02:03 AM
|
#13
|
|
Senior Member
|
|
Join Date: Oct 2014
Location: Pasadena, CA
Posts: 1,433
Real Name: Dave
|
|
|
Senior Member
Join Date: Oct 2014
Location: Pasadena, CA
Posts: 1,433
Real Name: Dave
|
Seats do not bear on the floor
Quote:
Originally Posted by daDrumpf
I'm definitely considering removing the seat bottoms at the least for this upcoming trip. You're right, it doesn't sit flat when it's supported by the seat bottoms, but the angle isn't repulsive and I'm still able to sleep easily. I sleep with my head toward the rear hatch because there's more headroom there than on the other end. I just kind of lucked out in that I had these plastic containers lying around that were the perfect size to support the middle, with the seat backs in at least. I'll need to take dog food on any trip I go on, so I think that's a fairly good solution and combination for my particular circumstance.
...
|
Today I was putting my back seats back in the 4Runner so I could pick 4 people up at the airport on Friday. It took me about 1&1/2 hours, taking time to put a drop of oil on each nut so it would come out easily later. The first time I took them out it took me 2 hours to figure them out as I did it. Now it goes pretty fast.
Now watch out. Here's something I noticed today:
As I put the seat bottoms back in I notice the seats do not bear on the floor as one might assume. They bear on the arm that's bolted to the floor. Look at the seats in the folded up position and notice the 1/2" to 1" gap under the front seat edge above the floor. The arm is at about a 90 degree angle to the seat bottom which puts a bending force on the joint between the arm and seat frame. It's fine for the weight of the seat but when you add a load like water bottles, camping gear or two people and a dog it probably puts excessive force on the little seat bracket. You could mitigate that by putting something under the seat to raise it up slightly, or take the seats out and make legs for your platform.
If you go camping in bear country make sure that dog food is in a tight fitting container, in a bear box or tied it up in a tree, not in your car. A bear would rip your door off to get that dog food. Just saying is all... 
__________________
2015 T4R Trail Edition w/KDSS. Baja Rack flat utility rack, Baja Rack ladder, WeatherTech floor mats, Demello rock sliders. RCI skid plates, Falken AT3W LT285/70R17 tires, ICON Stage 7 tubular 2" extended travel lift, ICON Rebound 17x8.5" 0 offset alloy wheels, Baxter Performance remote oil filter adapter. Side exit exhaust, 2nd recovery hook on rear frame corner, DIY wheel well liners with 1/4" neoprene rubber.
|
|
|
Reply With Quote
|
|
03-24-2016, 02:16 AM
|
#14
|
|
Senior Member
|
|
Join Date: Sep 2008
Location: Denver,CO
Posts: 1,401
Real Name: Bob/Buckwheat
|
|
|
Senior Member
Join Date: Sep 2008
Location: Denver,CO
Posts: 1,401
Real Name: Bob/Buckwheat
|
My thoughts are:
1) Your dog looks like one cool dog. I bet she is a hoot.
2) I know you had some leftover carpet from your 1980's home refurb, but brother - drop the dime and go to Home Depot and spend a few $$. It makes a huge difference in curb appeal.
:-)
__________________
"I speak three languages and liberal ain't one of them."
|
|
|
Reply With Quote
|
|
03-24-2016, 10:47 AM
|
#15
|
|
Junior Member
|
|
Join Date: Mar 2016
Location: Whitefish, MT
Posts: 22
|
|
|
Junior Member
Join Date: Mar 2016
Location: Whitefish, MT
Posts: 22
|
Quote:
Originally Posted by oljedi11950
Only relevant question how'd you sleep ?
|
In comparison to without the platform, 1000% better.
Quote:
Originally Posted by Blitzkrieg
My thoughts are:
1) Your dog looks like one cool dog. I bet she is a hoot.
2) I know you had some leftover carpet from your 1980's home refurb, but brother - drop the dime and go to Home Depot and spend a few $$. It makes a huge difference in curb appeal.
:-)
|
Whoops, looks like I Home Depoted wrong  . But $27 for 70sqft wasn't a bad deal.
Quote:
Originally Posted by DesertCanyons
Today I was putting my back seats back in the 4Runner so I could pick 4 people up at the airport on Friday. It took me about 1&1/2 hours, taking time to put a drop of oil on each nut so it would come out easily later. The first time I took them out it took me 2 hours to figure them out as I did it. Now it goes pretty fast.
Now watch out. Here's something I noticed today:
As I put the seat bottoms back in I notice the seats do not bear on the floor as one might assume. They bear on the arm that's bolted to the floor. Look at the seats in the folded up position and notice the 1/2" to 1" gap under the front seat edge above the floor. The arm is at about a 90 degree angle to the seat bottom which puts a bending force on the joint between the arm and seat frame. It's fine for the weight of the seat but when you add a load like water bottles, camping gear or two people and a dog it probably puts excessive force on the little seat bracket. You could mitigate that by putting something under the seat to raise it up slightly, or take the seats out and make legs for your platform.
If you go camping in bear country make sure that dog food is in a tight fitting container, in a bear box or tied it up in a tree, not in your car. A bear would rip your door off to get that dog food. Just saying is all... |
The way that it's designed, coupled with the fact that I sleep with my head towards the rear, I really don't think the seats are bearing much weight. All of the cargo stuff is supported by the frame of the rear box, and then the majority of the rest of the weight is supported by the black boxes underneath the middle joint. Even if I were to lay with my head towards the front, I think the weight that gets distributed to the seats is fairly minimal. I do have supports to use if I take them out as well.
Last edited by daDrumpf; 03-24-2016 at 10:57 AM.
|
|
|
Reply With Quote
|
| Thread Tools |
|
|
| Display Modes |
Rate This Thread |
 Linear Mode Linear Mode
|
|
 Posting Rules
|
You may not post new threads
You may not post replies
You may not post attachments
You may not edit your posts
HTML code is On
|
|
|
|


