 04-30-2020, 06:11 PM
|
#151
|
 |
Elite Member
|
|
Join Date: Dec 2014
Location: Utah
Posts: 5,017
|
|
|
Elite Member
Join Date: Dec 2014
Location: Utah
Posts: 5,017
|
I've had a few PM's about how to do this. So...let's add some tech here. Rather than an electrical diagram - I drew an easy guide for DIY folks who might not be familiar with a wiring diagram. Typical wiring diagrams are like greek if you're not familiar with them. And having more of a plainly drawn out version might be more helpful. So I thought I'd take my own advice on contributing a bit more and draw this in paint rather than SkyCAD which is what i was going to do.
The first picture is the correct way to wire this using Bosch style relays. Lots of relay options. These are the most common, cheap, and waterproof. Personally I prefer to use relay PCBs with solid state relays. But this is the easiest way with parts that most people are familiar with. The numbering system on the relay pins is important. They are not universal in color on the pigtails, but the pin numbering is universal so you can rely on the pin number matching whatever brand of relay. I would use waterproof relays and mount them in a small box on the frame rail next to the KDSS Accumulator. You will run a single wire up to the dash from the KDSS accumulator. The wiring colors are not meaningful in my drawing. The two OEM wires you will interrupt with the relay are pins 5 and 6. On the OEM harness they will be light green and pink. On the bypass harness you would make - who knows. Some will come with randomly colored wires. Some will come all black. Doesn't really matter. Just make sure that the brown and yellow wires on my drawing match up to the pink and light green ones on the factory wiring and that they go to pins 30 and 87a on the two relays.
If you do not use resistors - leave pin 87 open on each relay. Do not connect to ground or you'll create a short circuit that will blow the fuse.
The connectors are available either as DIY assembly where you crimp your own insulation displacement terminals (requires a special tool - not expensive, but you can't do this with pliers very well). Or they are available with pigtails where you'd use butt connectors. The assembly-required pair of connectors is roughly $5-10 for a pair. The pigtail set is around $25-30 for a pair. Relays are $5 each. Resistors are $5 for a lifetime supply of them.
The two resistors are not required if you want to let the dash light come on. They are there to replace the resistance of the solenoid in the shutter valve and mimic the resistance so the dash light will not come on. I have not measured the internal resistance of the solenoid when activated. I would start with a 1k ohms just as a base point. Typically 12v solenoids are around 100 ohms, but I'd start higher and see how it works. Higher resistance = less current and less parasitic watts wasted. Or measure the resistance between pin 4 and 5 on the male plug end on the accumulator and choose something a little bit higher. I don't know exactly how Toyota's ECU measures the continuity through the shutter valve.
The second image is the shade tree mechanic version. There's a lot of reasons not to do it this way. But it would probably work... at least initially until it doesn't. It's the easiest way to do it. The primary failure mode on this style is open valves. That's the opposite of sound engineering. Failure modes should revert to OEM function. The first diagram does this.
Another way to do this entirely under the dash is to interrupt the same pink and light green wires from the KDSS ECU under the dash. Then follow the same wiring as the first image below where those wires would be represented by the brown and yellow wires. You'd need to find a place to stick the relays under the dash. But it might be easier and you wouldn't have to buy any connector housings, but you would cut in to the factory wires to put relays on them.
Good luck.
Last edited by Jetboy; 04-30-2020 at 06:43 PM.
|

|
 Reply With Quote Reply With Quote
|
|
05-01-2020, 02:20 PM
|
#153
|
|
Member
|
|
Join Date: Sep 2019
Posts: 287
|
|
|
Member
Join Date: Sep 2019
Posts: 287
|
Only KDSS w/lift need apply
Quote:
Originally Posted by Jetboy

I've had a few PM's about how to do this. So...let's add some tech here. Rather than an electrical diagram - I drew an easy guide for DIY folks who might not be familiar with a wiring diagram. Typical wiring diagrams are like greek if you're not familiar with them. And having more of a plainly drawn out version might be more helpful. So I thought I'd take my own advice on contributing a bit more and draw this in paint rather than SkyCAD which is what i was going to do.
The first picture is the correct way to wire this using Bosch style relays. Lots of relay options. These are the most common, cheap, and waterproof. Personally I prefer to use relay PCBs with solid state relays. But this is the easiest way with parts that most people are familiar with. The numbering system on the relay pins is important. They are not universal in color on the pigtails, but the pin numbering is universal so you can rely on the pin number matching whatever brand of relay. I would use waterproof relays and mount them in a small box on the frame rail next to the KDSS Accumulator. You will run a single wire up to the dash from the KDSS accumulator. The wiring colors are not meaningful in my drawing. The two OEM wires you will interrupt with the relay are pins 5 and 6. On the OEM harness they will be light green and pink. On the bypass harness you would make - who knows. Some will come with randomly colored wires. Some will come all black. Doesn't really matter. Just make sure that the brown and yellow wires on my drawing match up to the pink and light green ones on the factory wiring and that they go to pins 30 and 87a on the two relays.
If you do not use resistors - leave pin 87 open on each relay. Do not connect to ground or you'll create a short circuit that will blow the fuse.
The connectors are available either as DIY assembly where you crimp your own insulation displacement terminals (requires a special tool - not expensive, but you can't do this with pliers very well). Or they are available with pigtails where you'd use butt connectors. The assembly-required pair of connectors is roughly $5-10 for a pair. The pigtail set is around $25-30 for a pair. Relays are $5 each. Resistors are $5 for a lifetime supply of them.
The two resistors are not required if you want to let the dash light come on. They are there to replace the resistance of the solenoid in the shutter valve and mimic the resistance so the dash light will not come on. I have not measured the internal resistance of the solenoid when activated. I would start with a 1k ohms just as a base point. Typically 12v solenoids are around 100 ohms, but I'd start higher and see how it works. Higher resistance = less current and less parasitic watts wasted. Or measure the resistance between pin 4 and 5 on the male plug end on the accumulator and choose something a little bit higher. I don't know exactly how Toyota's ECU measures the continuity through the shutter valve.
The second image is the shade tree mechanic version. There's a lot of reasons not to do it this way. But it would probably work... at least initially until it doesn't. It's the easiest way to do it. The primary failure mode on this style is open valves. That's the opposite of sound engineering. Failure modes should revert to OEM function. The first diagram does this.
Another way to do this entirely under the dash is to interrupt the same pink and light green wires from the KDSS ECU under the dash. Then follow the same wiring as the first image below where those wires would be represented by the brown and yellow wires. You'd need to find a place to stick the relays under the dash. But it might be easier and you wouldn't have to buy any connector housings, but you would cut in to the factory wires to put relays on them.
Good luck.
|
Yeah definitely Id prefer pcbs with solid state relays over standard relays.
JetBoy, curious if you have actually done the wiring or just going off some one who did or just going off diagram? Id prefer to not use those resistors so that kdss light will come on as an indicator rather then using a switch to tell me its deactivated or not. The problem with that is , when you interrupt those circuits , and with out resistors is that the kdss light will come on after you interrupt but will stay on when connecting them again and will not turn off until you cycle your key. I dont know if the kdss system is open or closed because I didnt like that test result so I didnt do the seat of the pants feel by driving until I was able to achieve the same results with the kdss light coming on as when unplugging the system.
What would be the reason for the light to stay on and not go away till you cycle the key? Clearly you are a lot more knowledgeable then me about all this. Seriously.
I also agree with the way pic 2 is wired , is the low budget cheap way to do it and will work until it doesnt and like you mention , you do want the failure modes to fail into stock oem configurations with the system closed.
Sent from my iPhone using Tapatalk
Last edited by dom42; 05-01-2020 at 02:30 PM.
|
|
|
Reply With Quote
|
|
05-02-2020, 11:00 AM
|
#154
|
|
Elite Member
|
|
Join Date: Dec 2014
Location: Utah
Posts: 5,017
|
|
|
Elite Member
Join Date: Dec 2014
Location: Utah
Posts: 5,017
|
I have not done this to my 4Runner. I probably won't. I don't know how long the metal baffles in the accumulator will live being open like this. Flexing metalic baffles at high speed doesn't give me warm fuzzy feelings about them also having a long service life. The LC200 is sort of always "open" but not really. It uses ball style check valves so it closes the accumulators at higher fluid flows, it just does it automatically via a mechanical check valve instead of with electronics. The LX570 uses similar designed high pressure accumulators in the AHC system, but they also are on and off depending on a variety of factors. The LX system uses rubber bladders in some, metal baffles in some, and floating pistons in other chambers. I wish I knew more about why they used each one. The metal baffles are generally for pressures too high for bladders or pistons to maintain the seal between the nitrogen and hydraulic fluids. They seem to last a long time in that system, but I don't know how much they cycle.
Without seeing the ECU code (I think it's encrypted) I don't know why the light stays on. From the FSM the ECU tests the relays periodically. I don't know how often. It believe it is effectively testing resistance in the circuits. According to the FSM if it senses a short circuit in either channel - it will test 8 times and then disconnect the circuit and illuminate the warning light. Probably until the next time you turn it on. It doesn't say how long this lasts, why it does it 8 times, or how it's actually testing the circuit for continuity and resistance. It also doesn't tell us when this happens or how often.
If the circuit is open - broken wire or failed coil in the solenoid that moves the valve - it will register a high resistance and then illuminate the dash light. It certainly knows whenever the circuit is open. Even if when the system isn't sending power to the shutter valves. So it's either testing all the time, on a clock with routine checks, or based on some other outside trigger from the canbus. I'm not an expert on the clocking of the various ECUs or what the communication looks like between them. I've read that the newer Toyota models have a fairly complex handshake between all the ECUs and there may be a lot more info back and forth than I think. My guess would be that there's basically a few or whether a shared clock is used. If I have some more time I'll try to look more closely at the wiring and see if something is obvious.
My guess - and this is pure speculation - is that the KDSS ECU will store a code and not reset the error code until the next time the ignition switch is cycled off and back on. It's possible that the ECU only uses short term memory and doesn't store the error codes long term, but that seems unlikely. My guess is that it just re-tests on startup and clears all the error codes, but that you can't reset it without restarting.
|
|
|
Reply With Quote
|
|
07-04-2020, 07:01 PM
|
#155
|
 |
Member
|
|
Join Date: Mar 2017
Location: South Bay, Ca
Posts: 265
|
|
|
Member
Join Date: Mar 2017
Location: South Bay, Ca
Posts: 265
|
So..... I got a prototype Switch from
@ dom42
and let me tell you.... This is a HUGE game Changer! This, coupled with the spacers that blackgatecustoms also sells, it is a whole next level! With the system switched off (KDSS light on), the Pistons are relaxed and the 4runner takes the bumps and turns it very plush! Im very happy with it and cant wait for it to be released to the public! THis is a huge win for us KDSS folks! People are going to want to put it back in, or buy their truck brand new with the KDSS.
__________________
'17 T4R TRD OR Premium w/KDSS. Icon Stage 7,Nitro 4.88 Gears, Volk TE-37 XT-M SPec wheels, Toyo Open Country RT Trail 35/12.50/17 Tires, RCI Aluminum Skids, CBI Front/Rear Bumpers, Alu-Cab load bars, Alu-Cab 3.1 Roof Top Tent, OEM Audio Plus Reference 450Q, Baja designs S8 30", Baja Designs Squadron Pros, Baja Designs Squadron Sports (Rear bumper), Baja Designs LP6 (Roof)
IG: @Expo_T4R
|
|
|
Reply With Quote
|
|
07-04-2020, 07:30 PM
|
#156
|
|
Member
|
|
Join Date: Mar 2017
Location: South Bay, Ca
Posts: 265
|
|
|
Member
Join Date: Mar 2017
Location: South Bay, Ca
Posts: 265
|
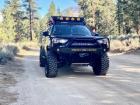
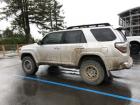
Couple pics
__________________
'17 T4R TRD OR Premium w/KDSS. Icon Stage 7,Nitro 4.88 Gears, Volk TE-37 XT-M SPec wheels, Toyo Open Country RT Trail 35/12.50/17 Tires, RCI Aluminum Skids, CBI Front/Rear Bumpers, Alu-Cab load bars, Alu-Cab 3.1 Roof Top Tent, OEM Audio Plus Reference 450Q, Baja designs S8 30", Baja Designs Squadron Pros, Baja Designs Squadron Sports (Rear bumper), Baja Designs LP6 (Roof)
IG: @Expo_T4R
|
|
|
Reply With Quote
|
|
07-25-2020, 06:37 PM
|
#157
|
 |
Member
|
|
Join Date: Oct 2013
Location: Kirkland, WA
Posts: 257
|
|
|
Member
Join Date: Oct 2013
Location: Kirkland, WA
Posts: 257
|
I definitely need this switch haha, any updates?
@ dom42
__________________
1987 Classic Silver 22re - Stock
2015 Classic Silver Trail Premium
Lift: Dobinson C59-314 Front Coils, C59-725 Rear Coils, Total Chaos Upper Control Arms
Wheels: 17x8.5" FN Overland Spec B Gunmetal
Tires: 285/70/17 Cooper Maxx S/T
|
|
|
Reply With Quote
|
|
07-28-2020, 02:22 PM
|
#158
|
|
Member
|
|
Join Date: Sep 2019
Posts: 287
|
|
|
Member
Join Date: Sep 2019
Posts: 287
|
Quote:
Originally Posted by williamlv282
I definitely need this switch haha, any updates?
@ dom42
|
About 2 months out. Im having a professional wireharness manufacturer put them together for me. They have the blue prints and the sample harness. They are just making it in their most professional way possible. All the way down to certifications on the crimp and all. USA made stuff. Only thing not USA made is the factory connector which we sourced over seas direct from manufacture where Toyota gets them.
Sent from my iPhone using Tapatalk
|
|
|
Reply With Quote
|
|
07-28-2020, 08:49 PM
|
#159
|
|
Member
|
|
Join Date: Jul 2018
Location: CA
Posts: 351
Real Name: Nick
|
|
|
Member
Join Date: Jul 2018
Location: CA
Posts: 351
Real Name: Nick
|
Quote:
Originally Posted by dom42
About 2 months out. Im having a professional wireharness manufacturer put them together for me. They have the blue prints and the sample harness. They are just making it in their most professional way possible. All the way down to certifications on the crimp and all. USA made stuff. Only thing not USA made is the factory connector which we sourced over seas direct from manufacture where Toyota gets them.
Sent from my iPhone using Tapatalk
|
Looking forward to the KDSS switch!
__________________
'18 TRD Off Road Premium w/KDSS.....and Kings, etc...
|
|
|
Reply With Quote
|
|
07-29-2020, 01:01 AM
|
#160
|
|
Member
|
|
Join Date: Oct 2013
Location: Kirkland, WA
Posts: 257
|
|
|
Member
Join Date: Oct 2013
Location: Kirkland, WA
Posts: 257
|
Sweet! Are you going to be taking any pre-orders? I definitely want one of these.
__________________
1987 Classic Silver 22re - Stock
2015 Classic Silver Trail Premium
Lift: Dobinson C59-314 Front Coils, C59-725 Rear Coils, Total Chaos Upper Control Arms
Wheels: 17x8.5" FN Overland Spec B Gunmetal
Tires: 285/70/17 Cooper Maxx S/T
|
|
|
Reply With Quote
|
|
07-29-2020, 10:37 AM
|
#161
|
|
Elite Member
|
|
Join Date: Dec 2014
Location: Utah
Posts: 5,017
|
|
|
Elite Member
Join Date: Dec 2014
Location: Utah
Posts: 5,017
|
Quote:
Originally Posted by dom42
Yeah definitely I’d prefer pcb’s with solid state relays over standard relays.
JetBoy, curious if you have actually done the wiring or just going off some one who did or just going off diagram? I’d prefer to not use those resistors so that kdss light will come on as an indicator rather then using a switch to tell me its deactivated or not. The problem with that is , when you interrupt those circuits , and with out resistors is that the kdss light will come on after you interrupt but will stay on when connecting them again and will not turn off until you cycle your key. I don’t know if the kdss system is open or closed because I didn’t like that test result so I didn’t do the seat of the pants feel by driving until I was able to achieve the same results with the kdss light coming on as when unplugging the system.
What would be the reason for the light to stay on and not go away till you cycle the key?
|
I finally got my order of plugs. Took about 6 weeks or whatever to ship from China. They got stuck in customs for a long time. I suspect trade/covid issues are causing major delays in most imports. I'll try to give this a try with the resistors when I have some time (that's the biggest issue I have right now - time with no childcare I'm either working or childcare 7 days a week - and we're so the time to do this stuff is really limited until something changes with the covid situation). I'll probably just run the wiring into the cab and then mock up different options with a breadboard and see what happens.
I don't think there's another way to trick the ECU into not putting on the dash light, and I don't think it resets without turning on/off the ignition. I think it sets the code and leaves it on until it restarts the KDSS ecu. But Toyota locks down the code and I'm certainly not enough of a software hacker to crack Toyota's encryption. The only solution I can think of that I'd try is to use the relay to trigger a time delay secondary relay that would then open the circuit to the KDSS ECU for maybe 5 seconds. Since it's an add-on ECU it would restart separately and probably clear the code.
However - with that, I don't know if the temporary disconnect of the KDSS ECU would signal to the CAN bus to set some other code in another place. Just something that would have to try. You wouldn't need to do that at the KDSS ECU. It could be done at the fuse I think. So I'd probably just make up a circuit at tap in using what's called a fuse socket connector. Allows you to easily access a fused circuit in a plug and play type way and disconnect with your aftermarket circuit. A fuse tap can function for this and if it were wired up the right way it could serve both functions of powering the relays for the disconnect and cutting out the KDSS ECU to reset when turned back on.
They look like this - I don't see them used much, but they're handy for some situations like this or when you need to measure current to diagnose something:

Last edited by Jetboy; 07-29-2020 at 10:43 AM.
|
|
|
Reply With Quote
|
|
07-29-2020, 06:29 PM
|
#162
|
|
Member
|
|
Join Date: Sep 2019
Posts: 287
|
|
|
Member
Join Date: Sep 2019
Posts: 287
|
Quote:
Originally Posted by williamlv282
Sweet! Are you going to be taking any pre-orders? I definitely want one of these.
|
No I dont like doing ore orders. We are making 500+ sets. Hopefully they sell out lol but hat should be plenty for ppl not to miss them especially say first few weeks or months for that matter. I have over 20k invested into this project  . And thats me not even paying them in full.
Sent from my iPhone using Tapatalk
|
|
|
Reply With Quote
|
|
10-19-2020, 07:46 PM
|
#163
|
|
Member
|
|
Join Date: Sep 2019
Posts: 287
|
|
|
Member
Join Date: Sep 2019
Posts: 287
|
Hey guys. Im not gonna be the one coming out with the kdss harness anymore. Under more testing , I like the way that Jetboy has his wired up minus the resistors. I went back and forth with what I did and his and yes , his design with interrupting the wires he mention are better then interrupting the one ground wire. Except I used a relay and not directly to the switches.
Anyway my old partner doesnt understand any of this and he still going to release it   . Thats gonna be all him.
Sent from my iPhone using Tapatalk
|
|
|
Reply With Quote
|
|
10-20-2020, 09:41 AM
|
#164
|
 |
Member
|
|
Join Date: Apr 2015
Location: Kuwait City, Kuwait
Posts: 675
|
|
|
Member
Join Date: Apr 2015
Location: Kuwait City, Kuwait
Posts: 675
|
So all we need now is for
@ Jetboy
to start mass producing his setup with switches
__________________
2015 T4R TEP-KDSS - Overland build, getting slower by the mod:
Borfoo3's '15 TEP-KDSS 'no longer' mild build
|
|
|
Reply With Quote
|
|
01-08-2021, 05:23 AM
|
#165
|
|
Junior Member
|
|
Join Date: Jun 2020
Location: British Columbia
Posts: 12
|
|
|
Junior Member
Join Date: Jun 2020
Location: British Columbia
Posts: 12
|
so erm, anymore headway on this? lol
|
|
|
Reply With Quote
|
| Thread Tools |
|
|
| Display Modes |
Rate This Thread |
 Linear Mode Linear Mode
|
|
 Posting Rules
|
You may not post new threads
You may not post replies
You may not post attachments
You may not edit your posts
HTML code is On
|
|
|
|


