 02-05-2019, 09:07 AM
|
#76
|
 |
Senior Member
|
|
Join Date: Aug 2014
Location: Walnut Grove
Posts: 1,268
Real Name: Krister
|
|
|
Senior Member
Join Date: Aug 2014
Location: Walnut Grove
Posts: 1,268
Real Name: Krister
|
Quote:
Originally Posted by weeeee

Haha yeah. UC is actually a bit out of the way for me, but we should meet up sometime. I have my eye on a 4x4 labs rear to replace my CBI, would love to check yours out in person.
|
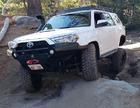
I have been seeing some improvements / changes Luke has mad to the rear bumper and accessories and I almost want a new one. People underestimate the advantage of the reduced overhang. It does make a big difference, I have honestly drug the rear bumper a hand full of times and they were minimal hits, and that was on some really tough trails.
__________________
2020 Tundra Limited Crew Max 4X4 - Tundra Build
2014 4Runner TE - rochmpr Build - SOLD
|

|
 Reply With Quote Reply With Quote
|
|
02-05-2019, 05:24 PM
|
#77
|
 |
Senior Member
|
|
Join Date: May 2009
Location: SF Bay Area, CA
Posts: 1,345
|
|
|
Senior Member
Join Date: May 2009
Location: SF Bay Area, CA
Posts: 1,345
|
Quote:
Originally Posted by rochmpr
I have been seeing some improvements / changes Luke has mad to the rear bumper and accessories and I almost want a new one. People underestimate the advantage of the reduced overhang. It does make a big difference, I have honestly drug the rear bumper a hand full of times and they were minimal hits, and that was on some really tough trails.
|
My biggest concern is the weight on the 4x4Labs bumper. Definitely pretty stout, and I like that it gives a little more clearance vs. the other bumpers on the market. It's also a bit pricey for a steel bumper, at $3-3.5K its pretty much the same cost of the Hefty bumper except that one is aluminum.
Not too much of a fan on the de-sta-co latches holding it all together, I've seen some failures on those with CBI's bumper although design might play a big part. Either way if I go 4x4Labs I might try to do a single swing out so at least the swingarm latches back in to the bumper vs. latching into each other. I feel that tying back into the bumper gives it a bit more strength.
How much vibration do you guys get with the spare tire mounted up?
__________________
IG @go.xplre
|
|
|
Reply With Quote
|
|
02-06-2019, 12:11 AM
|
#78
|
 |
Member
|
|
Join Date: Aug 2016
Location: Cameron Park, CA
Posts: 393
|
|
|
Member
Join Date: Aug 2016
Location: Cameron Park, CA
Posts: 393
|
Thanks for the info on the sway bar. Ive been looking at doing this for awhile, trying to stay away from the all pro kit. I ended up getting a Currie kit off of Summit. Anyway, nice build and thanks again for the inspiration.
|
|
|
Reply With Quote
|
|
02-13-2019, 12:50 AM
|
#79
|
 |
Member
|
|
Join Date: Apr 2015
Location: Bay Area, CA
Posts: 336
|
|
|
Member
Join Date: Apr 2015
Location: Bay Area, CA
Posts: 336
|
Hey Jsparky! Nice meeting you on Sunday! We'll have to hit the trails together sometime!
-Bert
__________________
2015 4R TE w/ KDSS, Mag Gray, King coilovers, King shocks, Timbrens, Dobinsons 749V progressive coils, Dirt King UCAs, Full Rokmen rear arms and panhard, OPOR Sliders, Hefty Front aluminum bumper, rear C4 dual swingout bumper, Warn VR10000S, HeftyFab full skids, AVS Aero, Interior LED's, XenonDepot HID w/ Phillips 4300k, ARB twin compressor, Rear-diff Breather mod, TRD Pro front, Dometic 50, Frontrunner Slimline II Full, TrekBoxx System Alpha, Trekboxx sleep platform, BlueSea, and BajaDesigns lights (LP9's, S8 20", Squadron Pro's, S2's), McQueen Fiberglass Fenders...and a hatchet! 35" Falken Wildpeak MT01's wrapped around SCS Ray 10s, BORA 1" wheel spacers. ECGS 4.88's.
|
|
|
Reply With Quote
|
|
02-16-2019, 12:37 AM
|
#80
|
 |
Senior Member
|
|
Join Date: Jun 2013
Location: Bay Area CA
Posts: 1,811
|
|
|
Senior Member
Join Date: Jun 2013
Location: Bay Area CA
Posts: 1,811
|
Quote:
Originally Posted by 4Running303
Hey Jsparky! Nice meeting you on Sunday! We'll have to hit the trails together sometime!
-Bert
|
Totally, had a blast meeting everyone. Also let me know if youre interested in sharing your camp kitchen setup, I can feature your rig and/or favorite camp recipe on my channel.
|
|
|
Reply With Quote
|
|
03-09-2019, 01:16 PM
|
#81
|
 |
Member
|
|
Join Date: Mar 2014
Location: San Diego
Posts: 304
Real Name: Tony
|
|
|
Member
Join Date: Mar 2014
Location: San Diego
Posts: 304
Real Name: Tony
|
Quote:
Originally Posted by atchcraft
Thanks for the info on the sway bar. Ive been looking at doing this for awhile, trying to stay away from the all pro kit. I ended up getting a Currie kit off of Summit. Anyway, nice build and thanks again for the inspiration.
|
Whats wrong with the all pro kit? I was made by jointly with Currie. I am just curious because i was considering ordering the kit.
|
|
|
Reply With Quote
|
|
04-18-2019, 09:11 PM
|
#82
|
|
Senior Member
|
|
Join Date: Jun 2013
Location: Bay Area CA
Posts: 1,811
|
|
|
Senior Member
Join Date: Jun 2013
Location: Bay Area CA
Posts: 1,811
|
Did some work earlier this week, installed one of
@ eimkeith
panhard correction kit's, aka a rear track bar bracket. I wasn't sure how much a need there was for this on these trucks but it made huge difference, much less bobbing around turns.
Install was relatively easy. You need to unclip the abs lines and unscrew the hard brake lines in several spots. You'll also want to shield the fuel tank due to proximity.
We ended up adding a couple extra gussets, not so much that we felt the design needed it, but because we were in there already and figured why not (this isn't something you want failing.) Track bar is nearly flat now, it's really impressive.
Overall, thanks for the great product Keith, sorry if I ever doubted the need before, you were right!
|
|
|
Reply With Quote
|
|
04-19-2019, 08:05 AM
|
#83
|
|
Member
|
|
Join Date: Aug 2016
Location: Cameron Park, CA
Posts: 393
|
|
|
Member
Join Date: Aug 2016
Location: Cameron Park, CA
Posts: 393
|
Quote:
Originally Posted by Bonyfattony
Whats wrong with the all pro kit? I was made by jointly with Currie. I am just curious because i was considering ordering the kit.
|
Sorry, just saw this... I didnt mean for that to infer that there was something wrong with the all pro kit. I just like to make my own stuff, plus save a few $.
|
|
|
Reply With Quote
|
|
07-16-2019, 12:09 AM
|
#84
|
|
Senior Member
|
|
Join Date: Jun 2013
Location: Bay Area CA
Posts: 1,811
|
|
|
Senior Member
Join Date: Jun 2013
Location: Bay Area CA
Posts: 1,811
|
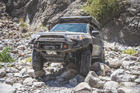
Random updates, it's been too long so figured I should at least throw some photos up.
Played around with some OME linear rear coils (899's). Ride was good with my weight, but I wanted more height. Eventually came back to Dobinsons, put their new super duper heavies in, really happy with them. I had previously installed some 2" bump stop extensions, paired with 26.5" long ADS 2.5" shocks. I'll do a write-up on those at some point, but it meets my needs perfectly... extended down travel while maintaining usable up-travel so I'm not riding on my bumpstops. Tried to show how having offset rear upper controls helps clear the fuel tank as well, for those running extended down travel setups.
I know why people do it, but 3" bump stop extensions are just too much for my taste on these vehicles, and this setup still flexes like a machine.
*edit - having trouble uploading the reast of the pics, once the system lets me Ill get them up.
Last edited by JSparky; 07-16-2019 at 12:54 AM.
|
|
|
Reply With Quote
|
|
07-16-2019, 04:06 PM
|
#85
|
|
Senior Member
|
|
Join Date: Jun 2013
Location: Bay Area CA
Posts: 1,811
|
|
|
Senior Member
Join Date: Jun 2013
Location: Bay Area CA
Posts: 1,811
|
Here we go, I think the file sizes were too big despite being screen shots.
|
|
|
Reply With Quote
|
|
07-16-2019, 04:17 PM
|
#86
|
|
Senior Member
|
|
Join Date: Jun 2013
Location: Bay Area CA
Posts: 1,811
|
|
|
Senior Member
Join Date: Jun 2013
Location: Bay Area CA
Posts: 1,811
|
More suspension porn.
|
|
|
Reply With Quote
|
|
12-10-2019, 10:13 PM
|
#87
|
|
Senior Member
|
|
Join Date: Jun 2013
Location: Bay Area CA
Posts: 1,811
|
|
|
Senior Member
Join Date: Jun 2013
Location: Bay Area CA
Posts: 1,811
|
Thought I'd throw this up for anyone else.. I'm shopping 35's and compiled some tire stats. I'll update it with prices once I have them.
I was surprised to see Nitto offering their Trail Grappler in a 35x11.5, those just may be the ticket.
|
|
|
Reply With Quote
|
|
12-31-2019, 06:29 PM
|
#88
|
|
Senior Member
|
|
Join Date: Jun 2013
Location: Bay Area CA
Posts: 1,811
|
|
|
Senior Member
Join Date: Jun 2013
Location: Bay Area CA
Posts: 1,811
|
Thought I'd update the thread here with some fresh content. Did a little holiday wheeling for a new recipe demo.. bacon wrapped enoki mushrooms with garlic chive.
Also, an Antirock update. I had clearance issues a couple months back between the sway bar links and the new bump stop extensions I put on.. working on a solution currently. I'll update that once it's confirmed to work.
|
|
|
Reply With Quote
|
|
01-21-2020, 02:40 AM
|
#89
|
|
Senior Member
|
|
Join Date: Jun 2013
Location: Bay Area CA
Posts: 1,811
|
|
|
Senior Member
Join Date: Jun 2013
Location: Bay Area CA
Posts: 1,811
|
Hella Micro DE Fog Light HID Conversion
Got around to installing an HID conversion into a pair of Hella Micro DE fog lights, thought Id post this for any interested parties.
Context: I first purchased these lights several years ago when I was running a Demello front bumper. They were recommended to me by Susquehanna Motorsports as one of the best performing street-legal fogs on the market, and they werent wrong. Ive worked with them numerous times and have always been happy. Great spread and output from an H3 halogen bulb placed in a magnesium-housed projector.
Fast forward a few years and I swapped the Demello out for a 4x4Labs front bumper. Super happy with it, except their fog light pockets are more of an aux-light pocket, as the mounting tabs are positioned on an angle. This is fine for a spot or flood light, but not anything that requires a horizontal cutoff (ie street legal).
I shelved the Hellas for awhile but found some time recently to get around to them. Picked up a DDM HID kit during Black Friday and welded some angled l-brackets together last weekend, to rotate the mounting surface horizontal from the bumpers angled tabs.
The bulb swap was easy. I wasnt sure how smoothly it was going to go at first because H3 bulbs use the mounting plate as a grounding interface. What I ended up doing was simply removing the H3 bulb catch, unscrewed the mounting plate, and fed the HID bulb through the plate (wires first). This functionally created a mounting plate that sandwiched the HID into the back of the housing via the factory 3 screws. I was pretty happy with how this turned out.
I mention the above because I read on several 4wd and enduro bike forums of people doing an HID swap into these housings, but using bailing wire, zip ties, washers, etc to secure the HID bulb to the housing. I think the method I used above is likely both easier and more robust, time will tell.
The rest of the install was more or leas the same as any other HID install. I re-used the factory Hella relay and wiring harness, simply swapped the power connectors over to the HID harness for a plug n play solution.
I included two iPhone shots, one with and one without the fogs on. Note the exposure wasnt standardized, Ill have to pull my dslr out for that and wanted to get a side by side with someone with factory fogs, for comparison. Ive aimed the cutoff of the fogs to be slightly below the low-beam cutoff, and the increase in near and wide field lighting appears substantial. Hope that helps!
|
|
|
Reply With Quote
|
|
04-25-2020, 05:45 PM
|
#90
|
|
Senior Member
|
|
Join Date: Jun 2013
Location: Bay Area CA
Posts: 1,811
|
|
|
Senior Member
Join Date: Jun 2013
Location: Bay Area CA
Posts: 1,811
|
Got around to installing the snorkel, went pretty smooth overall. Only notes are that I disagree with the amount of trimming that is indicated to the factory airbox, I trimmed less than recommended and still feel like there's barely enough material to create a good seal with the snorkel's rubber hose. I'll be checking it after a few hundred miles to make sure it's still seated properly.
|
|
|
Reply With Quote
|
 Posting Rules
|
You may not post new threads
You may not post replies
You may not post attachments
You may not edit your posts
HTML code is On
|
|
|
|


 Linear Mode


