Home Menu

Site Navigation


User Tag List

Reply
 
Thread Tools Rate Thread Display Modes
Old 08-23-2018, 08:17 AM #1
TedStriker's Avatar
TedStriker TedStriker is offline
Member
 
Join Date: Jul 2018
Location: San Diego, CA
Posts: 42
TedStriker is on a distinguished road
TedStriker TedStriker is offline
Member
TedStriker's Avatar
 
Join Date: Jul 2018
Location: San Diego, CA
Posts: 42
TedStriker is on a distinguished road
3rd Row Seat Delete--Goose Gear

After owning a '99 SR5 and putting over 250K miles on it, the opportunity came up to buy a 2011 SR5 4x4 from my father in law. It was completely stock, and very well maintained. The only option on it that I was not particularly fond of were the 3rd row seats: as you all know, they are pretty useless for anyone over 3ft tall, and they eat up some cargo room in the trunk.

(Side note, there will soon be a set of 3rd row seats, complete with trim, all hardware, and seatbelts for sale in the San Diego Area).

After looking at some options, I went with the 3rd row seat delete from Goose Gear: they make some great looking drawer systems, and although a little pricy, are high quality. I contemplated making my own (since some of you will look at it and say, 'it's just a piece of plywood') but I liked the modularity of the system, the heavy duty coating, and the mounting points that make it a flexible platform.

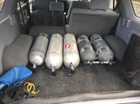
I mainly use the T4R for my DD and to haul dive gear around to different dive sites--I needed something that can stand up to dragging tanks in and out, and also that was more water tight as salt water does tend to drip when putting wet gear back in the cargo area.

Pics are below, along with some 'modifications' I made to the original goose gear system.

1) Rear seats come out really easily. Very intuitive and self explanatory.
2) after the seats were out, I sprayed all the bare metal with truck bed liner. Not really required, but I wanted an extra layer of rust prevention since water may drip back there with all the dive gear.
3) The goose gear plate mounts into the existing spots where the seat hardware went. I had to chase the threads, but that was about it.
4) I removed the 40% side (passenger side) seat as well, as I will be adding a extension to that part of the platform. (not yet installed)
Attached Images
3rd Row Seat Delete--Goose Gear-img_0819-jpg  3rd Row Seat Delete--Goose Gear-img_1022-jpg 
TedStriker is offline   Reply With QuoteReply With Quote
Old 08-23-2018, 08:23 AM #2
TedStriker's Avatar
TedStriker TedStriker is offline
Member
 
Join Date: Jul 2018
Location: San Diego, CA
Posts: 42
TedStriker is on a distinguished road
TedStriker TedStriker is offline
Member
TedStriker's Avatar
 
Join Date: Jul 2018
Location: San Diego, CA
Posts: 42
TedStriker is on a distinguished road
One of the changes I made was to add a piece that covered the rear of the second row seat where it pivots when you fold it forward. As mentioned, mostly dive gear goes in the cargo area, so I wanted to cover up this spot so sand/water didn't go behind the seat.

I used a piece of AL angle and attached it to the rear, using holes in the platform that Goose Gear pre drilled.
Then I cut a piece of 3/4' ply to size and put on a couple of coats of bedliner before bolting it to the angle.

You can see in the final Pic how it covers the gap but sill allows the seat to pivot forward. It also blends in nicely with the rest of the platform.
Attached Images
3rd Row Seat Delete--Goose Gear-img_0995-jpg  3rd Row Seat Delete--Goose Gear-img_0998-jpg  3rd Row Seat Delete--Goose Gear-img_1022-jpg 
TedStriker is offline   Reply With QuoteReply With Quote
Old 08-23-2018, 08:28 AM #3
TedStriker's Avatar
TedStriker TedStriker is offline
Member
 
Join Date: Jul 2018
Location: San Diego, CA
Posts: 42
TedStriker is on a distinguished road
TedStriker TedStriker is offline
Member
TedStriker's Avatar
 
Join Date: Jul 2018
Location: San Diego, CA
Posts: 42
TedStriker is on a distinguished road
The other change I made was to the 'ears'--the space behind the wheel wells. (not sure what else to call them).

You can put the stock ones back after some trimming, but after you trim them, they are pretty flimsy since you cut of the mounting tabs and there is no way to support them. Also, if you use the stock ones, there will be a big gap where the seat belt use to come out. Instead, made some templates and cut them out of 1/2" ply, made some supports for under them, and covered them with rubber liner. Much more solid, and it covers up the seat belt area.

There is some 'wasted space' under them where you could perhaps store things, but for my use, this will work fine.
Attached Images
3rd Row Seat Delete--Goose Gear-img_1020-jpg  3rd Row Seat Delete--Goose Gear-img_1031-jpg 
TedStriker is offline   Reply With QuoteReply With Quote
Old 08-23-2018, 11:04 AM #4
Bootleg's Avatar
Bootleg Bootleg is offline
Member
 
Join Date: Sep 2013
Location: Huntersville, NC
Posts: 233
Real Name: Brandon
Bootleg is on a distinguished road
Bootleg Bootleg is offline
Member
Bootleg's Avatar
 
Join Date: Sep 2013
Location: Huntersville, NC
Posts: 233
Real Name: Brandon
Bootleg is on a distinguished road
Thanks for posting this. I've been eyeing this platform for a while, mainly because they do all the hard work and I don't have the tools/know-how to build one myself. Plus GG doesn't really have good pictures of what their finished product looks like with the 3rd row removed.
__________________
2013 SR5 4wd Bike Hauler
275/70/17 BFG KO2 on 17x9 Level 8 MK6 <> Bilstein 6112 (@ 2.5") /5160 w/ Icon 2" springs <> JBA Offroad UCAs <> ShrockWorks step sliders <> Front Runner Full Length Rack <> Baja Ladder <> Canvasback cargo liner
Bootleg is offline   Reply With QuoteReply With Quote
Old 09-01-2018, 07:56 PM #5
TedStriker's Avatar
TedStriker TedStriker is offline
Member
 
Join Date: Jul 2018
Location: San Diego, CA
Posts: 42
TedStriker is on a distinguished road
TedStriker TedStriker is offline
Member
TedStriker's Avatar
 
Join Date: Jul 2018
Location: San Diego, CA
Posts: 42
TedStriker is on a distinguished road
Updated pics: got the 40% (passenger side) installed. Will most likely make another panel to fill in the gap below the plate.

Pardon the dirt—hauled around a bunch of dive gear and tracked some back in...3rd Row Seat Delete--Goose Gear-img_1094-jpg3rd Row Seat Delete--Goose Gear-img_1096-jpg


Sent from my iPhone using Tapatalk
TedStriker is offline   Reply With QuoteReply With Quote
Old 03-26-2020, 02:48 PM #6
marcosdzed5 marcosdzed5 is offline
Junior Member
 
Join Date: Dec 2017
Location: LAS VEGAS
Posts: 10
marcosdzed5 is on a distinguished road
marcosdzed5 marcosdzed5 is offline
Junior Member
 
Join Date: Dec 2017
Location: LAS VEGAS
Posts: 10
marcosdzed5 is on a distinguished road
Question

I know it has been a log time since you originally posted this but am about to pull the trigger on the same plate you installed for the 3rd row delete. I wanted to know first though if the plate sat flat, without any downward slope from the front to back (closest to the rear)? Thanks for the pics and information. Gave me some confidence and direction for this project.
marcosdzed5 is offline   Reply With QuoteReply With Quote
Old 09-19-2020, 08:03 PM #7
dash4586 dash4586 is offline
Junior Member
 
Join Date: Sep 2020
Location: Ottawa, Canada
Posts: 3
dash4586 is on a distinguished road
dash4586 dash4586 is offline
Junior Member
 
Join Date: Sep 2020
Location: Ottawa, Canada
Posts: 3
dash4586 is on a distinguished road
5th gen 3row delete

Hey guys, I know this is a old thread but I've been searching for info.
I finally completed the 3rd row seat delete on my 5th gen runner. I couldn't justify paying for the aftermarket kits. I used 1/2 plywood for the base. I painted it flat black but will probably cover it with automotive carpet or grip paint. The base plate ends up being 42''x42''. I added the sides to hide the openings left by the seat panels. In my opinion the 3rd row seat is only useful for young children. You gain loads more space with the delete. I also used foam tape on the underside of the panel where it meets high spots on the trucks floor.
Attached Images
3rd Row Seat Delete--Goose Gear-img_5839-2-jpg 
dash4586 is offline   Reply With QuoteReply With Quote
Old 09-19-2020, 08:06 PM #8
dash4586 dash4586 is offline
Junior Member
 
Join Date: Sep 2020
Location: Ottawa, Canada
Posts: 3
dash4586 is on a distinguished road
dash4586 dash4586 is offline
Junior Member
 
Join Date: Sep 2020
Location: Ottawa, Canada
Posts: 3
dash4586 is on a distinguished road
If you are only doing the 3rd row delete my base plate perfectly flat. I trimmed the plastic retainer clips for a wiring harness and its perfectly level.
dash4586 is offline   Reply With QuoteReply With Quote
Reply


Posting Rules
You may not post new threads
You may not post replies
You may not post attachments
You may not edit your posts

BB code is On
Smilies are On
[IMG] code is On
HTML code is On

Forum Jump

Similar Threads
Thread Thread Starter Forum Replies Last Post
Goose Gear Plate System Install - with cargo slide removal Fergie 5th gen T4Rs 11 04-20-2018 09:21 AM
WTB: Goose Gear Premium Storage (WA) NWtrdpro Want to Buy/Trade 0 06-20-2017 09:17 PM
IIKTWIKN: Goose Gear configuration thoughts after living with it Liquidmantis 5th gen T4Rs 15 09-10-2016 03:21 PM
WTB: 4Runner rear seat delete 4 X 4RUNNER Want to Buy/Trade 1 11-21-2015 05:30 PM
seat belt/delete oljedi11950 General Discussions 3 02-15-2012 07:14 PM

Powered by vBadvanced CMPS v3.2.2

All times are GMT -4. The time now is 09:16 PM.

Powered by vBulletin® Version 3.8.11
Copyright ©2000 - 2024, vBulletin Solutions Inc.
Search Engine Optimisation provided by DragonByte SEO (Pro) - vBulletin Mods & Addons Copyright © 2024 DragonByte Technologies Ltd.
Feedback Buttons provided by Advanced Post Thanks / Like (Lite) - vBulletin Mods & Addons Copyright © 2024 DragonByte Technologies Ltd.
User Alert System provided by Advanced User Tagging (Lite) - vBulletin Mods & Addons Copyright © 2024 DragonByte Technologies Ltd.
***This site is an unofficial Toyota site, and is not officially endorsed, supported, authorized by or affiliated with Toyota. All company, product, or service names references in this web site are used for identification purposes only and may be trademarks of their respective owners. The Toyota name, marks, designs and logos, as well as Toyota model names, are registered trademarks of Toyota Motor Corporation***Ad Management plugin by RedTyger
 
Copyright © 2020