 12-07-2018, 01:10 PM
|
#31
|
 |
Member
|
|
Join Date: Aug 2018
Location: Texas
Posts: 127
Real Name: Eric
|
|
|
Member
Join Date: Aug 2018
Location: Texas
Posts: 127
Real Name: Eric
|
Quote:
Originally Posted by Texachris

Fantastic write up! How do you feel about the 300 Hz cutoff? Do you think any higher or lower would have been better?
|
Thanks. I'm not an audio expert, but based on my research, 300 Hz is the ticket for these speakers.
It has been a little while since I installed them, and I'm still very happy with the sound. A very worthwhile upgrade, that is pretty easy/inexpensive.
I ordered some RAAMmat sound deadening material, and am going to put that inside the front doors next. I've heard that this makes a big difference in sound from the door speakers.
|

|
 Reply With Quote Reply With Quote
|
|
12-07-2018, 01:23 PM
|
#32
|
|
Junior Member
|
|
Join Date: Nov 2018
Location: Texas
Posts: 4
|
|
|
Junior Member
Join Date: Nov 2018
Location: Texas
Posts: 4
|
Quote:
Originally Posted by 57HotrodVW
Thanks. I'm not an audio expert, but based on my research, 300 Hz is the ticket for these speakers.
It has been a little while since I installed them, and I'm still very happy with the sound. A very worthwhile upgrade, that is pretty easy/inexpensive.
I ordered some RAAMmat sound deadening material, and am going to put that inside the front doors next. I've heard that this makes a big difference in sound from the door speakers.
|
That is something I might do as well since I'll be in there (RAAMmat). I found a pair of Infinity Kappas and since the cone size is the same 300 Hz should work well for them too. Looking forward to hearing a difference even though I'm going from the JBL speaker system. For the cost of the speakers it's definitely worth a shot.
|
|
|
Reply With Quote
|
|
01-22-2019, 07:57 PM
|
#33
|
 |
Member
|
|
Join Date: Mar 2018
Location: Tampa Bay Florida
Posts: 214
|
|
|
Member
Join Date: Mar 2018
Location: Tampa Bay Florida
Posts: 214
|
Nice write up. I'm thinking i am going to try and do this with a 4" speaker. Thinking of going with Audio Frog, bur I might cheap out with the JBL or JL.
|
|
|
Reply With Quote
|
|
01-23-2019, 02:37 PM
|
#34
|
 |
Elite Member
|
|
Join Date: Mar 2010
Location: Pittsburgh
Posts: 5,689
Real Name: Chris
|
|
|
Elite Member
Join Date: Mar 2010
Location: Pittsburgh
Posts: 5,689
Real Name: Chris
|
Quote:
Originally Posted by bigguy02
Nice write up. I'm thinking i am going to try and do this with a 4" speaker. Thinking of going with Audio Frog, bur I might cheap out with the JBL or JL.
|
I'd love to see you squeeze a 4" in there, it may be wide enough to bolt right into the stock holes. Not sure about the magnet height though, especially on the passenger side
__________________
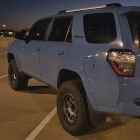
2017 Nautical Blue SR5 Premium - Black Emblems, AFE 76mm TB, AFE Momentum GT Intake, URD MAF Calibrator, Borla Touring Cat-Back Exhaust, VR ECU Tune, RCI Skid Plate, Morimoto MLED 2.0 Headlight Retrofit, Morimoto LED Fogs, Eagle Eye Smoked Black Tail Lights, FyreFlys LED Interior, Meso Puddle Lights, Tinted Mirror Turn Signals, Smoked Amber Raptor Lights, Odyssey 34 Battery, 32" LED Bar with Rago Hidden Brackets, Rago Molle Panels, Side Shooter LED Ditch Lights, sPod w/ PowerTray, Raceline Matte Bronze Wheels w/ Cooper Discoverer RTX, CaliRaised Rock Sliders, BajaRack Full Length Roof Rack, Kenwood DMX1057XR, Infinity Kappa Door Speakers and 3.5's in dash, JL 8w3v3 in JBL Enclosure, Husky Weather Beaters, Blackvue DR900S Dash Cams
|
|
|
Reply With Quote
|
|
01-23-2019, 03:54 PM
|
#35
|
|
Member
|
|
Join Date: Mar 2017
Location: Sacramento, CA
Posts: 106
|
|
|
Member
Join Date: Mar 2017
Location: Sacramento, CA
Posts: 106
|
Quote:
Originally Posted by Swipter
I am watching all the speaker changes using the factory head unit. Is it powerful enough to make a difference in a 2018 sr5 regular or are better quality speakers making the difference?
|
I did some JBL 3.5's in the dash and Kicker 6x9's in the doors. Also added sound deadening material to the doors. It sounds really good running off the factory amp. I am postponing my plans for a 4 channel amp and an under seat sub.
|
|
|
Reply With Quote
|
|
01-23-2019, 07:12 PM
|
#36
|
|
Member
|
|
Join Date: Mar 2018
Location: Idaho
Posts: 49
|
|
|
Member
Join Date: Mar 2018
Location: Idaho
Posts: 49
|
Quote:
Originally Posted by 97BlackAckCL
|
Do you happen to know where to get the brackets? Or where did the guy you got the brackets from, get them at? XD
__________________
2014 Trail || Grabber AT2s
|
|
|
Reply With Quote
|
|
01-23-2019, 08:26 PM
|
#37
|
|
Member
|
|
Join Date: Aug 2018
Location: Texas
Posts: 127
Real Name: Eric
|
|
|
Member
Join Date: Aug 2018
Location: Texas
Posts: 127
Real Name: Eric
|
Quote:
Originally Posted by ADT_192
Do you happen to know where to get the brackets? Or where did the guy you got the brackets from, get them at? XD
|
Those are the factory speaker brackets. You'll see pics of them attached to the factory speakers, early in this post.
|
|
|
Reply With Quote
|
|
01-23-2019, 08:30 PM
|
#38
|
|
Member
|
|
Join Date: Aug 2018
Location: Texas
Posts: 127
Real Name: Eric
|
|
|
Member
Join Date: Aug 2018
Location: Texas
Posts: 127
Real Name: Eric
|
Quote:
Originally Posted by bigguy02
Nice write up. I'm thinking i am going to try and do this with a 4" speaker. Thinking of going with Audio Frog, bur I might cheap out with the JBL or JL.
|
You might be able to swing that on the driver's side, but I think it would take major work to fit a 4" speaker on the passenger side.
A good 3.5" coaxial speaker makes a lot of difference, without a lot of effort/expense.
|
|
|
Reply With Quote
|
|
01-24-2019, 03:23 AM
|
#39
|
|
Member
|
|
Join Date: Mar 2018
Location: Idaho
Posts: 49
|
|
|
Member
Join Date: Mar 2018
Location: Idaho
Posts: 49
|
Quote:
Originally Posted by 57HotrodVW
Those are the factory speaker brackets. You'll see pics of them attached to the factory speakers, early in this post.
|
You mean the ones circled in red? Are they just cutouts from the OEM mount? 
Sent from my SAMSUNG-SM-G930A using Tapatalk
__________________
2014 Trail || Grabber AT2s
|
|
|
Reply With Quote
|
|
01-24-2019, 04:27 AM
|
#40
|
 |
Senior Member
|
|
Join Date: May 2012
Location: Bergenfield NJ.
Posts: 2,606
Real Name: Greg
|
|
|
Senior Member
Join Date: May 2012
Location: Bergenfield NJ.
Posts: 2,606
Real Name: Greg
|
Quote:
Originally Posted by 57HotrodVW
After seeing a few posts about speaker upgrades, I decided to do one to the dash speakers in my '18 TRD Pro, and thought I'd share. In short, this lower cost, relatively easy upgrade is well worth it, and makes a huge difference in sound quality!
|
Really "high quality" tutorial thread 57HotrodVW,
...very well planned, thought through, and exquisitely presented! 'Best to you',
rig!
__________________
2012 Limited (in bliz) Black leather interior.
Commercial hvac diagnostics/electrical specialist (Steamfitters Journeyman Local 475)
|
|
|
Reply With Quote
|
|
01-24-2019, 10:17 AM
|
#41
|
|
Member
|
|
Join Date: Mar 2018
Location: Tampa Bay Florida
Posts: 214
|
|
|
Member
Join Date: Mar 2018
Location: Tampa Bay Florida
Posts: 214
|
Quote:
Originally Posted by 97BlackAckCL
I'd love to see you squeeze a 4" in there, it may be wide enough to bolt right into the stock holes. Not sure about the magnet height though, especially on the passenger side
|
Quote:
Originally Posted by 57HotrodVW
You might be able to swing that on the driver's side, but I think it would take major work to fit a 4" speaker on the passenger side.
A good 3.5" coaxial speaker makes a lot of difference, without a lot of effort/expense.
|
In doing some research I know there is work to be done to get a 4" to fit, but I think its worth a shot. A 4 inch speaker will play a lot better off access down to 300-350HZ. A review of the AudioFrog GS42's that I'm thinking of springing for, says that they were successfully installed in a 4Runner with "extensive modifications" I just don't know what that means. Another speaker I'd like to run, but I do not feel like paying for is the Illusion C3CX that Simplicity in Sound put in a 4R. Between the two of those things I think I can make it work. Ill probably order both the 3.5 and the 4 so that I can get it done in one day.
|
|
|
Reply With Quote
|
|
01-24-2019, 10:45 AM
|
#42
|
|
Elite Member
|
|
Join Date: Mar 2010
Location: Pittsburgh
Posts: 5,689
Real Name: Chris
|
|
|
Elite Member
Join Date: Mar 2010
Location: Pittsburgh
Posts: 5,689
Real Name: Chris
|
Quote:
Originally Posted by ADT_192
You mean the ones circled in red? Are they just cutouts from the OEM mount? Attachment 324567
Sent from my SAMSUNG-SM-G930A using Tapatalk |
Yes, I got them from another member and then cut them. That pic is a side by side of the stock mount next to the one I cut
__________________
2017 Nautical Blue SR5 Premium - Black Emblems, AFE 76mm TB, AFE Momentum GT Intake, URD MAF Calibrator, Borla Touring Cat-Back Exhaust, VR ECU Tune, RCI Skid Plate, Morimoto MLED 2.0 Headlight Retrofit, Morimoto LED Fogs, Eagle Eye Smoked Black Tail Lights, FyreFlys LED Interior, Meso Puddle Lights, Tinted Mirror Turn Signals, Smoked Amber Raptor Lights, Odyssey 34 Battery, 32" LED Bar with Rago Hidden Brackets, Rago Molle Panels, Side Shooter LED Ditch Lights, sPod w/ PowerTray, Raceline Matte Bronze Wheels w/ Cooper Discoverer RTX, CaliRaised Rock Sliders, BajaRack Full Length Roof Rack, Kenwood DMX1057XR, Infinity Kappa Door Speakers and 3.5's in dash, JL 8w3v3 in JBL Enclosure, Husky Weather Beaters, Blackvue DR900S Dash Cams
|
|
|
Reply With Quote
|
|
06-19-2019, 02:23 PM
|
#43
|
|
Junior Member
|
|
Join Date: Nov 2018
Location: Tampa, FL
Posts: 10
|
|
|
Junior Member
Join Date: Nov 2018
Location: Tampa, FL
Posts: 10
|
Quote:
Originally Posted by 57HotrodVW
After seeing a few posts about speaker upgrades, I decided to do one to the dash speakers in my '18 TRD Pro, and thought I'd share. In short, this lower cost, relatively easy upgrade is well worth it, and makes a huge difference in sound quality!
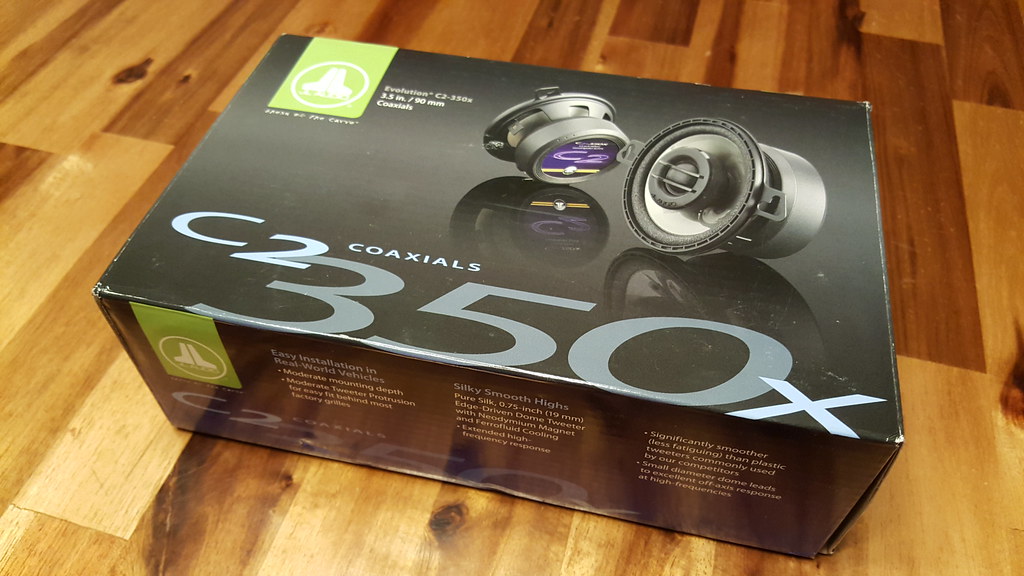
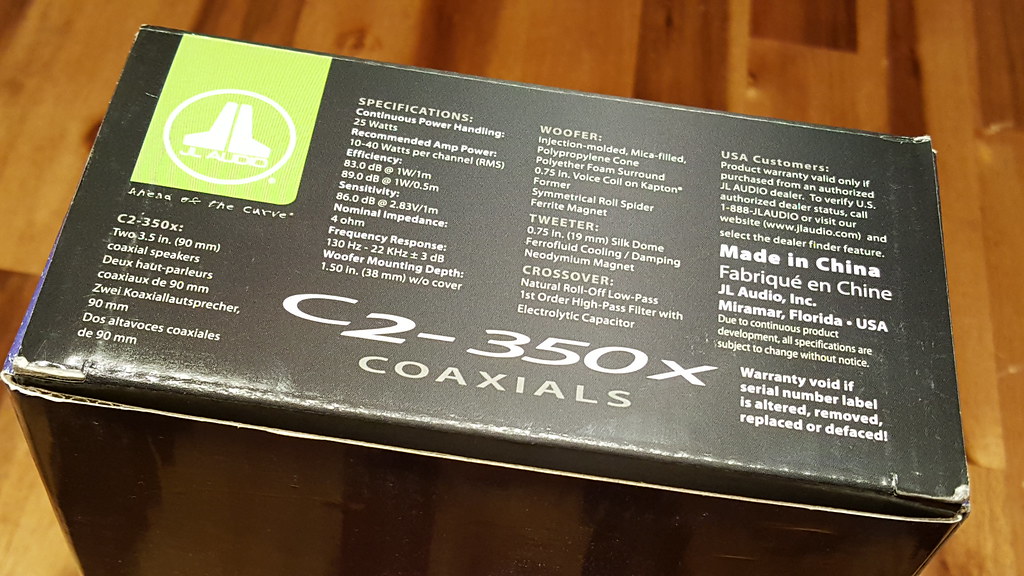
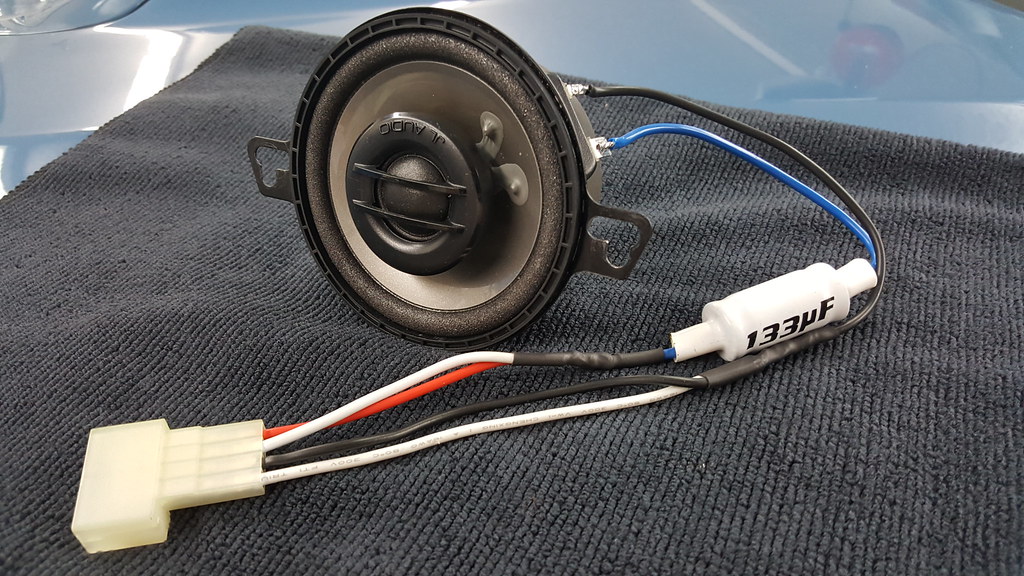
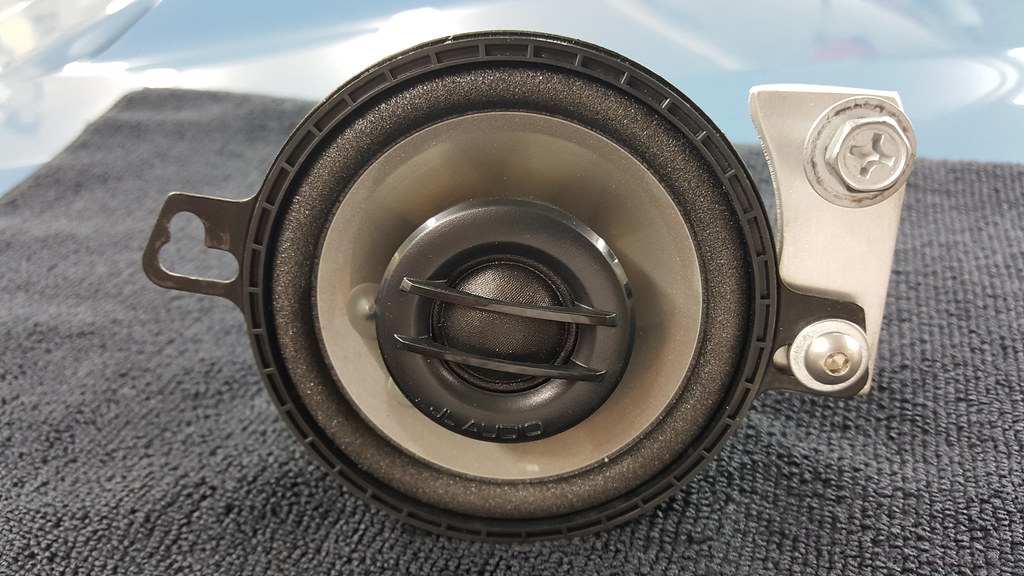
Rather than just going with a popular tweeter upgrade (aka, the Subaru/Kicker plug and play tweeters), I decided to go with 3.5" coaxial speakers from JL Audio - the C2-350x models. These full range speakers cost ~$80, and I bought mine at Amazon - https://www.amazon.com/dp/B001UDNXOQ
I also purchased a pair of tweeter wiring harness adapters, so I didn't have to cut the factory wiring (others have taken apart the stock speakers to make an adapter plug of sorts, or kind of "jumpered" the male portion of the 4 wire factory plug). I got the adapters from Taco Tunes - 2010-2020 Toyota 4Runner Tweeter Speaker Wiring Harness Adapter Connector (pair) - Taco Tunes - Toyota Audio Solutions
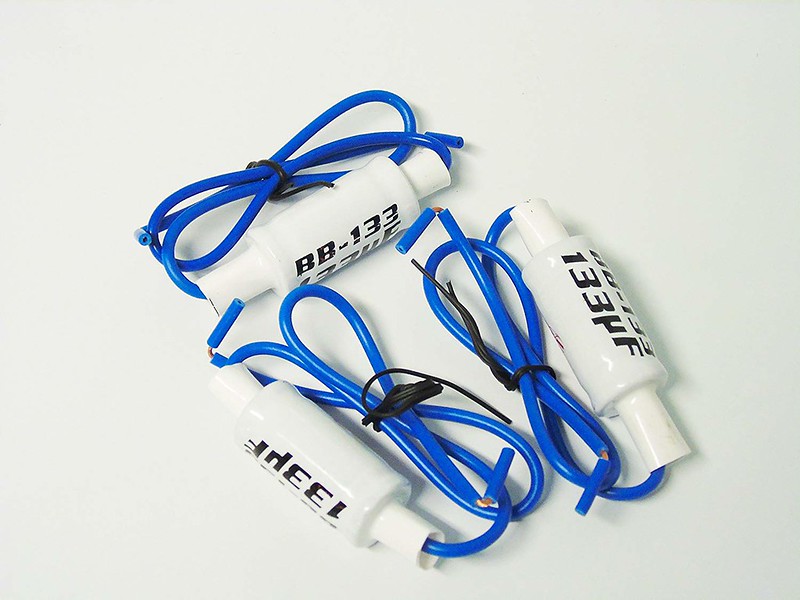
To limit lower frequency sounds from being played by these speakers, and prevent "clipping" at higher volumes, I also bought a pair of 133 microfarad capacitors (aka "bass blockers"), to cut sounds below 300 Hz - https://www.amazon.com/dp/B017AJ5ECW
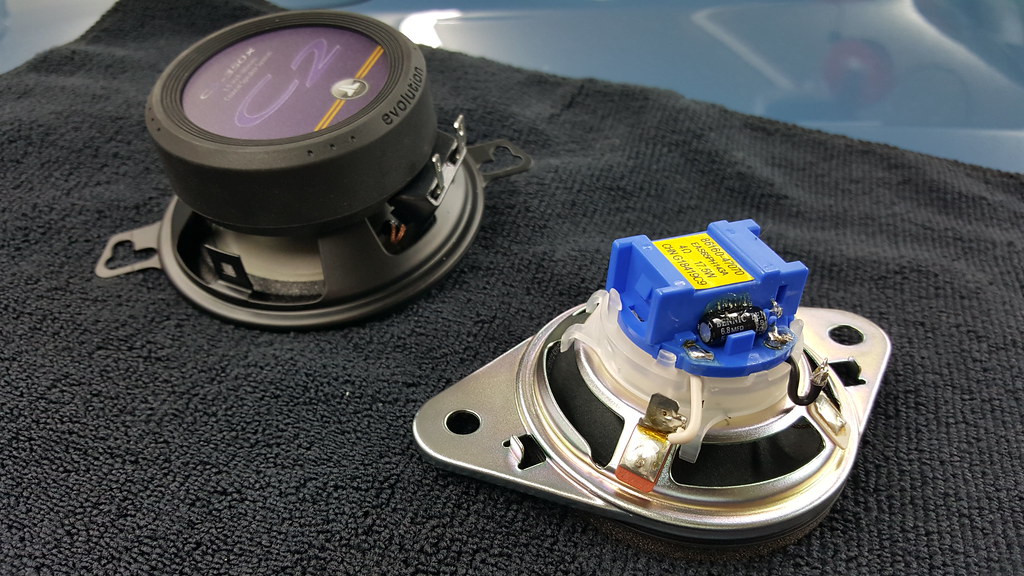
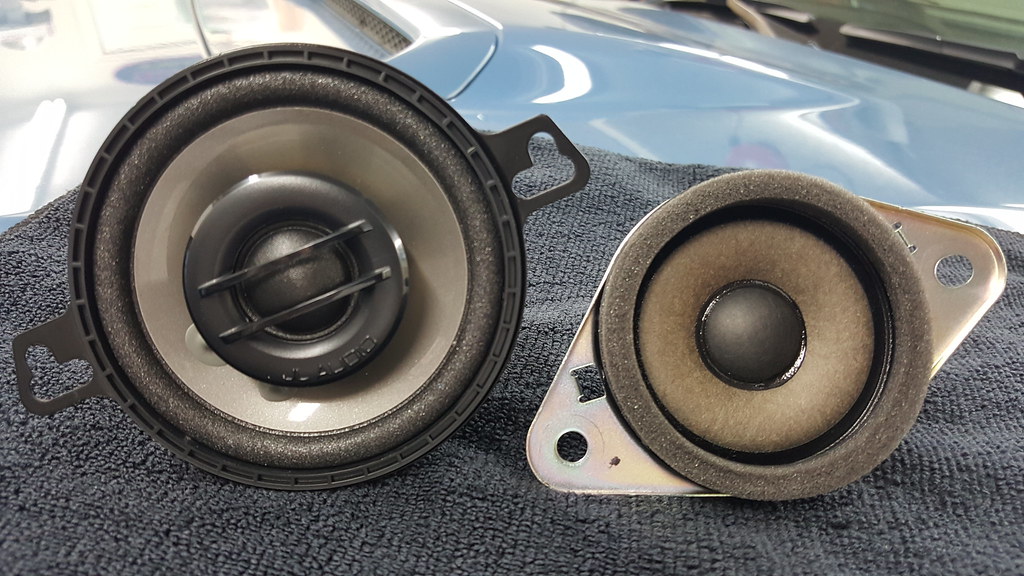
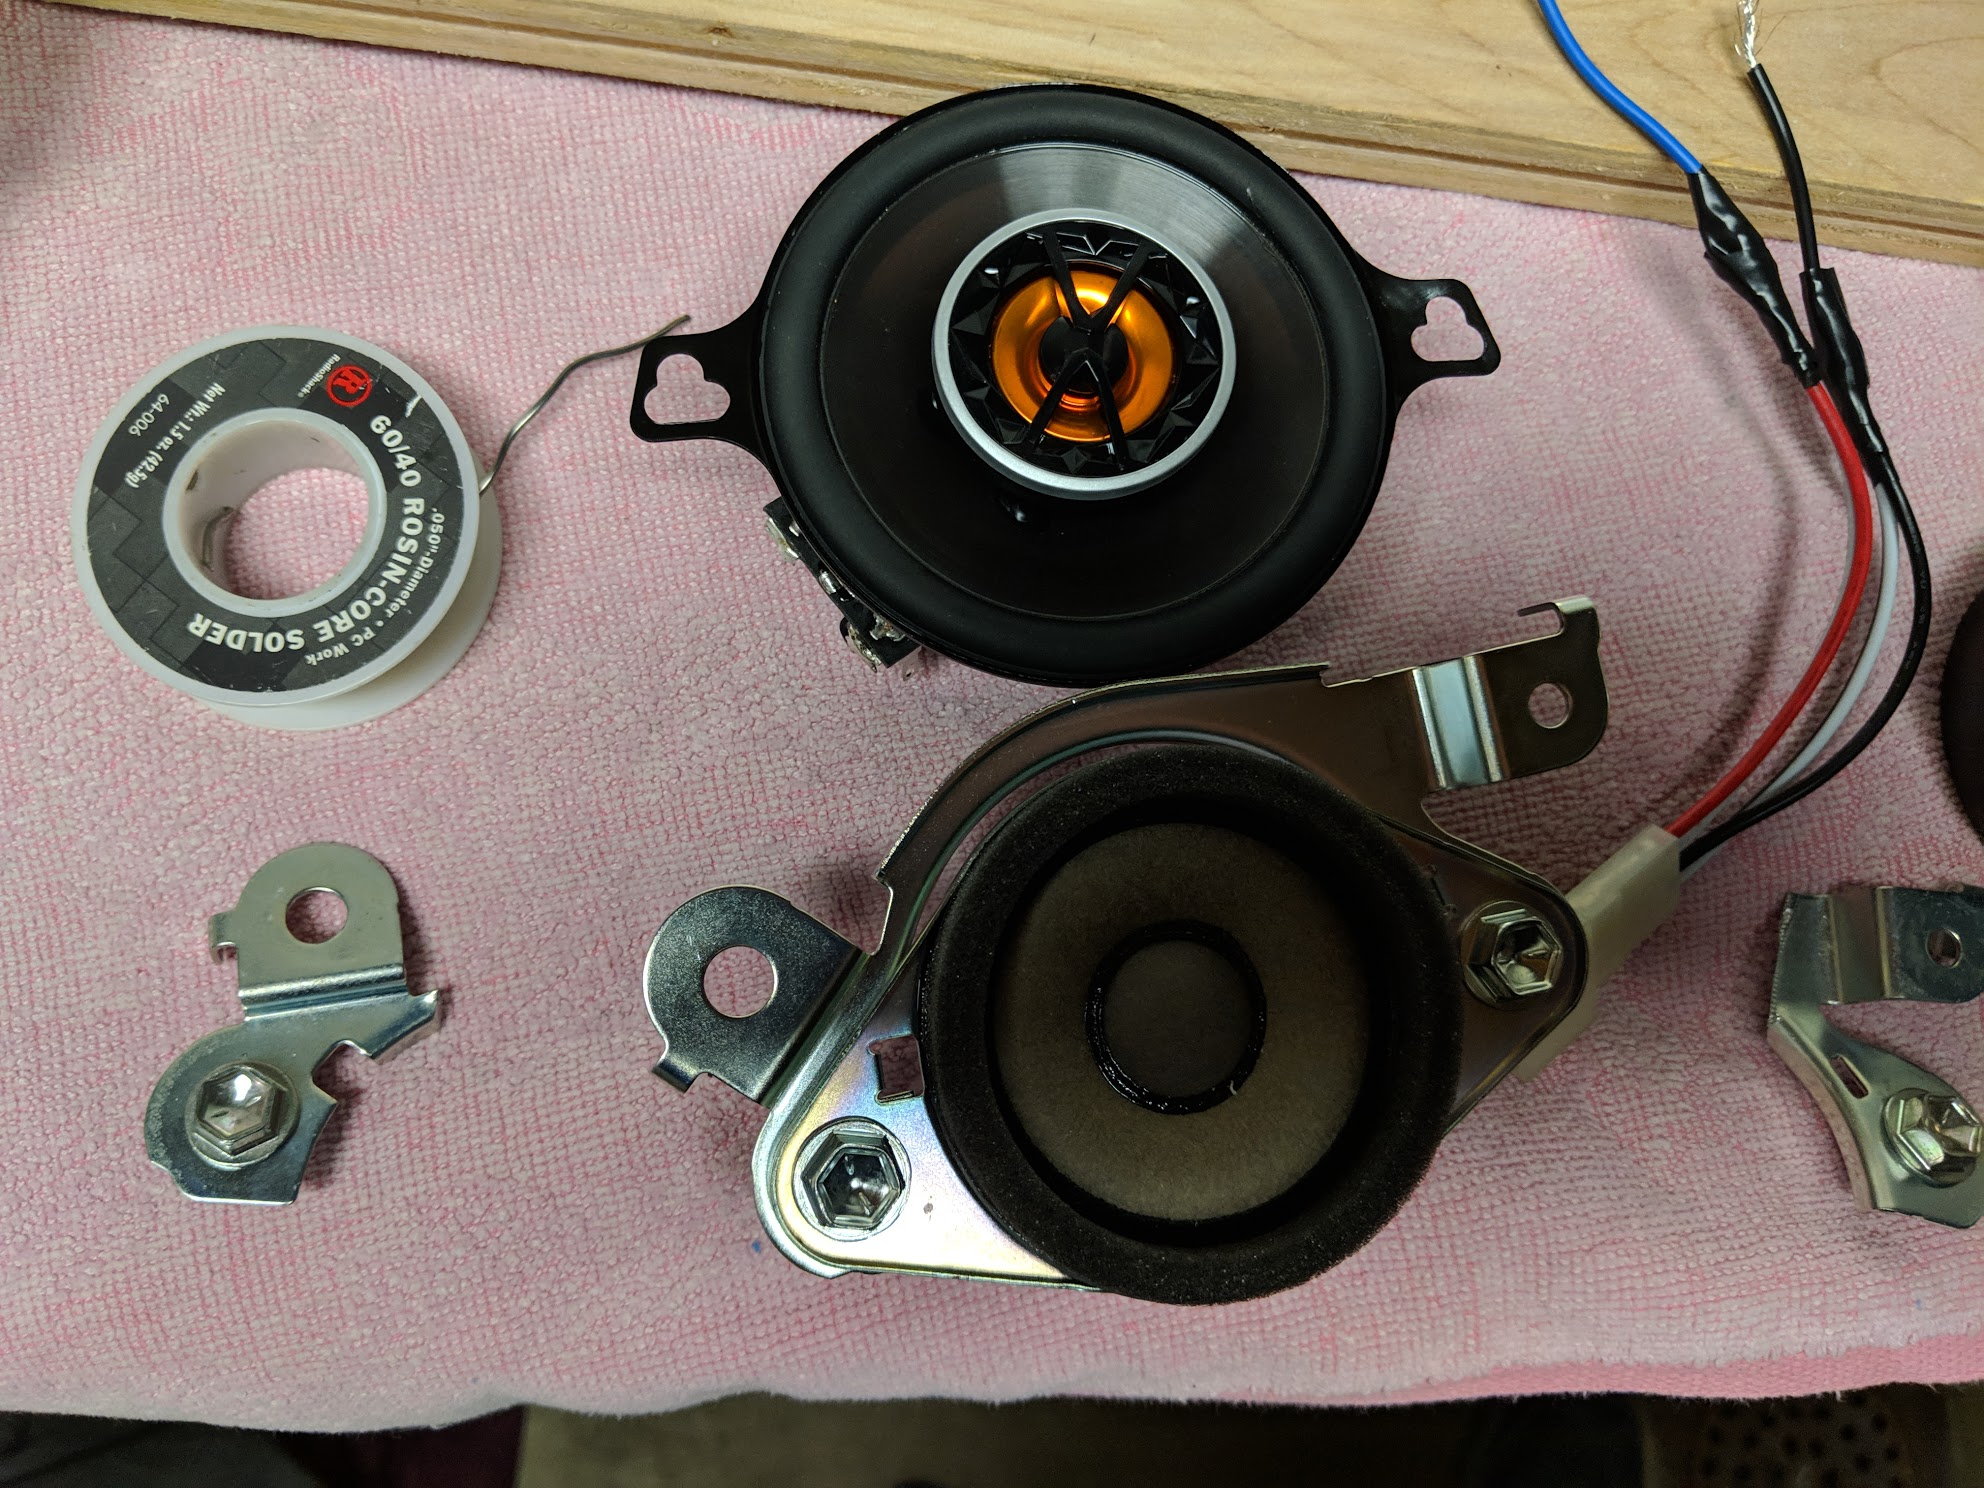
The construction differences between the OEM and JL Audio speakers are notable:
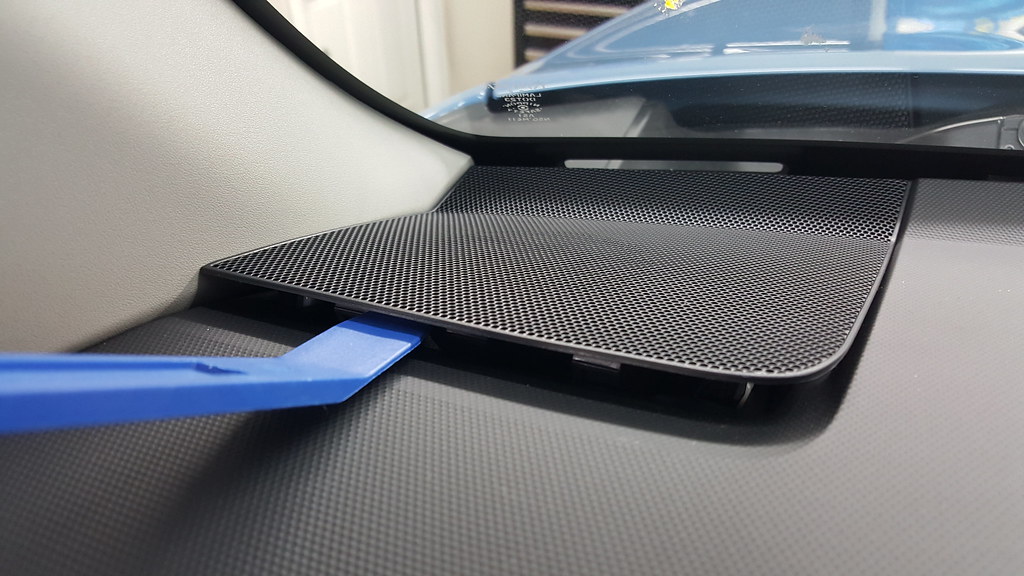
Removal of the stock speakers is easy. I started by using a plastic trim tool (part of a set like the ones at https://www.amazon.com/dp/B00ZRJCYQ2), and gently prying from the center/rear-most portion of the speaker grills to "pop" the two clips that hold them in.
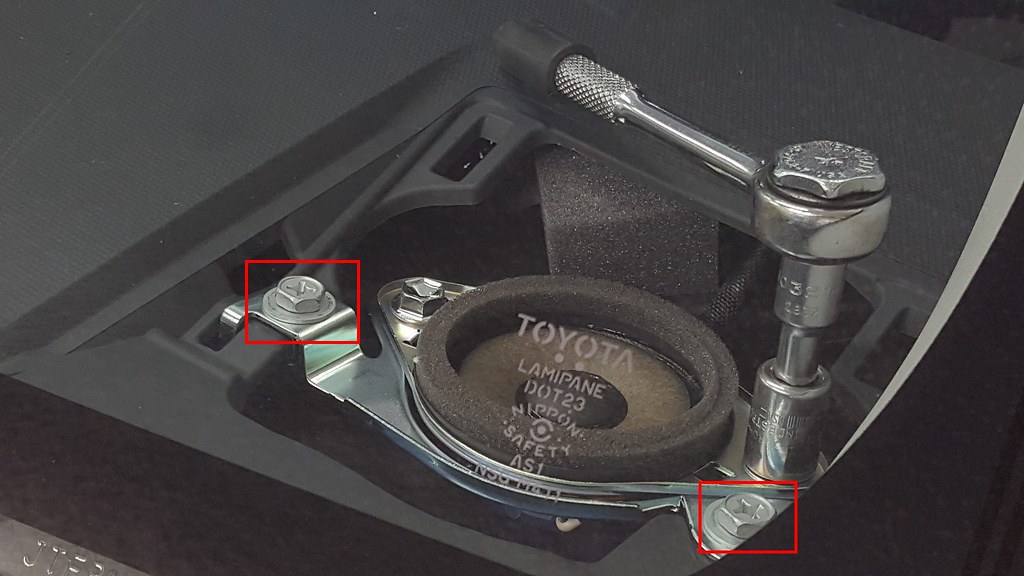
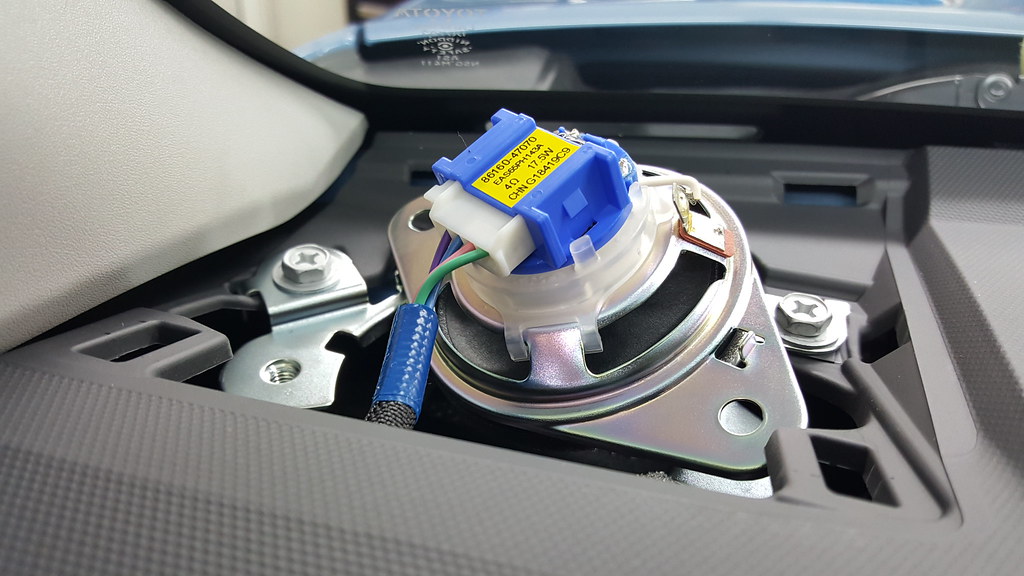
From there, a small ratchet, extension, and 10mm socket was used to remove the two hex head screws ( with Phillips patterns in the top, as highlighted in red in the image below). After these screws have been removed, the speaker mount and speaker can be lifted out as an assembly. Push the tab on one side of speaker plug/harness to release it from the blue "cap" of the stock speaker, and disconnect the speaker assembly ( the second image below is one where the factory mount is still in place, but I suggest removing the speaker and bracket as an assemblly, via the Phillips head screws)
The Taco Tunes adapter harnesses make wiring a pretty simple affair. Because of the way that the door speakers are wired with the dash speakers, there are four wires in the factory dash speaker harness/plug. To mimic the same using the Taco Tunes adapter harnesses, make four wires into two -- red and white wires go together for the positive side, and black and white/black go together for the negative side. I cut the long wires of the Taco Tunes adapter harnesses down to about six inches, to reduce bulk when installed under the dash.
The capacitor is connected inline, on the positive side wire. Joints were soldered and finished with heat shrink tubing.
Next, I fabricated some mounting tabs out of 1" wide x 1/8" thick aluminum bar stock, which can be purchased at most hardware or home improvement stores. These didn't have to have as complex of a shape as I made them, and a simple rectangle would have worked, but mine are shaped like they are due to earlier plans changing a bit, and not wanting to re-make the brackets.
Rectangular tabs would be 1.75" long and .75" wide. Two holes are drilled in the tab, 1 5/16" apart. The smaller one at the top (which the Phillips head screw will go into) was drilled using a 5/32" bit, and the larger one was drilled with a 3/16" bit.
The hardware used to attach the tabs to the speakers is 8-32 button head machine screws that are 3/4" long, with matching nuts and washers. I put one washer under the screw head, two washers between the aluminum tab and speaker (for spacing), and one washer under the aluminum tab.
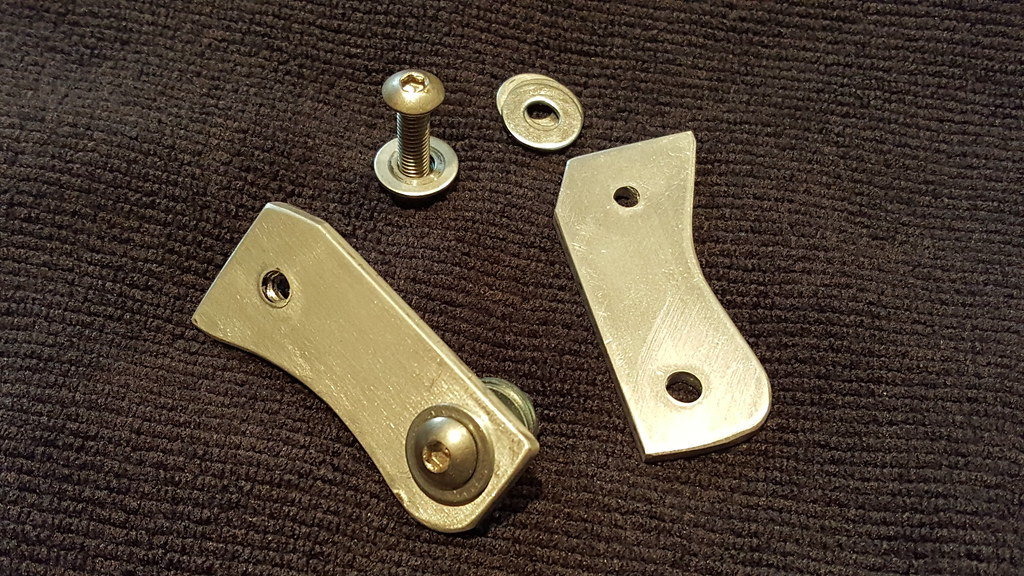
The Phillips head screw can be used to make threads in the smaller/top hole. It takes a little force to start the screw in the hole, but do this, tighten until snug, and then remove the screw. It is much easier to do this outside of the vehicle, than inside when mounting the tab/speakers in the dash.
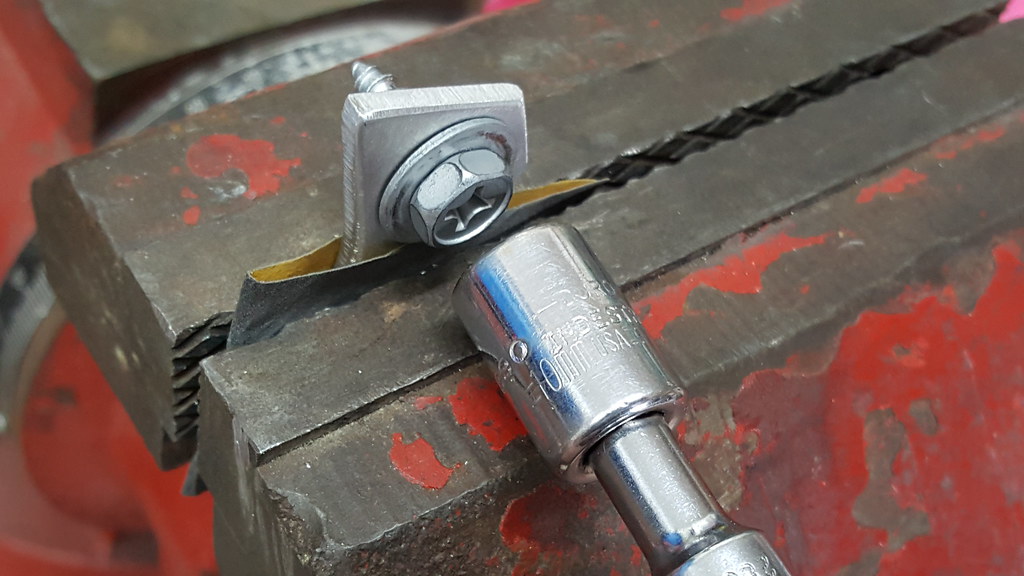
This photo depicts what the tab looks like when mounted on the speaker. The Phillips screw was removed prior to putting the speaker in the dash. I put blue thread locker (aka Loctite) on the button head hardware, and tightened it fairly well, but just loose enough so that I could move/align the tab with the speaker in the dash hole.
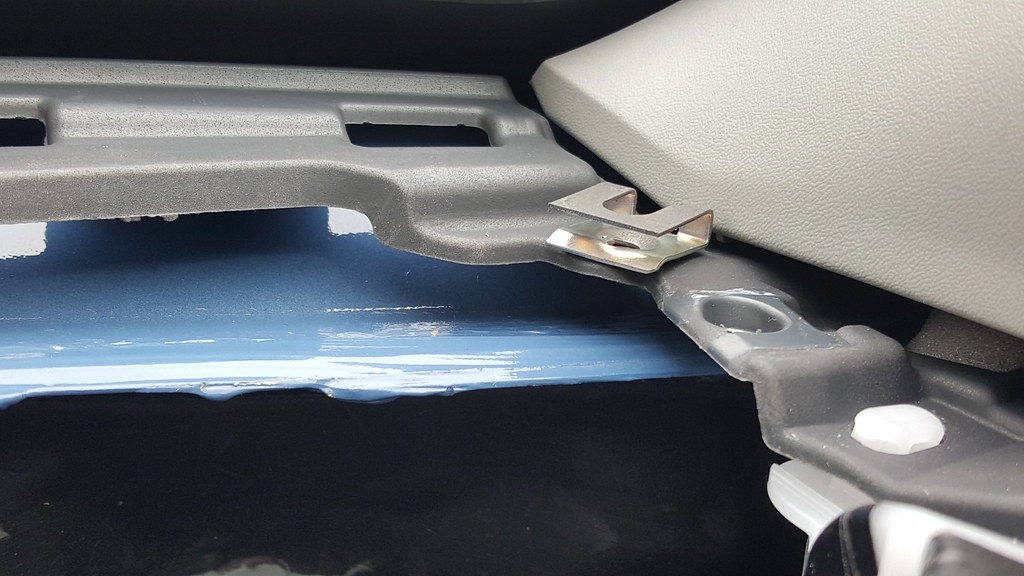
When installing the speakers in the dash, the side of the speaker without the "tab" attached will be fastened using the Phillips head screw and existing "spring nut" that is already installed on the dash plastic. On the opposite side, you'll need to remove the "spring nut" by simply sliding it off the dash plastic ( don't drop it into the dash hole, or it may be hard to retrieve. The photo below shows one of the spring nuts after it has been removed.
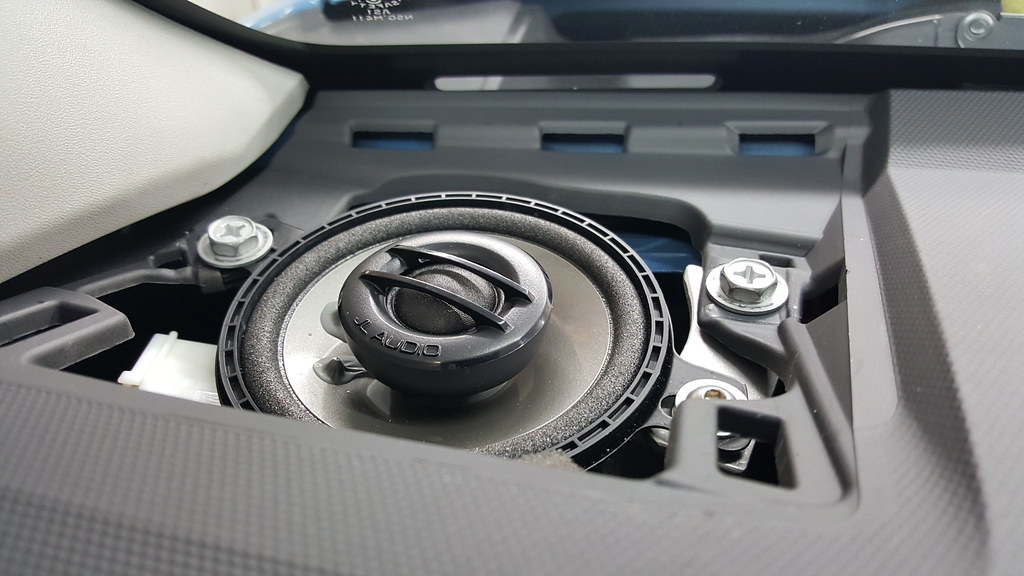
After plugging the factory speaker wiring harness to the speaker, and tucking in the wires, the speaker can be carefully dropped into the dash hole. On the driver's side, put the speaker "ear" on top of the spring nut that is on the left, and loosely fasten it with one of the Phillips head screws. The fabricated "tab" on the other side of the speaker goes under the dash plastic where the spring nut previously was. Insert the Phillips screw through the top of the dash, and tighten it into the tab below, as depicted in the images below. Don't overtighten the Phillips screws on either side of the speaker, and it is a good idea to put some thread locker on them.
The installation of the passenger side speaker is similar, but it is a tighter fit due to the ductwork for the defroster vent below the speaker hole. It took some wiggling and pushing down to get the speaker into position, and clearing the sheet metal closest to the windshield.
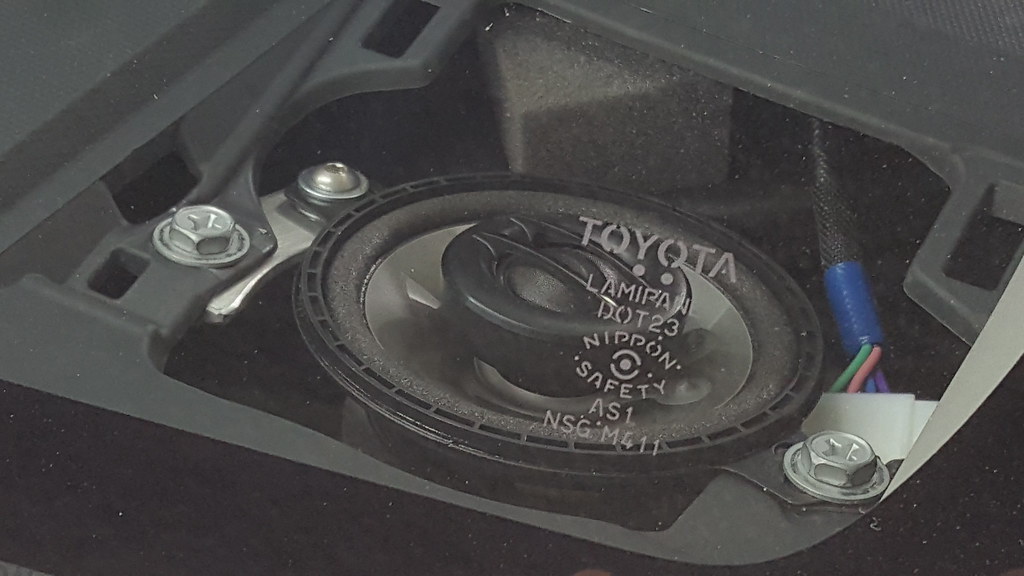
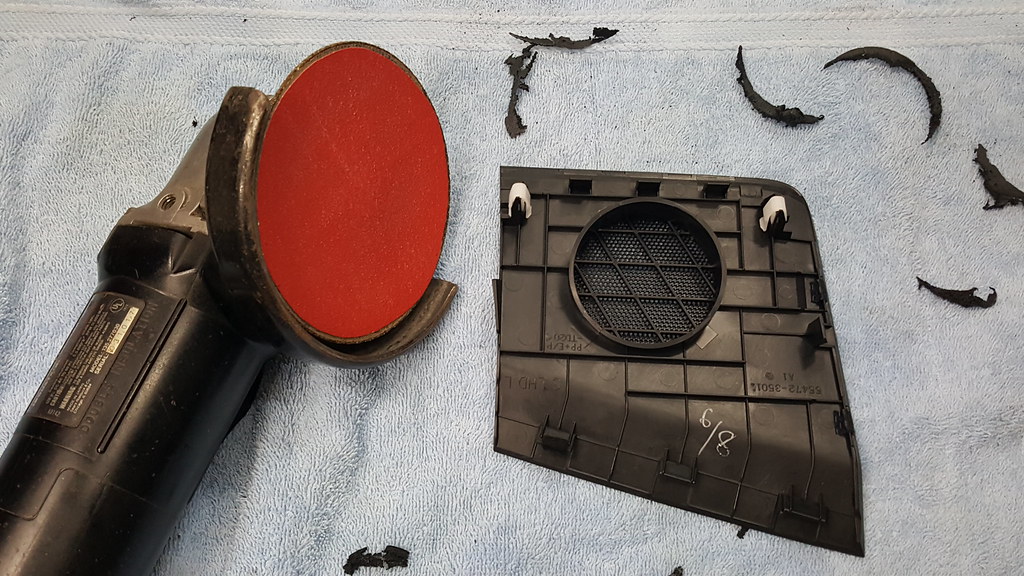
The OEM speaker grills have a ring on the bottom side that meets up with foam that is on top of the factory dash speakers. I used an angle grinder and sanding disc to carefully sand away/remove both rings, so that the back of the grills was essentially flat, and no speaker interference would occur.
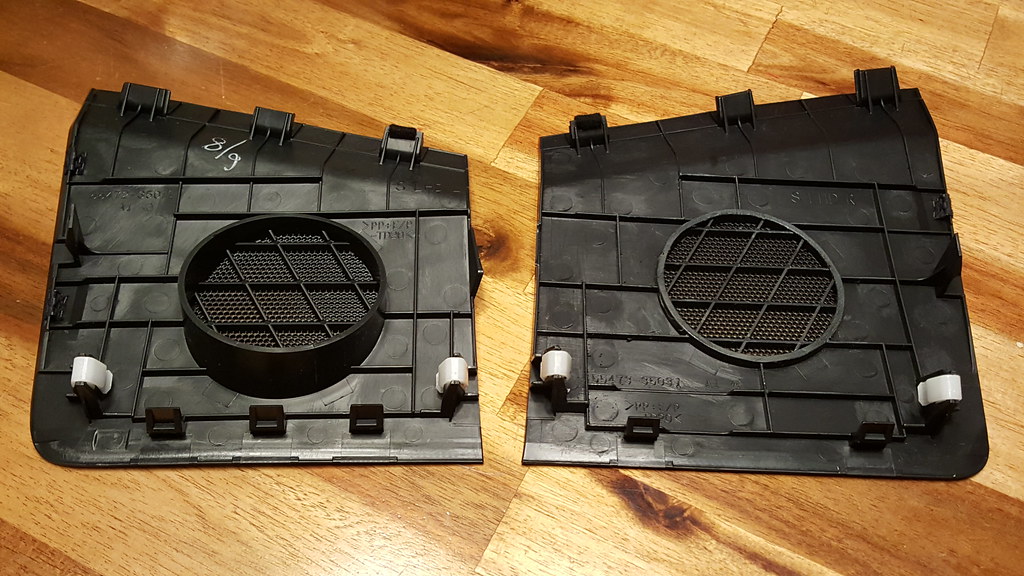
Snap the speaker grills back into place, and the installation is done.
Now crank up some tunes, and enjoy the much improved sounds, as well as the satisfaction that you did it yourself!! |
Followed this write up today to install some Hertz 3.5s in the dash. Thanks!
|
|
|
Reply With Quote
|
|
09-03-2019, 03:09 PM
|
#44
|
 |
Member
|
|
Join Date: Aug 2019
Location: KC
Posts: 220
|
|
|
Member
Join Date: Aug 2019
Location: KC
Posts: 220
|
It looks like the Hertz 87.3's are 1/4" shallower top mount than the JL's. I am going to give these a shot
__________________
2019 SW TRDORP
|
|
|
Reply With Quote
|
|
10-05-2019, 05:15 PM
|
#45
|
 |
Member
|
|
Join Date: Sep 2009
Location: Madison, Alabama
Posts: 39
|
|
|
Member
Join Date: Sep 2009
Location: Madison, Alabama
Posts: 39
|
Quote:
Originally Posted by 57HotrodVW
After seeing a few posts about speaker upgrades, I decided to do one to the dash speakers in my '18 TRD Pro, and thought I'd share. In short, this lower cost, relatively easy upgrade is well worth it, and makes a huge difference in sound quality!
Rather than just going with a popular tweeter upgrade (aka, the Subaru/Kicker plug and play tweeters), I decided to go with 3.5" coaxial speakers from JL Audio - the C2-350x models. These full range speakers cost ~$80, and I bought mine at Amazon - https://www.amazon.com/dp/B001UDNXOQ
I also purchased a pair of tweeter wiring harness adapters, so I didn't have to cut the factory wiring (others have taken apart the stock speakers to make an adapter plug of sorts, or kind of "jumpered" the male portion of the 4 wire factory plug). I got the adapters from Taco Tunes - 2010-2020 Toyota 4Runner Tweeter Speaker Wiring Harness Adapter Connector (pair) - Taco Tunes - Toyota Audio Solutions
To limit lower frequency sounds from being played by these speakers, and prevent "clipping" at higher volumes, I also bought a pair of 133 microfarad capacitors (aka "bass blockers"), to cut sounds below 300 Hz - https://www.amazon.com/dp/B017AJ5ECW
The construction differences between the OEM and JL Audio speakers are notable:
Removal of the stock speakers is easy. I started by using a plastic trim tool (part of a set like the ones at https://www.amazon.com/dp/B00ZRJCYQ2), and gently prying from the center/rear-most portion of the speaker grills to "pop" the two clips that hold them in.
From there, a small ratchet, extension, and 10mm socket was used to remove the two hex head screws ( with Phillips patterns in the top, as highlighted in red in the image below). After these screws have been removed, the speaker mount and speaker can be lifted out as an assembly. Push the tab on one side of speaker plug/harness to release it from the blue "cap" of the stock speaker, and disconnect the speaker assembly ( the second image below is one where the factory mount is still in place, but I suggest removing the speaker and bracket as an assemblly, via the Phillips head screws)
The Taco Tunes adapter harnesses make wiring a pretty simple affair. Because of the way that the door speakers are wired with the dash speakers, there are four wires in the factory dash speaker harness/plug. To mimic the same using the Taco Tunes adapter harnesses, make four wires into two -- red and white wires go together for the positive side, and black and white/black go together for the negative side. I cut the long wires of the Taco Tunes adapter harnesses down to about six inches, to reduce bulk when installed under the dash.
The capacitor is connected inline, on the positive side wire. Joints were soldered and finished with heat shrink tubing.
Next, I fabricated some mounting tabs out of 1" wide x 1/8" thick aluminum bar stock, which can be purchased at most hardware or home improvement stores. These didn't have to have as complex of a shape as I made them, and a simple rectangle would have worked, but mine are shaped like they are due to earlier plans changing a bit, and not wanting to re-make the brackets.
Rectangular tabs would be 1.75" long and .75" wide. Two holes are drilled in the tab, 1 5/16" apart. The smaller one at the top (which the Phillips head screw will go into) was drilled using a 5/32" bit, and the larger one was drilled with a 3/16" bit.
The hardware used to attach the tabs to the speakers is 8-32 button head machine screws that are 3/4" long, with matching nuts and washers. I put one washer under the screw head, two washers between the aluminum tab and speaker (for spacing), and one washer under the aluminum tab.
The Phillips head screw can be used to make threads in the smaller/top hole. It takes a little force to start the screw in the hole, but do this, tighten until snug, and then remove the screw. It is much easier to do this outside of the vehicle, than inside when mounting the tab/speakers in the dash.
This photo depicts what the tab looks like when mounted on the speaker. The Phillips screw was removed prior to putting the speaker in the dash. I put blue thread locker (aka Loctite) on the button head hardware, and tightened it fairly well, but just loose enough so that I could move/align the tab with the speaker in the dash hole.
When installing the speakers in the dash, the side of the speaker without the "tab" attached will be fastened using the Phillips head screw and existing "spring nut" that is already installed on the dash plastic. On the opposite side, you'll need to remove the "spring nut" by simply sliding it off the dash plastic ( don't drop it into the dash hole, or it may be hard to retrieve. The photo below shows one of the spring nuts after it has been removed.
After plugging the factory speaker wiring harness to the speaker, and tucking in the wires, the speaker can be carefully dropped into the dash hole. On the driver's side, put the speaker "ear" on top of the spring nut that is on the left, and loosely fasten it with one of the Phillips head screws. The fabricated "tab" on the other side of the speaker goes under the dash plastic where the spring nut previously was. Insert the Phillips screw through the top of the dash, and tighten it into the tab below, as depicted in the images below. Don't overtighten the Phillips screws on either side of the speaker, and it is a good idea to put some thread locker on them.
The installation of the passenger side speaker is similar, but it is a tighter fit due to the ductwork for the defroster vent below the speaker hole. It took some wiggling and pushing down to get the speaker into position, and clearing the sheet metal closest to the windshield.
The OEM speaker grills have a ring on the bottom side that meets up with foam that is on top of the factory dash speakers. I used an angle grinder and sanding disc to carefully sand away/remove both rings, so that the back of the grills was essentially flat, and no speaker interference would occur.
Snap the speaker grills back into place, and the installation is done.
Now crank up some tunes, and enjoy the much improved sounds, as well as the satisfaction that you did it yourself!! |
Just switched mine out to the exact same ones today. Much better sound quality!
__________________
2018 Toyota 4Runner SR5 Premium
|
|
|
Reply With Quote
|
 Posting Rules
|
You may not post new threads
You may not post replies
You may not post attachments
You may not edit your posts
HTML code is On
|
|
|
|


 Linear Mode


