 11-15-2022, 02:14 PM
|
#1
|
 |
Member
|
|
Join Date: Nov 2016
Location: Boise
Posts: 163
|
|
|
Member
Join Date: Nov 2016
Location: Boise
Posts: 163
|
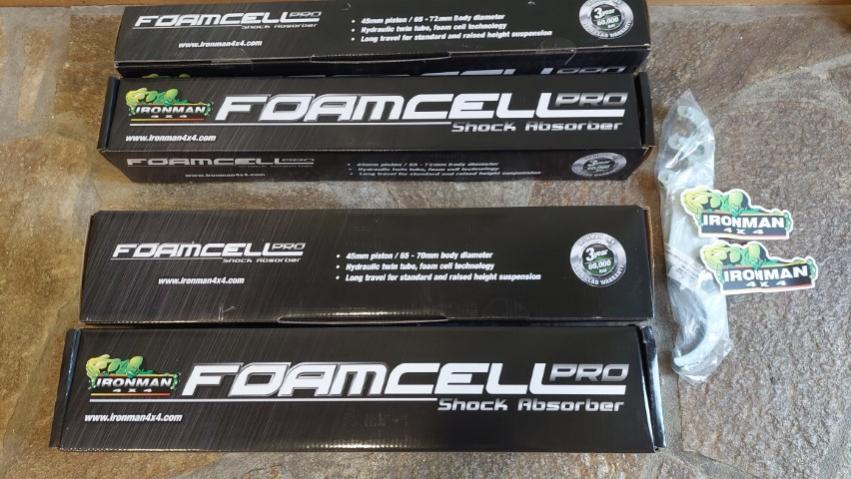
Ironman Foam Cell Pro install
Ironman Foam Cell Pro install
I finally wore out my original Dunlop tires. I replaced them with the Les Schwab 10 ply Open Range A/T. Little did I anticipate the heavier tire would cause me to notice that my shocks were fading on the dirt roads I travel (first half mile was fine then I would start bouncing around as they started to fade). After a ton of research (thanks tinkerer Tinkerer's Adventure - YouTube) (thanks accutune Articles - AccuTune Off-Road) (thanks shocksurplus Choosing Shocks for Your 2010-2021 Toyota 4Runner
– Shock Surplus) and evaluation of how I drive on and off road I determined the Ironman Foam Cell Pro using stock springs would work best for me. The other shock I seriously considered was the Bilstein 5100 or 6112. To help further me along, Ironman is currently running a 25% off coupon (Black25).
I ordered the Front sku: 45710FE and Rear sku: 45682 FEC. Note the "C" denoted in FEC rear is for "Comfort". A different sku: 45682 FE(P) is for a stiffer Professional rear shock. Since these are rebuild-able I also ordered the adjustment and service tool sku: Ishocktool001. I did not order the kit as it is a 2 inch lift kit and I am height impaired and more importantly my wife may have difficulty getting in if I lift it.
Finally, I ordered Dr. Kdss ( KDSS / Accessories
– Dr KDSS) sway bar bushings and sway bar billet clamps. I have an intermittent sound/squeak coming from the front that I think is my sway bar bushings getting old/worn out. Since I am under there I plan on swapping them out.
Goals:
Install new coil over and maintain current ride height.
Disclaimer:
This write up is to document my process and thoughts. In NO way should it influence how you attempt such an install. To paraphrase another user here on the forum. "Hey! What do I know, Im a friggin Accountant! "
Plan of operations:
I will be generally following Photog's installation of his OME Install ( Toyota 120 Platforms Forum)
In order to deactivate the KDSS I will follow Ironman's suggestions https://store-pusehjx.mybigcommerce....do_4Runner.pdf
I will be using Dr. Kdss 'instructions regarding the sway bar billet clamps. https://drkdss.com/products/kdss-fro...et-clamps-pair
That's it for now as I wait for the parts to come in.
__________________
2016 TEP, KDSS, ALPRO Apex Sliders, Focal IS690TOY, Old Red's Accessory Meter Display Mod  , Rear Differential Breather Mod, Radium Fuel Surge Tank, URD Supercharger  , Ironman FCP shocks
|

|
 Reply With Quote Reply With Quote
|
|
11-15-2022, 06:08 PM
|
#2
|
 |
Senior Member
|
|
Join Date: Oct 2013
Location: illinois
Posts: 1,609
Real Name: Ron
|
|
|
Senior Member
Join Date: Oct 2013
Location: illinois
Posts: 1,609
Real Name: Ron
|
I'll be interested in your thoughts on the Ironman shocks, I kind of like the "no nitrogen pressure" design and interested in the ride quality.
__________________
2003 Limited, V8, AWD. 4600 Bils/FJ springs, 1/2" spacer, SPC UCA, Super Pro bushings in front LCA and in all rear control arms, Michelin 265/65R17 LTX/Defenders, stock wheels with homemade center caps, Stop Tech slotted rotors w/Posi Quiet pads all around.
|
|
|
Reply With Quote
|
|
11-15-2022, 06:15 PM
|
#3
|
|
Senior Member
|
|
Join Date: Feb 2016
Location: phoenix
Posts: 2,292
|
|
|
Senior Member
Join Date: Feb 2016
Location: phoenix
Posts: 2,292
|
nice! I eliminated an intermittent clunk and squeak when i installed the KDSS brackets and collars. more importantly it feels like the suspension is working together now instead of fighting the sway bar
__________________
2016 TE : Grocery Getter, 34/10.5R17 Toyo at3, Prinsu Rack, King Coilovers, DuroBumps, ToyTec HD 2.0 springs, King shocks, King hydro bumps, Total Chaos mounts, DirtKing Fabrication UCA, VIVID RACING Tune, URD Y pipe, RCI skids, Marlin Crawler gussets, DRKDSS everything
|
|
|
Reply With Quote
|
|
11-18-2022, 02:32 PM
|
#4
|
 |
Member
|
|
Join Date: Jul 2020
Location: Kitsap
Posts: 73
|
|
|
Member
Join Date: Jul 2020
Location: Kitsap
Posts: 73
|
I've been very happy with mine. I compared with other shock/strut options out there and came to the conclusion that the Foam Cell would fit my needs nicely. I like that it is not nitrogren charged, provides great cooling with a large diameter body, and they're also already armored which is nice to protect against sand blasting and other debris damage.
|
|
|
Reply With Quote
|
|
11-18-2022, 04:52 PM
|
#5
|
|
Member
|
|
Join Date: Nov 2016
Location: Boise
Posts: 163
|
|
|
Member
Join Date: Nov 2016
Location: Boise
Posts: 163
|
Well I got the shocks today.

When I first pulled them out of the shipping box I noted two things. First the rear seemed heavier than the front and the diameter of the rear appeared to be larger than the front per the marketing on the box.
When I measured it .... Yep the body of the rear was roughly 2 3/4 where the front was 2 1/2.
Now I get to go into the garage and make some measurements (30 degrees now but hey there it is).
Front Driver (top of center cap to fender well) is 17 inches
Front Passenger (top of center cap to fender well) is 17 inches
Front Spring (wheels on ground) is 10 inches.

Rear Driver (top of center cap to fender well) is 19 5/8
Rear Passenger (top of center cap to fender well) is 19 3/4.
First up for changing is the rear because from what I see it will be easier than the front and the KDSS parts are not here. I have not figured out how to statically adjust the Front rings to keep the ride height the same.

__________________
2016 TEP, KDSS, ALPRO Apex Sliders, Focal IS690TOY, Old Red's Accessory Meter Display Mod , Rear Differential Breather Mod, Radium Fuel Surge Tank, URD Supercharger , Ironman FCP shocks
|
|
|
Reply With Quote
|
|
11-19-2022, 07:05 PM
|
#6
|
|
Member
|
|
Join Date: Nov 2016
Location: Boise
Posts: 163
|
|
|
Member
Join Date: Nov 2016
Location: Boise
Posts: 163
|
Got some sunshine today..... Attempted to install rear shocks.
Rear shock driver side came out ok. Terrible clearance around top bolt and the shock body spun independently of the piston rod.  But hey, it is a DIY project.
Now on to the install.....FAILED.
Written instructions are very poor. Well there is a youtube channel for that eh?
Not really.. Found something re a tacoma that showed the stack build. OK got the stack built. Dang, the built stack has no bolt showing.
I removed the cover and found a bump stop under the mud guard. I see it leaves quite abit of residue on the main shaft but it will move around. Should I remove it? Tried to call Ironman USA on the weekend..... Nope tech closed, retail open.
I made an executive decision to leave the bump stop on, I pushed it down the piston rod to provide MAX area for the stack. IT Worked! sorta.

In Ironman USA videos they say to vicegrip this black nubbin and tighten down the nut. Yah about that... It just ain't gonna happen even if you grind/pound significant body work away from that top bolt. Please note the stack in the picture is loose. The problem is the nylock nut engages so early that the shaft begins to spin before there is enough area to grab/engage the shaft. As it sits on the kitchen table I can partially get a 15/64 ignition wrench on it. On the car? There is gonna be a whole lot of  
Items to note: That protective cover is a PITA. Since the shock has no gas pressure you must lift the shock body up or extend the piston rod. If you grab the cover to do this it pushes the stack off the rod. You must hold it by the very bottom of the shock. If you can get the top installed then it will extend down to the lower mount.
Speaking of the lower mount. The mount is not centered and out of alignment (on purpose) Make sure you put a sharpie to the side you want facing out (when dry fitting) cause it is tough to see when you are outside on the ground looking at it.
I plan on calling Ironman USA on Monday to see if the short nubbin/long nut is a defect or they say to grid down the nylock nut. I will be sure to document it if they say to grid down the nylock. 
__________________
2016 TEP, KDSS, ALPRO Apex Sliders, Focal IS690TOY, Old Red's Accessory Meter Display Mod , Rear Differential Breather Mod, Radium Fuel Surge Tank, URD Supercharger , Ironman FCP shocks
|
|
|
Reply With Quote
|
|
11-19-2022, 07:50 PM
|
#7
|
|
Senior Member
|
|
Join Date: Oct 2013
Location: illinois
Posts: 1,609
Real Name: Ron
|
|
|
Senior Member
Join Date: Oct 2013
Location: illinois
Posts: 1,609
Real Name: Ron
|
You might have to put a jack under the bottom of the shock and apply pressure until enough of the stem comes through the top to get the nut started and a small wrench on the top end of shaft to hold it from spinning, or someone else to push up on the shock rather than a jack.
__________________
2003 Limited, V8, AWD. 4600 Bils/FJ springs, 1/2" spacer, SPC UCA, Super Pro bushings in front LCA and in all rear control arms, Michelin 265/65R17 LTX/Defenders, stock wheels with homemade center caps, Stop Tech slotted rotors w/Posi Quiet pads all around.
|
|
|
Reply With Quote
|
|
11-19-2022, 10:15 PM
|
#8
|
|
Member
|
|
Join Date: Nov 2016
Location: Boise
Posts: 163
|
|
|
Member
Join Date: Nov 2016
Location: Boise
Posts: 163
|
Quote:
Originally Posted by rdruss

You might have to put a jack under the bottom of the shock and apply pressure until enough of the stem comes through the top to get the nut started and a small wrench on the top end of shaft to hold it from spinning, or someone else to push up on the shock rather than a jack.
|
Thanks but the problem is not one of clearance. It is that there is too little landing at the top of the piston. Here is another picture. The bolt is nylocked and is turning the shaft at this point.
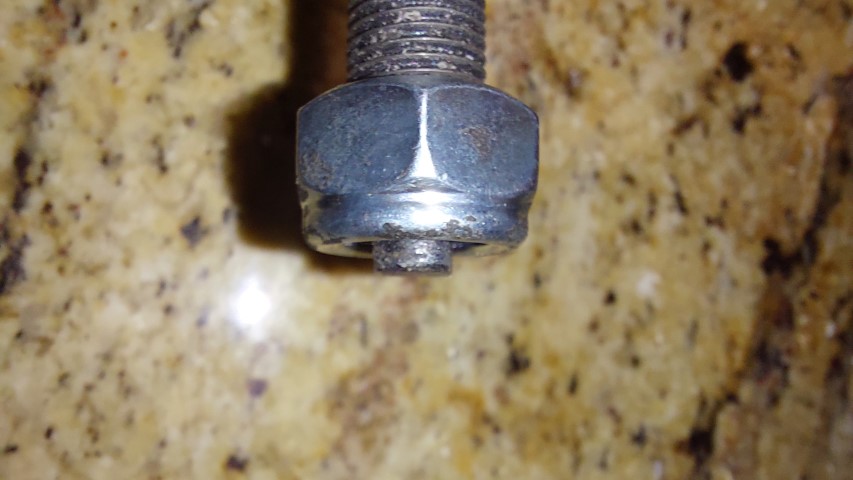
This angle is generous as the photo is taken above the nut. Access on the car is from below. While contemplating various fixes one that comes to mind is a set of pliers for rubber pipe. I may be able to clamp a bushing tight enough to overcome the nylock bushing friction and get the landing on the piston shaft exposed. It is still a design flaw though.
__________________
2016 TEP, KDSS, ALPRO Apex Sliders, Focal IS690TOY, Old Red's Accessory Meter Display Mod , Rear Differential Breather Mod, Radium Fuel Surge Tank, URD Supercharger , Ironman FCP shocks
|
|
|
Reply With Quote
|
|
11-19-2022, 10:27 PM
|
#9
|
|
Member
|
|
Join Date: May 2021
Location: Orange County, CA
Posts: 92
|
|
|
Member
Join Date: May 2021
Location: Orange County, CA
Posts: 92
|
Hmmm...maybe they sent you the wrong nut? I did not have this issue when I did my install a few months ago. I was able to use a 1/4" wrench to hold on to the flat. It was easy enough that I let my 8 year old daughter help me with that part (not making fun, just pointing out that it was not difficult). I used this video: https://youtu.be/5x6DHYZBnQc
And this one: https://youtu.be/lcA5z4YPUTk
Would it be possible to head to a hardware store and temporarily find a thinner nut? Hopefully I can help some, the install could be a little fresh in my mind, lol.
Is this the same on both shocks? Did you double check part numbers? Did you double check the orientation of the spacers/bushings? Sorry just trying to think of all the random steps I had to go through too.
Sent from my SM-N975U1 using Tapatalk
Last edited by GT0neX; 11-19-2022 at 10:42 PM.
|
|
|
Reply With Quote
|
|
11-20-2022, 11:01 AM
|
#10
|
|
Member
|
|
Join Date: Nov 2016
Location: Boise
Posts: 163
|
|
|
Member
Join Date: Nov 2016
Location: Boise
Posts: 163
|
Yep, I was using the second one a guide for how to tackle the KDSS, stack build and shock orientation.
There may be some manufacturing variances that create different amounts of clearance around the top perch. Today I think the weather will permit another go at it.
Thanks for posting the link 
__________________
2016 TEP, KDSS, ALPRO Apex Sliders, Focal IS690TOY, Old Red's Accessory Meter Display Mod , Rear Differential Breather Mod, Radium Fuel Surge Tank, URD Supercharger , Ironman FCP shocks
|
|
|
Reply With Quote
|
|
11-20-2022, 09:51 PM
|
#11
|
|
Member
|
|
Join Date: May 2021
Location: Orange County, CA
Posts: 92
|
|
|
Member
Join Date: May 2021
Location: Orange County, CA
Posts: 92
|
Any luck?
Sent from my SM-N975U1 using Tapatalk
|
|
|
Reply With Quote
|
|
11-20-2022, 10:39 PM
|
#12
|
|
Member
|
|
Join Date: Nov 2016
Location: Boise
Posts: 163
|
|
|
Member
Join Date: Nov 2016
Location: Boise
Posts: 163
|
Quote:
Originally Posted by GT0neX
Any luck?
Sent from my SM-N975U1 using Tapatalk
|
Rear shocks installed 
It took about an hour for both.
Hints:
Put a 17 mm on top bolt and pipe wrench the old body. No busted knuckles that way.
I needed to pinch the new bushings in order to overcome the nylock washer in the new nut. I was able to then use a 6mm wrench to hold the shaft flats once it was exposed.
The bottom needed help to go on with my judicious use of a 3lb mallet. You cant premount the bottom because the shock does not self expand up into the top hole. The bottom shaft does not gently go in because the new shock has tight custom angles on the bottom. You have to push/hold the shock up to get the nut started then mount the bottom.
Observations: The body overhang on the passenger side was different than the driver side. The passenger side was waaaayyyy easier and had clearance to work in.
The finished height was the same as the starting height.
One of the old shocks was seeping oil under the sleeve.
The old shocks were 6 lbs.
__________________
2016 TEP, KDSS, ALPRO Apex Sliders, Focal IS690TOY, Old Red's Accessory Meter Display Mod , Rear Differential Breather Mod, Radium Fuel Surge Tank, URD Supercharger , Ironman FCP shocks
|
|
|
Reply With Quote
|
|
11-21-2022, 01:54 AM
|
#13
|
|
Member
|
|
Join Date: May 2021
Location: Orange County, CA
Posts: 92
|
|
|
Member
Join Date: May 2021
Location: Orange County, CA
Posts: 92
|
Glad you got them installed. I have to say I'm surprised at the trouble they gave you. Hopefully the front goes in without issues!
Sent from my SM-N975U1 using Tapatalk
|
|
|
Reply With Quote
|
|
11-21-2022, 11:10 AM
|
#14
|
|
Member
|
|
Join Date: Nov 2016
Location: Boise
Posts: 163
|
|
|
Member
Join Date: Nov 2016
Location: Boise
Posts: 163
|
Here is a step by step write up for Rear Shock install: 
Block front and back of front wheels.
Loosen but don’t remove lug nuts on rear wheels.
Use floor jack under rear differential and then place jack stands under axle. Lower vehicle onto stands.
Remove rear tire of one side and place under vehicle as additional safety.
Use 17mm wrench on top bolt and pipe wrench/ channel lock pliers on top body of shock to loosen top bolt. Use top body of shock to turn shaft and remove bolt.
Remove bottom bolt and remove old shock.
Remove shroud from new shock. Pull shaft up and use rubber bushing located under shroud to lock it in place by sliding it down shaft. Replace shroud on shaft.
Mark short side of shock bottom “out”.
Place shock rough location. Build stack. Flat washer, bumper (convex up), short lip washer (lip up). On top of bumper perch place large lip washer (lip down), bumper (convex down). Guide shaft through top perch/washer/ bumper. Add top washer and nut to shaft. While supporting shock get a few turns on nut to secure stack.
If needed rotate shock body so “out” is facing front of vehicle. Mount bottom of shock to axle. (Some force may be needed) lightly secure with bolt removed earlier.
Begin to tighten top bolt down with 19mm wrench. Secure shaft from turning with 6mm wrench on flats located at top of shaft. While tightening stack make sure lipped washers are inside perch holes. Tighten until it won’t go anymore.
I torqued bottom at this time to 100 ft lb. Some say to torque after wheels mounted and car on ground.
Replace tire and put lug nuts on.
Repeat above for other side of vehicle.
Lower vehicle and torque lug nuts.
Remove tire chocks and imbibe beverage of choice. 
Feel free to add any suggestions 
__________________
2016 TEP, KDSS, ALPRO Apex Sliders, Focal IS690TOY, Old Red's Accessory Meter Display Mod , Rear Differential Breather Mod, Radium Fuel Surge Tank, URD Supercharger , Ironman FCP shocks
Last edited by Turfboy; 11-21-2022 at 02:41 PM.
Reason: Convex vs concave
|
|
|
Reply With Quote
|
|
11-21-2022, 01:59 PM
|
#15
|
|
Senior Member
|
|
Join Date: Oct 2013
Location: illinois
Posts: 1,609
Real Name: Ron
|
|
|
Senior Member
Join Date: Oct 2013
Location: illinois
Posts: 1,609
Real Name: Ron
|
I thought you weren't able to get a wrench on the shaft of shock when tightening down 19mm nylock nut, or were you able to put enough pressure upward on shock to get enough shaft through the bushings?
__________________
2003 Limited, V8, AWD. 4600 Bils/FJ springs, 1/2" spacer, SPC UCA, Super Pro bushings in front LCA and in all rear control arms, Michelin 265/65R17 LTX/Defenders, stock wheels with homemade center caps, Stop Tech slotted rotors w/Posi Quiet pads all around.
|
|
|
Reply With Quote
|
 Posting Rules
|
You may not post new threads
You may not post replies
You may not post attachments
You may not edit your posts
HTML code is On
|
|
|
|


 Linear Mode


