 05-02-2020, 10:02 PM
|
#31
|
|
Banned
|
|
Join Date: Nov 2017
Location: Bay Area, CA
Posts: 2,247
Real Name: Mark
|
|
|
Banned
Join Date: Nov 2017
Location: Bay Area, CA
Posts: 2,247
Real Name: Mark
|
Quote:
Originally Posted by JRLTRD

Oh, I got to have this!
What 'Color' did you go with? Torn between the 3 different whites (Cool, Warm, Neutral), I don't want it super bright ...
Also, what are your thoughts if 2 could be used to light up the tail gate area? Would the 1W version be bright enough if 2 were used on each side or tailgate?
|
You can get three different sizes in the Oznium bolt, 6mm, 11mm, 16mm. And two different powers 1W and 3W. Although 3W is only available in the 11mm size. For the console the 1W in the 6mm or 11mm would probably work best. I have a few of each that Im going to try out to see how bright it is.
As for color Id suggest the warm white or neutral. The cool seems too bluish for my tastes. You could order one of each color and size and see what you like best, theyre not very expensive.
For the tailgate the 3W gives off a lot of light. Im not sure if it would fit in the two existing light fixtures in the tailgate. I used different LEDs there. Plus the 3W does dissipate a good amount of heat, its not a good idea to mount it in plastic if you want to run it for a long time. I did mount one in the back ceiling on an aluminum plate heatsink under the headliner. It really provides a lot of light.
Yet ANOTHER Cargo Lighting Mod
|

|
 Reply With Quote Reply With Quote
|
|
05-02-2020, 10:12 PM
|
#32
|
 |
Senior Member
|
|
Join Date: Jun 2004
Location: Bay Area, CA
Posts: 1,409
|
|
|
Senior Member
Join Date: Jun 2004
Location: Bay Area, CA
Posts: 1,409
|
Quote:
Originally Posted by JRLTRD
Oh, I got to have this!
What 'Color' did you go with? Torn between the 3 different whites (Cool, Warm, Neutral), I don't want it super bright ...
Also, what are your thoughts if 2 could be used to light up the tail gate area? Would the 1W version be bright enough if 2 were used on each side or tailgate?
|
I got the 11mm, 12,000K cool white. I have led interior lights already and matches well with it.
Oznium Brightest Light Bolt - Flush Mount 12V LED Light for Bumper, Grille, Cars Interior, Dash, Ambient Lighting, Motorcycle w/Sleek Aluminum Housing & Screw Nut (11 mm Black, Cool White LED) Amazon.com: Oznium Brightest Light Bolt - Flush Mount 12V LED Light for Bumper, Grille, Cars Interior, Dash, Ambient Lighting, Motorcycle w/Sleek Aluminum Housing & Screw Nut (11 mm Black, Cool White LED): Automotive
|
|
|
Reply With Quote
|
|
05-02-2020, 11:18 PM
|
#33
|
|
Member
|
|
Join Date: Jan 2012
Location: Vancouver BC, Canada
Posts: 588
|
|
|
Member
Join Date: Jan 2012
Location: Vancouver BC, Canada
Posts: 588
|
Quote:
Originally Posted by JRLTRD
Oh, I got to have this!
What 'Color' did you go with? Torn between the 3 different whites (Cool, Warm, Neutral), I don't want it super bright ...
|
I went with cool white and I don't find it too bright. I actually want it to be brighter/whiter to be honest.
__________________
2015 Magnetic Gray SR5P
|
|
|
Reply With Quote
|
|
05-04-2020, 03:24 PM
|
#34
|
 |
Elite Member
|
|
Join Date: Mar 2010
Location: Pittsburgh
Posts: 5,689
Real Name: Chris
|
|
|
Elite Member
Join Date: Mar 2010
Location: Pittsburgh
Posts: 5,689
Real Name: Chris
|
Quote:
Originally Posted by daytonaviolet
Funny thing, I ordered the led and mercury switch days after seeing this mod 3/22 via amazon. The leds arrived 4/28. Waited over a month for the leds to arrive.
|
That sucks, I ordered my parts on Thursday, and got them today
__________________
2017 Nautical Blue SR5 Premium - Black Emblems, AFE 76mm TB, AFE Momentum GT Intake, URD MAF Calibrator, Borla Touring Cat-Back Exhaust, VR ECU Tune, RCI Skid Plate, Morimoto MLED 2.0 Headlight Retrofit, Morimoto LED Fogs, Eagle Eye Smoked Black Tail Lights, FyreFlys LED Interior, Meso Puddle Lights, Tinted Mirror Turn Signals, Smoked Amber Raptor Lights, Odyssey 34 Battery, 32" LED Bar with Rago Hidden Brackets, Rago Molle Panels, Side Shooter LED Ditch Lights, sPod w/ PowerTray, Raceline Matte Bronze Wheels w/ Cooper Discoverer RTX, CaliRaised Rock Sliders, BajaRack Full Length Roof Rack, Kenwood DMX1057XR, Infinity Kappa Door Speakers and 3.5's in dash, JL 8w3v3 in JBL Enclosure, Husky Weather Beaters, Blackvue DR900S Dash Cams
|
|
|
Reply With Quote
|
|
05-04-2020, 03:28 PM
|
#35
|
|
Senior Member
|
|
Join Date: Jun 2004
Location: Bay Area, CA
Posts: 1,409
|
|
|
Senior Member
Join Date: Jun 2004
Location: Bay Area, CA
Posts: 1,409
|
Quote:
Originally Posted by 97BlackAckCL
That sucks, I ordered my parts on Thursday, and got them today
|
Perhaps they waited for parts to arrive from China.
|
|
|
Reply With Quote
|
|
05-13-2020, 09:26 PM
|
#36
|
|
Member
|
|
Join Date: Dec 2019
Location: Bay Area, Ca
Posts: 44
|
|
|
Member
Join Date: Dec 2019
Location: Bay Area, Ca
Posts: 44
|
I'm no electrician ...
I have finally received all my parts to accomplish this mod but since I don't have a 12v cigarette lighter(s) located in the back like the OP does, I only have 2 USB ports. If I tap into those wires, is that enough to power 2 of these Oznium 1w lights and the mercury switch?
or, do I need to tap into the cigarette lighter wires that are in the center armrest console? (that will be more challenging because I think I need to take the whole console out?)
__________________
2020 ORP Mag Gray w/KDSS
Falken Wildpeak A/T 285/70/17 | Bilstein 5160/6112 | SPC Control Arm | RCI Rock Sliders | Rago Hidden Winch Mount | Badlands APEX 12k Winch | BOSS StrongBoxx Drawer System | BlackVue DR900S-2CH 4K UHD Dual-Lens Dashcam | Orange Boxx Molle rack system | Diode Dynamics Low Beam HID Conversion, High Beam LED Headlight, SS3 LED Fog Light
|
|
|
Reply With Quote
|
|
05-13-2020, 09:44 PM
|
#37
|
|
Banned
|
|
Join Date: Nov 2017
Location: Bay Area, CA
Posts: 2,247
Real Name: Mark
|
|
|
Banned
Join Date: Nov 2017
Location: Bay Area, CA
Posts: 2,247
Real Name: Mark
|
Quote:
Originally Posted by JRLTRD
I'm no electrician ...
I have finally received all my parts to accomplish this mod but since I don't have a 12v cigarette lighter(s) located in the back like the OP does, I only have 2 USB ports. If I tap into those wires, is that enough to power 2 of these Oznium 1w lights and the mercury switch?
or, do I need to tap into the cigarette lighter wires that are in the center armrest console? (that will be more challenging because I think I need to take the whole console out?)
|
USB supplies +5V. You need to tap into +12V.
|
|
|
Reply With Quote
|
|
05-14-2020, 02:12 AM
|
#38
|
|
Senior Member
|
|
Join Date: Jun 2004
Location: Bay Area, CA
Posts: 1,409
|
|
|
Senior Member
Join Date: Jun 2004
Location: Bay Area, CA
Posts: 1,409
|
Quote:
Originally Posted by JRLTRD
I'm no electrician ...
I have finally received all my parts to accomplish this mod but since I don't have a 12v cigarette lighter(s) located in the back like the OP does, I only have 2 USB ports. If I tap into those wires, is that enough to power 2 of these Oznium 1w lights and the mercury switch?
or, do I need to tap into the cigarette lighter wires that are in the center armrest console? (that will be more challenging because I think I need to take the whole console out?)
|
i would measure the voltage before tapping but, i believe it's 12V. the usb usually has a built in voltage regulators.
|
|
|
Reply With Quote
|
|
05-15-2020, 02:08 PM
|
#39
|
|
Elite Member
|
|
Join Date: Mar 2010
Location: Pittsburgh
Posts: 5,689
Real Name: Chris
|
|
|
Elite Member
Join Date: Mar 2010
Location: Pittsburgh
Posts: 5,689
Real Name: Chris
|
Shoutout to
@ emmantik
and
@ daytonaviolet
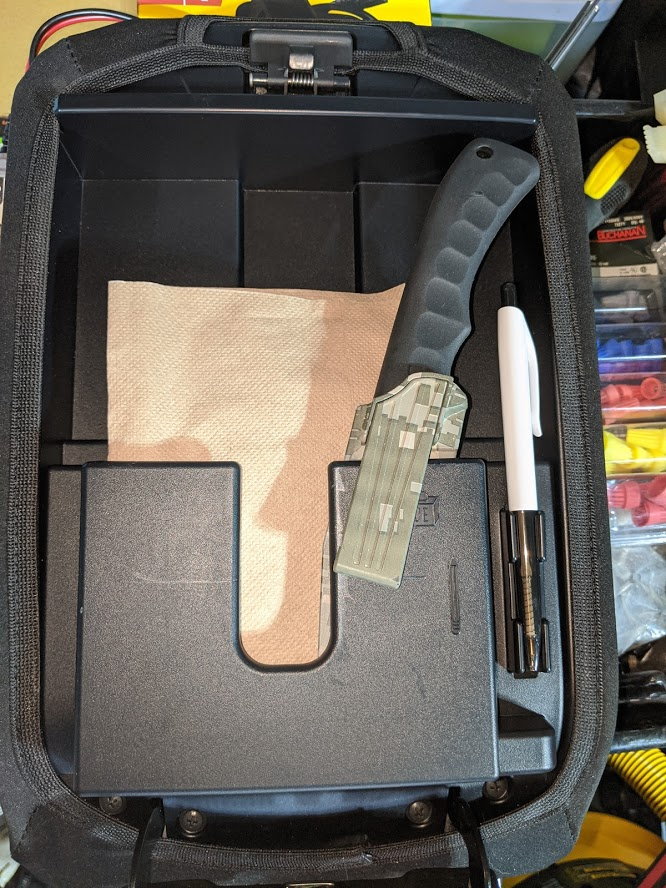
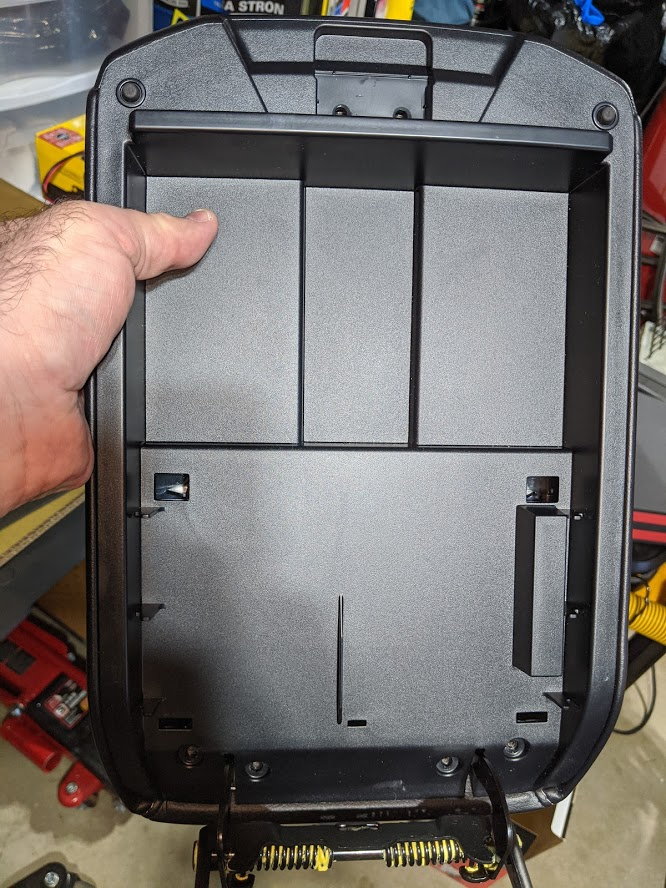
for the ideas and guidance for this mod. I'm super happy with how it came out. I have the console safe, and it's impossible to see the combination pad or inside it at night, so this was the perfect solution for me. I changed a few things and put my own spin on it, but I think I did a good job in the end.
Here's a before
Quick tear down
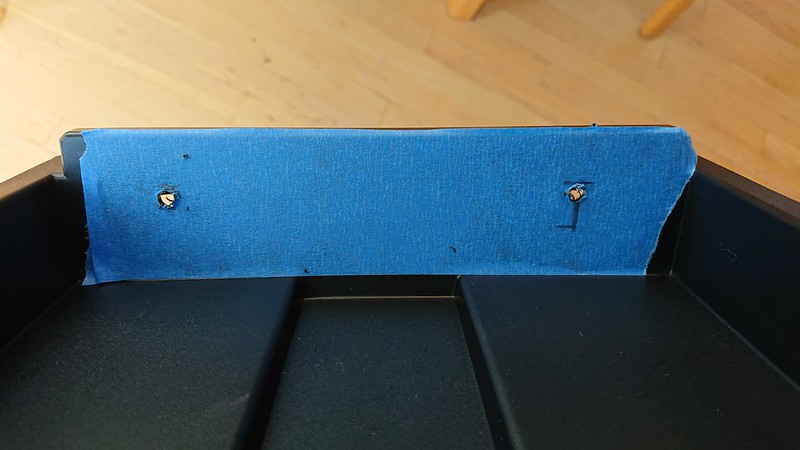
Found center and marked my holes
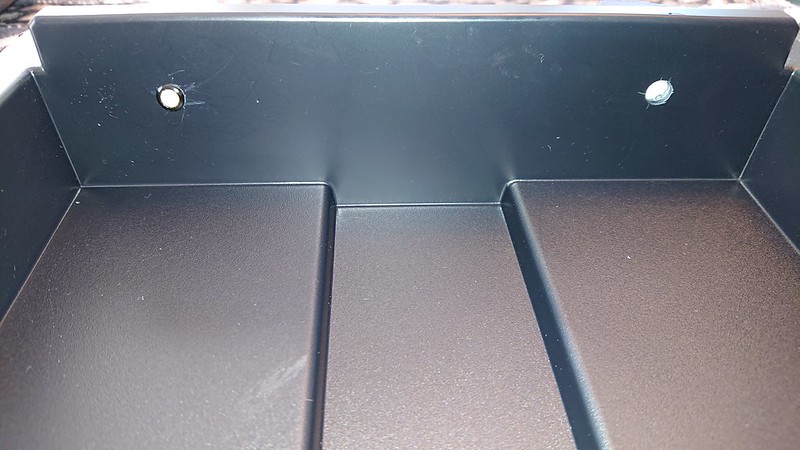
First hole
Second hole
Testing with the battery
The directions weren't clear, but I did what daytonaviolet did and used the ground for the switch, I also mounted mine at a 15 deg angle as recommended
I wired the 2 positives in parallel so that I could send 1 set of wires down
And here's the final test of the switch and wiring

I used wire taps for the back of the 12v socket so that I didn't have to cut the stock wiring
And here's my finished product. I had some 3m wire holders leftover from my Blackvue dash cam, so I used those to hold the wires. I also ran the wires through a mesh loom

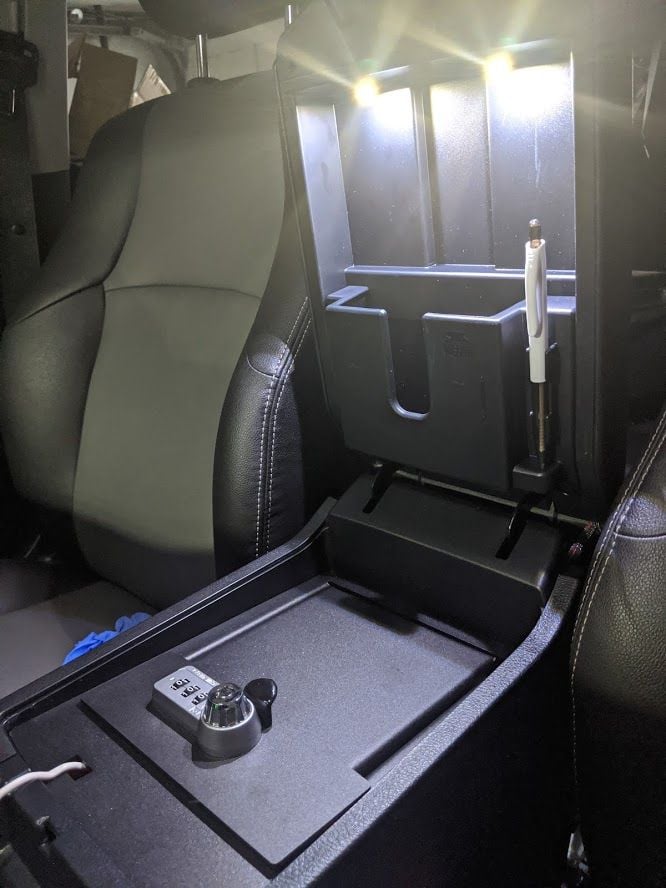
And here it is all reinstalled, this is before the switch triggers
Here's the light triggered with the switch
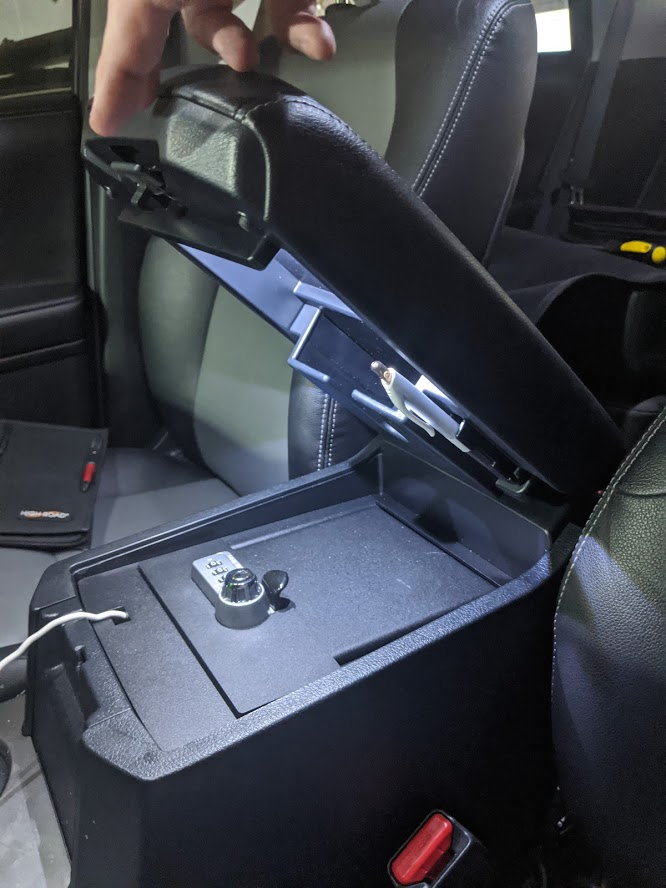
And the finished product, I'm now able to see and access my console safe at night. Thanks guys for the inspiration and information to get this mod done. I love it! Not bad for 20 bucks!
__________________
2017 Nautical Blue SR5 Premium - Black Emblems, AFE 76mm TB, AFE Momentum GT Intake, URD MAF Calibrator, Borla Touring Cat-Back Exhaust, VR ECU Tune, RCI Skid Plate, Morimoto MLED 2.0 Headlight Retrofit, Morimoto LED Fogs, Eagle Eye Smoked Black Tail Lights, FyreFlys LED Interior, Meso Puddle Lights, Tinted Mirror Turn Signals, Smoked Amber Raptor Lights, Odyssey 34 Battery, 32" LED Bar with Rago Hidden Brackets, Rago Molle Panels, Side Shooter LED Ditch Lights, sPod w/ PowerTray, Raceline Matte Bronze Wheels w/ Cooper Discoverer RTX, CaliRaised Rock Sliders, BajaRack Full Length Roof Rack, Kenwood DMX1057XR, Infinity Kappa Door Speakers and 3.5's in dash, JL 8w3v3 in JBL Enclosure, Husky Weather Beaters, Blackvue DR900S Dash Cams
|
|
|
Reply With Quote
|
|
05-15-2020, 02:14 PM
|
#40
|
|
Member
|
|
Join Date: Jan 2012
Location: Vancouver BC, Canada
Posts: 588
|
|
|
Member
Join Date: Jan 2012
Location: Vancouver BC, Canada
Posts: 588
|
Quote:
Originally Posted by 97BlackAckCL
Shoutout to
@ emmantik
and
@ daytonaviolet
for the ideas and guidance for this mod. I'm super happy with how it came out. I have the console safe, and it's impossible to see the combination pad or inside it at night, so this was the perfect solution for me. I changed a few things and put my own spin on it, but I think I did a good job in the end.
Here's a before
Quick tear down
Found center and marked my holes
First hole
Second hole
Testing with the battery
The directions weren't clear, but I did what daytonaviolet did and used the ground for the switch, I also mounted mine at a 15 deg angle as recommended
I wired the 2 positives in parallel so that I could send 1 set of wires down
And here's the final test of the switch and wiring
I used wire taps for the back of the 12v socket so that I didn't have to cut the stock wiring
And here's my finished product. I had some 3m wire holders leftover from my Blackvue dash cam, so I used those to hold the wires. I also ran the wires through a mesh loom
And here it is all reinstalled, this is before the switch triggers
Here's the light triggered with the switch
And the finished product, I'm now able to see and access my console safe at night. Thanks guys for the inspiration and information to get this mod done. I love it! Not bad for 20 bucks!
|
Great job on the install! Glad it worked out for you as well!
__________________
2015 Magnetic Gray SR5P
Last edited by emmantik; 05-15-2020 at 02:22 PM.
|
|
|
Reply With Quote
|
|
05-15-2020, 04:30 PM
|
#41
|
|
Elite Member
|
|
Join Date: Mar 2010
Location: Pittsburgh
Posts: 5,689
Real Name: Chris
|
|
|
Elite Member
Join Date: Mar 2010
Location: Pittsburgh
Posts: 5,689
Real Name: Chris
|
Quote:
Originally Posted by emmantik
Great job on the install! Glad it worked out for you as well!
|
Thanks man! Thank you for the idea, and the great detailed walk through. I'm really happy with this mod
__________________
2017 Nautical Blue SR5 Premium - Black Emblems, AFE 76mm TB, AFE Momentum GT Intake, URD MAF Calibrator, Borla Touring Cat-Back Exhaust, VR ECU Tune, RCI Skid Plate, Morimoto MLED 2.0 Headlight Retrofit, Morimoto LED Fogs, Eagle Eye Smoked Black Tail Lights, FyreFlys LED Interior, Meso Puddle Lights, Tinted Mirror Turn Signals, Smoked Amber Raptor Lights, Odyssey 34 Battery, 32" LED Bar with Rago Hidden Brackets, Rago Molle Panels, Side Shooter LED Ditch Lights, sPod w/ PowerTray, Raceline Matte Bronze Wheels w/ Cooper Discoverer RTX, CaliRaised Rock Sliders, BajaRack Full Length Roof Rack, Kenwood DMX1057XR, Infinity Kappa Door Speakers and 3.5's in dash, JL 8w3v3 in JBL Enclosure, Husky Weather Beaters, Blackvue DR900S Dash Cams
|
|
|
Reply With Quote
|
|
05-27-2020, 09:45 PM
|
#42
|
|
Banned
|
|
Join Date: Nov 2017
Location: Bay Area, CA
Posts: 2,247
Real Name: Mark
|
|
|
Banned
Join Date: Nov 2017
Location: Bay Area, CA
Posts: 2,247
Real Name: Mark
|
Quote:
Originally Posted by emmantik
Added a hardwired light inside my center console storage box....
|
Thanks for this great idea. Im really pleased with how it turned out. Here are a few of my tweaks to your design.
For the switch I first tried to devise a way to use a mechanical limit switch but couldnt find a clean way to do it. So I took apart an old Leviton household power switch, the illuminated kind that used a small drum of mercury for silent operation, and soldered leads to it. I had to cut out a little of the plastic recess in the console lid to get it to fit snuggly. Its kind of a heavy item so I put some foam under it and glued it all to keep it in place.
The LED I used was a cool white 1W 6mm Oznium bolt, installed offset from the center of the lid. I didnt want a lot of light to shine out while driving at night, and this LED puts out enough to nicely light up the interior of the console box.
I installed a connector in the power leads for easy removal of the lid for any service or future mods.
When routing the power cord and taping it over the hinge bracket edge I noticed that if was a tight fit, so I enlarged the receiver hole with a round file.
To keep the power cord from flexing too much I taped up an edge to create a service loop to minimize wire bending.
Its working well, let there be light!
|
|
|
Reply With Quote
|
|
05-28-2020, 04:55 PM
|
#43
|
|
Member
|
|
Join Date: Jan 2012
Location: Vancouver BC, Canada
Posts: 588
|
|
|
Member
Join Date: Jan 2012
Location: Vancouver BC, Canada
Posts: 588
|
Quote:
Originally Posted by ElectroBoy
Thanks for this great idea. Im really pleased with how it turned out. Here are a few of my tweaks to your design.
For the switch I first tried to devise a way to use a mechanical limit switch but couldnt find a clean way to do it. So I took apart an old Leviton household power switch, the illuminated kind that used a small drum of mercury for silent operation, and soldered leads to it. I had to cut out a little of the plastic recess in the console lid to get it to fit snuggly. Its kind of a heavy item so I put some foam under it and glued it all to keep it in place.
The LED I used was a cool white 1W 6mm Oznium bolt, installed offset from the center of the lid. I didnt want a lot of light to shine out while driving at night, and this LED puts out enough to nicely light up the interior of the console box.
I installed a connector in the power leads for easy removal of the lid for any service or future mods.
When routing the power cord and taping it over the hinge bracket edge I noticed that if was a tight fit, so I enlarged the receiver hole with a round file.
To keep the power cord from flexing too much I taped up an edge to create a service loop to minimize wire bending.
Its working well, let there be light!
|
Great job on your install! Glad it worked out for you as well!
__________________
2015 Magnetic Gray SR5P
|
|
|
Reply With Quote
|
|
05-28-2020, 05:40 PM
|
#44
|
|
Senior Member
|
|
Join Date: Jun 2004
Location: Bay Area, CA
Posts: 1,409
|
|
|
Senior Member
Join Date: Jun 2004
Location: Bay Area, CA
Posts: 1,409
|
I really like this mod. Amazing how much light was needed and now we have it .
|
|
|
Reply With Quote
|
|
06-03-2020, 05:29 PM
|
#45
|
 |
Member
|
|
Join Date: Jul 2010
Location: Raleigh, NC
Posts: 260
|
|
|
Member
Join Date: Jul 2010
Location: Raleigh, NC
Posts: 260
|
My take on the LED center console mod
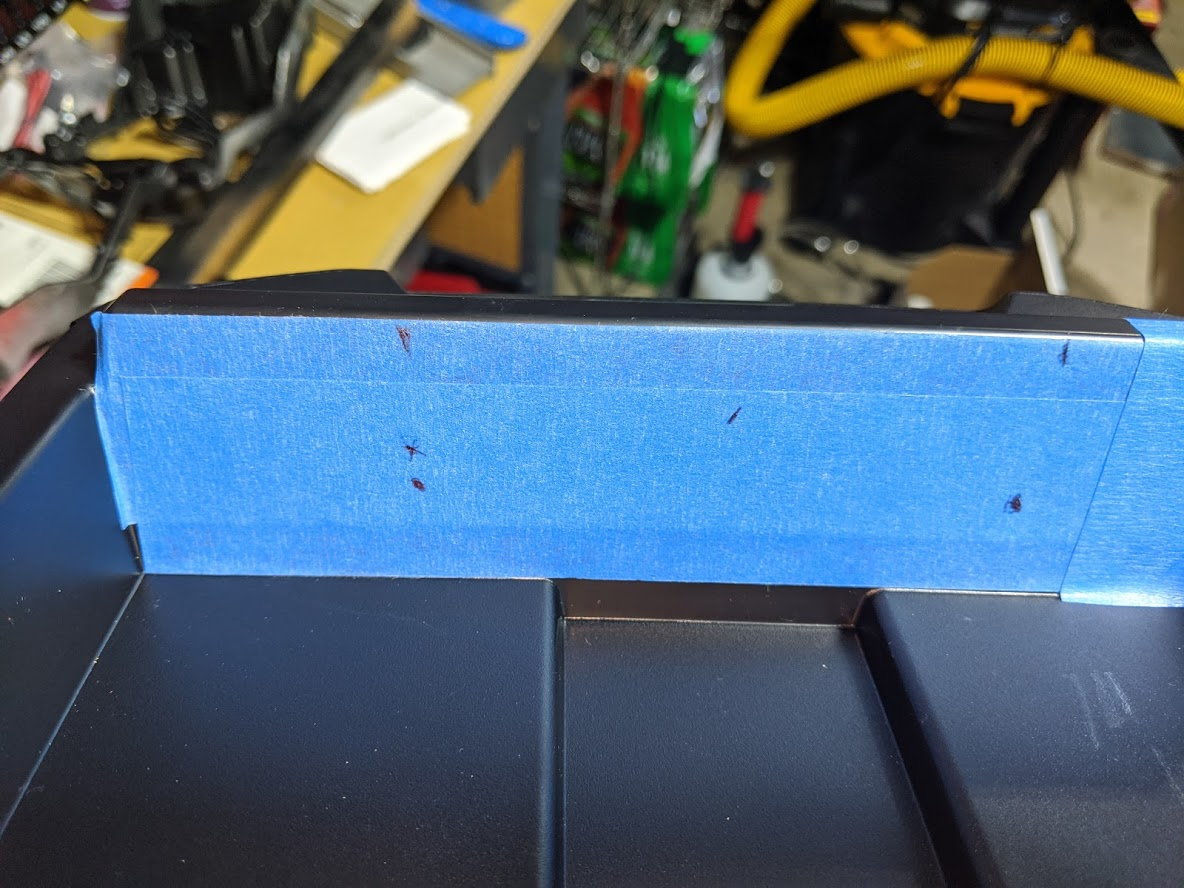
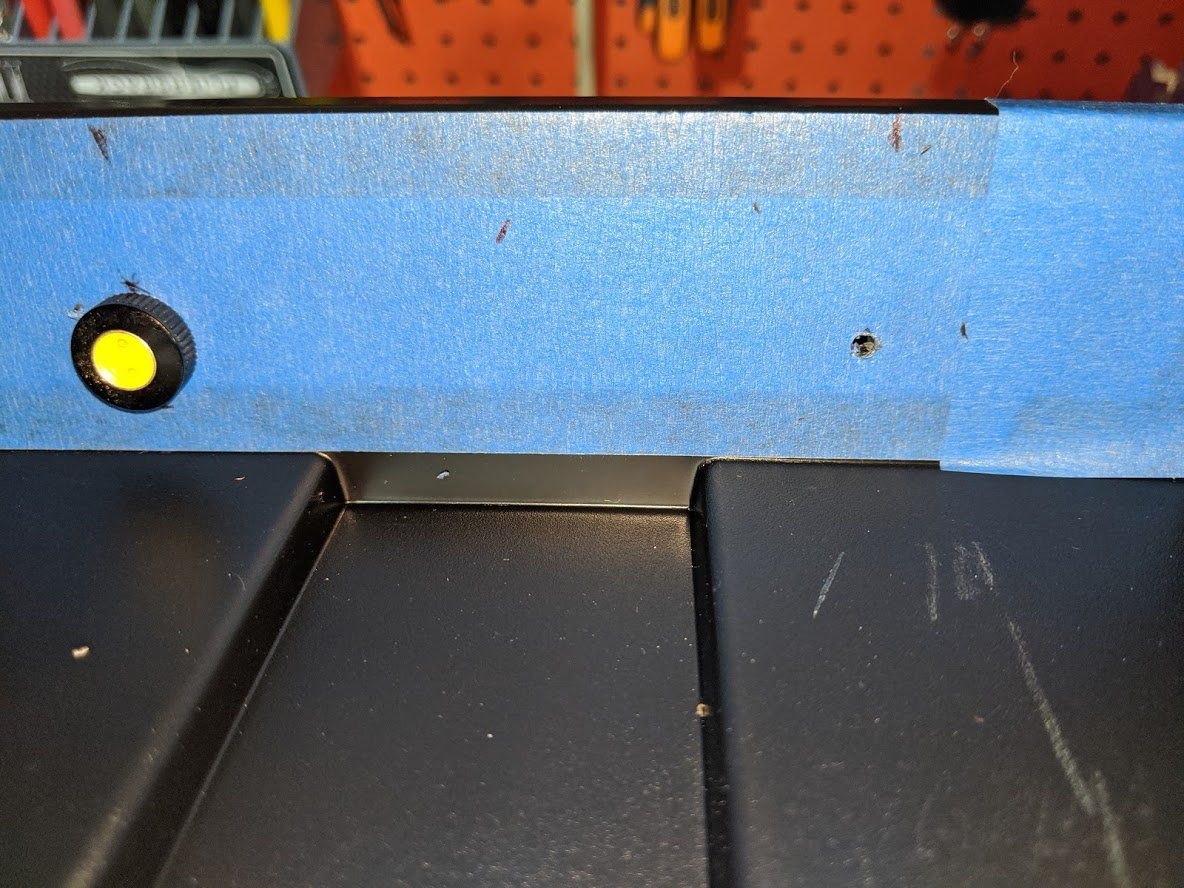
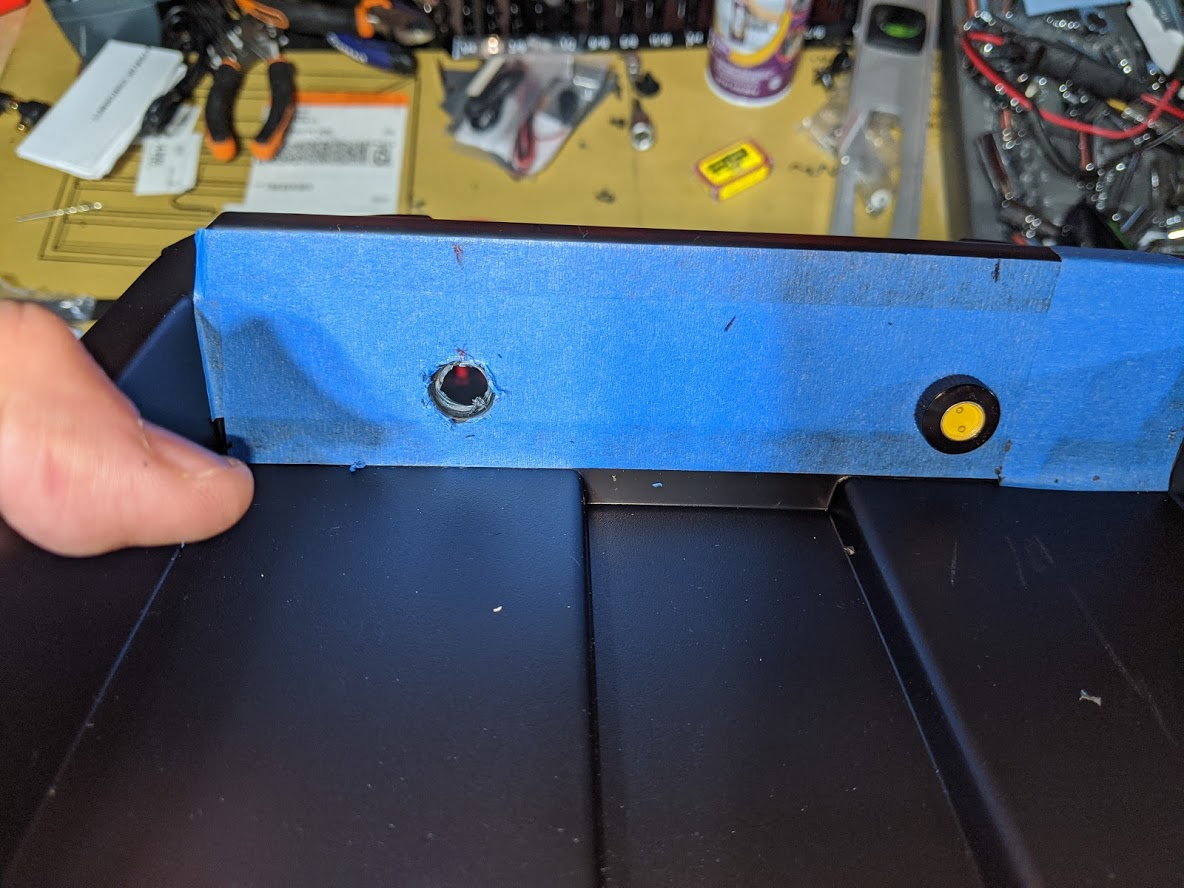
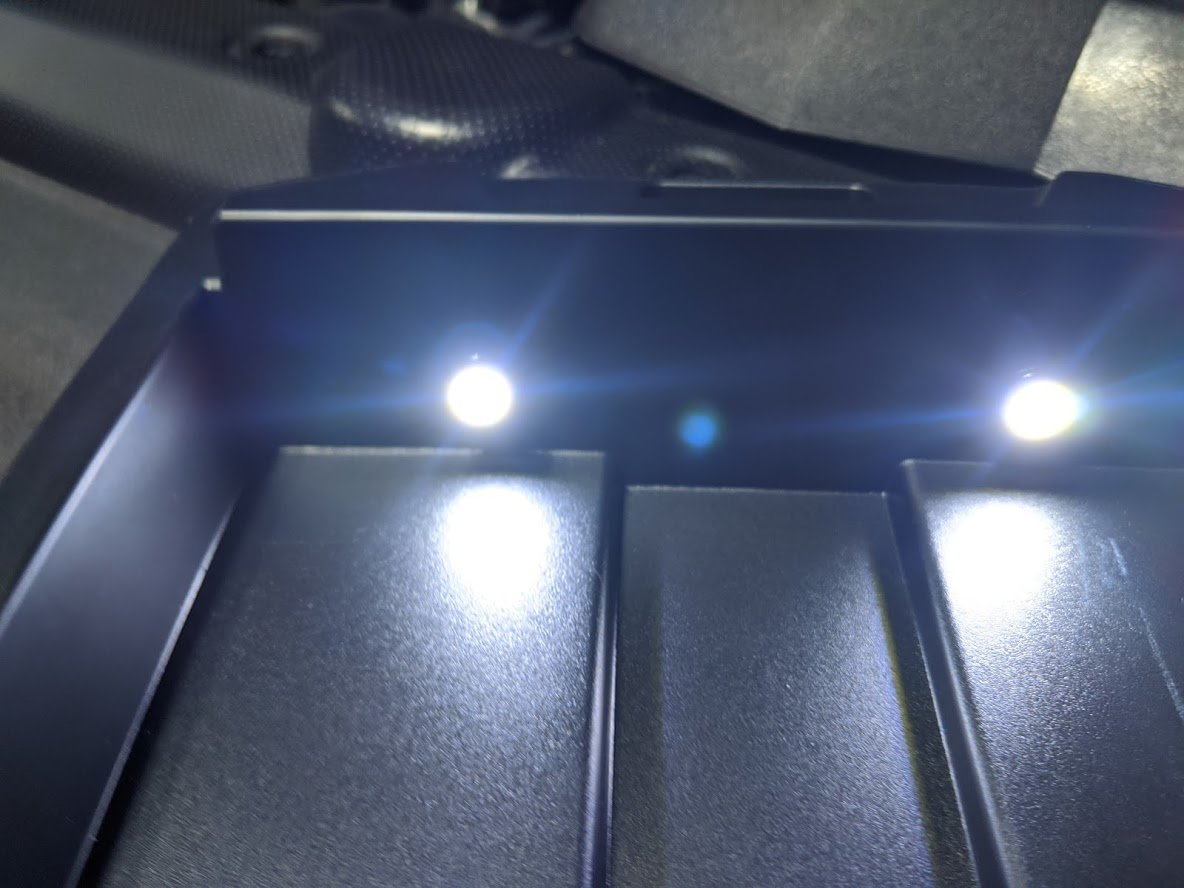
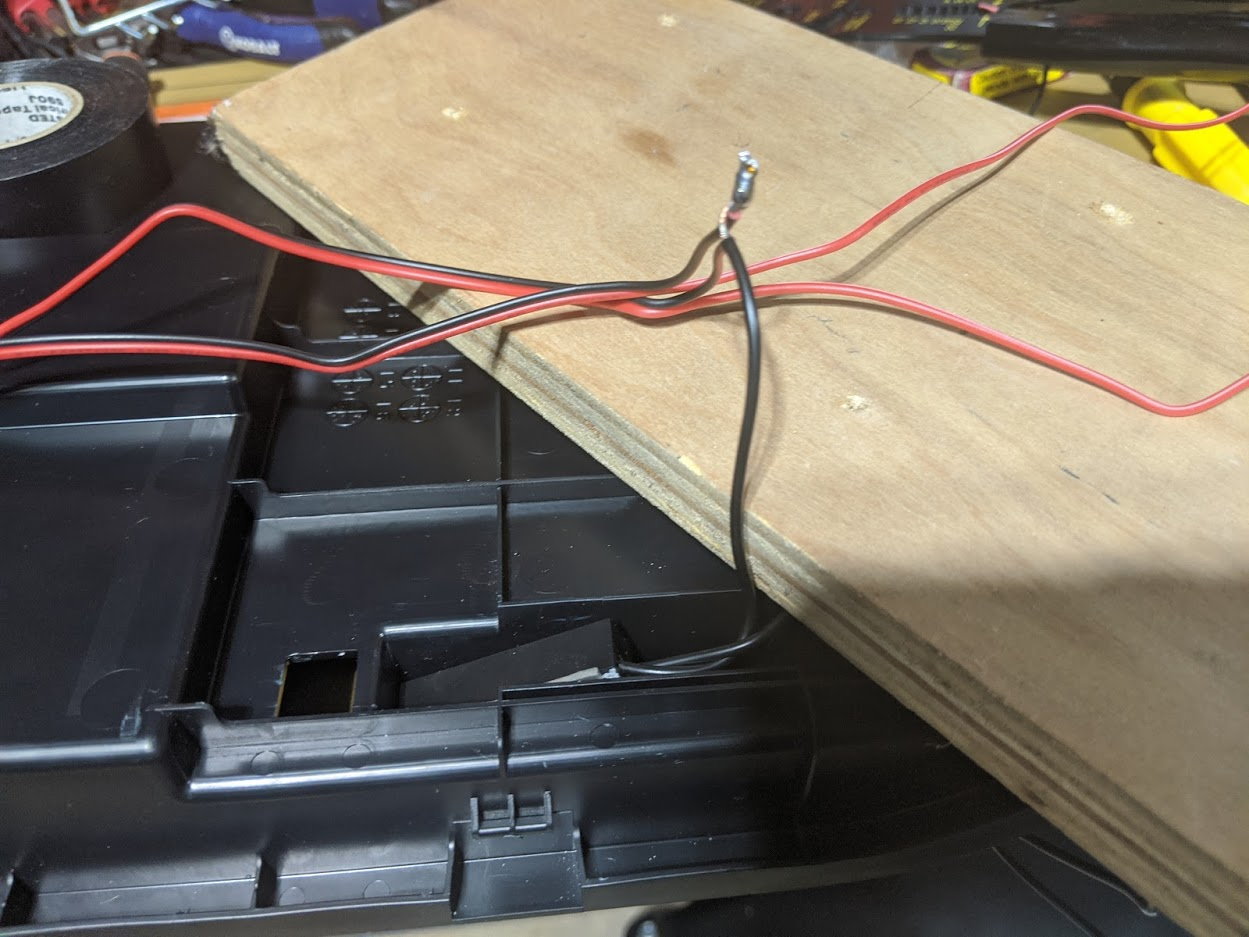
I tackled this project today. I did the dual-LED version with 6mm LED bolts.
Parts: - Oznium 6mm cool white LED bolts (2)
- InstallBay IBMS-3 mercury tilt switch
- Cable clips from Amazon


First, careful measuring for the holes. My holes are positioned like daytonaviolet's, but a little bit "higher" to move them more toward the center of the center console abiss. Drilled from the inside.

Mounting the LED bolts:

I chose to run a single pair of wires down the lid to the tilt switch to minimize the amount of material. I "T" soldered the two LEDs together in the gap between them:


I'm using aluminum tape, which I've found holds up better at high cabin temperatures than electrical tape:

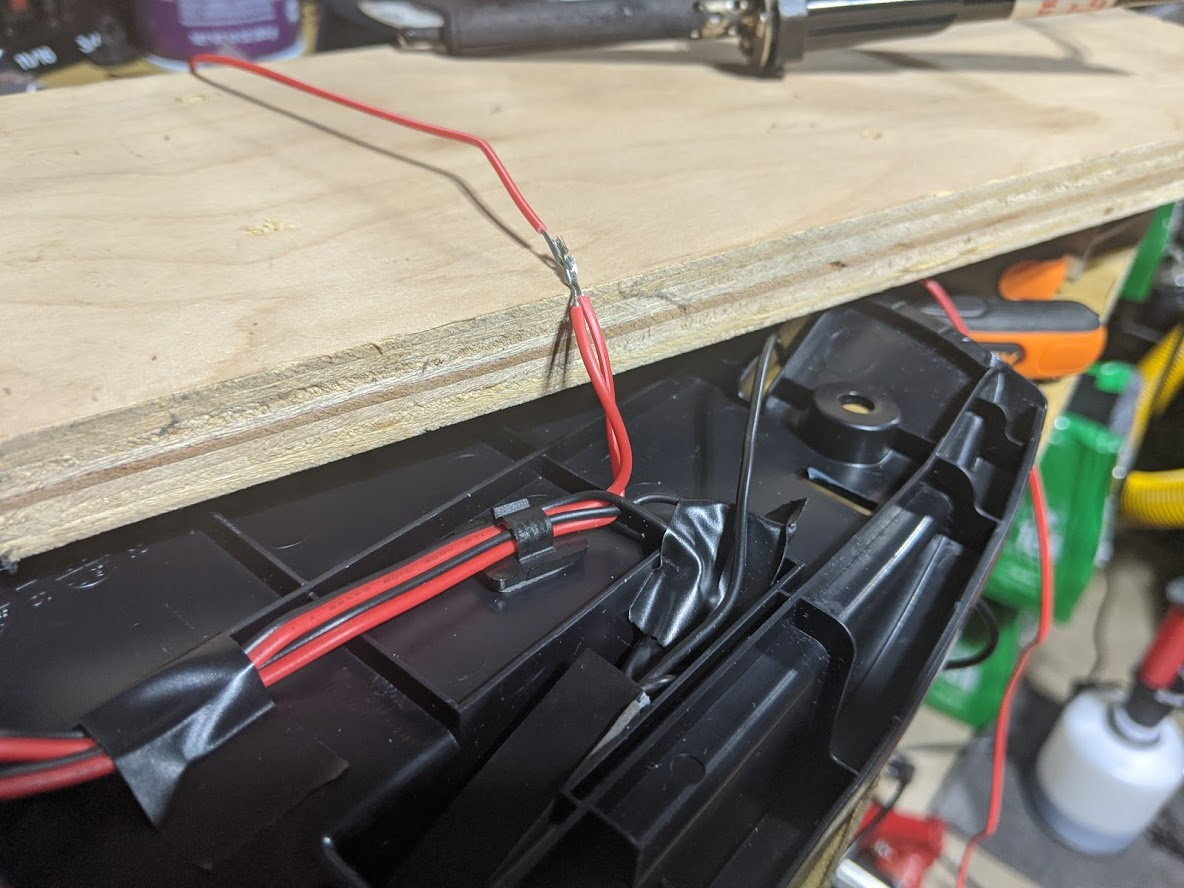
Tilt switch mounted at an angle like emmantik figured out is necessary. This one comes with its own double-sided mounting tape:
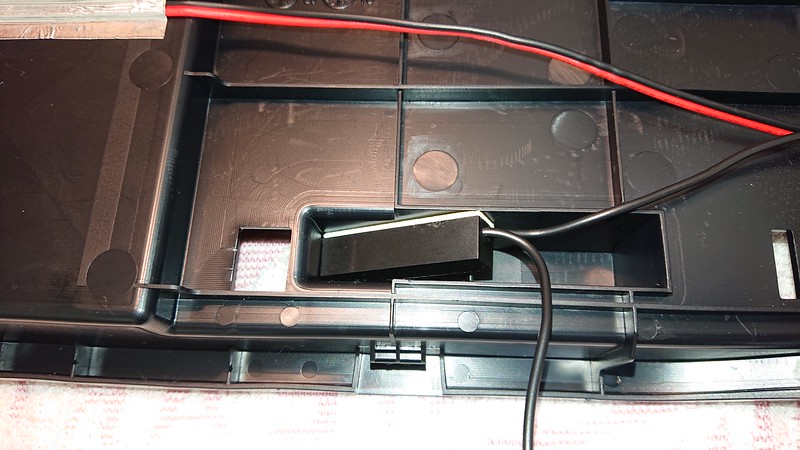
I'm letting the tilt switch control the ground, and the power is coming from the parking light/dash light circuit. This way the new LEDs only come on when the parking lights are on, and only when the center console lid is raised. And this is important...the whole project MUST be done on a zebra-print towel on the kitchen table. Otherwise, it won't work. All wiring run and taped down:


Wire exiting the hinge slot, with braided sleeve for protection (and good looks):

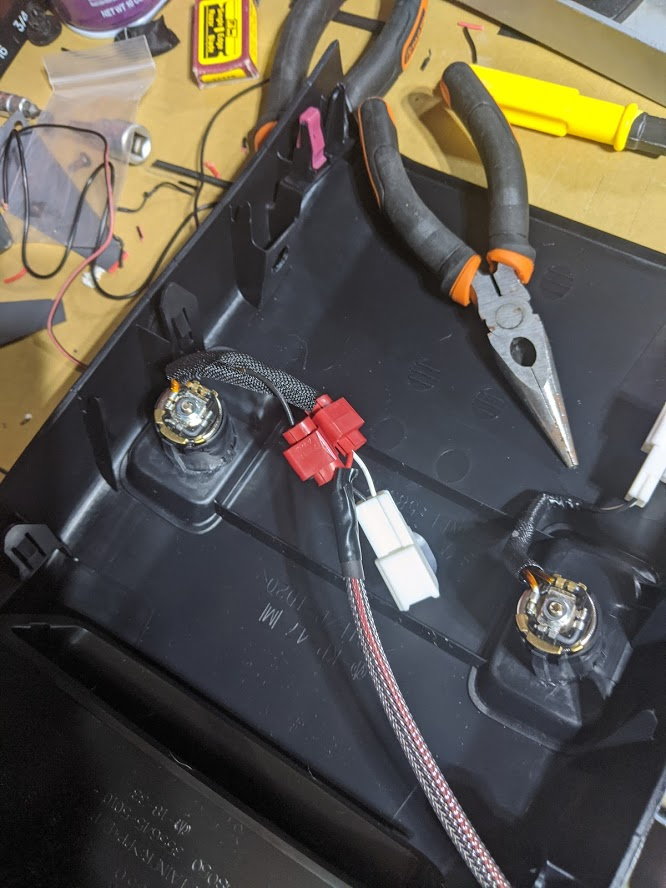
HD090 2-pin connector added for modularity. The harness side (truck side) of the wiring runs toward the shifter just like the rear-seat USB ports do. Ground goes to a bolt inserted into an unused stock threaded hole near the parking brake bracket, and power comes from one of the dark green wires that run along the passenger side of the inside of the center console near the shifter:

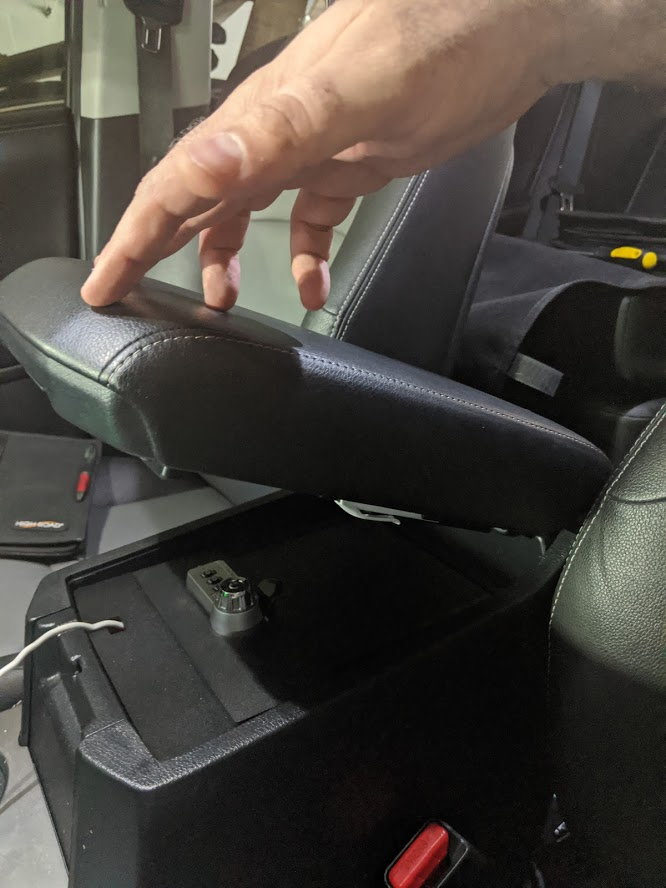
The finished product, ready to reinstall into the truck:

I mounted the LED bolts flush with both plastic "nuts" on the back side, for a professional finished look:

Thanks to emmantik for the excellent detailed writeup for taking everything apart, and for the original concept.
__________________
2018 Toyota 4Runner SR5 4WD, Black, 3rd row seating
Valentine 1 Gen 2/Savvy/concealed display hardwired, with custom power button. DRLs disabled. H9 / 9011 bulbs. Automatic locks disabled. Center console and glove box organized. Custom garage door opener button. Nav wire mod hack (with custom button). CarTrimHome motorized folding mirrors. Anytime backup camera with front parking camera & custom OEM-matching backlight LED.
|
|
|
Reply With Quote
|
 Posting Rules
|
You may not post new threads
You may not post replies
You may not post attachments
You may not edit your posts
HTML code is On
|
|
|
|


 Linear Mode


