 01-24-2022, 12:36 AM
|
#76
|
 |
Senior Member
|
|
Join Date: Jan 2017
Location: san diego
Posts: 3,186
|
|
|
Senior Member
Join Date: Jan 2017
Location: san diego
Posts: 3,186
|
excuse me kind sir.. but how did you install that front runner table to your shrockworks rear bumper?
I've been looking for a way to install a table to the shrockworks rear bumper and i'm super stumped.
thanks
__________________
2016 trail 4runner, twin locked on 34's.
Can read more of my build here (2 parts):
https://www.lasfit.com/blogs/news/ho...ad-build-part1
|

|
 Reply With Quote Reply With Quote
|
|
01-24-2022, 09:02 AM
|
#77
|
|
Junior Member
|
|
Join Date: Jan 2022
Location: North Cali
Posts: 3
|
|
|
Junior Member
Join Date: Jan 2022
Location: North Cali
Posts: 3
|
D d d damn!!!
|
|
|
Reply With Quote
|
|
01-24-2022, 02:29 PM
|
#78
|
|
Member
|
|
Join Date: Oct 2020
Location: Orange County, CA
Posts: 103
|
|
|
Member
Join Date: Oct 2020
Location: Orange County, CA
Posts: 103
|
Quote:
Originally Posted by mrblah

excuse me kind sir.. but how did you install that front runner table to your shrockworks rear bumper?
I've been looking for a way to install a table to the shrockworks rear bumper and i'm super stumped.
thanks
|

I found a picture that may help explain. I basically used a bracket behind the table to reinforce it since its quite flimsy. From there I mounted it using the existing holes in the shrockworks bumper and some oversized washers/plates to keep it in place. They don't make it easy to mount tables and have been changing it every so often.
|
|
|
Reply With Quote
|
|
01-24-2022, 05:12 PM
|
#79
|
|
Senior Member
|
|
Join Date: Jan 2017
Location: san diego
Posts: 3,186
|
|
|
Senior Member
Join Date: Jan 2017
Location: san diego
Posts: 3,186
|
Quote:
Originally Posted by rjtakesphotos
I found a picture that may help explain. I basically used a bracket behind the table to reinforce it since its quite flimsy. From there I mounted it using the existing holes in the shrockworks bumper and some oversized washers/plates to keep it in place. They don't make it easy to mount tables and have been changing it every so often.
|
dood thanks for the pic man...yeah..the only negative for shrockworks is the inability to easily install a table.... otherwise love the bumper.
FYI, awesome build btw...
__________________
2016 trail 4runner, twin locked on 34's.
Can read more of my build here (2 parts):
https://www.lasfit.com/blogs/news/ho...ad-build-part1
|
|
|
Reply With Quote
|
|
01-24-2022, 06:18 PM
|
#80
|
|
Member
|
|
Join Date: Oct 2020
Location: Orange County, CA
Posts: 103
|
|
|
Member
Join Date: Oct 2020
Location: Orange County, CA
Posts: 103
|
Quote:
Originally Posted by mrblah
dood thanks for the pic man...yeah..the only negative for shrockworks is the inability to easily install a table.... otherwise love the bumper.
FYI, awesome build btw...
|
Thank you! Hopefully that pic helped haha it was just a DIY sort of thing. Personally not a fan of the shrockworks bumper, but maybe they have been improved since I got mine back in 2018. I feel like there are better options out now a days.
|
|
|
Reply With Quote
|
|
02-10-2022, 05:34 PM
|
#81
|
|
Member
|
|
Join Date: Oct 2020
Location: Orange County, CA
Posts: 103
|
|
|
Member
Join Date: Oct 2020
Location: Orange County, CA
Posts: 103
|
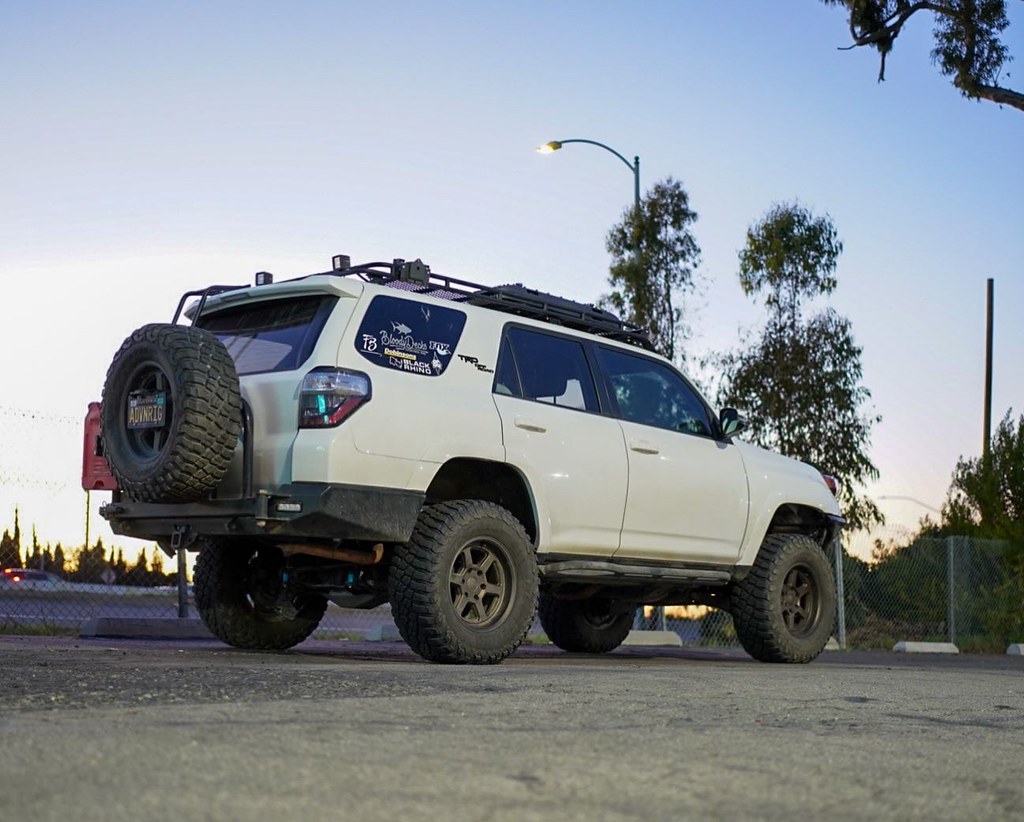
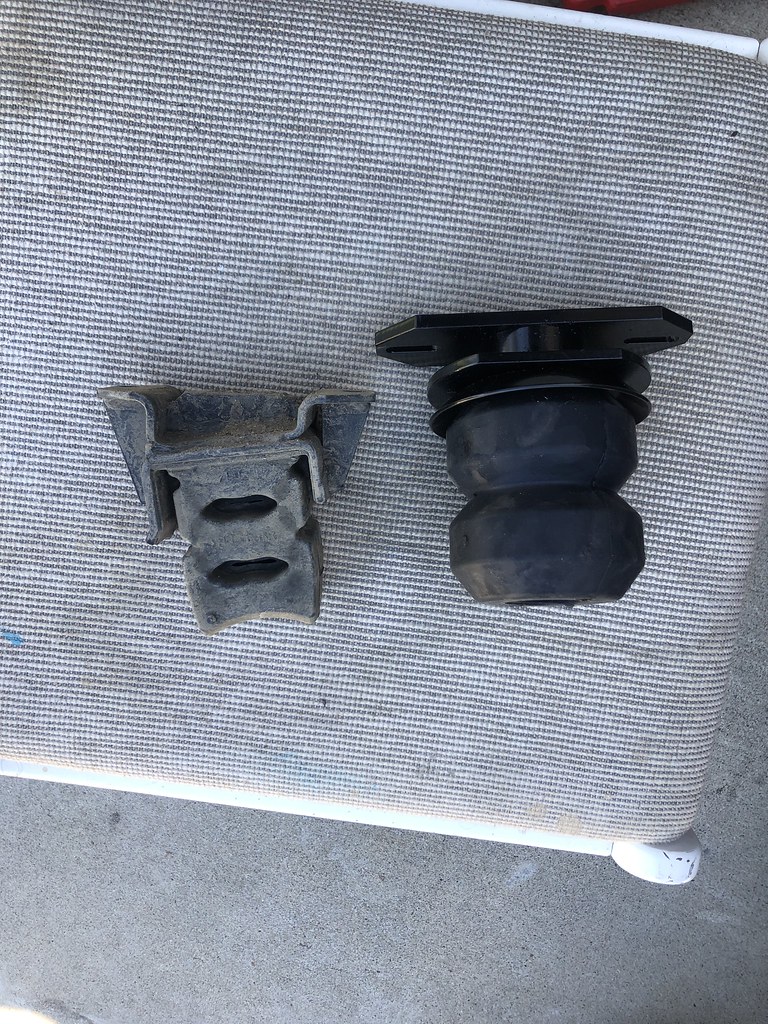
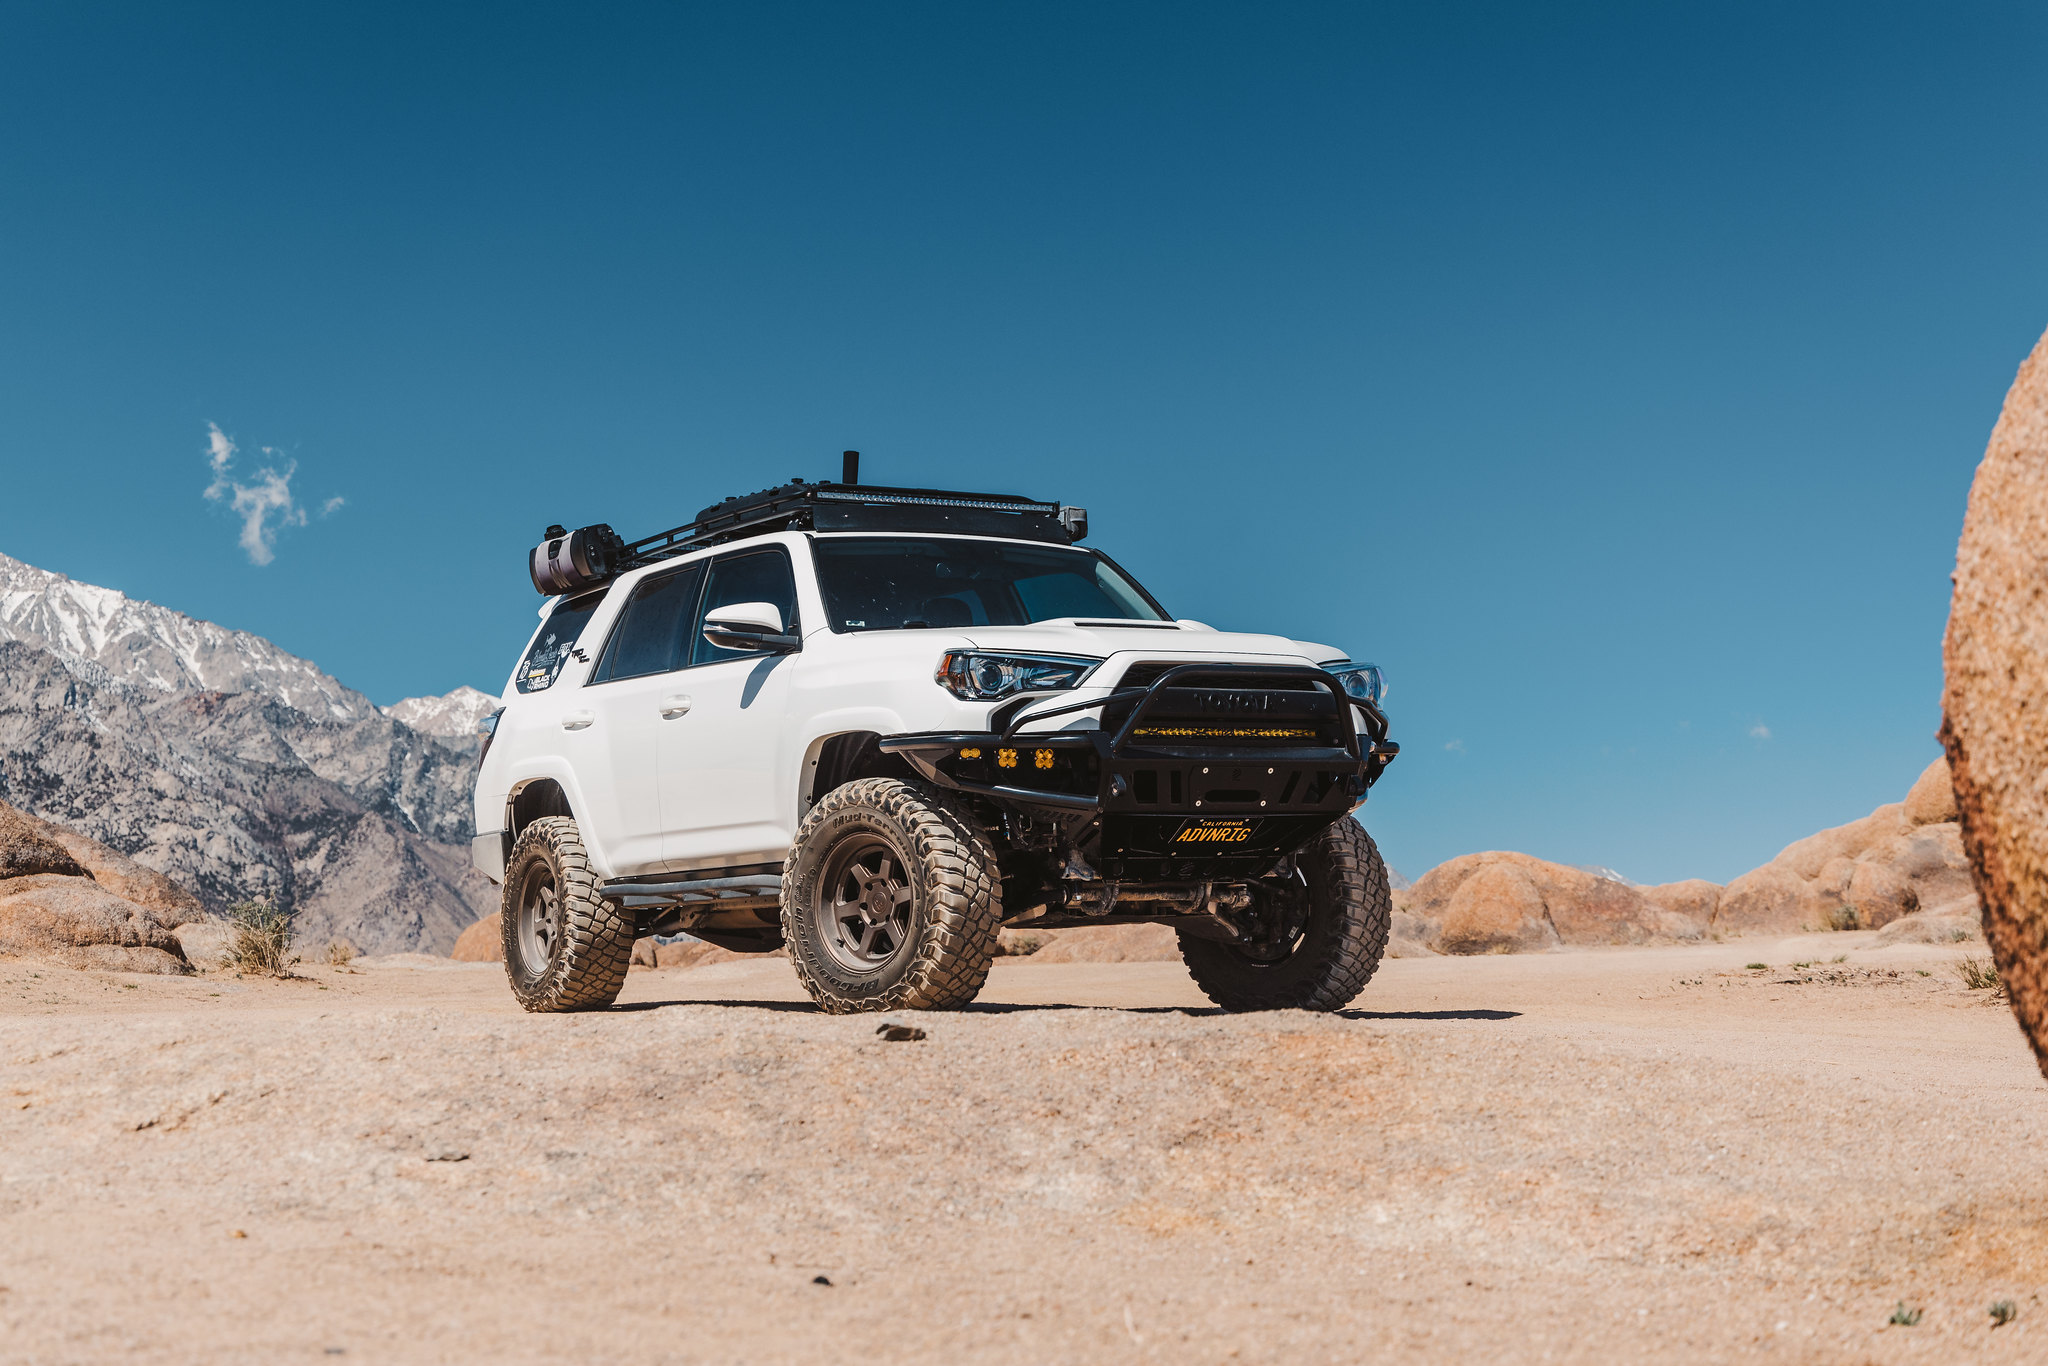
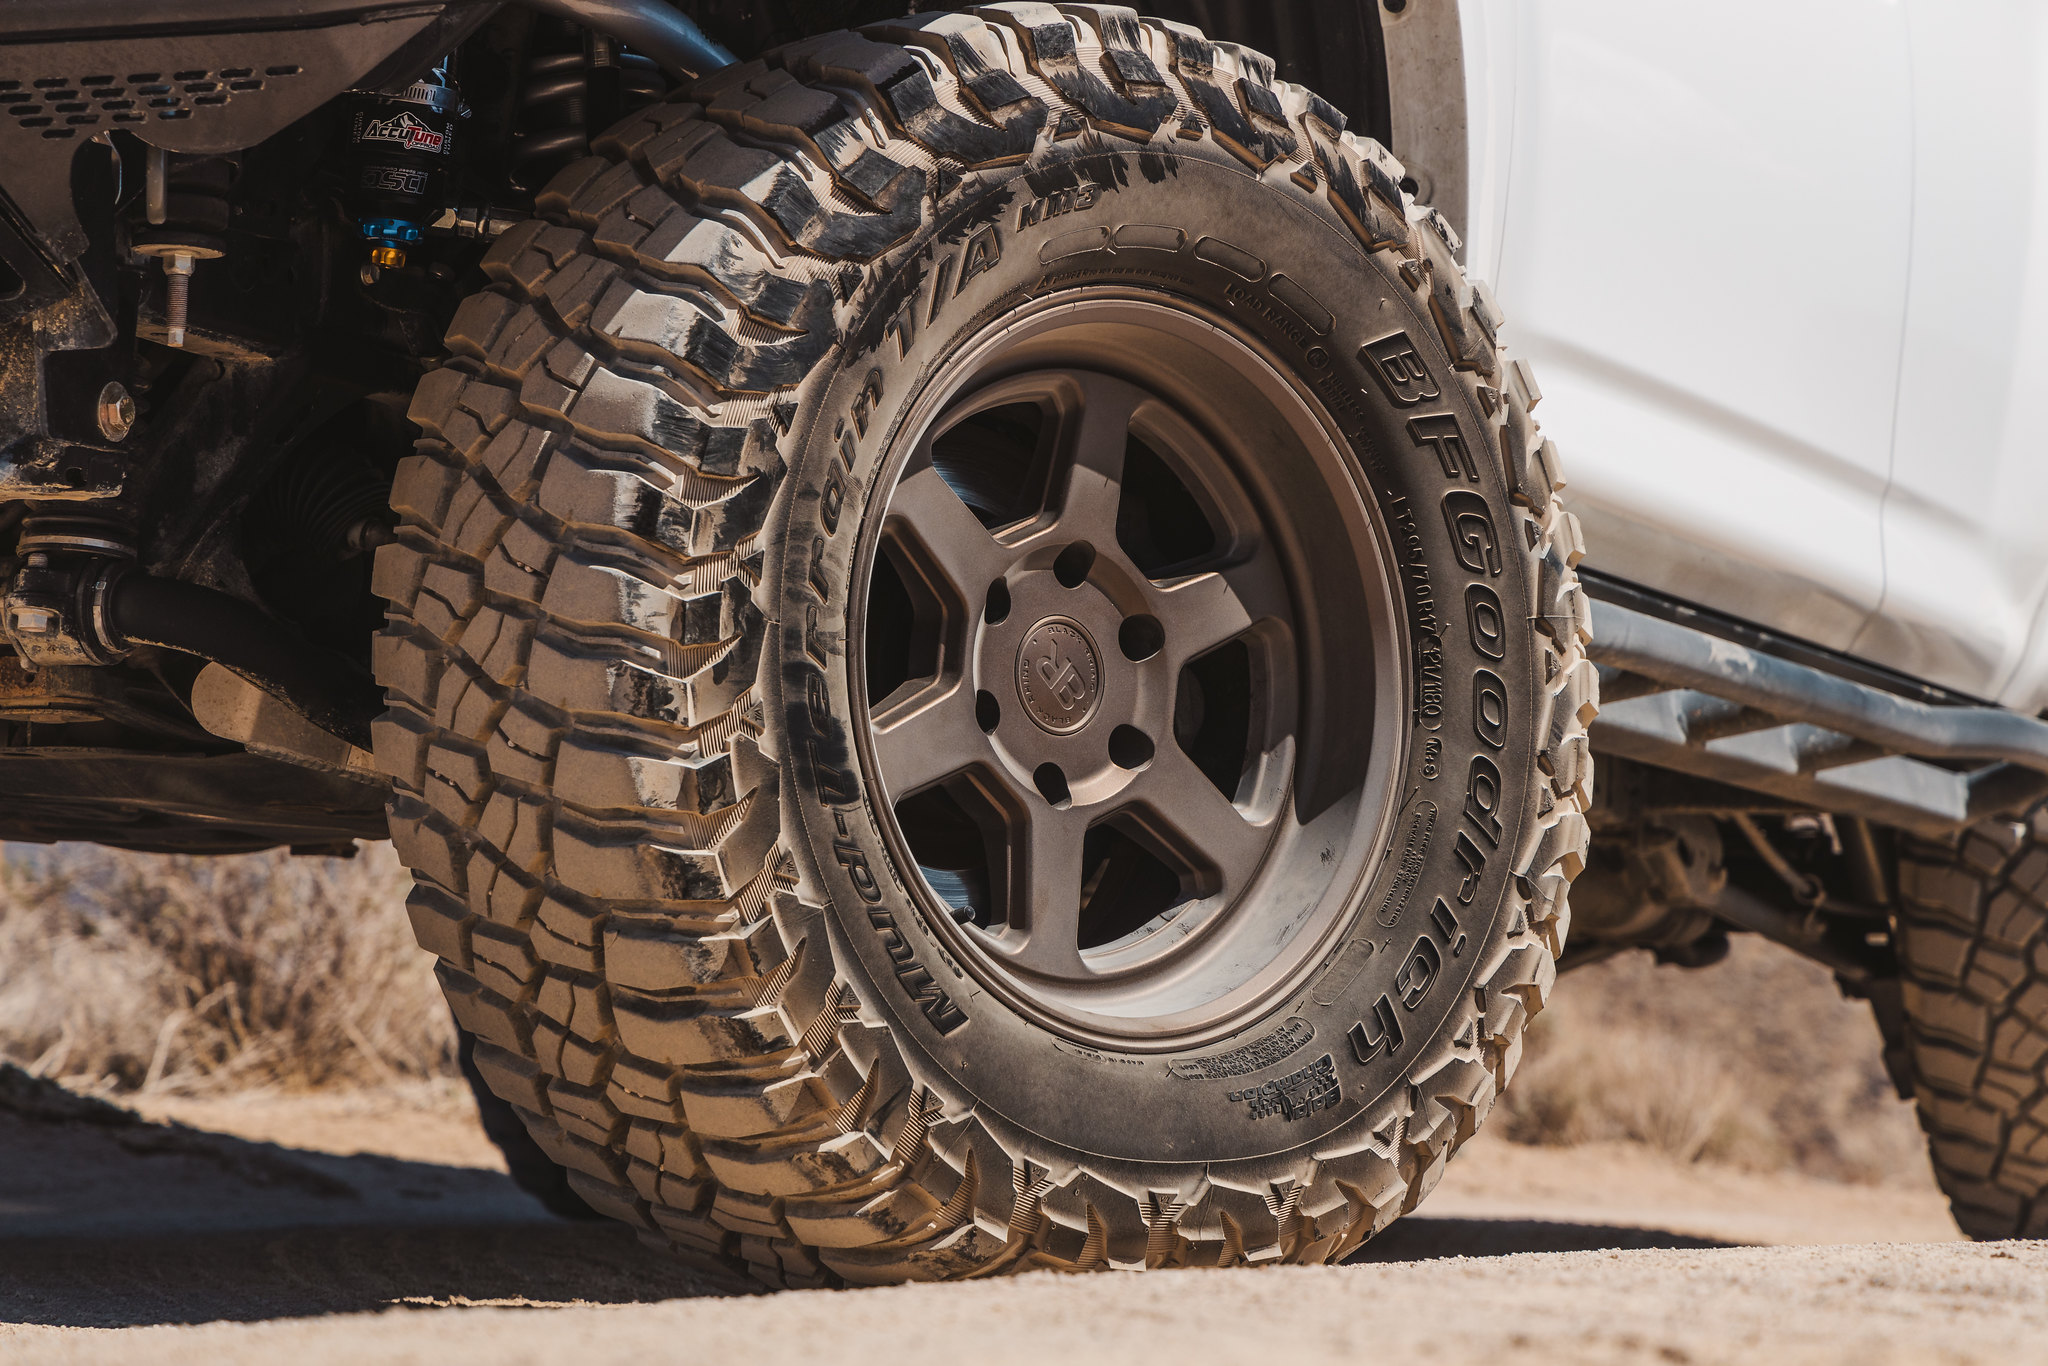
Took the rig out for a quick run with the new suspension, and may have overdone it a bit. Ended up with my eccentric cam bolt loosening up and backing itself out. Managed to get it tightened back up, but immediately ordered some cam tab gussets from Total Chaos and have those scheduled for install in a few weeks.

Once the suspension settled, the front was a bit too low for me and was causing quite a bit of rubbing up front. Headed back later that week to get the front raised up a bit. During the adjustment we noticed one of my upper control arm uniballs was on it's way out. Ended up picking up a set of beefy UCA's from Freedom Offroad later that day and throwing those in.


After the height adjustment..

A few more parts on the way, I swear it never ends haha
|
|
|
Reply With Quote
|
|
02-19-2022, 09:50 PM
|
#82
|
|
Member
|
|
Join Date: Oct 2020
Location: Orange County, CA
Posts: 103
|
|
|
Member
Join Date: Oct 2020
Location: Orange County, CA
Posts: 103
|
|
|
|
Reply With Quote
|
|
03-20-2022, 09:22 PM
|
#83
|
|
Member
|
|
Join Date: Oct 2020
Location: Orange County, CA
Posts: 103
|
|
|
Member
Join Date: Oct 2020
Location: Orange County, CA
Posts: 103
|
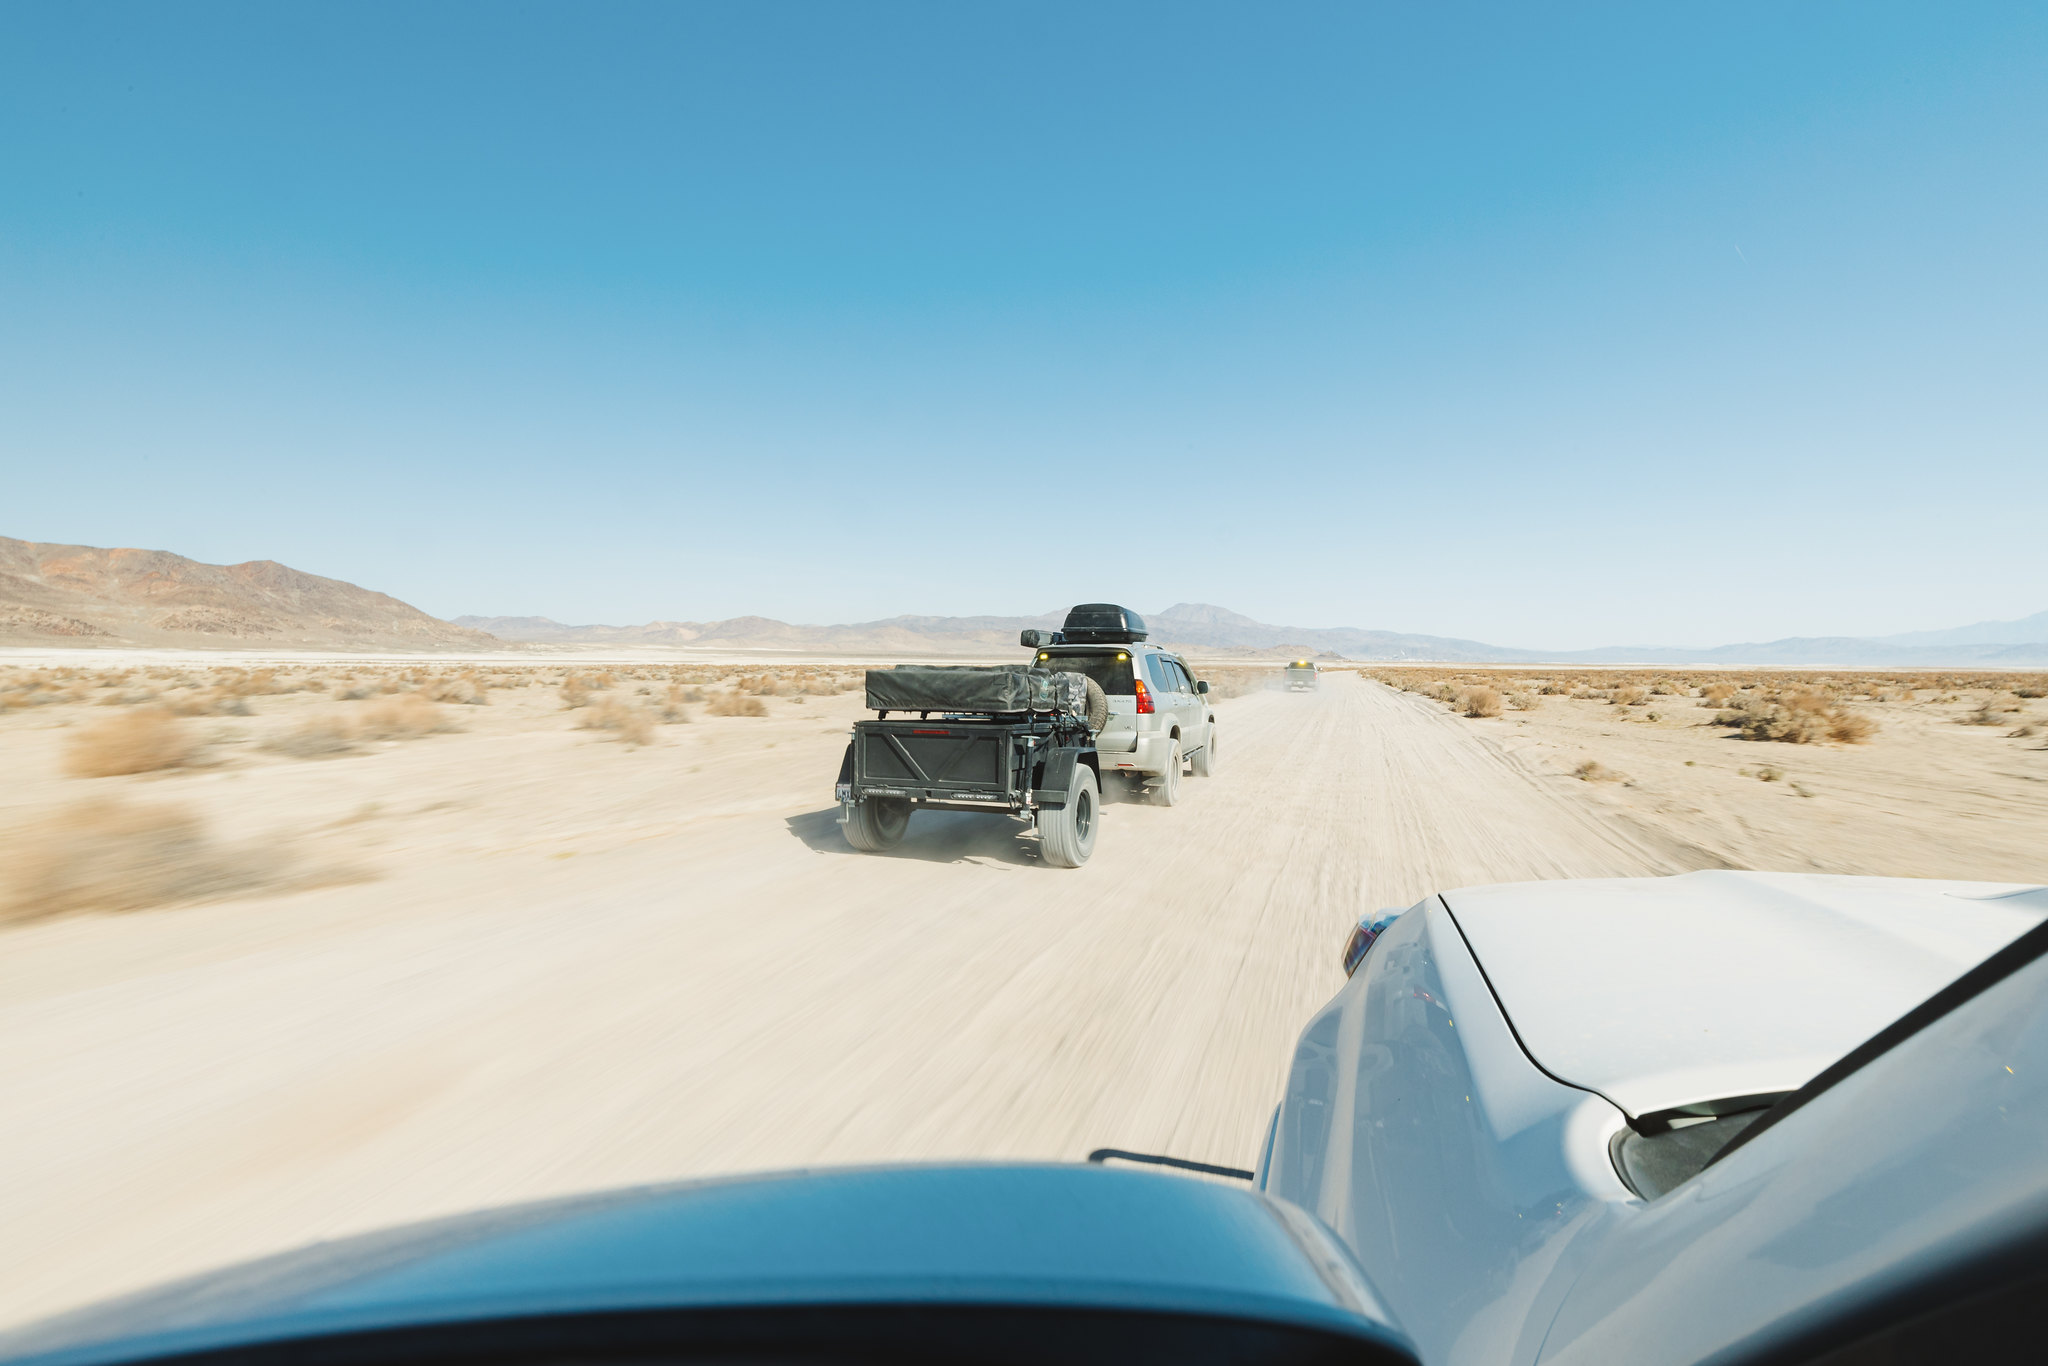
We back! Spent the last week away on a camping trip with the guys. Have hardly had a chance to edit any of the photos, but here are a few I managed to edit so far!
 RJTP1894 RJTP1894 by rjtakesphotos, on Flickr
 RJTP1038 RJTP1038 by rjtakesphotos, on Flickr
 RJTP1852 RJTP1852 by rjtakesphotos, on Flickr
 lightnight copy lightnight copy by rjtakesphotos, on Flickr
 RJTP1764 RJTP1764 by rjtakesphotos, on Flickr
 RJTP1758 RJTP1758 by rjtakesphotos, on Flickr
|
|
|
Reply With Quote
|
|
03-31-2022, 08:52 AM
|
#84
|
|
Junior Member
|
|
Join Date: Mar 2022
Posts: 15
|
|
|
Junior Member
Join Date: Mar 2022
Posts: 15
|
Awesome build. Really good photos as well
|
|
|
Reply With Quote
|
|
04-01-2022, 11:59 AM
|
#85
|
|
Member
|
|
Join Date: Jul 2018
Posts: 45
|
|
|
Member
Join Date: Jul 2018
Posts: 45
|
Your photos are amazing! How do you like the fox dsc? Im thinking to go with these over the kings because of the option for high and low speed adjustments.
|
|
|
Reply With Quote
|
|
06-05-2022, 01:19 AM
|
#87
|
|
Member
|
|
Join Date: Oct 2020
Location: Orange County, CA
Posts: 103
|
|
|
Member
Join Date: Oct 2020
Location: Orange County, CA
Posts: 103
|
Time has flown by! Anyways, not much has changed on the rig, but some more parts are on the way as we speak!

Went out for Memorial weekend for a quick 2 night trip. Winds were absolutely brutal with gusts up to 40mph. Definitely was not the most relaxing weekend, but much needed.
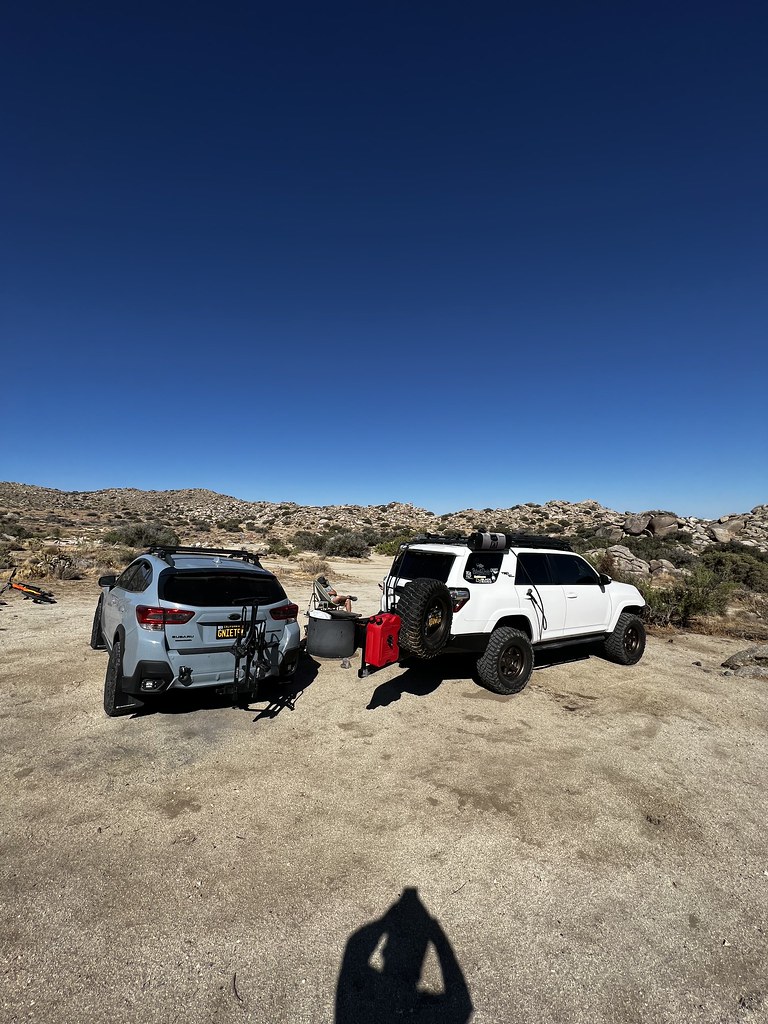
Propane fire pit still one of my favorite purchases.


A few days ago we received this new beast of a fridge from Setpower! 80qt's means there's no shortage of space considering we used to bring two fridges on longer trips, and now we only need this single one!

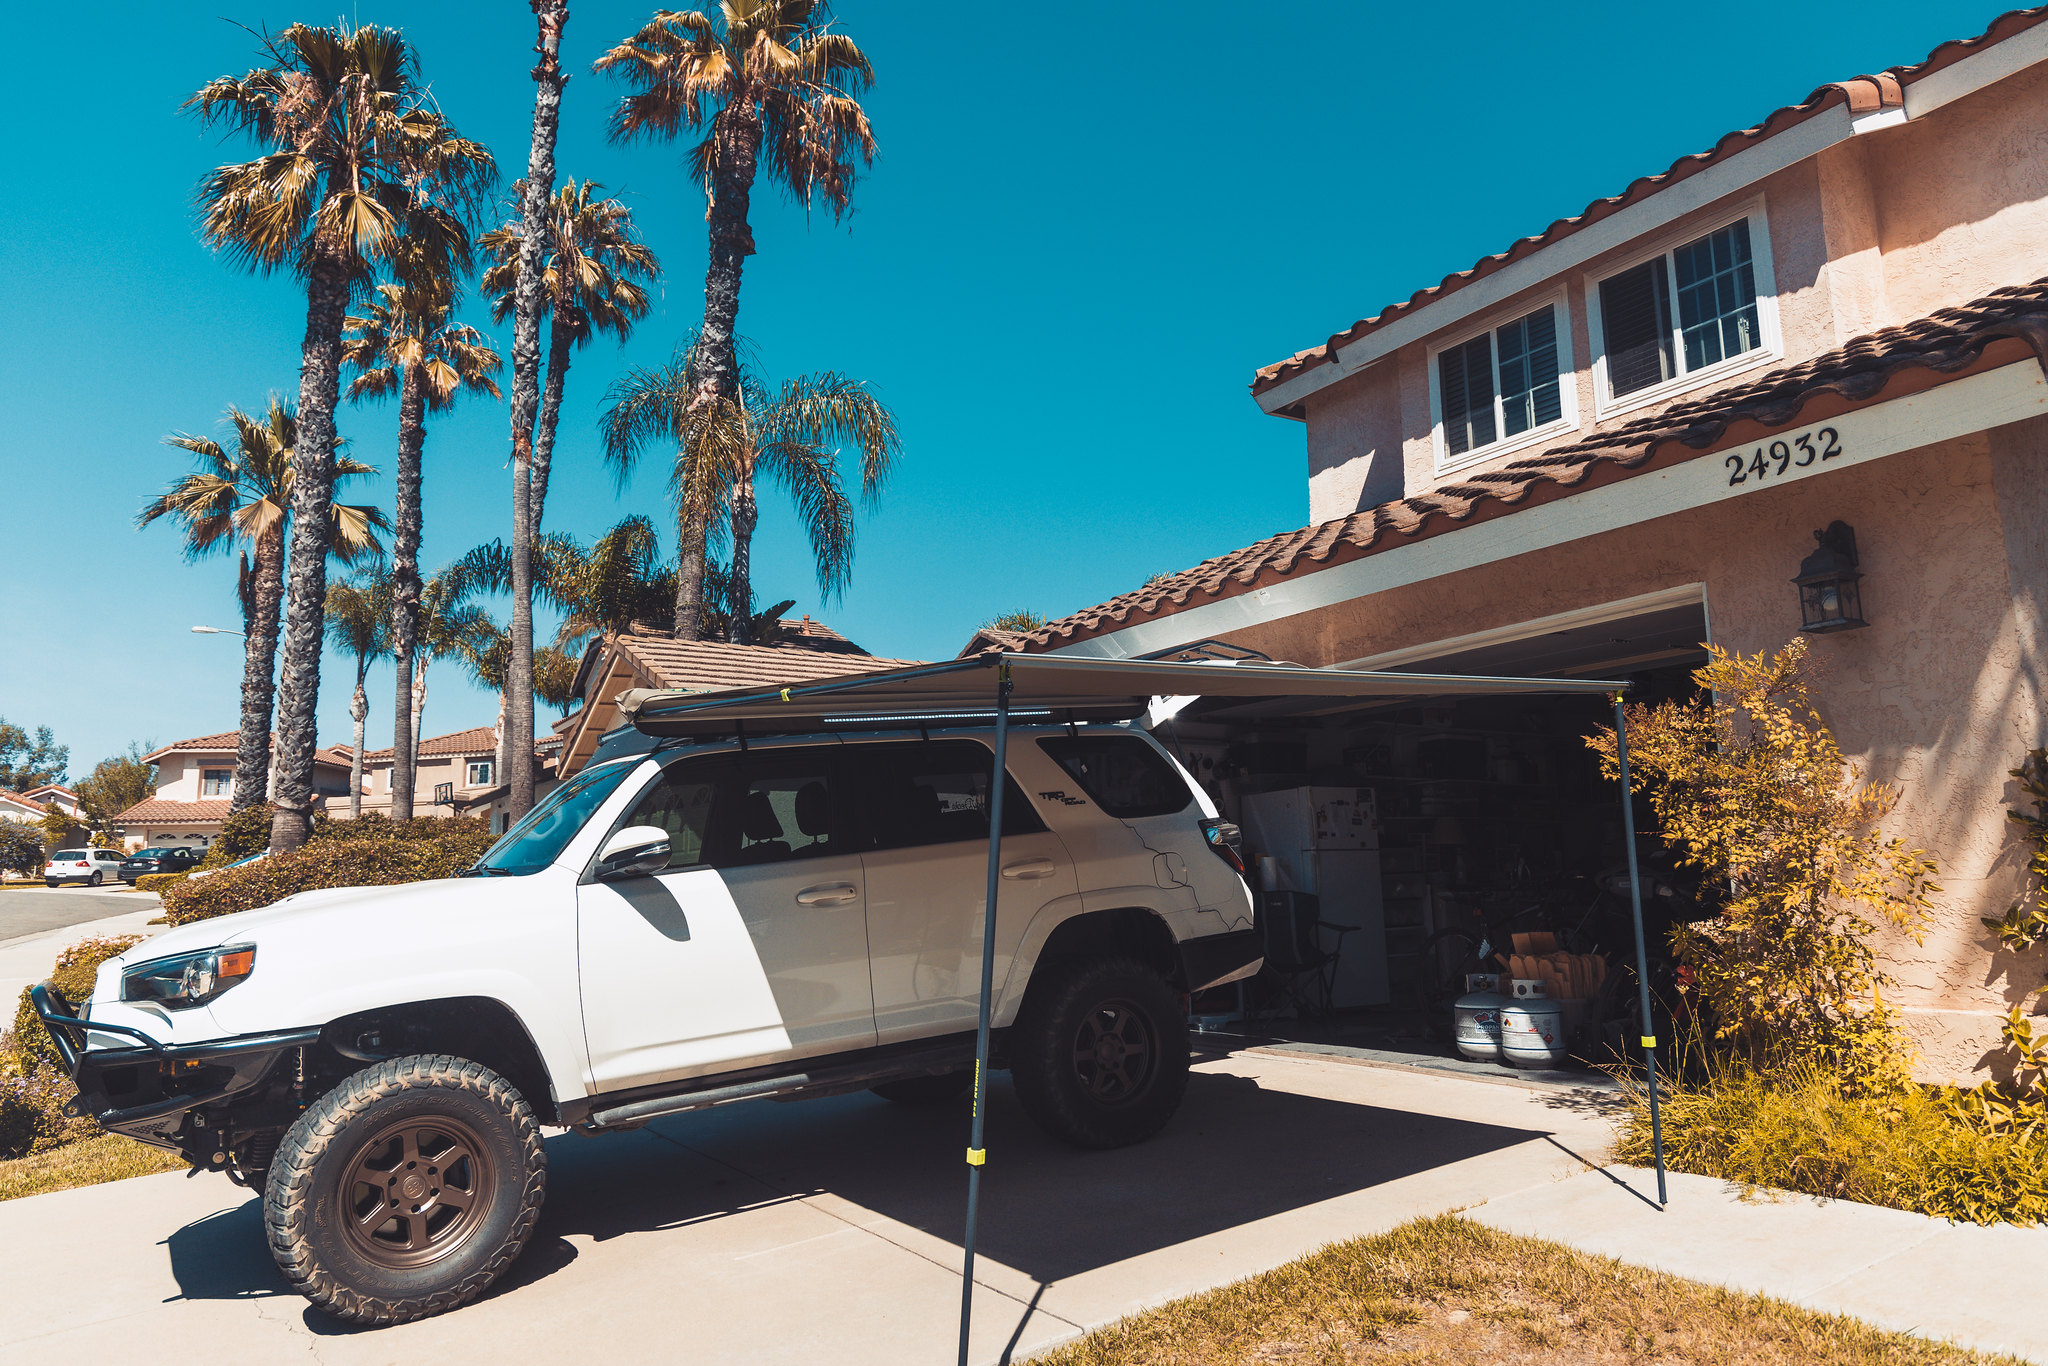
One of the incoming parts is a new awning/room setup. Our ARB combo is on it's last life and not quite what we were looking for. While we are still waiting for the awning, we did get our new awning room. Hoping to get the new awning put on soon and comparing them!

Just because the car adventures have been slow doesn't mean I haven't been staying home! Spent nearly every weekend this month on the water. Headed back out this weekend can't wait.

|
|
|
Reply With Quote
|
|
06-06-2022, 12:46 AM
|
#88
|
|
Member
|
|
Join Date: Oct 2020
Location: Orange County, CA
Posts: 103
|
|
|
Member
Join Date: Oct 2020
Location: Orange County, CA
Posts: 103
|
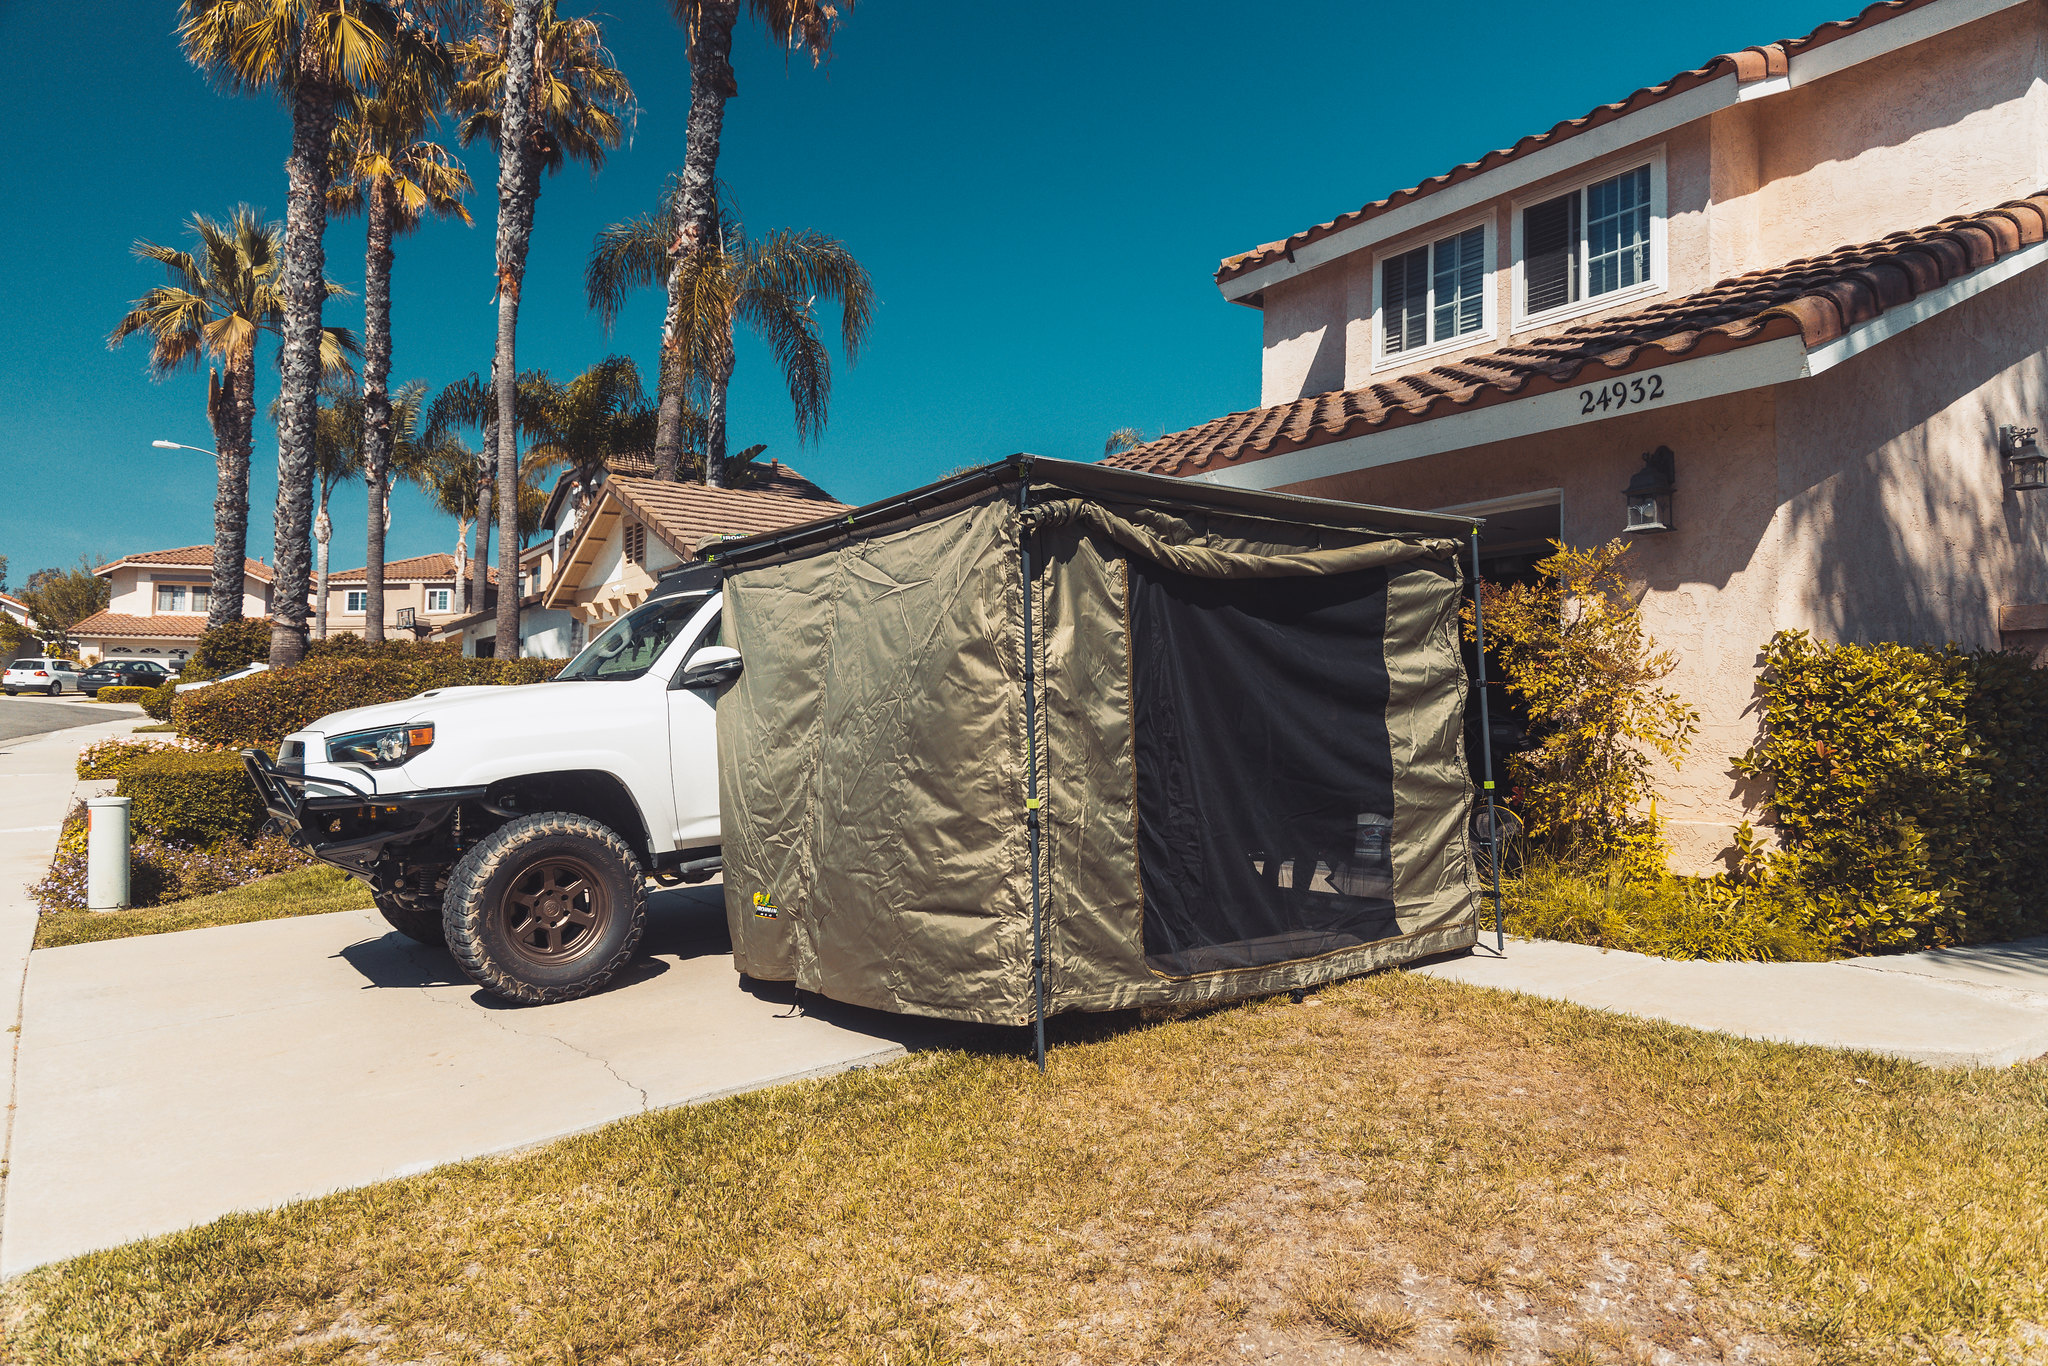
Just arrived! Had some time this afternoon and decided to go ahead and throw it on the rig!
 RJTP2292 RJTP2292 by rjtakesphotos, on Flickr
I am already liking the longer length and will enjoy the extra shade. I was worried it would extend pretty far past the front of my rack but it is not as bad as I thought! I backed it all the way towards the rear, yet allowing enough space to fully open the hatch. I was worried about not being able to open my front door once the awning room was on seeing out it lines up right with the middle of my drivers door, so we decided we might as well try it out now. That was one issue we had with the shorter ARB awning, it made it hard to have access to both doors.
 RJTP2294 RJTP2294 by rjtakesphotos, on Flickr
The LED light strip on the tracks was another feature our ARB was lacking so that was a nice addition. Easy plug and play, and comes with a dimmer switch!
 RJTP2297 RJTP2297 by rjtakesphotos, on Flickr
 RJTP2296 RJTP2296 by rjtakesphotos, on Flickr
Another angle, only attached one velcro strap on either side. Our old ARB awning velcro was completely messed up and would not hold and was tearing out at some parts. Everything just feels so much more solid.
 RJTP2301 RJTP2301 by rjtakesphotos, on Flickr
Here's the room! No floor and not staked obviously. The extra space inside will come in handy for sure. The removable floor will make cleaning a piece of cake. Inside we were able to access both doors.
 RJTP2311 RJTP2311 by rjtakesphotos, on Flickr
One of the selling points that we didn't get around to was using the outer room wall as an awning with the extra poles we picked up. Now we can have both the awning and room whereas before we could only have one or the other!
 RJTP2308 RJTP2308 by rjtakesphotos, on Flickr
|
|
|
Reply With Quote
|
|
06-06-2022, 10:32 PM
|
#89
|
|
Member
|
|
Join Date: Oct 2020
Location: Orange County, CA
Posts: 103
|
|
|
Member
Join Date: Oct 2020
Location: Orange County, CA
Posts: 103
|
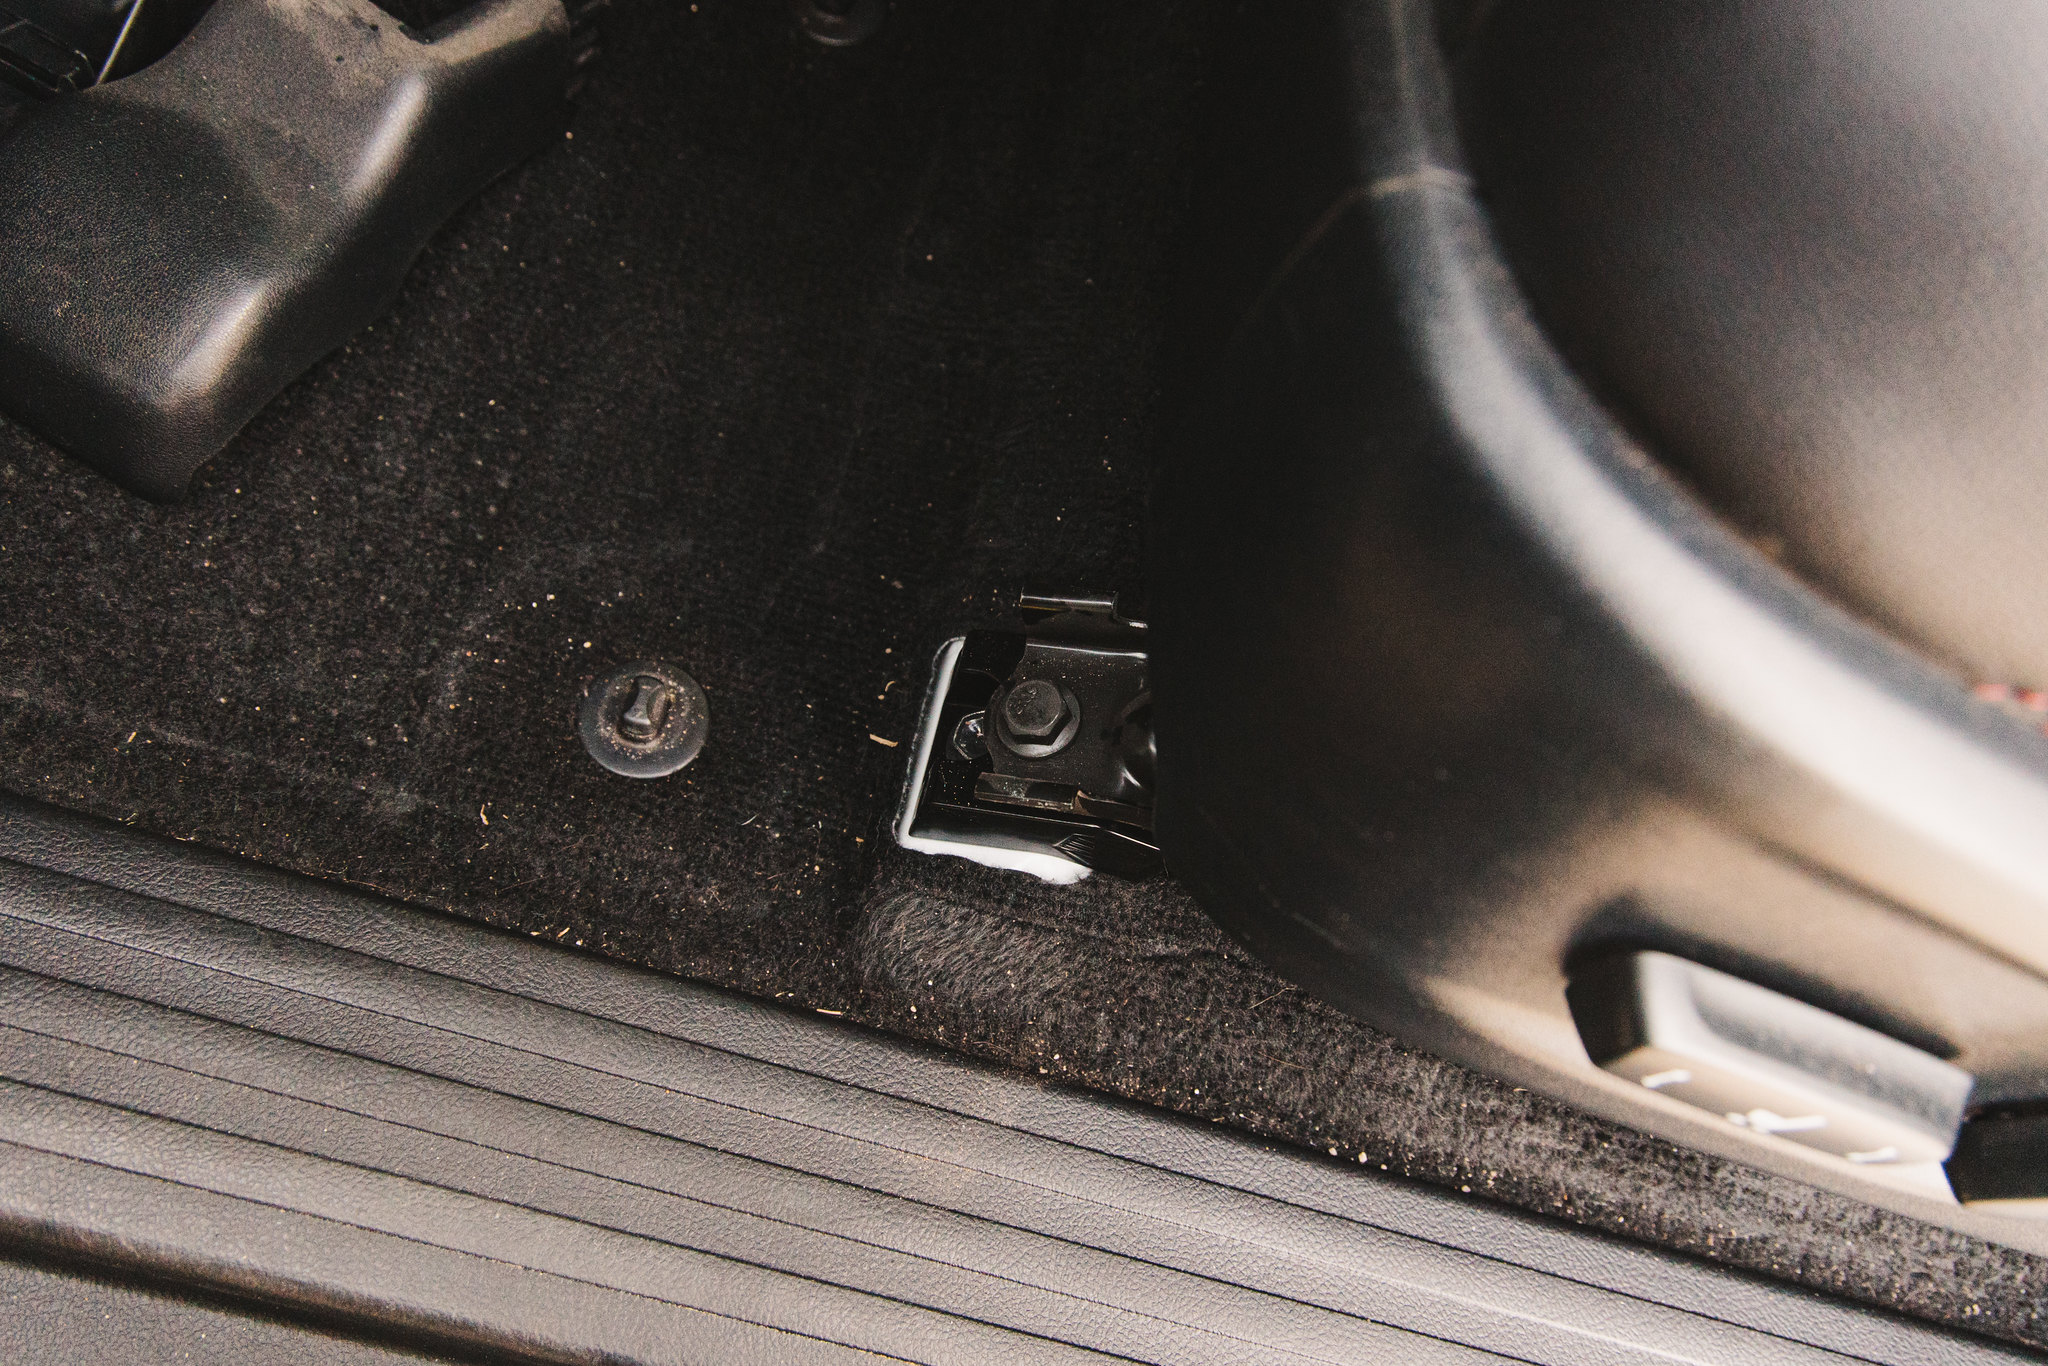
Another day another small project. Heard a lot about these seat jackers, and have always felt like something was off about the seats on the 4runner. Picked up a pair for the front on my driver's side just to try them out and see if they make a difference! Will have to post an update down the road after I get some time behind the wheel.
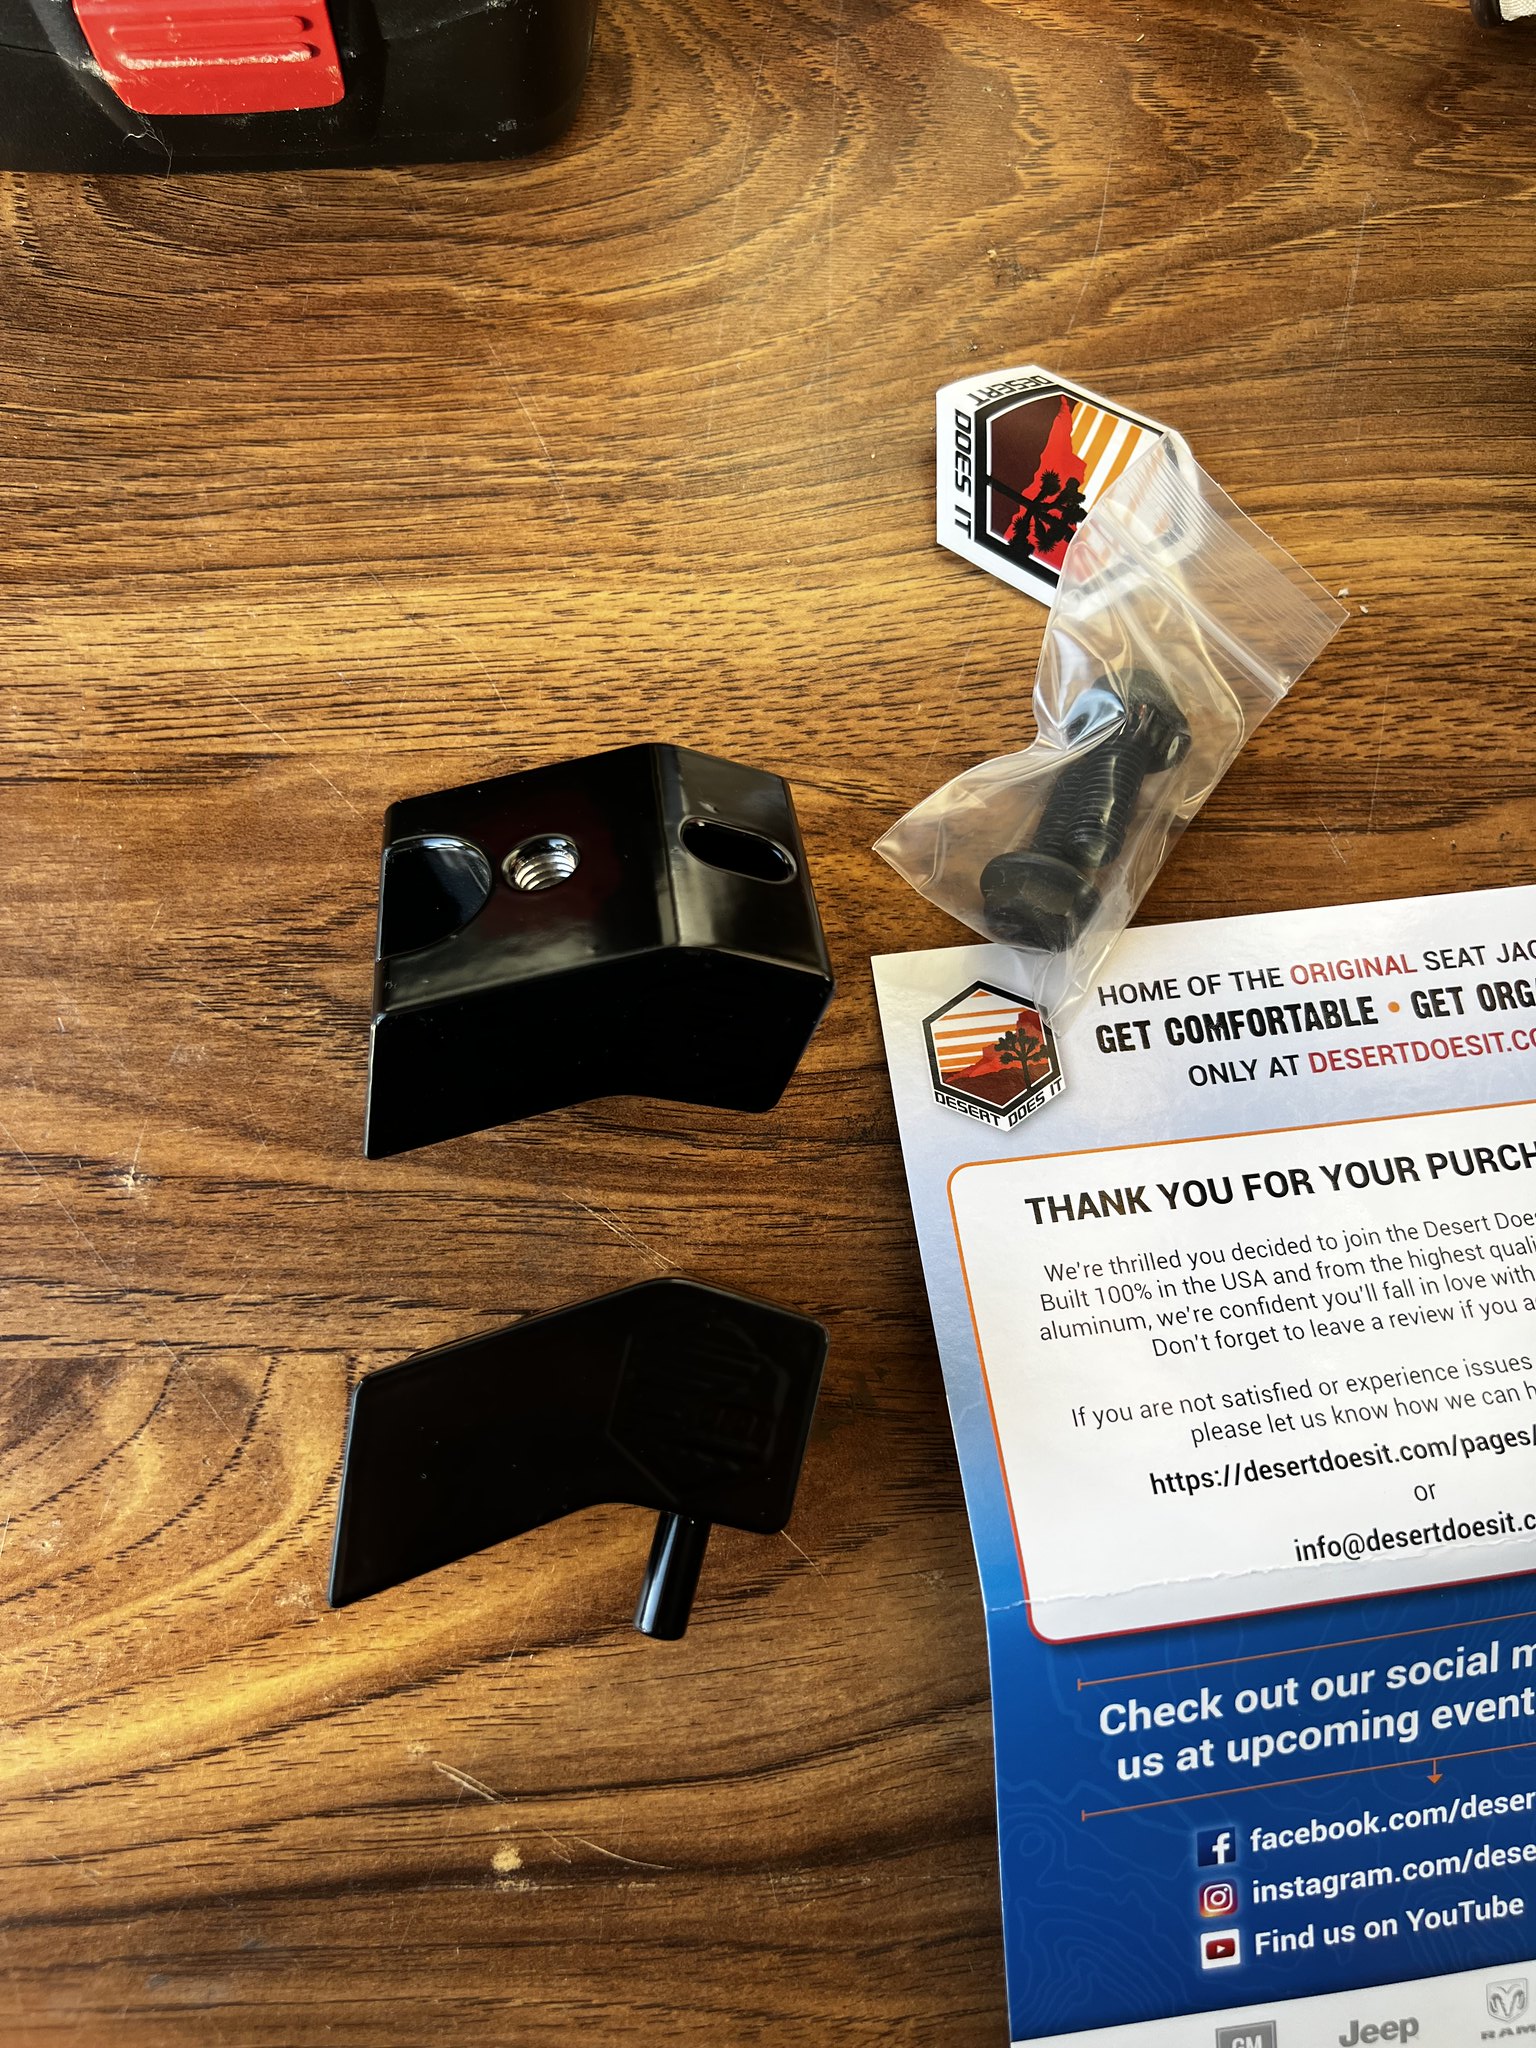 Photo Jun 06, 6 48 43 PM Photo Jun 06, 6 48 43 PM by rjtakesphotos, on Flickr
Ignore the mess, haven't had time to vacuum in a while. Install is as easy as it gets. Just a 14/15mm socket needed and some loctite. Take off the front two bolts and loosen the rear bolts, slip them in, and tighten back up!
 RJTP2315 RJTP2315 by rjtakesphotos, on Flickr
 RJTP2318 RJTP2318 by rjtakesphotos, on Flickr
 RJTP2319 RJTP2319 by rjtakesphotos, on Flickr
|
|
|
Reply With Quote
|
|
07-15-2022, 11:55 PM
|
#90
|
|
Member
|
|
Join Date: Oct 2020
Location: Orange County, CA
Posts: 103
|
|
|
Member
Join Date: Oct 2020
Location: Orange County, CA
Posts: 103
|
Not much to update as of now, finally got to link up with my buddy to get some new tint. Went with 18% all around, and 60% on the windshield. Super happy with how it came out!
 Photo Jul 10, 1 44 20 PM Photo Jul 10, 1 44 20 PM by rjtakesphotos, on Flickr
 Photo Jul 10, 4 08 28 PM Photo Jul 10, 4 08 28 PM by rjtakesphotos, on Flickr
 Photo Jul 10, 4 54 57 PM Photo Jul 10, 4 54 57 PM by rjtakesphotos, on Flickr
|
|
|
Reply With Quote
|
 Posting Rules
|
You may not post new threads
You may not post replies
You may not post attachments
You may not edit your posts
HTML code is On
|
|
|
|


 Linear Mode


