 06-28-2015, 12:12 AM
|
#1
|
 |
Member
|
|
Join Date: Jun 2015
Location: Colorado
Posts: 50
|
|
|
Member
Join Date: Jun 2015
Location: Colorado
Posts: 50
|
LED bar roof rack wire routing
So I've researched a lot of users threads on wiring LED bars and have found some good info. My question is though, how do I route the wires off of a Gobi roof rack to run the LED bar in the front of the rack? I'm wondering how the wires will get down into the dash? I'm really hoping there is no drilling! If anyone has had experience in this, I'd like to hear. I ordered a Gobi stealth and rigid light bar. Haven't received yet but just preparing myself. Thanks!

|

|
 Reply With Quote Reply With Quote
|
|
06-28-2015, 12:23 AM
|
#2
|
 |
Member
|
|
Join Date: Dec 2014
Location: Cherry Log, GA
Age: 51
Posts: 581
Real Name: Steve Fry
|
|
|
Member
Join Date: Dec 2014
Location: Cherry Log, GA
Age: 51
Posts: 581
Real Name: Steve Fry
|
There are a few ways to do so.
1. Run along the driver side trim panel, relays located under the hood for the light. Only wires go through the factory boot for all applications except one of them to use on the switch.
2. It is possible to run out the rear of the truck, though is would be negating some of the internal wiring in the gobi rack for the rear lights. That is the only wiring in the rack. From the front passenger and front drivers side to the rear passenger and the rear drivers side, there is no internal wirinf for side lights nor the front.
3. Possibly the bets but most permanent install and involves drilling. Drilling through the roof and i stalling one of the bulkhead wiring connectors with a single loomed connector with all roof rack lighting so it can be quick disconnected at one central location and at each independent light, woukd allow removal of rack without messing up wiring, or looms, or having to remove wiring and lights to remove the rack.
I did number one. I have front light bar, side lights and rear led lights. It isnt rocket scince though I did run duplex marine wiring you could ground at the rack if you wanted to. Take your time it isnt hard to figure out. Learn a bit more about wiring up relays, and switches. As well as how to make waterproof marine type connections. This is the largest learning curve but the beat way to go. Good luck.
__________________
15 TRD Pro Build Thread - OIF 09-10 - Combat Disabled Army Veteran - Purple Heart - Combat Medical Badge
Note: Dont get all butthurt because my grammar is terrible. See above and consider this before you stick your foot in your mouth. Also, I do post from an i-Device so words tend to get garbled and misspelled. I cant believe I have to out this here.
|
|
|
Reply With Quote
|
|
06-28-2015, 03:30 PM
|
#3
|
 |
Member
|
|
Join Date: Jun 2010
Location: CNY
Posts: 123
|
|
|
Member
Join Date: Jun 2010
Location: CNY
Posts: 123
|
There is a post on here somewhere that a member removed the right and left windshield molding, ran the pos wire down one side and the neg down the other and then into the engine bay. Evidently there is enough room under the windshield molding to run one wire and then replace the molding, one each side. If I can find it I will link it for you.
__________________
- "The Big Baller Toyota" 2010 TE, subdued badging, Satoshi grill mod, OW Lift, LR UCA's, KMC XD Enduro 17x9 wheels, 285/70-17 Kelly Safari TSR, Doug Thorley headers, Magnaflow cat-back, AFE CAI, URD MAF CAL, 4.56 gears, ARB front air locker, Wet Okole seat covers, M-PAC MOLLE panels, Hella Rallye 4000 compacts, Gobi Stealth with 40" single row LED combo light bar -
|
|
|
Reply With Quote
|
|
06-28-2015, 03:54 PM
|
#4
|
|
Member
|
|
Join Date: Jun 2010
Location: CNY
Posts: 123
|
|
|
Member
Join Date: Jun 2010
Location: CNY
Posts: 123
|
Light Bar wiring
2014 Warthog has a build thread, not sure if he covered it there...
__________________
- "The Big Baller Toyota" 2010 TE, subdued badging, Satoshi grill mod, OW Lift, LR UCA's, KMC XD Enduro 17x9 wheels, 285/70-17 Kelly Safari TSR, Doug Thorley headers, Magnaflow cat-back, AFE CAI, URD MAF CAL, 4.56 gears, ARB front air locker, Wet Okole seat covers, M-PAC MOLLE panels, Hella Rallye 4000 compacts, Gobi Stealth with 40" single row LED combo light bar -
|
|
|
Reply With Quote
|
|
06-28-2015, 05:03 PM
|
#5
|
|
Senior Member
|
|
Join Date: Jan 2015
Location: San Diego, CA
Posts: 1,625
|
|
|
Senior Member
Join Date: Jan 2015
Location: San Diego, CA
Posts: 1,625
|
Quote:
Originally Posted by Santacruzbro

I ordered a Gobi stealth and rigid light bar. Haven't received yet but just preparing myself. Thanks!
|
When did you order them? You may have a few months to prepare yourself.... 
Anyways, many of us in the big group buy is doing exactly this right now.
You can ground your lights to the rack, and in turn, they get grounded to your chassis. All you need is to bring the "positive/12V" of each independently controlled light into the cabin/engine compartment. Each side of your windshield, you can sneak 1 or 2 wires down into the engine room. One tips is to sneak "black" wires, they are less visible, but use them to run 12V.
The other way is to bundle all the "positive/12V" of each independently controlled light to the rear of the car, and sneak them in thru the tail hatch's hinge.
I personally preferred the first route, but the limitation would be 2 to 4 lights. I had wired an emergency vehicle before (a bunch of lights up top, all blinking/flashing at different rate) which requires basically a bunch of "12V" to come down and make the side of windshield routing not too practical. And that's the time I need to go the 2nd route. I doubt too many of you have that requirement.
All of the lights that do not need to be controlled independently can be bundled up together. Most of the wiring should be good enough for currently carrying capability unless you are putting like two 40" E2s or so, and what them all be turned on with 1 switch, then you may need to either get some larger wires, or to run them separately. So, if you have like four E2s 6", and you want to bundle them up into 1 wire (1 control), you will have no issue, bundling all of them up.
__________________
2015 SR5 Premium 4x4 / 3rd row seat
Jicko's Build & Adventure Thread
"Group buy, anyone?"
Last edited by jicko; 06-28-2015 at 05:09 PM.
|
|
|
Reply With Quote
|
|
06-28-2015, 09:20 PM
|
#6
|
|
Member
|
|
Join Date: Dec 2014
Location: Cherry Log, GA
Age: 51
Posts: 581
Real Name: Steve Fry
|
|
|
Member
Join Date: Dec 2014
Location: Cherry Log, GA
Age: 51
Posts: 581
Real Name: Steve Fry
|
On another note. When I ran my wires down the channel I am runnign a duplex type wire both positive and negative. I have two pairs of wires running down the drivers side molding.
These control my front light bar, and my two rear Rigid SRQs.
I will run another wire for my side lights as well. Though I am thinking of making a harness with a duetch connector out the rear of the vehicle. I dont know whe. i rewire for my relay box if I will do all out the back or some out the back and some out the front. Probably the latter. The only issue you are going to have is not the windshield trim but the roof trim, it is what is really limited for hiding some wire.
__________________
15 TRD Pro Build Thread - OIF 09-10 - Combat Disabled Army Veteran - Purple Heart - Combat Medical Badge
Note: Dont get all butthurt because my grammar is terrible. See above and consider this before you stick your foot in your mouth. Also, I do post from an i-Device so words tend to get garbled and misspelled. I cant believe I have to out this here.
|
|
|
Reply With Quote
|
|
06-29-2015, 08:31 PM
|
#7
|
|
Member
|
|
Join Date: Jun 2015
Location: Colorado
Posts: 50
|
|
|
Member
Join Date: Jun 2015
Location: Colorado
Posts: 50
|
Thanks everyone for the information. I will only be running the single 40" up front that I know of for now. I'm sure it will be like 8 weeks, I have time to plan.. Haha
|
|
|
Reply With Quote
|
|
09-09-2015, 11:56 PM
|
#8
|
|
Member
|
|
Join Date: Jun 2015
Location: Colorado
Posts: 50
|
|
|
Member
Join Date: Jun 2015
Location: Colorado
Posts: 50
|
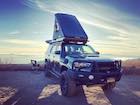
Finally got the rack and light installed. The light wiring was a lot easier than anticipated. From the battery into the cab, I used the hole were the main wiring harnesses went through. Plenty of room, just cut an additional slit in the rubber housing that seals the hole in the firewall. Going from the battery up to the light I ran it to the windshield, for the length of the windshield I removed the black housing that the wires were in. I tucked the wires in along side the windshield with the negative wire in top. Very clean look an barely noticeable. From the top of the windshield to the gobi mount, I tucked it under the black rubber that goes along the roof above doors. Once to the mount, just ran up along the bottom rack and plugged in. Works and looks great. I will post some more detail pics soon.
Thanks

|
|
|
Reply With Quote
|
|
09-10-2015, 01:29 AM
|
#9
|
|
Member
|
|
Join Date: Sep 2014
Location: Colorado
Posts: 160
|
|
|
Member
Join Date: Sep 2014
Location: Colorado
Posts: 160
|
looks sweet bro!! I get mine put on next friday from gobi
|
|
|
Reply With Quote
|
|
09-10-2015, 04:34 AM
|
#10
|
|
Junior Member
|
|
Join Date: Sep 2015
Location: new york
Posts: 4
|
|
|
Junior Member
Join Date: Sep 2015
Location: new york
Posts: 4
|
This is the largest learning curve but the beat way to go. Good luck. 
|
|
|
Reply With Quote
|
|
09-10-2015, 05:48 PM
|
#11
|
 |
Member
|
|
Join Date: Sep 2015
Location: San Francisco - Bangkok
Posts: 56
|
|
|
Member
Join Date: Sep 2015
Location: San Francisco - Bangkok
Posts: 56
|
Love the light bar with Gobi rack. I'm hoping to do the light too. Do you know if there is other brand that not as expensive as Rigid that I should look?
|
|
|
Reply With Quote
|
|
09-10-2015, 09:30 PM
|
#12
|
|
Member
|
|
Join Date: Jun 2015
Location: Colorado
Posts: 50
|
|
|
Member
Join Date: Jun 2015
Location: Colorado
Posts: 50
|
Quote:
Originally Posted by ManhstuhT4R
looks sweet bro!! I get mine put on next friday from gobi
|
Awesome. I was in and out in less than hour. They do good work.
|
|
|
Reply With Quote
|
|
09-10-2015, 09:32 PM
|
#13
|
|
Member
|
|
Join Date: Jun 2015
Location: Colorado
Posts: 50
|
|
|
Member
Join Date: Jun 2015
Location: Colorado
Posts: 50
|
|
|
|
Reply With Quote
|
|
09-10-2015, 09:34 PM
|
#14
|
|
Member
|
|
Join Date: Jun 2015
Location: Colorado
Posts: 50
|
|
|
Member
Join Date: Jun 2015
Location: Colorado
Posts: 50
|
Quote:
Originally Posted by puckitpuck
Love the light bar with Gobi rack. I'm hoping to do the light too. Do you know if there is other brand that not as expensive as Rigid that I should look?
|
My brother got his 50" off of amazon and I know that was probably half of what I paid. He couldn't remember the brand though. Still Pretty bright though
|
|
|
Reply With Quote
|
|
09-10-2015, 10:20 PM
|
#15
|
|
Member
|
|
Join Date: Sep 2015
Location: San Francisco - Bangkok
Posts: 56
|
|
|
Member
Join Date: Sep 2015
Location: San Francisco - Bangkok
Posts: 56
|
Oh cool, I'll check amazon and eBay. The photo instruction are boss! Cheers!
__________________
IG @ BAJA4RN 2015 4runner TPE, Grey, 285/70/17 BFG KM3, Method 105 17x9 3.50" BS 6x139.7, Magnuson SC, FrontRunner Slimline II, ARB Summit front bumper, Bruteforce Rear, Safari Snorkel, Autohome Columbus RTT, Alu Cab Shadow Awning,Quick Pitch Ensuite, King Shocks OME 2.5", Dometic CFX 65W, REDARC Multi-Stage charger, 100W solar panel, 80ah 2nd AGM battery, BAMF sliders
|
|
|
Reply With Quote
|
 Posting Rules
|
You may not post new threads
You may not post replies
You may not post attachments
You may not edit your posts
HTML code is On
|
|
|
|


 Linear Mode


