 01-20-2011, 05:46 PM
|
#1
|
 |
Member
|
|
Join Date: Jul 2010
Location: Charleston, SC
Posts: 718
|
|
|
Member
Join Date: Jul 2010
Location: Charleston, SC
Posts: 718
|
Cargo area LED light mod!
__________________
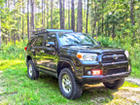
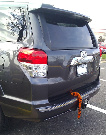
2010 LTD 4x4, blk/sbl, nav, remote start MODS/ADDS: TE Conversion; ICON Stage 2 w/ LRUCAs; 285/70/17 DuraTracs; Baja Rack; SW Sliders, ARB CKMA12 onboard air; Fiamm horns; Tan Huskys; 30% tint; 5" mangowalk; LED lights in interior, puddle lights, license plate, engine compartment, and cargo area; small tool box under the hood; removed cargo tray stopper; reverse cam switch; 4-pin trailer light hookup relocation; K&N air filter; AVS bug deflector; 3m carbonfiber chrome coverup (except door handles); midland CB; Firestik 2' hood-mounted CB antenna.
Last edited by Snooperstyle; 01-20-2011 at 06:10 PM.
|

|
 Reply With Quote Reply With Quote
|
|
01-20-2011, 05:48 PM
|
#2
|
|
Member
|
|
Join Date: Nov 2010
Location: Orange County, CA
Posts: 53
|
|
|
Member
Join Date: Nov 2010
Location: Orange County, CA
Posts: 53
|
real nice!
__________________
2010 SR5 4x4 Blizzard Pearl, Metal Tech sliders, Bilstein 6112(HD)/TRD5160 + OME UCA + rear coils, ATX AX202 Bronze 17x9 (-12 offset), Cooper Evolution MT 285/70-17 + spare, TMT Skyline full roof rack w/ led light bars, Stubby antenna, Late 5th gen tail lights, C4 Hatch ladder, Full LED low/high/fog, ditch lights, TuffStuff Alpha RTT, Waterport. @blzrdt4r
www.beyondthelensstudios.com @beyondthelens_
www.mrbeardbutler.com @mrbeardbutler
|
|
|
Reply With Quote
|
|
01-20-2011, 05:50 PM
|
#3
|
|
Member
|
|
Join Date: Jul 2010
Location: Charleston, SC
Posts: 718
|
|
|
Member
Join Date: Jul 2010
Location: Charleston, SC
Posts: 718
|
1--Purchase LED strips at Autozone or elsewhere. I bought the ones that have two per pack, and they have the little test button right on the box. Mine are bright white.
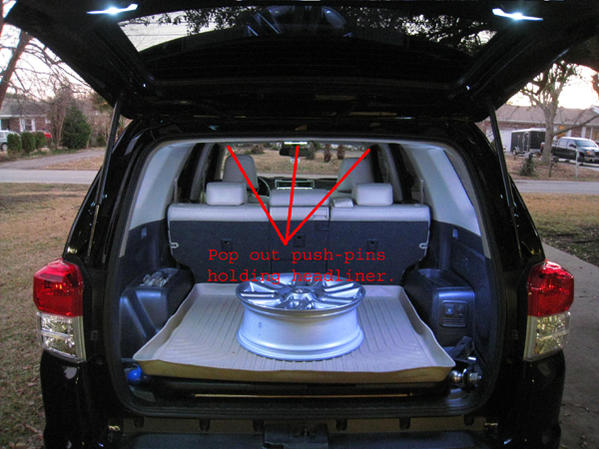
2--Remove three clips on rear of headliner and remove panels that cover access to tail lights on inside of cargo area.
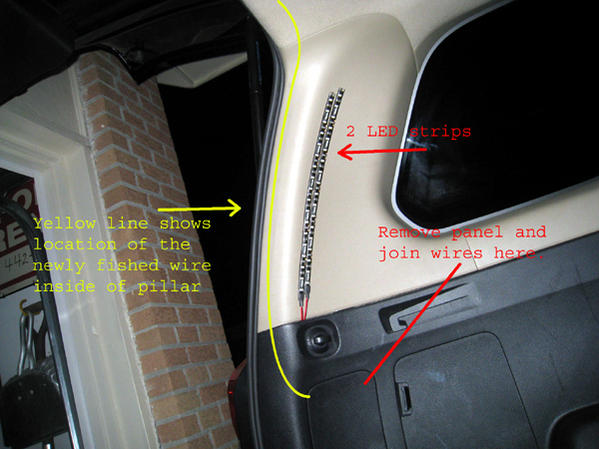
3--Run a dual wire from the tail light access area up through the rear pillar to the area under the headliner. Make the right one and the left one meet/end right in the middle (where there SHOULD be a dang dome light). Using a putty knife, screwdriver, and a panel remover, bend open the trim and/or weather stripping on the rear pillars just enough to slip your wire into the area behind it. You do not have to remove the pillar panel if you are careful and patient. You can use anything from shielded RCA wire to trailer wiring. I used trailer wiring for this part, but used bundled shielded RCA cable to get from the door to the headliner (in a later step).
4--Stick two LED strips on each rear pillar as pictured, leaving just a tiny bit of wire exposed, with the rest of it fished into the tail light access area.
5--Conjoin the wires with the one you fished down the pillar and tie them off somewhere in there using plastic ties.
6--Do the same on the right side.
More to come...please wait.
__________________
2010 LTD 4x4, blk/sbl, nav, remote start MODS/ADDS: TE Conversion; ICON Stage 2 w/ LRUCAs; 285/70/17 DuraTracs; Baja Rack; SW Sliders, ARB CKMA12 onboard air; Fiamm horns; Tan Huskys; 30% tint; 5" mangowalk; LED lights in interior, puddle lights, license plate, engine compartment, and cargo area; small tool box under the hood; removed cargo tray stopper; reverse cam switch; 4-pin trailer light hookup relocation; K&N air filter; AVS bug deflector; 3m carbonfiber chrome coverup (except door handles); midland CB; Firestik 2' hood-mounted CB antenna.
|
|
|
Reply With Quote
|
|
01-20-2011, 05:53 PM
|
#4
|
|
Member
|
|
Join Date: Jul 2010
Location: Charleston, SC
Posts: 718
|
|
|
Member
Join Date: Jul 2010
Location: Charleston, SC
Posts: 718
|
7--Pop out each of the two rear lift gate interior lights using a small putty knife on the LEFT side of each one of them. Then, unplug them and set them aside.
8--Make sure your rear lift gate window is DOWN. Remove the rear lift gate paneling. This pops off just like most plastic door panels. It has about 6 or 8 plastic pins that will pop right out if you can get a putty knife in there, or use a panel remover. The top of the panel hangs on the edge of the window opening. FYI, the speakers ARE NOT connected in any way to the panel itself or the speaker grates.
9--Unplug the left speaker connector. Remove the left speaker using a 10mm socket. Just undo the three nuts that are right around the edge. You dont need to remove the whole plate that holds the speaker. The first time your remove it, it feels like it is glued, but it is actually notit is just a piece of padding that is between the metal and the speaker rim.
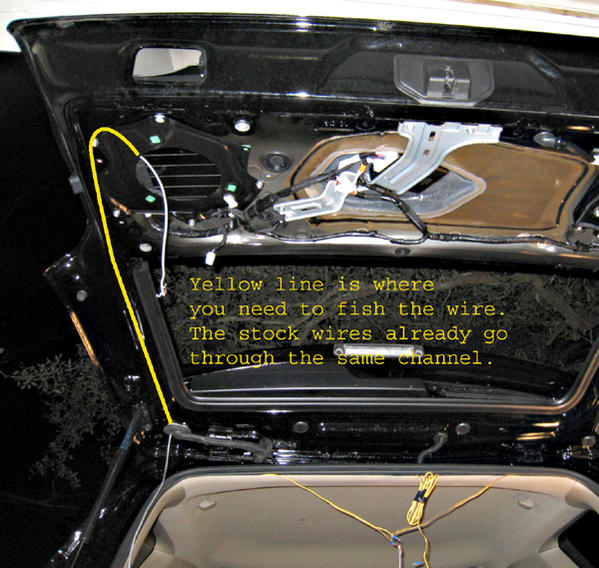
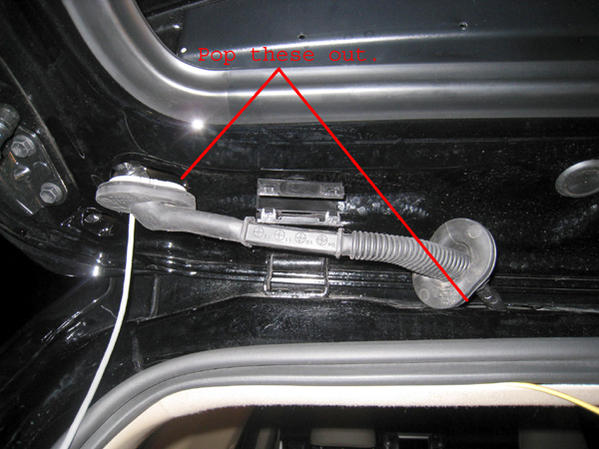
10--Pop out the rubber tubes that protect the wires coming from the gate door to the roof of the car. See image.
11--Fish a wire from the speaker hole opening down to the hole where the rubber tube was connected at the lift gate. This is tricky! Do not use a regular household wire fish that you buy at the hardware. It is too big and too stiff. Instead, try using a ground wire from your household-type wiring. It is rigid enough to fish through, but bendable enough to get it pointed in the right direction.
12--Once you have that wire fished through, tape on your dual wire on the lower end, and then carefully pull the wires back through.

__________________
2010 LTD 4x4, blk/sbl, nav, remote start MODS/ADDS: TE Conversion; ICON Stage 2 w/ LRUCAs; 285/70/17 DuraTracs; Baja Rack; SW Sliders, ARB CKMA12 onboard air; Fiamm horns; Tan Huskys; 30% tint; 5" mangowalk; LED lights in interior, puddle lights, license plate, engine compartment, and cargo area; small tool box under the hood; removed cargo tray stopper; reverse cam switch; 4-pin trailer light hookup relocation; K&N air filter; AVS bug deflector; 3m carbonfiber chrome coverup (except door handles); midland CB; Firestik 2' hood-mounted CB antenna.
|
|
|
Reply With Quote
|
|
01-20-2011, 05:58 PM
|
#5
|
|
Member
|
|
Join Date: Jul 2010
Location: Charleston, SC
Posts: 718
|
|
|
Member
Join Date: Jul 2010
Location: Charleston, SC
Posts: 718
|
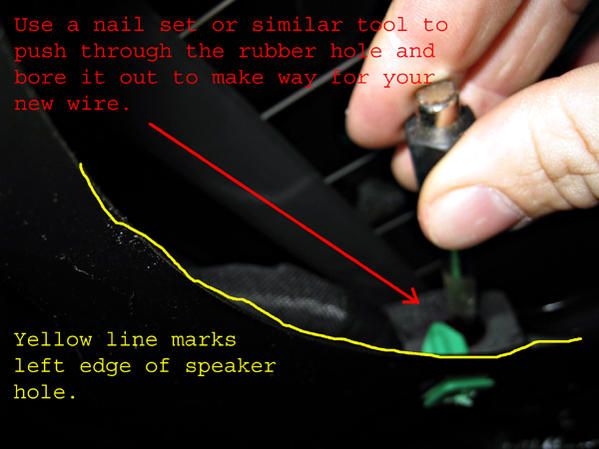
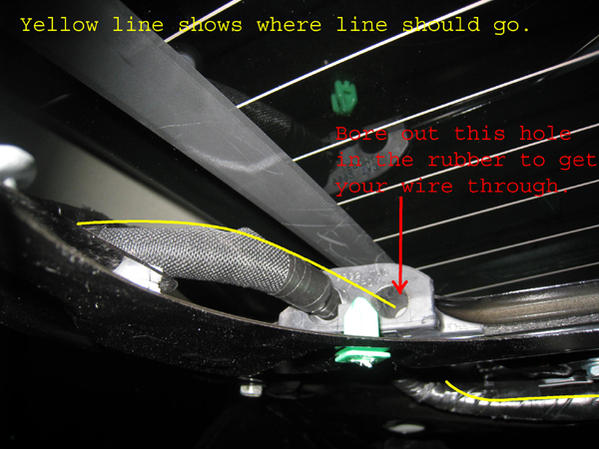
13--To get the wire from the speaker hole to the left interior light location, you can use a blank spot in the rubber connector, but you have to bore it out. I used a nail set tool to bore it out.
14--Once it is bored out, put some oil onto your LED wire and push it through.
15--Now you need to fish the dual wire down the rubber tubing to get it into the headliner area of the vehicle. It is buttoned up pretty good on the lift gate side, so I had to use a pair of wire snips to cut a tiny hole in it to get the new wire in. You will need to lube up this part of the wire as well. Then, fish it through, tape back over where you put the hole in the lift gate side. See pics.
16--Push the rubber tube connectors back into their oval shaped holes.
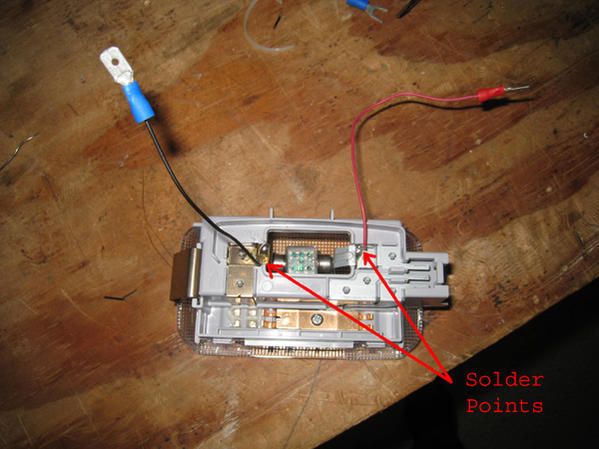
17--Take the left lift gate interior light assembly and solder two wires onto the back of it, and put connectors on them, as shown.
18--Put connectors onto the new wire you fished into the left side of the lift gate above the speaker hole.
19--Put connectors onto the wires that you fished into the headliner and hook them up.
20--Test it all before putting everything back together, and then use electrical tape to protect your connectors (if you used the kind that are exposed like I did).
21--Now, when you open the lift gate, there is TONS of light, and you can turn if off by turning off the left light assembly on the rear lift gate panel.


__________________
2010 LTD 4x4, blk/sbl, nav, remote start MODS/ADDS: TE Conversion; ICON Stage 2 w/ LRUCAs; 285/70/17 DuraTracs; Baja Rack; SW Sliders, ARB CKMA12 onboard air; Fiamm horns; Tan Huskys; 30% tint; 5" mangowalk; LED lights in interior, puddle lights, license plate, engine compartment, and cargo area; small tool box under the hood; removed cargo tray stopper; reverse cam switch; 4-pin trailer light hookup relocation; K&N air filter; AVS bug deflector; 3m carbonfiber chrome coverup (except door handles); midland CB; Firestik 2' hood-mounted CB antenna.
Last edited by Snooperstyle; 01-20-2011 at 06:09 PM.
|
|
|
Reply With Quote
|
|
01-20-2011, 08:57 PM
|
#6
|
 |
Member
|
|
Join Date: Apr 2010
Location: Calgary
Age: 49
Posts: 606
|
|
|
Member
Join Date: Apr 2010
Location: Calgary
Age: 49
Posts: 606
|
Sweet! Nice write up.
__________________
My Truck(Bro Show)
|
|
|
Reply With Quote
|
|
01-20-2011, 09:27 PM
|
#7
|
 |
Senior Member
|
|
Join Date: Feb 2010
Location: Umm... Seattle ;)
Age: 54
Posts: 1,683
|
|
|
Senior Member
Join Date: Feb 2010
Location: Umm... Seattle ;)
Age: 54
Posts: 1,683
|
Nice write up but damn man.... are trying land airplanes in there?
__________________
2010 Trail Edition 4Runner - KDSS / Nav / RRO Sliders / Perkins Rack / Java Drawers / Duratracs 265/70/17/E
|
|
|
Reply With Quote
|
|
01-20-2011, 09:45 PM
|
#8
|
 |
Member
|
|
Join Date: Sep 2010
Location: San Diego, CA
Posts: 671
|
|
|
Member
Join Date: Sep 2010
Location: San Diego, CA
Posts: 671
|
Great write-up. Do you remember how much room is between the headliner and the sheet metal? I'm pondering the idea of flush mounting through the headliner LEDs. Find the right LEDs is quite the challenge though.
__________________
Current Toys: 2011 T4R Limited Blizzard Pearl w/stuff | 1979 Jeep CJ5 w/lots of stuff | 1989 Harley Davidson Sportster 883 w/lots of chrome | M416 Army Trailer
Past Toys: 1988 T4R 1-Ton SAS (1st Generation) | 1998 Tacoma Ext Cab Supercharged |1995 Wrangler YJ | 2003 Wrangler Rubicon
|
|
|
Reply With Quote
|
|
01-20-2011, 10:31 PM
|
#9
|
 |
Member
|
|
Join Date: Dec 2010
Location: Charlotte, NC
Posts: 294
|
|
|
Member
Join Date: Dec 2010
Location: Charlotte, NC
Posts: 294
|
Awesome Snooper - Thank you!
__________________
2011 Mag Grey Limited Probably not as modded out as yours
War Eagle!
|
|
|
Reply With Quote
|
|
01-21-2011, 09:42 AM
|
#10
|
 |
Elite Member
|
|
Join Date: Mar 2010
Location: Illinois
Posts: 6,046
Real Name: Um, Phil?
|
|
|
Elite Member
Join Date: Mar 2010
Location: Illinois
Posts: 6,046
Real Name: Um, Phil?
|
Very nice Snooper, thanks for the writeup.
EDIT: I'm not too experienced at ripping apart my car. Please, what is a panel remover tool, and where do I get one?
__________________
2010 Blizzard Pearl SR5/P - traded
2018 Superwhite SR5/P ... IS350 retrofit.
Last edited by philsey; 01-21-2011 at 09:53 AM.
|
|
|
Reply With Quote
|
|
01-21-2011, 10:09 AM
|
#11
|
|
Member
|
|
Join Date: Jul 2010
Location: Charleston, SC
Posts: 718
|
|
|
Member
Join Date: Jul 2010
Location: Charleston, SC
Posts: 718
|
Quote:
Originally Posted by SeattleMike

Nice write up but damn man.... are trying land airplanes in there?
|
Ha! I probably could! They used to be hooked up to my dome light over the second row, and it was damn near embarrassing when I had to open the door to get in and out. People thought I was trying to make my t4r into a limo. That is why I did this mod this way...it only comes on now when I open the lift gate. Even though it is quite bright, it is frekin' AWESOME to be able to see as well as I can when I am loading things back there.
__________________
2010 LTD 4x4, blk/sbl, nav, remote start MODS/ADDS: TE Conversion; ICON Stage 2 w/ LRUCAs; 285/70/17 DuraTracs; Baja Rack; SW Sliders, ARB CKMA12 onboard air; Fiamm horns; Tan Huskys; 30% tint; 5" mangowalk; LED lights in interior, puddle lights, license plate, engine compartment, and cargo area; small tool box under the hood; removed cargo tray stopper; reverse cam switch; 4-pin trailer light hookup relocation; K&N air filter; AVS bug deflector; 3m carbonfiber chrome coverup (except door handles); midland CB; Firestik 2' hood-mounted CB antenna.
|
|
|
Reply With Quote
|
|
01-21-2011, 10:21 AM
|
#12
|
|
Member
|
|
Join Date: Jul 2010
Location: Charleston, SC
Posts: 718
|
|
|
Member
Join Date: Jul 2010
Location: Charleston, SC
Posts: 718
|
Quote:
Originally Posted by TOYSTRY
Great write-up. Do you remember how much room is between the headliner and the sheet metal? I'm pondering the idea of flush mounting through the headliner LEDs. Find the right LEDs is quite the challenge though.
|
There is room in the middle all of the way towards the rear of the vehicle where the headliner goes diagonally downwards toward the weatherstripping.
I would estimate about 2" between the roof and the headliner. There IS NOT room forward of that location. I had a hell of a time fishing a wire through that part.
The best way to see how much room is to pop out those three little fasteners on the back, pull it down a little bit carefully, and see for yourself. I bought a panel remover tool from Advance Auto Parts, which has been a very valuable tool for me for stuff like this.
I am actually thinking of putting a dome light there that is connected to my 2nd row dome light, so it has better light back there when I open one of the four front doors, so it won't turn on my "landing strip" LEDs as SeattleMike calls them, but I am just too scared to start cutting gaping holes into my headliner. I already have the wire fished from the 2nd row dome light though.
__________________
2010 LTD 4x4, blk/sbl, nav, remote start MODS/ADDS: TE Conversion; ICON Stage 2 w/ LRUCAs; 285/70/17 DuraTracs; Baja Rack; SW Sliders, ARB CKMA12 onboard air; Fiamm horns; Tan Huskys; 30% tint; 5" mangowalk; LED lights in interior, puddle lights, license plate, engine compartment, and cargo area; small tool box under the hood; removed cargo tray stopper; reverse cam switch; 4-pin trailer light hookup relocation; K&N air filter; AVS bug deflector; 3m carbonfiber chrome coverup (except door handles); midland CB; Firestik 2' hood-mounted CB antenna.
|
|
|
Reply With Quote
|
|
01-21-2011, 10:40 AM
|
#13
|
|
Member
|
|
Join Date: Aug 2007
Location: SoCal
Posts: 622
|
|
|
Member
Join Date: Aug 2007
Location: SoCal
Posts: 622
|
Damn you! Now it looks like I have to add this to my list of things to do! Thanks for the detialed write-up. I would like to do my own but dont have the patience to note and take pics of my progress. I really do commend you!
|
|
|
Reply With Quote
|
|
01-21-2011, 10:41 AM
|
#14
|
|
Member
|
|
Join Date: Jul 2010
Location: Charleston, SC
Posts: 718
|
|
|
Member
Join Date: Jul 2010
Location: Charleston, SC
Posts: 718
|
Quote:
Originally Posted by philsey
Very nice Snooper, thanks for the writeup.
EDIT: I'm not too experienced at ripping apart my car. Please, what is a panel remover tool, and where do I get one?
|
Just looked it up. They are actually called "clip removal pliers". There is no picture online, but here is the product page at Advance Auto:
PLIERS CLIP REMOVAL AMPRO by Autocraft - part# AC505/W86556
They have a red handle, and the tips are black.
__________________
2010 LTD 4x4, blk/sbl, nav, remote start MODS/ADDS: TE Conversion; ICON Stage 2 w/ LRUCAs; 285/70/17 DuraTracs; Baja Rack; SW Sliders, ARB CKMA12 onboard air; Fiamm horns; Tan Huskys; 30% tint; 5" mangowalk; LED lights in interior, puddle lights, license plate, engine compartment, and cargo area; small tool box under the hood; removed cargo tray stopper; reverse cam switch; 4-pin trailer light hookup relocation; K&N air filter; AVS bug deflector; 3m carbonfiber chrome coverup (except door handles); midland CB; Firestik 2' hood-mounted CB antenna.
|
|
|
Reply With Quote
|
|
01-21-2011, 10:42 AM
|
#15
|
 |
Senior Member
|
|
Join Date: Jan 2010
Location: Ottawa, Ontario, Canada
Posts: 1,041
Real Name: Derek
|
|
|
Senior Member
Join Date: Jan 2010
Location: Ottawa, Ontario, Canada
Posts: 1,041
Real Name: Derek
|
Brilliant. Thanks for sharing.
|
|
|
Reply With Quote
|
 Posting Rules
|
You may not post new threads
You may not post replies
You may not post attachments
You may not edit your posts
HTML code is On
|
|
|
|


 Linear Mode


