 04-10-2011, 12:58 PM
|
#76
|
 |
Senior Member
|
|
Join Date: Feb 2011
Location: Cape Coral, FL
Age: 42
Posts: 1,087
Real Name: Matt
|
|
|
Senior Member
Join Date: Feb 2011
Location: Cape Coral, FL
Age: 42
Posts: 1,087
Real Name: Matt
|
Quote:
Originally Posted by sp8ball

OH, I'm not going to remove the roof rack. It's staying in place - I just want to paint the ends black. However, I want to hang on to my chrome ones since the wife seems to prefer them. The set I'd buy would get painted black and installed on the T4R as "my way" and if it doesn't fly, I can always switch it back.
|
oh okay cool hahahah
__________________
2011 4Runner SR5 - Black
Stubby Antenna - 5% Tint - Weathertech Liners
Pioneer AVIC z130BT w/Camera feed in Nav
Ultra Gauntlet 20 X 9 - Nitto Terra Grappler G2 275/55r/20
H11 XTREME LED PRO Kit
|

|
 Reply With Quote Reply With Quote
|
|
04-10-2011, 05:36 PM
|
#77
|
|
Member
|
|
Join Date: Dec 2010
Location: Texas
Posts: 75
|
|
|
Member
Join Date: Dec 2010
Location: Texas
Posts: 75
|
Spaceball,
I followed the hyperlink and ordered the AVS Bugflector II. I received the package but it did not come with any mounting hardware (screws, plastic tabs etc). Was it supposed to come with these parts or do I have to order them sep?
Regards
|
|
|
Reply With Quote
|
|
04-10-2011, 09:55 PM
|
#78
|
 |
Member
|
|
Join Date: Jan 2010
Location: Bel Air, MD
Posts: 456
|
|
|
Member
Join Date: Jan 2010
Location: Bel Air, MD
Posts: 456
|
Quote:
Originally Posted by hrothgar02
Spaceball,
I followed the hyperlink and ordered the AVS Bugflector II. I received the package but it did not come with any mounting hardware (screws, plastic tabs etc). Was it supposed to come with these parts or do I have to order them sep?
Regards
|
Mine came with them! If I remember correctly, they were hiding in a little pouch...but they were there!
__________________
**2011 SR5 - Salsa Red Pearl** Backup Camera, Moonroof, Upgraded Stereo, Third Row, Remote Start, and Anti-Theft
Mods: Weathertech DigitalFit Floor Liners, Husky Weatherbeater Cargo Liner, Stubby Antenna, Black Steelcraft Nerf Bars, Interior & Puddle Lamp LEDs, 35% Window Tint, Vinyl Chrome Strip Blackout, Color-matched Door Handles, AVS Bugflector II, Toytec Front Plate Spacer Lift, Interior Accent Lighting, Backup Camera Switch, Cupholder & Door Handle LEDs, Infinity Kappa Speakers
My Build Thread: http://www.toyota-4runner.org/5th-ge...id-2010-a.html
|
|
|
Reply With Quote
|
|
04-10-2011, 09:59 PM
|
#79
|
 |
Member
|
|
Join Date: Dec 2010
Location: Watsonville, CA
Posts: 337
|
|
|
Member
Join Date: Dec 2010
Location: Watsonville, CA
Posts: 337
|
Quote:
Originally Posted by sp8ball
The Toytec Top Plate Spacers went in today, and I have Antman to thank for walking me through the process and hosting me in his garage. We were able to do it pretty effectively with two people and no spring compressor.
Write-up and pics will be up this weekend. LOTS of pictures.
Also...he went and showed me all the lighting mods has he made. Footwell lighting, cupholder lighting, and Limited-like interior door handle lighting. Lots of cool accent stuff. So, we're going to tackle some of these in the near future and document them on this thread.
Stay tuned.
|
Any update on the lift mod? Looking forward to the How To and pics.
__________________
2016 F150-mine, 2016 4Runner SR5-wifes
Previous Rides: 2010 Tundra CrewMax Platinum
2008 4Runner SR5
2010 4Runner SR5
1989 4Runner SR5
|
|
|
Reply With Quote
|
|
04-10-2011, 10:02 PM
|
#80
|
|
Member
|
|
Join Date: Jan 2010
Location: Bel Air, MD
Posts: 456
|
|
|
Member
Join Date: Jan 2010
Location: Bel Air, MD
Posts: 456
|
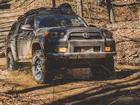
Modification: Toytec Top Plate Spacer Lift
Toytec Lifts Front Top Plate Spacer Kit - $60.00
Front Top Plate Spacer Kit - Toytec Lifts: Toyota Lift Kits: FJ Cruiser Lift Kits, Tacoma Lift Kits, Tundra Lift Kits, 4 Runner Lift Kits, Sequoia Lift Kits, Toyota Truck Lift Kits
Added bonus: Toytec Lifts decal!
Hidden Cost: Front End Alignment is required after the lift ($75-$90)
Difficulty Scale (1 to 10): Six
Sp8ball’s Personal Intimidation Factor (1 to 10): Nine (mitigated to a “four” by Antman having already done it, and offering to help)
Install Time: 2-3 hours
Reason for Doing It: Level the rake of the truck to make the front even with the back
Benefit: Looks better, and it’s cheaper and easier than replacing suspension components (shocks, struts, UCAs, installing coilovers, etc.). And it prepares the truck for new shoes!
Cons: It’s the hardest mod so far!
Other Products Considered: Bilstein 5100s.
_____________________________
Alright…here’s the biggest one so far!
I’d like to start off by saying – again – that I couldn’t have done this mod without the guidance and insight provided by this forum. Not only is it full of great ideas, but great people as well. In this particular case, Antman and I discovered that we live about a mile apart, and he offered to not only help me with this mod, but to host me in his garage (with his large collection of tools and jacks and impact guns) to do it! Mad props to Antman.
[Note: Want to know what Antman looks like? That’s his arms doing all the work in the pictures. In all fairness, I did the driver’s side after this tutorial on the passenger side. With some help.]
The documents posted in this thread ( Modifications, Write-Ups, & Quick Links) (specifically, the TIS FSM sections on the front end suspension) proved invaluable. You have to go through some downloading and a tiny bit of searching to get to it, but it’s well worth taking your time and doing a little bit of upfront research.
OK, this write-up is going to be picture heavy for a number of reasons:
1) A picture is worth a thousand words, and I have 30-some pictures to post. That’s 30,000+ words I don’t have to write. And it has been noted that my posts are “wordy”.
2) There was a lot of discussion on here about needing a spring compressor to do this mod. We’re hoping to show how we did it without one.
We’ll have before-and-after pictures at the end to show the rake both before and after the spacer lift.
So, let’s get started!
Step One: Chock the rear wheels.
Step Two: Jack up the side on which you are going to install the lift. Put a jack stand under the truck and slowly lower the jack. For this series of posts, we are working on the passenger’s side. (we started with the passenger’s side because it was closest to the coffee pot)


Step Three: Give the opposite side of the car a slight lift, and install another, lower jack stand on that side for stability.

Step Four: remove the six lugs holding the wheels onto the rotors.

Step Five: Remove wheel.

Step six: place the jack under the lower control arm (large metal part of the suspension just behind the rotor) to support it during the next few steps, because you’ll want that slight upward pressure on the spring while you do step 7.
Step seven: Loosen and remove the nut, cushion retainer (a metal washer), and shock absorber cushion (a thick rubber disk).

 [continued on next post...]
__________________
**2011 SR5 - Salsa Red Pearl** Backup Camera, Moonroof, Upgraded Stereo, Third Row, Remote Start, and Anti-Theft
Mods: Weathertech DigitalFit Floor Liners, Husky Weatherbeater Cargo Liner, Stubby Antenna, Black Steelcraft Nerf Bars, Interior & Puddle Lamp LEDs, 35% Window Tint, Vinyl Chrome Strip Blackout, Color-matched Door Handles, AVS Bugflector II, Toytec Front Plate Spacer Lift, Interior Accent Lighting, Backup Camera Switch, Cupholder & Door Handle LEDs, Infinity Kappa Speakers
My Build Thread: http://www.toyota-4runner.org/5th-ge...id-2010-a.html
Last edited by sp8ball; 04-10-2011 at 10:33 PM.
|
|
|
Reply With Quote
|
|
04-10-2011, 10:05 PM
|
#81
|
|
Member
|
|
Join Date: Jan 2010
Location: Bel Air, MD
Posts: 456
|
|
|
Member
Join Date: Jan 2010
Location: Bel Air, MD
Posts: 456
|
Modification: Toytec Top Plate Spacer Lift (cont.)
Step eight: Remove the nut and disconnect the stabilizer link from the steering knuckle. You may need to use a 6mm allen wrench to hold the stud if it rotates with the nut.


Step nine: IMPORTANT NOTE about this step: In step 6, we put the jack under the lower control arm. It should still be there. If somebody takes these next 2 bolts out without being careful and following directions (to quote Antman) "it could wind up being a bad, bad day." Remove the two large bolts just behind the rotor (but not the odd shaped one between the two of them). Now you slowly lower the jack to release the spring pressure.


 [continued on next post]
__________________
**2011 SR5 - Salsa Red Pearl** Backup Camera, Moonroof, Upgraded Stereo, Third Row, Remote Start, and Anti-Theft
Mods: Weathertech DigitalFit Floor Liners, Husky Weatherbeater Cargo Liner, Stubby Antenna, Black Steelcraft Nerf Bars, Interior & Puddle Lamp LEDs, 35% Window Tint, Vinyl Chrome Strip Blackout, Color-matched Door Handles, AVS Bugflector II, Toytec Front Plate Spacer Lift, Interior Accent Lighting, Backup Camera Switch, Cupholder & Door Handle LEDs, Infinity Kappa Speakers
My Build Thread: http://www.toyota-4runner.org/5th-ge...id-2010-a.html
Last edited by sp8ball; 04-11-2011 at 01:52 PM.
|
|
|
Reply With Quote
|
|
04-10-2011, 10:13 PM
|
#82
|
|
Member
|
|
Join Date: Jan 2010
Location: Bel Air, MD
Posts: 456
|
|
|
Member
Join Date: Jan 2010
Location: Bel Air, MD
Posts: 456
|
Modification: Toytec Top Plate Spacer Lift (cont.)
Step ten: Prop up the rotor so it doesnt fall and ruin your CV joint.

Step eleven: Insert a pry bar into one of the holes in the arm where the bottom of the shock absorber is mounted and push down on it to relieve the pressure on the bolt at the bottom of the shock.


(note, these pry bar openings are on both legs of the suspension system...you can use either side)

Step twelve: Remove bolt, nut, and washer from bottom of shock absorber.

Step thirteen: Apply downward pressure to pry bar again, and work the shock and springs out of the top support.

Step fourteen: This leaves three nuts that you have to remove from the three studs holding the top cushion in place. Here are two of the three studs in question (third is in the back):

Step fifteen: Loosen nuts from studs
but DONT take it apart yet.
[continued on next post]
__________________
**2011 SR5 - Salsa Red Pearl** Backup Camera, Moonroof, Upgraded Stereo, Third Row, Remote Start, and Anti-Theft
Mods: Weathertech DigitalFit Floor Liners, Husky Weatherbeater Cargo Liner, Stubby Antenna, Black Steelcraft Nerf Bars, Interior & Puddle Lamp LEDs, 35% Window Tint, Vinyl Chrome Strip Blackout, Color-matched Door Handles, AVS Bugflector II, Toytec Front Plate Spacer Lift, Interior Accent Lighting, Backup Camera Switch, Cupholder & Door Handle LEDs, Infinity Kappa Speakers
My Build Thread: http://www.toyota-4runner.org/5th-ge...id-2010-a.html
|
|
|
Reply With Quote
|
|
04-10-2011, 10:16 PM
|
#83
|
|
Member
|
|
Join Date: Jan 2010
Location: Bel Air, MD
Posts: 456
|
|
|
Member
Join Date: Jan 2010
Location: Bel Air, MD
Posts: 456
|
__________________
**2011 SR5 - Salsa Red Pearl** Backup Camera, Moonroof, Upgraded Stereo, Third Row, Remote Start, and Anti-Theft
Mods: Weathertech DigitalFit Floor Liners, Husky Weatherbeater Cargo Liner, Stubby Antenna, Black Steelcraft Nerf Bars, Interior & Puddle Lamp LEDs, 35% Window Tint, Vinyl Chrome Strip Blackout, Color-matched Door Handles, AVS Bugflector II, Toytec Front Plate Spacer Lift, Interior Accent Lighting, Backup Camera Switch, Cupholder & Door Handle LEDs, Infinity Kappa Speakers
My Build Thread: http://www.toyota-4runner.org/5th-ge...id-2010-a.html
|
|
|
Reply With Quote
|
|
04-10-2011, 10:19 PM
|
#84
|
|
Member
|
|
Join Date: Jan 2010
Location: Bel Air, MD
Posts: 456
|
|
|
Member
Join Date: Jan 2010
Location: Bel Air, MD
Posts: 456
|
Modification: Toytec Top Plate Spacer Lift (cont.)
Step nineteen: Press new studs (from Toytec) into holes.


Step twenty: Place metal spacer lift onto assembly.

Step twenty-one: After getting alignment (silver sharpie marks) right, reinsert shock absorber cushion assembly (with spacer) into top of shock absorber housing. Tighten the three nuts to 47 ft-lbs.

Step twenty-two: Work top end of shock absorber back through hole in top of housing and seat coils onto rubber shock absorber cushion.

Step twenty-three: Work pry bar again, and apply pressure to allow the bottom of the shock absorber find its seating location.
 [continued on next post]
__________________
**2011 SR5 - Salsa Red Pearl** Backup Camera, Moonroof, Upgraded Stereo, Third Row, Remote Start, and Anti-Theft
Mods: Weathertech DigitalFit Floor Liners, Husky Weatherbeater Cargo Liner, Stubby Antenna, Black Steelcraft Nerf Bars, Interior & Puddle Lamp LEDs, 35% Window Tint, Vinyl Chrome Strip Blackout, Color-matched Door Handles, AVS Bugflector II, Toytec Front Plate Spacer Lift, Interior Accent Lighting, Backup Camera Switch, Cupholder & Door Handle LEDs, Infinity Kappa Speakers
My Build Thread: http://www.toyota-4runner.org/5th-ge...id-2010-a.html
|
|
|
Reply With Quote
|
|
04-10-2011, 10:22 PM
|
#85
|
|
Member
|
|
Join Date: Jan 2010
Location: Bel Air, MD
Posts: 456
|
|
|
Member
Join Date: Jan 2010
Location: Bel Air, MD
Posts: 456
|
Modification: Toytec Top Plate Spacer Lift (cont.)
Step twenty-four: Move jack back into position behind rotor to apply pressure to springs and further push the top stud into position to receive hardware.

Step twenty-five: Secure rubber shock absorber cushion, retainer, and nut to top of shock absorber at 18 ft-lbs.

Step twenty-six: Secure bottom of shock absorber with bolt, washer, and nut. (70 ft-lbs of torque)
Step twenty-seven: Re-secure stabilizer link. (52 ft-lbs of torque)

Step twenty-eight: Put red loctite on the two bolts that go into the lower control arm. Re-install two bolts from just behind rotor. (165 ft-lbs of torque)

Step twenty-nine: Reattach wheel, but don’t overtighten.

Step thirty: Lower truck and remove jacks and jackstands. Torque six wheel lug nuts to 83 ft-lbs.

Step thirty-one: Remove rear chocks.
[continued on next post]
__________________
**2011 SR5 - Salsa Red Pearl** Backup Camera, Moonroof, Upgraded Stereo, Third Row, Remote Start, and Anti-Theft
Mods: Weathertech DigitalFit Floor Liners, Husky Weatherbeater Cargo Liner, Stubby Antenna, Black Steelcraft Nerf Bars, Interior & Puddle Lamp LEDs, 35% Window Tint, Vinyl Chrome Strip Blackout, Color-matched Door Handles, AVS Bugflector II, Toytec Front Plate Spacer Lift, Interior Accent Lighting, Backup Camera Switch, Cupholder & Door Handle LEDs, Infinity Kappa Speakers
My Build Thread: http://www.toyota-4runner.org/5th-ge...id-2010-a.html
Last edited by sp8ball; 04-10-2011 at 10:38 PM.
|
|
|
Reply With Quote
|
|
04-10-2011, 10:24 PM
|
#86
|
|
Member
|
|
Join Date: Jan 2010
Location: Bel Air, MD
Posts: 456
|
|
|
Member
Join Date: Jan 2010
Location: Bel Air, MD
Posts: 456
|
Modification: Toytec Top Plate Spacer Lift (cont.)
Heres a picture of the installed spacer.

It started raining on Thursday night, so I havent had a chance to take an after picture for a before and after comparison. All measurements are from the ground to the bottom of the fender.
Before:
Front Driver Side: 34-3/4 inches ** Front Passenger Side: 35-1/4 inches
Rear Driver Side: 36-1/2 inches ** Rear Passenger Side: 36-1/2 inches
 After:
Front Driver Side:
After:
Front Driver Side: 36 inches ** Front Passenger Side: 36 inches
Rear Driver Side: 36-1/2 inches ** Rear Passenger Side: 36-1/2 inches

__________________
**2011 SR5 - Salsa Red Pearl** Backup Camera, Moonroof, Upgraded Stereo, Third Row, Remote Start, and Anti-Theft
Mods: Weathertech DigitalFit Floor Liners, Husky Weatherbeater Cargo Liner, Stubby Antenna, Black Steelcraft Nerf Bars, Interior & Puddle Lamp LEDs, 35% Window Tint, Vinyl Chrome Strip Blackout, Color-matched Door Handles, AVS Bugflector II, Toytec Front Plate Spacer Lift, Interior Accent Lighting, Backup Camera Switch, Cupholder & Door Handle LEDs, Infinity Kappa Speakers
My Build Thread: http://www.toyota-4runner.org/5th-ge...id-2010-a.html
Last edited by sp8ball; 04-11-2011 at 06:42 PM.
|
|
|
Reply With Quote
|
|
04-10-2011, 10:30 PM
|
#87
|
|
Member
|
|
Join Date: Jan 2010
Location: Bel Air, MD
Posts: 456
|
|
|
Member
Join Date: Jan 2010
Location: Bel Air, MD
Posts: 456
|
Quote:
Originally Posted by emsmatt
Any update on the lift mod? Looking forward to the How To and pics.
|
Perfect timing! I was loading it (and the pics) up to the site when you asked.
__________________
**2011 SR5 - Salsa Red Pearl** Backup Camera, Moonroof, Upgraded Stereo, Third Row, Remote Start, and Anti-Theft
Mods: Weathertech DigitalFit Floor Liners, Husky Weatherbeater Cargo Liner, Stubby Antenna, Black Steelcraft Nerf Bars, Interior & Puddle Lamp LEDs, 35% Window Tint, Vinyl Chrome Strip Blackout, Color-matched Door Handles, AVS Bugflector II, Toytec Front Plate Spacer Lift, Interior Accent Lighting, Backup Camera Switch, Cupholder & Door Handle LEDs, Infinity Kappa Speakers
My Build Thread: http://www.toyota-4runner.org/5th-ge...id-2010-a.html
|
|
|
Reply With Quote
|
|
04-10-2011, 10:48 PM
|
#88
|
 |
Elite Member
|
|
Join Date: Feb 2011
Location: Maryland
Age: 54
Posts: 6,876
Real Name: Jeff
|
|
|
Elite Member
Join Date: Feb 2011
Location: Maryland
Age: 54
Posts: 6,876
Real Name: Jeff
|
My arms are now famous. Yes- great forum- great people and thanks for the props- it was fun. As usual = good writeup! Personal note- I got to keep the Toytec Sticker for my "toolbox trophy"- thanx sp8ball! 
__________________
HERE FISHY FISHY FISHY!
|
|
|
Reply With Quote
|
|
04-10-2011, 11:04 PM
|
#89
|
 |
Member
|
|
Join Date: Apr 2010
Location: Calgary
Age: 49
Posts: 606
|
|
|
Member
Join Date: Apr 2010
Location: Calgary
Age: 49
Posts: 606
|
Great post. Consider making this a stand alone post so it doesn't get lost.
It's truly worth it's own thread.
__________________
My Truck(Bro Show)
|
|
|
Reply With Quote
|
|
04-10-2011, 11:08 PM
|
#90
|
|
Member
|
|
Join Date: Dec 2010
Location: Watsonville, CA
Posts: 337
|
|
|
Member
Join Date: Dec 2010
Location: Watsonville, CA
Posts: 337
|
Quote:
Originally Posted by sp8ball
Perfect timing! I was loading it (and the pics) up to the site when you asked.
|
Bravo sir, Bravo. That was a great write-up. It makes me think I could maybe even pull it off except for the fact that I own neither a floorjack, jack stand or any other 'car' tools to speak of. Great thread, I look forward to your seeing your new posts. Almost like getting a new issue of a favorite magazine. Keep up the great work and if you get the inclination to start a thread on "How To Convince Your Wife That Doing this To The Truck Is Not A Waste Of Time And Money" Im sure you would have many more subscribers.
__________________
2016 F150-mine, 2016 4Runner SR5-wifes
Previous Rides: 2010 Tundra CrewMax Platinum
2008 4Runner SR5
2010 4Runner SR5
1989 4Runner SR5
|
|
|
Reply With Quote
|
 Posting Rules
|
You may not post new threads
You may not post replies
You may not post attachments
You may not edit your posts
HTML code is On
|
|
|
|


 Linear Mode


