 11-24-2013, 01:17 AM
|
#16
|
 |
Senior Member
|
|
Join Date: Mar 2012
Location: Southern California
Posts: 1,836
|
|
|
Senior Member
Join Date: Mar 2012
Location: Southern California
Posts: 1,836
|
Suspension: Removed and Replaced Front Shocks
I had been hearing metallic-sounding creaks around the front suspension when rolling over the tiniest dip and bumps at idle in 2nd gear.
My idler arm had obvious play so I replaced that. Creaking remained.
Finally I had a friend push bumper down and release repeatedly as I felt/listened to the vibration. I localized it to the front shocks. No sound or vibration from control arms as I earlier suspected, too.
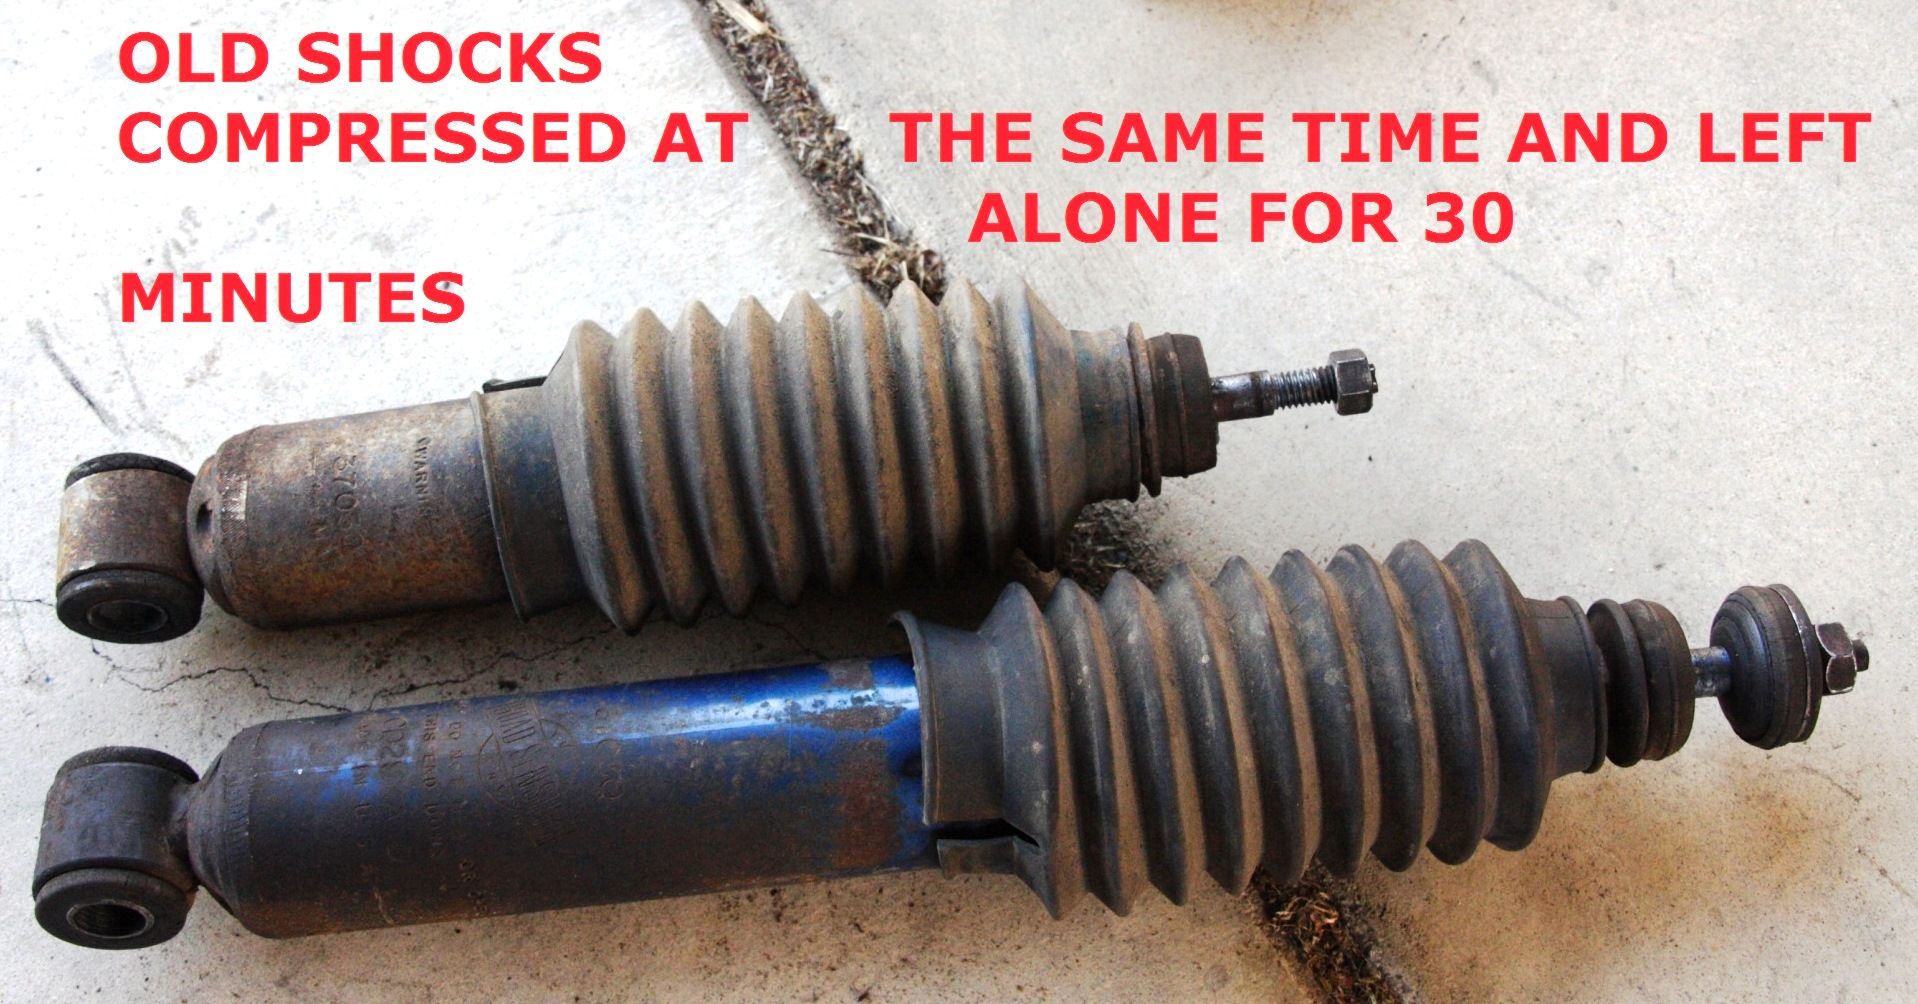
Problems Uncovered: - One of the old shocks is totally shut. I compressed them both and left them aside. After about 30 minutes, they looked like below.
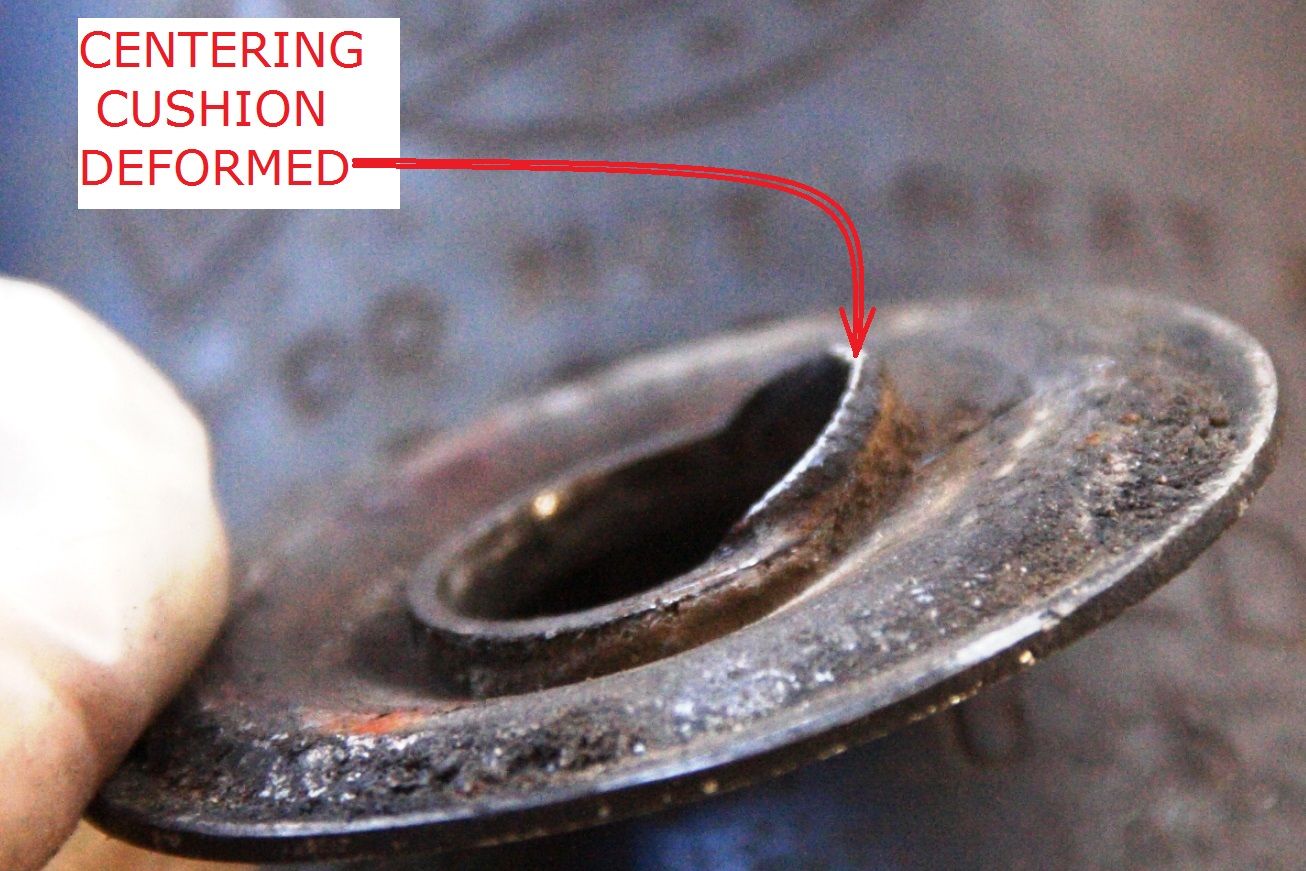
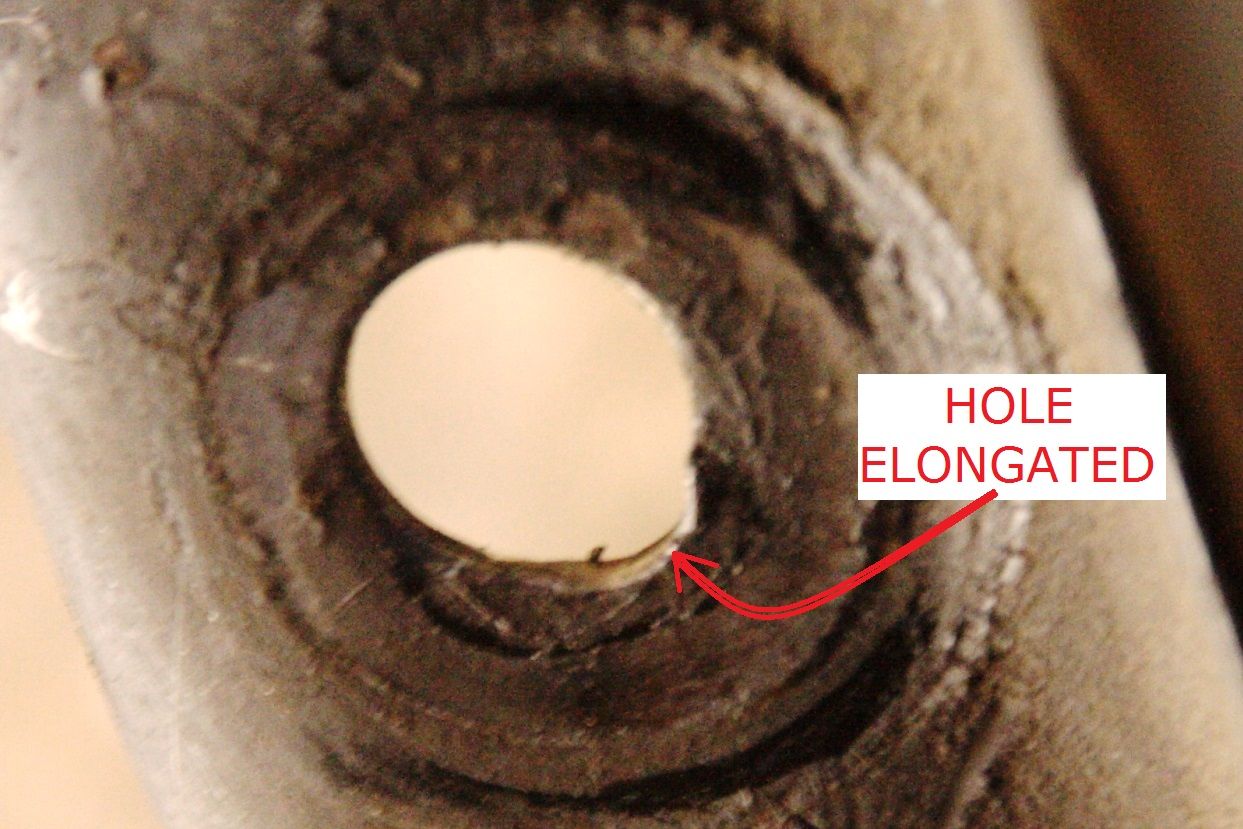
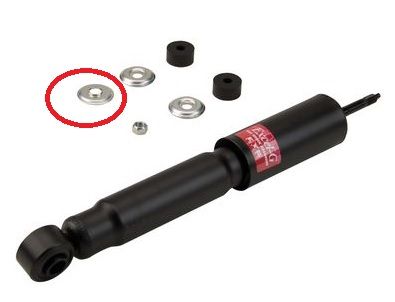
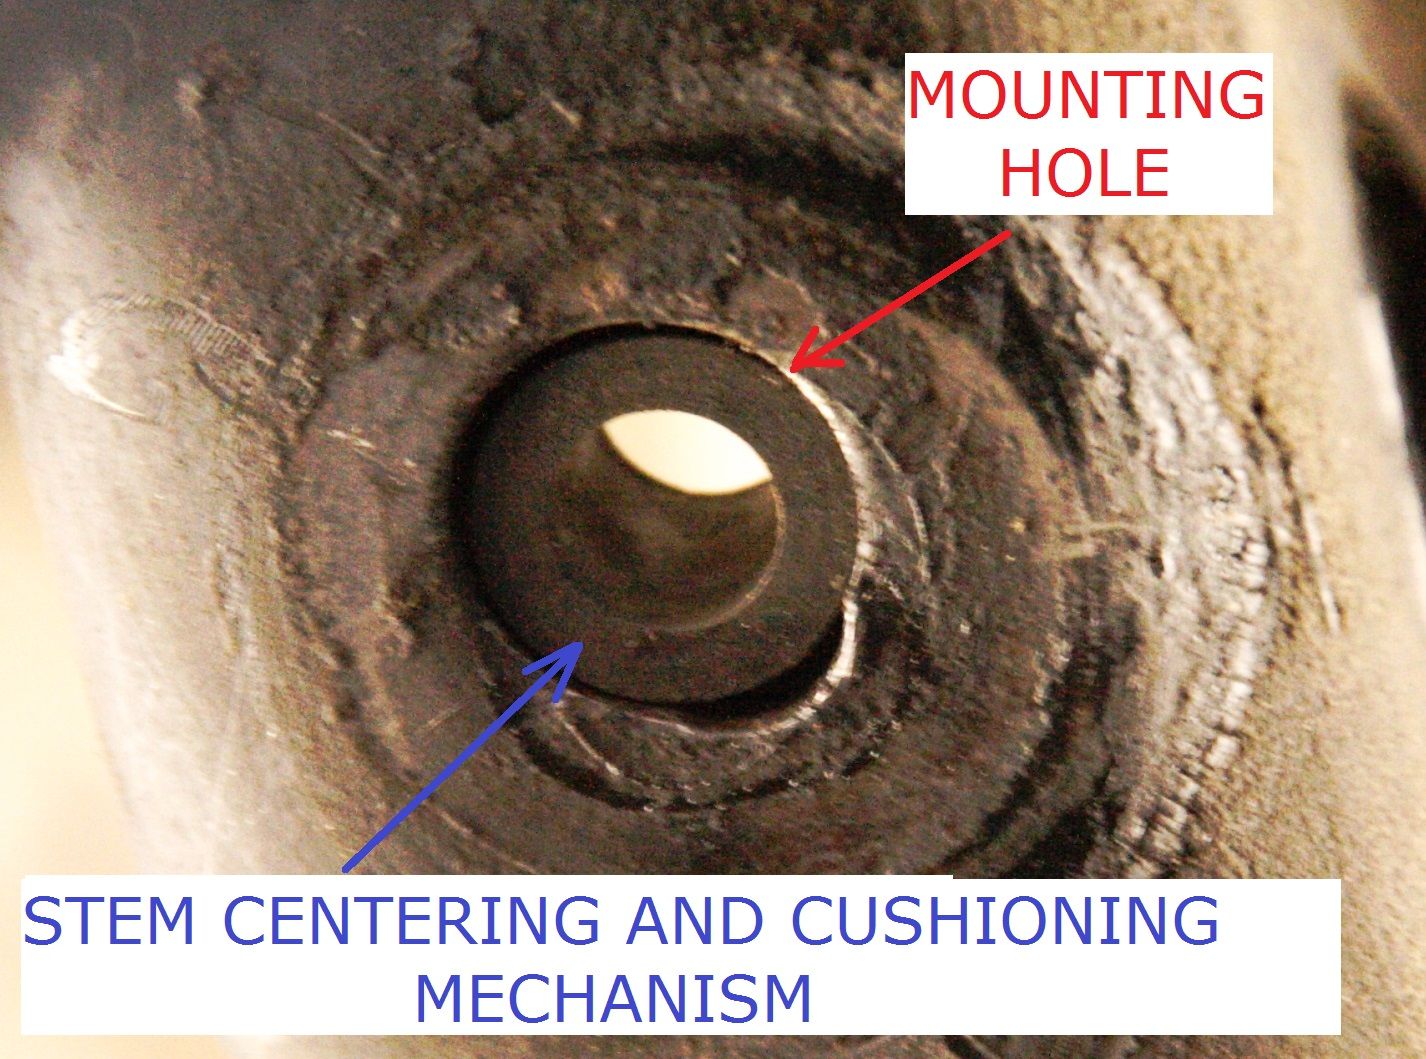
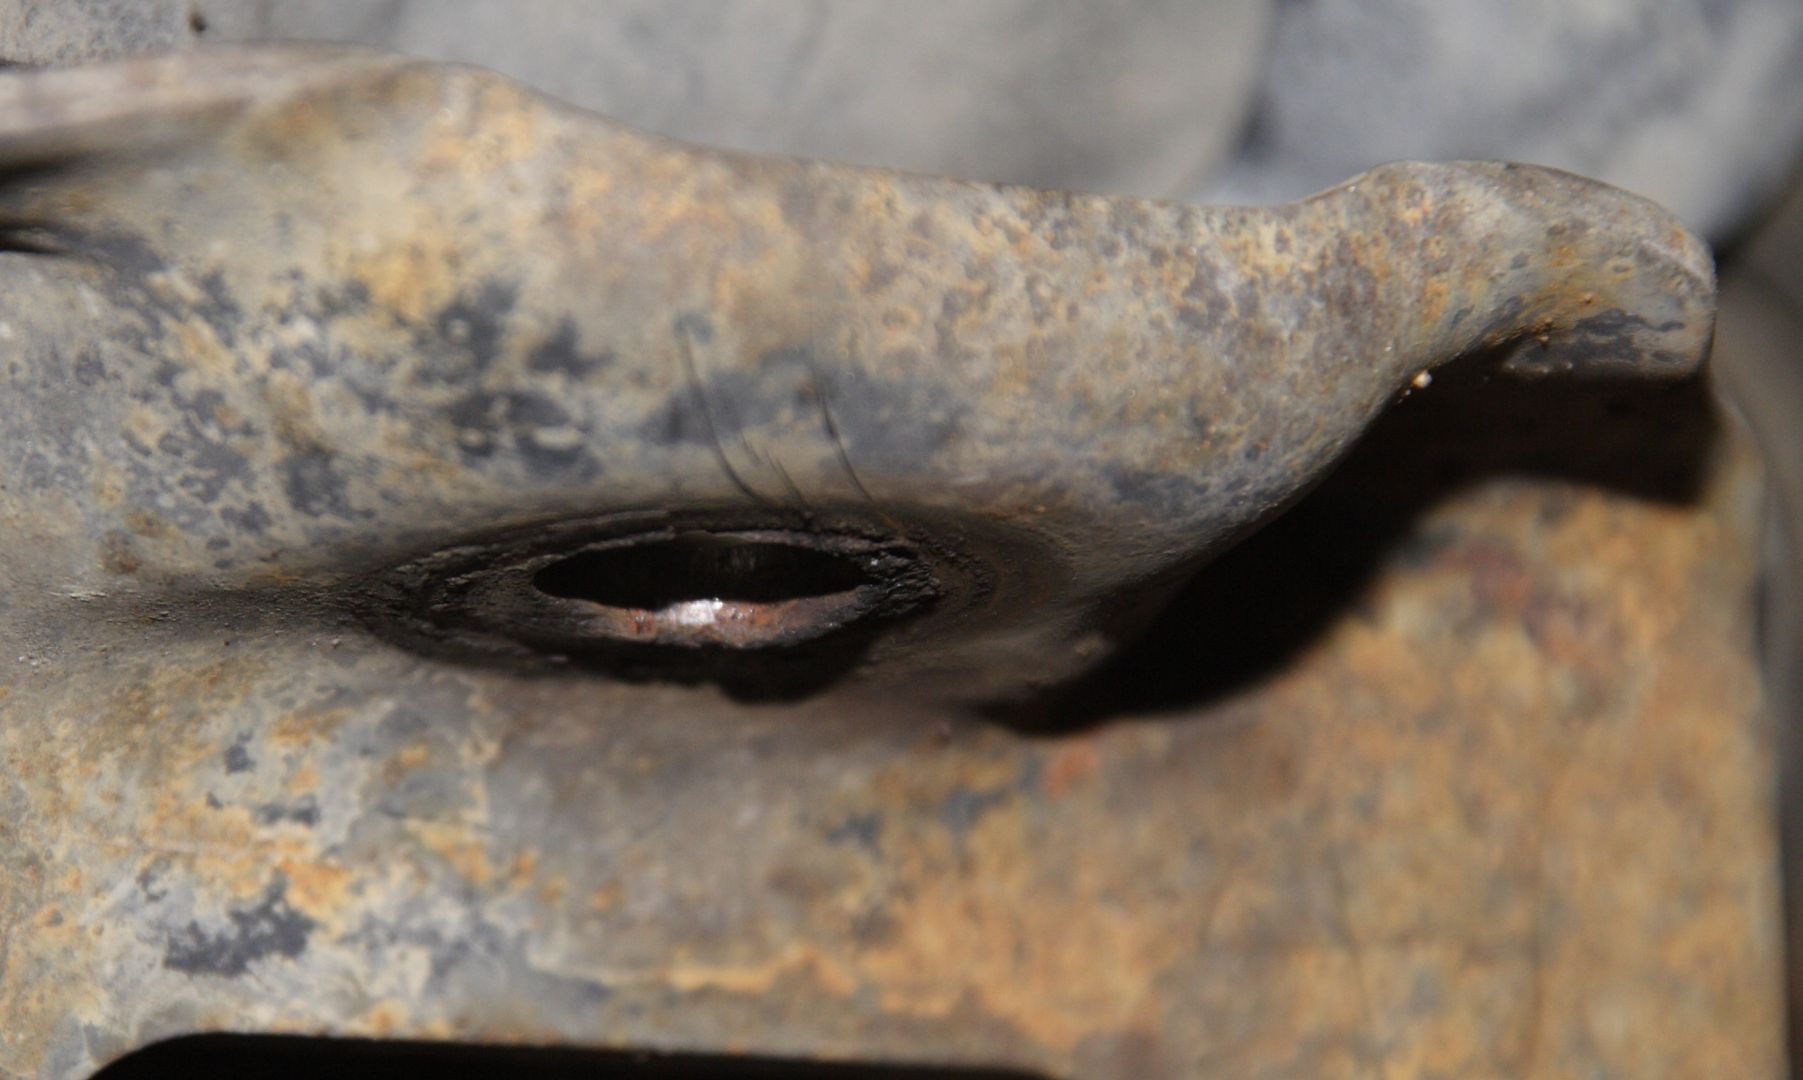
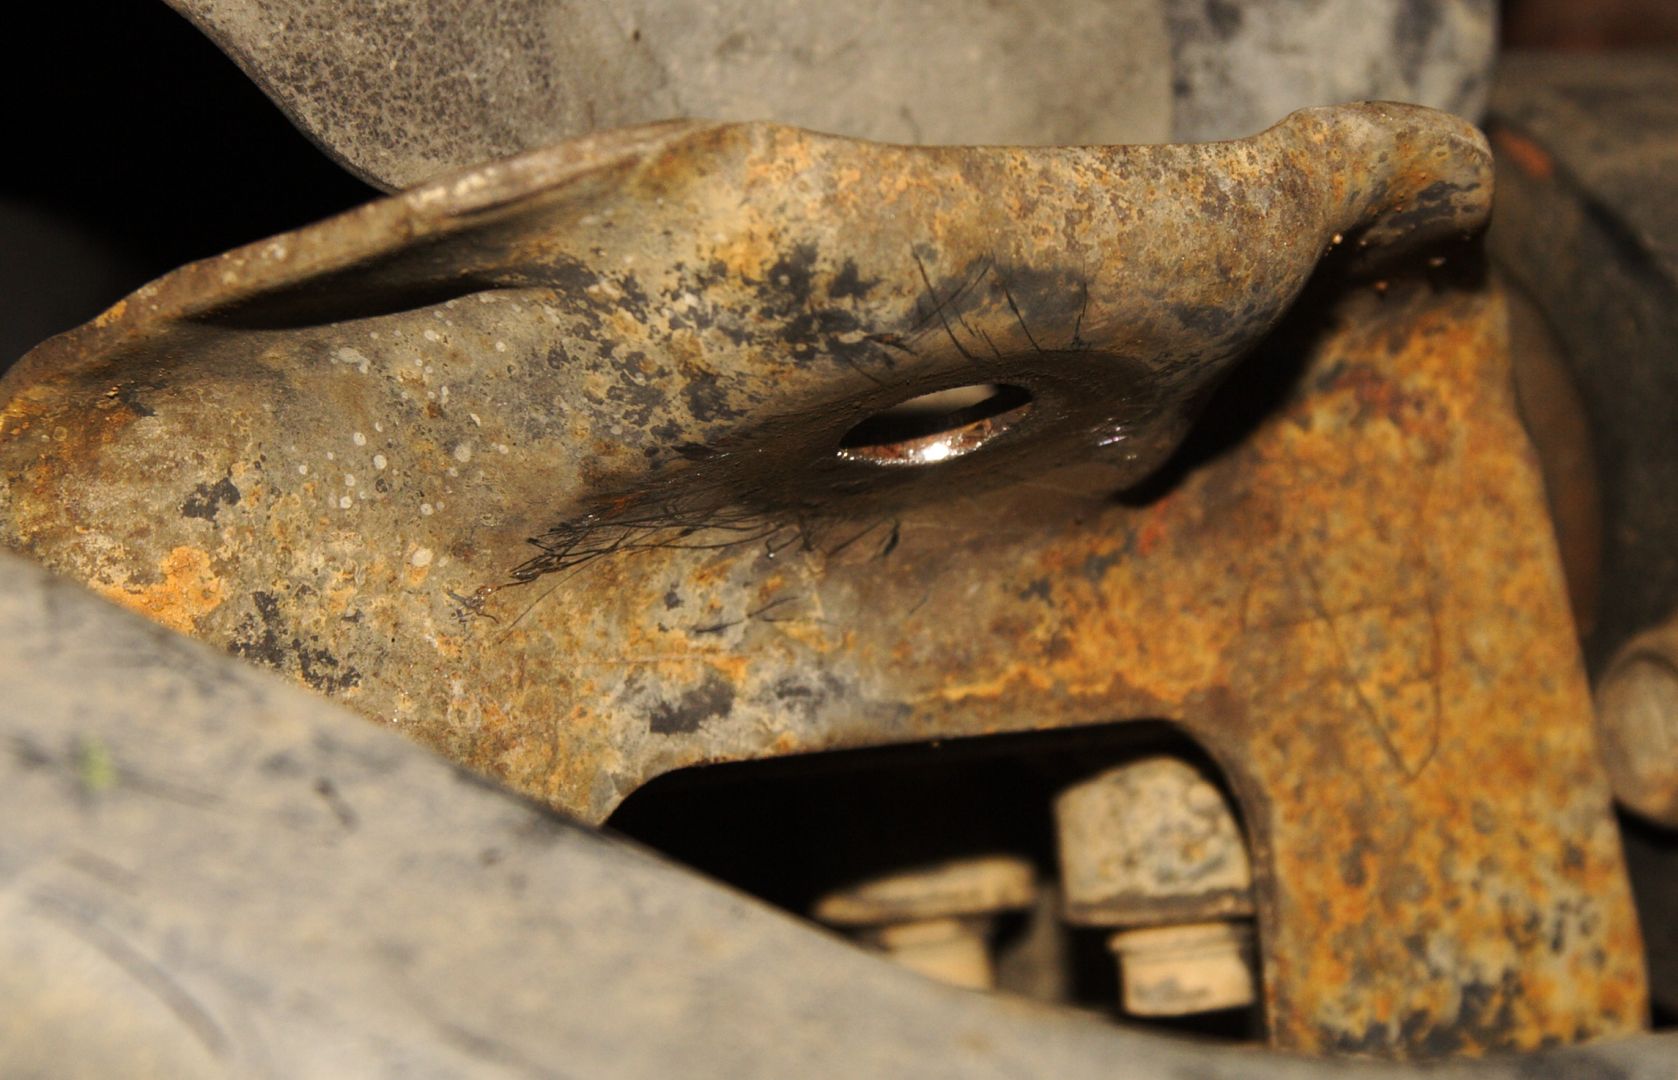
- Old shocks do not have effective mechanism to center the stem within the mounting hole. In only has a "sacrificial" centering washer which designer probably hoped would keep bushings centered around the hole and in turn keep the stem from contacting opening. Obviously, that failed. See pictures of deformed mounting hole and shock stem where the two made contact and also caused the creaking sound I had been hearing.
Old Shocks Shut.
"Sacrificial" Centering Washer Also Deformed:
Mounting Hole Deformed:
 Selecting Replacement Shocks: I do not know whether or not torsion bad had been cranked, so I measured actual full droop with shocks removed. I measured 14.370 from center of lower shock mounting bolt to bottom of upper shock mount.
Taking into account the approx. 0.375 inch combined thickness of upper bushing/cushion and one washer, I determined I need shock that had extended length spec of approx 13.995 inches or close.
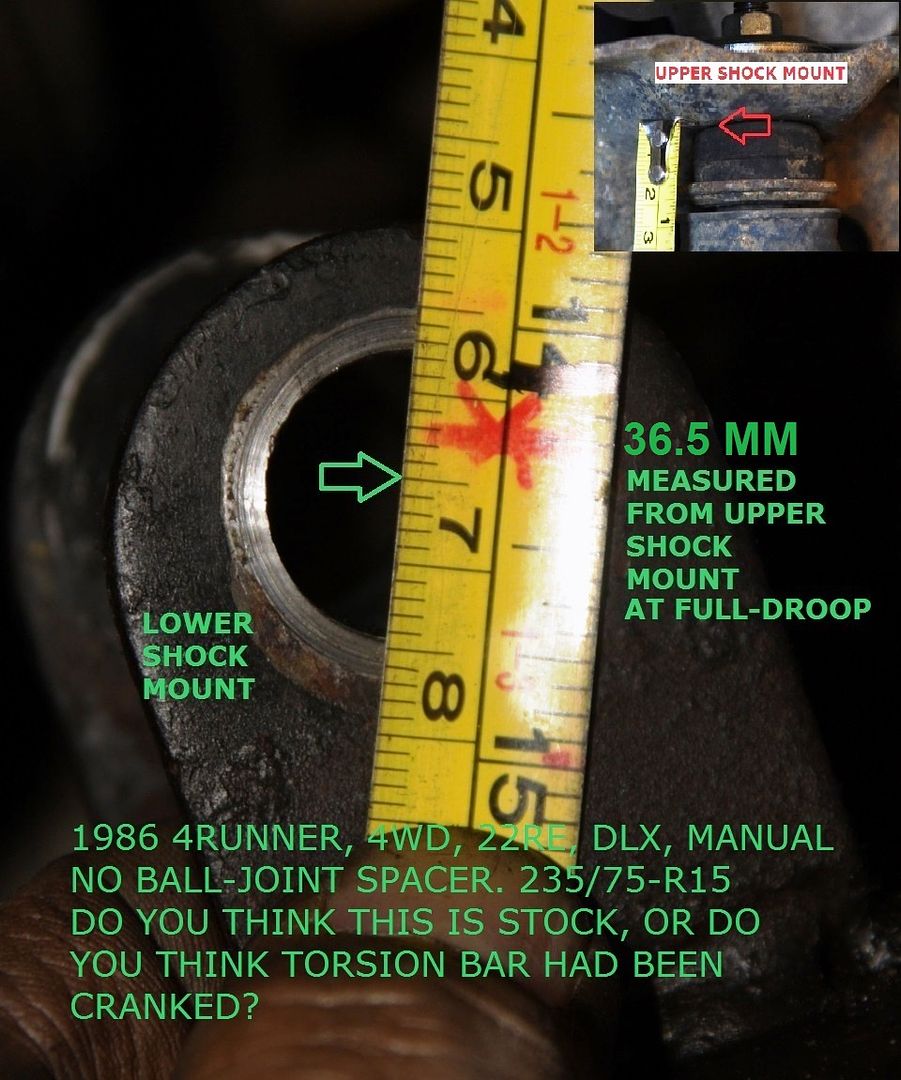
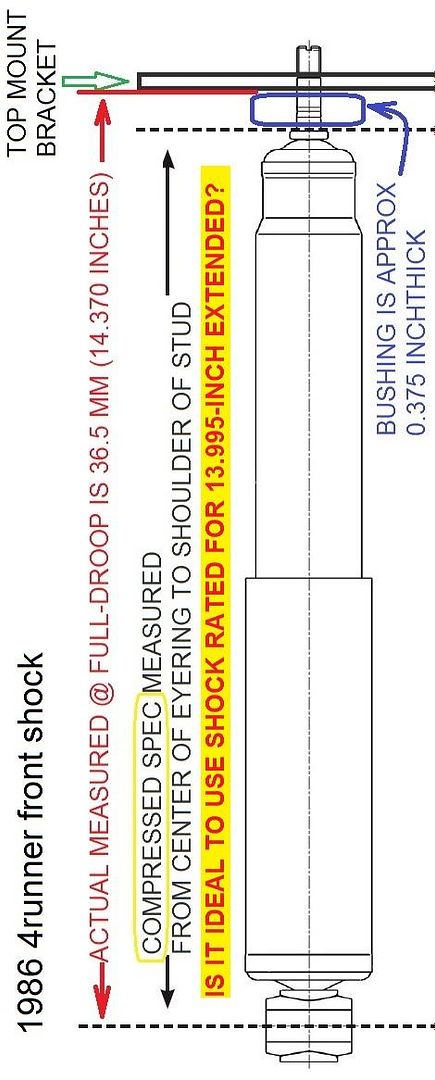
I could not measure actual compressed length because that would depend on weight of load, so I just looked for the shocks that satisfied above and with longest travel.
Looking both at OReilly and Autozone selector tool, I narrowed choices down to the KYB GR2/Excel-G (Compressed 9.09", Extended 13.7 in.") and Gabriel Max Control 77479 (Compressed 9.04", Extended 14.14").
I decided on Gabriel Max Control because:- It is longest when extended and shorter when compressed
- It has a positive centering mechanism; a "collared" bushing that actually puts rubber between the stem and the metal around the mounting hole.
KYB does not have "collared" bushing. It has centering/sacrificial washer that had been proven in-effective.
Gabriels, like Rancho's have "collared" bushing.
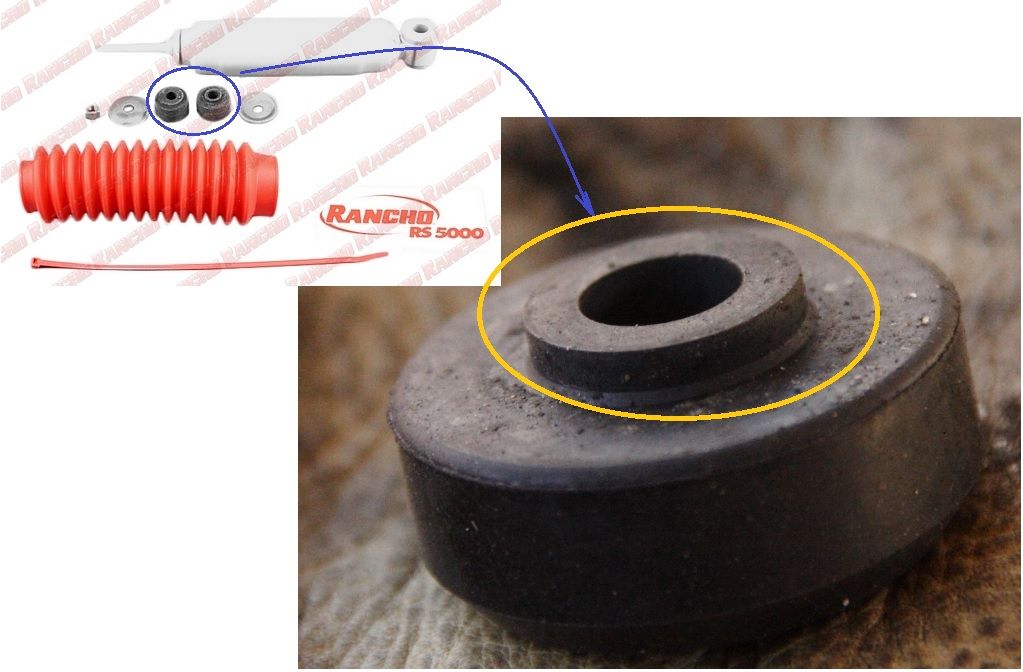
Collar on the bushing goes between shock stem and mounting hole, providing positive centering and cushioning.
Installation: Plain and simple as described in FSM.
A couple of precautions not mentioned in FSM:- Ensure mounting frame clean and is free of deformity
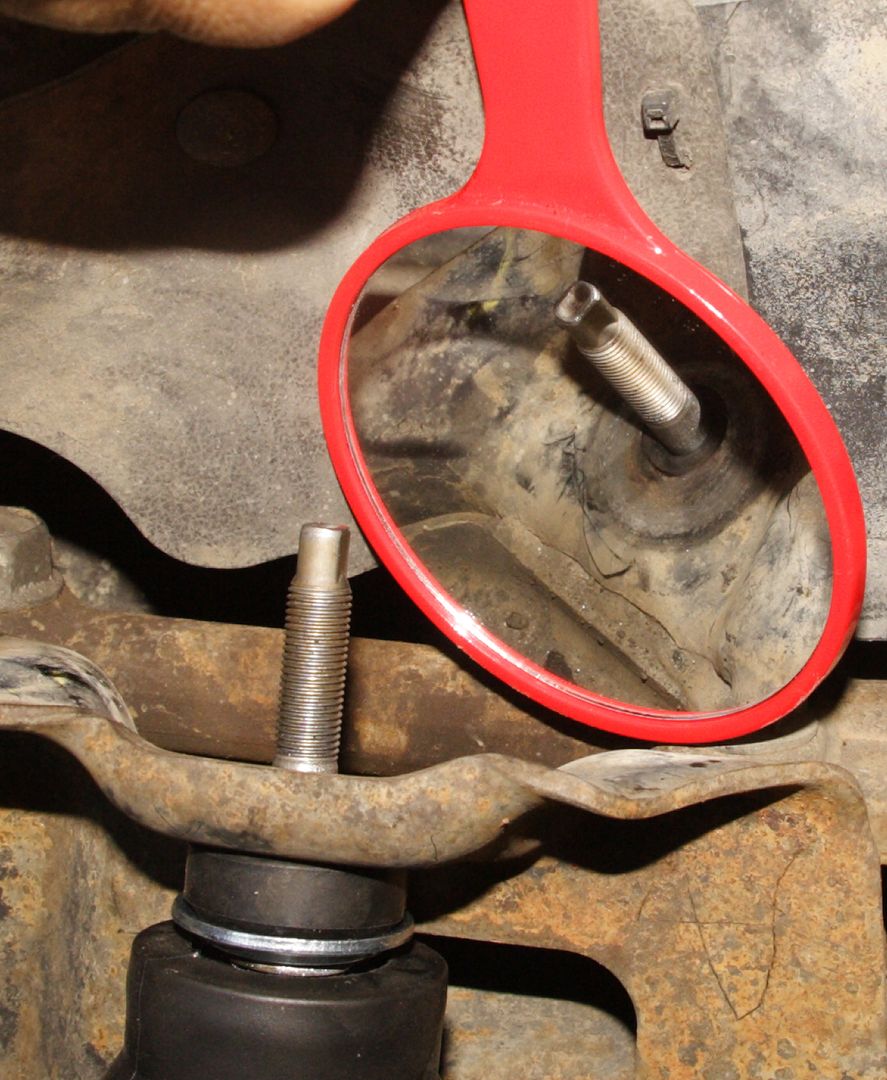
- Ensure that bushing collar is actually centered inside the mounting hole and that stem is centered within the collar before installing upper cushion, washer and nut.
Mounting has deformed from metal-to-metal contact:
Deformity cleaned/flattened:
Collar Centered In Hole:

Damn Right, I'm not insecure - LOL!
__________________
86 4Runner, 22R-Eliable, 5-Speed Manual, dlx. WHAT'S YOURS?
If you want us to help from afar please let us see, hear, feel what you're dealing with.
A picture paints a thousand words.
Toyota components are bullet-proof. Issues often arise from poor wiring, assembly and/or maintenance. Suspect those first.
Next only to our senses, the multi-meter is the most important electrical diagnostic tool. Spend $6 at Harbor Freight or $$$ blindly replacing parts.
|

|
 Reply With Quote Reply With Quote
|
|
11-25-2013, 01:48 PM
|
#17
|
|
Senior Member
|
|
Join Date: Mar 2012
Location: Southern California
Posts: 1,836
|
|
|
Senior Member
Join Date: Mar 2012
Location: Southern California
Posts: 1,836
|
Update25Nov2013
No creaks during my commute on pavement. Will try it on dirt; maybe Anza-Borrego this weekend. Speaking of Anza-Borrego Desert...
Here's the Runner, at home both in Hollywood and the desert - LOL!

Here she was with her long lost sister, another Red 86 4Runner:

And at our camp:

My buddy exploring the top of the mud ridge above.
Happy Thanksgiving
__________________
86 4Runner, 22R-Eliable, 5-Speed Manual, dlx. WHAT'S YOURS?
If you want us to help from afar please let us see, hear, feel what you're dealing with.
A picture paints a thousand words.
Toyota components are bullet-proof. Issues often arise from poor wiring, assembly and/or maintenance. Suspect those first.
Next only to our senses, the multi-meter is the most important electrical diagnostic tool. Spend $6 at Harbor Freight or $$$ blindly replacing parts.
|
|
|
Reply With Quote
|
|
12-29-2013, 05:24 PM
|
#18
|
|
Member
|
|
Join Date: Dec 2013
Location: Meridian ID
Posts: 379
|
|
|
Member
Join Date: Dec 2013
Location: Meridian ID
Posts: 379
|
think ill have to use a few of your ideas once i get mine running..... (got to sell my samurai first)
|
|
|
Reply With Quote
|
|
06-19-2014, 03:37 AM
|
#19
|
|
Senior Member
|
|
Join Date: Mar 2012
Location: Southern California
Posts: 1,836
|
|
|
Senior Member
Join Date: Mar 2012
Location: Southern California
Posts: 1,836
|
How the 22R-E Charging System Works - Updated with Google Photos
UPDATED WITH GOOGLE PHOTOS
(I'm posting this here so it will be easier to refer to, rather than re-typing explanation into various threads that need the explanation.)
Here's the 22 RE-liable schematic:

Close-up of alternator pin-outs is here:
 White "B" wire (heavy gauge) to the 80amp fuse
This is the battery charging wire.
From FSM:
With engine from idle to 2000RPM, Voltages at B should be:
13.9 to 15.1 V @25°C (77°F)
13.5 - 14.3V @115°C (239°F)
Temp is probably engine compartment temp.
White "S" to the 40amp (always-on) fuse
This senses actual battery voltage and should be connected as close as possible to battery positive. However, the way it is wired as-built (merely spliced with the B wire downstream of the Fusible link) it will read exactly alternator output and not battery output it is supposed to sense. Anyway, it will only be a small fraction of a volt off; no big deal.
Red "IG" to the Engine fuse
This provides field current to "seed" the charging. This should have steady 12V when ignition is on (coming from Engine fuse). If no 12V here or if this voltage is erratic or engine fuse blows, trace wiring back to Engine Fuse, to "E" battery positive wire from fuse block, and verify that your backup switch or wiring is not shorting to transmission body as shown here.
Yellow "L" to the Charge Warning Light
This should be +12V when alternator is working properly (B voltage 13.5V-15.1V). If B voltage goes lower or higher that that range "L" will go low, and provide ground to negative side of the Charge Light causing it to come on.
(Unfortunately, it also provides ground to Brake Light and A/T Oil temp light- making it confusing to many.)
Most accessible place to measure "L" voltage is here:

ALTERNATOR HARNESS AND MORE VOLTAGE TESTS OF NORMALLY-FUNCTIONING CHARGING SYSTEM: The engine compartment wiring harness has an "intermediate" connector along the left inner fender, near the power steering pump, shown below:  Pin-outs are as follows:


__________________
86 4Runner, 22R-Eliable, 5-Speed Manual, dlx. WHAT'S YOURS?
If you want us to help from afar please let us see, hear, feel what you're dealing with.
A picture paints a thousand words.
Toyota components are bullet-proof. Issues often arise from poor wiring, assembly and/or maintenance. Suspect those first.
Next only to our senses, the multi-meter is the most important electrical diagnostic tool. Spend $6 at Harbor Freight or $$$ blindly replacing parts.
Last edited by RAD4Runner; 12-14-2017 at 11:35 PM.
Reason: Updated with Google Photos
|
|
|
Reply With Quote
|
|
06-21-2014, 09:55 PM
|
#20
|
|
Member
|
|
Join Date: Mar 2014
Location: Raleigh NC
Posts: 123
|
|
|
Member
Join Date: Mar 2014
Location: Raleigh NC
Posts: 123
|
Thanks for the grille mount tip. I pulled my grill today to replace a bulb that got on the wrong side of a rock and the headlight surround was cracked so I yanked the whole grill but it was like most of the rest of the truck , a hodge podge of clips, broken clips, and rusted/stripped screws. I will try this mod when I am done improving the grille some. I take it fro your use of MMs and diagrams your an engineer. Just a hunch but after reading your first two posts I thought I was looking at a note from one of my co-workers 
|
|
|
Reply With Quote
|
|
06-22-2014, 07:09 PM
|
#21
|
|
Senior Member
|
|
Join Date: Mar 2012
Location: Southern California
Posts: 1,836
|
|
|
Senior Member
Join Date: Mar 2012
Location: Southern California
Posts: 1,836
|
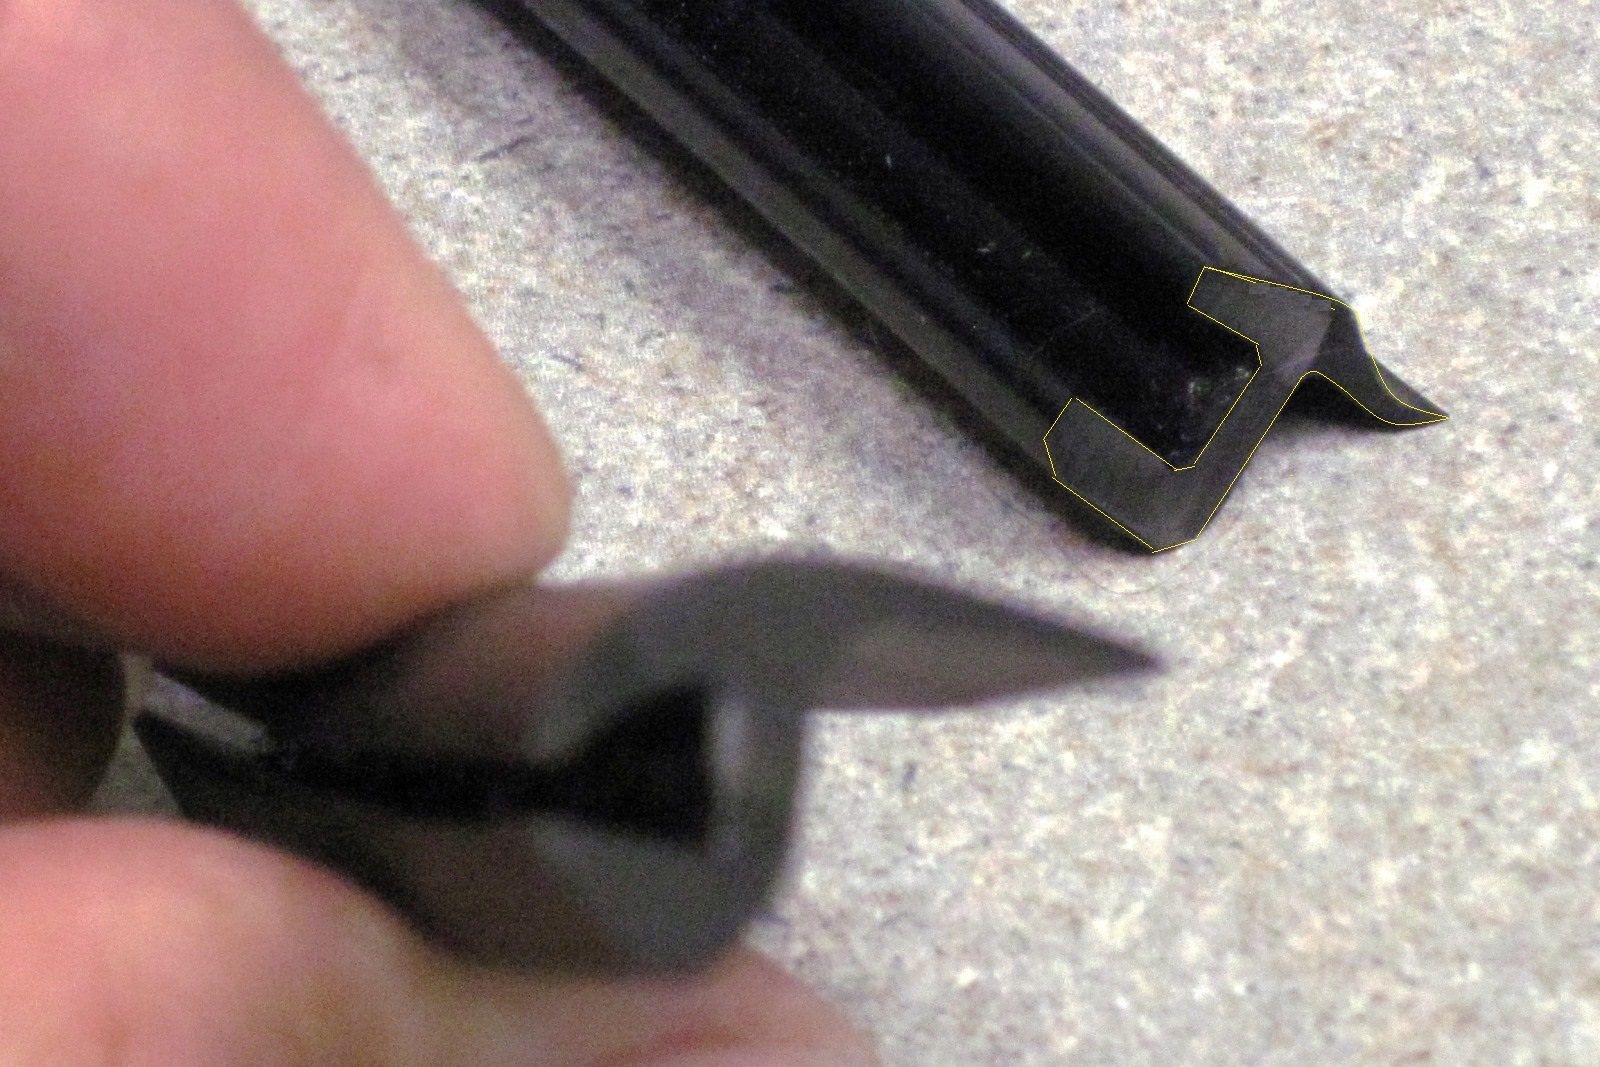
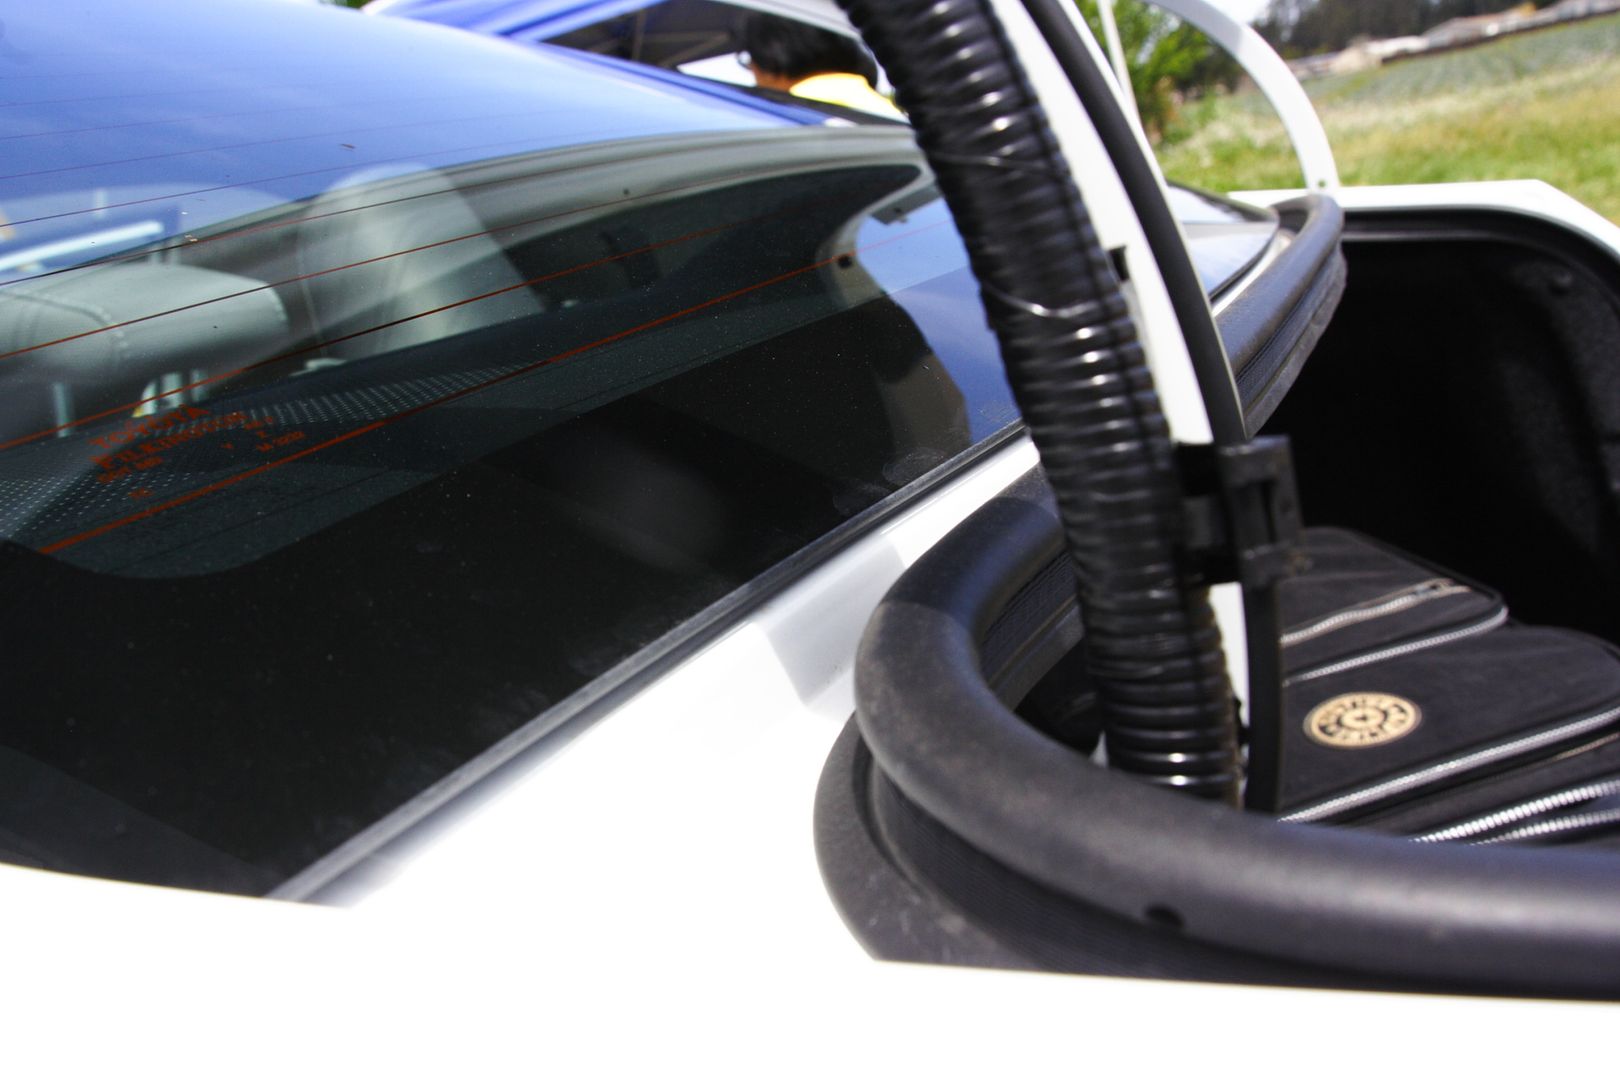
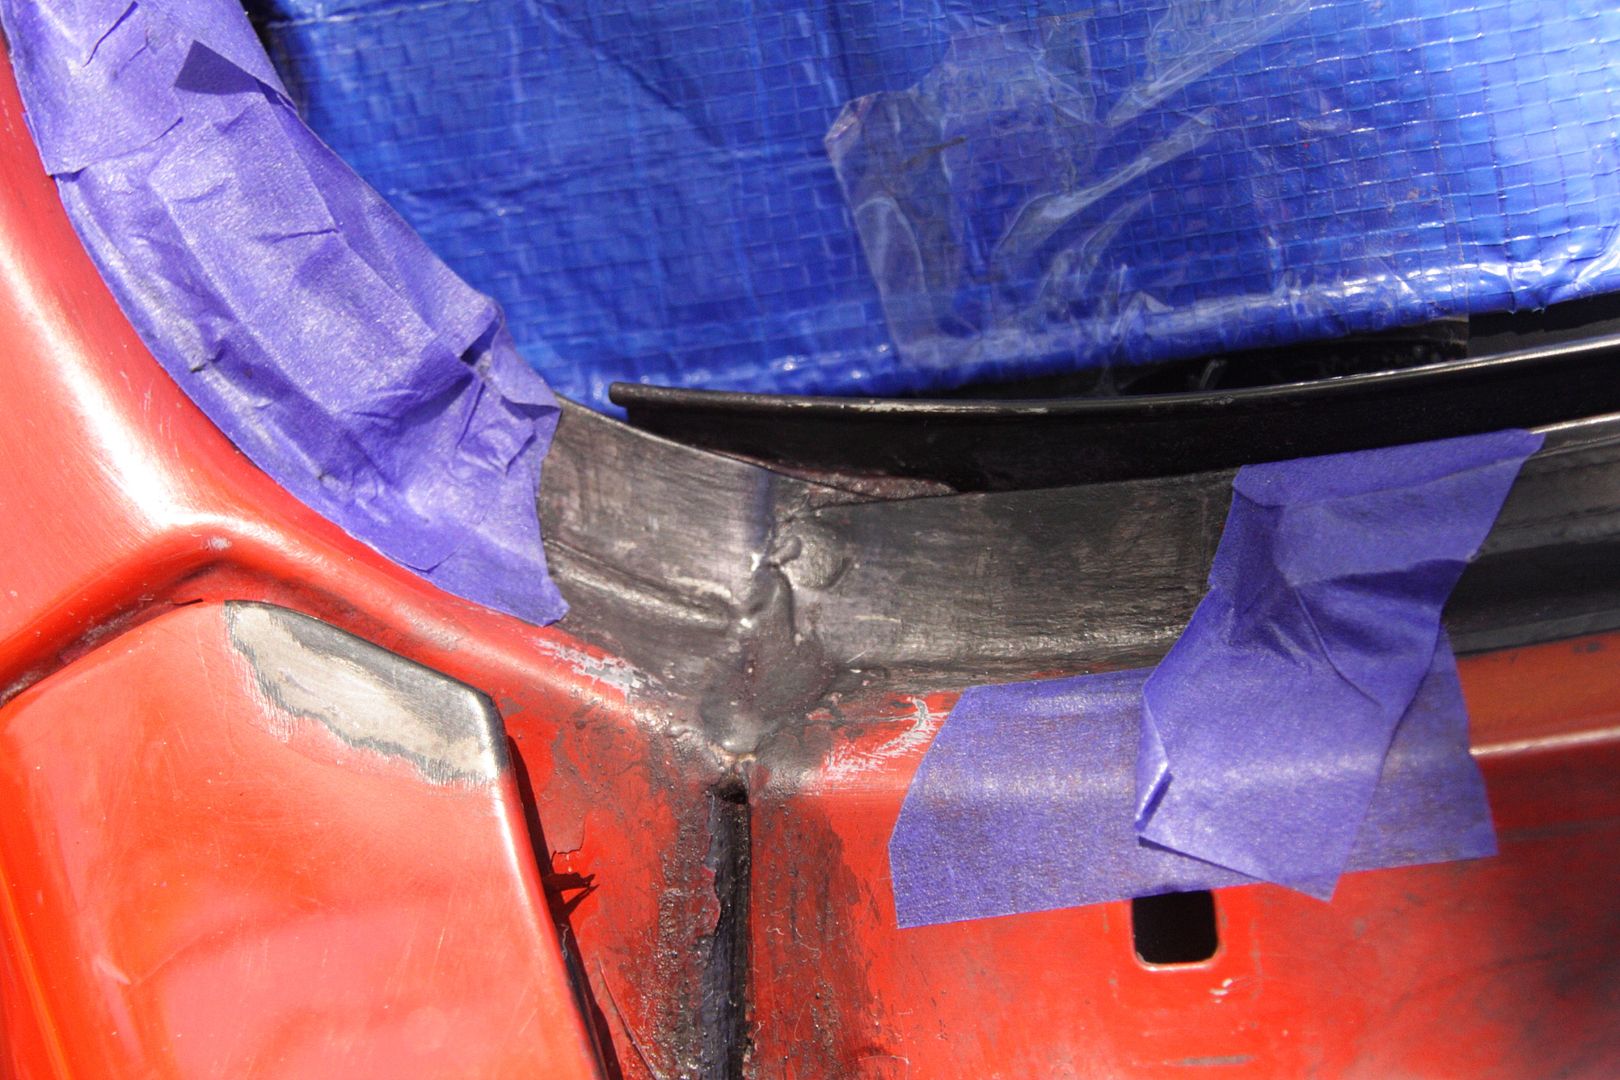
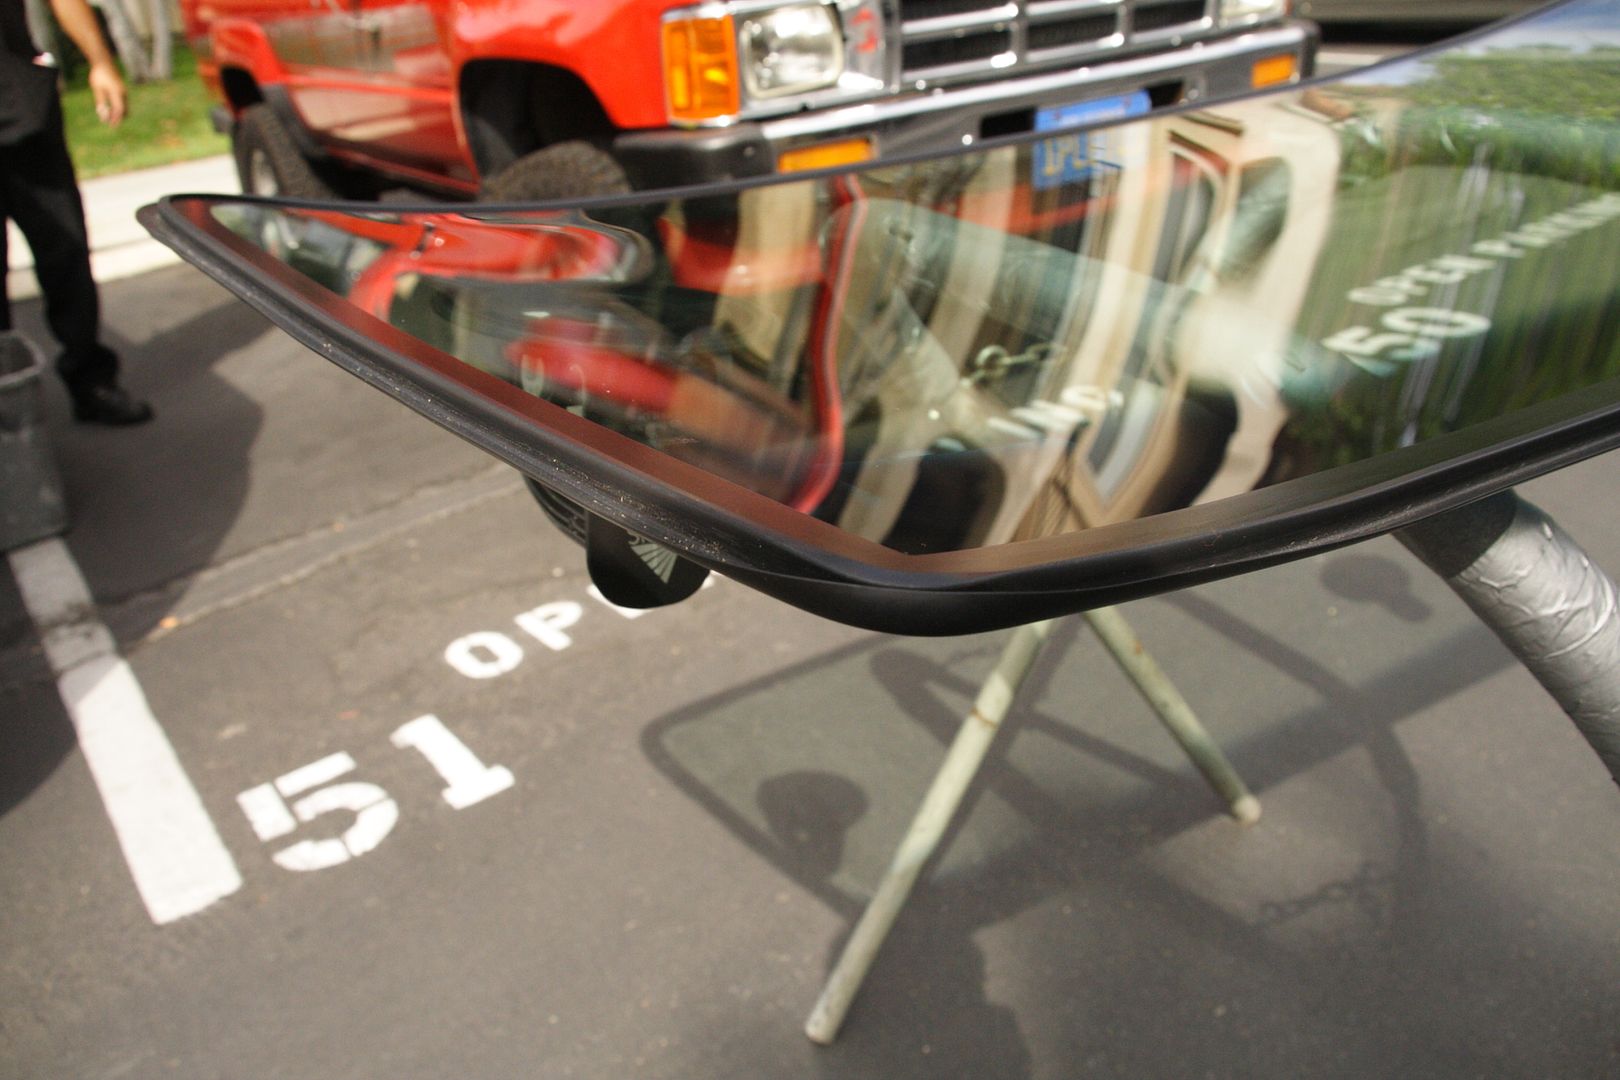
Windshield Replacement and Trim Delete
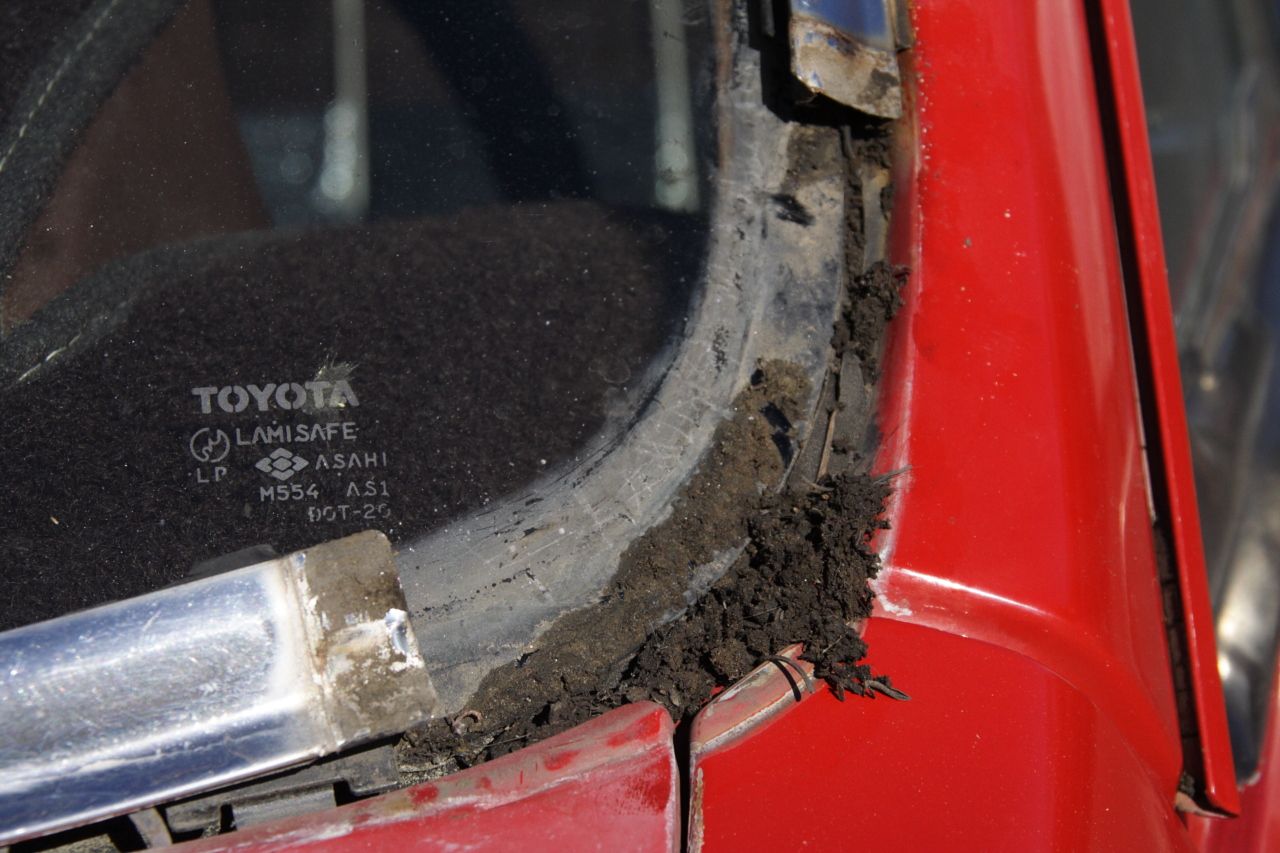
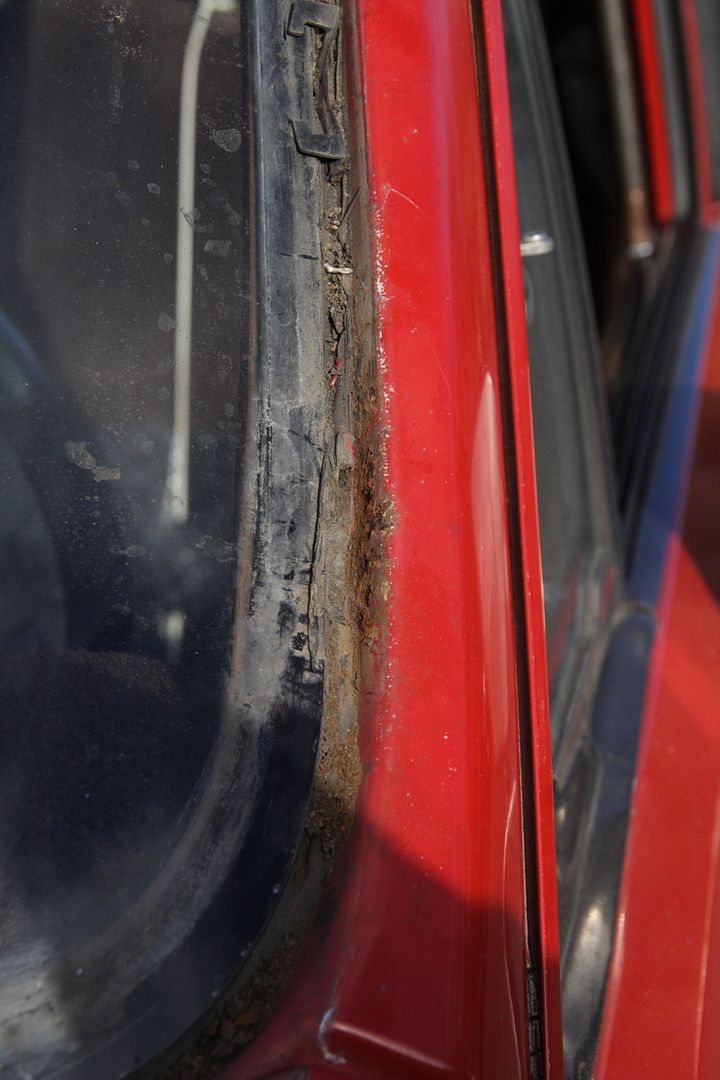
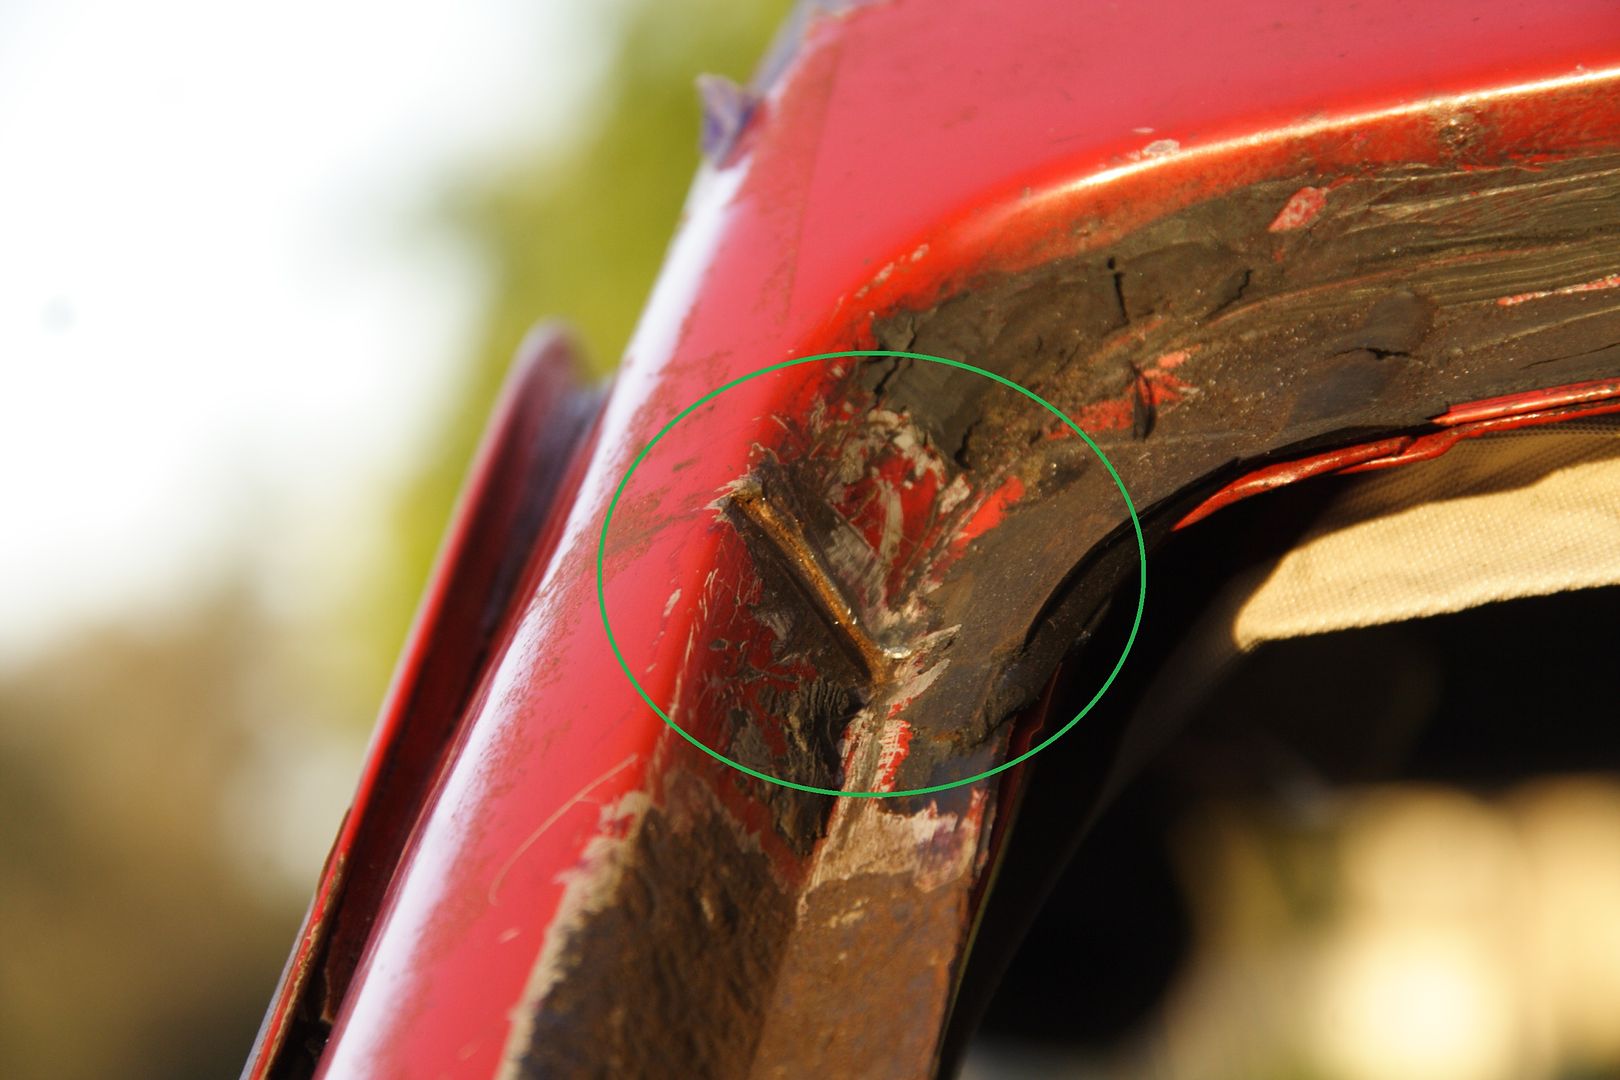
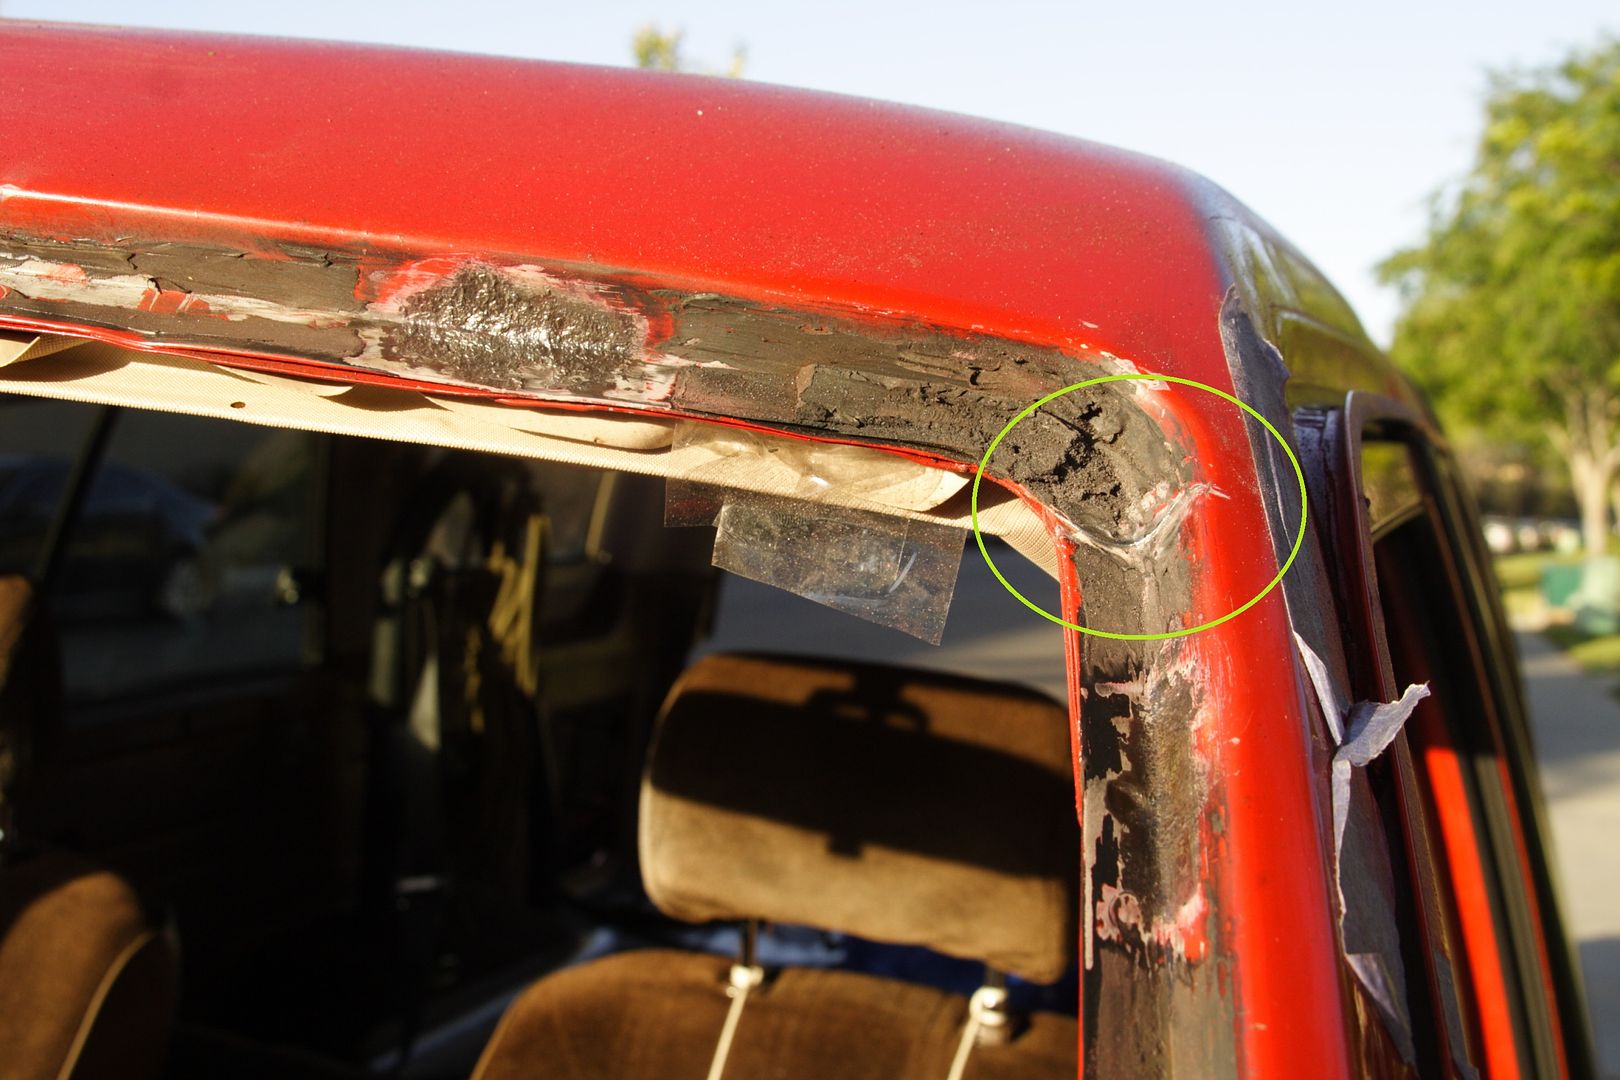
The Problem: - Chrome trim collects debris, catches and retains water, and worse yet, saltwater from ocean sports equipment.
- Water prevented from draining or evaporation by being absorbed by debris and hidden behind the chrome trim soaks area around windshield. This hastens rusting, possibly by galvanic corrosion: 2 Different metals in an electrolyte (like saltwater or water with debris dissolved in it)
See how much debris it collects?
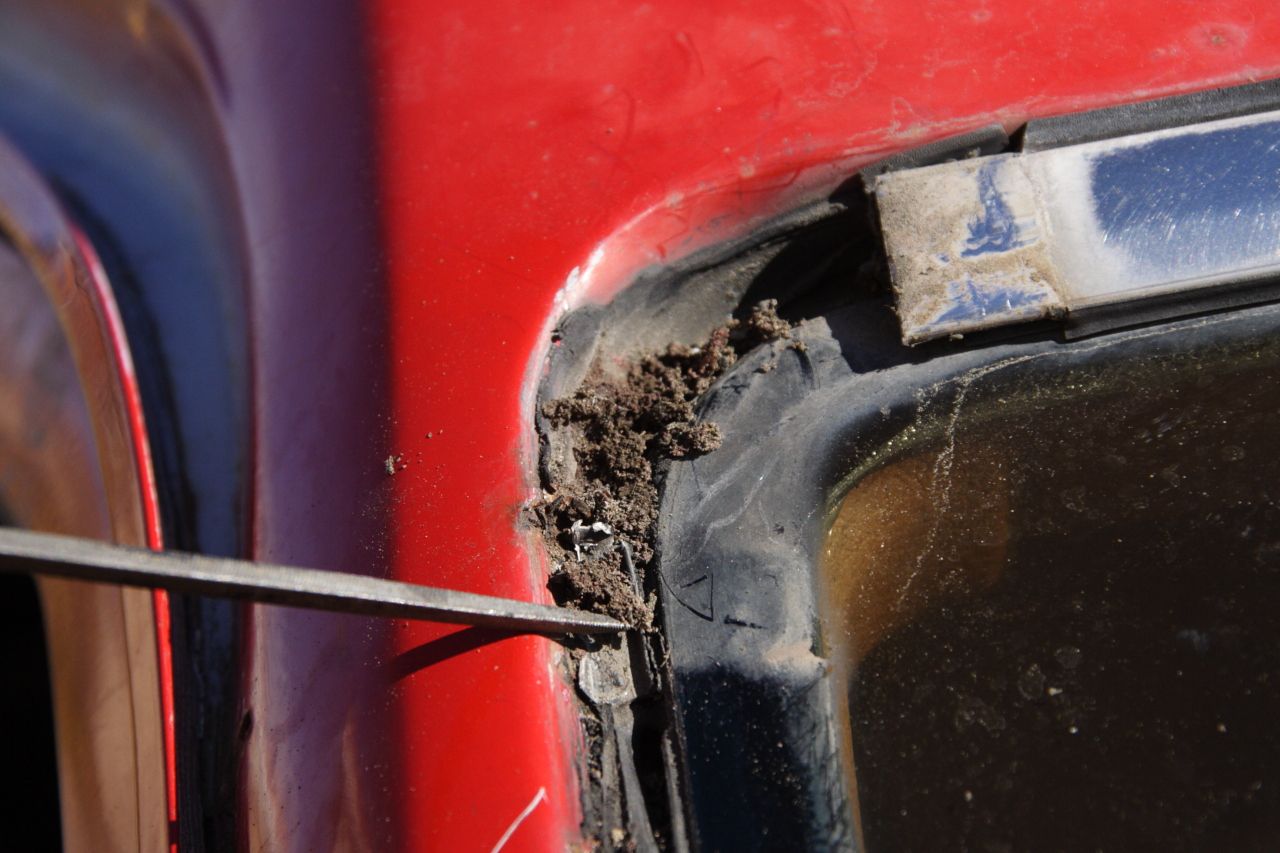
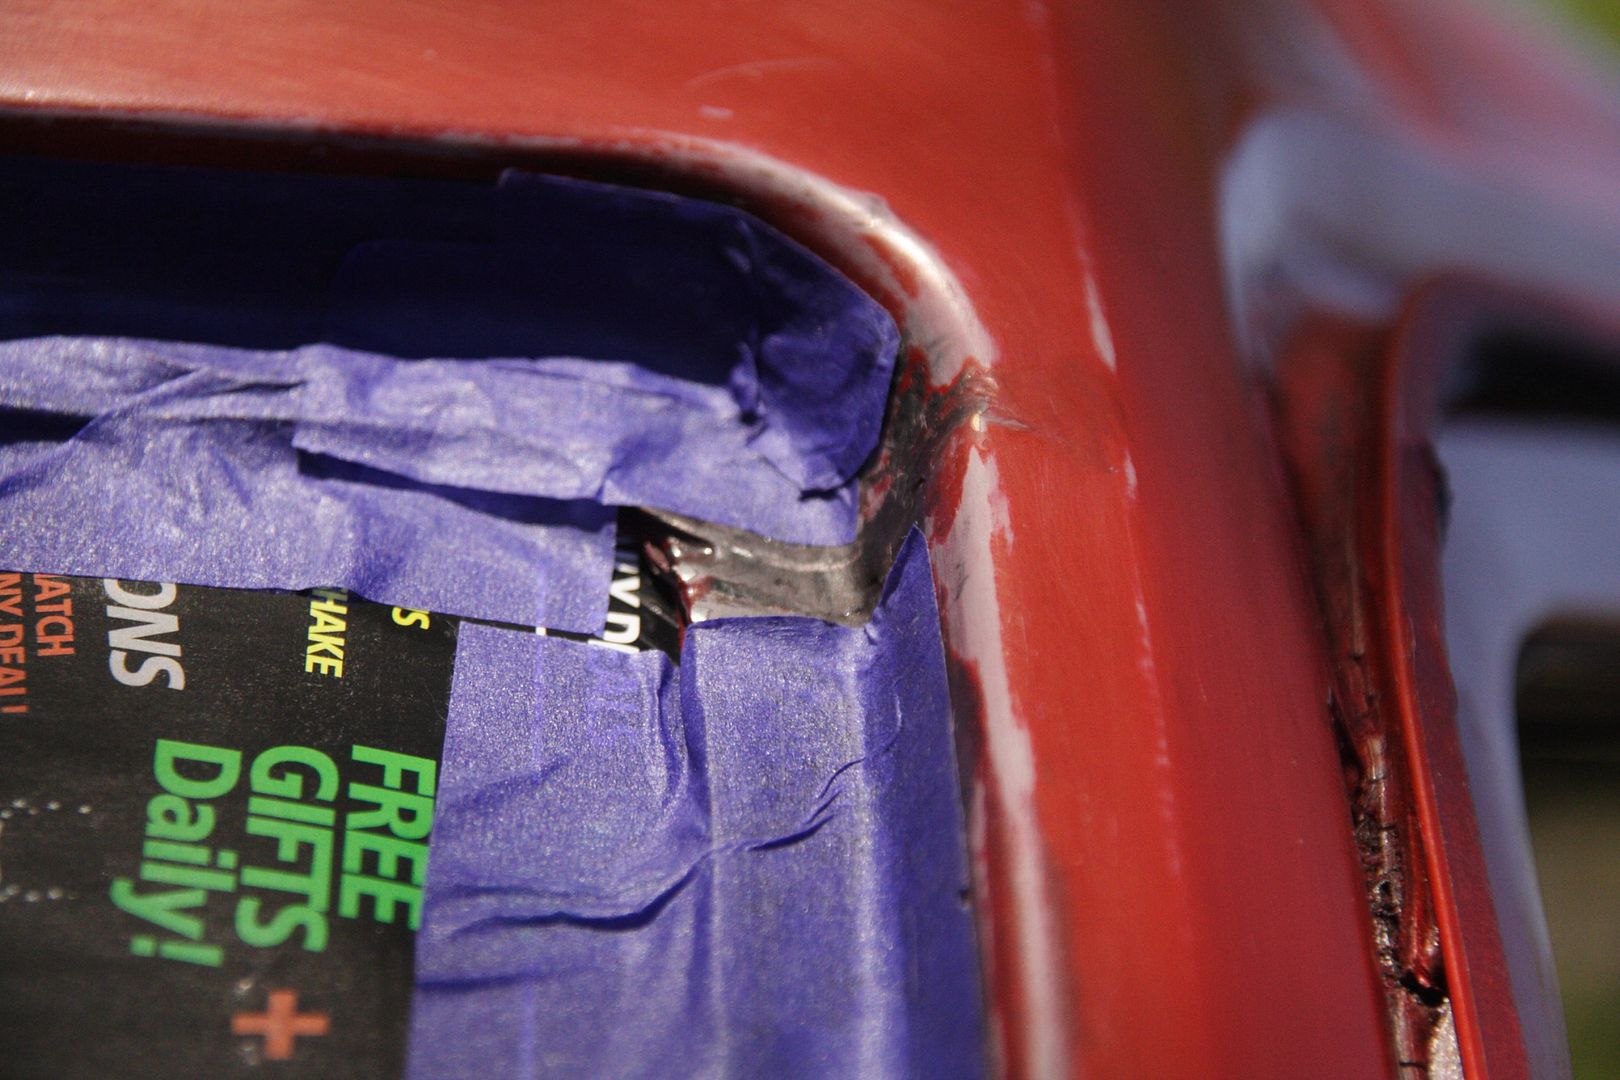
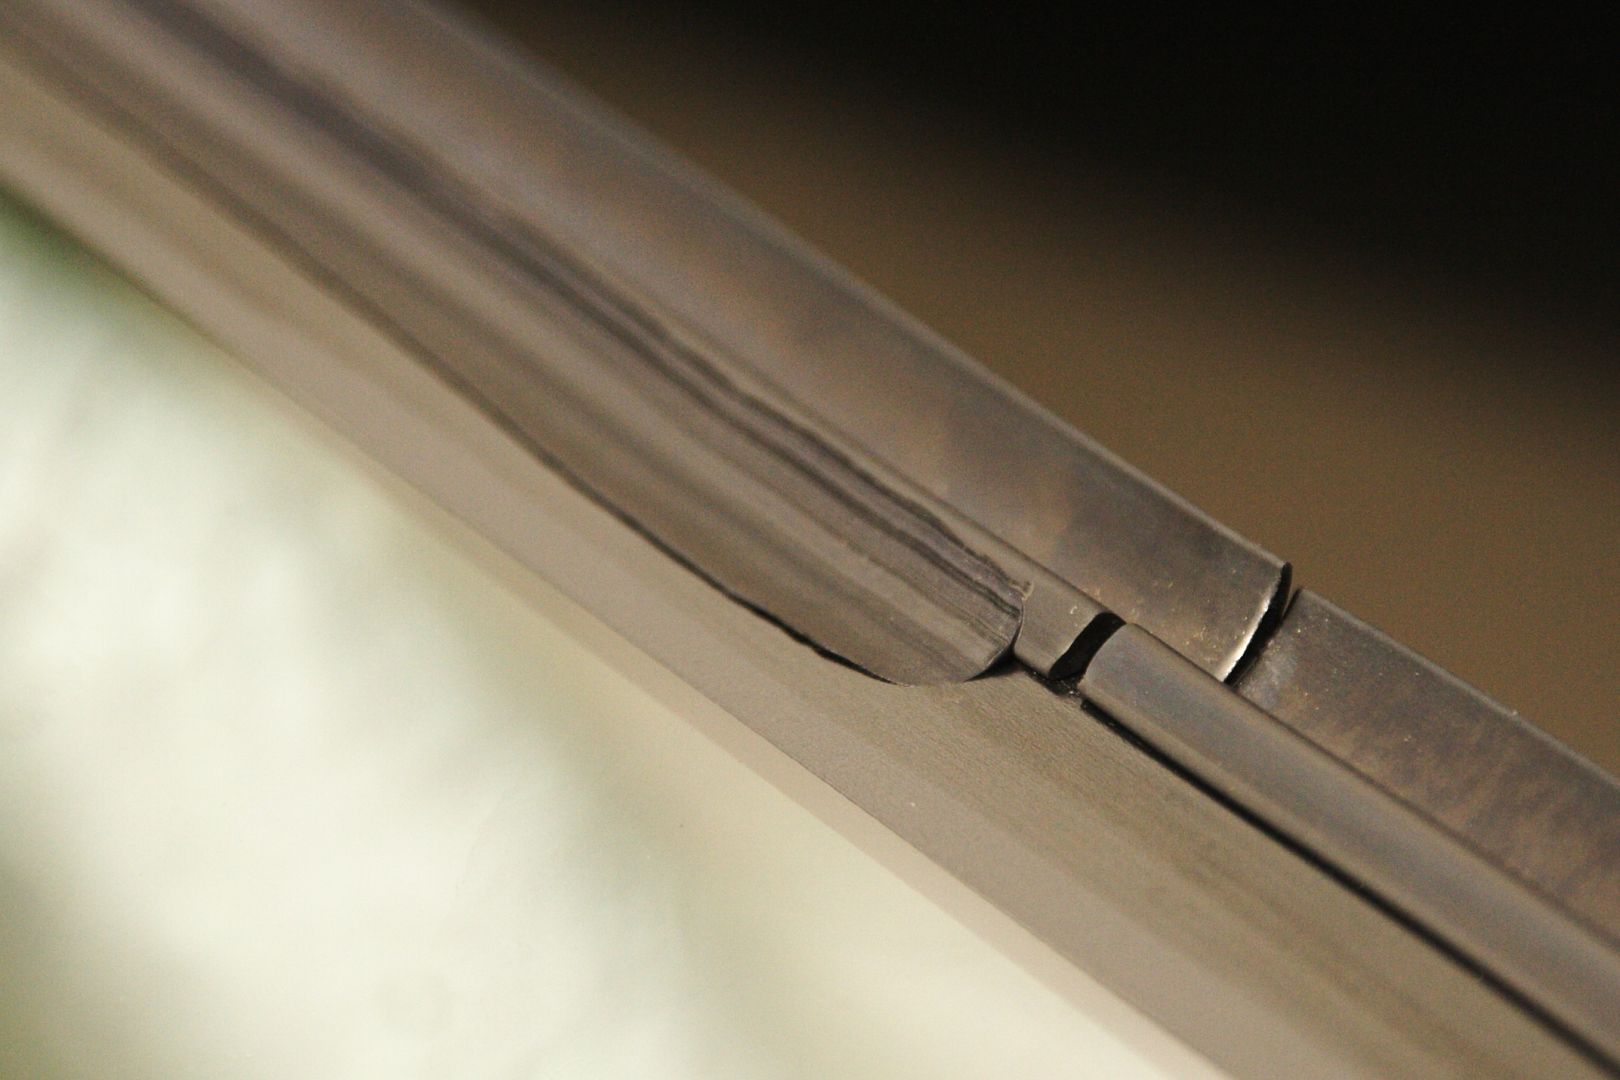
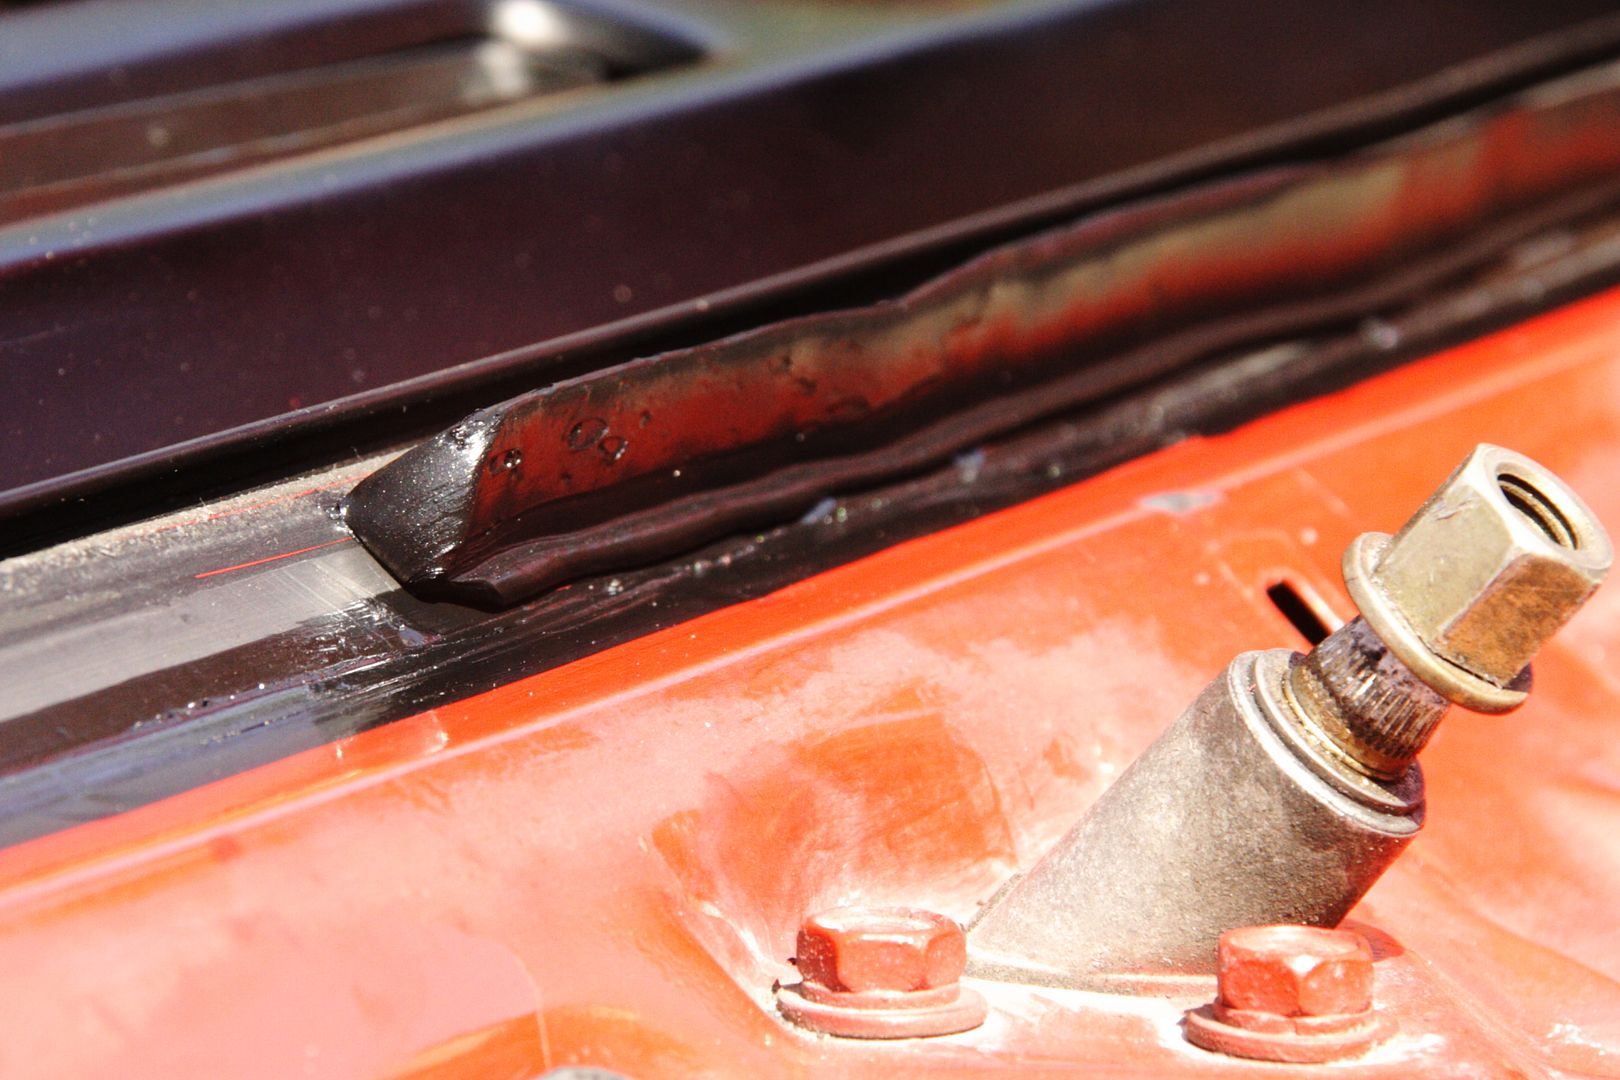
Rust is worst around this clip (Perhaps because there is a thin gap between the clip and the body that traps water):
Clip above is near top corners and bottom corners:
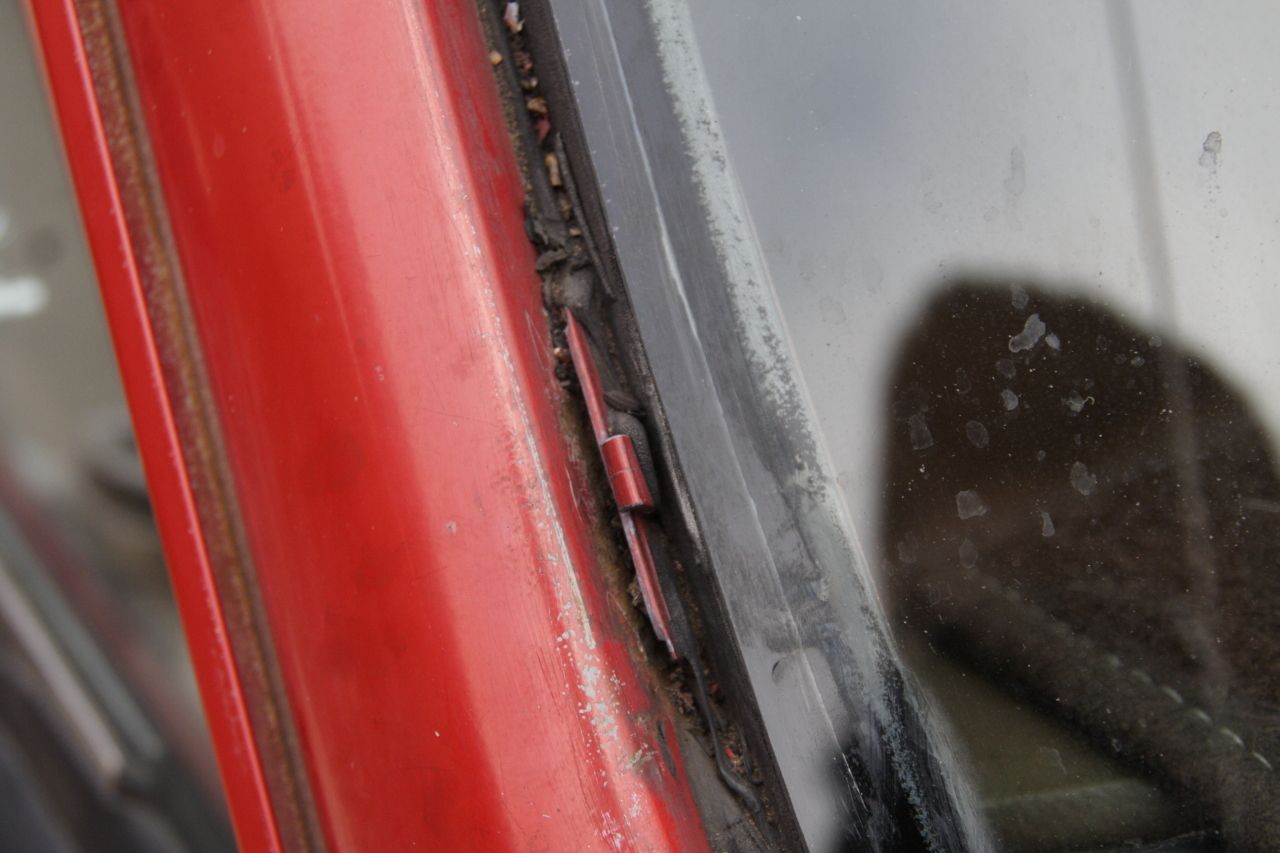
For some reason, the areas near this type of clip are not as bad (as you can see, gap between this and body is bigger, less likely to trap water):
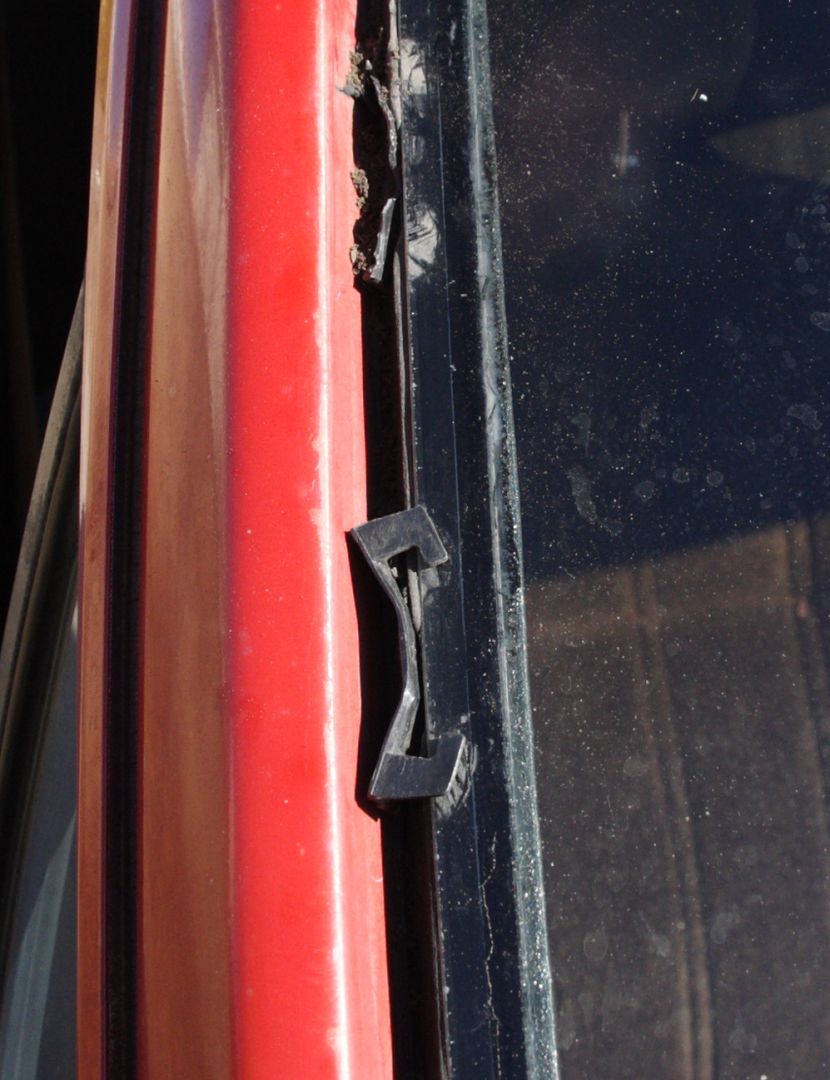
The clips on bottom that hold the trim look like this:

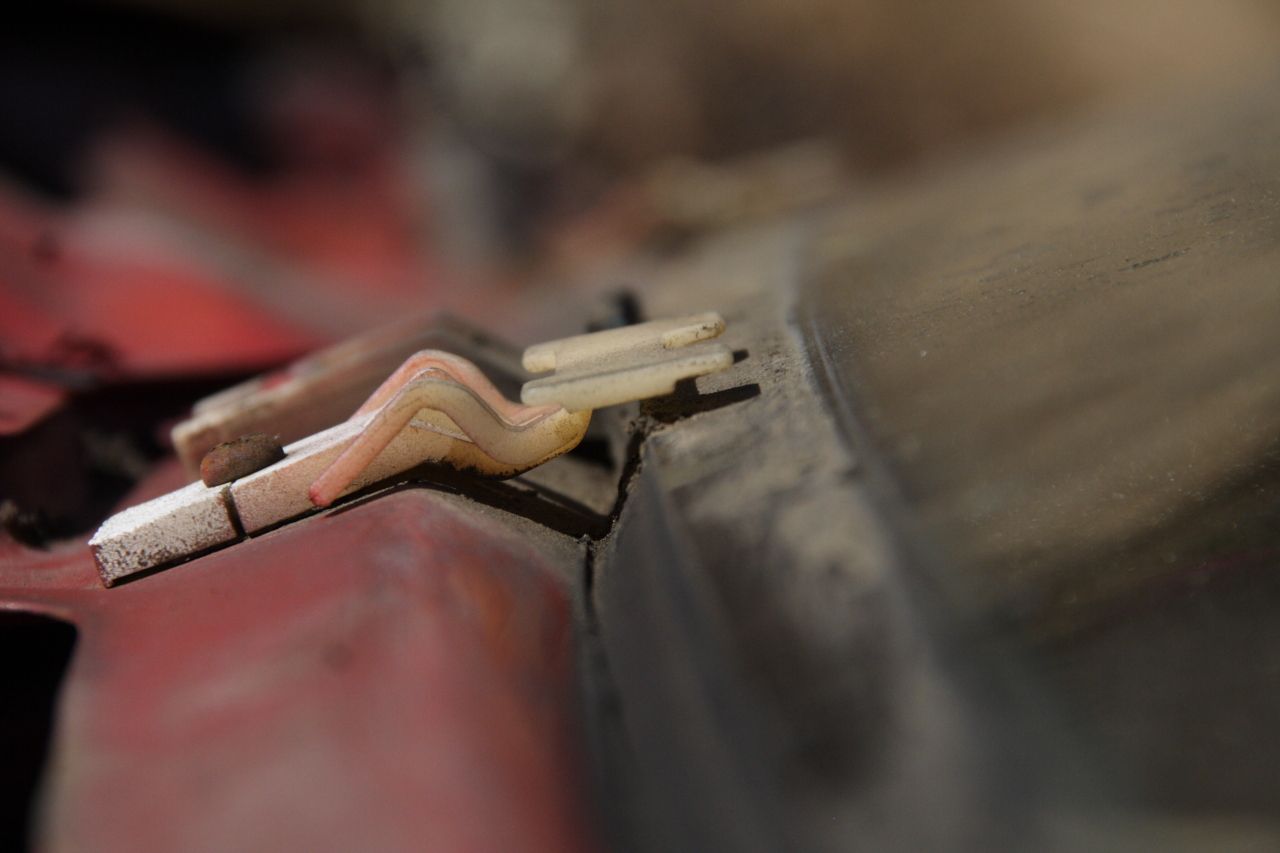
Note that white clip above does not touch windshield. On second thought this might actually hold the rear edge of cowl cover in place. Too late for me to check because I already threw this way, thinking it's for the chrome trim  ... Oh well.
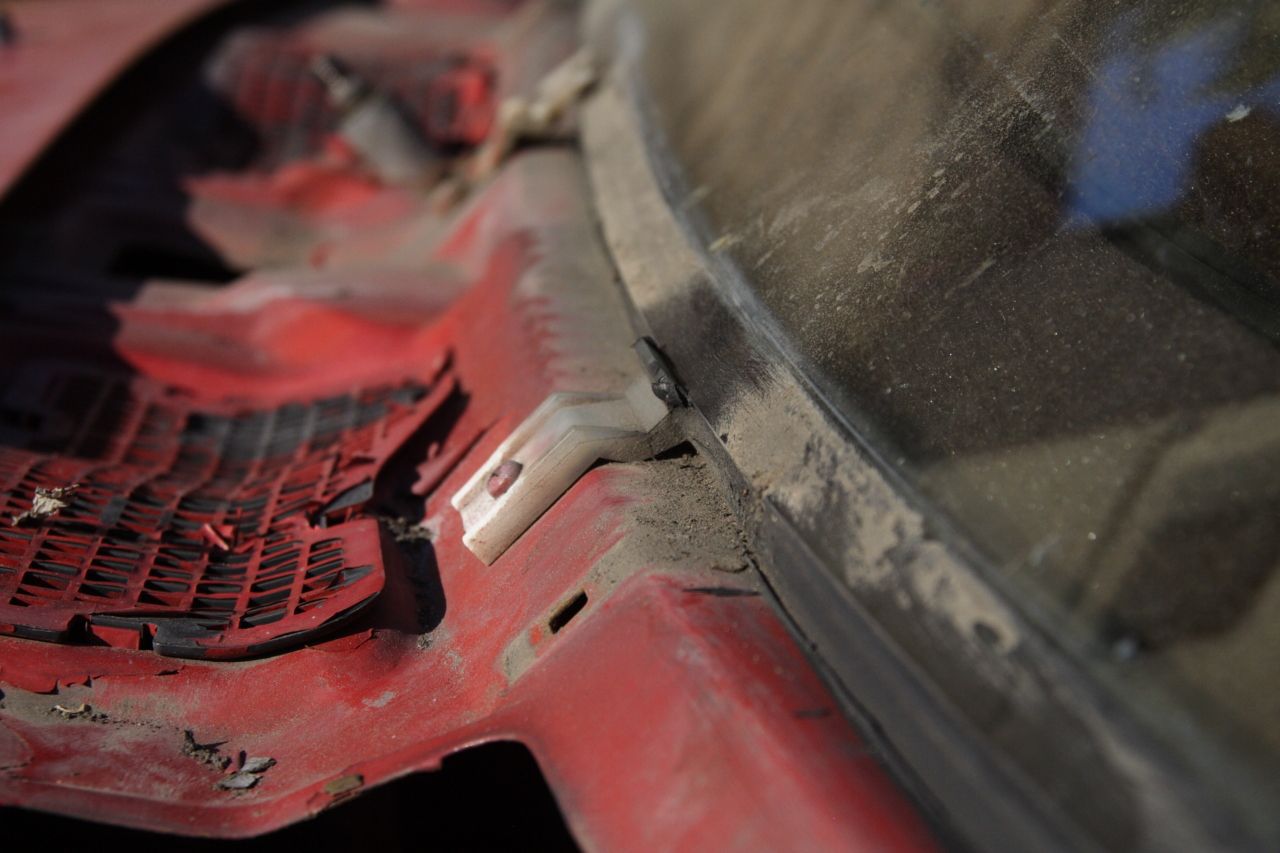
The windshield rests on two of this white clip below, so this is probably structural. Needed to keep windshield in position when installing:
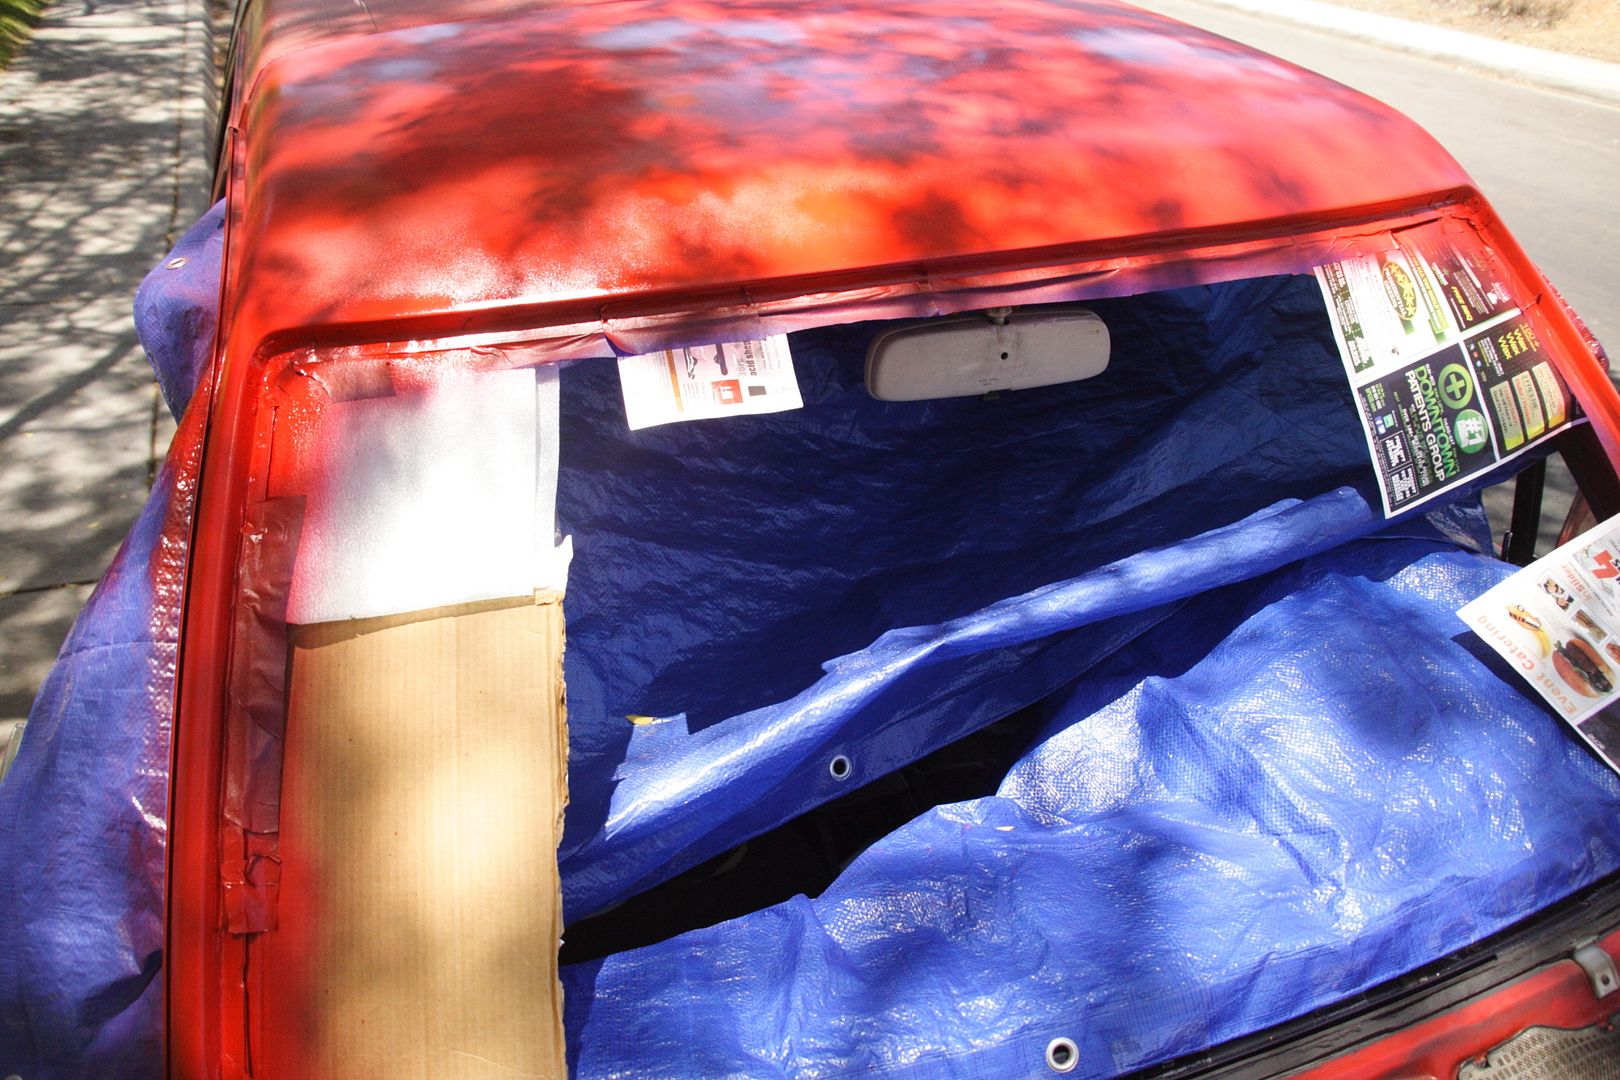
Update 20140304:
Safelite has this kind of trim. Although I want to seal with silicone this type trim is good because it will protect edge of glass from accidental stresses. My glass cracked after I pulled chrome trim and dug clips out. BE CAREFUL!
Would install like this:
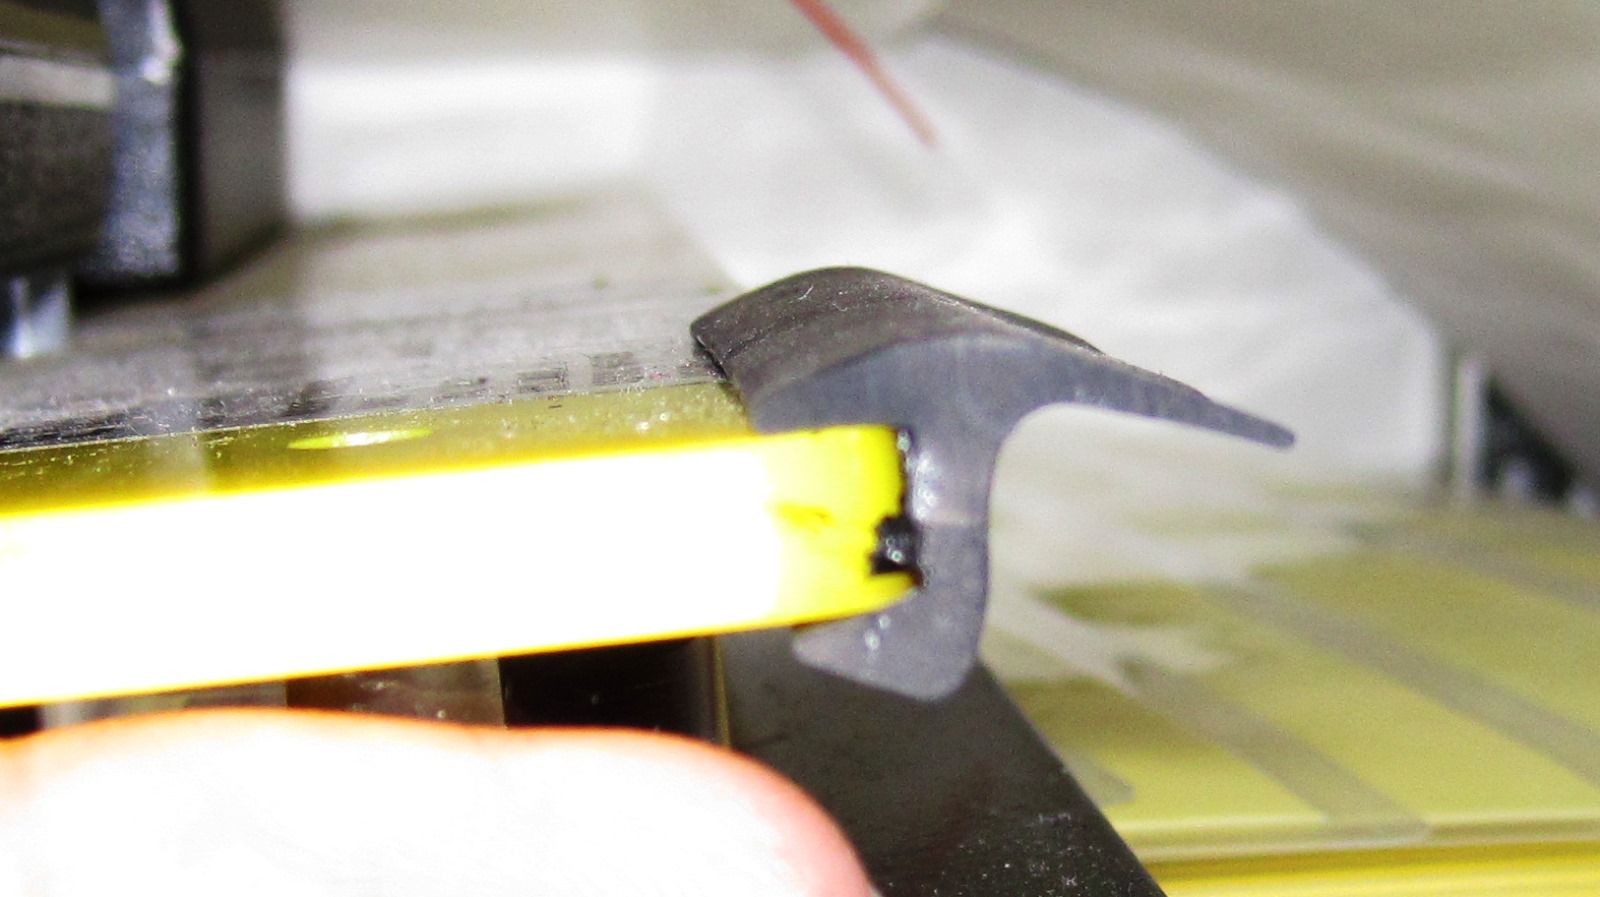
As you can see, probably needs to be installed on glass before glass is attached, therefore would only work If glass were removed (like in my case).
This is how I would fill gap with silicone:
Mark where 'flap" contacts body (around windshield).
Mask with masking tape for cleaner silicone coverage, and ease in removing of excess silicone.
Lift "flap/wing" up and out with finger, Inject silicone bead to fill all gaps.
Inject silicone to fill gap.
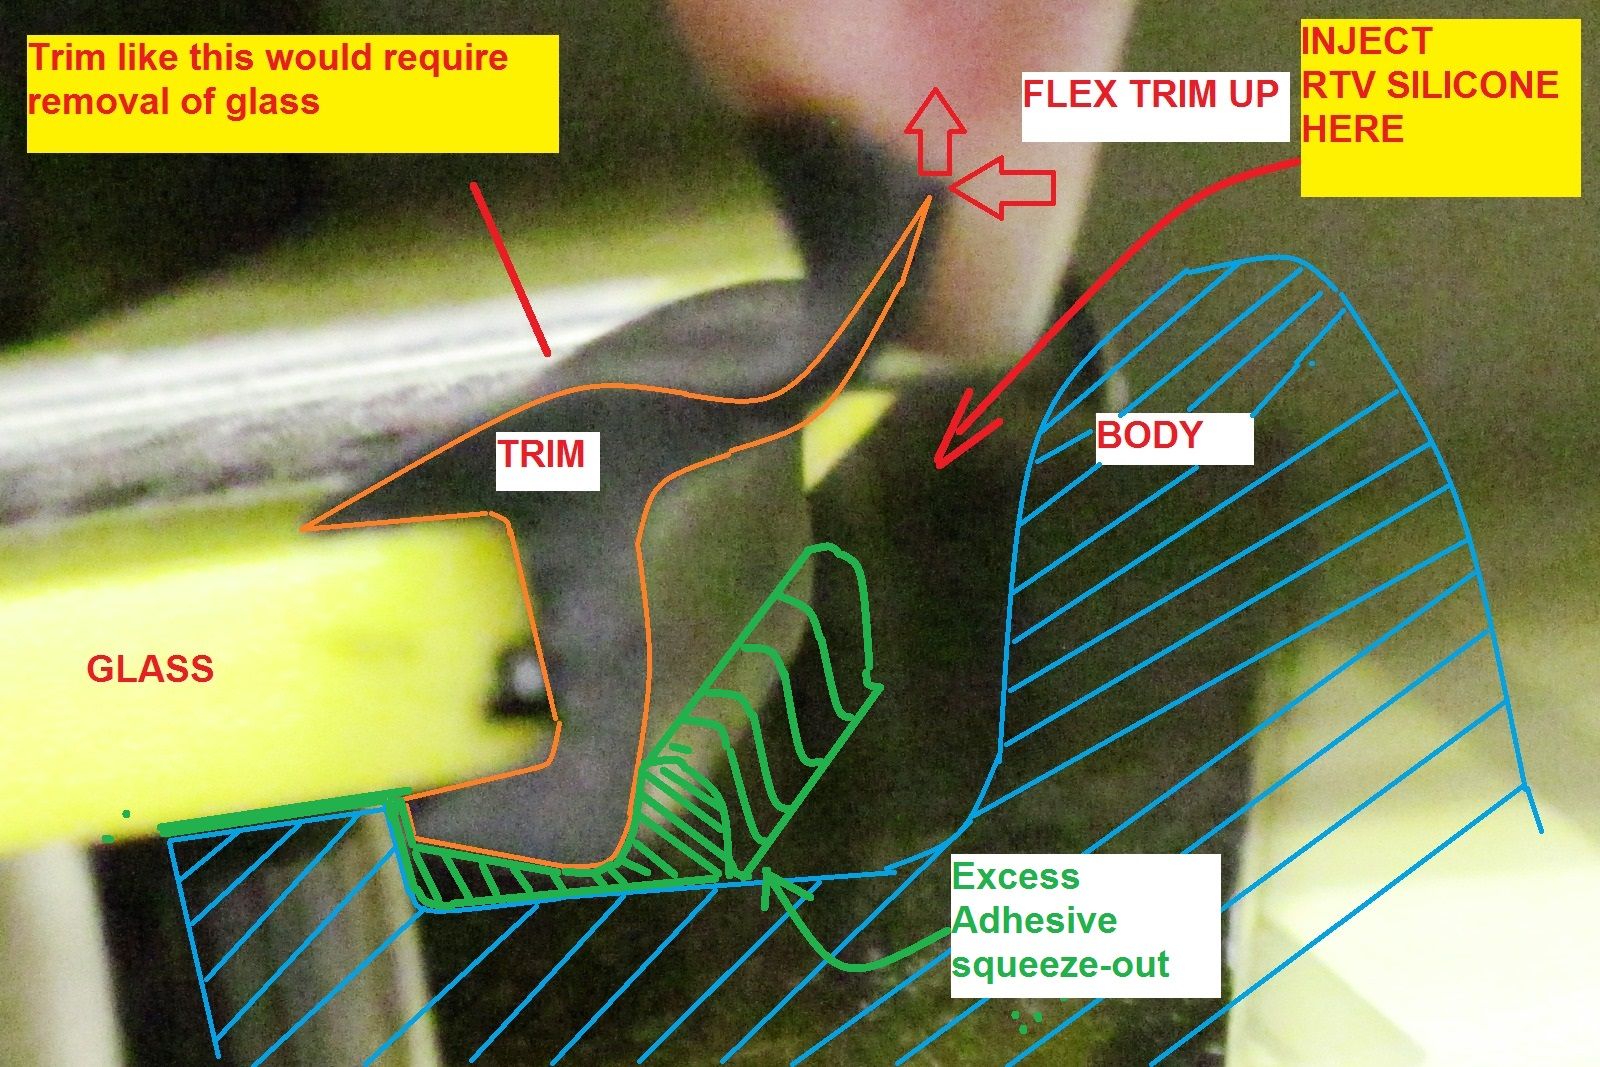
Or, to keep it simple although not pretty, cut wing/flap off with X-Axto knife, then fill gap with silicone.
Plan is getting more mature...
I want my windshield installed like a Corolla's rear window... No trim to retain moisture and catch debris. Easy to clean.

A trim attached only to edge of glass, but not touching body/paint like in sketch above ^^^ is still an option to protect glass edge from accidental stresses.
__________________
86 4Runner, 22R-Eliable, 5-Speed Manual, dlx. WHAT'S YOURS?
If you want us to help from afar please let us see, hear, feel what you're dealing with.
A picture paints a thousand words.
Toyota components are bullet-proof. Issues often arise from poor wiring, assembly and/or maintenance. Suspect those first.
Next only to our senses, the multi-meter is the most important electrical diagnostic tool. Spend $6 at Harbor Freight or $$$ blindly replacing parts.
|
|
|
Reply With Quote
|
|
06-22-2014, 07:13 PM
|
#22
|
|
Senior Member
|
|
Join Date: Mar 2012
Location: Southern California
Posts: 1,836
|
|
|
Senior Member
Join Date: Mar 2012
Location: Southern California
Posts: 1,836
|
Roof Rack Project Using Rail from Chevy Blazer
I'm using roof rack from certain year Blazer.
Will post dimensions soon.
Today, while waiting for paint prep for windshield surround to cure, I verified dimensions and sanded rack feet to follow roof contours...
__________________
86 4Runner, 22R-Eliable, 5-Speed Manual, dlx. WHAT'S YOURS?
If you want us to help from afar please let us see, hear, feel what you're dealing with.
A picture paints a thousand words.
Toyota components are bullet-proof. Issues often arise from poor wiring, assembly and/or maintenance. Suspect those first.
Next only to our senses, the multi-meter is the most important electrical diagnostic tool. Spend $6 at Harbor Freight or $$$ blindly replacing parts.
|
|
|
Reply With Quote
|
|
06-23-2014, 11:29 PM
|
#23
|
|
Senior Member
|
|
Join Date: Mar 2012
Location: Southern California
Posts: 1,836
|
|
|
Senior Member
Join Date: Mar 2012
Location: Southern California
Posts: 1,836
|
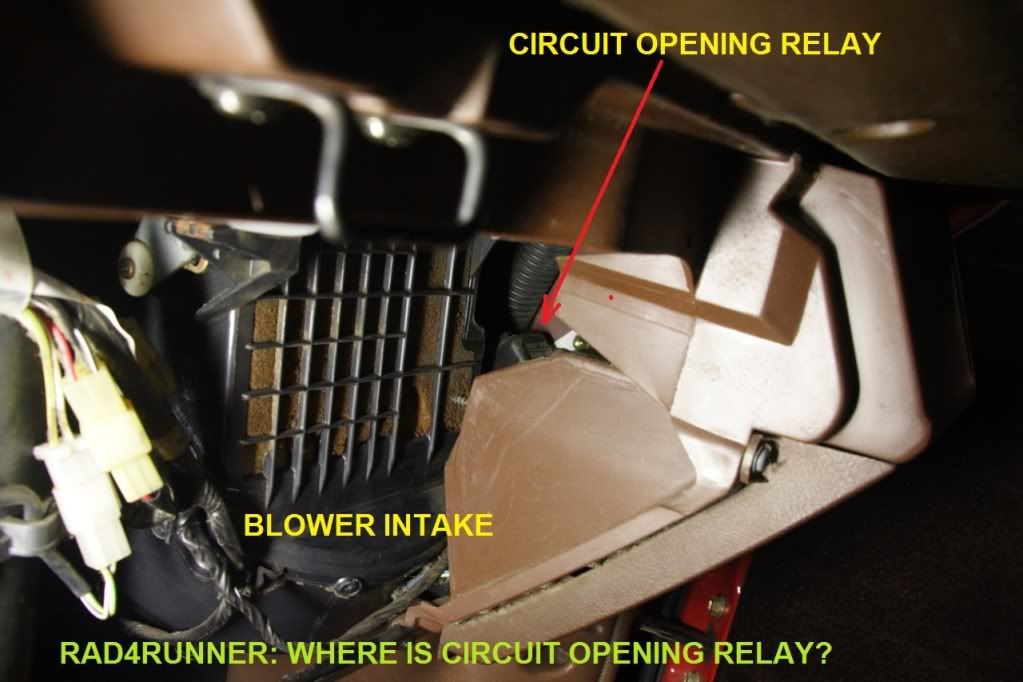
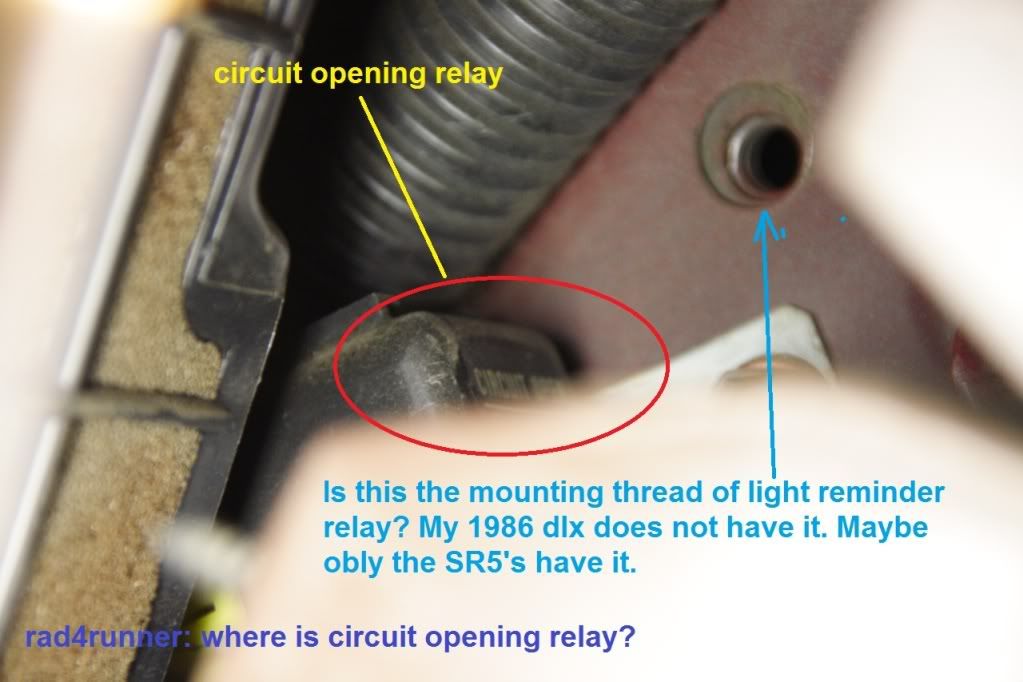
How the Circuit-Opening Relay Works
The Circuit opening relay is a safety feature. If something happens to the truck where engine stops running, the fuel pump needs to stop pumping fuel out. The COR takes care of this...
Circuit Opening Relay (COR) has two normally-open contacts (open when no power is applied). The relay prevents unintended fuel flow (i.e., when there is no ignition/combustion/airflow). COR is the thing that you'd hear click behind the glovebox when you're trying to start a first gen 4Runner. However, it does not affect cranking system.
(In 1986 Runner) COR is located behind glove compartment near speaker and blower motor. Someone had posted about moisture in COR. Possible because:
a) It's near some body seams,
b) Its below where windshield joins the frame- there could be a leak there, and
c) It's near right side wheelwell, where there could be leaks. There are 2 grommets there. One for engine harness, one for antenna. Check for leaks.
MAF-COR-Fuel pump circuit is below. Coil 1 of COR is energized by IGN switch while in START position. Once airflow is established due to combustion, MAF contacts provide ground to coil 2 of COR, keeps COR energized and its contacts closed.
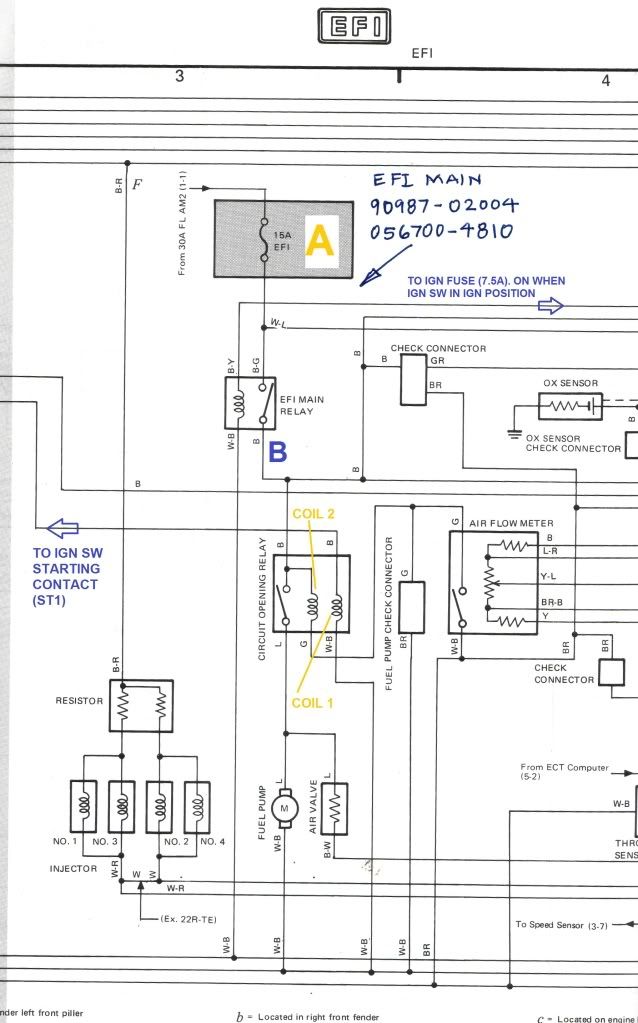

If you suspect MAF malfunction or to test IF fuel pump is working, with Ignition ON, jump terminals of Fuel Pump Check Connector (below. brown and green wires lead to connector). This will bypass MAF contacts and connect fuel pump directly to 12V from EFI relay. You should hear / feel fuel pump run.

NOTE TO SELF:
Pics on Fuel System Photos by rad4runner | Photobucket
Keywords: C.O.R. circuit-opening, how it works
__________________
86 4Runner, 22R-Eliable, 5-Speed Manual, dlx. WHAT'S YOURS?
If you want us to help from afar please let us see, hear, feel what you're dealing with.
A picture paints a thousand words.
Toyota components are bullet-proof. Issues often arise from poor wiring, assembly and/or maintenance. Suspect those first.
Next only to our senses, the multi-meter is the most important electrical diagnostic tool. Spend $6 at Harbor Freight or $$$ blindly replacing parts.
Last edited by RAD4Runner; 05-07-2018 at 12:48 AM.
|
|
|
Reply With Quote
|
|
06-26-2014, 08:44 PM
|
#24
|
|
Senior Member
|
|
Join Date: Mar 2012
Location: Southern California
Posts: 1,836
|
|
|
Senior Member
Join Date: Mar 2012
Location: Southern California
Posts: 1,836
|
Deleting Windshield Chrome Trim (aka-rust magnet)
The Problem: - Chrome trim collects debris, catches and retains water, and worse yet, saltwater from ocean sports equipment.
- Water prevented from draining or evaporation by being absorbed by debris and hidden behind the chrome trim soaks area around windshield. This hastens rusting, possibly by galvanic corrosion: 2 Different metals in an electrolyte (like saltwater or water with debris dissolved in it)
See how much debris it collects?
Rust is worst around this clip (Perhaps because there is a thin gap between the clip and the body that traps water):
The windshield rests on two of this white clip below, so this is probably structural. Needed to keep windshield in position when installing:
Safelite has this kind of trim. Although I want to seal with silicone this type trim is good because it will protect edge of glass from accidental stresses.
My glass cracked after I pulled chrome trim and dug clips out. BE CAREFUL!
Would install like this:
As you can see, probably needs to be installed on glass before glass is attached, therefore would only work If glass were removed (like in my case).
A trim attached only to edge of glass, but not touching body/paint like in sketch above will protect edge of glass from accidental stresses.
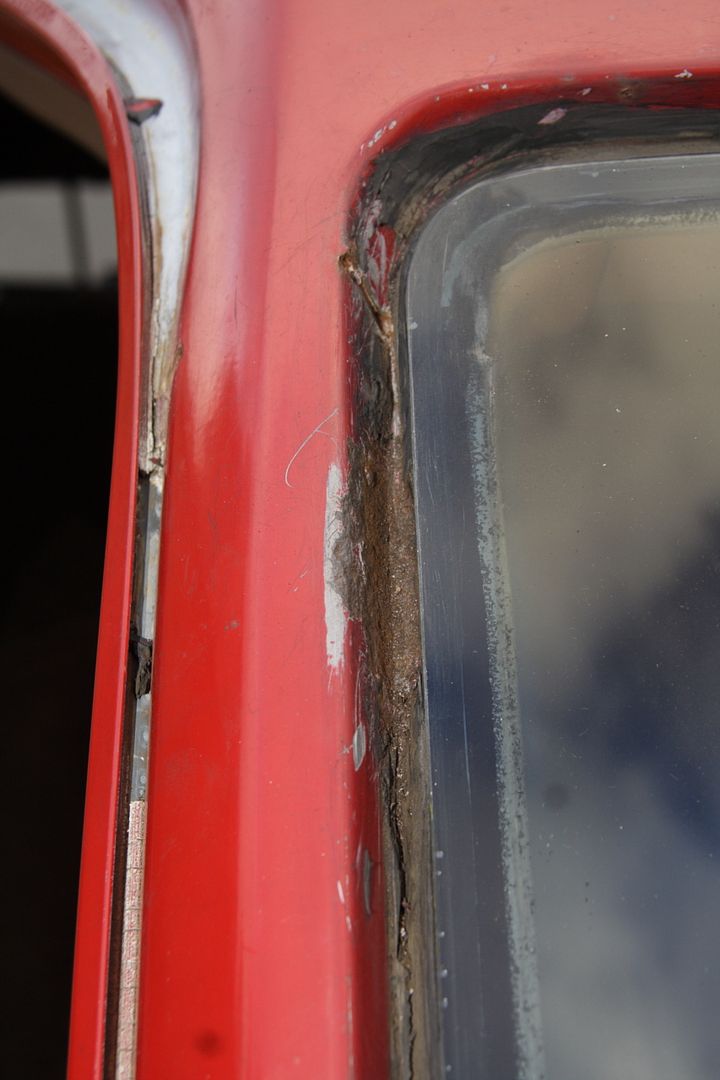
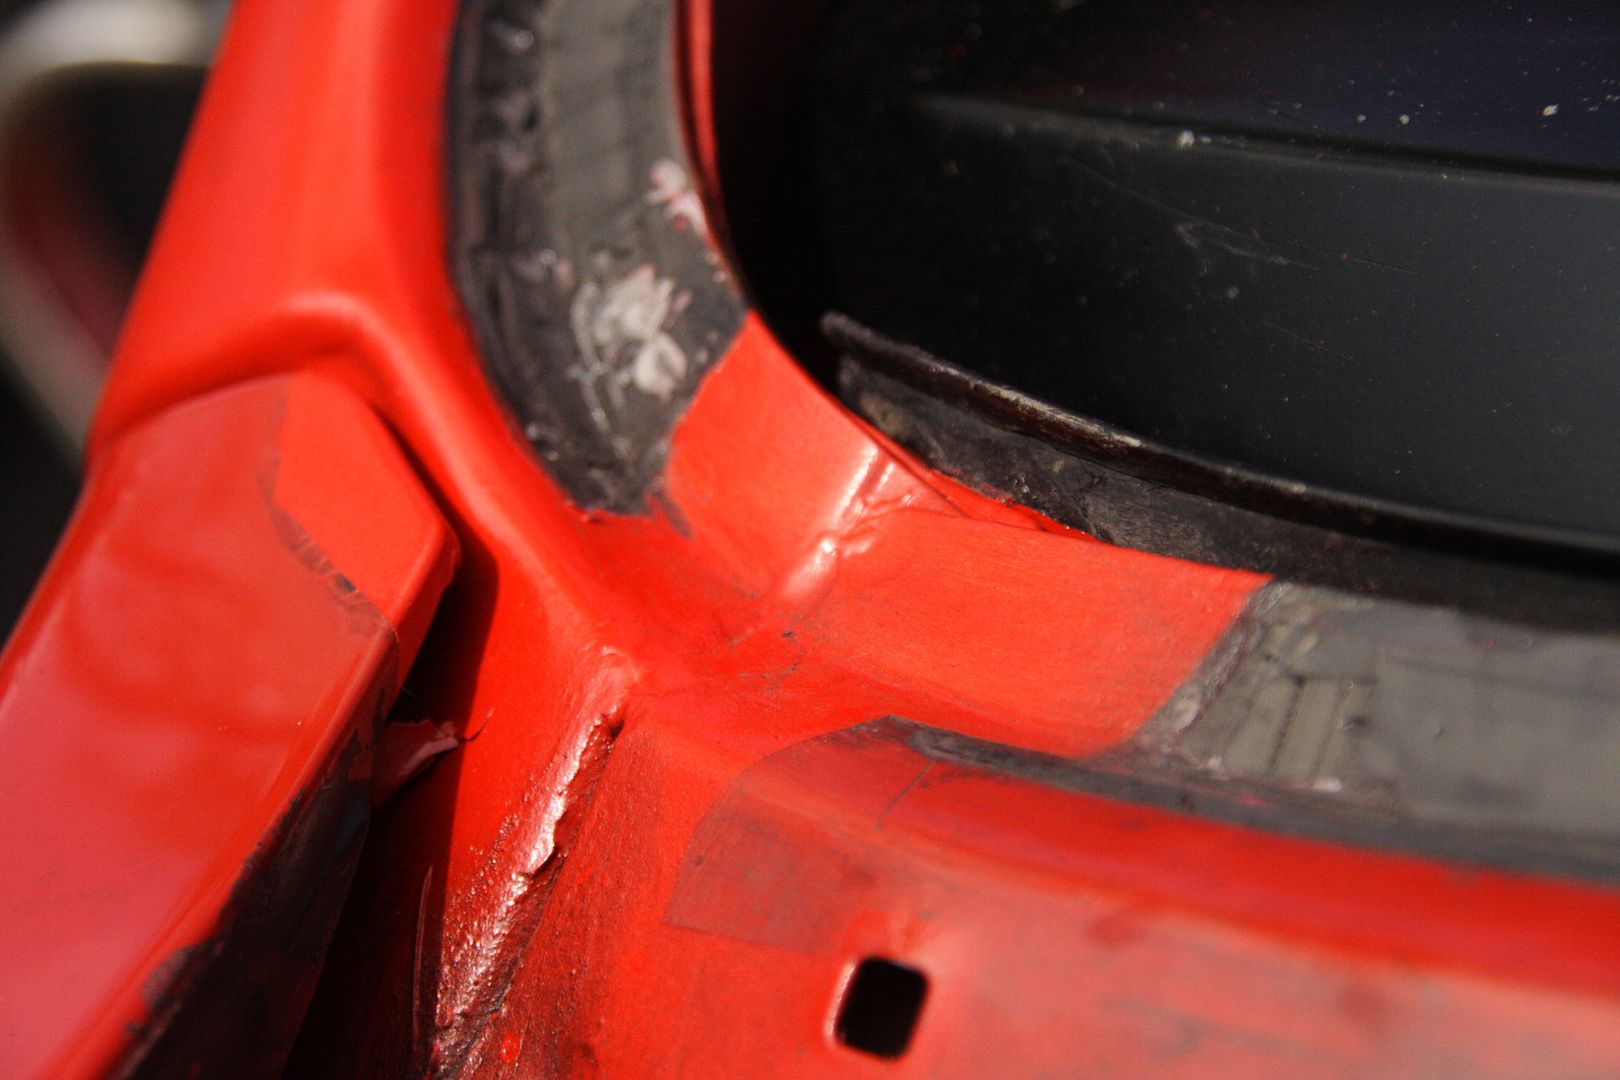
Some Pics of Rusted spots. Fortunately, it was only surface rust; no penetration, no leaks.

There are what look like seams near upper corners on both sides that are not welded. potential rust/leak areas. Later, I primed and sealed this with epoxy before painting.
Before:
After prime and epoxy fill:
I used Permatex rust converter, readily available at local auto stores. It also works as primer.
I masked good urethane areas per Safelite tech's advise. Urethane sticks better to itself. I only treated and painted areas affected by rust.
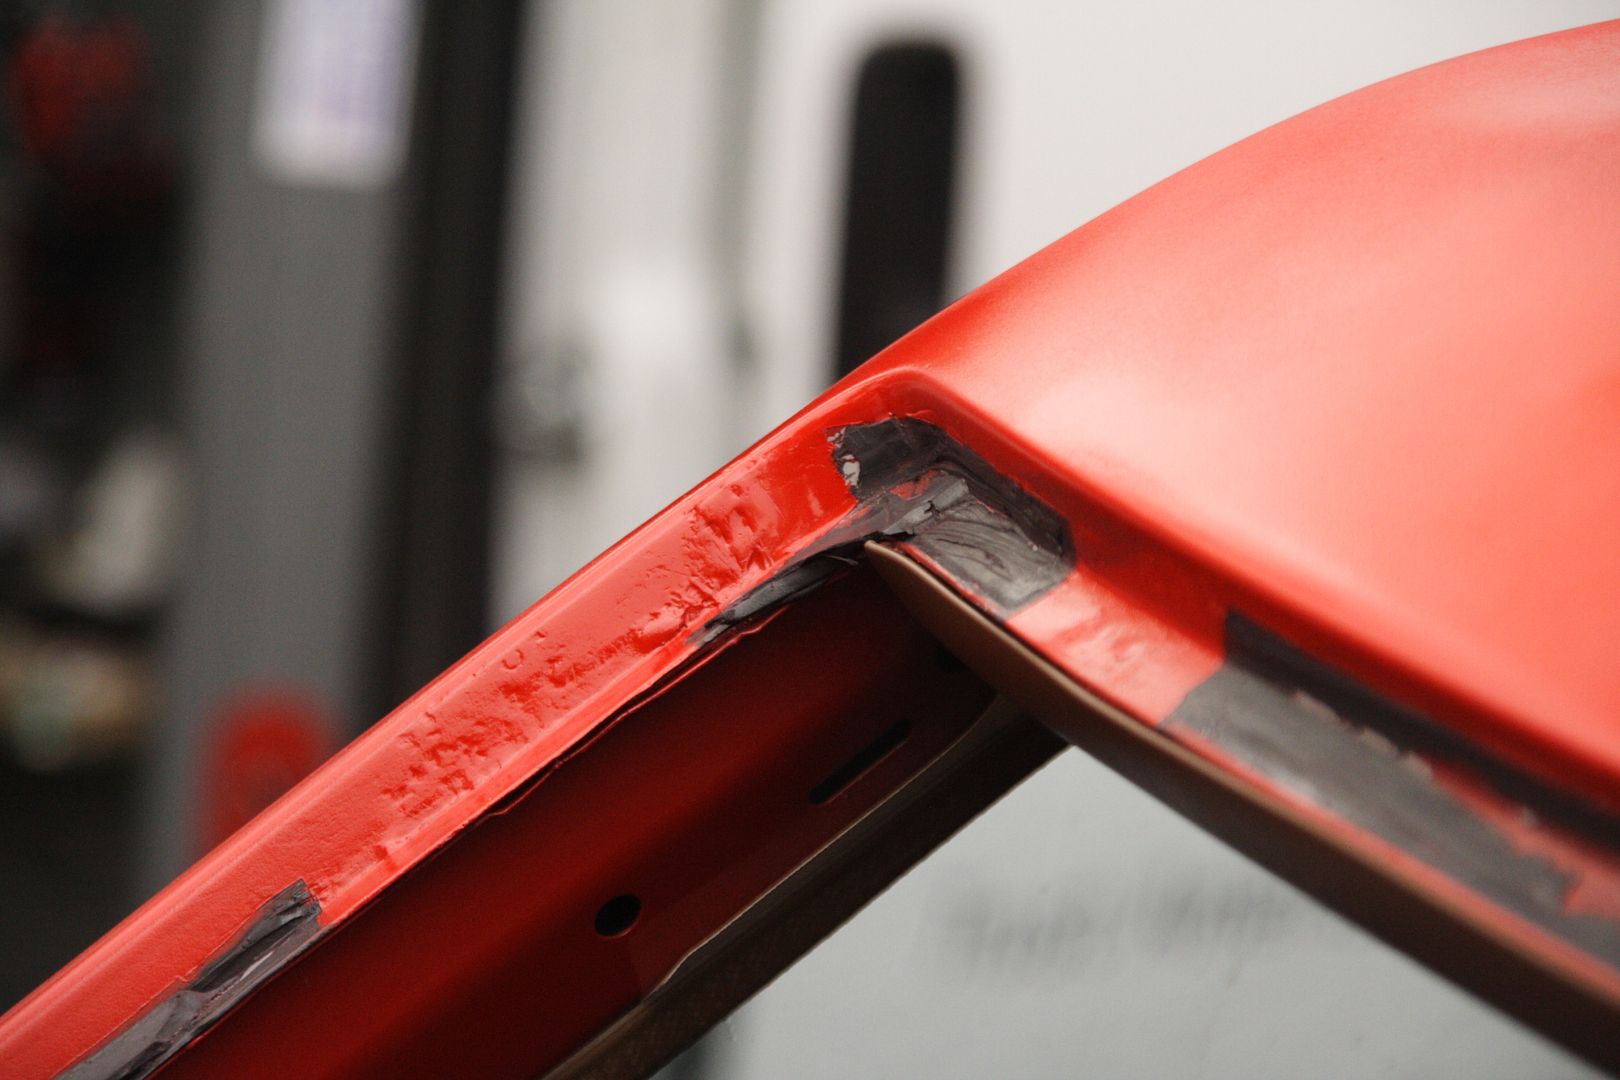
Another depression formed by - pinchweld. I filled a little with epoxy.
Thick bead of urethane windshield adhesive will take care of remaining depression.
Painted spots:
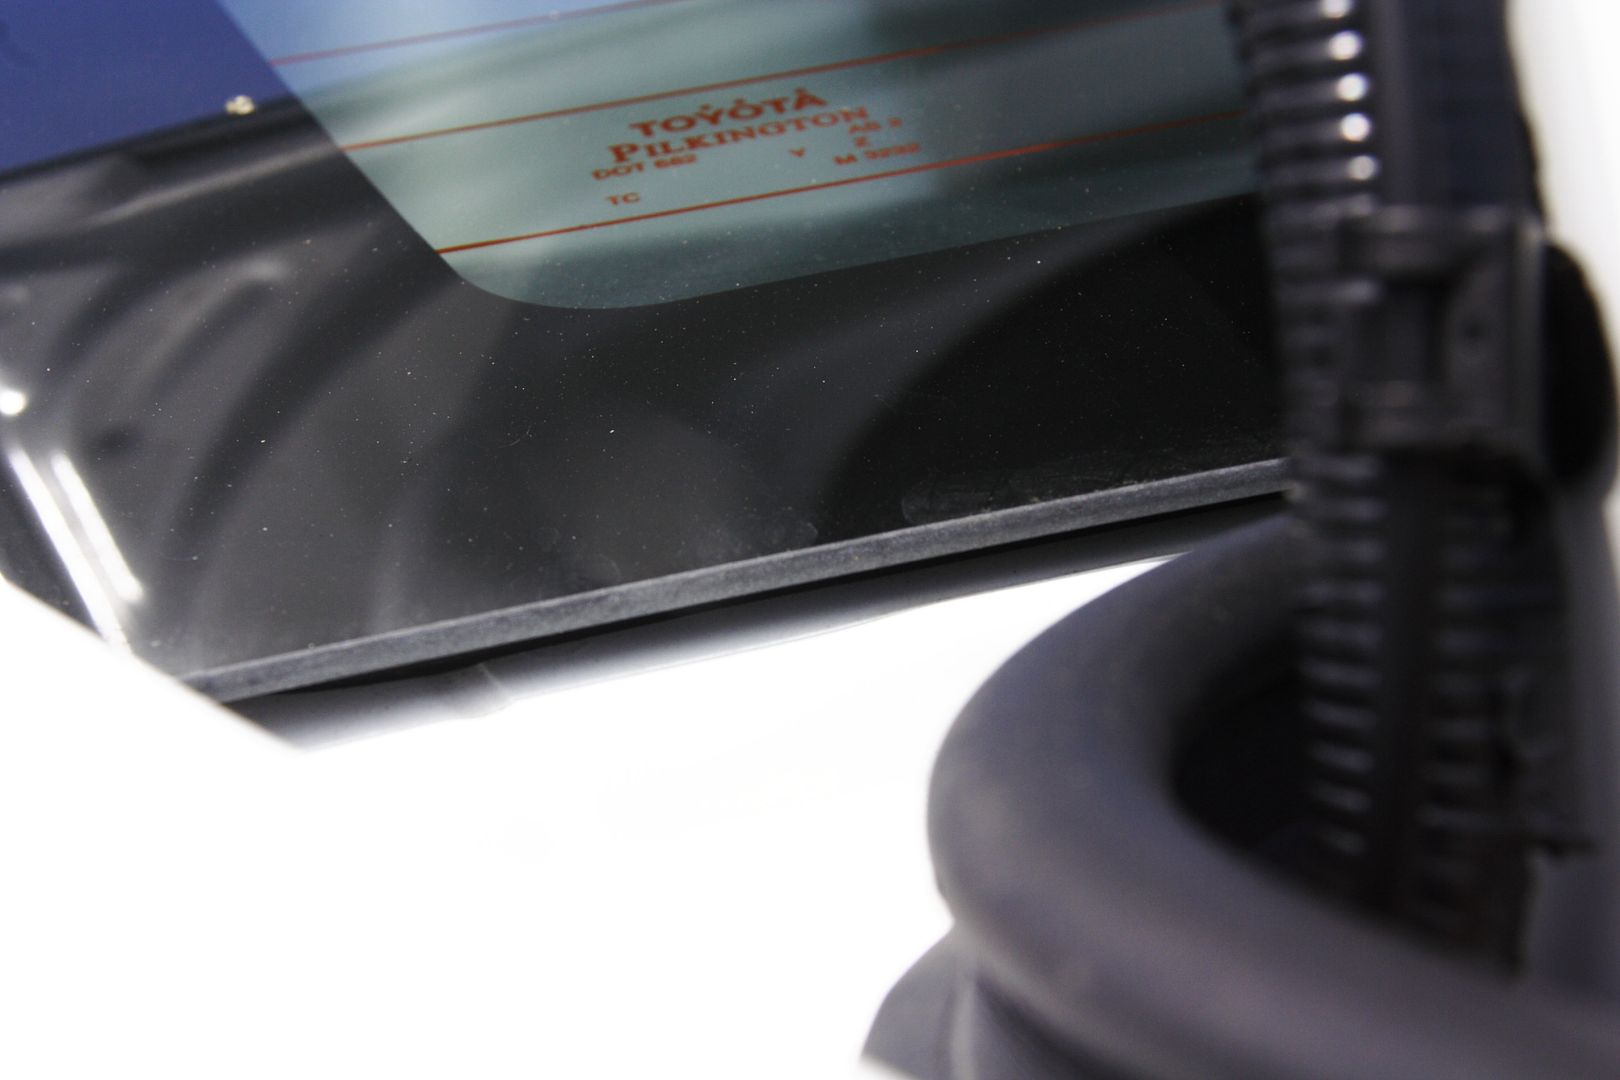
Universal rubber trim installed on glass:
Thin layer of urethane adhesive applied to inside of glass... all the away around:
Nicely-sized "V" Bead of urethane adhesive applied all the way around:
Continued to separate post because exceeds number of pics allowed...
__________________
86 4Runner, 22R-Eliable, 5-Speed Manual, dlx. WHAT'S YOURS?
If you want us to help from afar please let us see, hear, feel what you're dealing with.
A picture paints a thousand words.
Toyota components are bullet-proof. Issues often arise from poor wiring, assembly and/or maintenance. Suspect those first.
Next only to our senses, the multi-meter is the most important electrical diagnostic tool. Spend $6 at Harbor Freight or $$$ blindly replacing parts.
Last edited by RAD4Runner; 03-09-2015 at 02:37 PM.
Reason: Edited Some Details- in progress
|
|
|
Reply With Quote
|
|
06-26-2014, 09:07 PM
|
#25
|
 |
Senior Member
|
|
Join Date: Sep 2011
Location: Charles Town WV
Age: 64
Posts: 1,225
|
|
|
Senior Member
Join Date: Sep 2011
Location: Charles Town WV
Age: 64
Posts: 1,225
|
Nice work. That should last you many seasons!

__________________
"People sometimes mistake their own shortcomings for those of society and to want to fix it because they don't know how to fix themselves."
Sir Isaac Asimov
Honey Badger Build Thread
|
|
|
Reply With Quote
|
|
07-19-2014, 02:18 AM
|
#26
|
|
Senior Member
|
|
Join Date: Mar 2012
Location: Southern California
Posts: 1,836
|
|
|
Senior Member
Join Date: Mar 2012
Location: Southern California
Posts: 1,836
|
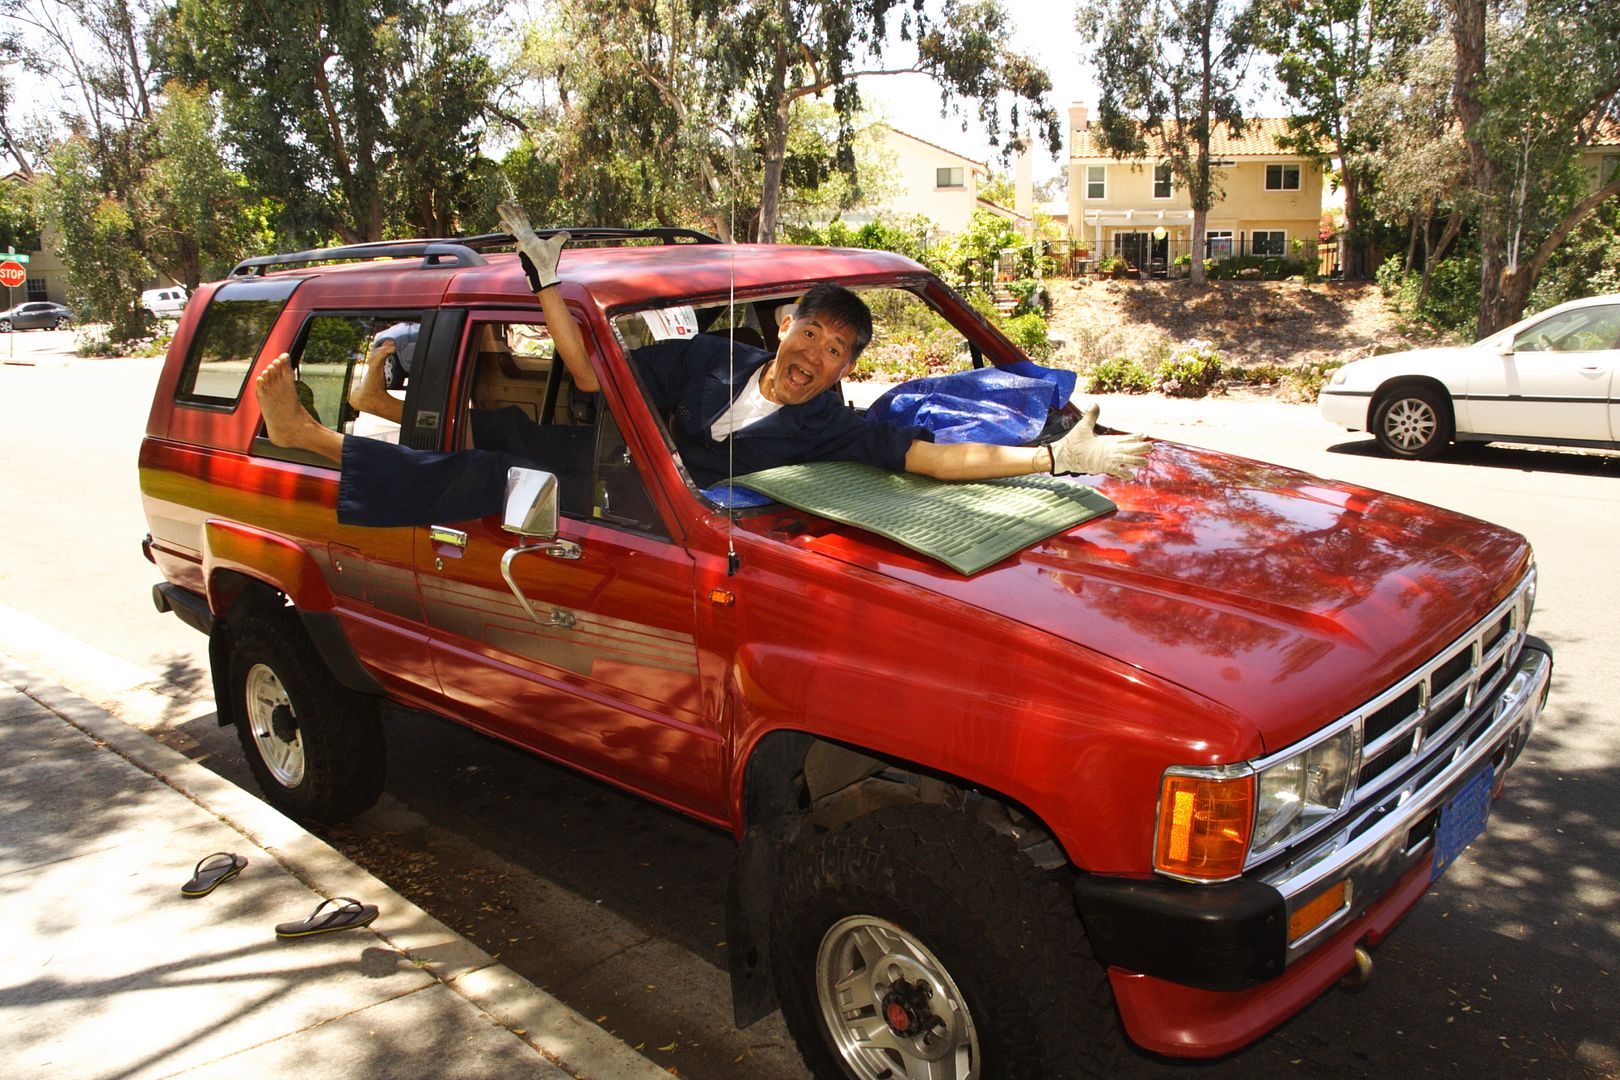
Is topless considered indecent exposure?

Fiberglas Cap is in body shop for re-painting. Timely for summer, eh?
__________________
86 4Runner, 22R-Eliable, 5-Speed Manual, dlx. WHAT'S YOURS?
If you want us to help from afar please let us see, hear, feel what you're dealing with.
A picture paints a thousand words.
Toyota components are bullet-proof. Issues often arise from poor wiring, assembly and/or maintenance. Suspect those first.
Next only to our senses, the multi-meter is the most important electrical diagnostic tool. Spend $6 at Harbor Freight or $$$ blindly replacing parts.
|
|
|
Reply With Quote
|
|
07-20-2014, 11:34 PM
|
#27
|
|
Junior Member
|
|
Join Date: Jul 2014
Location: nc
Posts: 3
Real Name: Brandon
|
|
|
Junior Member
Join Date: Jul 2014
Location: nc
Posts: 3
Real Name: Brandon
|
Nice post thanks for sharing Looking at doing some upgrades on my 92 when I get back state side definitely doing the wire upgrades.
|
|
|
Reply With Quote
|
|
08-10-2014, 12:57 AM
|
#28
|
|
Senior Member
|
|
Join Date: Mar 2012
Location: Southern California
Posts: 1,836
|
|
|
Senior Member
Join Date: Mar 2012
Location: Southern California
Posts: 1,836
|
Special Service Tool for Cranking System
When faced with intermittent "click only" starting issue, the click one hears from behind the glove compartment is that of the circuit opening relay - related but does not affect cranking system.
To verify that power is energizing starter relay (inside engine compartment), and/or relay is energizing solenoid one needs to hear/feel the relay and solenoid click. IF, and only IF, this issue occurs to me while no one is around to help by turning key while I'm standing by right side of engine compartment near the starter relay, here's how I do it.
http://youtu.be/YI-KvaRGyGc
__________________
86 4Runner, 22R-Eliable, 5-Speed Manual, dlx. WHAT'S YOURS?
If you want us to help from afar please let us see, hear, feel what you're dealing with.
A picture paints a thousand words.
Toyota components are bullet-proof. Issues often arise from poor wiring, assembly and/or maintenance. Suspect those first.
Next only to our senses, the multi-meter is the most important electrical diagnostic tool. Spend $6 at Harbor Freight or $$$ blindly replacing parts.
|
|
|
Reply With Quote
|
|
08-12-2014, 01:00 AM
|
#29
|
|
Senior Member
|
|
Join Date: Mar 2012
Location: Southern California
Posts: 1,836
|
|
|
Senior Member
Join Date: Mar 2012
Location: Southern California
Posts: 1,836
|
Divide and conquer!
The starter solenoid is a good place to divide a cranking issue.
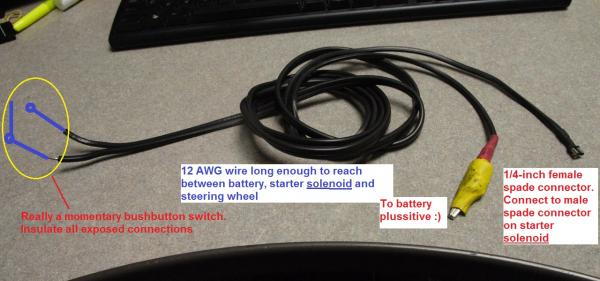
This Special Service Tool Will help you troubleshoot and/or get you started If something keeps power from getting to your starter solenoid coil. I used it to verify what my suspected problem was.
For troubleshooting:
To check solenoid and downstream to starter motor, clutch gear and flywheel,
Disconnect this female spade connector from starter solenoid. (This connnector supplies power from starter relay to the starter solenoid)
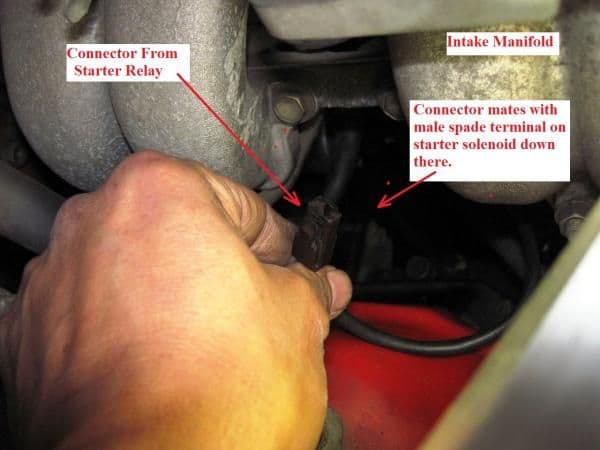
Connect RAD's Special Service Tool as follows:
Alligator clip to battery plussitive
Quarter-inch female spade to male spade on solenoid (where you disconnected wire from)
Ensure safety - trans in neutral, your tie not dangling near fans or belts, etc
Push button on. Solenoid should clunk, solenoid contacts will close sending cranking current from superthick wire (connected to battery and screwed-on to terminal on solenoid) to starter motor. Motor should turn, solenoid plunger will actuate clutch, engage starter gears with flywheel gears. You should already know how starter alone or starter engaged with flywheel sounds when turning. See what does not do what it's supposed to do, and go from there.
If all from solenoid and downstream works, troubleshoot from that female spade terminal, upstream to your ignition switch.
To start when you know solenoid and downstream is good, but power is not going to your solenoid coil (i.e., clutch switch defective, starter solenoid defective), or not enough power is getting to your solenoid coil (i.e., wiring flaw explained on my thread), and you have no assistant to jump battery directly to solenoid, do same while attempting to start- at the wheel of course.
If you really have to start the engine while you're looking into the engine compartment by yourself, use above in combination with the other Special Service Tool - LOL!
__________________
86 4Runner, 22R-Eliable, 5-Speed Manual, dlx. WHAT'S YOURS?
If you want us to help from afar please let us see, hear, feel what you're dealing with.
A picture paints a thousand words.
Toyota components are bullet-proof. Issues often arise from poor wiring, assembly and/or maintenance. Suspect those first.
Next only to our senses, the multi-meter is the most important electrical diagnostic tool. Spend $6 at Harbor Freight or $$$ blindly replacing parts.
Last edited by RAD4Runner; 08-12-2014 at 01:10 PM.
|
|
|
Reply With Quote
|
|
08-12-2014, 02:47 AM
|
#30
|
 |
Elite Member
|
|
Join Date: Feb 2010
Location: Utard
Posts: 12,985
Real Name: Kevin
|
|
|
Elite Member
Join Date: Feb 2010
Location: Utard
Posts: 12,985
Real Name: Kevin
|
Good stuff RAD.
__________________
.
'My needle always settles between west and southwest. The future lies that way to me, and the earth seems more unexhausted and richer on that side.' - Thoreau, sort of.
The Grey Bastard, 1985 4Runner, driveway ornament.
Utah DesertRunners T4R, for all things wheeling and 4Runner in Utah.
|
|
|
Reply With Quote
|
| Thread Tools |
|
|
| Display Modes |
Rate This Thread |
 Linear Mode Linear Mode
|
|
 Posting Rules
|
You may not post new threads
You may not post replies
You may not post attachments
You may not edit your posts
HTML code is On
|
|
|
|


