Well... these are not hard-core restoration write-ups, strictly-speaking, but mostly enhancements, mods, fixes...
__________________
86 4Runner, 22R-Eliable, 5-Speed Manual, dlx. WHAT'S YOURS?
If you want us to help from afar please let us see, hear, feel what you're dealing with.
A picture paints a thousand words.
Toyota components are bullet-proof. Issues often arise from poor wiring, assembly and/or maintenance. Suspect those first.
Next only to our senses, the multi-meter is the most important electrical diagnostic tool. Spend $6 at Harbor Freight or $$$ blindly replacing parts.
This is the clean, simple, robust fix for the starting (cranking) circuit wiring flaw explained here. This mod fixed my "click-only" starting issue. No additional or replacement parts, except for wire and a kill switch.
THIS APPLIES TO MODELS WITH STARTER RELAY, SUCH AS:
Those made from May 1986 and later.
Those made earlier than May Like richiegrich's Feb, and KidV's do not have starter relay.
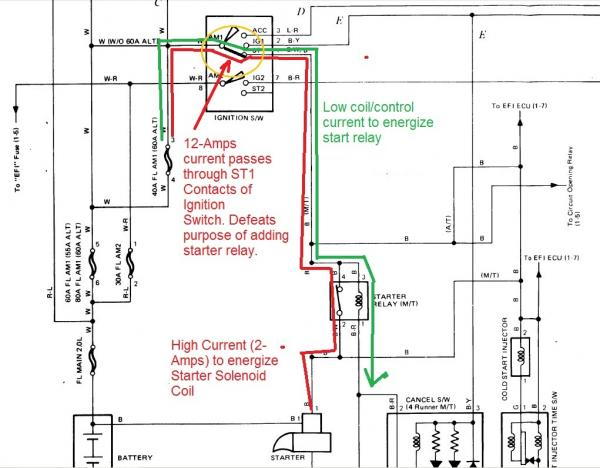
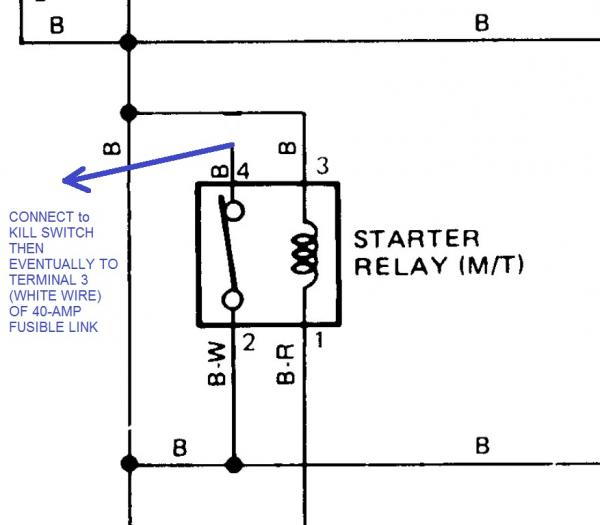
Schematic below shows that high current (12-Amps) to energize starter solenoid passes through ST1 contacts of ignition switch. This puts unnecessary stress on switch contacts, cause pitting, high resistance, too much voltage drop (solenoid not getting enough voltage), and defeats purpose of adding the relay in the first place.
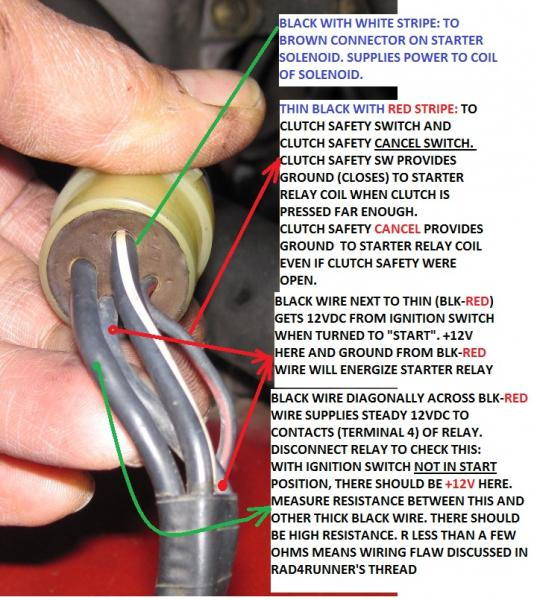
To verify if your stock wiring has this flaw:
To correct:
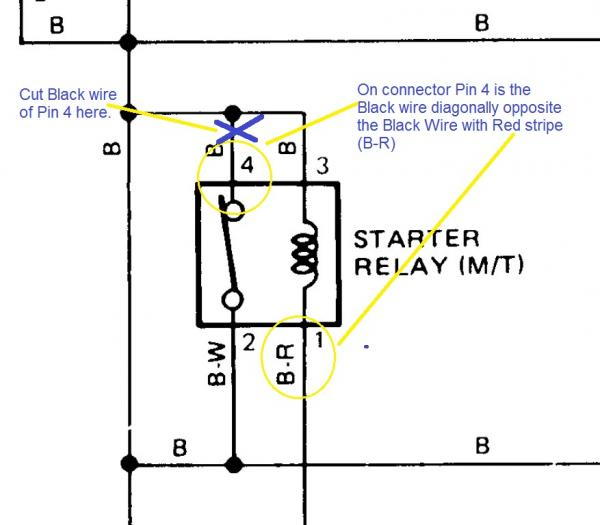
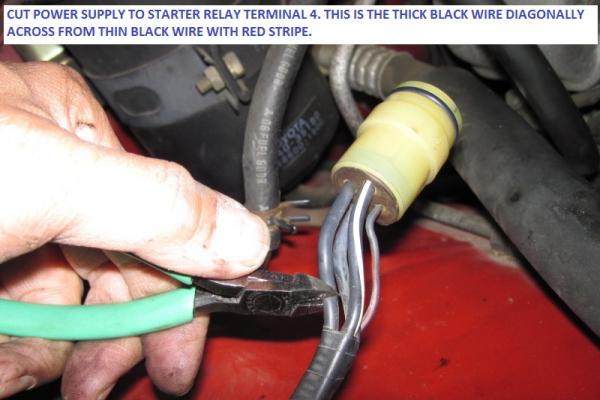
Cut wire to pin 4 of starter relay here:
Picture here:
Insulate end on harness. This will not connect to anything anymore.
It should look like this now.
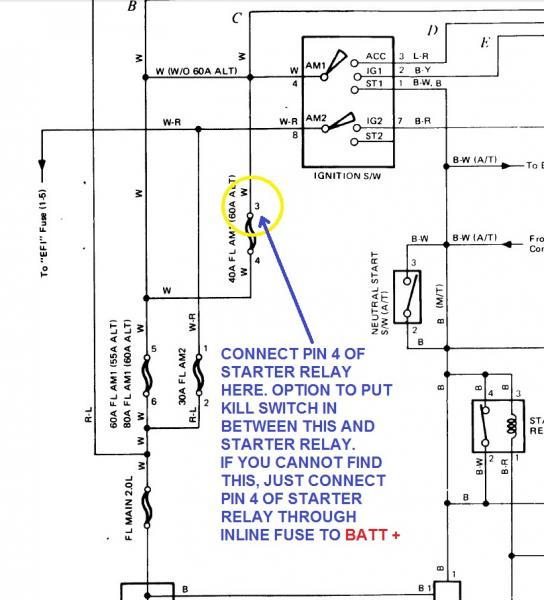
To find Pin3, look for terminal of 40-Amp fuse that connects to 80A Fusible link. This is terminal 4. Terminal 3 is the opposite terminal. To verify that you have the right Pin3 of FL, measure voltage there. With 40-Amp fuse installed, you should get 12V. Remove 40-amp fuse, you should get no voltage.
Connect (crimp or crimp PLUS solder) wire from Start relay Pin 4 to Terminal 3 of FL.
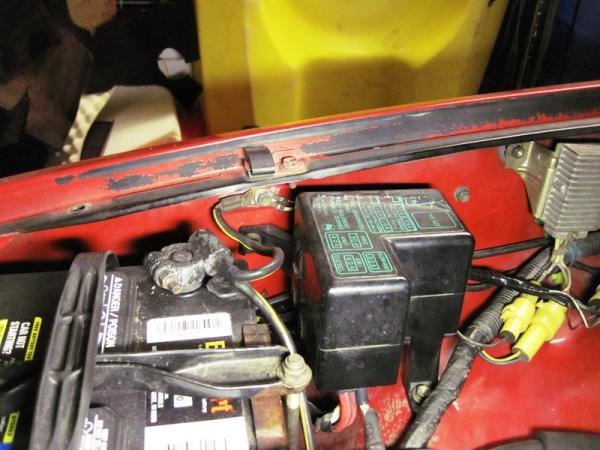
Fusible Link is in this fuse block:
Terminal 3 is accessible from bottom.
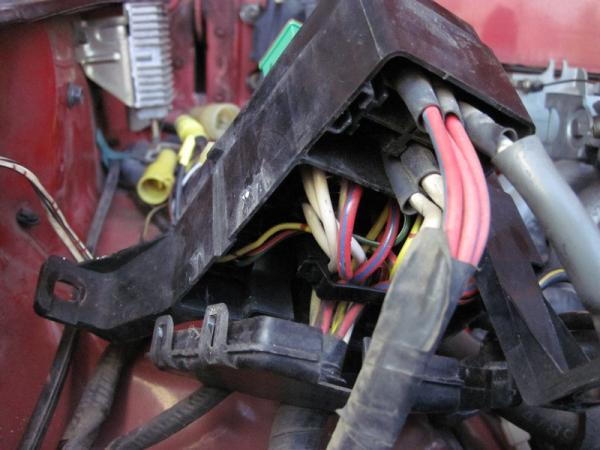
IIRC, this picture shows Terminal 3 removed so I can tap into it.
Verify it is Pin3, such that when you remove FL you do not get +12V, and you get +12V when FL is re-installed.
When you make a tap, make sure you have both mechanical & electrical integrity (i.e., crimp OR wrap around existing wire then solder).
It would be nice to insert a kill switch in wire between FL and start relay. Hide it and don't post where you put it here (duh!). Bonus is that kill switch will interrupt power in the extremely rare case that starter relay contacts get welded in closed position. Final circuit should look like this:
__________________
86 4Runner, 22R-Eliable, 5-Speed Manual, dlx. WHAT'S YOURS?
If you want us to help from afar please let us see, hear, feel what you're dealing with.
A picture paints a thousand words.
Toyota components are bullet-proof. Issues often arise from poor wiring, assembly and/or maintenance. Suspect those first.
Next only to our senses, the multi-meter is the most important electrical diagnostic tool. Spend $6 at Harbor Freight or $$$ blindly replacing parts.
Last edited by RAD4Runner; 08-18-2014 at 08:49 PM.
Alternator Upgrade To 90-Amp Stator >> What's This Part?
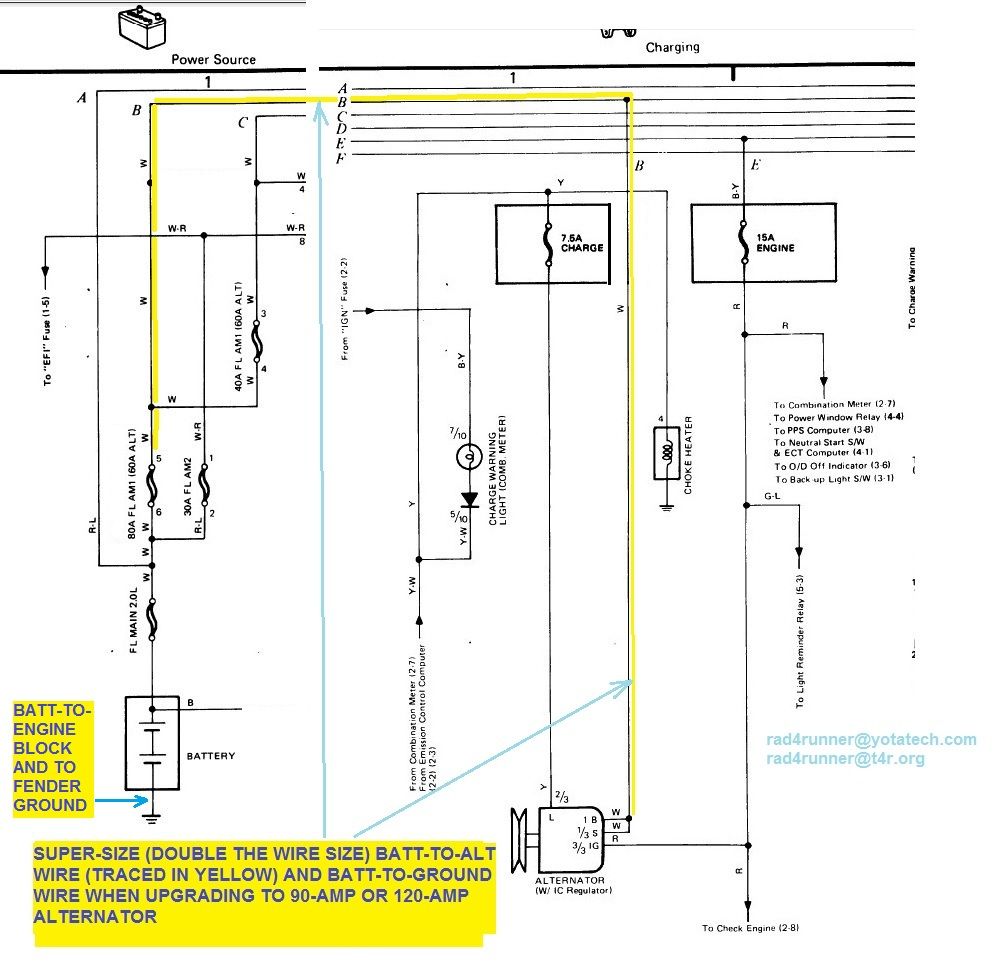
I recently had AES in San Diego install a stock body alternator with stator upgraded to 90-Amp one. Before I add any auxiliary equipment (lights/audio system), I would upgrade my wiring.
One important part of of a robust upgrade would be to super-size (double to be safe) effective wire thicknesses of the following:
Alternator-to-battery positive wire (traced in yellow on schematic below),
Battery-to-engine block ground wire (this is where it connects to alternator ground, and
Battery to fender ground (this is where many accessories, lights, ignition, etc) systems return.
Any additional circuit should be tapped off the upgraded alt-to-batt wire and properly fused. This way alt and battery will provide current / aid each other depending on demand, via safe paths - proper wire capacity, proper auxiliary fuses and stock fuses that are not bypassed.
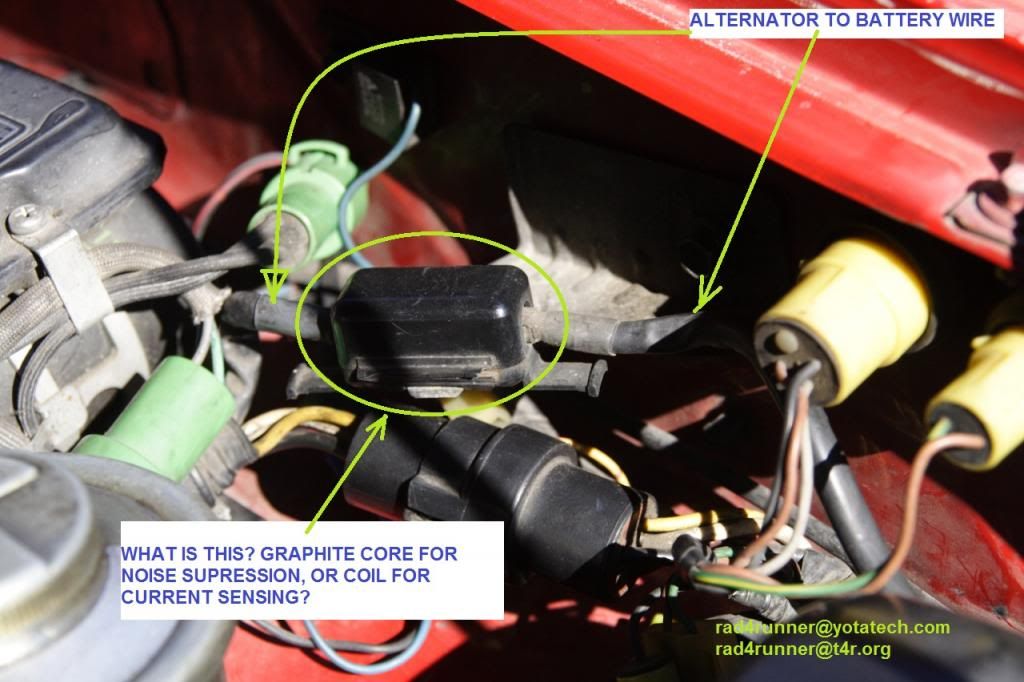
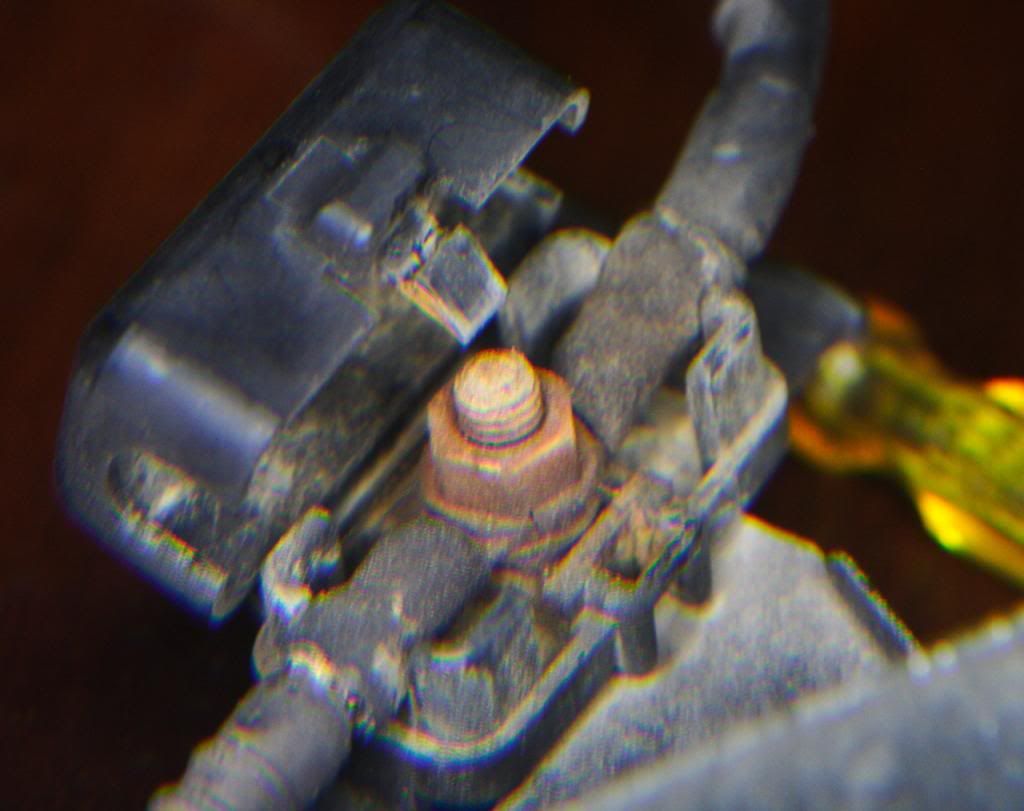
I would simply put another wire in parallel with existing alt-to-batt wire. However, there is a cube looking thing around the alt-to-batt wire. It does not show in schematic above. Could this simply be a ferrite noise suppression core? It could be a current sensing coil, but I do not see any wires connected to it. Does anyone now what it is?
Guys, I finally opened it up. It's just a junction point. No foreseen use at all, and is another potential point of failure from corrosion or loose nut & bolt. I will eliminate when I upgrade my alt-to-battery wire.
__________________
86 4Runner, 22R-Eliable, 5-Speed Manual, dlx. WHAT'S YOURS?
If you want us to help from afar please let us see, hear, feel what you're dealing with.
A picture paints a thousand words.
Toyota components are bullet-proof. Issues often arise from poor wiring, assembly and/or maintenance. Suspect those first.
Next only to our senses, the multi-meter is the most important electrical diagnostic tool. Spend $6 at Harbor Freight or $$$ blindly replacing parts.
Last edited by RAD4Runner; 06-10-2013 at 09:34 PM.
Any additional circuit should be tapped off the upgraded alt-to-batt wire and properly fused. This way alt and battery will provide current / aid each other depending on demand, via safe paths - proper wire capacity, proper auxiliary fuses and stock fuses that are not bypassed.
Can you rephrase that for us slow children? If I drop in an auxiliary fuse block, you're saying don't feed it straight off the positive battery terminal?
__________________
.
'My needle always settles between west and southwest. The future lies that way to me, and the earth seems more unexhausted and richer on that side.' - Thoreau, sort of.
Oh yes, I meant "Ferrite" Core, 'cause nothing's wired to it. Thanks, 92-SR5
Quote:
Originally Posted by KidVermicious
Wait, who's choking ferrets now?
I meant Ferret - LOL!
Quote:
Can you rephrase that for us slow children? If I drop in an auxiliary fuse block, you're saying don't feed it straight off the positive battery terminal?
Correct, KidV. Worst-case scenario (maybe remote possibility but): If there is demand for current up to capacity of upgraded alternator, the stock alt-to-batt wire will not handle the 120-Amperes or 90-amperes from alt.
That's why I want to super-size that wire by wiring one of same size in parallel. If anyone has that wire /sees that in a junkyard, please advise how much it would cost including shipping.
Else, I'll just get new wire of thicker gauge and replace stock one.
__________________
86 4Runner, 22R-Eliable, 5-Speed Manual, dlx. WHAT'S YOURS?
If you want us to help from afar please let us see, hear, feel what you're dealing with.
A picture paints a thousand words.
Toyota components are bullet-proof. Issues often arise from poor wiring, assembly and/or maintenance. Suspect those first.
Next only to our senses, the multi-meter is the most important electrical diagnostic tool. Spend $6 at Harbor Freight or $$$ blindly replacing parts.
Hey, me again. Whale sightings look sweet, I didn't even get that close off Newfoundland.
So my intermittent no start issue became constant, and I'm camped out in the parking lot beside a o'reilly auto parts, bout 50 miles from the north end of Death Valley (made it through just to get a flat in the last mile...d'uh!).
Starter works, replaced the batt to starter cable because I thought that was it, redid the grounds, still no go.
I did your starter relay fix, but the pin 4 wire to the relay is currently disconnected for several reasons, let's go with I couldn't find terminal 3 of the FL - when I remove the FL, the white wires are all still hot. Go figure. Well, actually, yes please, if you know what I'm doing wrong, that would be fantastic.
So in the process, I noticed that sometimes, let's make it 99 times out of 100, NONE of the wires to the starter relay are hot. Doesn't matter what position the key is in. It worked once, then not again. So I ran a wire from the starter into the cab, and I touch it to the cig lighter to start the truck. Crude but it should get me back home. My wiring schematic is from a 85, is there any chance you could send me the one you have ([email protected])? The 85 doesn't have the starter relay, and I'd like to trace the problem.
Dual battery w isolator and all the rear window switches work great, btw
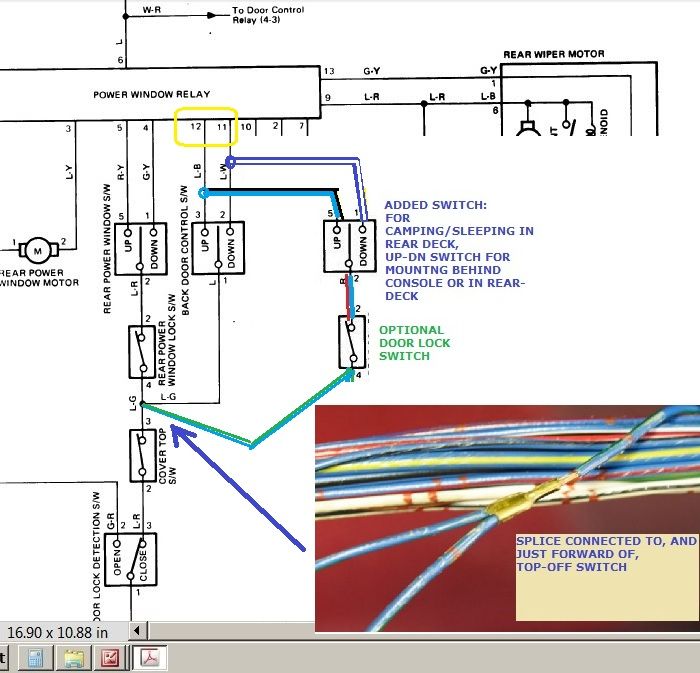
This mod will allow one to roll rear window down from inside the rear deck (i.e., when camping in truck), without having to scramble over to front, put key in ignition in order to lower window from console switch.
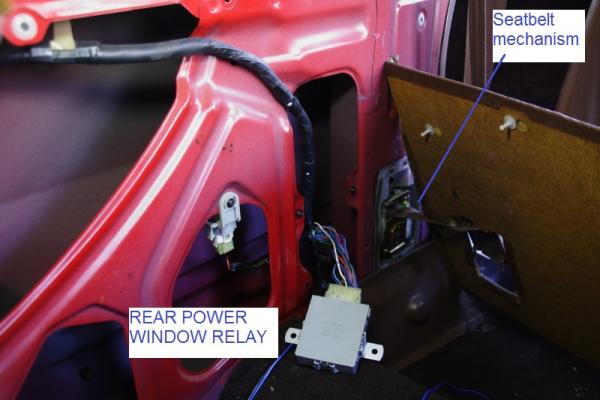
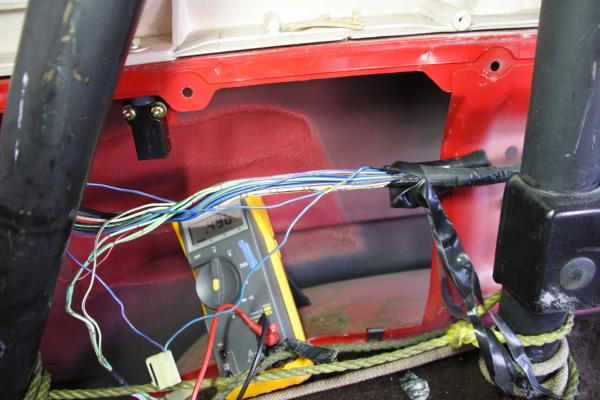
Rear Window/Wiper Relay is behind panel near driver side seatbealt mechanism here:
Relevant wiring runs behind panel near left side of rollbar here:
Top Off Switch is also there.
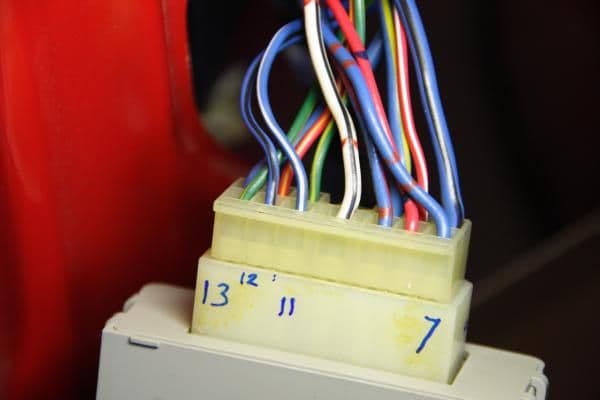
Connector for Rear Window & Wiper Relay here:
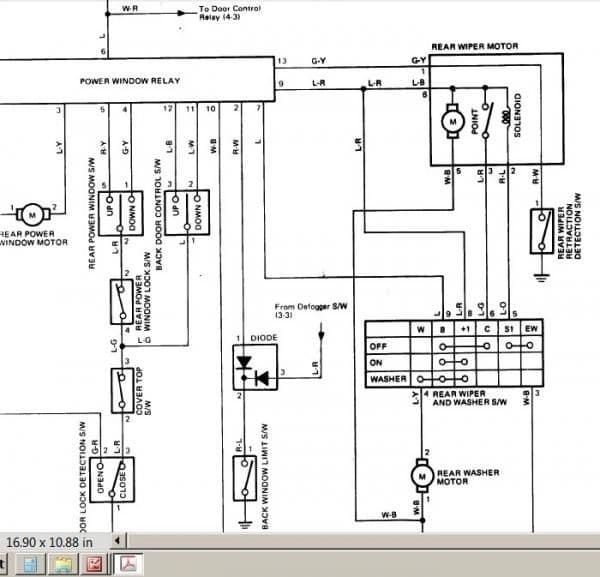
Check against schematic here:
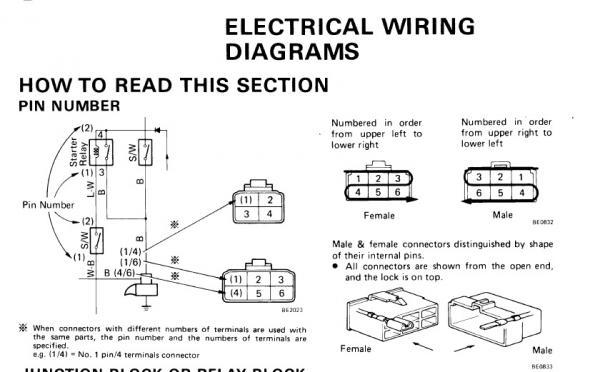
Pin Numbering here:
This mod will duplicate exactly what the key switch does:
Mod Schematic is here:
Wire to pin 11 (light blue-white stripe) when connected to ground (via terminal 3 of top-off switch) will lower window.
Wire to pin 12 (lt blue-blk stripe) when connected to ground (via terminal 3 of top-off switch) will raise window.
(To test relay function, touching directly to chassis ground will work regardless of state of top off switch)
Wire a momentary SPDT with center-off switch (Up/Down) exactly same and in parallel with backdoor control switch (key switch),
I recommend to:
Locate switches so they are shielded from cargo by roll-bar, and
Add fail-safe feature by inserting SPST window lock switch between center terminal of Up/Down switch and terminal 3 of top off switch. (i.e., cargo un-intentionally presses against any of the switches.)
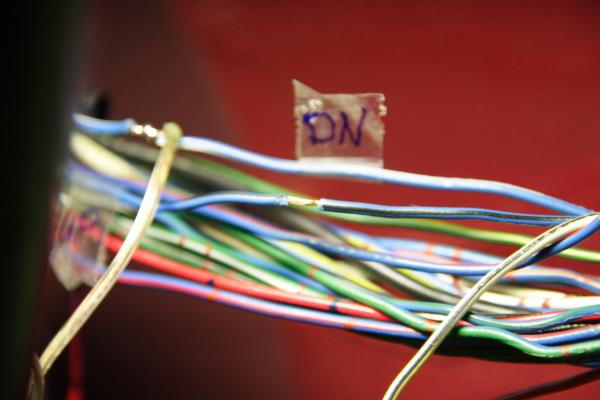
You can do this by carefully stripping off insulation on wires above, and tapping into them. As you can see in pic below, I have labeled Light blue wire with white stripe "DN". Near label, Lt Blue Wire with Black stripe had been stripped to accept tap for "UP" wire.
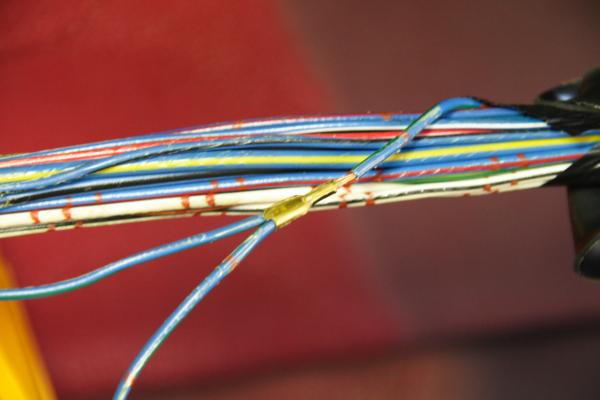
Good place to connect center terminal of SPDT (Up/Down) switch is on this crimp, just forward of top off switch:
Console switch Operation:
In same manner, touching wire going to pin 4 (Green with yel stripe) will lower window, and Pin5 to ground (Red yellow stripe) will raise it. This is where console switch connects. Connecting directly to ground bypasses console rear window lock and rear door lock detection switches.
Here it is in use:
__________________
86 4Runner, 22R-Eliable, 5-Speed Manual, dlx. WHAT'S YOURS?
If you want us to help from afar please let us see, hear, feel what you're dealing with.
A picture paints a thousand words.
Toyota components are bullet-proof. Issues often arise from poor wiring, assembly and/or maintenance. Suspect those first.
Next only to our senses, the multi-meter is the most important electrical diagnostic tool. Spend $6 at Harbor Freight or $$$ blindly replacing parts.
Last edited by RAD4Runner; 04-06-2019 at 05:39 AM.
Hey! Thnx for all your posts. So i'm following the rear window switch mod. I've got it all wired in, but: I'm not sure what to do with the centre wire off the switch.
I'm using a window switch from another 4runner, so its an SPDT switch. I've attached the up (red w stripe) and down (red w another stripe) to the corresponding blue wired off the relay (#12 &11). The switch has what I'm assuming are grounds coming off both the up and down, so I've grounded those to the chassis.
Now, where do I put the centre wire?! Looking online seems to reveal that it goes above the relay, and you say to attach it to that crimp, but I don't see that crimp anywhere and I'm not sure what wire I should splice it to, if any.
Thanks...
Now, where do I put the centre wire?! ...I don't see that crimp anywhere and I'm not sure what wire I should splice it to, if any.
Thanks...
The center terminal goes to ground, via the Cover Top off switch.
To find the crimp, you would need to strip the wrapping on the harness, just a forward of the cover top switch...
__________________
86 4Runner, 22R-Eliable, 5-Speed Manual, dlx. WHAT'S YOURS?
If you want us to help from afar please let us see, hear, feel what you're dealing with.
A picture paints a thousand words.
Toyota components are bullet-proof. Issues often arise from poor wiring, assembly and/or maintenance. Suspect those first.
Next only to our senses, the multi-meter is the most important electrical diagnostic tool. Spend $6 at Harbor Freight or $$$ blindly replacing parts.
Ah. Well, in the process, two wires touched each other and fried the relay. Oops.
Now I'm trying to figure out how to jig this switch straight to the motor, bypassing the relay entirely.
I think I've got it: centre wire to battery, then one side to motor1 and ground respectively, and the other side to motor2 and ground respectively. Think that'll do the trick til I can get to my parts truck (and spare relay) next week? Wish I'd paid more attention during the electronics unit way back when.
Working up the gumption to go outside and try it: its -12'C up here, and we're leaving on a camping trip tomorrow...bout one hour of daylight left...guess I'm going outside now...
This mod will allow one to roll rear window down from inside the rear deck (i.e., when camping in truck), without having to scramble over to front, put key in ignition in order to lower window from console switch.
I love this also! I have to do it!
But first things first, I need to solve all the electrical problems I already have
Return Trip Photos from Texas to So Cal.
Happy to drive a more quiet truck... but when I picked her up, I started missing the 6th gear of my loaner Mini-Cooper - LOL!
Took the I-20 Corridor from TX to New Mexico...
Then Hwy 82 that ascends to Cloudcroft, NM where it was snowing as I passed through:
Then back down southwest on hwy 70 IIRC...
Arrived at White Sands National Monument trailhead to back country trail/campsites as sun was setting... Hike was easy over rolling dunes, except that it was hard to see the trail markers in fading light. Coordinates to campsite would have been great.
Ruby Tuesday among the dunes surrounding the Loop Drive (tourist drive)... The loop drive has a boardwalk over the dunes so the handicapped can also enjoy the beauty...
Took the 10 Freeway from Las Cruces, NM to AZ, and to Joshua Tree National Park where my friend from the dark side (LOL!) met me for overnight camp and sight-seeing...
Mural In honor of the few and the proud... in Twenty-Nine Palms...
Woke up and moved here to observe first-light, but it was not as dramatic...
This is called Skull Rock... It's on Google Maps. Right off the road...
To match my only set of cuff links (believe it or not, from Nordstrom) ...
__________________
86 4Runner, 22R-Eliable, 5-Speed Manual, dlx. WHAT'S YOURS?
If you want us to help from afar please let us see, hear, feel what you're dealing with.
A picture paints a thousand words.
Toyota components are bullet-proof. Issues often arise from poor wiring, assembly and/or maintenance. Suspect those first.
Next only to our senses, the multi-meter is the most important electrical diagnostic tool. Spend $6 at Harbor Freight or $$$ blindly replacing parts.
Last edited by RAD4Runner; 01-23-2017 at 02:28 AM.
This procedure should work for most, if not all of our ATO fuses, but I will illustrate using the Engine Fuse because that's what I'm helping Someday with right now.
We will check:
1) IF there is voltage coming to the fuse,
2) IF there is voltage going through that fuse, and
3) IF none, verify that the fuse is blown (no continuity).
Set multimeter to voltage DC range immediately higher than 12VDC; That's usually 20VDC.
Negative (black) probe to "COM"
Positive (red) probe to "V"
The Engine Fuse (15A) is on the driver-side kick panel fuse block. Note the grounding screw into the body. This will be the ground reference point for most voltage checks. Touch the negative (black) probe to this for most voltage checks.
NOTE:
Some fuses like Hazard-Horn may not require IGN to be on because they are connected to battery through fuses with no switch in between.
I will also check which side of the engine fuse is the supply side, and will update picture ASAP.
(to be continued...)
__________________
86 4Runner, 22R-Eliable, 5-Speed Manual, dlx. WHAT'S YOURS?
If you want us to help from afar please let us see, hear, feel what you're dealing with.
A picture paints a thousand words.
Toyota components are bullet-proof. Issues often arise from poor wiring, assembly and/or maintenance. Suspect those first.
Next only to our senses, the multi-meter is the most important electrical diagnostic tool. Spend $6 at Harbor Freight or $$$ blindly replacing parts.
Last edited by RAD4Runner; 01-21-2017 at 01:54 AM.


 ~original[/IMG]


 Hybrid Mode


