User Tag List

Reply
 
Thread Tools Rate Thread Display Modes
Old 08-12-2013, 05:38 PM #1
89FourRunner's Avatar
89FourRunner 89FourRunner is offline
Member
 
Join Date: May 2013
Location: USA
Posts: 514
89FourRunner is on a distinguished road
89FourRunner 89FourRunner is offline
Member
89FourRunner's Avatar
 
Join Date: May 2013
Location: USA
Posts: 514
89FourRunner is on a distinguished road
Full How-to Fix Intermediate Horn on 1st Gen 4Runner/Pickup with Pictures

If you have a 1st Generation Toyota Pickup or 4Runner you have most likely run into the intermediate horn issue. For those who are not familiar, this issue is described as a horn that only works when depressed in a certain position, say, at 10 o'clock, but will not function at every position, or will not function at all. Please ensure the horn itself is getting power and functioning before moving to this step.

I decided to do a small write up, even though a few already exist.

Tools Needed:

1. 19mm deep Socket and half Inch drive ratchet (or a standard socket with extension).

2. Philips Head Screw Driver

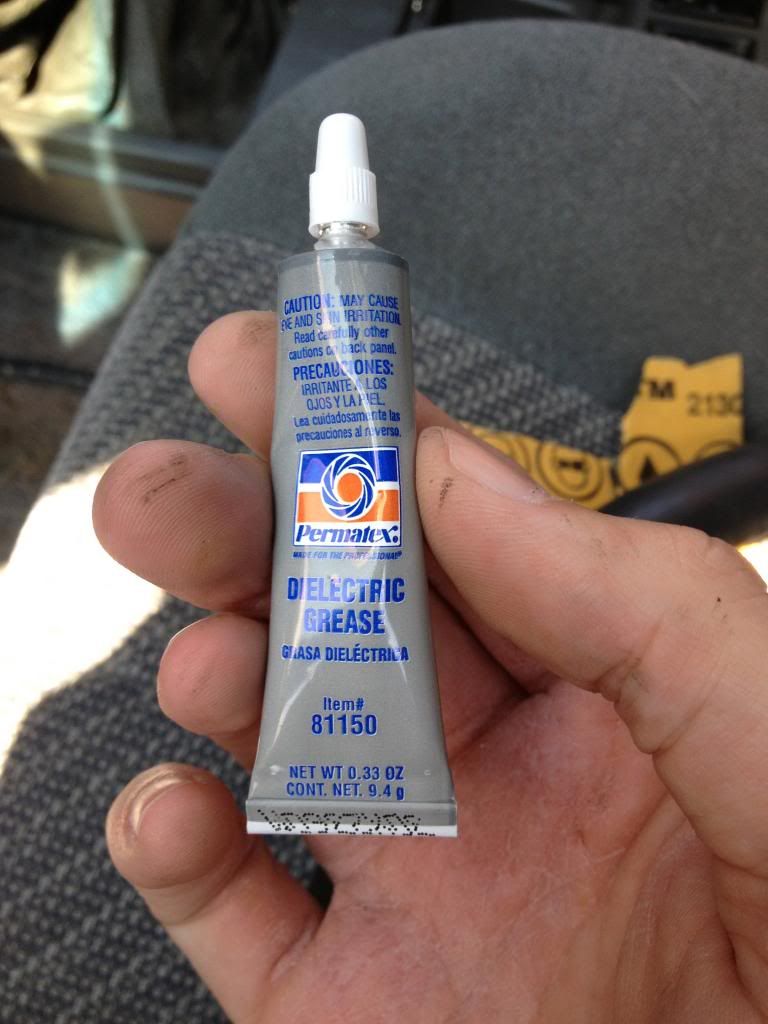
3. Dielectric grease

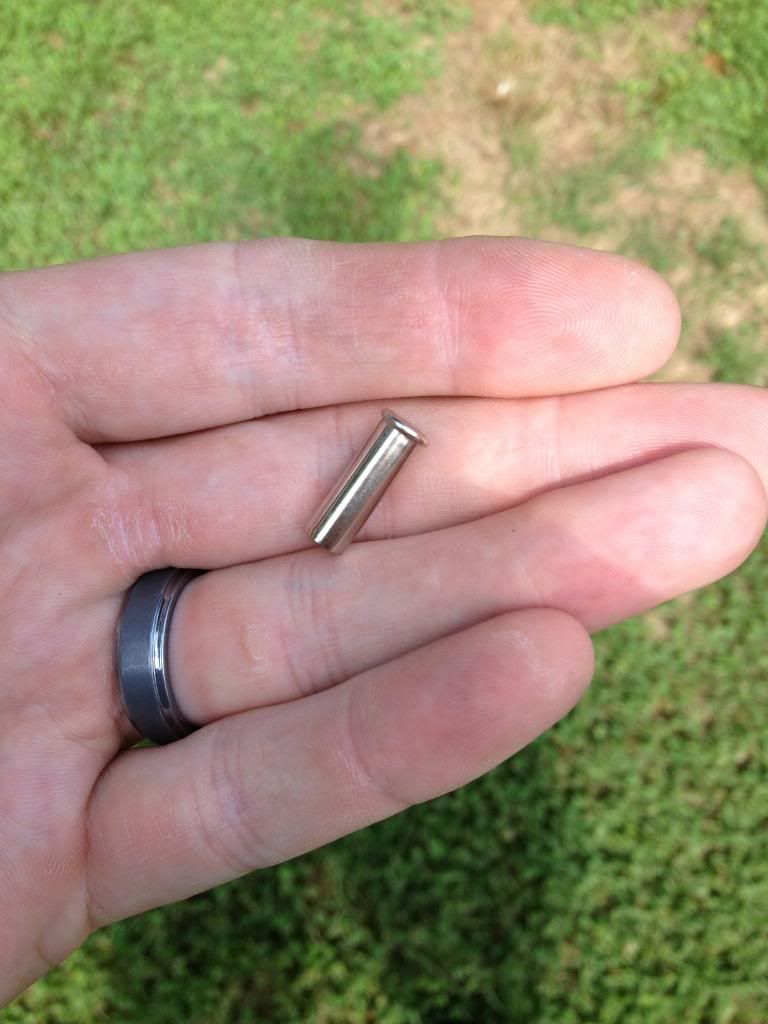
4. 22 cal bullet shell

5. Washers and/or Nuts

6. 800 grit sand paper (or any other fine grit to sand copper)

Procedure:

Park your car with the wheel straight and true.

Start by removing the small screw on the bottom of the steering wheel "horn pad". It is located here:


Once removed you can gently pull outward on the button, and then push up and the horn pad will pop off. Again, be gentle, there is a contact connector that you want to ensure you do not break. Disconnect the wire, and place the horn pad to the side.

Next, you will see a 19mm nut that holds the steering wheel to the shaft. Before you remove it, mark the wheel and the shaft with a line using a permanent marker or grease pen to ensure when you replace the wheel, you replace it straight. Of course, you could scratch it in as well.

At this point you are going to want to loosen the nut for the shaft. Using a 19mm socket and 1/2" ratchet, remove the nut by firmly holding the steering wheel with one hand, and loosening the bolt with your free hand.


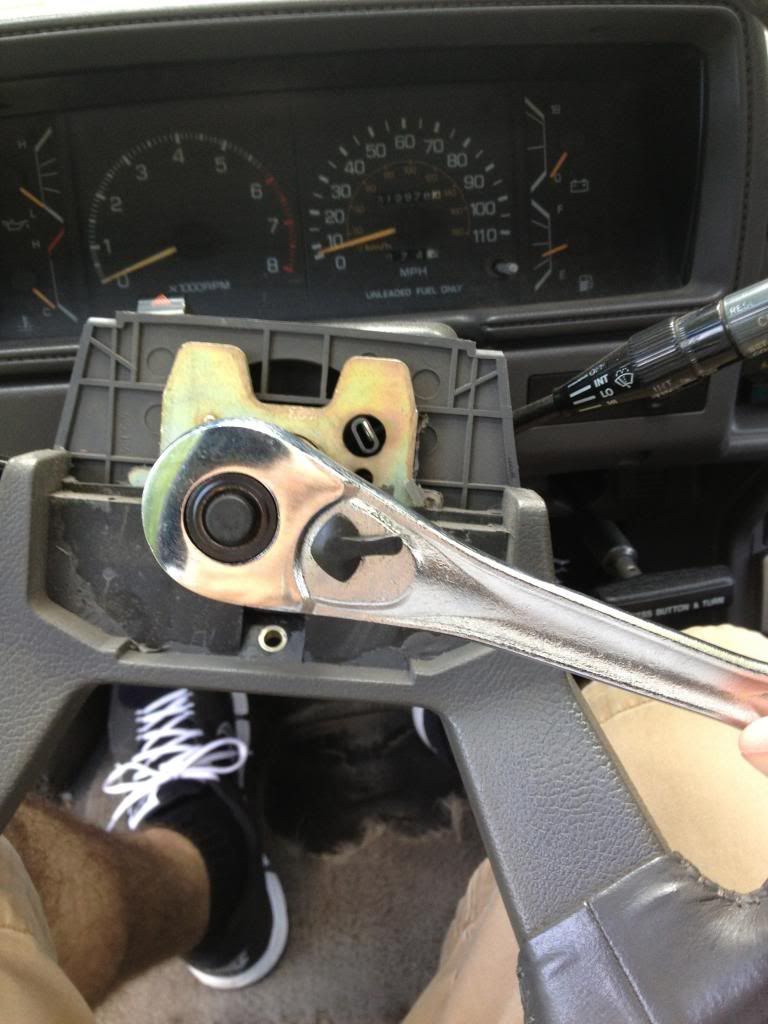
The bolt is supposed to be at 26ft lbs, so you shouldn't need a breaker bar. If you do, it is not the end of the world. Once the nut breaks free, loosen it about half way, but leave it on. Firmly pull up on the steering wheel until it breaks free of the spline's grip. The nut you left on the shaft will stop the steering wheel from breaking your nose. ;)

Now that the wheel is free, remove the nut.


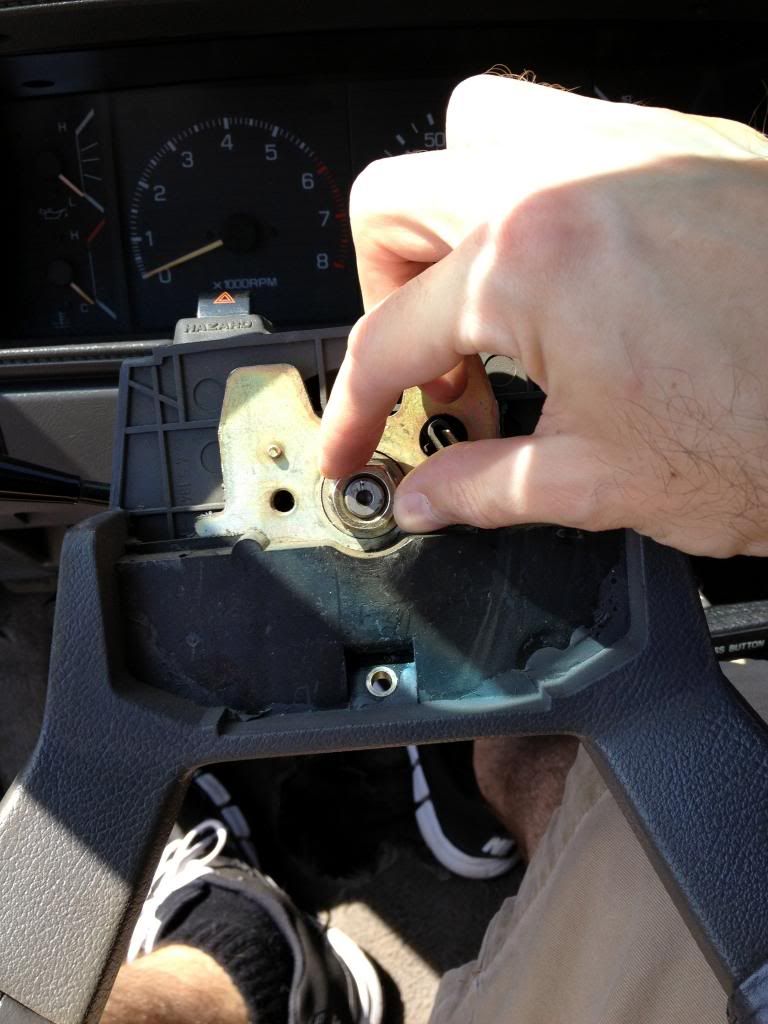
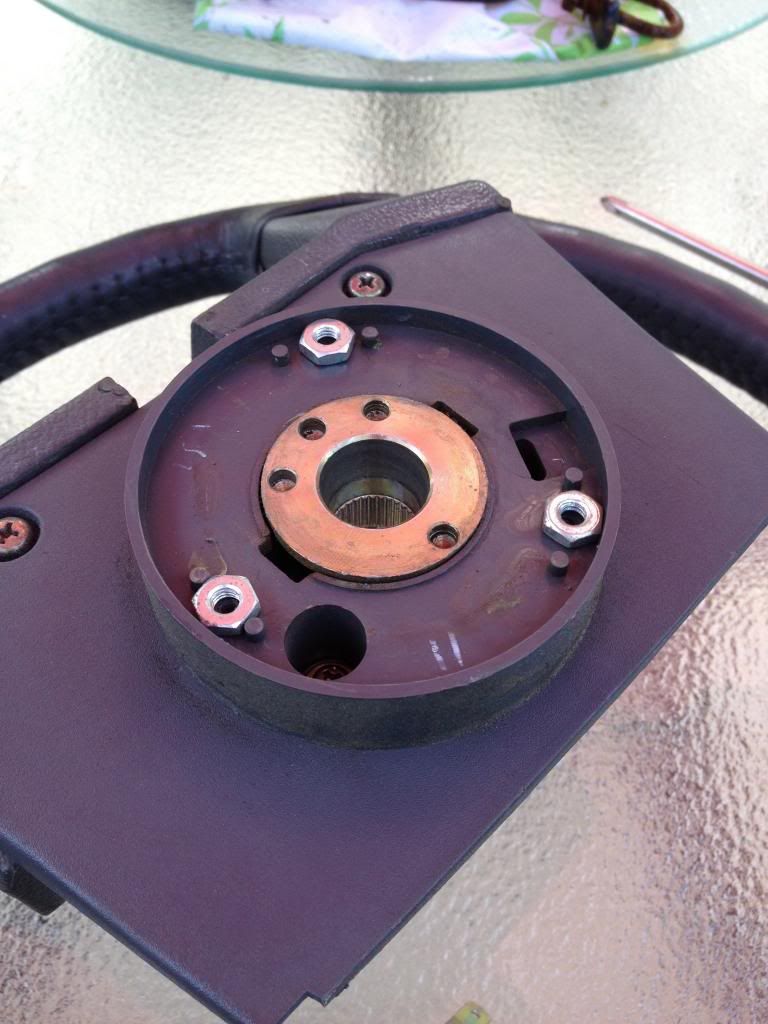
Remove the steering wheel to reveal the inside of the steering column.


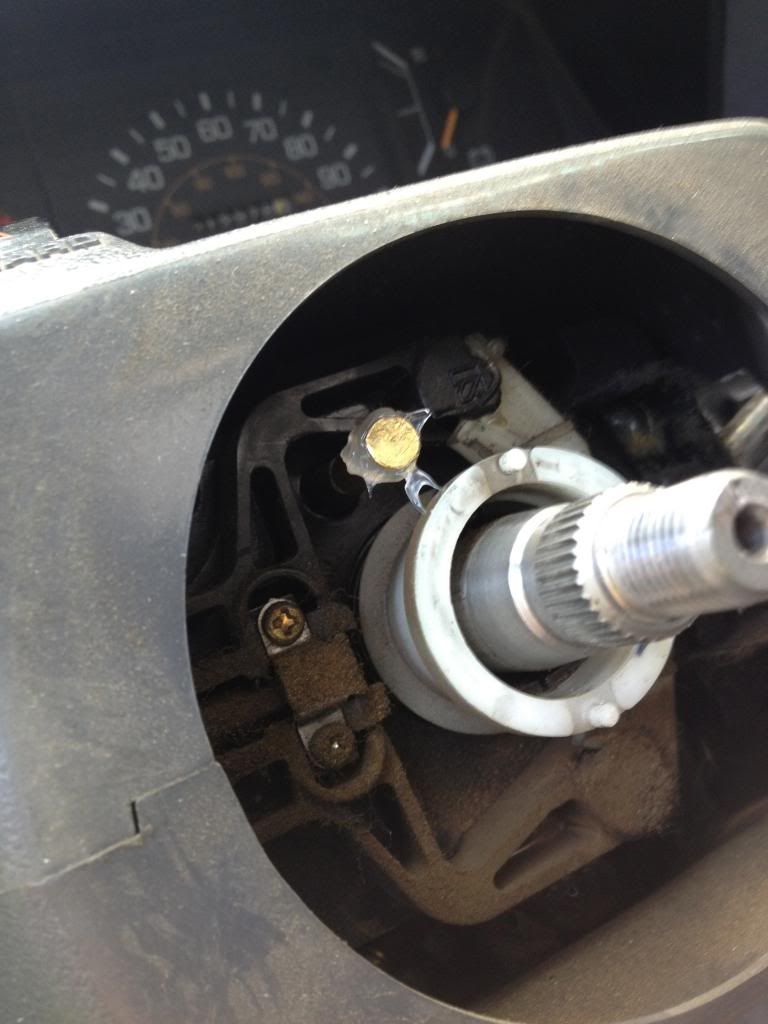
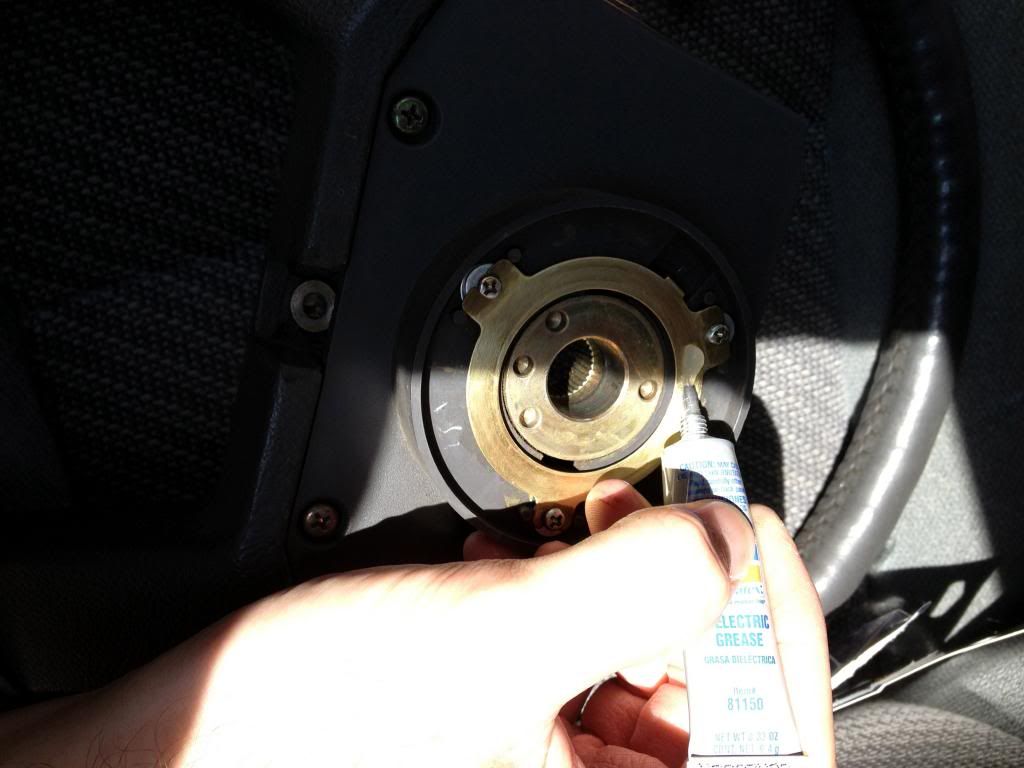
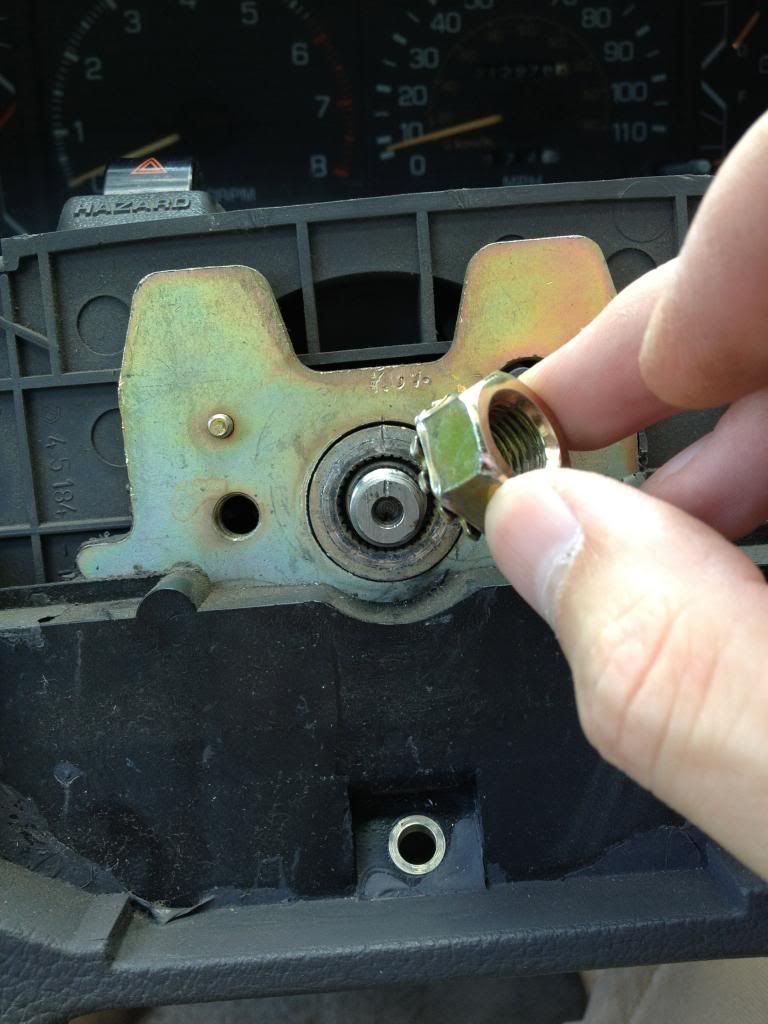
You will notice a small pin or spring tensioned bolt at about ten o'clock in relation to the shaft. This pin contacts a copper ring on the back side of the steering wheel.


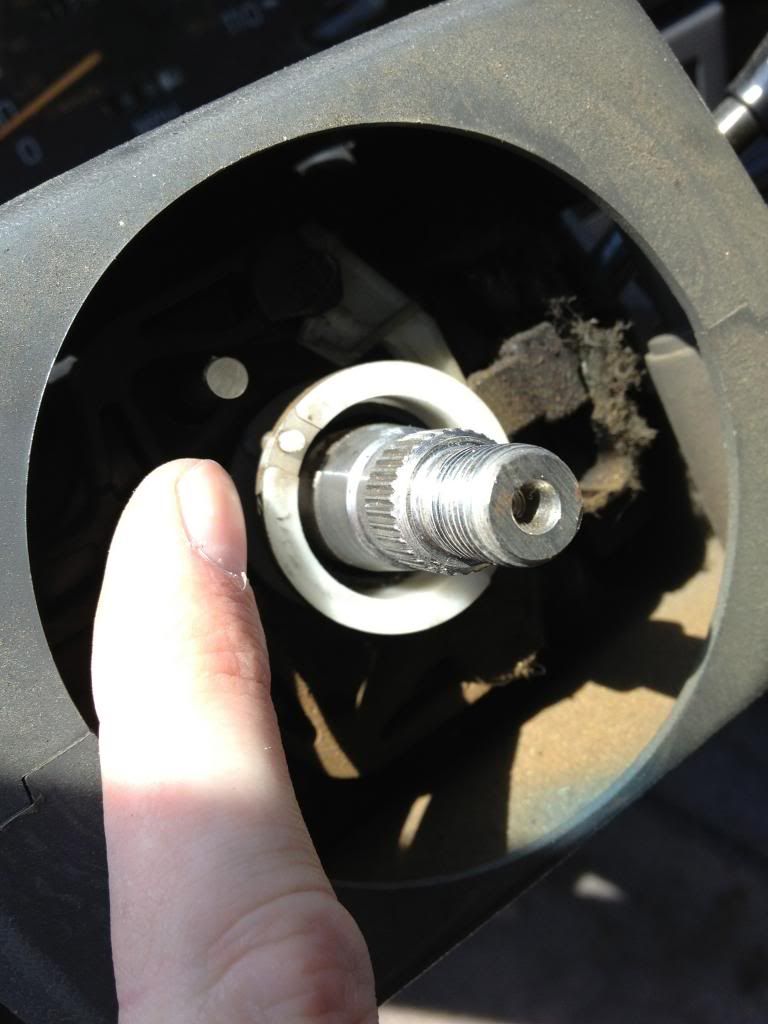
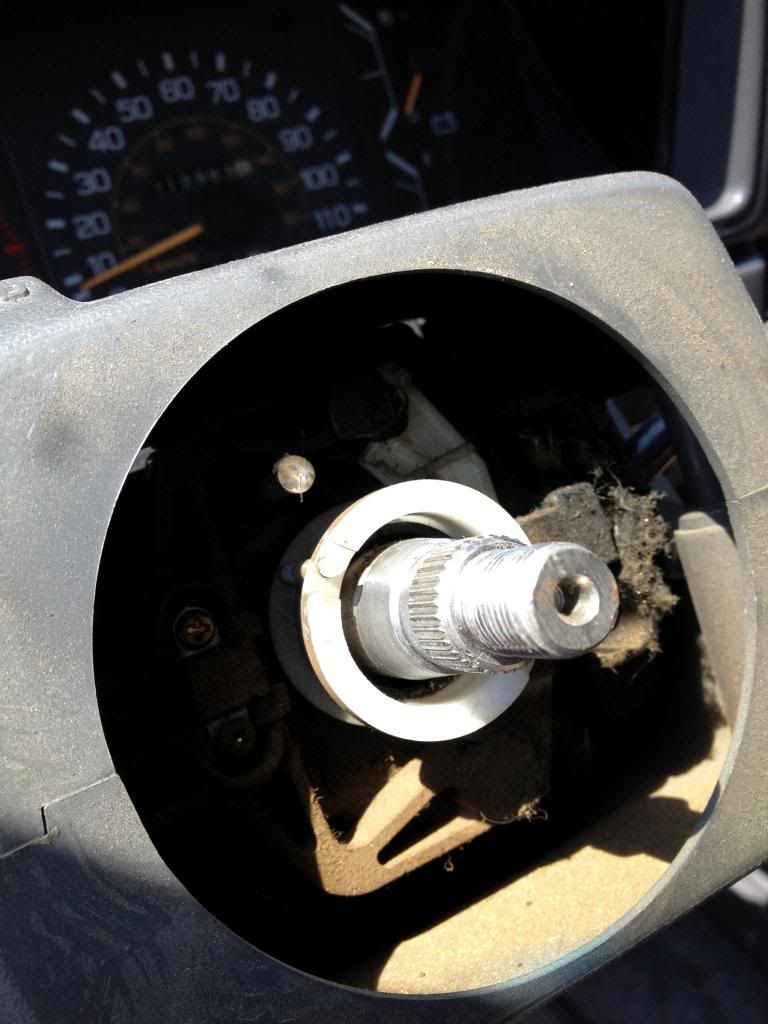
Over the years, the constant contact of this pin with the copper ring on the steering wheel causes the pin to wear down, shorter and shorter. Eventually the pin will no longer contact the ring. To stop the issue of the pin wearing down (because it will continue to wear down if you do not take this step) you will need a 22 cal bullet shell. First, if the pin's tip is dirty, sand it a bit until it shines. Fill the shell with a little dielectric grease, and push it on and over the pin. The shell will not wear down like the pin, and you can consider the pin "bullet proof" ha-ha-ha. ;)


Put a dab of dielectric grease on the back of the shell for good luck (and for contact with the ring).


With the shell in place, you have completed repair of the steering column end of the job, and you can now move to the steering wheel.


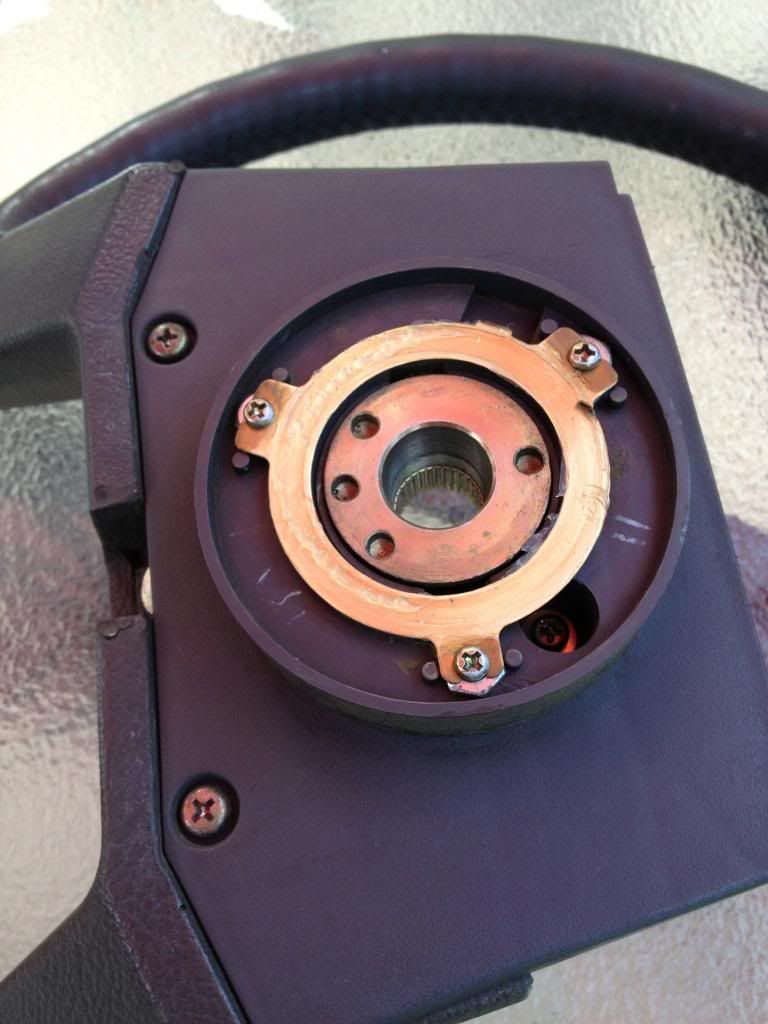
The steering wheel will have a ring installed that contacts the pin, and then moves to the front of the steering wheel via a copper arm where it awaits to be plugged in (what you unplugged earlier) to complete the ground when you press the horn pad.

Take the time to sand the ring. If it is dirty clean it first. Lightly sand it until it shines, removing all corrosion.


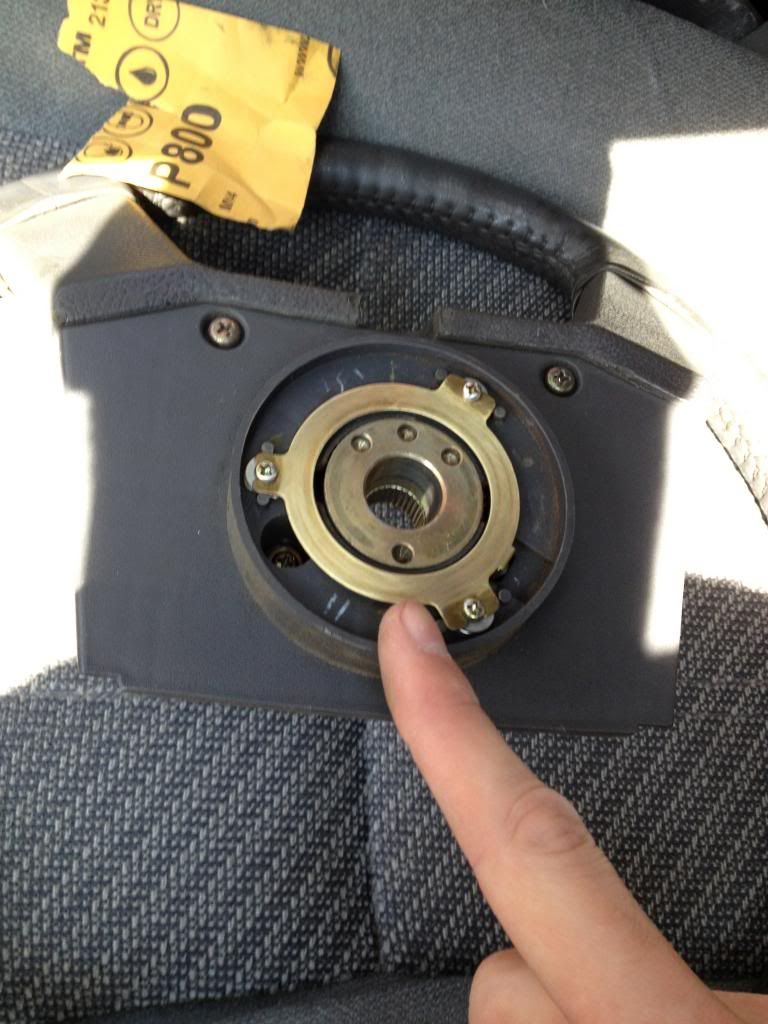
On my truck you can see the last owner had already installed washers to shim out the ring, and that is what we are going to do as well, but because this repair had been done before, by shimming out the ring WITHOUT using the bullet shell, my pin in the steering column was worn down once again, even shorter, and once again the horn stopped working. Your horn will most likely not be shimmed with washers, and just be held on by the three factory screws.

The goal is to make the ring rise, so it can contact the bullet shell covered pin. Some members have gone as far as creating a true shim with plastic, to ensure they do not bend the copper ring. This is not an issue however, as the pin is spring loaded, and should press in long before the copper ring bends, so washers or nuts are fine to use.

Remove the three screws and pull straight up on the ring, keeping in mind that there is a copper arm running through the wheel.


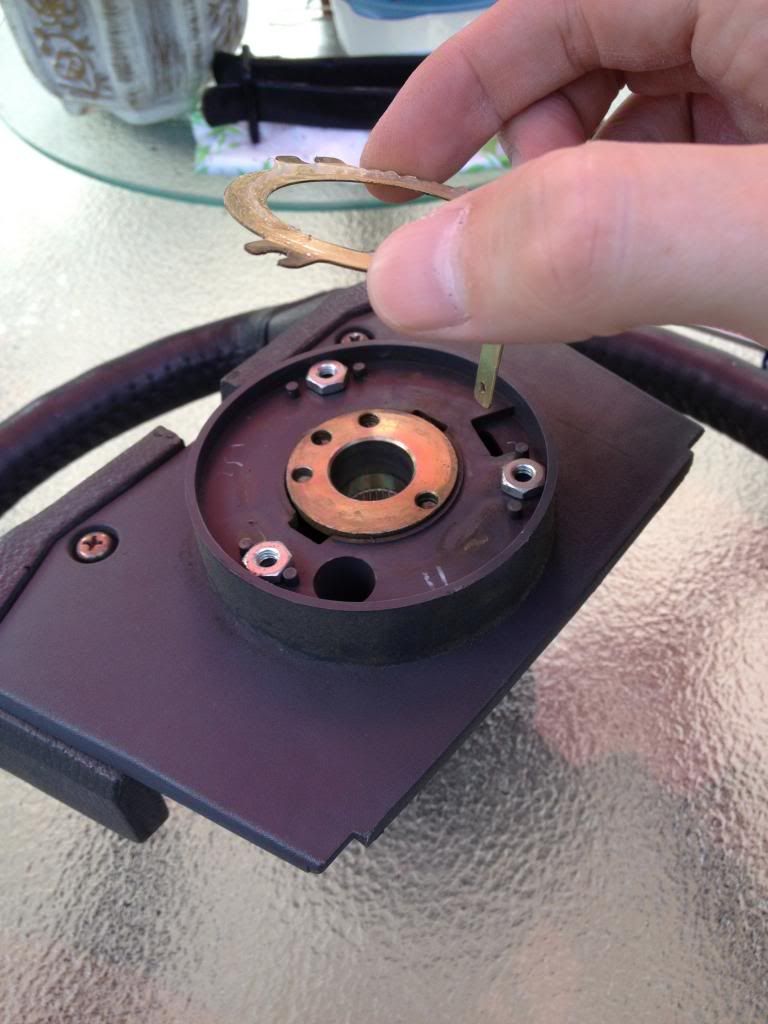
I used nuts, because the washer method was already done as explained earlier. Only shim as much as necessary, most likely a few washers will do the trick.


Insert your spacers (washers or nuts) and then re-install the screws. Do not over tighten these, barely hand tight, you do not want to press out the copper fingers and make a mess of the ring.

The ring should now be elevated, and you can begin applying a healthy coating of dielectric grease.


Make sure you get a coating around the entire ring. The grease is not a step worth skipping, as it will ensure that the ring and pin will not squeak and squeal when turning your wheel, and ensure smooth quiet operation. In addition, it prevents wear from metal to metal contact. It's grease it lubricates! Do not skip this step! ;)


You can now replace the steering wheel. Before you do, you need to check a few things. Ensure the white plastic collar around the shaft (near the splines) matches the copper inner ring. The collar has two tiny plastic stubs, and the copper inner ring has the female ends to this. Just twist the collar to line it up. Then, ensure you match your alignment markings you made from the shaft to the wheel to ensure the steering wheel is straight. If you didn't make these, thats ok, you can always remove the wheel again to fix/fine tune the issue in the future.


When the wheel has been reinstalled, you can reinstall the 19mm nut. You could put a torque wrench on this nut, but hand tight with a 1/2" drive will do the trick, and there should be a lock washer that will bite well enough. Remember, this nut is only holding the steering wheel from being PULLED OFF, it has nothing to do with turning the wheel, all that torque is on the splines, so no need to over torque this bolt!


Grab the horn pad, reinstall the ground wire connector, and then slide the horn pad back on from the top down, ensuring that the two "hooks" properly go behind the steering wheel plate.

Re install the retainer screw on the bottom of the wheel.

Test the horn.

If the horn now works in all positions, you are finished. If it works but only in a few positions, or a few more positions, then you need to add more washers or a thicker nut. Trial and error.

Hopefully this write-up helps! Very important for the daily driver first gens!


BEEP BEEP!
__________________
1989 Toyota 4Runner SR5, 3.0L V6, 4x4, 5-Speed Manual, 2" add-a-leaf kit in rear, Bone Stock with 31x10.5" tires.

Last edited by 89FourRunner; 08-12-2013 at 06:03 PM.
89FourRunner is offline   Reply With QuoteReply With Quote
Old 08-12-2013, 06:29 PM #2
85toy4runner 85toy4runner is offline
Member
 
Join Date: Feb 2012
Location: timbuktu
Posts: 115
85toy4runner is on a distinguished road
85toy4runner 85toy4runner is offline
Member
 
Join Date: Feb 2012
Location: timbuktu
Posts: 115
85toy4runner is on a distinguished road
thanks for taking the time and doing this write up, I was wondering what the anatomy looked like under the steering wheel . mine is squeaking when I turn the wheel
85toy4runner is offline   Reply With QuoteReply With Quote
Old 08-13-2013, 03:06 AM #3
KidVermicious's Avatar
KidVermicious KidVermicious is offline
Elite Member
 
Join Date: Feb 2010
Location: Utard
Posts: 12,985
Real Name: Kevin
KidVermicious has a spectacular aura about KidVermicious has a spectacular aura about
KidVermicious KidVermicious is offline
Elite Member
KidVermicious's Avatar
 
Join Date: Feb 2010
Location: Utard
Posts: 12,985
Real Name: Kevin
KidVermicious has a spectacular aura about KidVermicious has a spectacular aura about
Good writeup! @SV_Dude should put it in the sticky.
__________________
.
'My needle always settles between west and southwest. The future lies that way to me, and the earth seems more unexhausted and richer on that side.' - Thoreau, sort of.

The Grey Bastard, 1985 4Runner, driveway ornament.
Utah DesertRunners T4R, for all things wheeling and 4Runner in Utah.
KidVermicious is offline   Reply With QuoteReply With Quote
Old 08-15-2013, 12:13 AM #4
BigBluePile's Avatar
BigBluePile BigBluePile is offline
Member
 
Join Date: Apr 2012
Location: Oak Harbor, WA
Posts: 471
Real Name: BBP
BigBluePile is on a distinguished road
BigBluePile BigBluePile is offline
Member
BigBluePile's Avatar
 
Join Date: Apr 2012
Location: Oak Harbor, WA
Posts: 471
Real Name: BBP
BigBluePile is on a distinguished road
Funny reading this the other night only to notice my horn not working today. Normally, I would have not paid mind to it but instead I turned the steering wheel and boom horn works. Lolz.

Thanks for the write up!
__________________
It's OEM brah.
BigBluePile is offline   Reply With QuoteReply With Quote
Old 09-29-2013, 05:05 PM #5
wallytoo's Avatar
wallytoo wallytoo is offline
Member
 
Join Date: May 2013
Location: nh
Posts: 858
wallytoo has a spectacular aura about wallytoo has a spectacular aura about
wallytoo wallytoo is offline
Member
wallytoo's Avatar
 
Join Date: May 2013
Location: nh
Posts: 858
wallytoo has a spectacular aura about wallytoo has a spectacular aura about
.....and another 1st gen fix completed. the most difficult part was removing the bullet from the case (live round). soaked entire cartridge in small cup of PB, which thoroughly soaked the powder. used small vise-grip to grab bullet, and used gloved hand to gently wiggle case, eventually the bullet freed up from the case, and i could remove it. cleaned up the inside of the case, and inserted on horn spring assembly. beep. beep.
wallytoo is offline   Reply With QuoteReply With Quote
Old 04-16-2015, 10:39 AM #6
rusty904 rusty904 is offline
Member
 
Join Date: Feb 2015
Location: Winston-Salem NC
Posts: 228
rusty904 is on a distinguished road
rusty904 rusty904 is offline
Member
 
Join Date: Feb 2015
Location: Winston-Salem NC
Posts: 228
rusty904 is on a distinguished road
Bringing this thread back! Great write up, followed the instructions to the letter but.....nothing.

I removed the steering column cover and I can clearly see the pin making contact with the plate but still no horn.

I guess I have worse problems because I'm pretty sure I followed the procedure correctly. Anyone have any ideas for what my next course of action should be? I should mention the first thing I did was replace the fuse.
rusty904 is offline   Reply With QuoteReply With Quote
Old 04-16-2015, 11:05 AM #7
fourwd1's Avatar
fourwd1 fourwd1 is offline
Moderator
 
Join Date: Jun 2004
Location: the Socialist State of Maryland
Posts: 11,443
Real Name: The Chosen One
fourwd1 is just really nice fourwd1 is just really nice fourwd1 is just really nice fourwd1 is just really nice
fourwd1 fourwd1 is offline
Moderator
fourwd1's Avatar
 
Join Date: Jun 2004
Location: the Socialist State of Maryland
Posts: 11,443
Real Name: The Chosen One
fourwd1 is just really nice fourwd1 is just really nice fourwd1 is just really nice fourwd1 is just really nice
Could be the horn relay, but that depends, some years have one, some don't.
__________________
- the Internet - the mother-ship of people who don't know much and aren't afraid to go public
'84 4Runner - ARBed 5.29s F&R, 4.7 & 2.28 t-cases, 2" drive train lift, BudBuilt x-member/skid, 30 spl Longs
'83 Toy P/U - Buick 231 V6, Holley 4 bbl, Weiand intake, Downey headers, TH350 w/700R4 low gearset,
'89 4Runner SR5 - stock
fourwd1 is offline   Reply With QuoteReply With Quote
Old 04-16-2015, 11:10 AM #8
KidVermicious's Avatar
KidVermicious KidVermicious is offline
Elite Member
 
Join Date: Feb 2010
Location: Utard
Posts: 12,985
Real Name: Kevin
KidVermicious has a spectacular aura about KidVermicious has a spectacular aura about
KidVermicious KidVermicious is offline
Elite Member
KidVermicious's Avatar
 
Join Date: Feb 2010
Location: Utard
Posts: 12,985
Real Name: Kevin
KidVermicious has a spectacular aura about KidVermicious has a spectacular aura about
Quote:
Originally Posted by rusty904 View Post
Bringing this thread back! Great write up, followed the instructions to the letter but.....nothing.

I removed the steering column cover and I can clearly see the pin making contact with the plate but still no horn.

I guess I have worse problems because I'm pretty sure I followed the procedure correctly. Anyone have any ideas for what my next course of action should be? I should mention the first thing I did was replace the fuse.
Take the wheel off. Ground the pin to something and see if you get horn - if you do, something's wrong in the column cover or on the ground side of the circuit. If you don't, something's wrong on the supply side of the circuit.
__________________
.
'My needle always settles between west and southwest. The future lies that way to me, and the earth seems more unexhausted and richer on that side.' - Thoreau, sort of.

The Grey Bastard, 1985 4Runner, driveway ornament.
Utah DesertRunners T4R, for all things wheeling and 4Runner in Utah.
KidVermicious is offline   Reply With QuoteReply With Quote
Old 04-21-2015, 11:47 AM #9
rusty904 rusty904 is offline
Member
 
Join Date: Feb 2015
Location: Winston-Salem NC
Posts: 228
rusty904 is on a distinguished road
rusty904 rusty904 is offline
Member
 
Join Date: Feb 2015
Location: Winston-Salem NC
Posts: 228
rusty904 is on a distinguished road
My truck is an 88, dunno if it has a horn relay or not.

I'm an idiot with all things electrical (and most other things honestly) How would one ground the pin to something?

This is really starting to piss me off, I never use the horn and it's the last thing keeping me from passing inspection.

I have a new horn pin from Toyota but I honestly don't think that's the problem. Mine looked to have been replaced recently so I just sanded, cleaned, and shimmed the steering wheel plate then added some dielectric grease. Like I said earlier, connection looks really solid.
rusty904 is offline   Reply With QuoteReply With Quote
Old 04-21-2015, 12:09 PM #10
flyinhawaiian01's Avatar
flyinhawaiian01 flyinhawaiian01 is offline
Senior Member
 
Join Date: Dec 2014
Location: Idaho/Honolulu
Posts: 1,330
Real Name: Chris
flyinhawaiian01 will become famous soon enough
flyinhawaiian01 flyinhawaiian01 is offline
Senior Member
flyinhawaiian01's Avatar
 
Join Date: Dec 2014
Location: Idaho/Honolulu
Posts: 1,330
Real Name: Chris
flyinhawaiian01 will become famous soon enough
could be the horn itself. Try giving it a few taps with a screwdriver handle while someone holds the horn down. Sometimes that frees up whatever is inside the horn and gets it working again.
__________________
2011 4 Runner (my daily driver)
1987 Xtra Cab (35's and locked front/rear, the trail toy!)
1985 Supra (430rwhp track toy!)
2006 Honduh Odyssey (the wife's van)
flyinhawaiian01 is offline   Reply With QuoteReply With Quote
Old 04-21-2015, 12:47 PM #11
KidVermicious's Avatar
KidVermicious KidVermicious is offline
Elite Member
 
Join Date: Feb 2010
Location: Utard
Posts: 12,985
Real Name: Kevin
KidVermicious has a spectacular aura about KidVermicious has a spectacular aura about
KidVermicious KidVermicious is offline
Elite Member
KidVermicious's Avatar
 
Join Date: Feb 2010
Location: Utard
Posts: 12,985
Real Name: Kevin
KidVermicious has a spectacular aura about KidVermicious has a spectacular aura about
Quote:
Originally Posted by rusty904 View Post
My truck is an 88, dunno if it has a horn relay or not.

I'm an idiot with all things electrical (and most other things honestly) How would one ground the pin to something?
Run something conductive between that pin and the nearest chassis ground . If I remember right, I scared the crap out of myself once when a screwdriver touched that pin and the metal in the column and the horn went off. But maybe I'm making that up, it's been a while since I had to screw around in my steering column. Anyway, find a source of ground, connect the pin to it, listen for a honk.
__________________
.
'My needle always settles between west and southwest. The future lies that way to me, and the earth seems more unexhausted and richer on that side.' - Thoreau, sort of.

The Grey Bastard, 1985 4Runner, driveway ornament.
Utah DesertRunners T4R, for all things wheeling and 4Runner in Utah.
KidVermicious is offline   Reply With QuoteReply With Quote
Old 01-15-2016, 06:54 PM #12
1974RUNNER's Avatar
1974RUNNER 1974RUNNER is offline
Member
 
Join Date: Nov 2012
Location: Monterey, CA
Posts: 73
1974RUNNER is on a distinguished road
1974RUNNER 1974RUNNER is offline
Member
1974RUNNER's Avatar
 
Join Date: Nov 2012
Location: Monterey, CA
Posts: 73
1974RUNNER is on a distinguished road
Just installed my aftermarket .22 shell horn upgrade. Hot damn it works GREAT!!! Thanks for the write up!!!
1974RUNNER is offline   Reply With QuoteReply With Quote
Old 02-02-2016, 11:04 AM #13
89FourRunner's Avatar
89FourRunner 89FourRunner is offline
Member
 
Join Date: May 2013
Location: USA
Posts: 514
89FourRunner is on a distinguished road
89FourRunner 89FourRunner is offline
Member
89FourRunner's Avatar
 
Join Date: May 2013
Location: USA
Posts: 514
89FourRunner is on a distinguished road
Quote:
Originally Posted by 1974RUNNER View Post
Just installed my aftermarket .22 shell horn upgrade. Hot damn it works GREAT!!! Thanks for the write up!!!
No Problem! It lasts quite a long time, but have another shell ready in about two years.
__________________
1989 Toyota 4Runner SR5, 3.0L V6, 4x4, 5-Speed Manual, 2" add-a-leaf kit in rear, Bone Stock with 31x10.5" tires.
89FourRunner is offline   Reply With QuoteReply With Quote
Old 04-26-2017, 02:51 PM #14
69desertdog 69desertdog is offline
Junior Member
 
Join Date: Apr 2017
Location: Phoenix, AZ
Posts: 1
69desertdog is on a distinguished road
69desertdog 69desertdog is offline
Junior Member
 
Join Date: Apr 2017
Location: Phoenix, AZ
Posts: 1
69desertdog is on a distinguished road
85 4r

Great write up! Any other suggests? I running out of things to try. I have followed every suggestion on the thread and nothing works at this time. I know the fuse (hazards works) is good and the horn works (verified with 9V B+). Is there a relay or something I'm overlooking?
69desertdog is offline   Reply With QuoteReply With Quote
Old 04-26-2017, 06:23 PM #15
RAD4Runner's Avatar
RAD4Runner RAD4Runner is offline
Senior Member
 
Join Date: Mar 2012
Location: Southern California
Posts: 1,836
RAD4Runner has a spectacular aura about RAD4Runner has a spectacular aura about
RAD4Runner RAD4Runner is offline
Senior Member
RAD4Runner's Avatar
 
Join Date: Mar 2012
Location: Southern California
Posts: 1,836
RAD4Runner has a spectacular aura about RAD4Runner has a spectacular aura about
Quote:
Originally Posted by 69desertdog View Post
Great write up! Any other suggests? I running out of things to try. I have followed every suggestion on the thread and nothing works at this time. I know the fuse (hazards works) is good and the horn works (verified with 9V B+). Is there a relay or something I'm overlooking?
There is no relay, and that is bad. (Back in those days, Toyota mechanical engineers were much better than electrical engineers. I hope they are equally good nowadays.)

Assuming yours is wired same as 1986 to 1988 22R-E's as in first picture... Proceed with test as shown on second picture and keep us posted.


Test for Horn Circuit:
This is one of the quickest ways to narrow down a horn problem, AFTER YOU HAVE USED YOUR SENSES (see, hear, feel) to inspect the system. ABSOLUTELY NO NEED TO TAKE ANYTHING APART. JUST VOLT DC SETTING ON THE MULTI-METER. (An assistant may be needed).
Perform with everything connected as normal. This will test both positive side and ground/switch side of the system.
__________________
86 4Runner, 22R-Eliable, 5-Speed Manual, dlx. WHAT'S YOURS?
If you want us to help from afar please let us see, hear, feel what you're dealing with.
A picture paints a thousand words.
Toyota components are bullet-proof. Issues often arise from poor wiring, assembly and/or maintenance. Suspect those first.
Next only to our senses, the multi-meter is the most important electrical diagnostic tool. Spend $6 at Harbor Freight or $$$ blindly replacing parts.

Last edited by RAD4Runner; 03-19-2018 at 10:42 PM.
RAD4Runner is offline   Reply With QuoteReply With Quote
Reply

Thread Tools
Display Modes Rate This Thread
Rate This Thread:

Posting Rules
You may not post new threads
You may not post replies
You may not post attachments
You may not edit your posts

BB code is On
Smilies are On
[IMG] code is On
HTML code is On

Forum Jump

Similar Threads
Thread Thread Starter Forum Replies Last Post
Tired of my wussy sounding horn. Anyone done a horn Mod? jklimek 3rd gen T4Rs 24 11-17-2014 01:03 PM
front intermediate Shaft Rockdawg84 3rd gen T4Rs 4 02-29-2012 01:58 AM
Intermediate shaft replaced! Dkon82 4th Gen T4Rs 1 09-13-2011 05:40 PM
Toyota Pickup/4runner Full Knuckle rebuild KIT. NEW!! w/ wheel bearings. 4x4climber For Sale: Suspension/Wheels/Tires 0 09-01-2011 12:18 PM
Intermediate 4wd Class Bridgeport, TX 19 June Mr. Leary General Discussions 7 06-17-2011 01:03 PM

Powered by vBadvanced CMPS v3.2.2

All times are GMT -4. The time now is 09:28 AM.

Powered by vBulletin® Version 3.8.11
Copyright ©2000 - 2024, vBulletin Solutions Inc.
Search Engine Optimisation provided by DragonByte SEO (Pro) - vBulletin Mods & Addons Copyright © 2024 DragonByte Technologies Ltd.
Feedback Buttons provided by Advanced Post Thanks / Like (Lite) - vBulletin Mods & Addons Copyright © 2024 DragonByte Technologies Ltd.
User Alert System provided by Advanced User Tagging (Lite) - vBulletin Mods & Addons Copyright © 2024 DragonByte Technologies Ltd.
***This site is an unofficial Toyota site, and is not officially endorsed, supported, authorized by or affiliated with Toyota. All company, product, or service names references in this web site are used for identification purposes only and may be trademarks of their respective owners. The Toyota name, marks, designs and logos, as well as Toyota model names, are registered trademarks of Toyota Motor Corporation***Ad Management plugin by RedTyger
 
Copyright © 2020