User Tag List

Reply
 
Thread Tools Rate Thread Display Modes
Old 12-27-2018, 11:10 AM #1
Arild Arild is offline
Member
 
Join Date: Mar 2018
Location: Belgium
Posts: 127
Arild is on a distinguished road
Arild Arild is offline
Member
 
Join Date: Mar 2018
Location: Belgium
Posts: 127
Arild is on a distinguished road
DIY roof rails. This is how i did it...

Hi there,

It's winter here in Belgium and with all that salt on the roads the 4runner isn't going anywhere. So i'm using the time to ready her for next summer. We have a RTT but our 4runner came without roof rails so I needed to fabricate them.

Notice:

You don't need to dismantle the roof interior.
Clean and degrease your roof.
Don't do it when temps are below zero. (celcius that is)
Be patient! It took me almost a full day. (painting not included)
Metric system used. (Meters M, centimeters CM, millimeters MM)

This is how i did it but it is by no means the best way to do it! Others may have more experience/knowledge of materials and tools.
If you have some good idea's or advice, please post them and refer to Step # so others (and I) can follow and learn from it.


Components needed:
  • Rivet nuts for 6mm diam. bolts

  • 6mm countersunk screws

  • ISB aluminium 16x40 (i used 1.8m long)

  • some anti rust spray
  • silicone sealant
  • rubber strips (or bike inner tube)
  • Alu primer spray (optional)
  • Black spray can (optional)

Tools needed:
  • Rivet nut tool
  • Dremel-style grinding stone
  • Low rpm drill
  • Pilot point drill bits
  • Multi purpose drill bit
  • Basic screwdriver bit set
  • Sciccors

Step 1: Mark your holes in the alu profile.
My rails are 1.8m long so I drilled 9 holes with 1.8cm between them. Then another 2 at 2cm from the ends.


Step 2: drill holes in the aluminium profile

First use a drill bit with the same size as your bolts. I used 6mm bolts so i used a 6mm bit. Afterwards, use the larger bit so the coned head of the countersunk screw fit perfectly. A bench drill makes life easier!


Step 3: (be aware, not my best english ) Mill out for rivet nut

At the back side of the alu profile i milled out some space to fit the head of rivet nut. This way we eliminate the gap between the roof and the rails making it more sturdy. Use a pilot point drill bit!


Step 4 (optional): paint black

I painted my rails black. Aluminium doesn't rust so this is purely for aesthetic reasons. First i sanded the rails. Then applied some primer and paint. All with spray cans. I failed miserably btw.


Step 5: measure and mark ONE roof hole

I actually just put them on the roof and alinged them on sight. I don't know the inner stucture of the 4runner's roof but i can tell you, i didn't cut any electrical wires or roofing.


Of course the roof isn't completely flat...


I used the rail as a template to mark the holes but you need to tighten the rail first because of the curved roof, otherwise the holes won't lign up. I started with the rear one and scratched an X in the roof with an old screwdriver to mark it.

Last edited by Arild; 12-27-2018 at 11:25 AM.
Arild is offline   Reply With QuoteReply With Quote
Old 12-27-2018, 11:10 AM #2
Arild Arild is offline
Member
 
Join Date: Mar 2018
Location: Belgium
Posts: 127
Arild is on a distinguished road
Arild Arild is offline
Member
 
Join Date: Mar 2018
Location: Belgium
Posts: 127
Arild is on a distinguished road
WARNING !! Point of no return !! WARNING

Step 6: drill roof hole

Using a pilot point drill bit i started drilling at low rpm's. The package of the rivet nuts sais 9mm. Yours may be different. No need to drill a smaller hole first! In fact, it will do more harm than good when using a pilot point bit. Be carefull as the drill can get stuck sometimes and the roof can get twisted a bit:

Good hole:


Bad hole (twisted roof):


I used some tube to put over the bit so i could not drill too deep. If you drill too deep you will get stuck in the interiour and we don't want that...


Step 7: apply anti-rust

Well, bare metal is what you get when drilling holes so some zinc-spray is needed. I spayed some of it in a small cup and used a small brush to apply in and around the hole. (see picture above) Let it dry out.

Step 8: apply silicone sealant

I used some silicone sealant around the hole in order to get it waterproof.


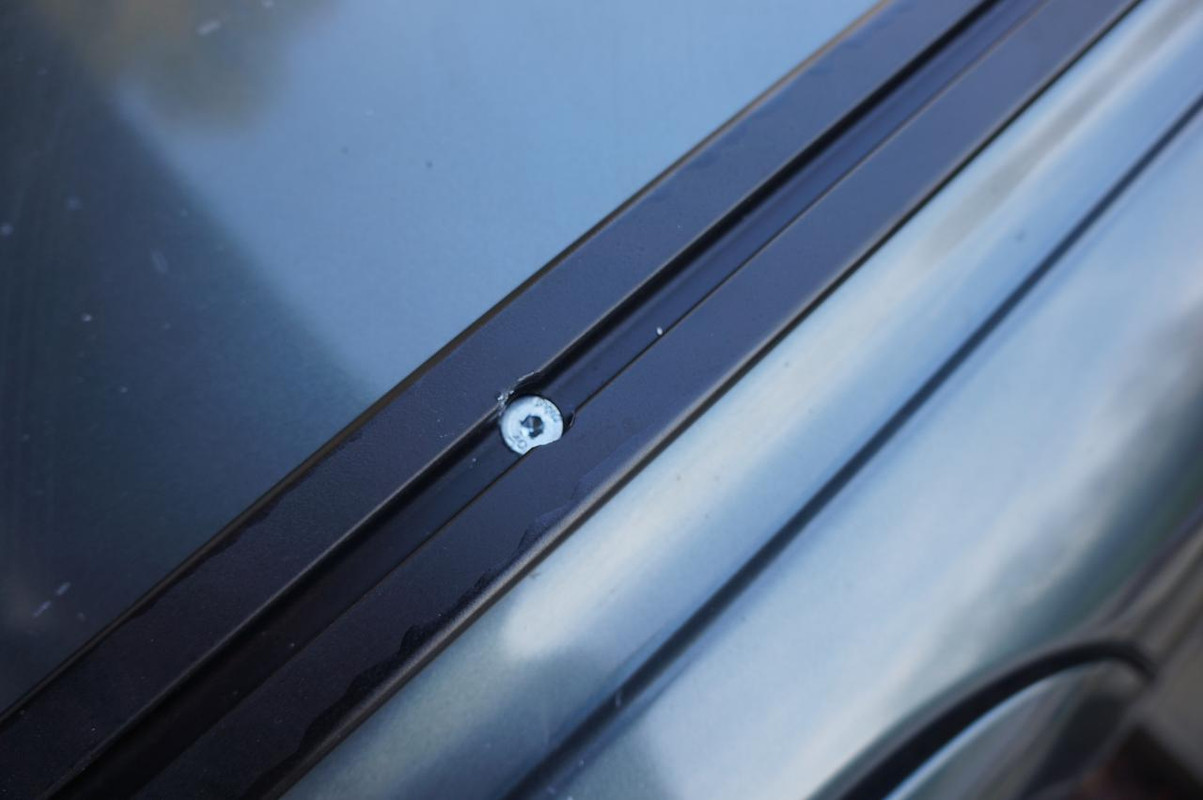
Step 9: insert rivet nut

Put the rivet nut in and used that special tool-thing to tighten it.

There it is. My first roof hole...


Step 10: align other end's hole

So i screwed in one end of the rail and now i can mark the hole on the other end. Put some pressure on the rail so it bends with the roof.

Step 11: drill other hole

Repeat step 6 to 9

Step 12: align other holes

Fasten the rail in the two outer holes and mark the rest of the holes, using the rail as a template. Remove the rail afterwards.

Step 13: drill rest of the holes

I marked down the remaining 9 holes so i can begin drilling. Repeat step 6 to 9 .

All holes drilled.


Step 14: rubber foil

I don't want my roof to get scratched so i put some rubber foil between the rails and the roof. It's also more waterproof. I used some leftover EPDM-rubber but there are rubber foils in all sizes and even with one- or two-sided tape. I made some cut-outs to fit over the rivets.


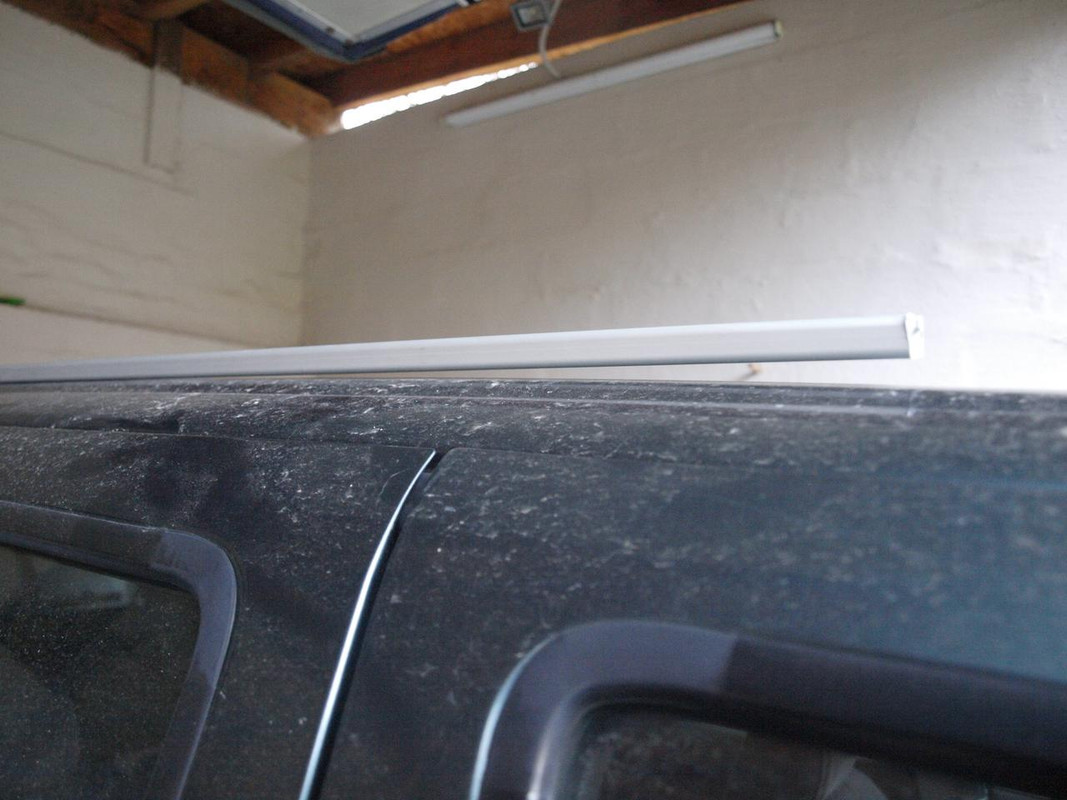
Step 15: Tighten the rails

This is a DIY job so there is no way that all the holes lign up prefectly. I screwed in the outer bolts first but didn't tighten them. Then i screwed in the rest. Now i could tightend them some more. Kinda like you do with rims.

There you have it. My DIY roof rails...

And my perfect paint job!


Arild is offline   Reply With QuoteReply With Quote
Old 12-27-2018, 01:38 PM #3
Chuckles89's Avatar
Chuckles89 Chuckles89 is offline
Senior Member
 
Join Date: Jul 2013
Location: Tennessee
Age: 26
Posts: 2,852
Real Name: Charlie
Chuckles89 has a spectacular aura about Chuckles89 has a spectacular aura about Chuckles89 has a spectacular aura about
Chuckles89 Chuckles89 is offline
Senior Member
Chuckles89's Avatar
 
Join Date: Jul 2013
Location: Tennessee
Age: 26
Posts: 2,852
Real Name: Charlie
Chuckles89 has a spectacular aura about Chuckles89 has a spectacular aura about Chuckles89 has a spectacular aura about
That looks great!
__________________
Quote:
Originally Posted by STX4Runner View Post
90% of the build threads in the 5th Gen section consist of Fuel Wheels, Plastidip, Duratracs and window tint.
1998 4Runner "Diamond" - Daily Driver (rolled & rebuilt) - 3.4 5-Speed, Coastal Bumper, Manual Hubs, 255/80r17 AT3Ws (409k+ Miles)
1997 4Runner "Becky" - Camping Rig - 3.4 Auto (for now), Armored, Cable E-Locked, Coastal Bumper, Sleeper Deck, 255/80r17 AT3Ws (185k+ Miles)
1989 4Runner | Tennessee 4Runner Group
Chuckles89 is offline   Reply With QuoteReply With Quote
Old 12-28-2018, 03:04 AM #4
RAD4Runner's Avatar
RAD4Runner RAD4Runner is offline
Senior Member
 
Join Date: Mar 2012
Location: Southern California
Posts: 1,836
RAD4Runner has a spectacular aura about RAD4Runner has a spectacular aura about
RAD4Runner RAD4Runner is offline
Senior Member
RAD4Runner's Avatar
 
Join Date: Mar 2012
Location: Southern California
Posts: 1,836
RAD4Runner has a spectacular aura about RAD4Runner has a spectacular aura about
Nice! Did the aluminum conform to the roof's curve easily?
__________________
86 4Runner, 22R-Eliable, 5-Speed Manual, dlx. WHAT'S YOURS?
If you want us to help from afar please let us see, hear, feel what you're dealing with.
A picture paints a thousand words.
Toyota components are bullet-proof. Issues often arise from poor wiring, assembly and/or maintenance. Suspect those first.
Next only to our senses, the multi-meter is the most important electrical diagnostic tool. Spend $6 at Harbor Freight or $$$ blindly replacing parts.
RAD4Runner is offline   Reply With QuoteReply With Quote
Old 12-28-2018, 04:14 AM #5
Arild Arild is offline
Member
 
Join Date: Mar 2018
Location: Belgium
Posts: 127
Arild is on a distinguished road
Arild Arild is offline
Member
 
Join Date: Mar 2018
Location: Belgium
Posts: 127
Arild is on a distinguished road
Thanks.
Yes. The rails can be bend with some force. I was afraid of little cracks in the rails but all seems fine. I'm also surprised about the stifness of the metal roof.

The rails will hold a RTT but i won't do any serieus off roading like rock crawling or so.

Last edited by Arild; 12-28-2018 at 01:09 PM.
Arild is offline   Reply With QuoteReply With Quote
Old 12-28-2018, 11:46 AM #6
Redthies's Avatar
Redthies Redthies is offline
Member
 
Join Date: Mar 2017
Location: 49*N 123*W
Posts: 68
Redthies is on a distinguished road
Redthies Redthies is offline
Member
Redthies's Avatar
 
Join Date: Mar 2017
Location: 49*N 123*W
Posts: 68
Redthies is on a distinguished road
Very nice job Arild. You have “huevos grandes” to drill all those holes in your roof! I’ve only gone the other way and removed roof racks and welded up holes.
__________________
‘99 UZJ 100 factory locker with OME and ST Maxxs
‘89 VN60 with OME and BFGs
Redthies is offline   Reply With QuoteReply With Quote
Old 12-30-2018, 02:20 PM #7
Dropzone's Avatar
Dropzone Dropzone is offline
Senior Member
 
Join Date: Nov 2013
Location: Elsewhere
Posts: 1,686
Dropzone is a jewel in the rough Dropzone is a jewel in the rough Dropzone is a jewel in the rough
Dropzone Dropzone is offline
Senior Member
Dropzone's Avatar
 
Join Date: Nov 2013
Location: Elsewhere
Posts: 1,686
Dropzone is a jewel in the rough Dropzone is a jewel in the rough Dropzone is a jewel in the rough
Looks Great!
Have you come up with cross bars yet?

what size strut did you use?
looks like an 8020 fascia piece similar to this
https://8020.net/shop/1050.html

I kind of wish I had gone that route instead of extending the factory roof rails using some from a parts truck I had
__________________
1994 4Runner AKA: Project Recycle

@503dropzone on IG
Dropzone is offline   Reply With QuoteReply With Quote
Old 12-31-2018, 05:07 AM #8
Arild Arild is offline
Member
 
Join Date: Mar 2018
Location: Belgium
Posts: 127
Arild is on a distinguished road
Arild Arild is offline
Member
 
Join Date: Mar 2018
Location: Belgium
Posts: 127
Arild is on a distinguished road
Quote:
Originally Posted by Dropzone View Post
Looks Great!
Have you come up with cross bars yet?
No idea on the crossbars yet. The goal was to be able to fit our RTT in the first place and we don't need crossbars for that as they are prefitted on the RTT structure.

I'm currently looking for a way to securly mount the RTT. I already found some bolts that slide perfectly into the rails, now i only need a bracket of some sort. This shouldn't be to difficult.


Quote:
Originally Posted by Dropzone View Post
what size strut did you use?
looks like an 8020 fascia piece similar to this
https://8020.net/shop/1050.html

I kind of wish I had gone that route instead of extending the factory roof rails using some from a parts truck I had
It's very similar to that 8020. The one I used is 40mm wide and 16mm in height. (That's 1,57 x 5/8 inch)


Yeah i read your topic a few times. Great runner! I searched for factory rails from used trucks but there aren't many 4runners in Belgium. Actually almost none...
__________________
:: '92 4runner 2L-T :: even slower then your 3.slow ::
Arild is offline   Reply With QuoteReply With Quote
Old 12-31-2018, 10:41 AM #9
Dropzone's Avatar
Dropzone Dropzone is offline
Senior Member
 
Join Date: Nov 2013
Location: Elsewhere
Posts: 1,686
Dropzone is a jewel in the rough Dropzone is a jewel in the rough Dropzone is a jewel in the rough
Dropzone Dropzone is offline
Senior Member
Dropzone's Avatar
 
Join Date: Nov 2013
Location: Elsewhere
Posts: 1,686
Dropzone is a jewel in the rough Dropzone is a jewel in the rough Dropzone is a jewel in the rough
Quote:
Originally Posted by Arild View Post
No idea on the crossbars yet. The goal was to be able to fit our RTT in the first place and we don't need crossbars for that as they are prefitted on the RTT structure.

I'm currently looking for a way to securly mount the RTT. I already found some bolts that slide perfectly into the rails, now i only need a bracket of some sort. This shouldn't be to difficult.


It's very similar to that 8020. The one I used is 40mm wide and 16mm in height. (That's 1,57 x 5/8 inch)


Yeah i read your topic a few times. Great runner! I searched for factory rails from used trucks but there aren't many 4runners in Belgium. Actually almost none...
using the short carriage bolts should do the trick.

Thanks, appreciate it! Hard to believe but even 2nd gen 4runners as parts trucks are getting harder to find around my area junk yards too. You can find complete 4runners fairly cheap used periodically but my wife would kill me if I brought anything else home I can't imagine how hard it would be to find stuff in Europe with out paying a ton to have used parts shipped in.
__________________
1994 4Runner AKA: Project Recycle

@503dropzone on IG
Dropzone is offline   Reply With QuoteReply With Quote
Old 12-31-2018, 08:34 PM #10
RAD4Runner's Avatar
RAD4Runner RAD4Runner is offline
Senior Member
 
Join Date: Mar 2012
Location: Southern California
Posts: 1,836
RAD4Runner has a spectacular aura about RAD4Runner has a spectacular aura about
RAD4Runner RAD4Runner is offline
Senior Member
RAD4Runner's Avatar
 
Join Date: Mar 2012
Location: Southern California
Posts: 1,836
RAD4Runner has a spectacular aura about RAD4Runner has a spectacular aura about
May I also suggest you try T-nuts or T-bolts? We used them on our Bosch profile/extrusion systems at previous work. They can be inserted mid-span of the profile, so you may install them as needed between existing bolts, because you do not need to insert from ends of the profile.
Happy New Year!
Attached Images
DIY roof rails. This is how i did it...-tnuts-jpg  DIY roof rails. This is how i did it...-t_bolt_nut-jpg 
__________________
86 4Runner, 22R-Eliable, 5-Speed Manual, dlx. WHAT'S YOURS?
If you want us to help from afar please let us see, hear, feel what you're dealing with.
A picture paints a thousand words.
Toyota components are bullet-proof. Issues often arise from poor wiring, assembly and/or maintenance. Suspect those first.
Next only to our senses, the multi-meter is the most important electrical diagnostic tool. Spend $6 at Harbor Freight or $$$ blindly replacing parts.
RAD4Runner is offline   Reply With QuoteReply With Quote
Reply

Tags
diy , roof bars , roof rack , roof rails , roof top tent

Thread Tools
Display Modes Rate This Thread
Rate This Thread:

Posting Rules
You may not post new threads
You may not post replies
You may not post attachments
You may not edit your posts

BB code is On
Smilies are On
[IMG] code is On
HTML code is On

Forum Jump

Similar Threads
Thread Thread Starter Forum Replies Last Post
5th gen roof rails SantaFeTrailer Free 1 11-06-2017 01:45 PM
Yakima Roof Basket to roof rails decker1 4th Gen T4Rs 7 05-18-2016 01:12 PM
Changing SR5 roof rails to Trail roof rails Rocketegg 5th gen T4Rs 0 08-20-2012 04:50 PM
3rd gen roof rails T4R NEWBIE Want to Buy/Trade 4 05-22-2012 12:08 AM
Roof Rails flyingyogi 3rd gen T4Rs 3 08-31-2009 01:43 AM

Powered by vBadvanced CMPS v3.2.2

All times are GMT -4. The time now is 06:59 PM.

Powered by vBulletin® Version 3.8.11
Copyright ©2000 - 2024, vBulletin Solutions Inc.
Search Engine Optimisation provided by DragonByte SEO (Pro) - vBulletin Mods & Addons Copyright © 2024 DragonByte Technologies Ltd.
Feedback Buttons provided by Advanced Post Thanks / Like (Lite) - vBulletin Mods & Addons Copyright © 2024 DragonByte Technologies Ltd.
User Alert System provided by Advanced User Tagging (Lite) - vBulletin Mods & Addons Copyright © 2024 DragonByte Technologies Ltd.
***This site is an unofficial Toyota site, and is not officially endorsed, supported, authorized by or affiliated with Toyota. All company, product, or service names references in this web site are used for identification purposes only and may be trademarks of their respective owners. The Toyota name, marks, designs and logos, as well as Toyota model names, are registered trademarks of Toyota Motor Corporation***Ad Management plugin by RedTyger
 
Copyright © 2020