 10-06-2019, 01:46 PM
|
#61
|
 |
Member
|
|
Join Date: Jan 2019
Location: San Rafael
Posts: 55
|
|
|
Member
Join Date: Jan 2019
Location: San Rafael
Posts: 55
|
Correct, it's vvti, with Kelford street cams. The cam specs are further up the thread. Since I had the engine apart, and my goal is to pass California smog inspection if possible, I serviced the air injection system and replaced the pump--using the vastly cheaper GM pump noted by several users on this forum. I just installed the engine with the stock exhaust, which I'll switch out when the smog verdict becomes clear. The only thing I didn't reinstall were the heat shields on the manifolds, because they make it a lot harder to get the manifolds on and off. May be a problem on inspection, we'll see. But I'm ~hoping~ I'll be able to smog it, then take it to the tuners with the new exhaust. If it won't smog, I'll move on to plan B.

|

|
 Reply With Quote Reply With Quote
|
|
10-10-2019, 12:59 PM
|
#62
|
|
Member
|
|
Join Date: Jan 2019
Location: San Rafael
Posts: 55
|
|
|
Member
Join Date: Jan 2019
Location: San Rafael
Posts: 55
|
Initial firing and run-in plan.
Looks like I'll finally be ready to fire it up on Saturday. I was pushing pretty fast, and then decided to slow down a bit and make sure I've got things dialed in. I spent some time researching an initial firing and run-in protocol, found a few good descriptions from pro builders, but they gloss over some details and special cases. And I'm definitely a special case. If something can go wrong, it will go wrong when I do it, so I try to figure that stuff out in advance and hedge against it.
Luckily I was able to get some input from the guys on Lextreme and from Kelford to come up with a super-duper driveway-mechanic idiots guide to running in a new engine that you can't afford to blow up. Here are the details I put together for my run in based on input so far. Feedback welcome.
--
1. Fill the motor with non-synthetic break-in oil. Nick at Yota1 got me some break-in oil with extra added zinc, which helps with the initial break-in. Install a new fuel filter. I put in a new radiator and all new hoses--small comparable investment compared to the engine. Double, triple, quadruple check all hoses and wire connections. Make sure your battery is fully charged so you get a good crank.
2. 2uz motors are not easy to prime with oil, and the oil pumps are apparently not known for self-priming. You could just fire it and hope for the best, but if the start is labored and you have high-end cams, you could wind up grinding surfaces as the assembly lube wears off if there's no oil pressure. Not good. The solution is a bit of a pain, but again, small relative investment.
Disconnect the fuel lines so it can crank without firing, and remove all the spark plugs. That will eliminate compression and allow a much faster initial crank, which is what you want for the cams, and it will allow you to get oil moving while making sure you're generating oil pressure. Then remove the valve covers so you can see the cams. Put some oil in a squirt bottle and oil the lobes of the cams just before you crank it. Now you're ready to give it a good crank so you can see if you're getting oil pressure, and you won't grind the cams against the valve tappets. If you crank it and you get pressure (use a manual pressure gauge or an OBD2 monitor), you're good to go. Oil the cam lobes again, then put the valve covers on, install the spark plugs, and connect the fuel lines.
3. Now that you know you have oil pressure and the cams are happy, you can fire it up. Leave the radiator cap open until the engine gets to temperature and the thermostat opens, so the air purges from the system. You want a quick start, not a lot of cranking, so if it doesn't fire up, move to troubleshooting. Don't keep cranking hoping it will catch.
4. If it starts right up, the idea is to run it for 20 minutes at operating temperature, but not at idle. You want to vary the RPMs steadily in the low to low-mid range. Don't wind it up to redline, just keep varying it for several seconds at different low-mid levels. Ideally you can have someone do the throttle while you check for leaks--particularly coolant or oil. Keep an eye on oil pressure.
5. If you also rebuilt an automatic transmission, like I did, there's some added fun. The tranny doesn't take all the fluid it needs on the initial fill. You have to run it through the gears to get fluid flowing through the whole system, and add fluid as it's needed. That's a bit of a trick while you're simultaneously running in the engine. I left my drive shafts disconnected so I can have my throttle person shift through the gears without driving off. I also put a quart of fluid in the torque converter before I started it so it's not dry. I've got a tube installed into the filler hole, and quarts ready to add as we go. The plan is to do one gear at a time, add some fluid, go to the next gear, add some fluid, and slowly bring it up to the manufacturer specified capacity.
6. Once the motor has been running at operating temperature and varying RPMs for 20-30 minutes, shut it down. Let it cool only enough to be able to drain the oil, but don't wait too long--you want the oil to be viscous enough to fully drain. Drain it into a pan--hopefully no obvious metal shavings come out. Replace the oil filter--some people even suggest cutting it open to look for signs of metal caught in the filter. Not sure I'd want to know at that point. Fill the motor back up with another round of break-in oil with zinc. Check all your fluids again.
7. The next step is a road run-in. You don't want to put any heavy load on the motor for at least 500 miles--no big hills, no towing or hauling. This is where it gets a little controversial on the boards if you search for run-in procedures. Some people swear by winding up the motor hard. I'm siding with the crowd that suggests a more measured run in. Find someplace flat where you can safely drive between 30 and 60 mph, and start doing intervals. Roll at 30mph, then bring it up to 60 for several seconds and drop it to 30, repeat 6-10 times. This is about seating the rings properly. My crude understanding of it is that when you let off the gas at 60 and the motor is spinning down, you're basically polishing the cylinders. I probably have the mechanics of that wrong, but the procedure is widely recommended just after you do the first firing up.
8. After the road run-in, drive it normally for 500 miles--again, no towing, no big loads, etc--then change the oil and filter. During this period, I'm planning to try to smog it. And when the 500 miles is up, I'll take it up to Sac to get the ECU installed, tuned and dyno'd.
So, that's my super duper idiot's guide to running in a new motor. Probably more anal than your mechanic would recommend. But, if you've spent more than $10k and months building a motor, and you have the kind of luck I do, you might want to spend the extra effort.
Like I said, feedback is welcome. I compiled this from a lot of other people's input, and I'm sure I might have missed something or got something wrong.
Last edited by scribb; 10-10-2019 at 01:02 PM.
|
|
|
Reply With Quote
|
|
10-10-2019, 02:23 PM
|
#63
|
 |
Senior Member
|
|
Join Date: Sep 2015
Location: Kansas
Age: 28
Posts: 4,304
|
|
|
Senior Member
Join Date: Sep 2015
Location: Kansas
Age: 28
Posts: 4,304
|
Good luck with startup.
@ scribb
did you have your deck plate on your air box open when you hydrolocked your engine?
__________________
2005 4R Sport 4WD "The last of the V8s!" - Custom TIG'd SS Dual Exhaust - King 2.5" +2 LT. - ARB Front & Rear - 37's - Dana 60 - Build Thread
2005 Tundra 2WD Regular Cab V8 - Chopped Frame - Short Bed Swap
1977 Celica Liftback - LFX Swap - Build Thread

|
|
|
Reply With Quote
|
|
10-10-2019, 02:51 PM
|
#64
|
|
Member
|
|
Join Date: Jan 2019
Location: San Rafael
Posts: 55
|
|
|
Member
Join Date: Jan 2019
Location: San Rafael
Posts: 55
|
Great question. Yes, I did have it on. We were in the middle of a major set of winter storms. I tend to put it on around the end of October and leave it on until April. I'm not sure where the water went in to the motor, but I have a blown out rubber skirt from inside the wheel well where it looks like the water was forced in to the engine compartment.
|
|
|
Reply With Quote
|
|
10-12-2019, 05:18 PM
|
#65
|
|
Member
|
|
Join Date: Jan 2019
Location: San Rafael
Posts: 55
|
|
|
Member
Join Date: Jan 2019
Location: San Rafael
Posts: 55
|
|
|
|
Reply With Quote
|
|
10-13-2019, 03:28 AM
|
#66
|
|
Member
|
|
Join Date: Jan 2019
Location: San Rafael
Posts: 55
|
|
|
Member
Join Date: Jan 2019
Location: San Rafael
Posts: 55
|
That went from being what I expected to be a 90 minute job to an all day, troubleshoot and hunt for parts day. You have to drop the tank, completely disassemble the fuel pump assembly--down to removing individual wires from a connector to pass the wires through the filter cage. Possibly one of the least serviceable projects I've dealt with. Then the filter I'd bought in advance didn't come with the plastic fuel tube, and of course it gets deformed if you try to remove it from the push on fitting. The dealership didn't have a replacement line, and no auto shops in town had submersible fuel line for inside the tank in stock. Had to order a new fuel filter with the hose on it and now wait for Monday.
The only solace I'm taking is the fuel filter was done. I'll post pictures when I finish the job. 15 years/150k miles was definitely time for a change.
I did manage to wrap up everything else. Got the URD exhaust installed, which was a dream compared to dealing with the fuel filter. Took no more than an hour from the Y-pipe back. Everything fit together perfectly.
Last edited by scribb; 10-13-2019 at 03:41 AM.
|
|
|
Reply With Quote
|
|
10-16-2019, 03:23 PM
|
#67
|
|
Member
|
|
Join Date: Jan 2019
Location: San Rafael
Posts: 55
|
|
|
Member
Join Date: Jan 2019
Location: San Rafael
Posts: 55
|
So, the fuel filter situation on the '05 4Runner is absurd. Some of the threads I read here discussed the issue, but didn't lead me to conclude it was totally unserviceable. Which it is. Here's the deal, and the solution:
The fuel filter is located inside the fuel tank, inside a tank assembly that includes the fuel pump. You have to drop the fuel tank to access it, but first pull up the carpet under the rear seats to access a secret doorway, which only is only big enough to allow you to unplug the tank assembly from the electrical systems, but not remove the assembly.
Once you drop the tank, you have to remove and completely disassemble the fuel pump assembly--including removing wires from the fuel pump connector to pass the wires through a hole in the filter. Up until this point, you think it's just an overly complicated system to get at the filter, but it seems serviceable--because, after all, you can buy the replacement filters online, and even from the dealership.
The problem is, the submersible plastic hose that connects the filter to the fuel line is not serviceable. It is molded to the nipple that connects to the fuel line, probably by heat during manufacturing. You can get the hose with some of the filters, but the diameter is too small to pass over the nipple. I tried heating it with hot water, then boiling water, and it never became pliable enough to get it over the nipple. I took it down to my local old-school auto-parts/machine shop store, and the guy just shook his head. He called up a buddy who works at the local Toyota dealership who went off on a rant about those things. They're considered by Toyota to be not serviceable. You have to replace the whole tank unit, for about $600. They claim it's not necessary to service, but that seems patently absurd--and in fact, Gadget at URD claims they've done tests showing these filters can lead to fuel starvation and too-lean air/fuel mix at only 30K miles.
I went home and made one more effort to fit the hose, this time by heating with a heat gun, and it deformed the plastic hose. No way to get that thing on and have it withstand 100+ psi.
Gadget rescued me with a rush shipment of a replacement fuel pump with an external filter. He recommended the Deatchswerks 255 psi pump for my application. The pump will arrive tomorrow, and I should be back on track.
|
|
|
Reply With Quote
|
|
10-17-2019, 01:23 PM
|
#68
|
 |
Elite Member
|
|
Join Date: Oct 2014
Location: Citrus Heights, California
Age: 36
Posts: 7,338
Real Name: Jerod
|
|
|
Elite Member
Join Date: Oct 2014
Location: Citrus Heights, California
Age: 36
Posts: 7,338
Real Name: Jerod
|
Sorry to hear about your fuel filter debacle. 3rd gens have it halfway between the engine & tank with nothing obstructing it.
Your engine break-in procedure is very similar to what I did for when I put my performance cams in. Zinc oil, run it for 20 minutes, drain oil, run it easy for 500 miles then go to town and enjoy it. Adding the transmission break in on top of it does sound pretty complicated though.
Starting it up after a replacement is the most nerve-wracking experience I've yet to experience working on a car. You want to start it up, but at the same time you don't because you don't want anything to go wrong! Maybe I can just turn it into a 1000 lb paperweight...
|
|
|
Reply With Quote
|
|
10-17-2019, 08:27 PM
|
#69
|
|
Member
|
|
Join Date: Jan 2019
Location: San Rafael
Posts: 55
|
|
|
Member
Join Date: Jan 2019
Location: San Rafael
Posts: 55
|
Unfortunately the wrong pump came via FedEx today. It's now been nearly two weeks just trying to replace a fuel filter.
You're right about the nerve wracking over startup. When I last did a 302, the builder had a run-in stand to verify the build. But since this is a relatively new domain, the builder didn't have the harnesses available to do the run in. So yeah, I'm feeling the same conflict. Want to start it. Don't want to have more issues like the fuel pump.
|
|
|
Reply With Quote
|
|
10-20-2019, 02:38 AM
|
#70
|
|
Member
|
|
Join Date: Jan 2019
Location: San Rafael
Posts: 55
|
|
|
Member
Join Date: Jan 2019
Location: San Rafael
Posts: 55
|

Got it running tonight! Gadget overnighted the parts I needed for the fuel pump, and it all went together like a charm. I went through the routine as planned. Took out the plugs, and removed the valve covers. Oiled the cams and then turned it over to verify oil pressure and fuel. Both looked good. Oiled the cams again before putting everything back together. It took three cranks and then it started right up. Nasty exhaust leak I'll have to fix, which made a racket, but everything else sounded tight. No fluid leaks. Ran it for 20 minutes and got it up to temperature. Was a little rough at first and sluggish on the throttle response, but it evened out and sounded sweet by the time I shut it down. Drained the oil and dropped the filter. Everything looked clean.
Tomorrow I'll take it out for a road run-in.
|
|
|
Reply With Quote
|
|
10-21-2019, 11:03 PM
|
#71
|
|
Member
|
|
Join Date: Jan 2019
Location: San Rafael
Posts: 55
|
|
|
Member
Join Date: Jan 2019
Location: San Rafael
Posts: 55
|
Had a few set backs to sort out. Some that kind of freaked me out, but now it seems to be settling in.
First, I was throwing a bunch of 0300 codes. In fact, the entire right bank of cylinders was throwing codes. 0301. 0303. 0305. 0307. It's actually kind of helpful that it was a whole side, because it suggested a central cause. Possibilities include fuel delivery problem, wiring problem, camshaft sensor problem, crankshaft sensor problem...
I started by pulling the coils and plugs, and sure enough the right side plugs were fouled. I switched the coils to the other side, just to rule out a bizarre coincidence that several were bad on one side. Then I checked the wiring, and lo and behold discovered a bad wire on the crankshaft sensor. Fixed the wire, and bingo, the codes all the engine codes disappeared. In theory, that means I'm now smogable. We'll see.
I'm still throwing a bunch of transmission codes that I need to sort out.. Half the pressure solenoids seem to be malfunctioning. So that could be another wiring issue (unplugging and plugging connectors is not good for the life of the wiring), or it could be a transmission fluid issue. Maddeningly, I can't find a single authoritative listing for the complete capacity of the transmission. The FSM gives amounts used for different types of service, but not for a complete rebuild and refill. I've got about 8 in it, and when it's warm, it should be full when ATF comes out of the overflow plug, which it is. So I'm leaning toward a wiring issue.
If anyone knows the actual amount of ATF capacity for a 2005 transmission, please let me know.
|
|
|
Reply With Quote
|
|
10-22-2019, 12:53 AM
|
#72
|
|
Member
|
|
Join Date: Jan 2019
Location: San Rafael
Posts: 55
|
|
|
Member
Join Date: Jan 2019
Location: San Rafael
Posts: 55
|
Ta da! 
Holy crap it's a beast. The tranny issues turned out to be nothing. It was throwing 4 codes, which immediately made it seem like a wiring issue. No way 4 pressure switches and sensors would all be out in a new transmission. Sure enough, the big electronic connector's swing-arm lock was in the wrong position. Started up, and no codes. Woot!
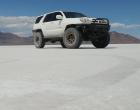
So I took out on the nearest big road to do some sprints to 60 to set in the rings. You can feel the ECU fighting the cams. If you give it moderate pedal, it kind of surges and falls off on its way up to forty. But if you hammer it, it spit fire. It doesn't even have the headers and y-tube on yet, and it sounds like a demon. Unfortunately, it's all over the road, so I need to get it in first thing for an alignment. You can see how jank it is in the picture up top. There's still tape on the grill too--need to finish painting that too.
Can't believe it's been 10 months. My snowboard racks are still on the roof from the winter storm before I swamped the motor. Can't wait to get this thing in the snow. 
|
|
|
Reply With Quote
|
|
10-23-2019, 03:45 PM
|
#73
|
|
Junior Member
|
|
Join Date: Nov 2016
Location: Philadelphia
Posts: 11
|
|
|
Junior Member
Join Date: Nov 2016
Location: Philadelphia
Posts: 11
|
Cool thread and great work!
So, roughly what are the new BHP and Torque numbers?
|
|
|
Reply With Quote
|
|
10-23-2019, 05:53 PM
|
#74
|
 |
Senior Member
|
|
Join Date: Jan 2015
Location: Merritt Island, Florida
Posts: 1,603
Real Name: Brett
|
|
|
Senior Member
Join Date: Jan 2015
Location: Merritt Island, Florida
Posts: 1,603
Real Name: Brett
|
__________________

1988 DLX 22RE AUTO BLACK- "Granny" - SOLD
2003 SR5 SPORT V8- Build- "Pearl" You Tube 2UZ 120
2012 LIMITED V6 "LE Mae" 5TH GEN BUILD THREAD
|
|
|
Reply With Quote
|
|
10-23-2019, 06:39 PM
|
#75
|
|
Elite Member
|
|
Join Date: Oct 2014
Location: Citrus Heights, California
Age: 36
Posts: 7,338
Real Name: Jerod
|
|
|
Elite Member
Join Date: Oct 2014
Location: Citrus Heights, California
Age: 36
Posts: 7,338
Real Name: Jerod
|
Let me know when you are up in Sac to get it tuned...
|
|
|
Reply With Quote
|
 Posting Rules
|
You may not post new threads
You may not post replies
You may not post attachments
You may not edit your posts
HTML code is Off
|
|
|
|


 Linear Mode


