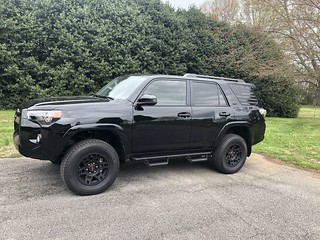
I recently installed Bilstein 5100 front and rear shocks with the front set to 2.5" and a 1.5" Daystar rear spacer on my 2019 4Runner. I wanted to give you guys some insights into the problems I encountered and how I got through them. I only had 3500 miles on my 4runner on install, so I did not have to worry about bolts being seized up and other problems from higher mileage installs. I should have taken pictures throughout the process, but I think this will still be helpful for someone doing the install. Also, we had the vehicle on a lift for this process. Here are my before and after pictures:

To start, I followed this instructional video (
https://www.youtube.com/watch?v=dEnMvblCHyo) for the front shocks; however, I set my front shocks to 2.5". The front was fairly problem free. I wanted to make sure I did not overstretch the ABS wire, so I removed it from the clip first thing. I found that there was more than enough slack in it for the entire process after removing it from the clip. One thing I noticed was that my lower control arm was not nearly as loose as his was. I found that I did not need the jack underneath it after the initial catch when you loosen the 22mm nut. The more you drop the lower control arm down, the easier it is to get the strut out. If the lower control arm is not down far enough, there will not be enough room for the strut to come out. We had to loosen the nuts a little bit more to get it to drop down as far as we needed to. After loosened, it was more of pushing the lower control arm down out of the way as opposed to supporting it from going too far. We used a paint pen to mark the springs before removal. We marked the spring where it lined up with the 2 lateral most top nuts. We then realigned this when reinstalling. We also checked the alignment of the bottom of the spring before loosening it to make sure it was properly aligned on reinstall. We did not have to readjust our springs or shocks after we got them back in. We used a set of spring compressors that we rented from O'Reillys; however, we did not use an impact with these. I found that it was easier if you tightened them more than was needed during the removal to help make up for the extra compression needed for the lift. It made it easier to get it lined up properly when moving over to the 5100. After reinstalling the strut, go ahead and reconnect your sway bar linkage. If you reconnect the rest of the suspension first, it gets very tough to get this bolt lined back up. Getting the 2 outer bolts that attach to the lower control arms lined back up was tough. We had to put the jack under the LCA to help realign this. Also, during the entire process, I was wondering why we had to remove the skid plate to do the install. It is because you will not have access to the 22mm nut to loosen the LCA without removing it.
The rear shock and rear Daystar spacer install was an overall easier process than the front, but I felt like there were more minor hiccups that came up. I used the FJ Cruiser spacers from amazon instead of the 4Runner because they were almost 1/3 of the price (notice they are the same parts number). They worked out without any problem. I followed this video (
https://www.youtube.com/watch?v=Pm-dSFeSR6o) from the same guy as the first to help with the shocks, and I followed my paper instructions from daystar for the spacers. First off, you must have a 19mm wrench. We made it through the whole process using a crescent wrench for the 19mm nuts; however, for the castle nut on the driver's side, you must have the 19mm wrench because there is not enough space for a crescent. Also, before getting started, there were a couple wiring harnesses that needed to be unclipped. The first, is connected right beside where the rear track bar attaches. That clip has to be removed to disconnect the track bar. Second, there was a wiring harness that is to the front of the axle just to the passenger side of midline that looked a little short. We unclipped this as well before getting started. I don't know if you have to do this, but we wanted to be safe. The process was pretty simple, we removed 3 nuts on each side, the sway bar linkage and the top and bottom of the shock. We also had to remove the bolt attaching the rear track bar to the axle. When doing this, we had a floor jack supporting the center of the axle because it will be loose at this point. Once this is all removed, the shocks come right out. Then, we just had to push down on one side of the axle while a friend lifts up on the other. That allowed the stock springs to come out pretty easily. Next step was to get the springs with the new 1.5" spacers in. We put the passenger side spring in first; however, I would do the driver's side first if I did it again. There is much less space on the driver's side, and the first spring is significantly easier than the second due to the increased tension from the newly installed spring. Also, the brake lines come through more so on the driver's side, and they were restricting us from getting the stretch we needed to get the new spring in. The first spring went in easily. I pushed down on the passenger side axle, and a friend lifted up on the driver's side. The spring slid right in. We had to work hard to get the driver's side in. We ultimately had to put the spring compressors on the driver's side spring because the brake lines did not have enough travel for us to get the spring and spacer in as it was. If you were thinking about doing extended brake lines, now might be a good time to do it as it would make this install much easier. After putting the spring compressor on and pushing hard to get as much room as we could, we got the new spacers in. We had to stretch the brake lines as far as I felt comfortable even with the spring compressors to get the spring and spacer in. However, there is plenty of length in the stock brake lines once everything is buttoned back up. Next, we reinstalled the bolt through the track bar. This was incredibly difficult for us. You have to raise the rear axle back up to get it aligned. We had to raise the floor jack as far as we could without lifting the frame of my 4Runner off the pads of the lift. Then we had to take it another couple pumps to get it realigned. Even still, the holes never appeared to be realigned. We eventually got it pretty close and just had to start screwing the bolt back in; at which point, it helped line everything up. Once we did this, the bolt when it pretty easily. Next we reinstalled the shocks. I put them on the bottom bolt first, compressed them, and then guided them up into the top hole as they extended. To get the top bolt high enough to get a nut on it, we had to jack that side up pretty high. To get the bolt through enough to get the nut on it, we had to jack that side up just to the point where the 4Runner was starting to want to lift off that side rear lift pads a bit. We made sure we maintained contact with the pads for this step though. After we did this and had everything reconnected and torqued, we reconnected both wiring harnesses to the clips and reinstalled the tires.
My before measurement from ground to fender were:
FD: 34.5 FP: 35
RD: 36-1/8 RP: 36-7/8
My after measurement were 38" at all 4 corners. I was surprised because everyone said that my frame would be level with a mild rake when measured at the fenders. However, this lift brought my 4Runner to completely level. I did not replace my UCA's for this, and my alignment shop said they had no trouble getting everything lined up. I did not get my spec sheet though. I plan to move up to Falken Wildpeak 275's or maybe even 285's if I can fit them when my stock tires wear out.
I hope this helps you guys out. I have very little experience working on cars if any (I change oil and tires and that's about it), and I felt like this was a very doable DIY install. It helped that I had access to a lift; however, I think it would still be doable with jack stands.


 Linear Mode


