 06-13-2011, 05:17 PM
|
#46
|
 |
Senior Member
|
|
Join Date: Feb 2011
Location: Pittsburgh, PA
Age: 42
Posts: 1,332
|
|
|
Senior Member
Join Date: Feb 2011
Location: Pittsburgh, PA
Age: 42
Posts: 1,332
|
Quote:
Originally Posted by MrBunnyRunner

|
Nice. Excellent info.
Sent from my LS670 using Tapatalk
__________________
2006 T4R SR5 v8 4wd: Napa Ultra Premium Rotors; Weather Tech liners; AVS Ventshades; Westin Bull Bar; Hydrocarbon Delete; Blackhoused Headlights; Fog Light Mod; Sulfer TSB; Magnaflow 22" Muffler (#12586); Front: Bilstein 5100's set at .85" + Toytec 1" Net "Top1-T" Spacer = 2" total Front Lift; Rear: Cornfed 1" + Air Lift 1000; Plasti-Dip center grill + rear Toyota Emblem; JVC Bluetooth + HD Radio HDR81BT
http://www.toyota-4runner.org/new-me...purchased.html
|

|
 Reply With Quote Reply With Quote
|
|
07-02-2011, 06:16 PM
|
#47
|
|
Banned
|
|
Join Date: Sep 2009
Location: St. Louis
Posts: 224
|
|
|
Banned
Join Date: Sep 2009
Location: St. Louis
Posts: 224
|
Speakers
Did you swap the speakers yet?
|
|
|
Reply With Quote
|
|
07-09-2011, 08:13 PM
|
#48
|
|
Member
|
|
Join Date: Mar 2011
Location: Colorado City, Texas
Posts: 65
|
|
|
Member
Join Date: Mar 2011
Location: Colorado City, Texas
Posts: 65
|
Quote:
Originally Posted by PhdNPrerunners
Will the t1809 work in a 3rd gen?
|
This. Poised to buy either the 1808 or 1809 for my 2001 sr5 6-speaker.
|
|
|
Reply With Quote
|
|
07-16-2011, 11:04 PM
|
#49
|
|
Member
|
|
Join Date: Mar 2011
Location: Colorado City, Texas
Posts: 65
|
|
|
Member
Join Date: Mar 2011
Location: Colorado City, Texas
Posts: 65
|
Too late, bought a T1808 and mostly installed it in about 20 minutes this afternoon. Just need to trim the edges of the dash trim tomorrow.
The sound is astounding compared to the old HU, and the dimmer switch even works just like before. Amazing. Glad I did it.
|
|
|
Reply With Quote
|
|
07-16-2011, 11:42 PM
|
#50
|
|
Member
|
|
Join Date: Jul 2011
Posts: 61
|
|
|
Member
Join Date: Jul 2011
Posts: 61
|
Quote:
Originally Posted by chainring
Too late, bought a T1808 and mostly installed it in about 20 minutes this afternoon. Just need to trim the edges of the dash trim tomorrow.
The sound is astounding compared to the old HU, and the dimmer switch even works just like before. Amazing. Glad I did it.
|
Pics please. This sounds like a great mod.
|
|
|
Reply With Quote
|
|
07-17-2011, 12:58 PM
|
#51
|
|
Member
|
|
Join Date: Mar 2011
Location: Colorado City, Texas
Posts: 65
|
|
|
Member
Join Date: Mar 2011
Location: Colorado City, Texas
Posts: 65
|
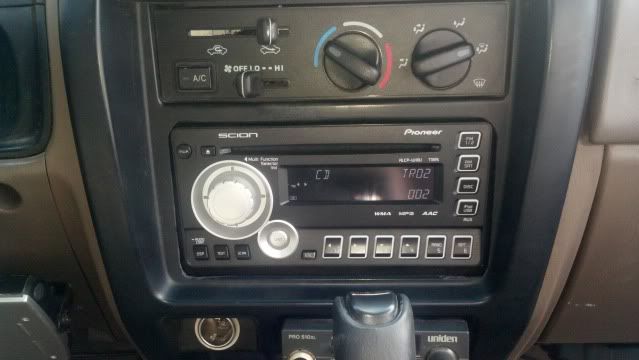
OK. Pics.
Installed new head unit yesterday without the camera, but on either side there is a plastic receiver for the dash trim mounting clips. The ridge/lip (covered by the dash trim once it is in place) on both sides of the Head Unit has to be ground down about 1/8 of an inch for about a length of 1 inch in order to clear these plastic projections. Not a demanding process, just make sure you keep the grinding confined to the ridge that gets covered and don't let it drift out toward the face of the radio. Areas to trim are on both sides, even with the display.

 Today, I aligned the dash trim and looked at how much of the bezel would need to be trimmed away on both sides. It was about 1/2 inch that it needed to clear.

 I marked the face of the Head Unit with a pencil, so I could measure exactly and transfer the line to the surface of the bezel.

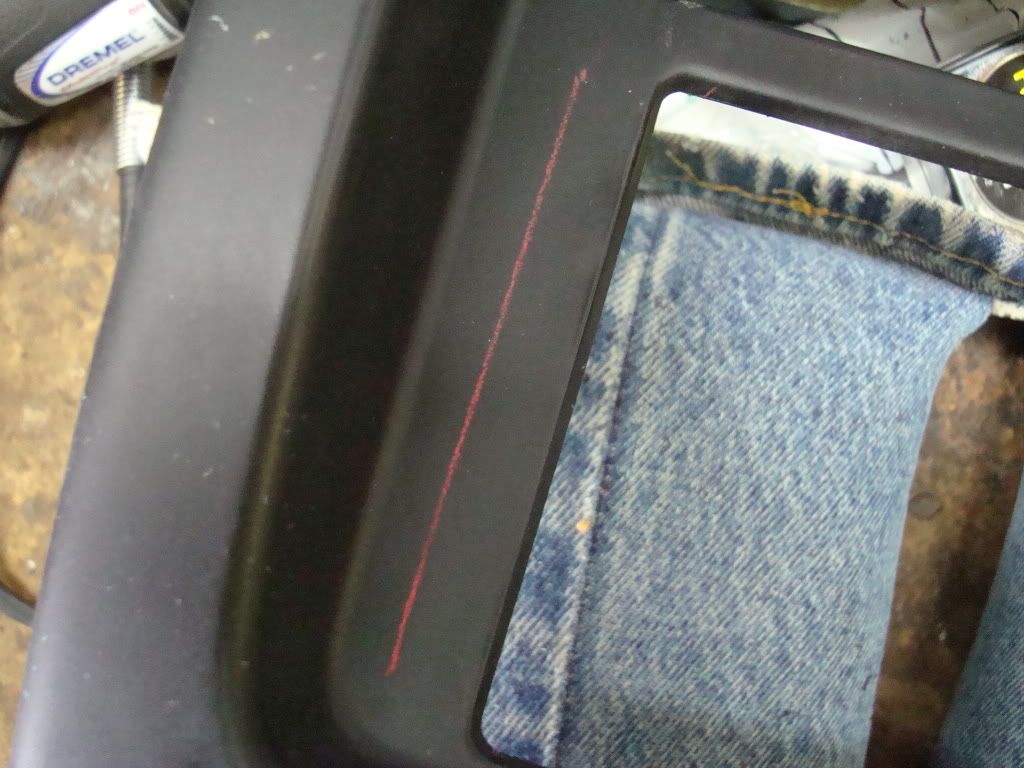 I used a Ridgid Job Max to do the trimming. The first thing I trimmed was the little stiffener ridge on the back of the bezel. That allowed me to hold the trim in place over the Head Unit and get it right up against the face - just wanted to check my trim lines a little better before actually cutting.
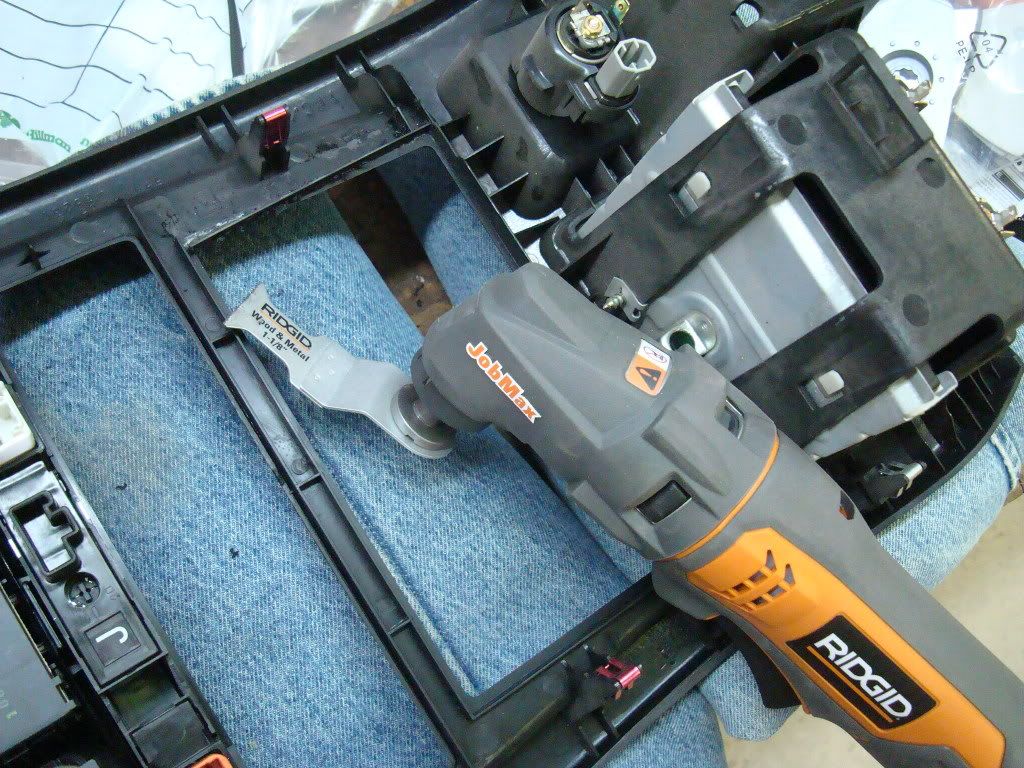
 Looked right, so I went ahead and cut on both sides, just inside the lines. Then I used the sanding head for the same tool and cleaned up both edges and brought them all the way out to the line.
 Now, on the right side, the bezel curves away from the face of the Head Unit at the bottom right corner. I knew that if I just continued a straight line down into that corner, it would end up being a big gap between the face of the HU and the edge of the trim. I decided to curve the cut in and allow the bezel to cover a portion of the face of the HU, but stay up close to it. That seemed to work out OK, but it took a bit more fitting than the other side.
Frankly, once you cut the stiffener ridges off the back of the bezel, the trimming process becomes more about uncovering the face of the HE than about making the bezel fit. I'm pretty sure I could have popped it on and left it without trimming the actual face of the bezel, but it would have looked a bit strange.
Go slow, check it twice and cut it once - cut it short of where you think it needs to be cut if you aren't sure! You can always take a bit more off!  The little Ridgid tool worked great, and I'm not sure what the best way to cut would have been without that. The little Ridgid tool worked great, and I'm not sure what the best way to cut would have been without that.
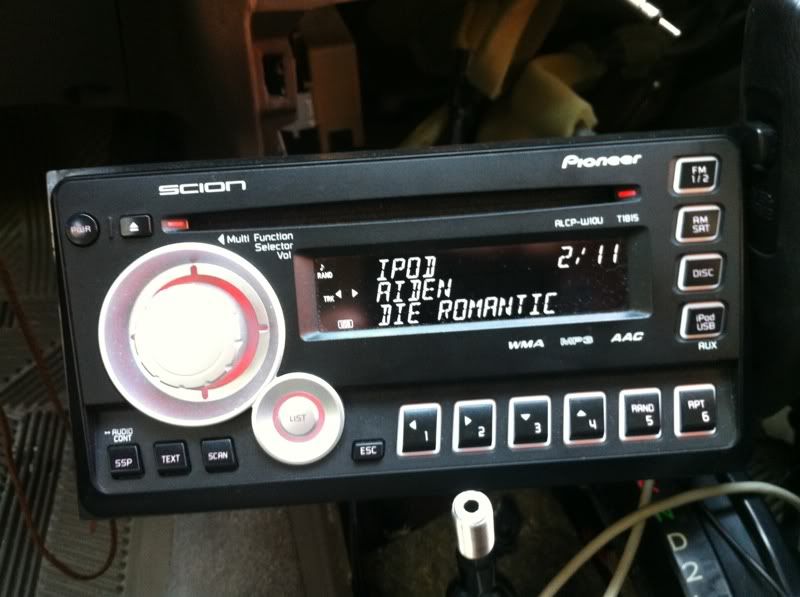
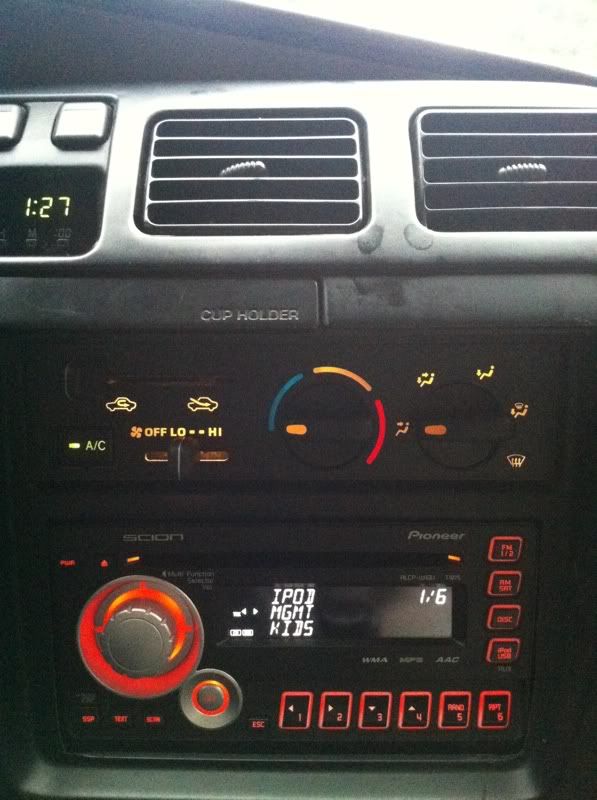
Pics of the original HU with the portions of dash bezel that I removed from either side to make the new HU (T1808) look right:

 Finished install:


 I also found a PDF of the Scion manual online and printed it out. Handy when it came time to change the startup display!
 The project turned out cleanly enough, the Scion radio was affordable on EvilBay, and the sound it pushes through those old speakers is just amazing in comparison to the OEM unit. Very pleased. Thanks to all who have gone before!
|
|
|
Reply With Quote
|
|
08-07-2011, 03:19 PM
|
#52
|
|
Member
|
|
Join Date: Jul 2011
Posts: 61
|
|
|
Member
Join Date: Jul 2011
Posts: 61
|
Well FRACK!
Soldered up the Scion head unit last night. Followed Falcon115's instructions so there is no need to document that. http://www.toyota-4runner.org/audio-...installed.html
However, I go out to install it today and guess what..
Scion -
Stock 4runner.
Even better, i have two antena wires! 
I'm not sure what to do at this point.
My truck is a 1998 SR5
|
|
|
Reply With Quote
|
|
08-07-2011, 04:07 PM
|
#53
|
|
Member
|
|
Join Date: Mar 2011
Location: Colorado City, Texas
Posts: 65
|
|
|
Member
Join Date: Mar 2011
Location: Colorado City, Texas
Posts: 65
|
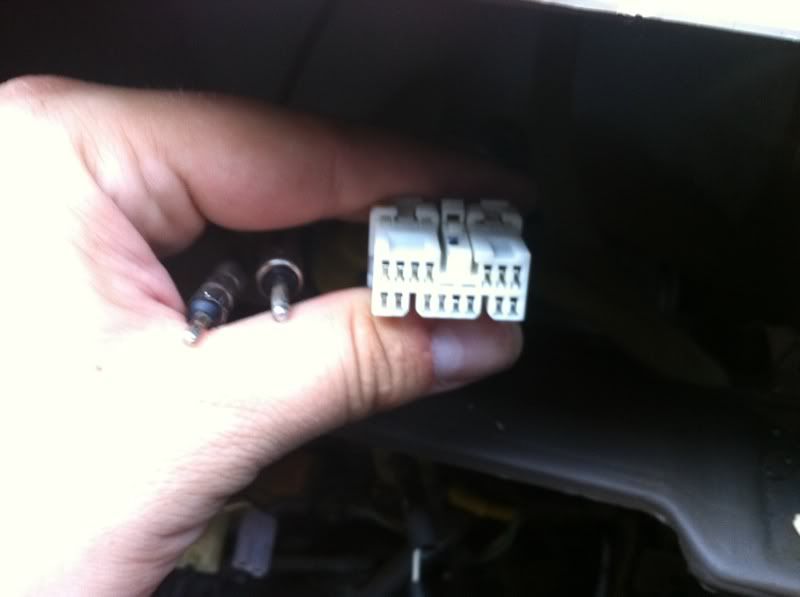
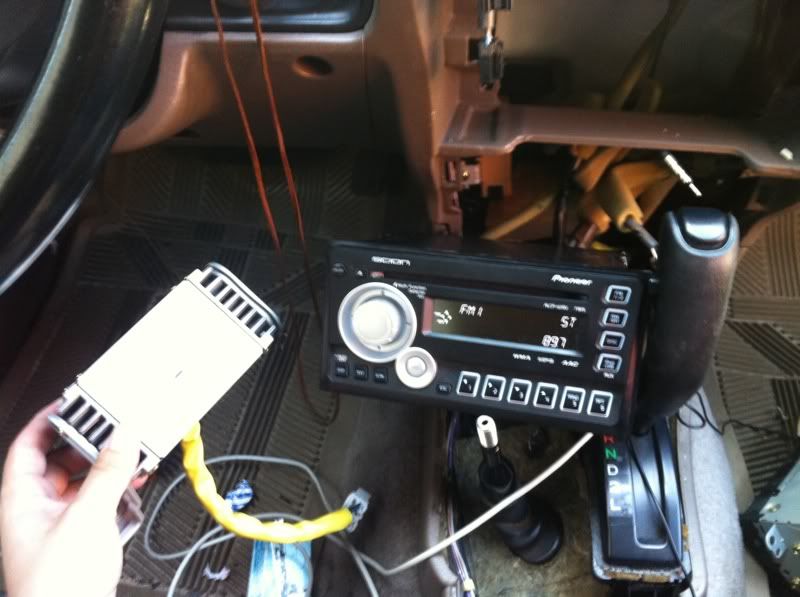
Follow that plug wire to a little silver box behind the radio - that's your old amp, probably! ;) Remove the amp and you will find the wires/plugs you need plugged into the back. The new radio has an internal amp.
Plug in your larger antenna wire and tape off the small one. Works fine.
|
|
|
Reply With Quote
|
|
08-07-2011, 04:25 PM
|
#54
|
|
Member
|
|
Join Date: Jul 2011
Posts: 61
|
|
|
Member
Join Date: Jul 2011
Posts: 61
|
Quote:
Originally Posted by chainring
Follow that plug wire to a little silver box behind the radio - that's your old amp, probably! ;) Remove the amp and you will find the wires/plugs you need plugged into the back. The new radio has an internal amp.
Plug in your larger antenna wire and tape off the small one. Works fine.
|
*SIGH*
I just ordered a reverse harness... lmao.
Oh well, it was only $15, I'm still ahead, maybe I'll buy another unit to stick in my Nissan. 
|
|
|
Reply With Quote
|
|
08-07-2011, 04:35 PM
|
#55
|
|
Member
|
|
Join Date: Jul 2011
Posts: 61
|
|
|
Member
Join Date: Jul 2011
Posts: 61
|
Last edited by A&F; 08-07-2011 at 08:40 PM.
|
|
|
Reply With Quote
|
|
08-30-2011, 06:41 PM
|
#56
|
 |
Member
|
|
Join Date: Aug 2011
Location: Sachse, Texas
Posts: 75
|
|
|
Member
Join Date: Aug 2011
Location: Sachse, Texas
Posts: 75
|
Does anyone know if the Alpine head units will match the wiring hardnesses in the 4Runner? Specifically the '07. Someone local as an AXCL-W09U.

(I apologize for the size of this picture.)
__________________
- Jeremy
2007 black Toyota 4Runner SR5
TRD shift knob | next?
|
|
|
Reply With Quote
|
|
12-31-2011, 10:05 PM
|
#57
|
|
Member
|
|
Join Date: Jul 2009
Location: California
Posts: 36
|
|
|
Member
Join Date: Jul 2009
Location: California
Posts: 36
|
Hi so I had the t1808 installed for a long time now and remembered there was an extra harness that fits in a slot in the rear. Now I'm trying to add a sub to the runner and was curious if that third harness is meant to be the output for the sub.
The extra harness I'm talking about is the one that has only three wires attached to it.
__________________
05 SR5 v8
|
|
|
Reply With Quote
|
|
01-14-2012, 06:33 PM
|
#58
|
 |
Junior Member
|
|
Join Date: Jan 2012
Location: Waianae, HI
Posts: 22
|
|
|
Junior Member
Join Date: Jan 2012
Location: Waianae, HI
Posts: 22
|
Part/Model # of Scion Alpine Premium w/Bluetooth and USB
Does anyone know what the part number or model number is for the Scion Alpine Premium HU that is in the 2012 xB? I believe it has bluetooth, HD Radio and USB.
Also, does anyone know if its plug and play with 2012 T4R SR5 nonJBL nonNAV?
Thanks
|
|
|
Reply With Quote
|
|
01-14-2012, 09:48 PM
|
#59
|
 |
Member
|
|
Join Date: Mar 2011
Location: IL
Posts: 34
|
|
|
Member
Join Date: Mar 2011
Location: IL
Posts: 34
|
Quote:
Originally Posted by HI808SR5
Does anyone know what the part number or model number is for the Scion Alpine Premium HU that is in the 2012 xB? I believe it has bluetooth, HD Radio and USB.
Also, does anyone know if its plug and play with 2012 T4R SR5 nonJBL nonNAV?
Thanks
|
This is the 2012 HU scion xb. I bought it but my harness is diff from the HU, I got 07 sr5 NON jbl. Part number is PT146-00120.
Sorry This is the base unit of scion xb, my bad.
Last edited by timon; 01-14-2012 at 09:51 PM.
|
|
|
Reply With Quote
|
|
01-18-2012, 10:12 AM
|
#60
|
 |
Member
|
|
Join Date: Oct 2010
Location: Santee, CA
Posts: 134
|
|
|
Member
Join Date: Oct 2010
Location: Santee, CA
Posts: 134
|
I recently installed a t1815 in my 3rd gen 4runner and it is great. I am not too happy with the radio reception as the fm plug (small antenna plug) is not used on the t1815. What are you guys doing to remedy this? Is there an adaptor that allows both plugs to be used?
I have searched, but cant find anything
__________________
85 4runner...5.0 HO, C4 Trans, tons of mods...sold
03 4Runner...RCI skids, 4xInnovations sliders, OME lift...sold
98 4Runner...TJM, Budbuilt, SS 2.1, Rockware, and more...GONE
95 4Runner...axle swapped, double locked, and
armored...GONE
|
|
|
Reply With Quote
|
 Posting Rules
|
You may not post new threads
You may not post replies
You may not post attachments
You may not edit your posts
HTML code is Off
|
|
|
|


 Linear Mode


