 05-16-2017, 09:27 AM
|
#1
|
 |
Member
|
|
Join Date: Aug 2016
Location: Cameron Park, CA
Posts: 393
|
|
|
Member
Join Date: Aug 2016
Location: Cameron Park, CA
Posts: 393
|
3-axis coupler
Hello all,
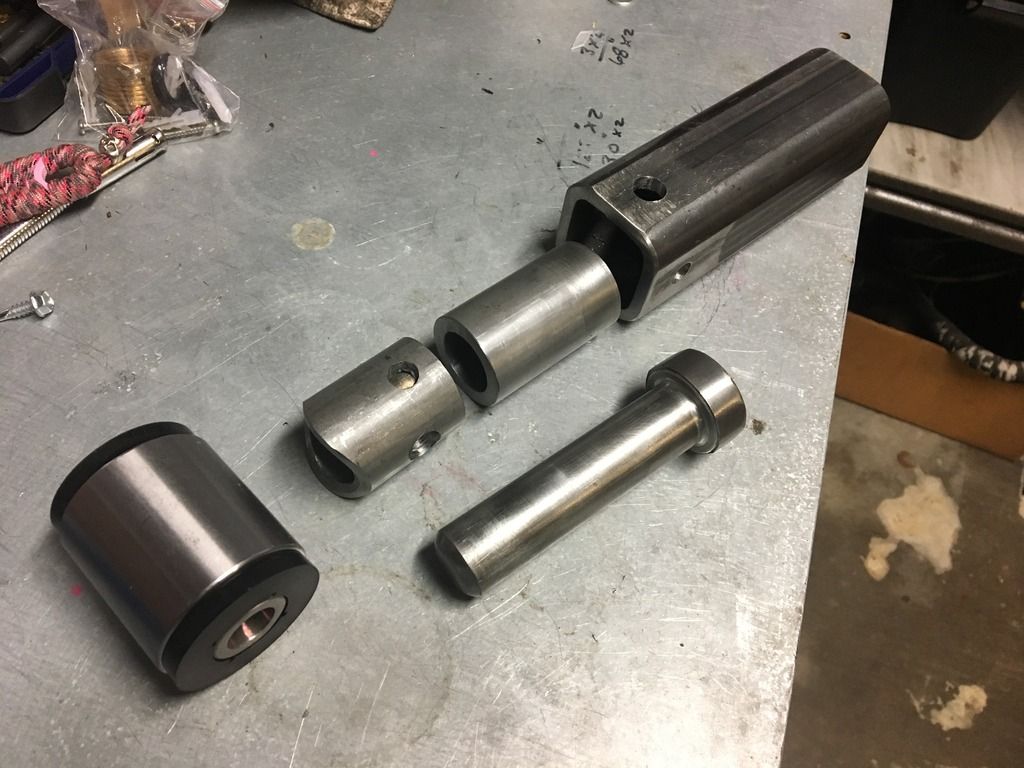
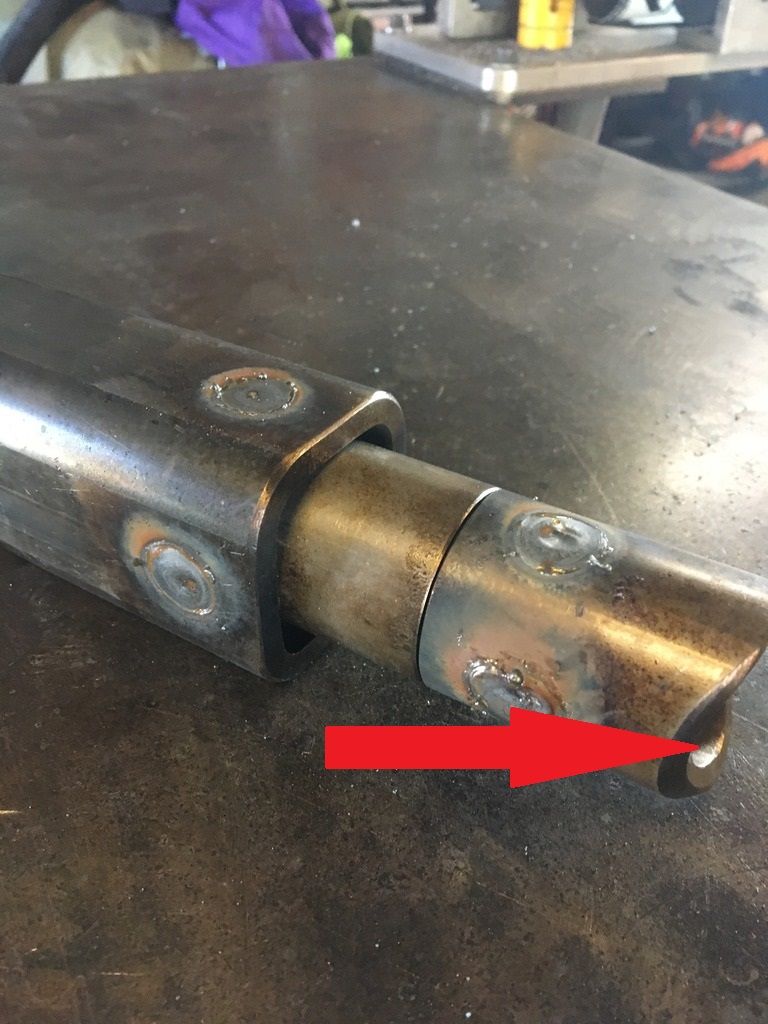
Im building a 3-axis coupler and I have a question for those of you that have used them. As you can see in the pic, I have a pin that rotates in a sleeve, allowing the coupler to roll. It started as an interference fit and I knew it would tighten up a bit. But, after full welding, it got a bit tighter than I expected. It won't even take grease. I know that it will loosen up, but it's driving me nuts. Anyone use a coupler that started out tight as hell then "broke in"?
Thanks, Matt
|

|
 Reply With Quote Reply With Quote
|
|
05-16-2017, 09:51 AM
|
#2
|
 |
Member
|
|
Join Date: Jun 2015
Location: Arkansas
Posts: 36
Real Name: Dan
|
|
|
Member
Join Date: Jun 2015
Location: Arkansas
Posts: 36
Real Name: Dan
|
Is your Zerk bad by chance? Where did you get your parts to do this by the way?
Sent from my iPhone using Tapatalk
__________________
2010 SR5 Premium, Pretty much stock right now.
|
|
|
Reply With Quote
|
|
05-16-2017, 10:14 AM
|
#3
|
|
Member
|
|
Join Date: Aug 2016
Location: Cameron Park, CA
Posts: 393
|
|
|
Member
Join Date: Aug 2016
Location: Cameron Park, CA
Posts: 393
|
Quote:
Originally Posted by Lockcuff

Is your Zerk bad by chance? Where did you get your parts to do this by the way?
Sent from my iPhone using Tapatalk
|
I think the zero is ok, just that tight. With the coupler in the trailer, I can turn it with a 2' bar... with effort. I've driven it around the block and obviously it moves. Maybe I'll just drive it a bit and see how it works out.
All the materials are basic. The pin is a grade 8 bolt and the rest is from the local steel shop. I was going to do a quick, detailed thread once it's finished.
|
|
|
Reply With Quote
|
|
05-16-2017, 09:50 PM
|
#4
|
|
Member
|
|
Join Date: Jun 2015
Location: Arkansas
Posts: 36
Real Name: Dan
|
|
|
Member
Join Date: Jun 2015
Location: Arkansas
Posts: 36
Real Name: Dan
|
I'd like to build one myself this summer, looking forward to your writeup
Sent from my iPhone using Tapatalk
__________________
2010 SR5 Premium, Pretty much stock right now.
|
|
|
Reply With Quote
|
|
05-17-2017, 12:08 AM
|
#5
|
 |
Member
|
|
Join Date: Jul 2016
Location: The great state of TEXAS
Age: 33
Posts: 239
Real Name: Kyle, But you must call me dragon
|
|
|
Member
Join Date: Jul 2016
Location: The great state of TEXAS
Age: 33
Posts: 239
Real Name: Kyle, But you must call me dragon
|
Quote:
Originally Posted by atchcraft
I think the zero is ok, just that tight. With the coupler in the trailer, I can turn it with a 2' bar... with effort. I've driven it around the block and obviously it moves. Maybe I'll just drive it a bit and see how it works out.
All the materials are basic. The pin is a grade 8 bolt and the rest is from the local steel shop. I was going to do a quick, detailed thread once it's finished.
|
The welded sleeve is probably warped due to un even heat distribution that your going to get welding a round object into a square whole. I think the only thing you can do is let it break in since you can not take it apart and try and true up the bore due to its design. I have replaced a lot of pin bosses on Deere Skid steers and they use a Morse tapered pin and you have to get those set dead on or they will bind when you go to curl the bucket and if you concentrate to much heat to one side of the boss to long and it will pull it just a hair off.
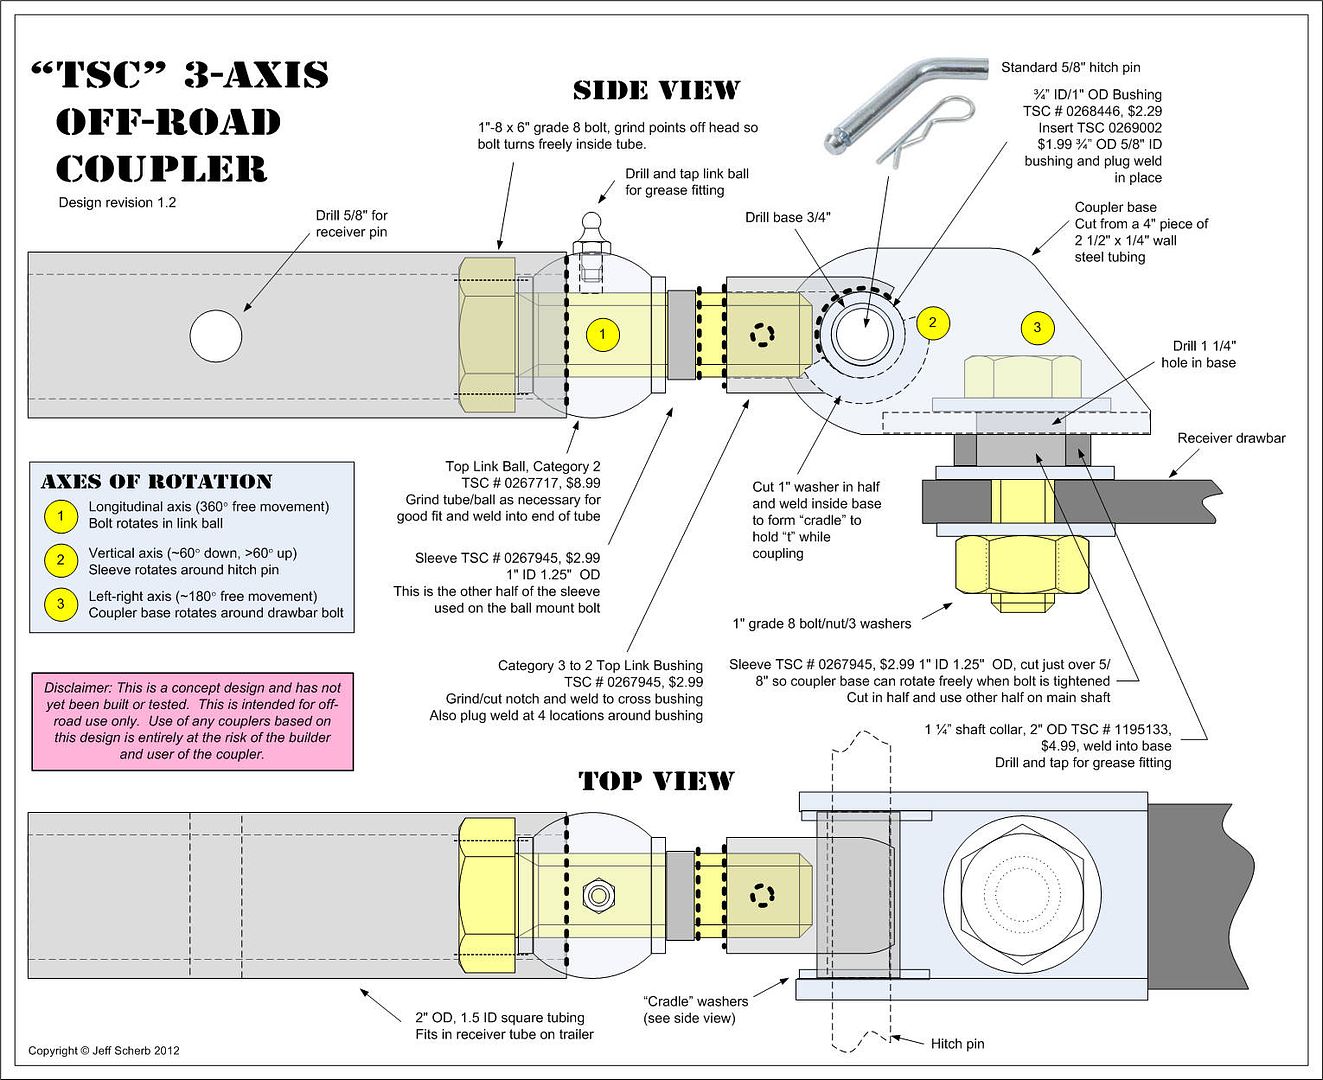
Very cool hitch design by the way never seen any thing like this on automotive application only on construction equipment and AG impliments
__________________
Do it for dale
Last edited by Ralphman; 05-17-2017 at 09:34 AM.
|
|
|
Reply With Quote
|
|
05-17-2017, 12:49 AM
|
#6
|
 |
Senior Member
|
|
Join Date: Oct 2014
Location: Pasadena, CA
Posts: 1,433
Real Name: Dave
|
|
|
Senior Member
Join Date: Oct 2014
Location: Pasadena, CA
Posts: 1,433
Real Name: Dave
|
3 way coupler
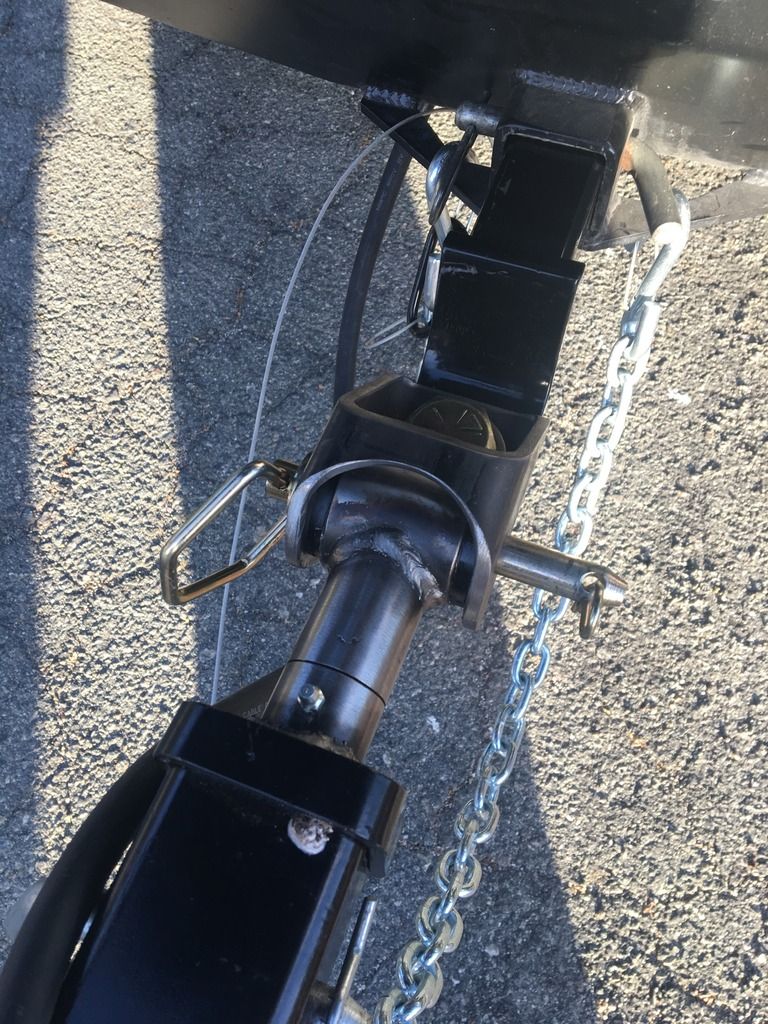
The finished piece looks great. Simple and functional. Looking at the parts I can't tell exactly how it fits together. I see the round tube piece that gets welded to the tube and black bushing. I don't see where the two holes went. I see the solid pin and assume you welded it into the trailer square tube. Where did the square tube go? And which parts are tight?
Wish I could fabricate steel like that. Nice work.
Dave
__________________
2015 T4R Trail Edition w/KDSS. Baja Rack flat utility rack, Baja Rack ladder, WeatherTech floor mats, Demello rock sliders. RCI skid plates, Falken AT3W LT285/70R17 tires, ICON Stage 7 tubular 2" extended travel lift, ICON Rebound 17x8.5" 0 offset alloy wheels, Baxter Performance remote oil filter adapter. Side exit exhaust, 2nd recovery hook on rear frame corner, DIY wheel well liners with 1/4" neoprene rubber. 

|
|
|
Reply With Quote
|
|
05-17-2017, 08:30 AM
|
#7
|
|
Member
|
|
Join Date: Aug 2016
Location: Cameron Park, CA
Posts: 393
|
|
|
Member
Join Date: Aug 2016
Location: Cameron Park, CA
Posts: 393
|
Thank you
Quote:
Originally Posted by Ralphman
The welded sleeve is probably wrapped due to in even heat distribution that your going to get welding a round object into a square whole. I think the only thing you can do is let it break in since you can not take it apart and try and true up the bore due to its design. I have replaced a lot of pin bosses on Deere Skid steers and they use a Morse tapered pin and you have to get those set dead on or they will bind when you go to curl the bucket and if you concentrate to much heat to one side of the boss to long and it will pull it just a hair off.
Very cool hitch design by the way never seen any thing like this on automotive application only on construction equipment and AG impliments
|
Thank you, that puts it into perspective and makes a lot of sense. I'm going to have that in mind when I make another. You're right, this is going to be hard to avoid, so I'm just going to loosen it up a bit. I have extra material, so I'm just going to make a new tonight and maybe turn this into a build thread. I have a few other things that I'm going to add for version 2.0.
Thanks again for the kudos!
Matt
|
|
|
Reply With Quote
|
|
05-17-2017, 08:44 AM
|
#8
|
|
Member
|
|
Join Date: Aug 2016
Location: Cameron Park, CA
Posts: 393
|
|
|
Member
Join Date: Aug 2016
Location: Cameron Park, CA
Posts: 393
|
Quote:
Originally Posted by DesertCanyons
The finished piece looks great. Simple and functional. Looking at the parts I can't tell exactly how it fits together. I see the round tube piece that gets welded to the tube and black bushing. I don't see where the two holes went. I see the solid pin and assume you welded it into the trailer square tube. Where did the square tube go? And which parts are tight?
Wish I could fabricate steel like that. Nice work.
Dave
|
Thanks, Dave! The piece of tube that is welded to the bushing, has holes that were drilled for rosette welds. I ground those off, so you can't see them in the finished pic. As for the square tube, it is flush with the trailer tongue tube and you can't really see it in the pic. I think I'm going to redo it tonight and post some better pics.
Matt
|
|
|
Reply With Quote
|
|
05-17-2017, 09:32 AM
|
#9
|
|
Member
|
|
Join Date: Jul 2016
Location: The great state of TEXAS
Age: 33
Posts: 239
Real Name: Kyle, But you must call me dragon
|
|
|
Member
Join Date: Jul 2016
Location: The great state of TEXAS
Age: 33
Posts: 239
Real Name: Kyle, But you must call me dragon
|
Quote:
Originally Posted by atchcraft
Thank you, that puts it into perspective and makes a lot of sense. I'm going to have that in mind when I make another. You're right, this is going to be hard to avoid, so I'm just going to loosen it up a bit. I have extra material, so I'm just going to make a new tonight and maybe turn this into a build thread. I have a few other things that I'm going to add for version 2.0.
Thanks again for the kudos!
Matt
|
What is your welding process are you using? Mig or stick kinda looks like a 6010 or 6011
__________________
Do it for dale
|
|
|
Reply With Quote
|
|
05-17-2017, 09:45 AM
|
#10
|
 |
Senior Member
|
|
Join Date: Dec 2007
Location: Castle Rock, CO
Age: 34
Posts: 2,337
Real Name: Jeff
|
|
|
Senior Member
Join Date: Dec 2007
Location: Castle Rock, CO
Age: 34
Posts: 2,337
Real Name: Jeff
|
Don't have any insight for the OP, just wanted to say nice job! Look forward to seeing your write up! I was planning to follow this one when I build mine.
https://tventuring.com/trailerforum/thread-65.html
__________________
3RDGENS.COM
My Video's
'96 Limited - October '08 T4R Of The Month (Sold)
'00 SR5 - Lifted/Supercharged/E-locker
'16 SR5 Barcelona Red
|
|
|
Reply With Quote
|
|
05-17-2017, 01:54 PM
|
#11
|
|
Member
|
|
Join Date: Aug 2016
Location: Cameron Park, CA
Posts: 393
|
|
|
Member
Join Date: Aug 2016
Location: Cameron Park, CA
Posts: 393
|
Quote:
Originally Posted by sn0wrunner
|
Thank you! I'm really glad you referenced this, because this is one of the motivations behind my project. In fact, i used a few of those parts (bushings) listed on the vehicle end. The rest of it just seemed better suited coming from a steel shop. I'm going to try and get the new pieces cuy up tonight and I'll post them up.
Last edited by atchcraft; 05-17-2017 at 02:01 PM.
|
|
|
Reply With Quote
|
|
05-17-2017, 01:59 PM
|
#12
|
|
Member
|
|
Join Date: Aug 2016
Location: Cameron Park, CA
Posts: 393
|
|
|
Member
Join Date: Aug 2016
Location: Cameron Park, CA
Posts: 393
|
Quote:
Originally Posted by Ralphman
What is your welding process are you using? Mig or stick kinda looks like a 6010 or 6011
|
It's MIG. I'm a big rusty and actually was never very good at pretty beads on tube joints.
|
|
|
Reply With Quote
|
|
05-17-2017, 02:11 PM
|
#13
|
|
Member
|
|
Join Date: Jul 2016
Location: The great state of TEXAS
Age: 33
Posts: 239
Real Name: Kyle, But you must call me dragon
|
|
|
Member
Join Date: Jul 2016
Location: The great state of TEXAS
Age: 33
Posts: 239
Real Name: Kyle, But you must call me dragon
|
Quote:
Originally Posted by atchcraft
It's MIG. I'm a big rusty and actually was never very good at pretty beads on tube joints.
|
This a 120v or 240v welder? If its a 120v I would suggest using a.035" self shield wire you will get better penatration on that .250 wall tube and be able to run the bead faster to help with that warping. Also if it was me I would weld the end of the bolt shaft on the very tip to the sleeve it welds to then clean that up and then weld it to the bushings sleeve to make it stronger along with the 4 plug welds you did. You can also wrap a damp cloth around the round tube while welding it to help absorb some of the heat to help prevent a warp
__________________
Do it for dale
|
|
|
Reply With Quote
|
|
05-17-2017, 04:17 PM
|
#14
|
|
Member
|
|
Join Date: Aug 2016
Location: Cameron Park, CA
Posts: 393
|
|
|
Member
Join Date: Aug 2016
Location: Cameron Park, CA
Posts: 393
|
Quote:
Originally Posted by Ralphman
This a 120v or 240v welder? If its a 120v I would suggest using a.035" self shield wire you will get better penatration on that .250 wall tube and be able to run the bead faster to help with that warping. Also if it was me I would weld the end of the bolt shaft on the very tip to the sleeve it welds to then clean that up and then weld it to the bushings sleeve to make it stronger along with the 4 plug welds you did. You can also wrap a damp cloth around the round tube while welding it to help absorb some of the heat to help prevent a warp
|
It's 240V and handles .250 very well. If im understanding correctly, you mean the tip of the pin to the joint before the bushing?
I actually did weld that part before i joinded it to the bushing.That joint at the bushing has a nice bevel and the HAZ on the backside was solid. I think I have good penitration (giggity)?
I appriciate your advice! Its nice talking this stuff out. I've got a new game for the sequence that I weld them up. I'm going to loosen up the tolerence on the pin, then weld that sleeve to the 2" receiver tube before I install the pin. that way i can deal with any fit issues. then ill cap it and finish weld it to the bushing, if that makes any sence.
Thanks again for the input!
Matt
|
|
|
Reply With Quote
|
|
05-17-2017, 06:22 PM
|
#15
|
|
Member
|
|
Join Date: Jul 2016
Location: The great state of TEXAS
Age: 33
Posts: 239
Real Name: Kyle, But you must call me dragon
|
|
|
Member
Join Date: Jul 2016
Location: The great state of TEXAS
Age: 33
Posts: 239
Real Name: Kyle, But you must call me dragon
|
Quote:
Originally Posted by atchcraft
It's 240V and handles .250 very well. If im understanding correctly, you mean the tip of the pin to the joint before the bushing?
I actually did weld that part before i joinded it to the bushing.That joint at the bushing has a nice bevel and the HAZ on the backside was solid. I think I have good penitration (giggity)?
I appriciate your advice! Its nice talking this stuff out. I've got a new game for the sequence that I weld them up. I'm going to loosen up the tolerence on the pin, then weld that sleeve to the 2" receiver tube before I install the pin. that way i can deal with any fit issues. then ill cap it and finish weld it to the bushing, if that makes any sence.
Thanks again for the input!
Matt |
Sounds like you got this knowing you got a 240v welder i have no doubts about ample penatration... he said penatration...
__________________
Do it for dale
|
|
|
Reply With Quote
|
 Posting Rules
|
You may not post new threads
You may not post replies
You may not post attachments
You may not edit your posts
HTML code is On
|
|
|
|


 Linear Mode


