As many of you know when the forum software was updated some posts were truncated. This post by "Mike the Wino" is a terrific and informative thread. Thanks to J.B.'s character flaws he had the foresight to save it on his computer and reposted it below. Through the magic of my super powers as a moderator I have copy/pasted Mike's thread via J.B. to restore this thread. Thanks to both Mike and J.B.
Mikes original thread:
DIY: Non-Sealed Transmission Service for 4th Gen T4R's and Prior
he had the foresight to save it on his computer and reposted it below. Through the magic of my super powers as a moderator I have copy/pasted Mike's thread via J.B. to restore this thread. Thanks to both Mike and J.B.
Mikes original thread:
DIY: Non-Sealed Transmission Service for 4th Gen T4R's and Prior
Howdy all! After much reading on this forum, and in discussions with other members, it was thought that a DYI on this subject was in order. Our fleet of '03 and '04 4Runners are going to see a lot more fluid changes coming up, and most who read these pages have the DIY genes in their blood anyway. So if this is helpful to you, or helps set your mind at ease as to just how easy it is to do, great!

If not, well just ignore this and move on!
 How to Change the Transmission Filter and Perform a “Flush and Fill” Procedure on 4th Gen TR4’s (and prior) With “Non-Sealed” Transmissions.
This DIY guide is designed for the 4Runner owner that has at least rudimentary mechanical skills, and who wishes to save at least $300 over what most foreign auto repair shops and Toyota dealers charge for the same service. It is only applicable to those vehicles that don’t have “sealed” transmissions; i.e.: those with dipsticks for checking the transmission fluid. It is written with the fledgling garage mechanic in mind…the one who needs true step-by-step instructions.
The following instructions assume you’ve already been to the parts store and have everything you need to perform the task at hand. You may need more than a case of fluid, depending on how nasty the stuff is in your transmission. Many repair facilities say they use up to 18 quarts for a complete flush and fill.
Note: I bought the transmission filter kit at my local NAPA dealer (approx $35 with tax), and I picked up a case of ATF Type T-IV at the Toyota Stealership for $5.35/qt plus tax (about $70), for a grand total of $105. Make sure you buy the fluid specified in your owner’s manual.
Those of you that don’t imbibe in beverages comprised of C2H6O (otherwise known as ethanol, or “grain alcohol”) may wish to skip steps 1, 3, 9, 13 and 15d. (Or substitute for some other beverage of choice).
1. Grab a six pack (or more) of frosty cold malted beverages from the fridge, throw them into a cooler with some blue ice, and head for the shop, garage, or driveway. Conversely, if you’re one of those lucky bas****s that already has a fridge in the shop, you may bypass this step.
2. Ensure the vehicle is at normal operating temperature, and raise the front end on either jack stands or ramps. Turn the engine off.
3. Grab yourself a frosty, cold malted beverage and enjoy. You’ve gotten this far, you deserve it.

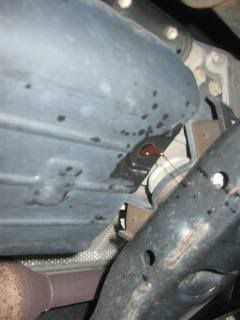
4. If you’re going to “flush” the transmission of all the old fluid, then from under the vehicle remove the front skid plate (between the radiator and front suspension). This will give you access to the transmission cooling return line. Determine which line is the return line by feeling both of them, both at the radiator and where they go into the transmission; the cooler one is most likely the return. In my case, the one that plugged into the aft end of the transmission was the return.
If you’re just doing a filter change, skip this step.
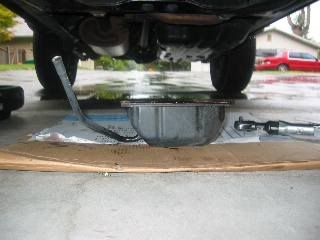
5. Remove the drain plug (14 mm) and drain fluid onto the floor, or into a drain pan if you’d prefer not clean up the mess later. You should get about 4-5 quarts.
 This shows the old nasty fluid draining from the sump pan.......
6. Remove the transmission dipstick, and then the upper section of the transmission dipstick tube by removing the bolt that holds it to the right cylinder head (see photo). Once the bolt is removed, rotate the tube back and forth while pulling up on it until it separates from the lower section.
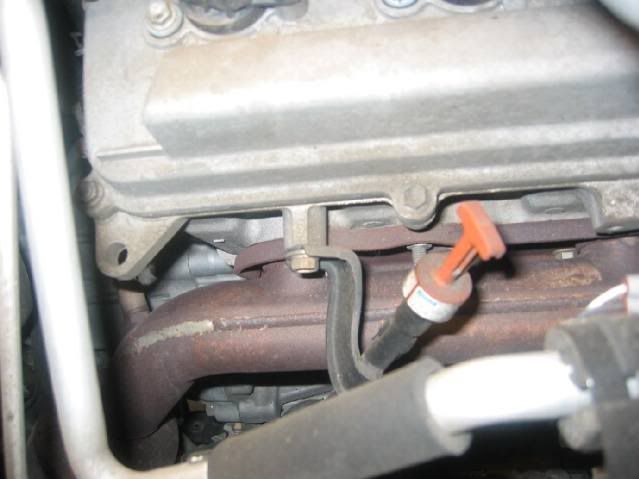 Remove this bolt in order to separate the upper section of tube from the lower...
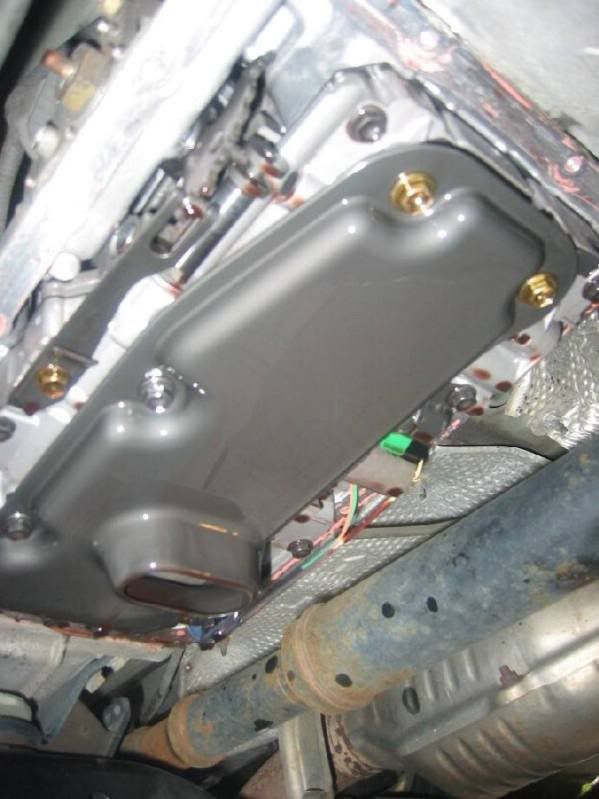
7. Remove all but two of the bolts (preferably closer to the front of the pan) holding on the transmission sump pan. Loosen the two bolts you left in a couple turns. Due to the type of gasket material the factory used, I had to tap a gasket scraper with a hammer at the seal plane to separate the pan from the case. Once the pan is loose, hold onto the pan and remove the two remaining bolts and “drop” the pan.
 The sump pan, sitting forlornly under the car.........
8. Remove the filter. You’re going to get more fluid pouring out as you remove the filter, so make sure the drain pan is positioned accordingly. Note: The aft bolt is the longest, followed by a shorter bolt in the middle, then two shorter yet at the forward end.
 The as yet un-removed filter.........
9. Grab yourself another frosty, cold malted beverage and swill it down, because you’ve reached a milestone. Whew!
10. Clean the gasket material from the sump pan. I had to remove it by using the wire brush wheel on my bench grinder. The residual dust can be seen in this photo. Also make sure there isn’t any gasket material left on the transmission case.
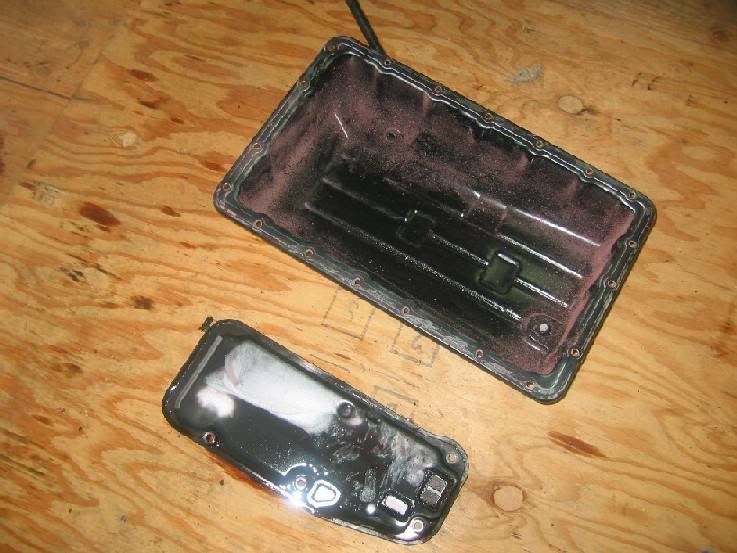 Shown here is the pan with the gasket material remnants, and the old dirty filter....
11. Remove the magnets that the factory left in the sump pan and wipe them clean. If you notice metal shards/shavings on any of them, you’ve got issues requiring further investigation. If not, clean out the sump pan thoroughly, and replace the magnets into the recessed areas of the pan.
12. Install the new filter, and reinstall the sump pan with the new gasket provided. Don’t use gasket cement; it’s unnecessary. I also reinstalled the upper half of the dipstick tube at this point.
13. Time for another beer!
14. Pour (4) quarts of transmission fluid in through the dipstick tube. Hopefully you’ve got a transmission fluid funnel, i.e.: the type with the long gooseneck. If not, you’ll need to improvise one. Go slowly, because for whatever reason the transmission can’t accept the fluid as fast as you can pour it in, so it backs up the tube and can spill out.
15a. If you’re going to do so, now you’re ready to start the “flushing” process. It’s easier than you think! In the case of my ’03, the transmission lines are metal tubes for the first 18” or so aft of the radiator, then have a rubber section that clamps to metal tubing again where the lines cross over the front suspension and motor mount. It is at this connection where the rubber tubing meets the aft metal tubing that you want to disconnect the cooling line that you previously identified in step (4). Once you’ve separated the line, hang a ¾” or so box-end wrench over the rubber line to keep it from flopping around like a runaway fire hose, and point the line downward into your drain pan. It helps to have an assistant at this point, preferably someone who shares your passion for frosty cold malted beverages.
15b. Have said assistant start the car while you watch the disconnected cooling line up front. In a moment or two (after an initial “sputter”), you should get a steady flow of fluid draining into the pan. When the fluid again starts to “sputter” and the flow reduces, have your helper turn off the motor. You should have 3-4 quarts of old fluid now in the drain pan.
15c. Refill the transmission with about 3 more quarts, and repeat the process. You want to continue this “flush and fill” process until you get nice, fresh red fluid coming out of the return line. It may take up four cycles to achieve this state. When that’s the case, re-install the return line and securely clamp in place. Be sure to top off the transmission, and you’re done!
15d. See, that wasn’t so hard! Congratulations are in order, so bore yourself another peer……uh, pour another beer (HIC!). And don’t forget the helper!
This whole procedure took me only two hours, including potty breaks and cleaning up. And I saved enough money to stock my beer fridge for weeks!
OBLIGATORY DISCLAIMER ALERT!!!: The procedure noted above is what worked for me, and should also work for you assuming all things being equal. I assume no responsibility for anything that may go wrong if you attempt this task on your own. If you’re unsure of your mechanical abilities, or are otherwise worried about the ramifications of screwing something up, by all means spend the extra money and have it done professionally. But really, in all honesty, this is a very simple job, with low risks and high rewards.
Cheers!
Mike the Wino
"Life is too short to drink bad wine."--Unknown


 I edited the first post in the sticky to have a link to this thread. It's now linked from the newly re-titled 'T4R Transmission Fluid Servicing (sealed & non-sealed)' sticky. I did it that way in the interest of limiting stickies.
 Linear Mode


