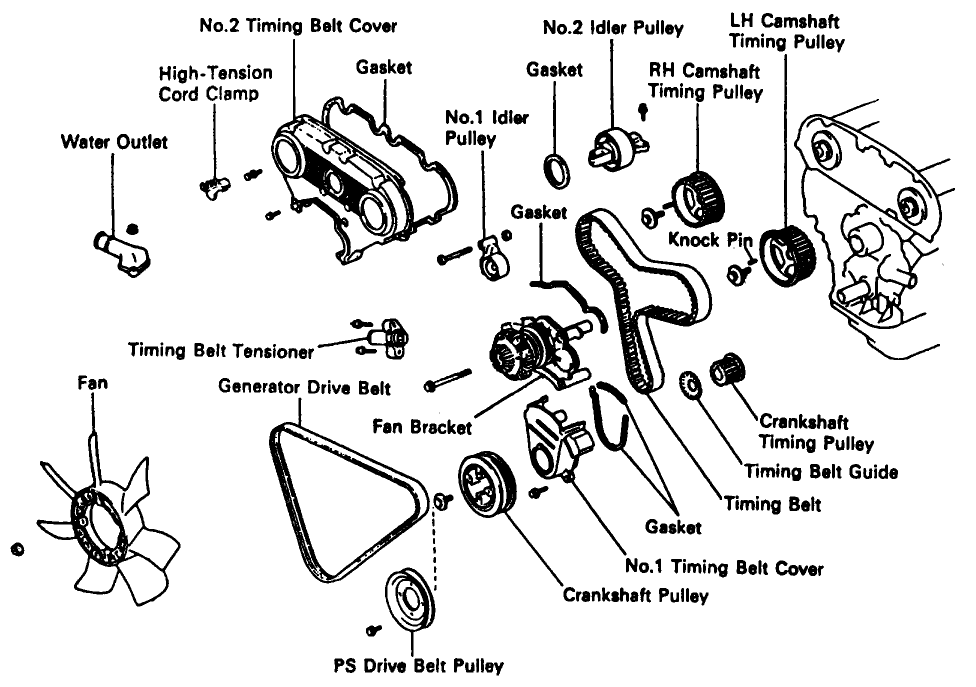
TIMING BELT INSTALLATION
1. Install crankshaft timing pulley.
(a) Align the timing pulley set key with the key groove of the pulley.
(b) Using SST 09214-60010 and a hammer, tap in the timing pulley, facing the flange side inward.
2. Install No.1 idler pulley.
(a) Using a 10 mm hexagon wrench, install the plate washer and idler pulley with the pivot bolt.
Torque: 34 N.m (350 kgf.cm, 25 ft.lbf)
(b) Check that the pulley bracket moves smoothly.
3. Temporarily install timing belt.
NOTICE: The engine should be cold.
(a) Using the crankshaft pulley bolt, turn the crankshaft and align the timing marks of the crankshaft timing pulley and oil pump body.
(b) Remove any oil or water on the crankshaft timing pulley and water pump pulley, and keep them clean.
(c) Align the installation mark on the timing belt with the dot mark of the crankshaft timing pulley.
(d) Install the timing belt on the crankshaft timing pulley and water pump pulley.
4. Install the timing belt guide, facing the cup side outward.
5. Install No.1 timing belt cover.
(a) Install the gasket to the timing belt cover.
(b) Install the timing belt cover with the 3 bolts.
6. Install crankshaft pulley.
(a) Align the pulley set key with the key groove of the crankshaft pulley.
(b) Temporarily install the pulley bolt.
(c) Using SST 09213-58012 (90201-08131, 91111-50845), 09330-00021 , tighten the pulley bolt.
Torque: 245 N.m (2,500 kgf.cm, 181 ft.lbf)
(d) Install the PS drive belt pulley with the 4 bolts.
7. install LH camshaft timing pulley.
(a) Install the knock pin to the camshaft.
(b) Align the knock pin hole of the camshaft with the knock pin groove of the timing pulley.
(c) Slide the timing pulley on the camshaft, facing the flange side outward.
(d) Using SST 09960-10010 (09963-01000) , install the pulley bolt.
Torque: 108 N.m (1,100 kgf.cm, 80 ft.lbf)
8. Set No.1 cylinder to TDC/compression.
(a) Crankshaft Position:
Turn the crankshaft pulley, and align its groove with timing mark "0" of the No.1 timing belt cover.
(b) RH Camshaft Pulley Position:
Turn the camshaft, align the knock pin hole of the camshaft with the timing mark of the No.3 timing belt cover.
(c) LH Camshaft Pulley Position:
Turn the camshaft timing pulley, align the timing marks of the camshaft timing pulley and No.3 timing belt cover.
9. Connect timing belt to LH camshaft timing pulley.
(a) Check that the installation mark on the timing belt is aligned with the end of the No.1 timing belt cover.
(b) Remove any oil or water on the LH camshaft timing pulley, and keep it clean.
(c) Using SST 09960-10010 (09963-01000) , slightly turn the LH camshaft timing pulley clockwise. Align the installation mark on the timing belt with the timing mark of the camshaft timing pulley, and hang the timing belt on the LH camshaft timing pulley.
(d) Using SST 09960-10010 (09963-01000) , align the timing marks of the LH camshaft pulley and No.3 timing belt cover.
(e) Check that the timing belt has tension between the crankshaft timing pulley and LH camshaft timing pulley.
10. Install RH camshaft timing pulley and timing belt.
(a) Remove any oil or water on the RH camshaft timing pulley. No.1 idler pulley and No.2 idler pulley. and keep them clean.
(b) Align the installation mark on the timing belt with the timing mark of the RH camshaft timing pulley. and hang the timing belt on the RH camshaft timing pulley. facing the flange side inward.
(c) Slide the RH camshaft timing pulley on the camshaft.
(d) Align the timing marks of the RH camshaft timing pulley and No.3 timing belt cover.
(e) Using SST 09960-10010 (09963-01000) , align the knock pin hole of the camshaft with the knock pin groove of the pulley and install the knock pin.
(f) Using SST 09960-10010 (09963-01000) , install the pulley bolt.
Torque: 108 N.m (1.100 kgfcm. 80 ft.lbf)
11. Install fan bracket.
(a) Install the gasket to the fan pulley bracket.
(b) Install the fan bracket with the 2 bolts and nut.
Torque: 41 N.m (420 kgf.cm, 30 ft.lbf)
12. Set timing belt tensioner.
(a) Using a press. slowly press in the push rod using 981 - 9.807 N (100 - 1.000 kgf. 200 - 2.205 lbf) of force.
(b) Align the holes of the push rod and housing, pass a 1.5 mm hexagon wrench through the holes to keep the setting position of the push rod.
(c) Release the press.
(d) Install the dust boot to the tensioner.
13. Install timing belt tensioner.
(a) Temporarily install the belt tensioner with the 2 bolts.
(b) Alternately tighten the 2 bolts.
Torque: 28 N.m (280 kgf.cm, 20 ft.lbf)
(c) Using pliers, remove the 1.5 mm hexagon wrench from the belt tensioner.
14. Check valve timing.
(a) Slowly turn the crankshaft pulley 2 revolutions from TDC to TDC.
NOTICE: Always turn the crankshaft pulley clockwise.
(b) Check that each pulley aligns with the timing marks as shown in the illustration.
If the timing marks do not align, remove the timing belt and reinstall it.
15. Install No.2 timing belt cover.
(a) Install the gasket to the No.2 idler pulley.
(b) Install the gasket to the fan bracket.
(c) Install the gasket to the timing belt cover.
(d) Install the timing belt cover with the 11 bolts.
(e) Using the 2 water outlet nuts, install the 2 stud bolts.
(f) Connect the 4 clamps on the high-tension cords to the mounting bolts of the No.2 timing belt cover.
16. Install water outlet.
(a) Remove any old packing (FIPG) material and be careful not to drop any oil on the contact surfaces of the water outlet and the water outlet housing on the No.2 idler pulley.
* Using a razor blade and gasket scraper. remove all the old packing (FIPG) material from the gasket surfaces and sealing groove.
* Thoroughly clean all components to remove all the loose material.
* Using a non-residue solvent, clean both sealing surfaces.
(b) Apply seal packing to the sealing groove of the water outlet as shown in the illustration.
Seal packing: Part No.08826-00100 or equivalent
* Install a nozzle that has been cut to a2 - 3 mm (0.08-0.1 2 in.) opening.
* Parts must be assembled within 5 minutes of application. Otherwise the material must be removed and reapplied.
* Immediately remove nozzle from the tube and reinstall cap.
(c) Install the water outlet with the 2 nuts. Alternately tighten the nuts.
Torque: 15 N.m (150 kgfcm. 11 ft.lbf)
17. Install generator drive belt.
18. Install the cooling fan with the 4 nuts.
Torque: 5.4 N.m (55 kgf.cm. 48 in.lbf)
19. Install A/C drive belt.
20. Install PS pump, PS pump pulley and drive belt.
21. Install spark plugs. Using a 1 6 mm plug wrench, install the 6 spark plugs.
Torque: 18 N.m (180 kgf.cm, 13 ft.lbf)
22. Connect high-tension cords to spark plugs
23. Connect No.2 and No.3 air hoses to air pipe.
24. Install radiator.
(a) Install the radiator with the 4 bolts.
(b) Install the No.1 fan shroud with the 4 bolts.
(c) Install the No.2 fan shroud with the 2 clips.
(d) Install the radiator hoses.
(e) On vehicles with A/T, connect the oil cooler hoses.
(f) Connect the reservoir tank hose.
25. Fill with engine coolant.
26. Start engine and check for leaks.
27. Recheck engine coolant level.