 04-16-2015, 03:01 PM
|
#1
|
|
Member
|
|
Join Date: Dec 2014
Location: Chesapeake, VA/Conover, NC
Posts: 227
|
|
|
Member
Join Date: Dec 2014
Location: Chesapeake, VA/Conover, NC
Posts: 227
|
 Ford F150 Gas Tank Swap into 2000 4Runner
Goal:
I plan to do an in depth review of how I installed an auxiliary tank from a Ford F150 into my 2000 4Runner. Feel free to skip any sections you aren't interested in. With all the partial information out there, my goal is for this to be the one stop thread for information on this tank swap.
Background:
I decided I wanted a 4Runner and purchased a 2002 model. After having it for about 6 months, I decided that I should have done more research before making a purchase. I didn't like the push button 4wd with the disconnecting center differential, I didn't like that it was Cali emissions, etc. So I did more research, then I began the search for a '96-'00 non-Limited model. I found one and bought it, but on the way home my girlfriend (who the car is really being purchased for) noticed something was off. She thought the gas gauge was dropping much faster than it should be. I applauded her awareness and recognition of the problem and told her I would check it when we stopped for gas. Sure enough, we were getting the same gas mileage as in the '02, but ran the tank down much faster. When we filled it from probably about 1/4 tank, it only took about 10 gallons of gas. Knowing that all the 3rd gen 4Runners have 18.5gal tanks, this struck me as odd. So I began research again, which ultimately lead to this modification.
Technical Service Bulletin:
Without going into too much detail, the '99-'00 4Runner had issues where the gas gauge would read inaccurately. The following Technical Service Bulletins (TSB) outline the problem in detail. My '00 4Runner falls into the VIN range where replacing the Fuel Sender and Suction Tube Assembly is recommended.
TSB EL010-00 Fuel Gauge Inaccuracy
TSB EL010-99 Fuel Gauge Horizontal Calibration Procedure
Benefits of the Ford Gas Tank:
I am not new to the Ford tank swap theory. I've looked into it previously as a consideration for my Tacoma. I don't like the location of the stock tank. It is offset to the driver side and fuel is heavy. I don't know if this affects 4Runners as much, but in Tacomas it contributes to the "Taco Lean" which is when the truck leans to the driver side. It also hangs a couple inches below the frame with only a thin skid plate for protection. In my Tacoma I was able to cut out and re-weld a crossmember to lift the tank so it's even with the frame rails. In 4Runners this isn't as easy because of the tube crossmember at the back of the tank. So in my opinion, there are four main benefits.
1. Mid-section ground clearance.
2. Weight distribution.
3. No longer have the potential issue of the driveshaft rubbing the gas tank during articulation.
4. Gives you the option to run whatever rear 4-link design you want.
Additional references and where I gathered much of my information:
There are others, but this is where I spent the most time.
Pirate
TTORA
Important Note:
1. My 4Runner is not Cali emissions and it does not have a charcoal canister or any of the additional emissions gear.
2. I have a 1.5" body lift on this 4Runner.
The Tank:
I chose to buy a brand new tank from an auto parts store. I knew I would be welding on it and I didn't want to have to worry about the cleanliness of the metal or residual gasoline fumes. The tank is an auxiliary tank (rear mount) from a '90-'97Ford F150. I ordered mine from PartsGeek.com and it cost $110.63 after shipping. The part number I ordered was TNKF1G. Here is a link to the tank. There were 18 and 19 gallon options on PartsGeek.com. Stock size in the 4Runner is 18.5gal. I chose to go with a 19gal tank.
Common Options:
There are a few common options when installing a Ford tank into a 4Runner.
1. Install the Ford tank with the Ford pump and sending unit and wire it to the Toyota wiring. If you do this, the gas gauge will read backwards (Empty to Full). People have bent the float arm to correct this and have the gauge read correctly. See the Pirate link above for more information.
2. Install the Ford Tank with the Ford pump and modify the Toyota sending unit onto the Ford pump. This allows the gas gauge to read correctly; however you still have to modify some wiring and I believe you need to add a wire for the low fuel light. See the Pirate link above for more info.
3. Install the ford tank with a Chevy pump and sending unit. Apparently a certain Chevy fuel pump will mount directly into the Ford tank and read correctly on the 4Runner gauge. You would still need to modify it to the Toyota wiring. See the Pirate link above for limited info on this option.
4. Install the Ford tank with the 4Runner fuel pump and sending unit. This requires significant modification to the tank in order to mount the Toyota components. It also requires modification to the Toyota Components in order to make them fit in the Ford tank. This is the method I chose.
My Build:
See the posts 11-23
Last edited by midcoma; 04-17-2015 at 02:09 PM.
|

|
 Reply With Quote Reply With Quote
|
|
04-16-2015, 03:10 PM
|
#2
|
 |
Elite Member
|
|
Join Date: Mar 2010
Location: CO
Posts: 6,023
|
|
|
Elite Member
Join Date: Mar 2010
Location: CO
Posts: 6,023
|
Nice, this was going to be my plan when I go SAS, will be nice to have this write up! Cant wait to read up.
Also with this setup does it eliminate the driveshaft flexing into the tank? I believe thats why some have done it also in the past.
__________________
1996 Toyota 4runner Limited - 4" Lift, 33's, AOR Bumper w/winch
1990 Eagle Talon Tsi- E316G @ 32psi E85 Tuned, 272 cams, ECMlink v3.0, 405whp - Gave back to Brother
2012 Toyota Tacoma DCSB - Stock on 32's- Wifes
2004 Cadillac CTS-V - 5.7L LS6 v8, 6-speed 400hp/400tq - My new DD
http://www.toyota-4runner.org/3rd-ge...read-pics.html
Last edited by JayRolla; 04-16-2015 at 03:13 PM.
|
|
|
Reply With Quote
|
|
04-16-2015, 03:24 PM
|
#3
|
|
Member
|
|
Join Date: Dec 2014
Location: Chesapeake, VA/Conover, NC
Posts: 227
|
|
|
Member
Join Date: Dec 2014
Location: Chesapeake, VA/Conover, NC
Posts: 227
|
This is actually one of the first mods I've done to my 4Runner so I haven't had any problems with the driveshaft hitting the tank, but I'm familiar with the issue. To answer your question, it will absolutely prevent the driveshaft from flexing into the tank. The tank is now located completely behind the rear axle and nowhere near the driveshaft. Gives you plenty of room for a more serious 4-link in the rear as well.
|
|
|
Reply With Quote
|
|
04-16-2015, 03:40 PM
|
#4
|
|
Elite Member
|
|
Join Date: Mar 2010
Location: CO
Posts: 6,023
|
|
|
Elite Member
Join Date: Mar 2010
Location: CO
Posts: 6,023
|
Quote:
Originally Posted by midcoma

This is actually one of the first mods I've done to my 4Runner so I haven't had any problems with the driveshaft hitting the tank, but I'm familiar with the issue. To answer your question, it will absolutely prevent the driveshaft from flexing into the tank. The tank is now located completely behind the rear axle and nowhere near the driveshaft. Gives you plenty of room for a more serious 4-link in the rear as well.
|
Wow, I kind of should have known that. Yes if behind the rear axle how would it rub. LOL. I cant wait to see the install photos.
__________________
1996 Toyota 4runner Limited - 4" Lift, 33's, AOR Bumper w/winch
1990 Eagle Talon Tsi- E316G @ 32psi E85 Tuned, 272 cams, ECMlink v3.0, 405whp - Gave back to Brother
2012 Toyota Tacoma DCSB - Stock on 32's- Wifes
2004 Cadillac CTS-V - 5.7L LS6 v8, 6-speed 400hp/400tq - My new DD
http://www.toyota-4runner.org/3rd-ge...read-pics.html
|
|
|
Reply With Quote
|
|
04-16-2015, 03:51 PM
|
#5
|
 |
Elite Member
|
|
Join Date: Feb 2010
Location: Utard
Posts: 12,985
Real Name: Kevin
|
|
|
Elite Member
Join Date: Feb 2010
Location: Utard
Posts: 12,985
Real Name: Kevin
|
Sweet. Been thinking about doing this to my '85 as an aux tank, looking forward to seeing your pump and sender mods.
__________________
.
'My needle always settles between west and southwest. The future lies that way to me, and the earth seems more unexhausted and richer on that side.' - Thoreau, sort of.
The Grey Bastard, 1985 4Runner, driveway ornament.
Utah DesertRunners T4R, for all things wheeling and 4Runner in Utah.
|
|
|
Reply With Quote
|
|
04-16-2015, 03:55 PM
|
#6
|
 |
Senior Member
|
|
Join Date: Jun 2012
Location: Hillsdale, MI
Posts: 1,222
Real Name: John
|
|
|
Senior Member
Join Date: Jun 2012
Location: Hillsdale, MI
Posts: 1,222
Real Name: John
|
Quote:
Originally Posted by midcoma
[COLOR="Red"]
TO BE CONTINUED... (waiting for 150 pictures to upload)
|
 
Very excited about this.
|
|
|
Reply With Quote
|
|
04-16-2015, 04:03 PM
|
#7
|
 |
Senior Member
|
|
Join Date: Oct 2011
Location: Stationed in Camp LeJeune, home is Conover, NC
Posts: 2,691
|
|
|
Senior Member
Join Date: Oct 2011
Location: Stationed in Camp LeJeune, home is Conover, NC
Posts: 2,691
|
About time dude. Should've done this write up a long time ago. Like when you finished the tank.
It holds 20 gal, right?
__________________
"We are experts in the application of violence."
-LtCol Christian Cabannis, Camp Letherneck, Afghanistan, 2009. The "Summer of Decision."

|
|
|
Reply With Quote
|
|
04-16-2015, 04:59 PM
|
#8
|
|
Member
|
|
Join Date: Dec 2014
Location: Chesapeake, VA/Conover, NC
Posts: 227
|
|
|
Member
Join Date: Dec 2014
Location: Chesapeake, VA/Conover, NC
Posts: 227
|
I just finished it at the beginning of March. I needed test time to make sure it didn't fail and that the gauge read properly, etc.
|
|
|
Reply With Quote
|
|
04-16-2015, 06:14 PM
|
#9
|
|
Member
|
|
Join Date: Nov 2012
Location: Washington
Posts: 471
|
|
|
Member
Join Date: Nov 2012
Location: Washington
Posts: 471
|
Following
__________________
98 T4R. Boosted, Urd 7th, locked, coilovers, LR UCA, B&M, Airaid, Scan Gauge, Sliders, Sport hood.
Upcoming installs: mustang rear calipers.
Future installs: ford tank, out board rear shocks, AOR hybrid front, CBI hybrid rear, rear cargo deck, TBU.
|
|
|
Reply With Quote
|
|
04-16-2015, 06:46 PM
|
#10
|
|
Member
|
|
Join Date: Mar 2015
Location: Dublin, texas
Posts: 42
|
|
|
Member
Join Date: Mar 2015
Location: Dublin, texas
Posts: 42
|
Subd
|
|
|
Reply With Quote
|
|
04-17-2015, 09:55 AM
|
#11
|
|
Member
|
|
Join Date: Dec 2014
Location: Chesapeake, VA/Conover, NC
Posts: 227
|
|
|
Member
Join Date: Dec 2014
Location: Chesapeake, VA/Conover, NC
Posts: 227
|
A Word of Caution
Last edited by midcoma; 04-17-2015 at 02:11 PM.
|
|
|
Reply With Quote
|
|
04-17-2015, 09:56 AM
|
#12
|
|
Member
|
|
Join Date: Dec 2014
Location: Chesapeake, VA/Conover, NC
Posts: 227
|
|
|
Member
Join Date: Dec 2014
Location: Chesapeake, VA/Conover, NC
Posts: 227
|
Tank Modification
Tank Modification:
I modified the Ford tank by mounting all the Toyota components to it. This probably isn't the easiest way to do as it requires cutting/welding on the tank, but I decided that I wanted to reuse all the original 4Runner components and keep the wiring simple. The entire swap took about 2 months, working on it when I had time. We have other vehicles so I wasn't in a rush to complete it in a weekend. I definitely recommend taking your time.
Start by removing the tank from the 4Runner. This is much easier if the tank is empty. Methods for emptying the tank include driving, syphoning, removing the fuel hose from the hard lines and routing it to a container then turning the vehicle to ON and letting the pump do the work, etc. I still had some fuel left in my tank and it made life a bit harder.
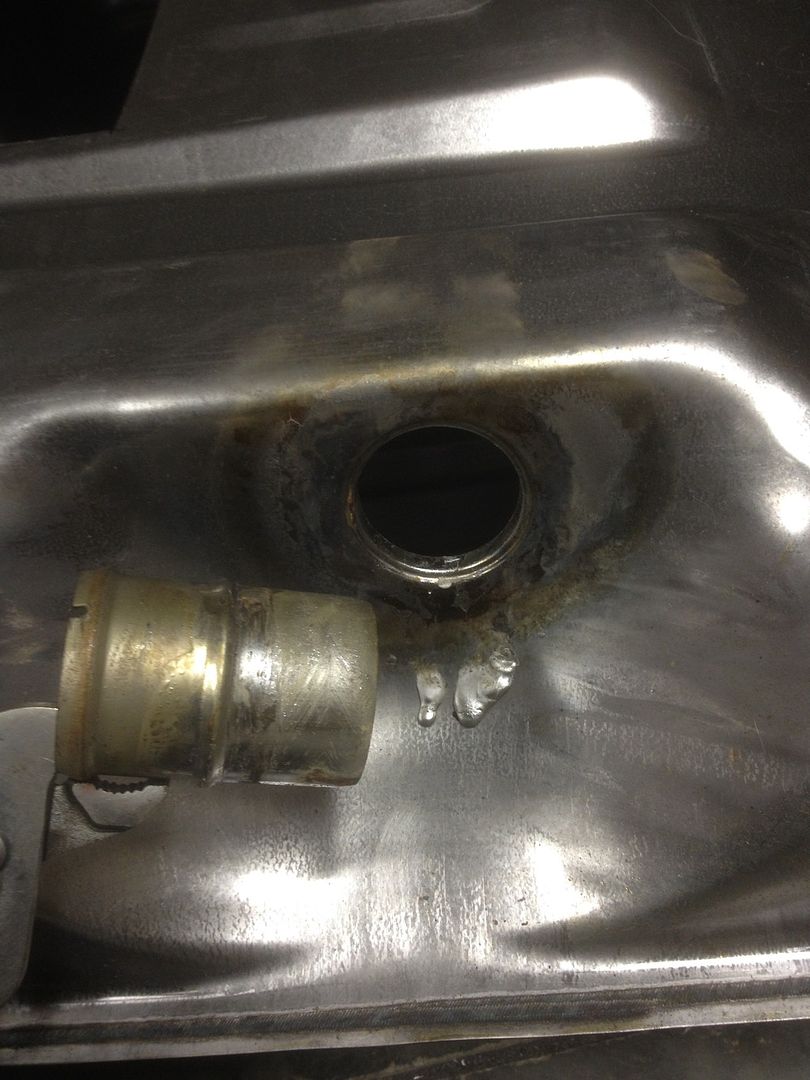
Once the tank is removed, empty any gas that is still in the tank. I poured the gas out of the filler. The metal filler tube on the tank has a valve on it to prevent gas from spilling out. Unbolt the metal tube from the tank and you will be able to pour the gas out.
Remove all the bolted on parts from the tank. On my tank that included the fuel pump/sending unit assembly, the cut off valve assembly and the metal filler tube.
Purge the tank of any remaining gasoline fumes. I reinstalled the metal filler tube to prevent water from escaping, and inserted a garden hose into the hole from the cut off valve assembly. I let the hose run for about 30-60min, allowing the tank to overflow, to remove any left over gas and fumes. Then I mounted a propane torch to a 10' pole, placed the gas tank on the back side of a large tree, light the torch and held it above the holes in the top of the tank while I hid behind the tree to ensure no fumes combusted. After no explosions with the flame above the holes, I put the flame through the holes to the inside of the tank to make sure no fumes were lingering. Luckily I had no explosions. Perform this step at your own risk with whatever method you choose. I recommend being overly careful.
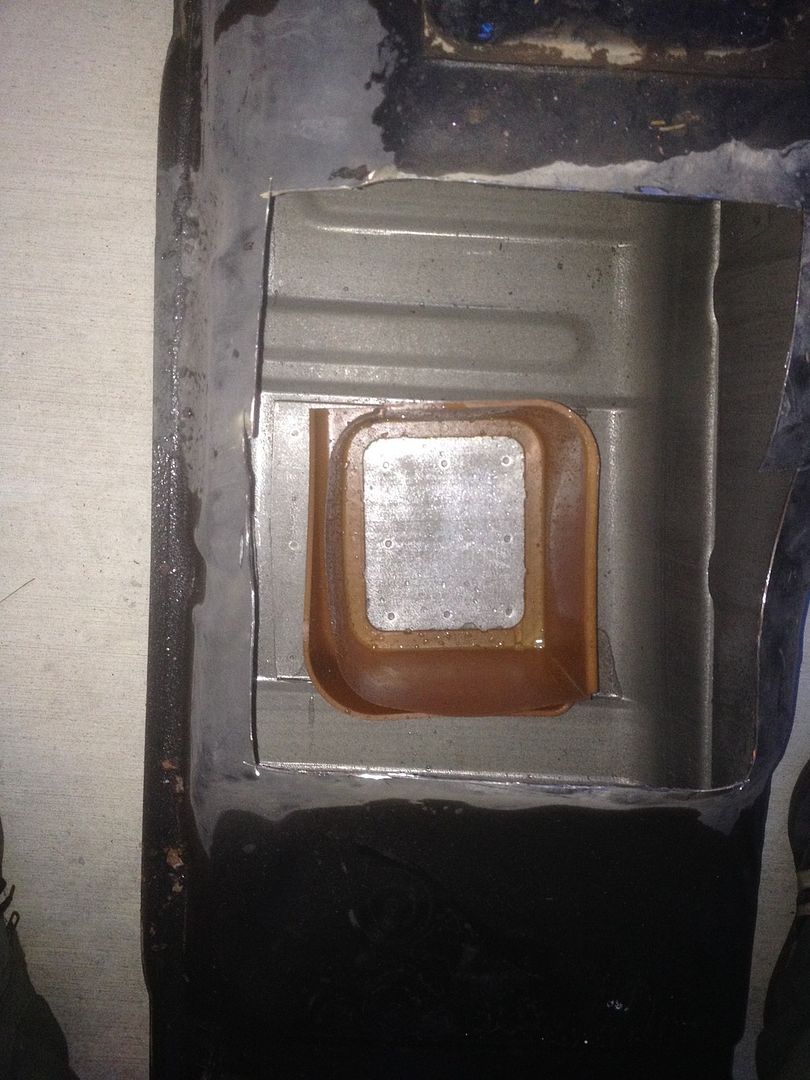
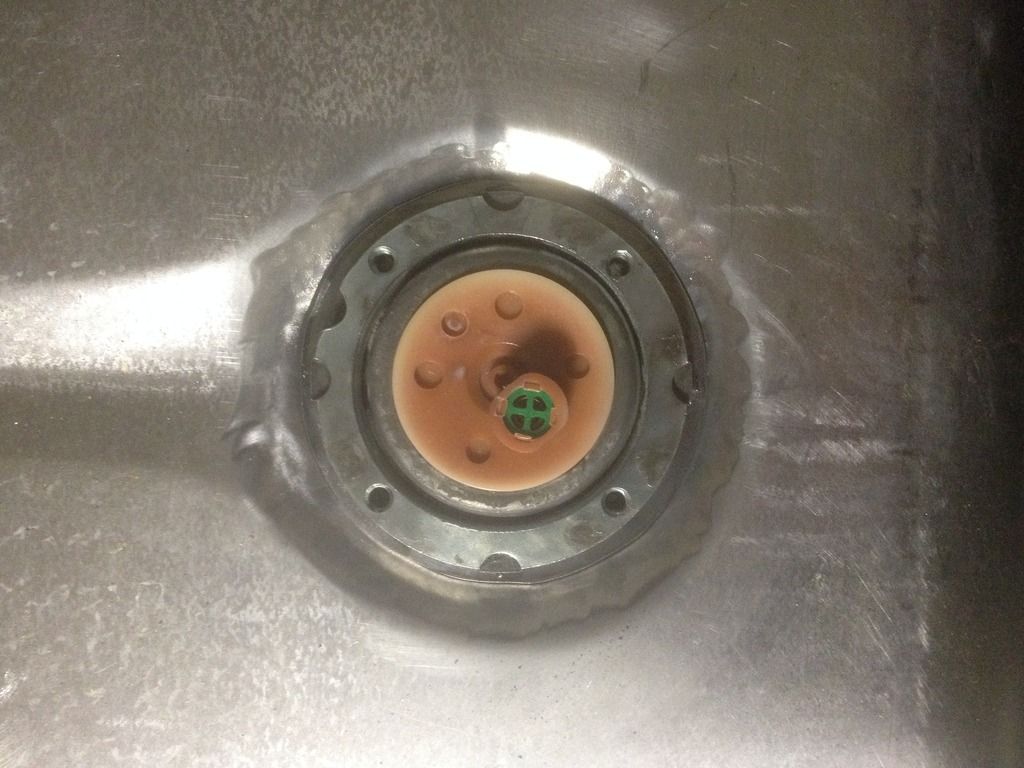
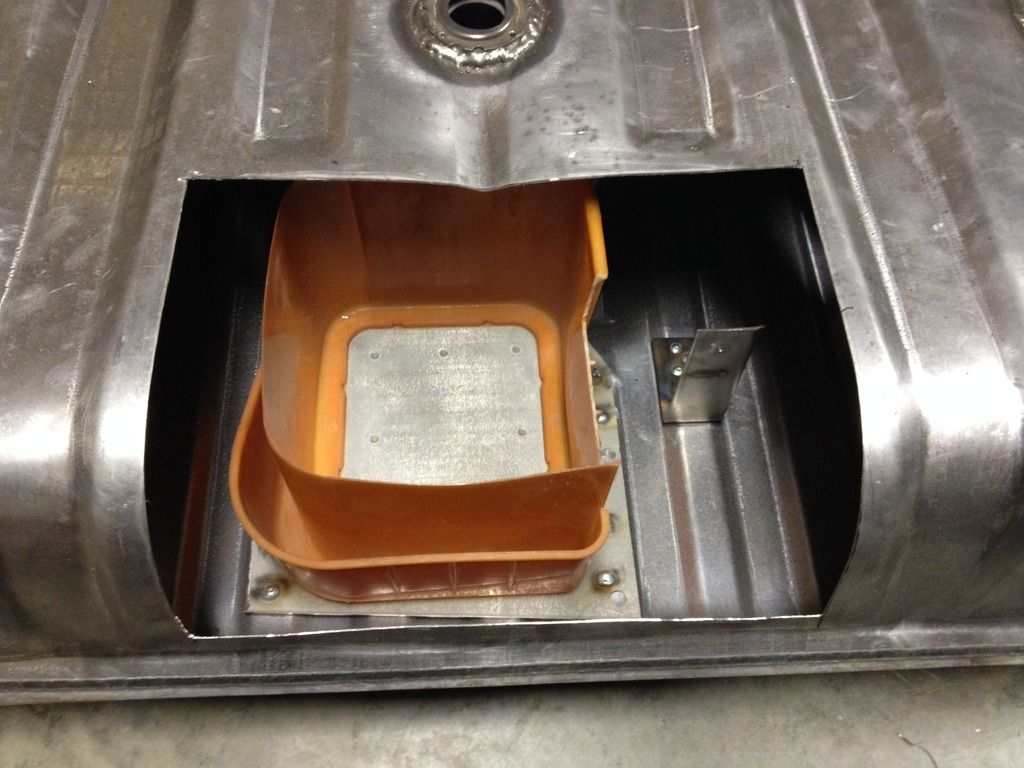
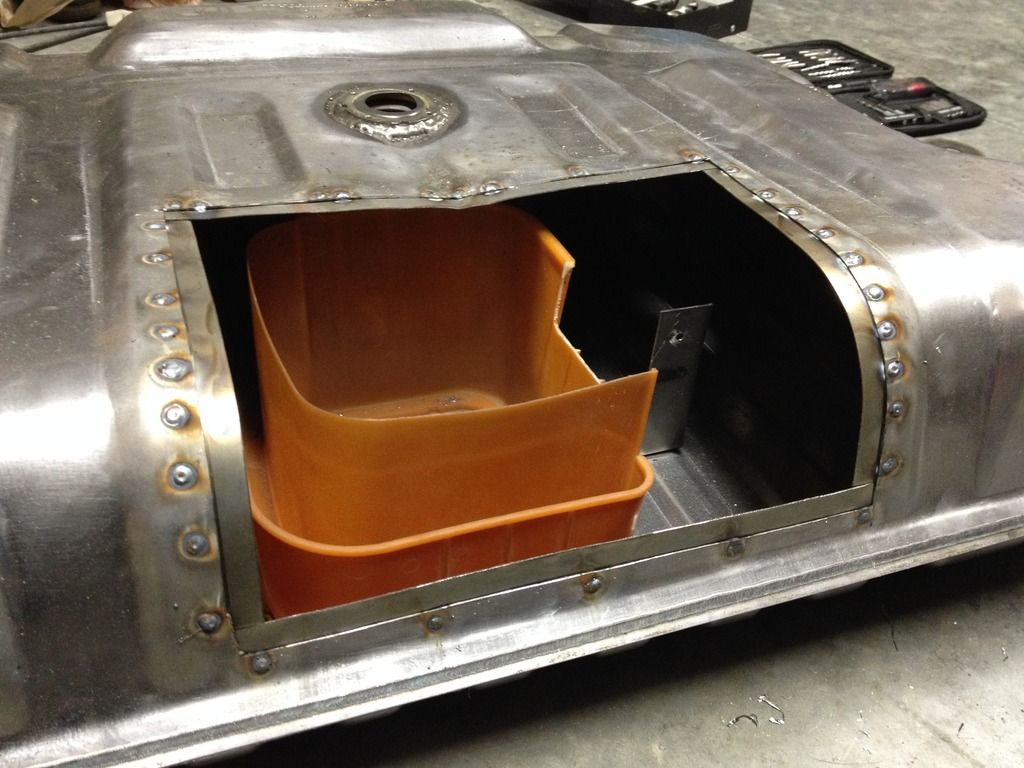
Now that the tank is purged, the factory mounting rings need to be removed so they can be mounted to the Ford tank. I used a 4.5" cut off wheel and it made quick work of the process. I also cut the Toyota baffle/sump bucket out of the tank and used it in the Ford tank.
The tank that I purchased has 0 baffles.
I didn't take many pictures of the stock tank with the parts cut off, but I did take this one of the sump bucket in the tank so I knew how to orient it in the new tank. The hole in the bucket goes to the front with the channel wrapping around to the back.
So now all the Toyota parts have to be placed on the Ford tank. To start, the Ford tank is 22ga galvanized sheet metal. I am absolutely not a professional welder, and mig welding sheet metal sucks. I looked into a couple tricks, and from what I found you want to use the thinnest gauge wire your machine can handle, make sure the material is clean as always, prevent having any gaps between the material, and be careful with the heat.
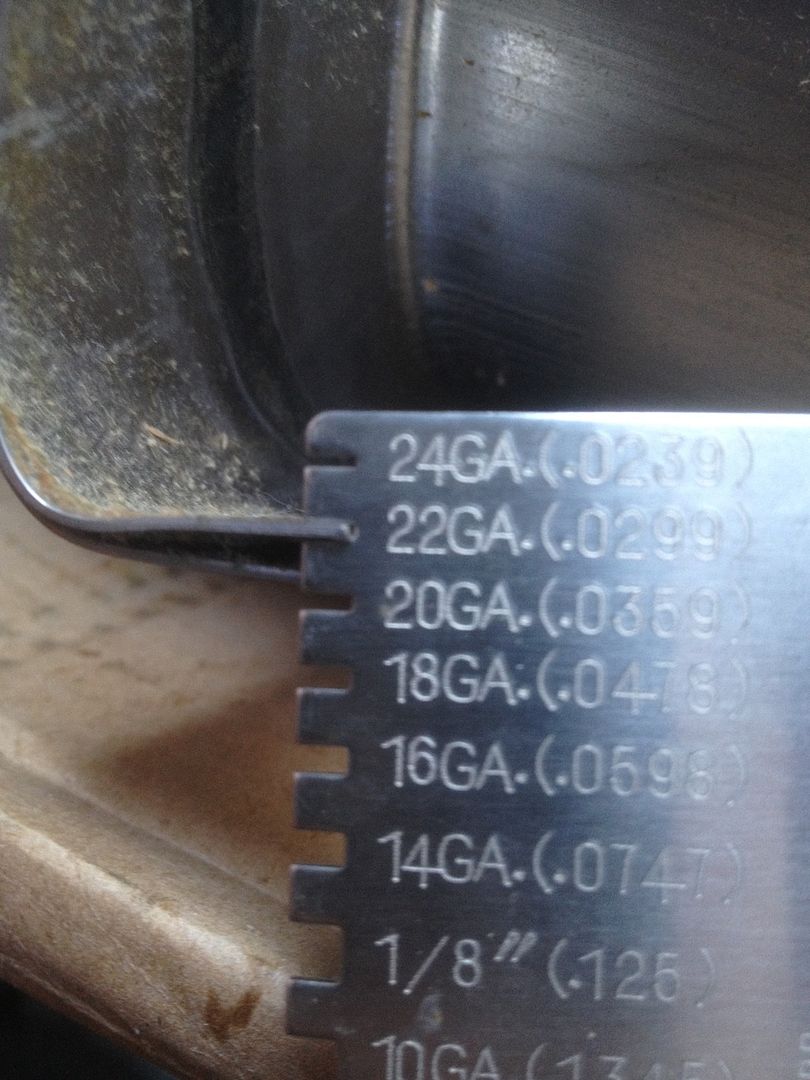
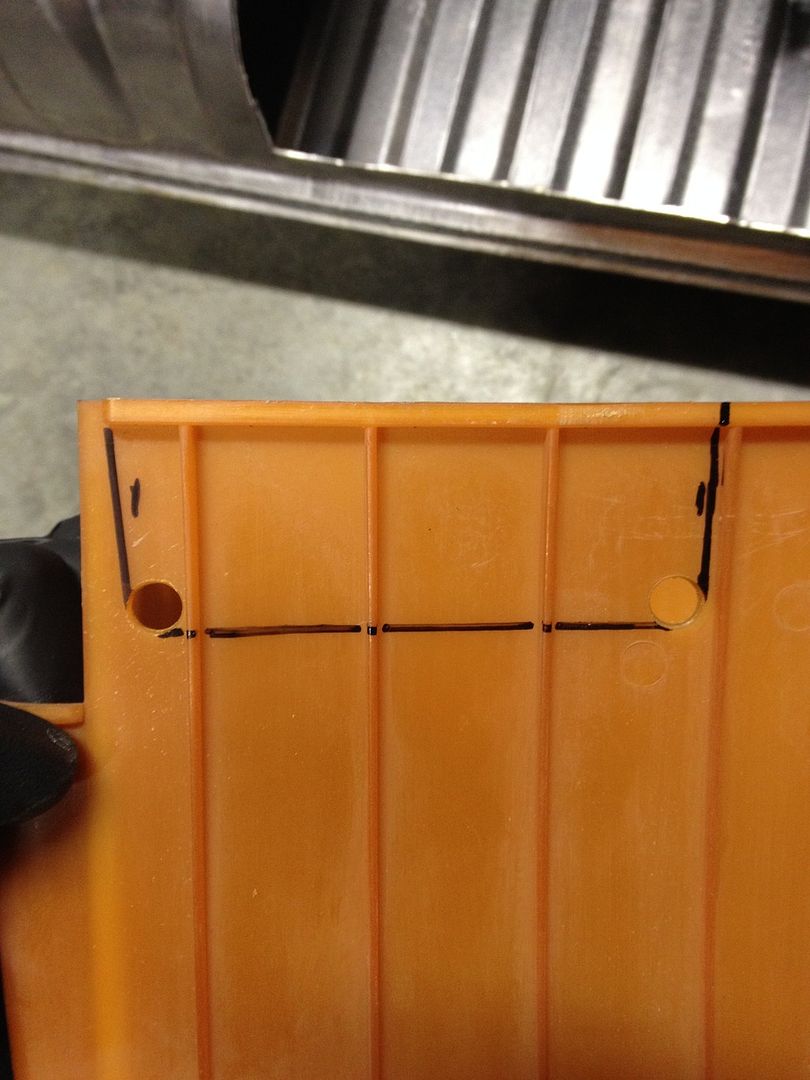
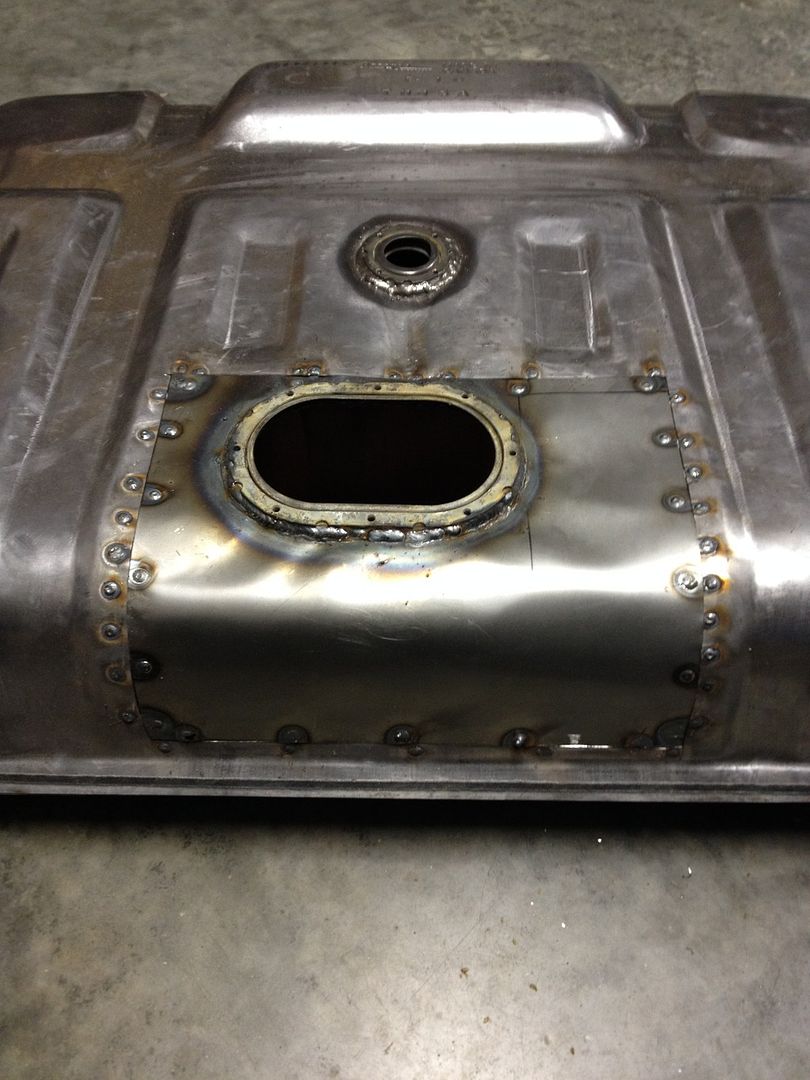
I took some measurements, and bought a 12"x18" sheet of 22ga sheet metal from Home Depot to use for mounting the Toyota pump to the Ford Tank. I decided to place it where the Ford tank is supposed to be. I measured very carefully (remember you don't want any gaps between the sheet metal) and cut on these lines.
There will be pictures later where you can see the hole.
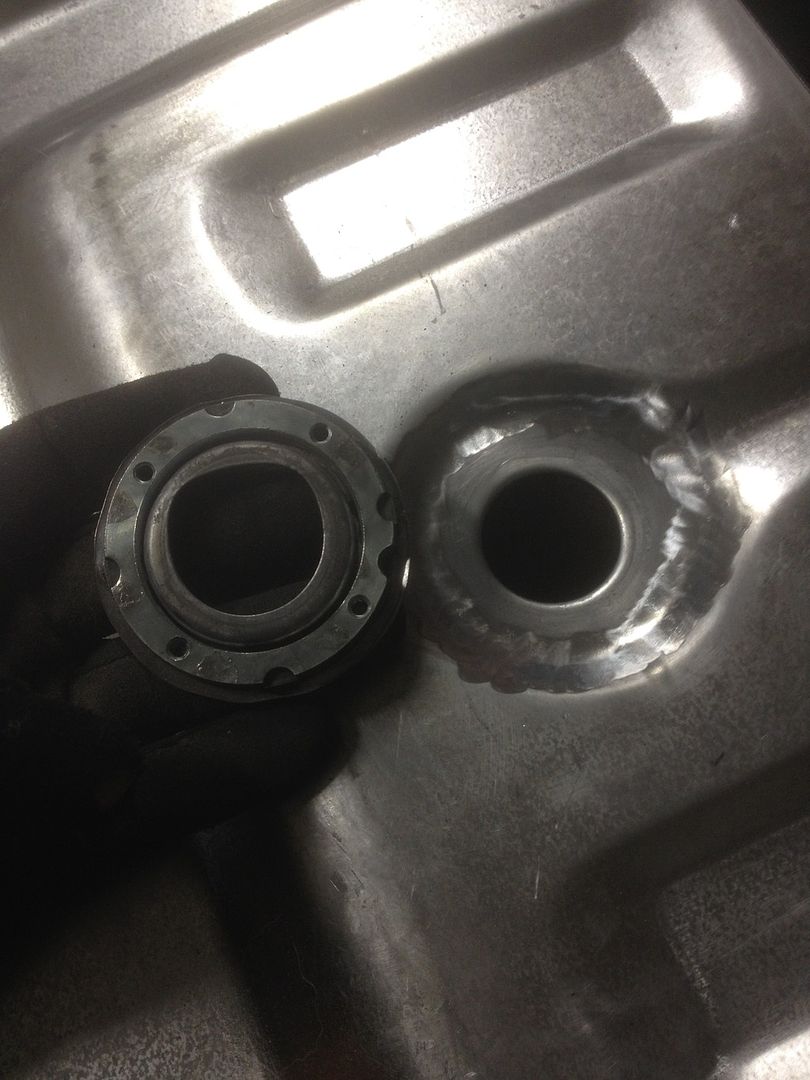
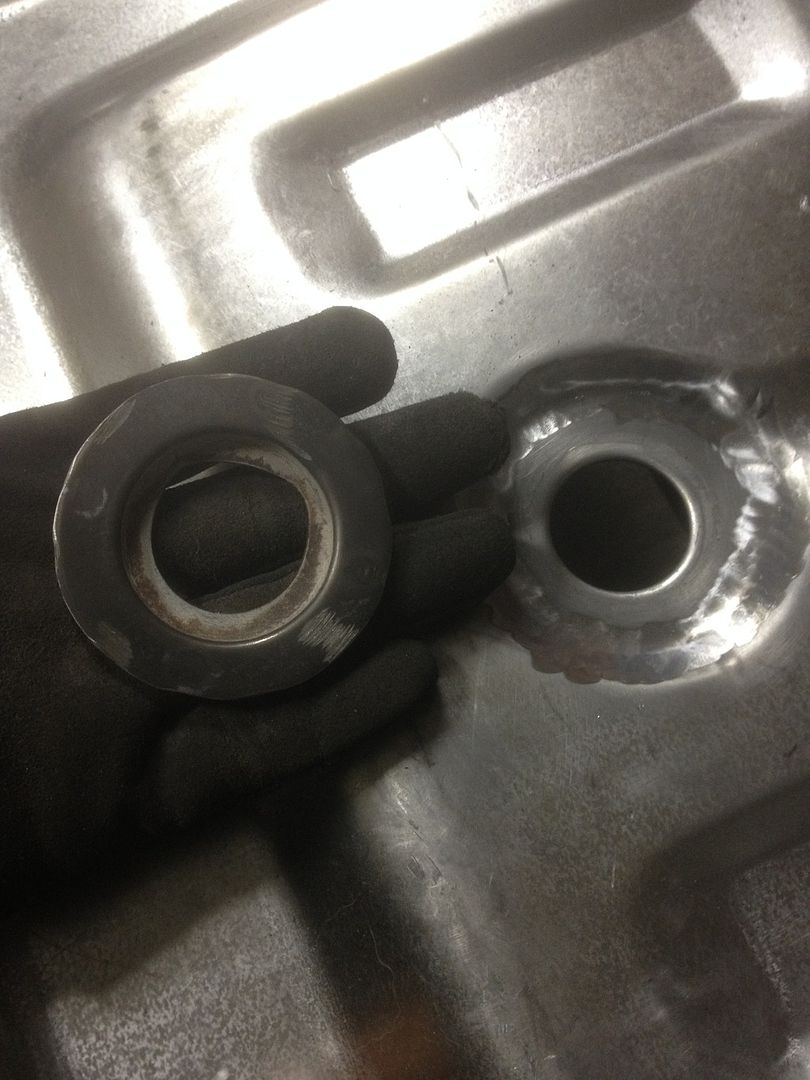
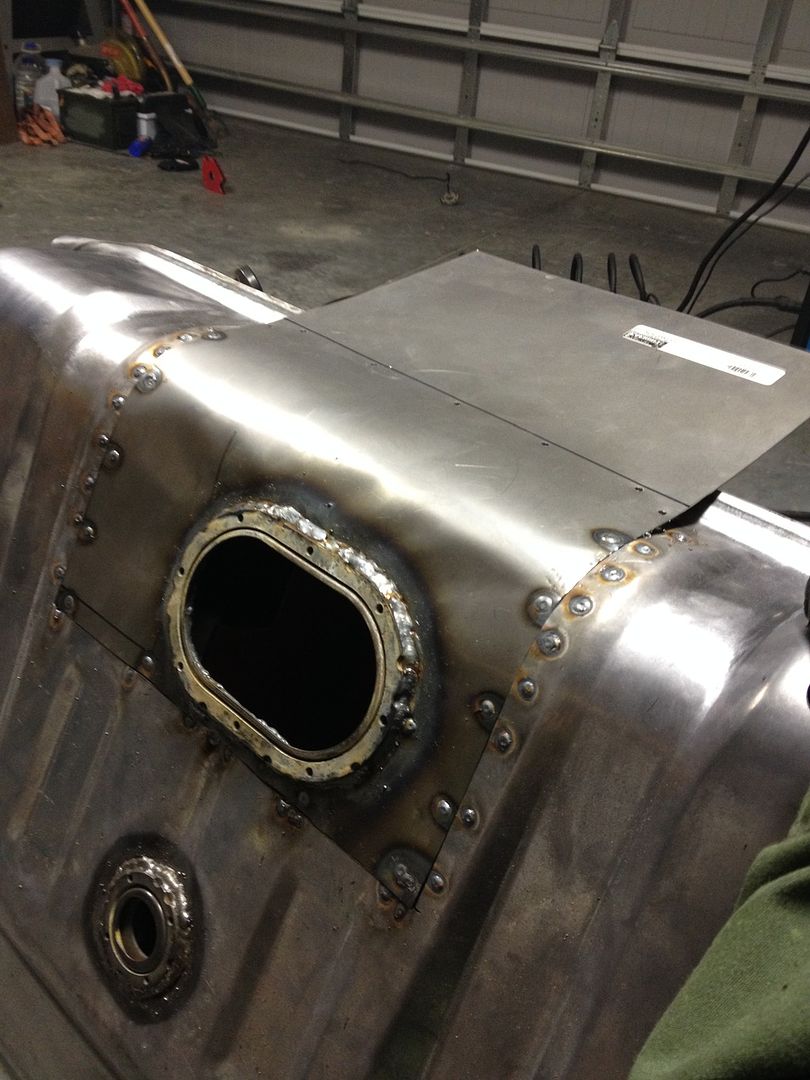
Here is the stock filler location on the Ford Tank.
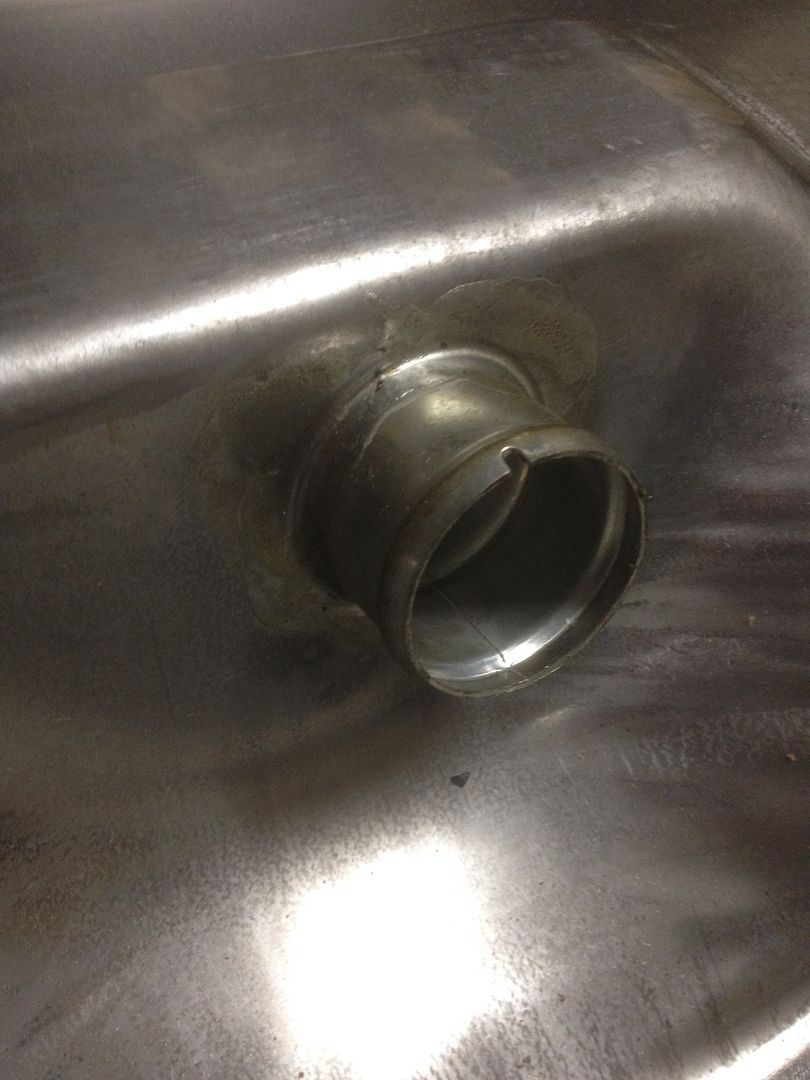
As you can see below, it is a straight tube with no valve. I decided to replace it with the Toyota tube because it will prevent fuel from pouring out in a tippy section or a roll.
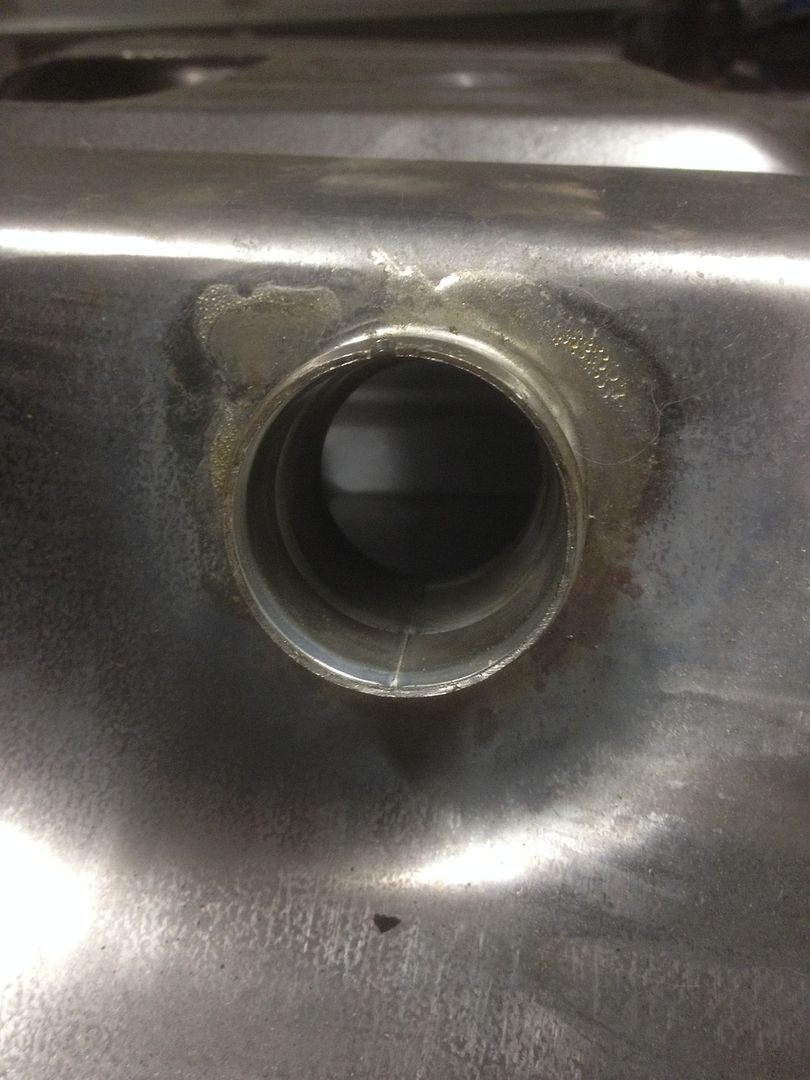
I used a propane torch to heat the solder holding the tube in and used a pair of pliers to remove the tube as the solder melted.
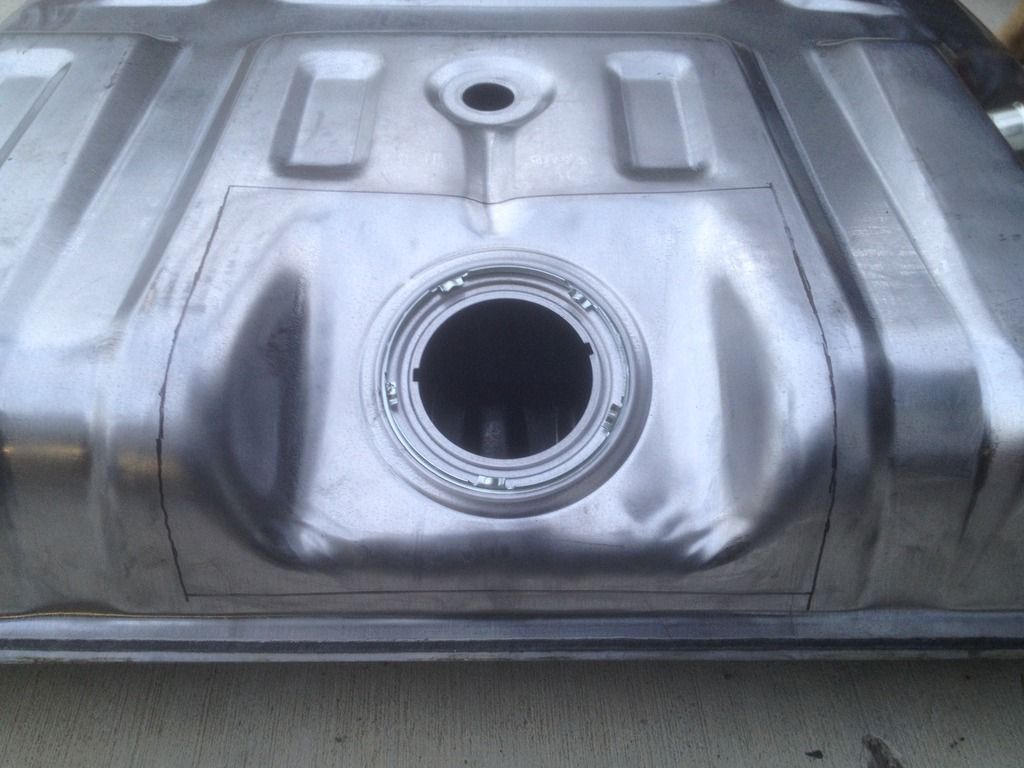
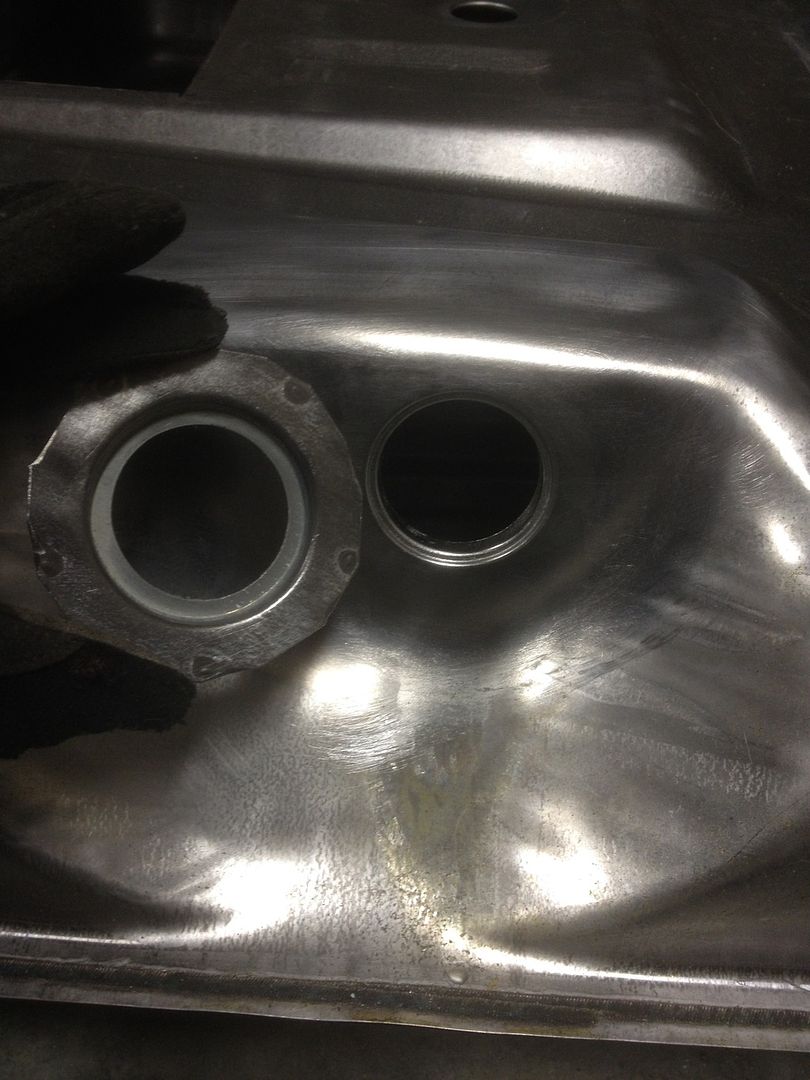
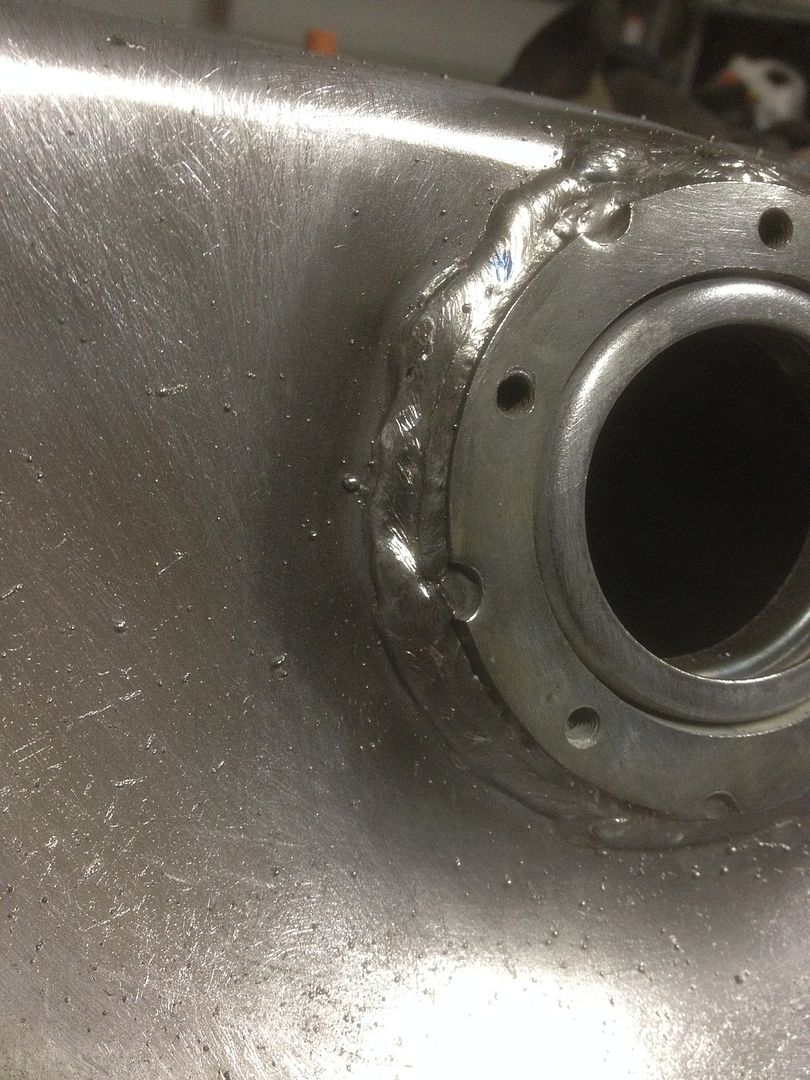
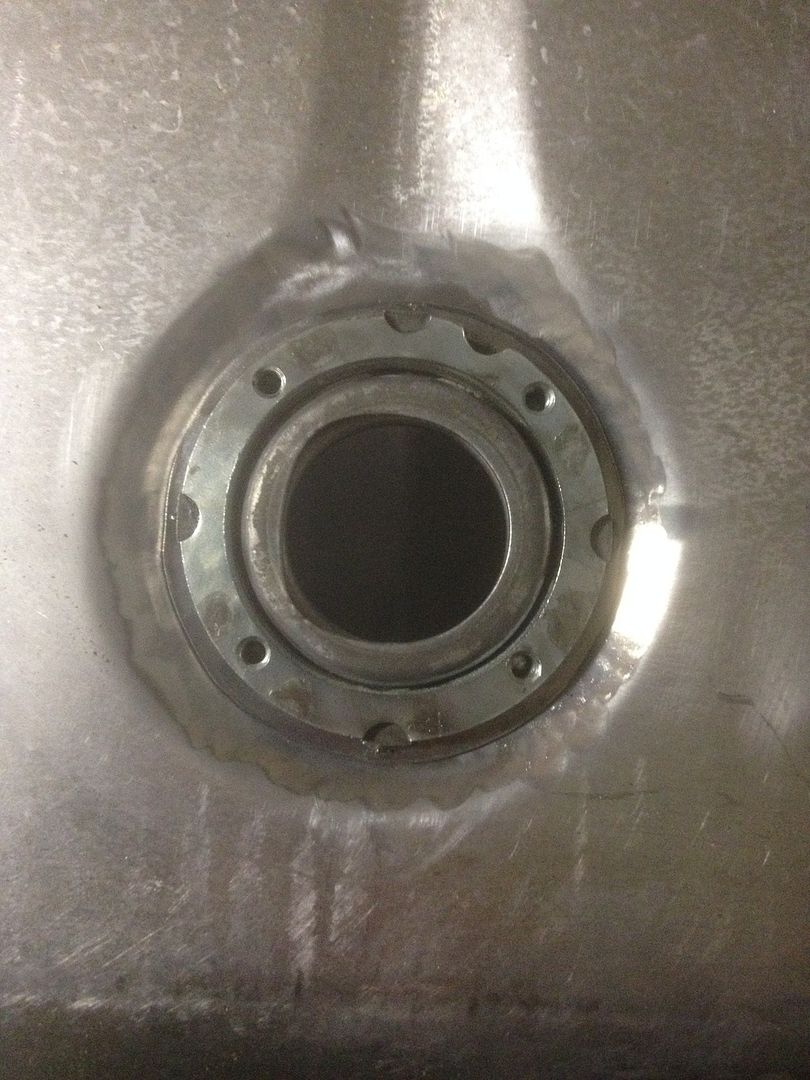
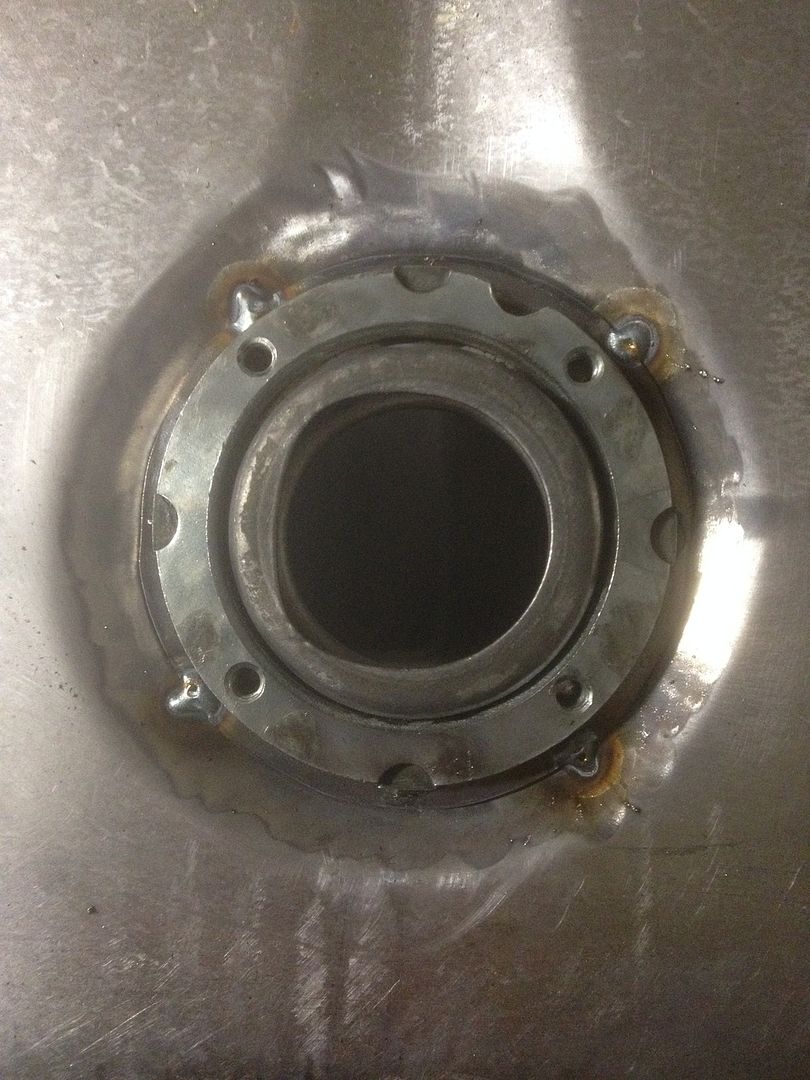
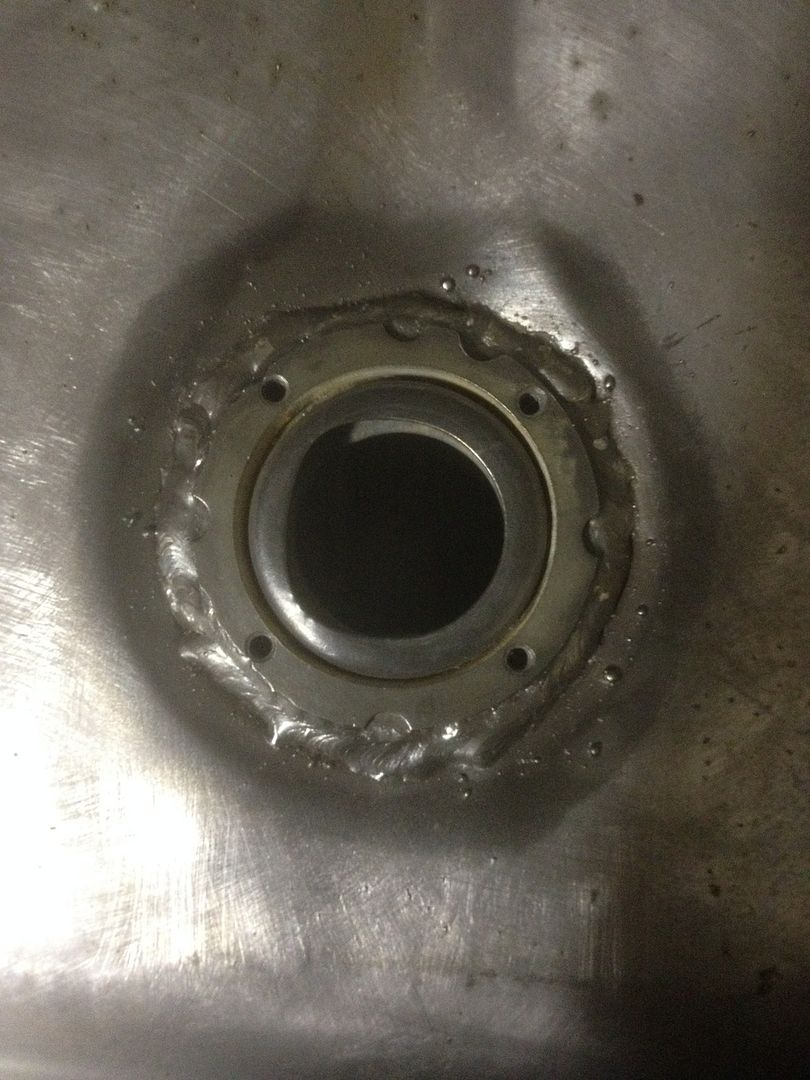
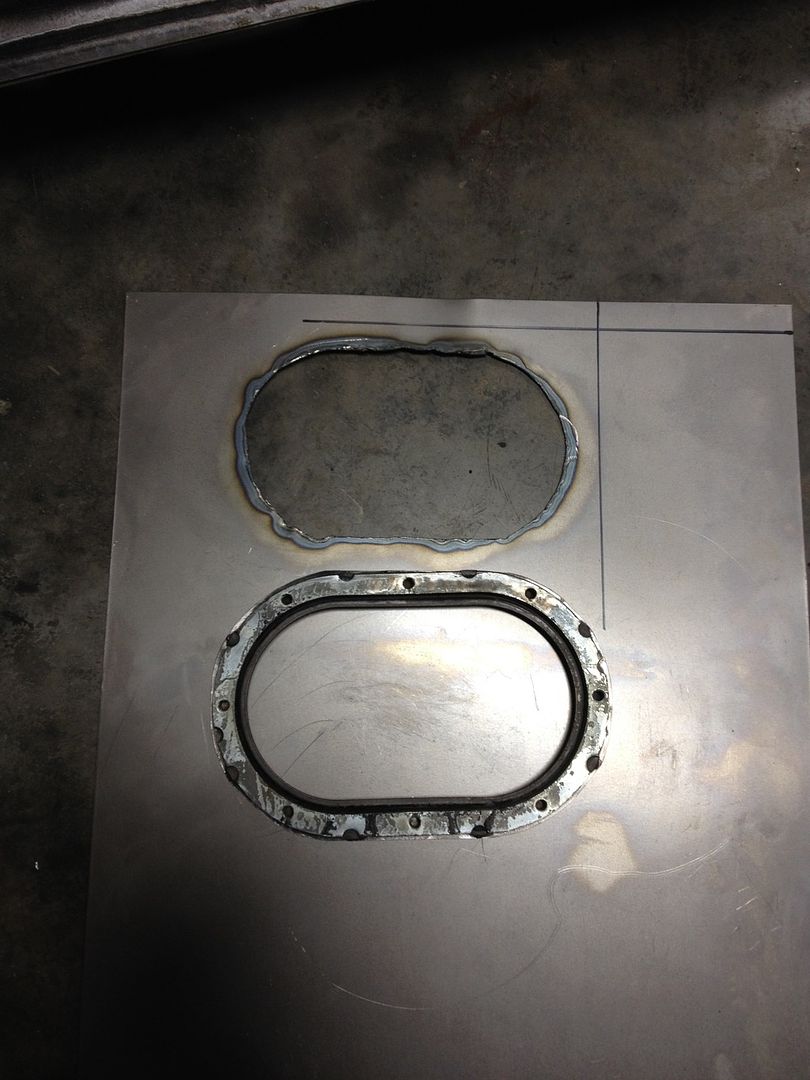
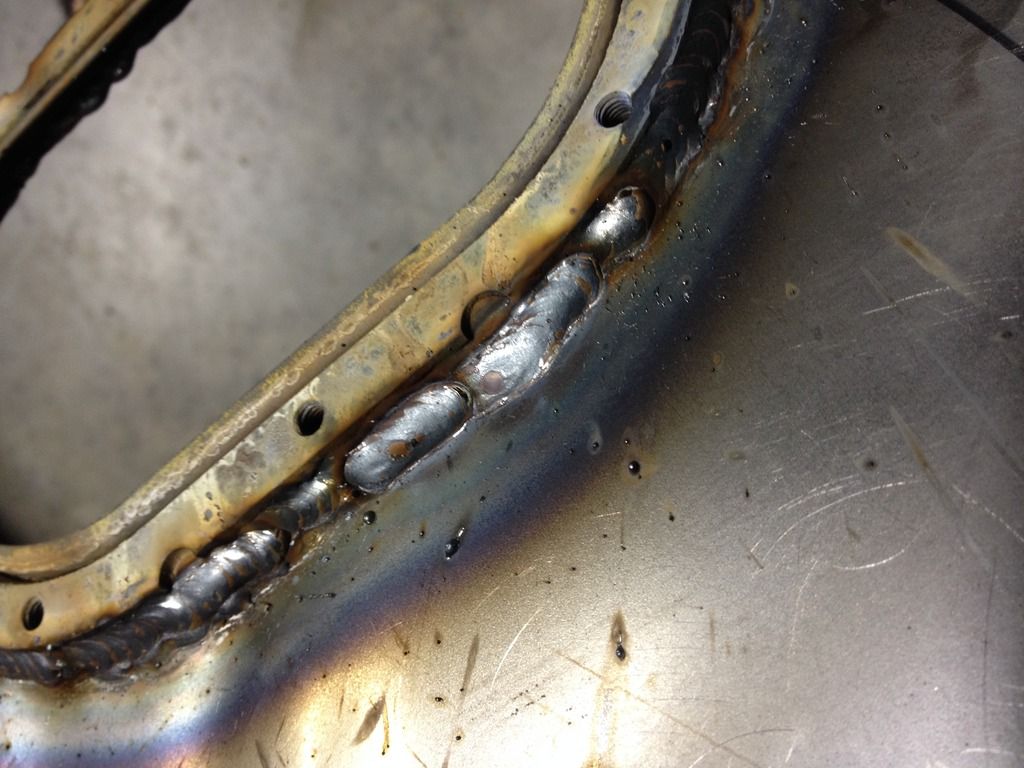
Then I began mounting the Toyota flanges. BTW, the Toyota parts seem to only mount to the flanges one way. Make sure you orient the flanges in the proper way on the tank. For example, I wanted the hinge of the filler tube valve to be at the top so I hade to make sure the bolt hole pattern was aligned for that. Always remove galvanization prior to welding.
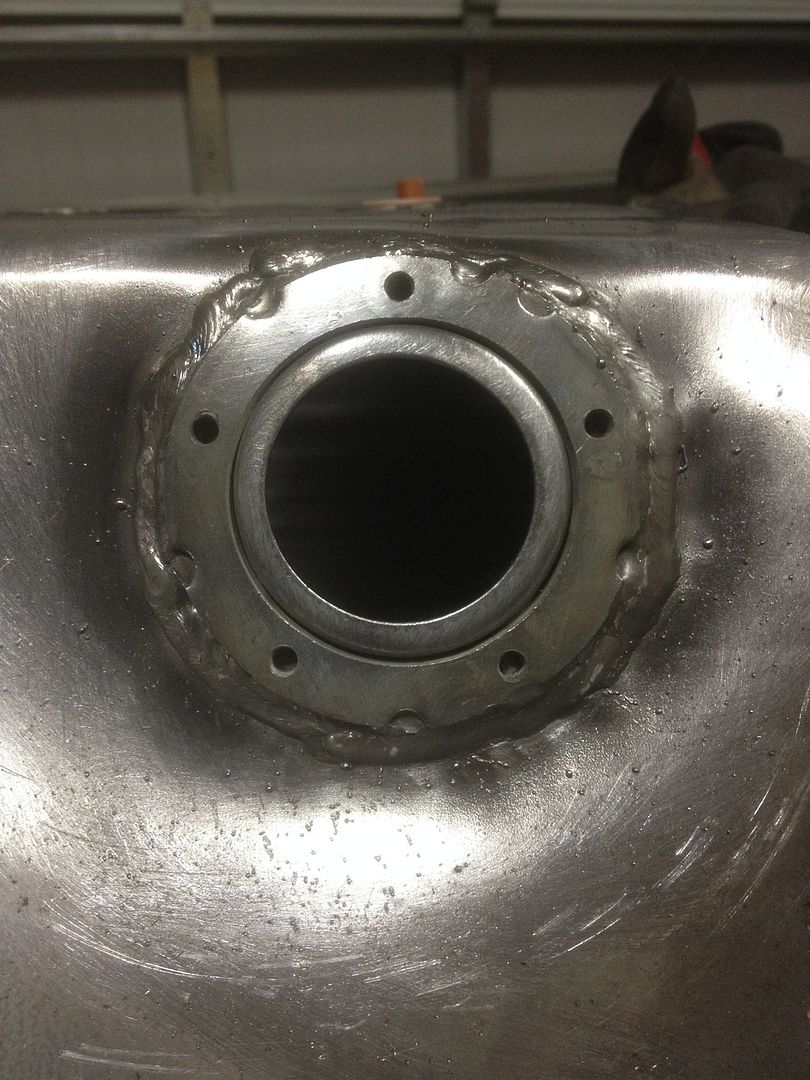
Then I mounted the cut off valve flange.
Now, skip to "Fuel Sender Modification"
Last edited by midcoma; 03-13-2018 at 02:55 PM.
|
|
|
Reply With Quote
|
|
04-17-2015, 09:56 AM
|
#13
|
|
Member
|
|
Join Date: Dec 2014
Location: Chesapeake, VA/Conover, NC
Posts: 227
|
|
|
Member
Join Date: Dec 2014
Location: Chesapeake, VA/Conover, NC
Posts: 227
|
Tank Modification
Last edited by midcoma; 04-17-2015 at 10:12 AM.
|
|
|
Reply With Quote
|
|
04-17-2015, 09:57 AM
|
#14
|
|
Member
|
|
Join Date: Dec 2014
Location: Chesapeake, VA/Conover, NC
Posts: 227
|
|
|
Member
Join Date: Dec 2014
Location: Chesapeake, VA/Conover, NC
Posts: 227
|
Tank Modification
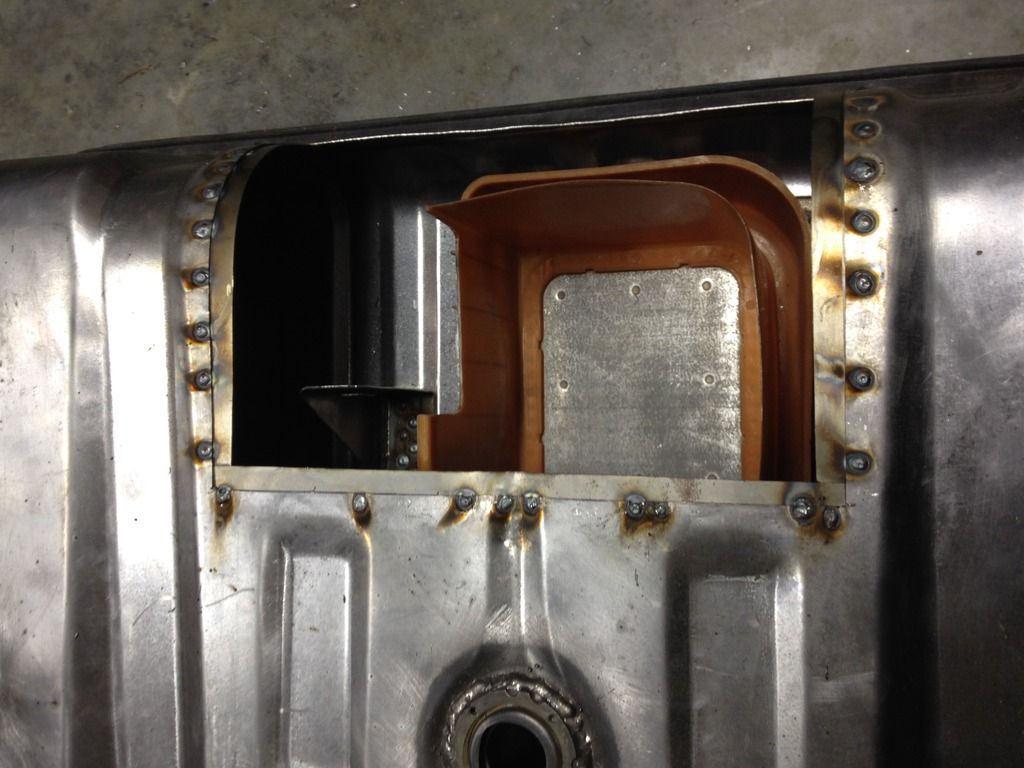
Determined my cut lines.
And went at it with a Dremel. The Dremel cut it very easily.
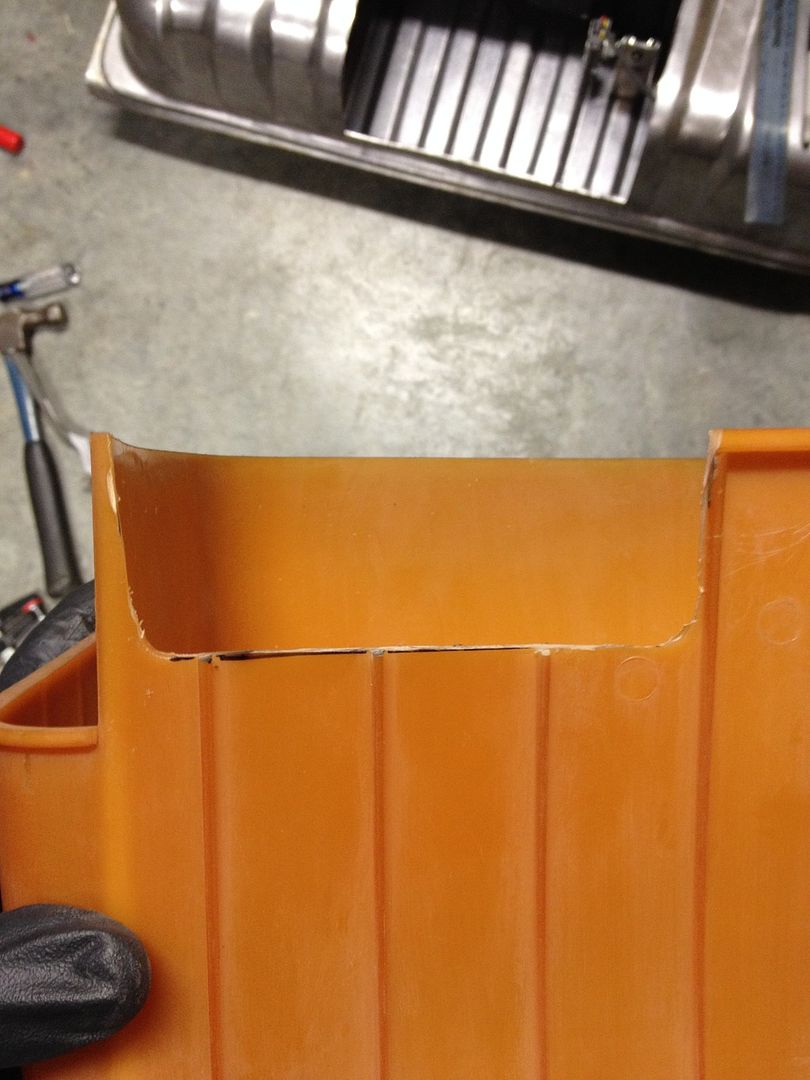
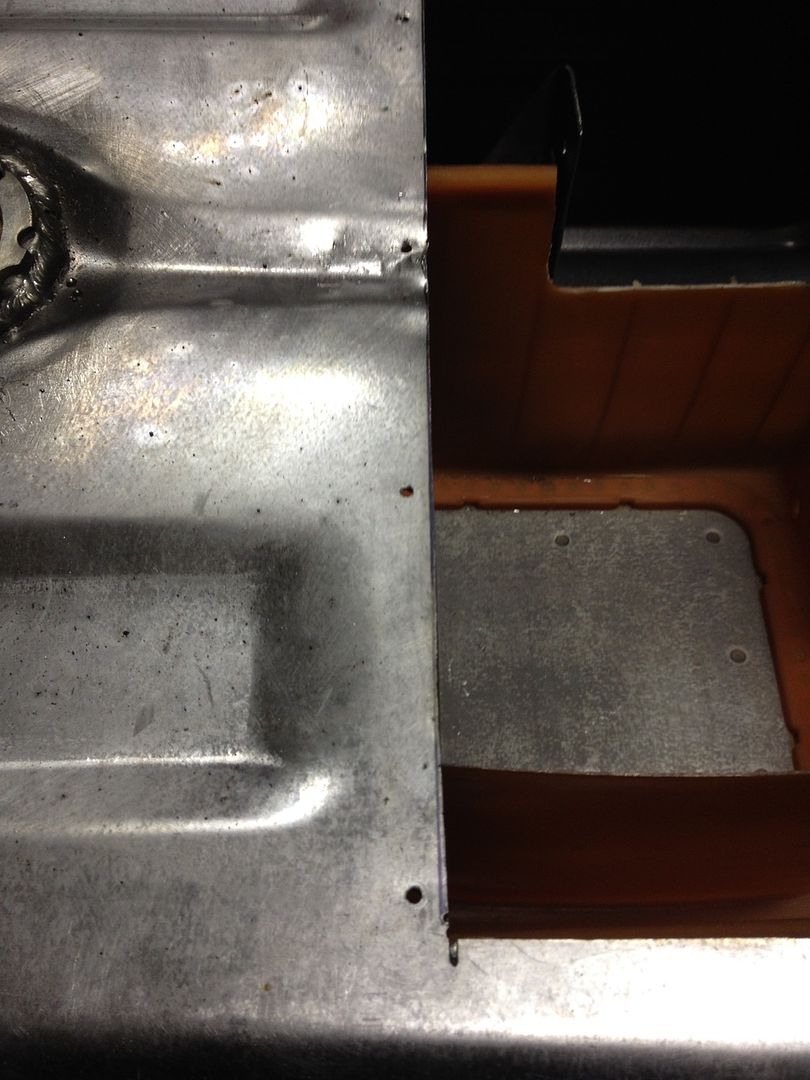
Here is the final mounting location of the bucket. Remember to remove galvanization prior to welding.
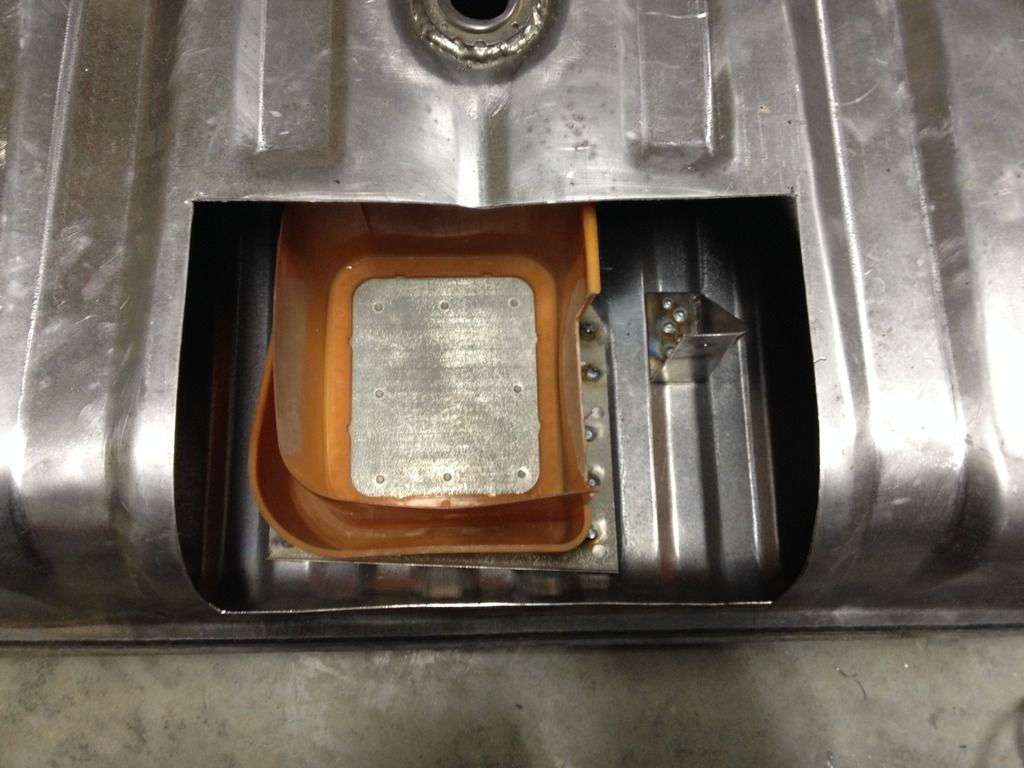
And the access to mount the sender.

Now, skip to "Fuel Pump Modification"
Last edited by midcoma; 03-13-2018 at 02:53 PM.
|
|
|
Reply With Quote
|
|
04-17-2015, 09:57 AM
|
#15
|
|
Member
|
|
Join Date: Dec 2014
Location: Chesapeake, VA/Conover, NC
Posts: 227
|
|
|
Member
Join Date: Dec 2014
Location: Chesapeake, VA/Conover, NC
Posts: 227
|
Tank Modification
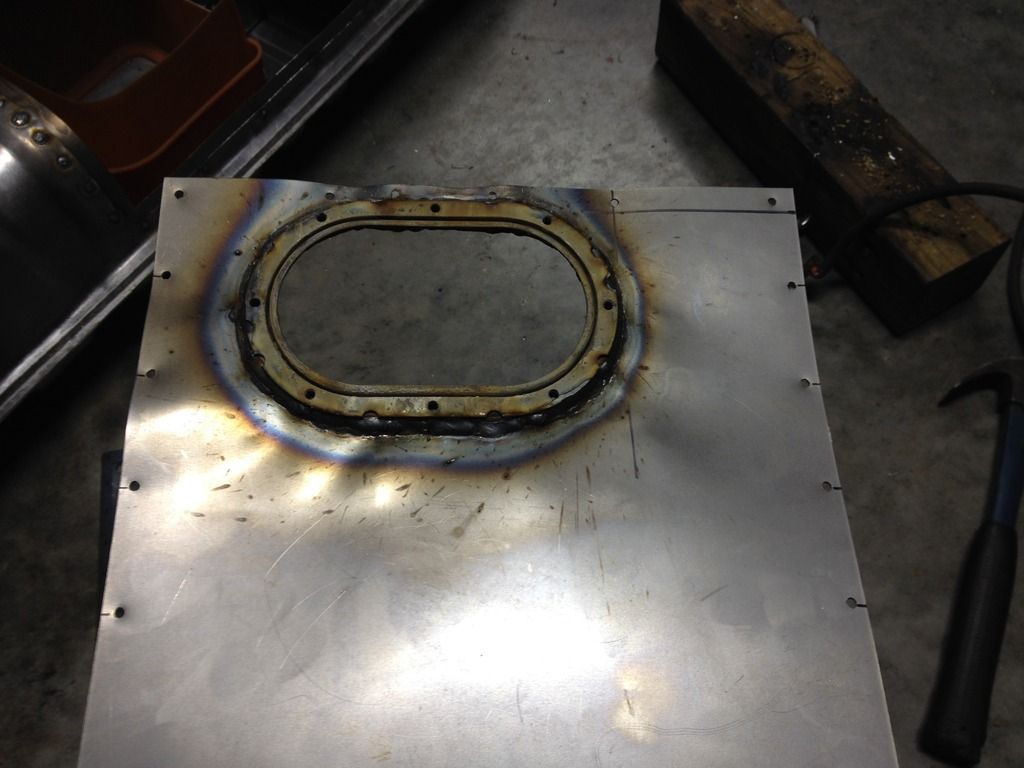
Now that the fuel pump is modified, you can determine where the mounting hole needs to be in the tank. I held the pump in place in the sump bucket and took some measurements to determine where the flange had to be mounted. I marked those likes on the sheet metal, aligned the flange, and traced the inner diameter onto the sheet. Then I cut it with the plasma.
Once the hole was cut I welded the flange to the sheet metal from the top and bottom.
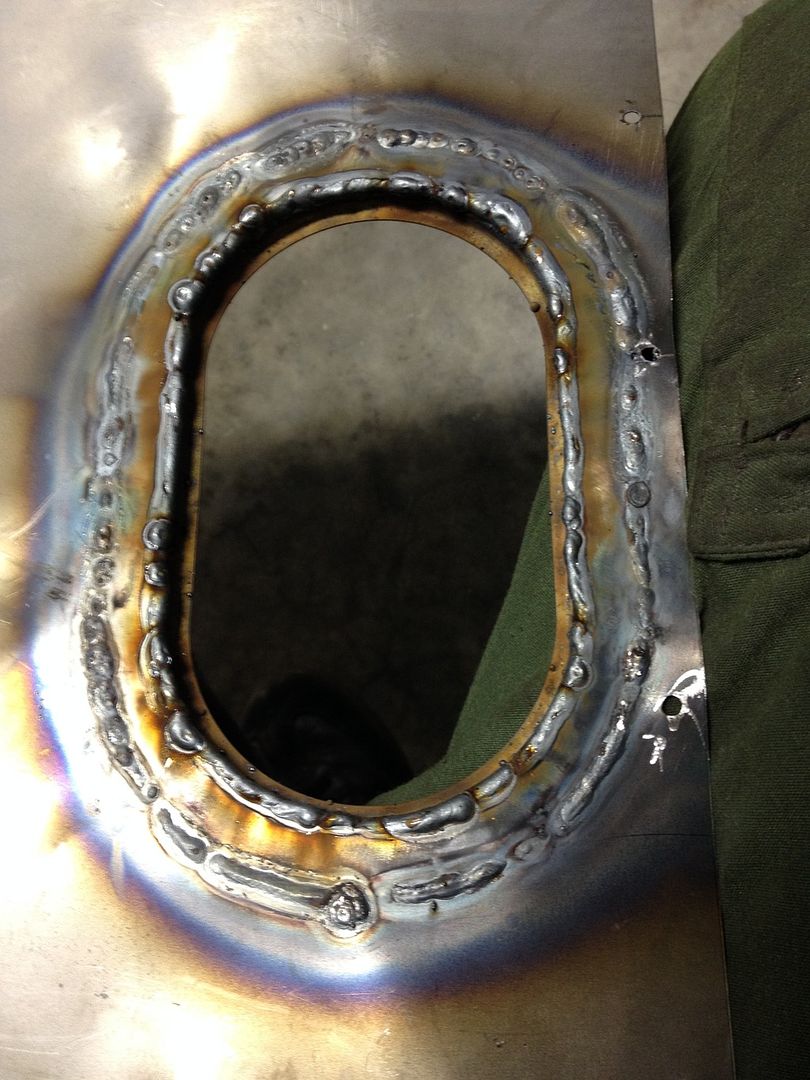
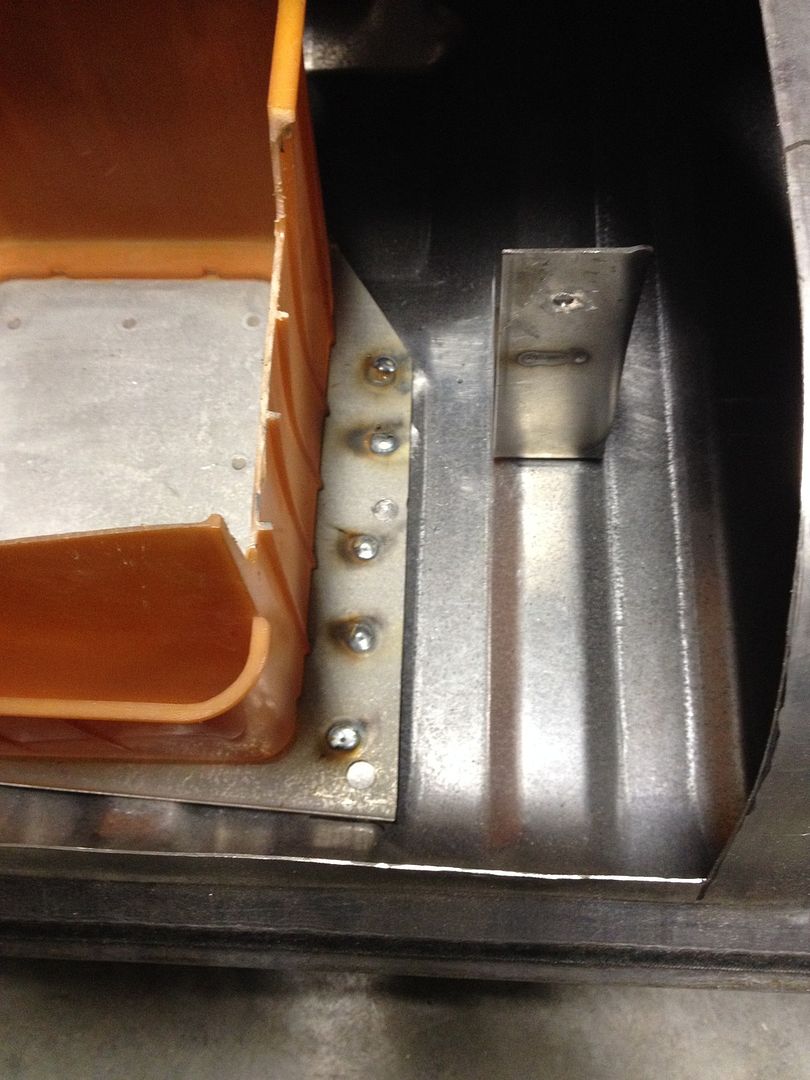
To mount the new sheet metal to the tank, I used a trick I should have used when bobbing the bed on my Tacoma. You drill holes along the border, close to the edge, and tack weld backing strips. You then tack weld the new sheet to the backing strips the same way. It helps hold everything in place while you weld and helps make burn through more forgiving.
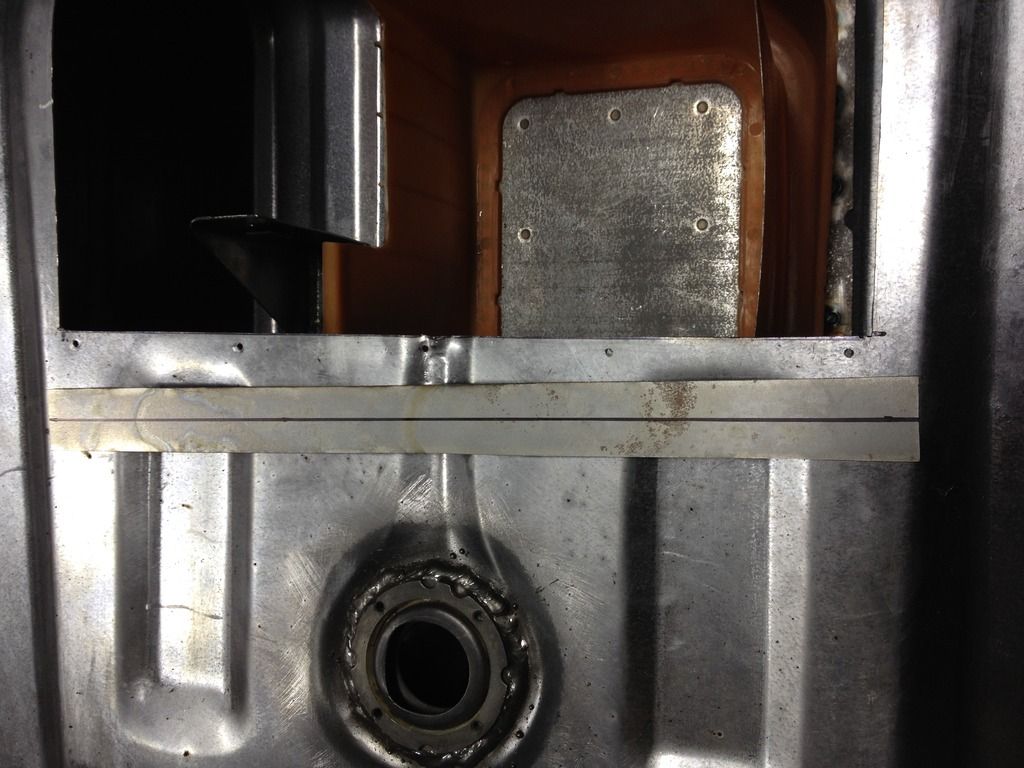
Then I started the same process with the sheet metal. I left the sheet metal long, because I wanted to make sure I didn't have a gap at the far side after bending around the corner.
Once it was bent and tacked, I made a cut line and drilled holes for tacking to the backing strip.
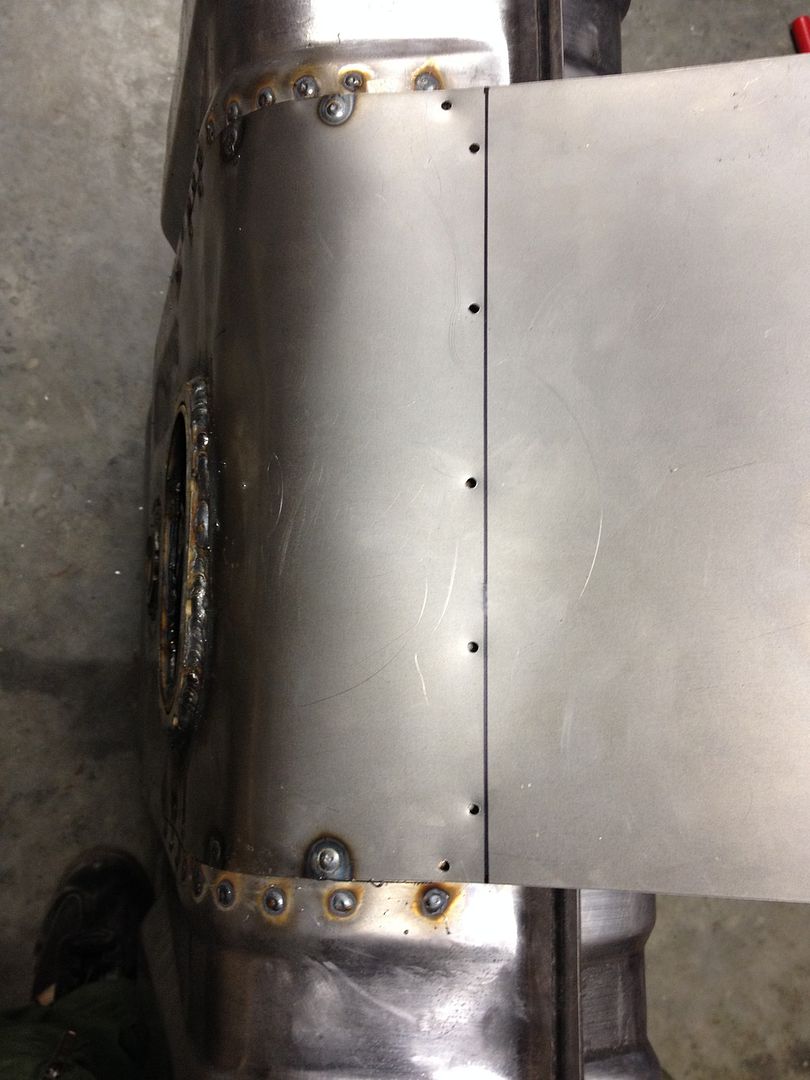
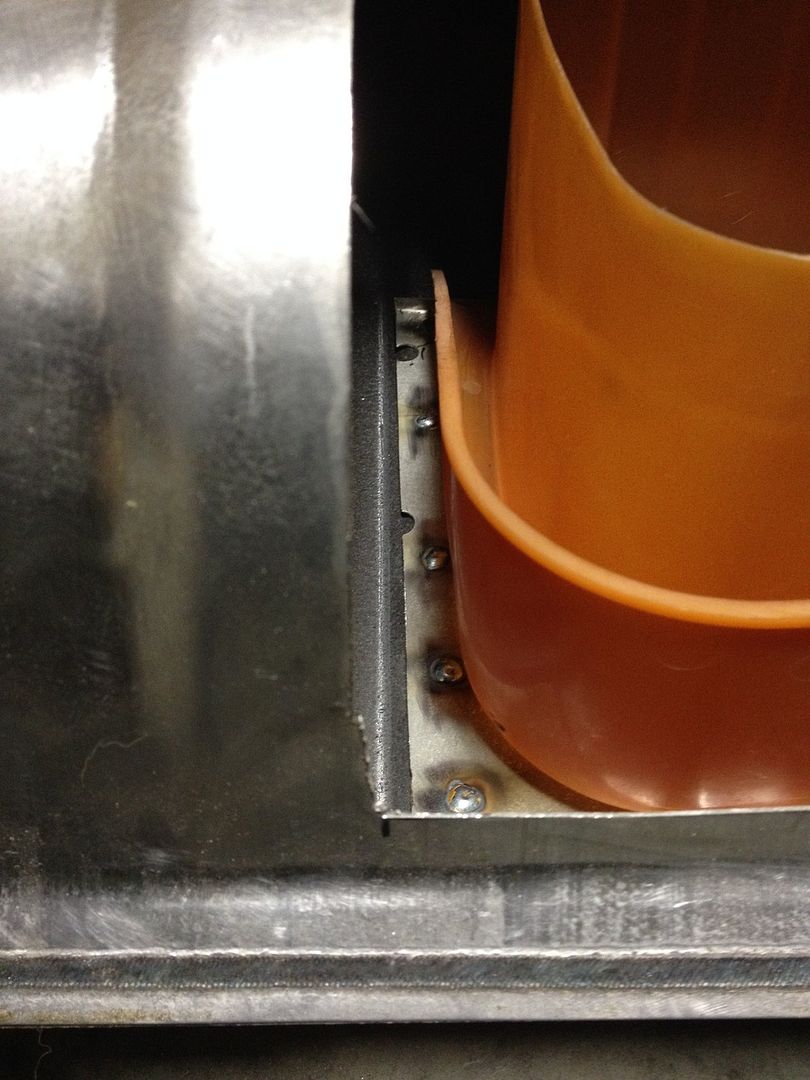
Then I finished the mounting.
Then I welded the seam.
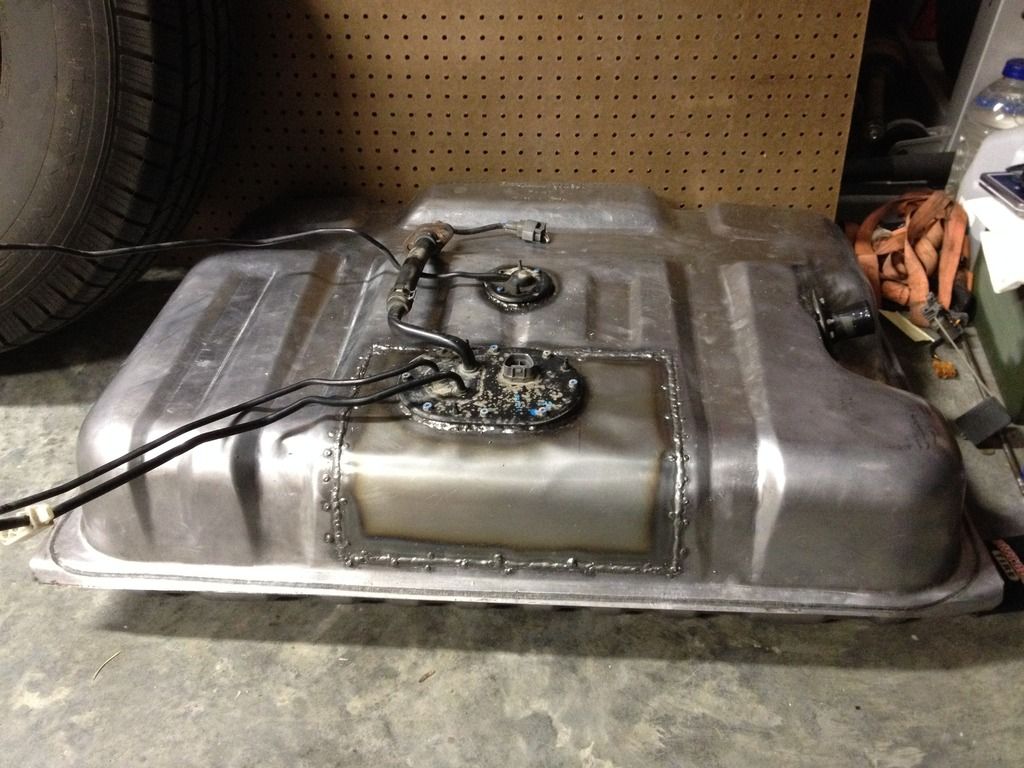
After it was welded I got everything set up to pressure test. DO NOT SKIP THIS STEP! The last thing you want it to have this tank installed and notice you have a leak. Take the time to test your weld and make sure it holds pressure. Even if the tank doesn't leak gas, you don't want it leaking gasoline fumes either. Here is the tank set up for pressure testing. I capped off all the lines and used an old O2 sensor to plug the cut off valve tube. I used a basketball pump with the needle inserted through the rubber cut off valve tube to add pressure. You only want to use 3-5 psi, then spray a solution (I use Windex) around the welds and check for bubbles. Bubbles mean leaks. Mark any locations that bubble and fix the leak.
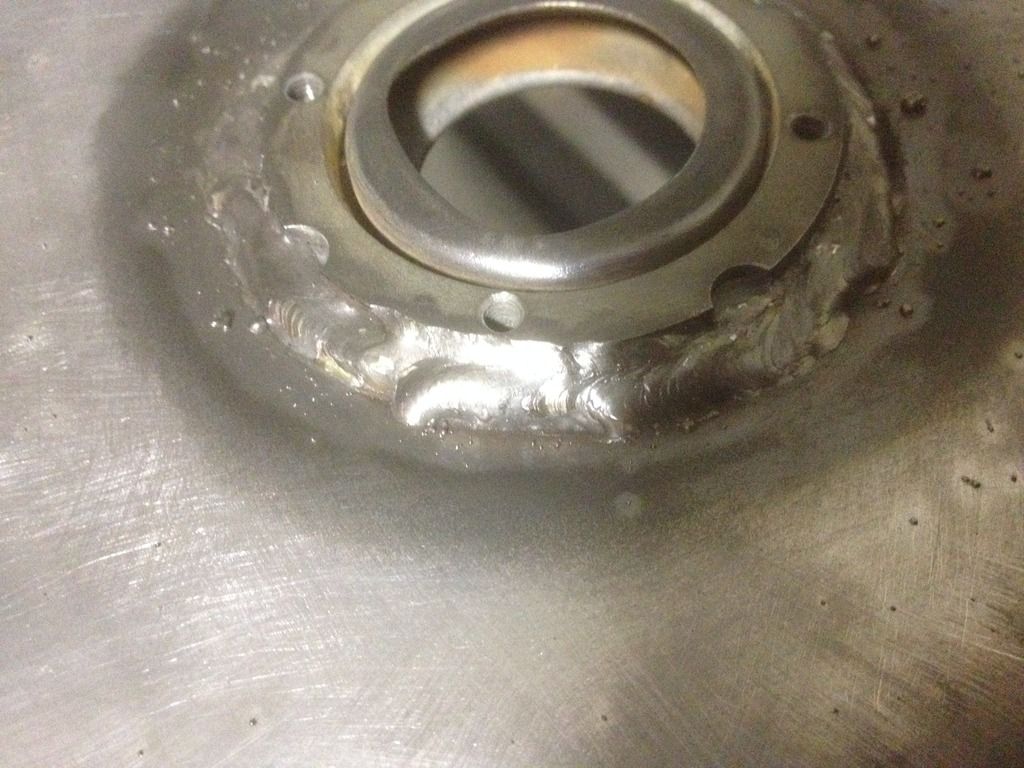
I had 3-4 very small leaks. I decided to go a little overboard to fix them. I ground down the initial welds and started welding over them again. I covered the holes to prevent metal dust from getting in the tank.
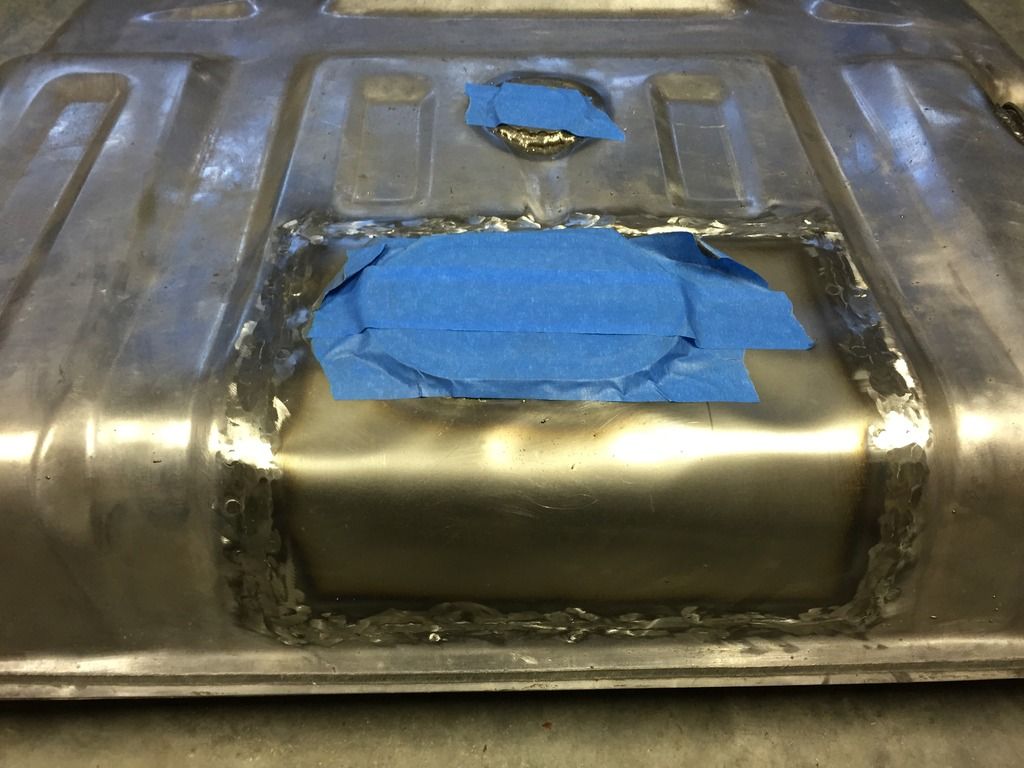
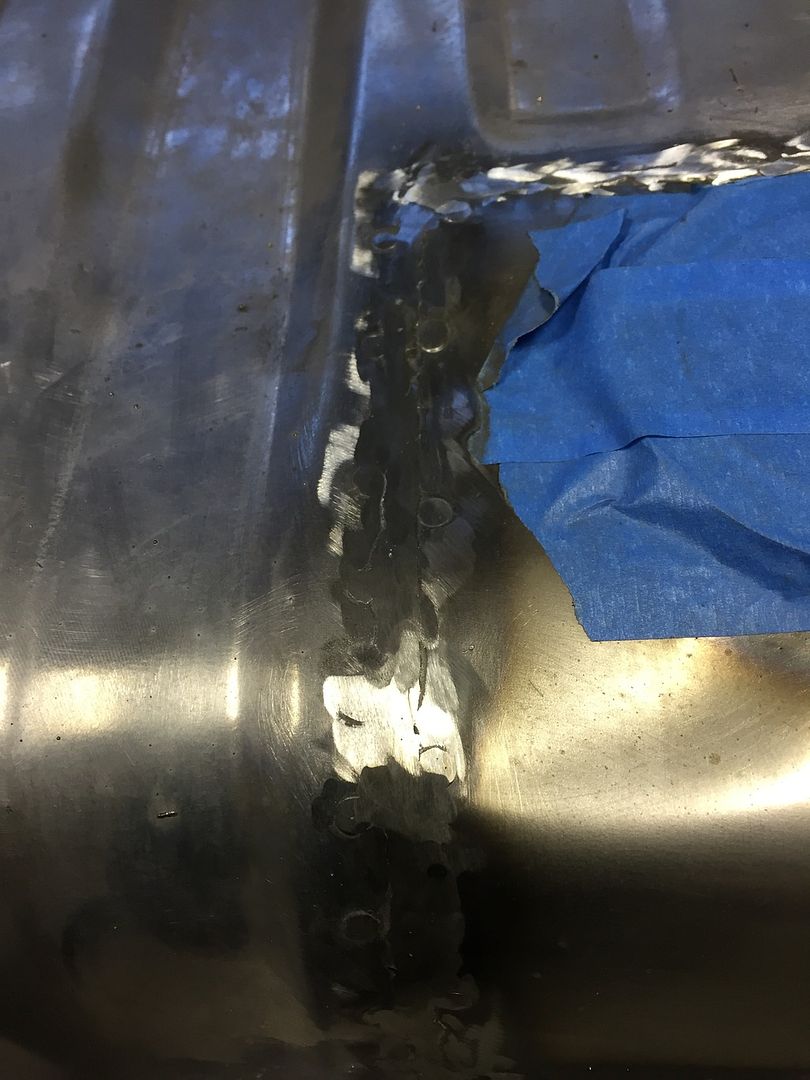
The final welds will be visible in other pictures. Make sure you pressure test after every repair.
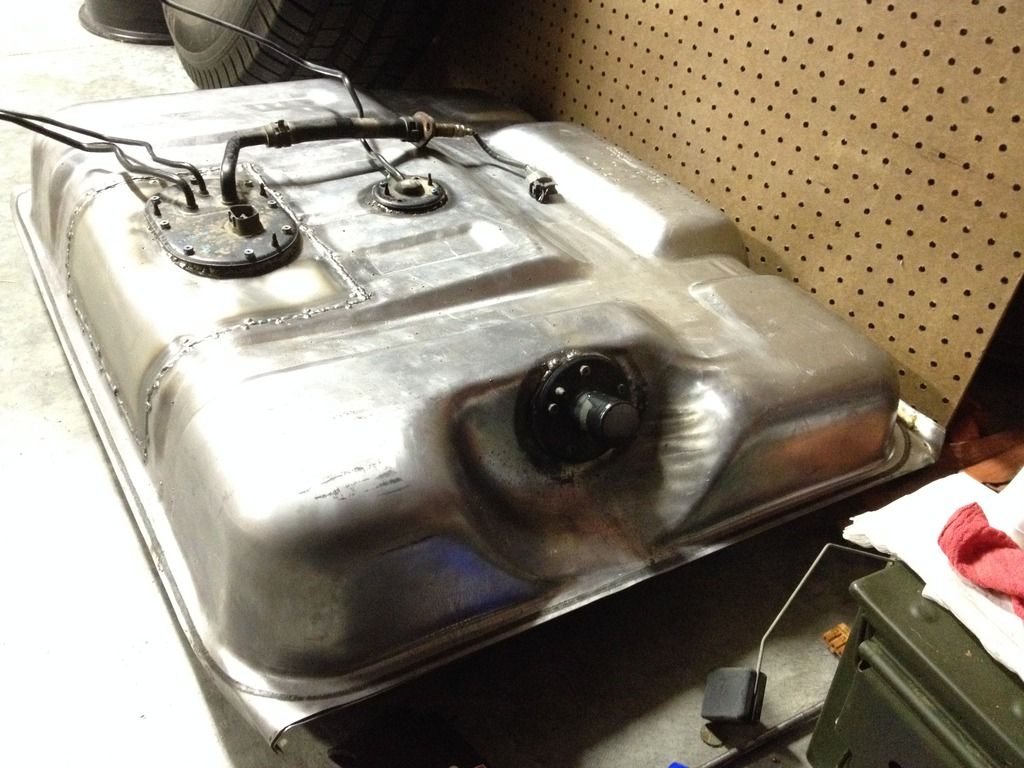
I bent and routed the fuel lines to make them fit the new application more cleanly. Here is how they turned out.
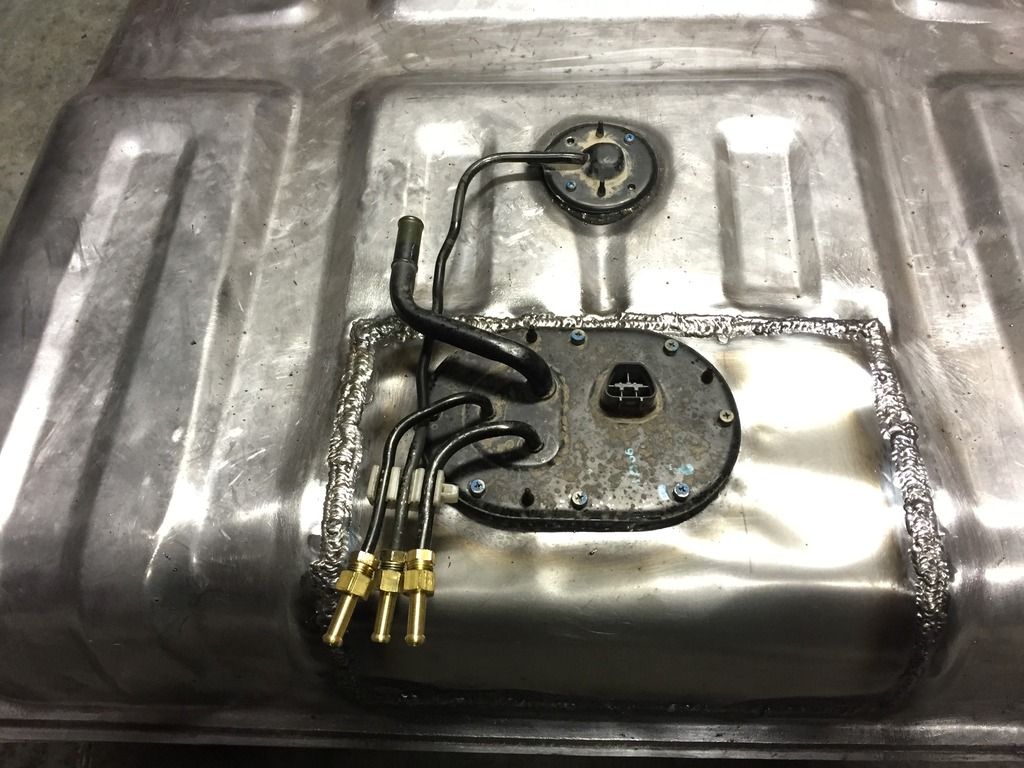
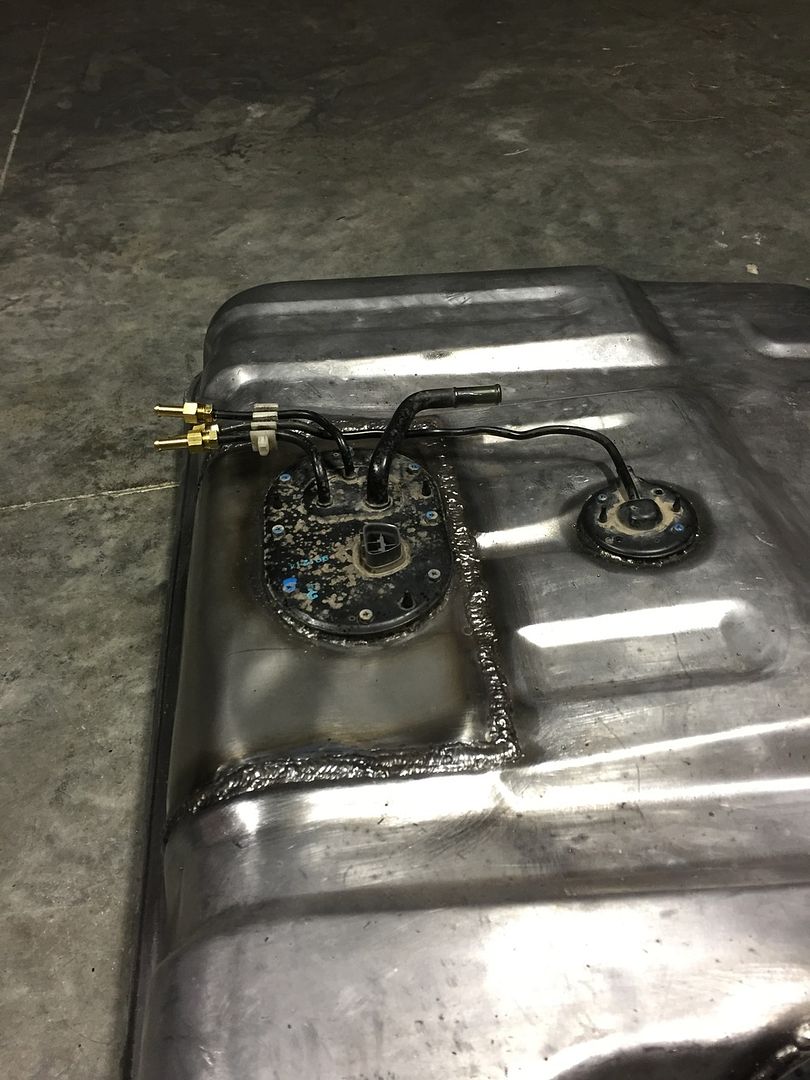
The lines were cut to the length I wanted and I chose to install barbed fittings so I could easily and securely attach fuel hose. I ordered the parts from Summit Racing.
I used one of these to adapt both ends of the high pressure fuel line (larger diameter) to a barbed fitting. Both ends meaning the tank side and the vehicle side. They come in a pair. Part
I used these to adapt the smaller lines on the tank to barbed fittings. The lines on the vehicle side already have bulges to prevent the hose from coming off when clamped. Part
I used all the same size barb fittings. Part
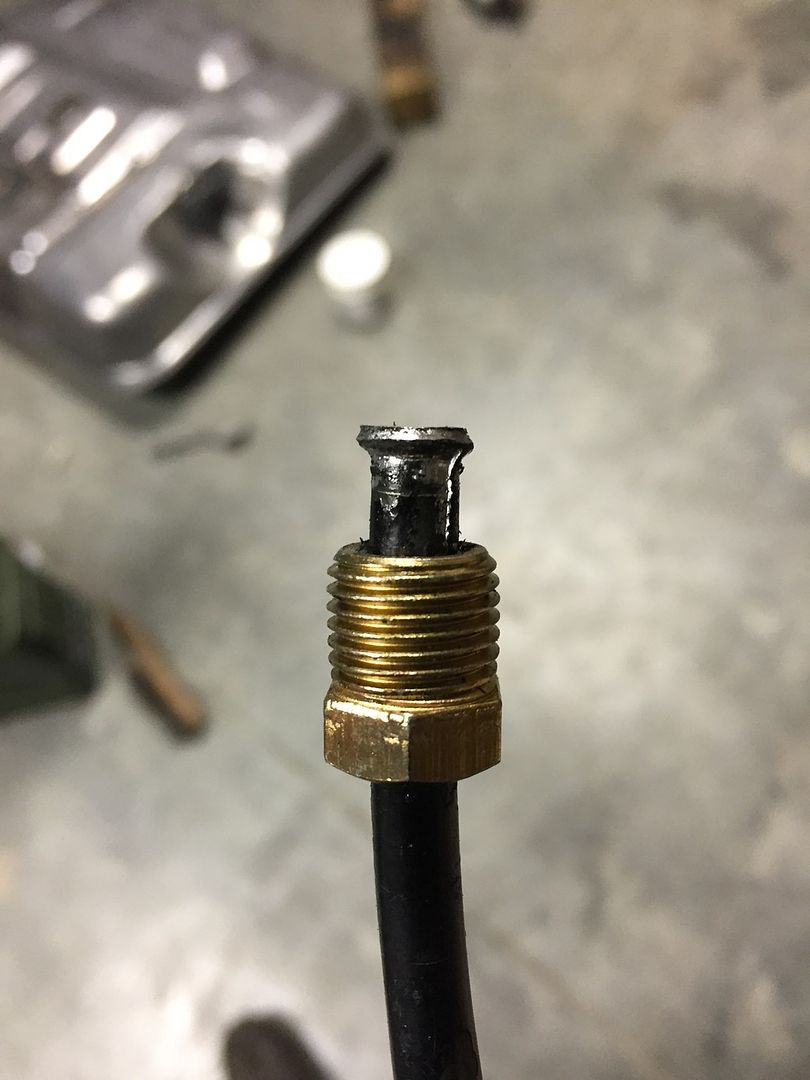
Here's a shot of the male fitting being installed and the tube flared. I used a brake line flaring kit that I rented from Advance Auto to install these.
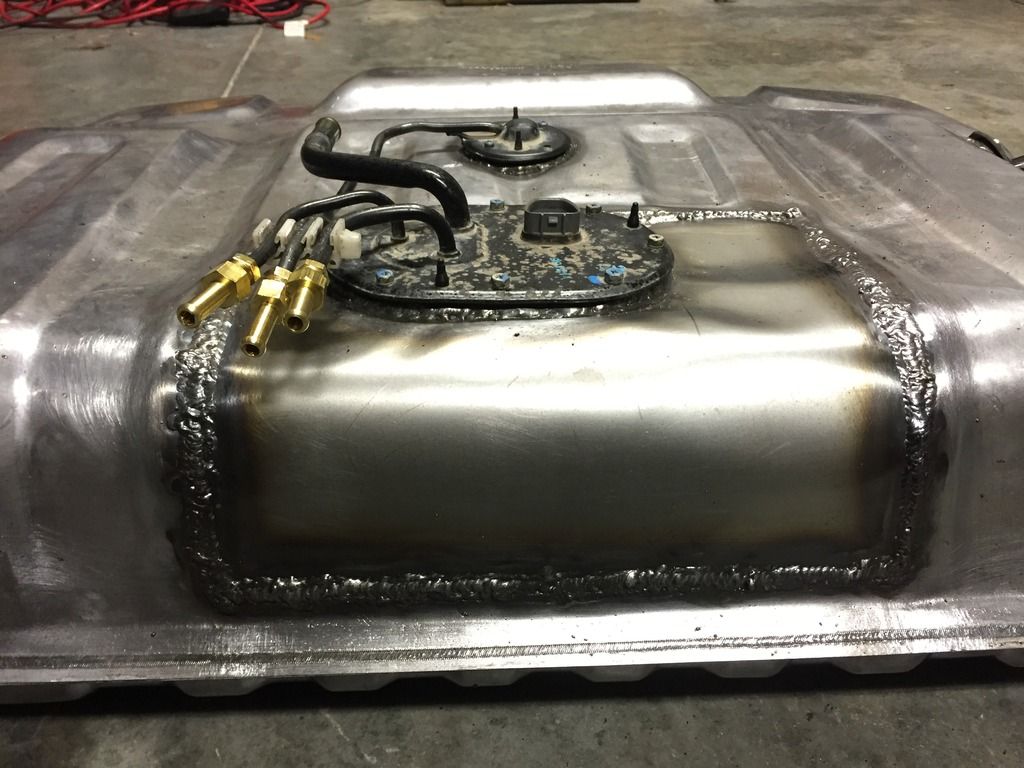
Now, skip to "Tank Mounting"
Now that you've mocked up the tank and have the support system installed, it's time to make it pretty. I primed the tank with self-etching primer and painted it satin black.
Last edited by midcoma; 03-13-2018 at 02:50 PM.
|
|
|
Reply With Quote
|
 Posting Rules
|
You may not post new threads
You may not post replies
You may not post attachments
You may not edit your posts
HTML code is On
|
|
|
|


 Linear Mode


