User Tag List

Reply
 
Thread Tools Rate Thread Display Modes
Old 08-09-2016, 09:05 PM #1
Myrunr2010's Avatar
Myrunr2010 Myrunr2010 is offline
Member
 
Join Date: Jul 2014
Location: Newport News
Age: 36
Posts: 783
Real Name: Dave
Myrunr2010 is on a distinguished road
Myrunr2010 Myrunr2010 is offline
Member
Myrunr2010's Avatar
 
Join Date: Jul 2014
Location: Newport News
Age: 36
Posts: 783
Real Name: Dave
Myrunr2010 is on a distinguished road
The Red Runner Rear bumper build

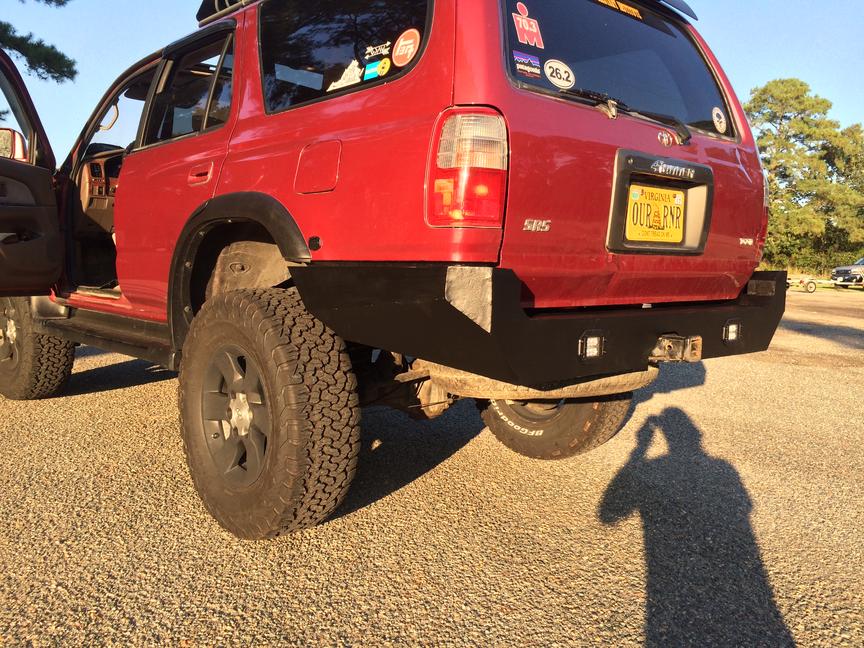
EDIT: So I figured i'd go ahead and post the finished product at the beginning so folks can see what I built without having to scroll to the end.

The Red Runner bumper build-img_0582-jpg

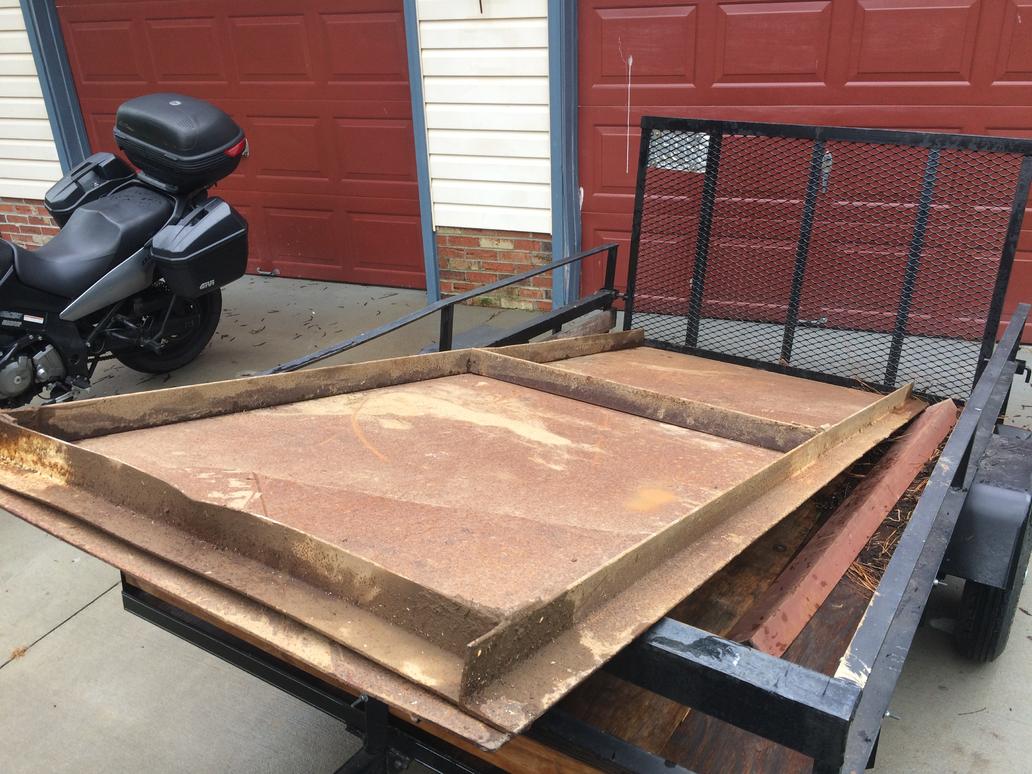
So a few weeks ago I went to the scrap yard and came home with this guy. Its 1/4", which was a little thicker than I was anticipating buying, but you can't beat the price at 30 cents a pound. All said and done it was 176.49 (i figure i should be able to return atleast 50 dollars in unused angle that i had to cut off).The Red Runner bumper build-img_0493-jpg

I had done some looking around and really liked the bumpers that @prospectator and @PATCO built ( Another Rear Bumper Build....... ). I needed to work around my tow hitch, which I've got figured out. I still really want to integrate some auxiliary backup lights into the bumper that will turn on when the vehicle is put into reverse, as well as have an auxiliary switch on the dash.

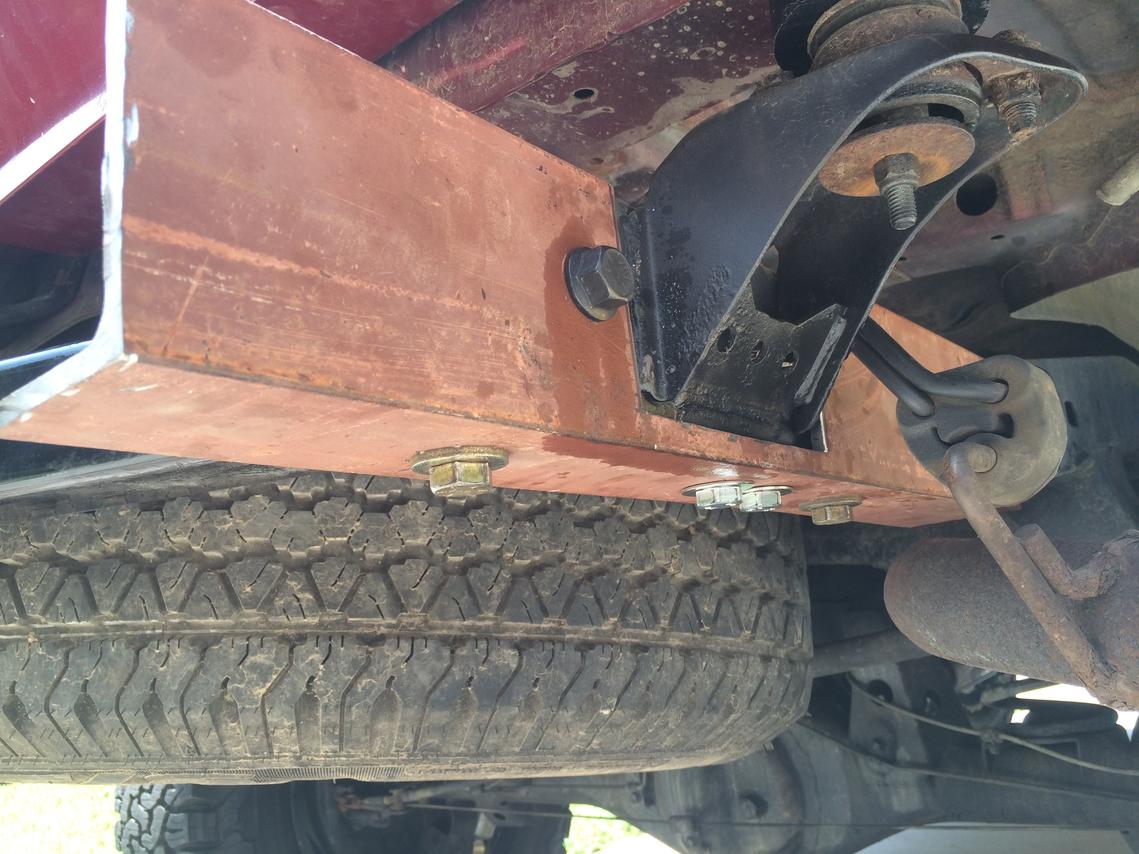
First step was figuring out my mounts and my tow hitch. With the 1" body lift I wanted to figure out a way to get my hitch a little higher. With the way that my Curt hitch was, I was able to use the standard mounting locations, and just flip it upside down. My mounts follow pretty close with what prospectator did.

The four bottom bolts are all using standard attachments either on the frame already or that were added when the hitch was installed. The bolt furthest back on the frame is just through the one side of the frame and i tack welded a nut to the inside. The bolt towards the front of the vehicle is all the way through both sides.The Red Runner bumper build-img_0519-jpg

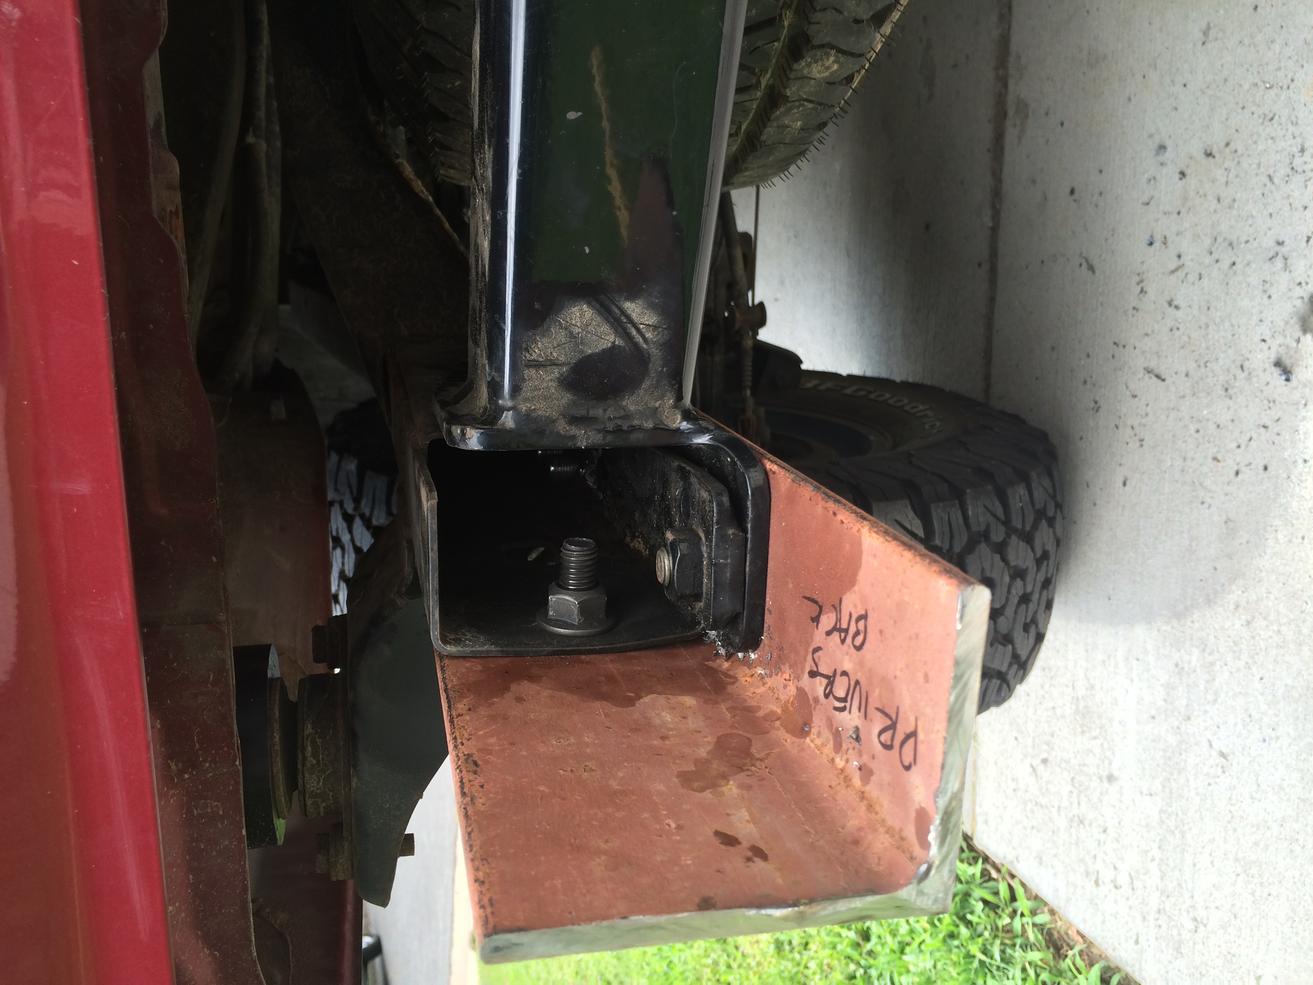
You can see the flipped hitch in this shot. The Red Runner bumper build-img_0521-jpg

And the last shot shows the rest of my mount. I needed to gain some height to account for the body lift. It will also provide a nice attachment point for the back plate to weld to.The Red Runner bumper build-img_0522-jpg

On a side note, i'll have to remember to orient my camera better when I take pictures, i have no clue why it always flips the photos sideways like that....
__________________

97 4runner SR5 3.4 manual
Tundra/LC Lift with Bilstein 5100's on 285/70/17 BFG KO2
2" "Fat Pats" body lift; 1.25" All Pro wheel spacers
Turbo Build; Rear Bumper Build; Front Bumper Build

Last edited by Myrunr2010; 08-21-2016 at 08:24 PM.
Myrunr2010 is offline   Reply With QuoteReply With Quote
Old 08-09-2016, 09:16 PM #2
Myrunr2010's Avatar
Myrunr2010 Myrunr2010 is offline
Member
 
Join Date: Jul 2014
Location: Newport News
Age: 36
Posts: 783
Real Name: Dave
Myrunr2010 is on a distinguished road
Myrunr2010 Myrunr2010 is offline
Member
Myrunr2010's Avatar
 
Join Date: Jul 2014
Location: Newport News
Age: 36
Posts: 783
Real Name: Dave
Myrunr2010 is on a distinguished road
So yesterday I was able to spend the afternoon spending some quality time with some card board, razor blade and duct tape. I've seen enough suggestions about using card board to mock everything up and make sure it looks right. I plan to try and attach pieces as I cut so I can use the rest of the card board to double check and make sure things haven't moved around on me at all.
Attached Images
The Red Runner bumper build-img_0530-jpg  The Red Runner bumper build-img_0537-jpg  The Red Runner bumper build-img_05381-jpg 
__________________

97 4runner SR5 3.4 manual
Tundra/LC Lift with Bilstein 5100's on 285/70/17 BFG KO2
2" "Fat Pats" body lift; 1.25" All Pro wheel spacers
Turbo Build; Rear Bumper Build; Front Bumper Build
Myrunr2010 is offline   Reply With QuoteReply With Quote
Old 08-10-2016, 12:36 AM #3
Sean K.'s Avatar
Sean K. Sean K. is offline
Member
 
Join Date: Aug 2016
Location: AZ
Posts: 793
Sean K. is on a distinguished road
Sean K. Sean K. is offline
Member
Sean K.'s Avatar
 
Join Date: Aug 2016
Location: AZ
Posts: 793
Sean K. is on a distinguished road
Grind that rust off to shiny metal before you do any welding.....otherwise your welds will be weaker as they are contaminated.
Sean K. is offline   Reply With QuoteReply With Quote
Old 08-10-2016, 04:46 AM #4
Myrunr2010's Avatar
Myrunr2010 Myrunr2010 is offline
Member
 
Join Date: Jul 2014
Location: Newport News
Age: 36
Posts: 783
Real Name: Dave
Myrunr2010 is on a distinguished road
Myrunr2010 Myrunr2010 is offline
Member
Myrunr2010's Avatar
 
Join Date: Jul 2014
Location: Newport News
Age: 36
Posts: 783
Real Name: Dave
Myrunr2010 is on a distinguished road
Quote:
Originally Posted by Sean K. View Post
Grind that rust off to shiny metal before you do any welding.....otherwise your welds will be weaker as they are contaminated.
That is the plan. That sheet is pretty well covered in it, thankfully it's mostly just surface rust. There are a few spots that were under the angle that are pretty rough looking though.
__________________

97 4runner SR5 3.4 manual
Tundra/LC Lift with Bilstein 5100's on 285/70/17 BFG KO2
2" "Fat Pats" body lift; 1.25" All Pro wheel spacers
Turbo Build; Rear Bumper Build; Front Bumper Build
Myrunr2010 is offline   Reply With QuoteReply With Quote
Old 08-10-2016, 07:58 PM #5
Myrunr2010's Avatar
Myrunr2010 Myrunr2010 is offline
Member
 
Join Date: Jul 2014
Location: Newport News
Age: 36
Posts: 783
Real Name: Dave
Myrunr2010 is on a distinguished road
Myrunr2010 Myrunr2010 is offline
Member
Myrunr2010's Avatar
 
Join Date: Jul 2014
Location: Newport News
Age: 36
Posts: 783
Real Name: Dave
Myrunr2010 is on a distinguished road
Just an update on the progress. Got the top plate cut and tacked in place. I went ahead and fully welded it to the backside of the mount. I wasn't sure what my access to that area would look like once the the whole thing was together. Ground it flat afterwards so that I had a flat surface to mount the back plate to.

The Red Runner bumper build-img_0544-jpg

Got the back plate cut and tacked in place as well.

The Red Runner bumper build-img_0546-jpg

I'm trying real hard to preserve and conserve my cut off wheels so I don't end up going through a million of them during this process. I think i did a pretty good job!

The Red Runner bumper build-img_0545-jpg
__________________

97 4runner SR5 3.4 manual
Tundra/LC Lift with Bilstein 5100's on 285/70/17 BFG KO2
2" "Fat Pats" body lift; 1.25" All Pro wheel spacers
Turbo Build; Rear Bumper Build; Front Bumper Build
Myrunr2010 is offline   Reply With QuoteReply With Quote
Old 08-10-2016, 08:23 PM #6
Scramble's Avatar
Scramble Scramble is offline
Elite Member
 
Join Date: Mar 2006
Location: Monroe, NY
Posts: 5,706
Real Name: Scramble
Scramble has a spectacular aura about Scramble has a spectacular aura about
Scramble Scramble is offline
Elite Member
Scramble's Avatar
 
Join Date: Mar 2006
Location: Monroe, NY
Posts: 5,706
Real Name: Scramble
Scramble has a spectacular aura about Scramble has a spectacular aura about
Nice job so far, the 1/4" steel is really gonna go through cut off wheels.
I would use Por 15 as a primer & then paint over that since it's not UV ray friendly. Good Luck!
__________________
____________

'99 4Runner - 2.7L 3RZ, 5 Speed, 4.56 Gears - Lifted, Locked & Loaded - 166k Original owner - http://www.toyota-4runner.org/3rd-ge...ld-thread.html
'99 Limited - E-Locker- Stock (for now) - 233k 2nd Owner http://www.toyota-4runner.org/3rd-ge...ted-build.html
Scramble is offline   Reply With QuoteReply With Quote
Old 08-10-2016, 09:09 PM #7
Myrunr2010's Avatar
Myrunr2010 Myrunr2010 is offline
Member
 
Join Date: Jul 2014
Location: Newport News
Age: 36
Posts: 783
Real Name: Dave
Myrunr2010 is on a distinguished road
Myrunr2010 Myrunr2010 is offline
Member
Myrunr2010's Avatar
 
Join Date: Jul 2014
Location: Newport News
Age: 36
Posts: 783
Real Name: Dave
Myrunr2010 is on a distinguished road
Quote:
Originally Posted by Scramble View Post
Nice job so far, the 1/4" steel is really gonna go through cut off wheels.
I would use Por 15 as a primer & then paint over that since it's not UV ray friendly. Good Luck!
Yeah I went through 2 just cutting that back plate. I'm trying to take it slow so I don't prematurely destroy them.

As far as paint goes, I'm thinking I will likely go get some bed liner and cover them in that
__________________

97 4runner SR5 3.4 manual
Tundra/LC Lift with Bilstein 5100's on 285/70/17 BFG KO2
2" "Fat Pats" body lift; 1.25" All Pro wheel spacers
Turbo Build; Rear Bumper Build; Front Bumper Build
Myrunr2010 is offline   Reply With QuoteReply With Quote
Old 08-10-2016, 10:08 PM #8
Scramble's Avatar
Scramble Scramble is offline
Elite Member
 
Join Date: Mar 2006
Location: Monroe, NY
Posts: 5,706
Real Name: Scramble
Scramble has a spectacular aura about Scramble has a spectacular aura about
Scramble Scramble is offline
Elite Member
Scramble's Avatar
 
Join Date: Mar 2006
Location: Monroe, NY
Posts: 5,706
Real Name: Scramble
Scramble has a spectacular aura about Scramble has a spectacular aura about
Quote:
Originally Posted by Myrunr2010 View Post
Yeah I went through 2 just cutting that back plate. I'm trying to take it slow so I don't prematurely destroy them.

As far as paint goes, I'm thinking I will likely go get some bed liner and cover them in that
Use a rust preventative paint like POR 15 or Eastwood before the Bed Liner.
__________________
____________

'99 4Runner - 2.7L 3RZ, 5 Speed, 4.56 Gears - Lifted, Locked & Loaded - 166k Original owner - http://www.toyota-4runner.org/3rd-ge...ld-thread.html
'99 Limited - E-Locker- Stock (for now) - 233k 2nd Owner http://www.toyota-4runner.org/3rd-ge...ted-build.html
Scramble is offline   Reply With QuoteReply With Quote
Old 08-10-2016, 10:15 PM #9
Red Monkey Red Monkey is offline
Junior Member
 
Join Date: Aug 2016
Location: Alabama
Age: 74
Posts: 20
Red Monkey is on a distinguished road
Red Monkey Red Monkey is offline
Junior Member
 
Join Date: Aug 2016
Location: Alabama
Age: 74
Posts: 20
Red Monkey is on a distinguished road
That's going to look great when you finish!!
Red Monkey is offline   Reply With QuoteReply With Quote
Old 08-10-2016, 11:37 PM #10
FMFwarrior FMFwarrior is offline
Member
 
Join Date: Aug 2016
Location: Newport News, VA
Posts: 51
FMFwarrior is on a distinguished road
FMFwarrior FMFwarrior is offline
Member
 
Join Date: Aug 2016
Location: Newport News, VA
Posts: 51
FMFwarrior is on a distinguished road
Smile

Looks like it's going to be a solid bumper. I noticed you're in Hampton. I might have to have you make me one
FMFwarrior is offline   Reply With QuoteReply With Quote
Old 08-10-2016, 11:59 PM #11
kolelt kolelt is offline
Senior Member
 
Join Date: Sep 2013
Location: new jersey
Posts: 4,830
kolelt will become famous soon enough kolelt will become famous soon enough
kolelt kolelt is offline
Senior Member
 
Join Date: Sep 2013
Location: new jersey
Posts: 4,830
kolelt will become famous soon enough kolelt will become famous soon enough
Quote:
Originally Posted by Scramble View Post
Use a rust preventative paint like POR 15 or Eastwood before the Bed Liner.
Agree. Even por15 looks nice. Paint it or use Bedliner over it. Por15 will fade under sun. Nice looking bumper. Tell us how much. It weights after finished.
__________________
97 3.4 JDM/5 Speed swap/eLocker Swap/ICON CDC all around/+more.....
kolelt is offline   Reply With QuoteReply With Quote
Old 08-11-2016, 05:01 AM #12
Myrunr2010's Avatar
Myrunr2010 Myrunr2010 is offline
Member
 
Join Date: Jul 2014
Location: Newport News
Age: 36
Posts: 783
Real Name: Dave
Myrunr2010 is on a distinguished road
Myrunr2010 Myrunr2010 is offline
Member
Myrunr2010's Avatar
 
Join Date: Jul 2014
Location: Newport News
Age: 36
Posts: 783
Real Name: Dave
Myrunr2010 is on a distinguished road
Quote:
Originally Posted by Scramble View Post
Use a rust preventative paint like POR 15 or Eastwood before the Bed Liner.
Do you think it will cause issues with adhesion of the bedliner? If i remember right from last time I used bedliner it wanted to be put directly on a bare metal surface.

Quote:
Originally Posted by FMFwarrior View Post
Looks like it's going to be a solid bumper. I noticed you're in Hampton. I might have to have you make me one
...lol. Where abouts in Newport News are ya?

Quote:
Originally Posted by kolelt View Post
Agree. Even por15 looks nice. Paint it or use Bedliner over it. Por15 will fade under sun. Nice looking bumper. Tell us how much. It weights after finished.
Im starting to get worried that its going to weigh a stinkin ton. Originally i was thinking like, oh, well, 1/4" is only 3 lbs per square foot heavier than 3/16", how much of a difference can it really be? But now i'm starting to realize that it could make quite the difference!
__________________

97 4runner SR5 3.4 manual
Tundra/LC Lift with Bilstein 5100's on 285/70/17 BFG KO2
2" "Fat Pats" body lift; 1.25" All Pro wheel spacers
Turbo Build; Rear Bumper Build; Front Bumper Build
Myrunr2010 is offline   Reply With QuoteReply With Quote
Old 08-11-2016, 05:03 AM #13
Myrunr2010's Avatar
Myrunr2010 Myrunr2010 is offline
Member
 
Join Date: Jul 2014
Location: Newport News
Age: 36
Posts: 783
Real Name: Dave
Myrunr2010 is on a distinguished road
Myrunr2010 Myrunr2010 is offline
Member
Myrunr2010's Avatar
 
Join Date: Jul 2014
Location: Newport News
Age: 36
Posts: 783
Real Name: Dave
Myrunr2010 is on a distinguished road
I bought these last night to be able to integrate into the rear bumper. doesn't make sense to me, if i ordered last night (wed night) and i used prime shipping, that tells me i should have them by friday, maybe saturday. I just checked and they don't come in until monday! Grrrr.

https://www.amazon.com/gp/product/B0...?ie=UTF8&psc=1
__________________

97 4runner SR5 3.4 manual
Tundra/LC Lift with Bilstein 5100's on 285/70/17 BFG KO2
2" "Fat Pats" body lift; 1.25" All Pro wheel spacers
Turbo Build; Rear Bumper Build; Front Bumper Build
Myrunr2010 is offline   Reply With QuoteReply With Quote
Old 08-11-2016, 07:37 AM #14
kolelt kolelt is offline
Senior Member
 
Join Date: Sep 2013
Location: new jersey
Posts: 4,830
kolelt will become famous soon enough kolelt will become famous soon enough
kolelt kolelt is offline
Senior Member
 
Join Date: Sep 2013
Location: new jersey
Posts: 4,830
kolelt will become famous soon enough kolelt will become famous soon enough
It shouldn't cause adhesive issues.... Although I recommend using monstaliner. Which they sell CHASSY saver. Almost same as por15.

My rear savage bumper, is little over 100lbs. You can check on their site how much it weights with carrier.
__________________
97 3.4 JDM/5 Speed swap/eLocker Swap/ICON CDC all around/+more.....
kolelt is offline   Reply With QuoteReply With Quote
Old 08-11-2016, 08:23 AM #15
Myrunr2010's Avatar
Myrunr2010 Myrunr2010 is offline
Member
 
Join Date: Jul 2014
Location: Newport News
Age: 36
Posts: 783
Real Name: Dave
Myrunr2010 is on a distinguished road
Myrunr2010 Myrunr2010 is offline
Member
Myrunr2010's Avatar
 
Join Date: Jul 2014
Location: Newport News
Age: 36
Posts: 783
Real Name: Dave
Myrunr2010 is on a distinguished road
Quote:
Originally Posted by kolelt View Post
It shouldn't cause adhesive issues.... Although I recommend using monstaliner. Which they sell CHASSY saver. Almost same as por15.

My rear savage bumper, is little over 100lbs. You can check on their site how much it weights with carrier.
I did my stock bumpers and trim like 6-9 months ago to try and stop/slow the rust issues I was having on them since I didn't know when this build would actually happen. We just used the brand that Walmart sells. It seems to be holding up pretty well except in areas where I didn't sand/rough it up too well, that's why I asked.
__________________

97 4runner SR5 3.4 manual
Tundra/LC Lift with Bilstein 5100's on 285/70/17 BFG KO2
2" "Fat Pats" body lift; 1.25" All Pro wheel spacers
Turbo Build; Rear Bumper Build; Front Bumper Build
Myrunr2010 is offline   Reply With QuoteReply With Quote
Reply

Thread Tools
Display Modes Rate This Thread
Rate This Thread:

Posting Rules
You may not post new threads
You may not post replies
You may not post attachments
You may not edit your posts

BB code is On
Smilies are On
[IMG] code is On
HTML code is On

Forum Jump

Similar Threads
Thread Thread Starter Forum Replies Last Post
87 4 Runner Build SV_Dude Classic T4Rs 403 01-18-2022 01:19 AM
Rear bumper build and Front bumper install ADH8796 3rd gen T4Rs 25 03-09-2016 03:43 PM
Can Build Plate bumper fit on a the stock bumper bracket? achha64 3rd gen T4Rs 4 10-02-2014 12:40 PM
1998 T4R Build Thread/Rear bumper build 4running11191 4running11191 3rd gen T4Rs 3 09-19-2014 07:07 PM

Powered by vBadvanced CMPS v3.2.2

All times are GMT -4. The time now is 11:17 AM.

Powered by vBulletin® Version 3.8.11
Copyright ©2000 - 2024, vBulletin Solutions Inc.
Search Engine Optimisation provided by DragonByte SEO (Pro) - vBulletin Mods & Addons Copyright © 2024 DragonByte Technologies Ltd.
Feedback Buttons provided by Advanced Post Thanks / Like (Lite) - vBulletin Mods & Addons Copyright © 2024 DragonByte Technologies Ltd.
User Alert System provided by Advanced User Tagging (Lite) - vBulletin Mods & Addons Copyright © 2024 DragonByte Technologies Ltd.
***This site is an unofficial Toyota site, and is not officially endorsed, supported, authorized by or affiliated with Toyota. All company, product, or service names references in this web site are used for identification purposes only and may be trademarks of their respective owners. The Toyota name, marks, designs and logos, as well as Toyota model names, are registered trademarks of Toyota Motor Corporation***Ad Management plugin by RedTyger
 
Copyright © 2020