 11-01-2012, 03:14 PM
|
#1
|
|
Junior Member
|
|
Join Date: Nov 2012
Location: TEXAS
Posts: 4
|
|
|
Junior Member
Join Date: Nov 2012
Location: TEXAS
Posts: 4
|
Shift actuator and transfer case timing
Took apart the shift actuator assembly and I am trying to figure out how to put it back on the TRANSFER CASE with the correct alignment. As of now I have just been doing a lot of trial and error, there are only certain ways it wants to go back on.
I can move the transfer case drive shafts -top is for 4HI LO and bottom is for differential lock unlock. I can move them by hand when the car is off, not sure which position I should move them to to install SHIFT ACTUATOR and which setting I should put the 4 LO HI in when installing.
I haven't found anything on line about this...I don't know if people usually take these apart usually isn't a reason to but I could use some help.
THANKS!
|

|
 Reply With Quote Reply With Quote
|
|
11-01-2012, 03:24 PM
|
#2
|
 |
Senior Member
|
|
Join Date: Feb 2011
Location: Monroe, North Carolina
Age: 35
Posts: 2,683
Real Name: Austin
|
|
|
Senior Member
Join Date: Feb 2011
Location: Monroe, North Carolina
Age: 35
Posts: 2,683
Real Name: Austin
|
I can't say from experience but i would place the actuators in the position that the switch settings on the dash are set to, so like 4hi should be in 4hi and the diff lock should be in the unlocked position hope this helps somewhat, (truth is i'd like to be there wrenching to help figure it out seems interesting for sure!) but if all else fails the transfer case is made my Aisin you can call there tech support and see if they can provide assistance.. that is who makes the transfer case they purchase the torsen 3 carrier from torsen and install to there assembly
http://www.aisin.com/product/group/ai_a.html
__________________
-Austin
A-Ha's Build
|
|
|
Reply With Quote
|
|
11-01-2012, 03:31 PM
|
#3
|
|
Junior Member
|
|
Join Date: Nov 2012
Location: TEXAS
Posts: 4
|
|
|
Junior Member
Join Date: Nov 2012
Location: TEXAS
Posts: 4
|
It's pretty complex, there are about 6-8 gears, two motors, then two small gears connected to a circuit that communicates with the computer...do you know of anyone or anywhere that talks about installing the SHIFT ACTUATOR ASSEMBLY?
|
|
|
Reply With Quote
|
|
11-01-2012, 03:37 PM
|
#4
|
|
Senior Member
|
|
Join Date: Feb 2011
Location: Monroe, North Carolina
Age: 35
Posts: 2,683
Real Name: Austin
|
|
|
Senior Member
Join Date: Feb 2011
Location: Monroe, North Carolina
Age: 35
Posts: 2,683
Real Name: Austin
|
not personally, I wouldn't even think alot of toyota tech's mess with it they would typically replace the whole transfer case. You need to find a manual on the transfer case and or for the truck with transfer case assembly details. hopefully someone else can post up with more info
__________________
-Austin
A-Ha's Build
|
|
|
Reply With Quote
|
|
10-02-2015, 12:02 PM
|
#5
|
|
Junior Member
|
|
Join Date: Jan 2015
Location: Long Beach, Ca.
Posts: 10
|
|
|
Junior Member
Join Date: Jan 2015
Location: Long Beach, Ca.
Posts: 10
|
After my 12th time pulling the transfercase on and off i figured it out
|
|
|
Reply With Quote
|
|
10-08-2015, 02:07 PM
|
#6
|
|
Junior Member
|
|
Join Date: Oct 2015
Location: Sweet Valley, PA
Posts: 5
Real Name: Dave
|
|
|
Junior Member
Join Date: Oct 2015
Location: Sweet Valley, PA
Posts: 5
Real Name: Dave
|
Quote:
Originally Posted by vvtisupra

After my 12th time pulling the transfercase on and off i figured it out
|
Please share your method. Any pictures?
Also, I just ordered a used transfer case with a working actuator installed. Can somebody confirm whether I really have to remove the transmission with it as the FSM details?
I have a 2007 SR5 V6.
|
|
|
Reply With Quote
|
|
10-08-2015, 03:23 PM
|
#7
|
|
Member
|
|
Join Date: Jul 2012
Location: Central NJ
Age: 40
Posts: 437
|
|
|
Member
Join Date: Jul 2012
Location: Central NJ
Age: 40
Posts: 437
|
Quote:
Originally Posted by chemicalgutter
Please share your method. Any pictures?
Also, I just ordered a used transfer case with a working actuator installed. Can somebody confirm whether I really have to remove the transmission with it as the FSM details?
I have a 2007 SR5 V6.
|
Not needed.
__________________
---------------------
2005 4R V8 4x4 Limited - LEDs, FX-Rs, Gibson exhaust, TRD Red Front/Rear shocks, OME front springs, Toyotec rear springs, BF Goodrich 275/70/17 K02s, 1.25" Spidertrax. Front/Rear Polyurethane sway bar bushings, Total Chaos lower control arm alignment tabs. 150k miles and counting
2005 Prius - DD/Grocery getter. 250k miles and counting.
|
|
|
Reply With Quote
|
|
10-15-2015, 07:59 PM
|
#8
|
|
Junior Member
|
|
Join Date: Jan 2015
Location: Long Beach, Ca.
Posts: 10
|
|
|
Junior Member
Join Date: Jan 2015
Location: Long Beach, Ca.
Posts: 10
|
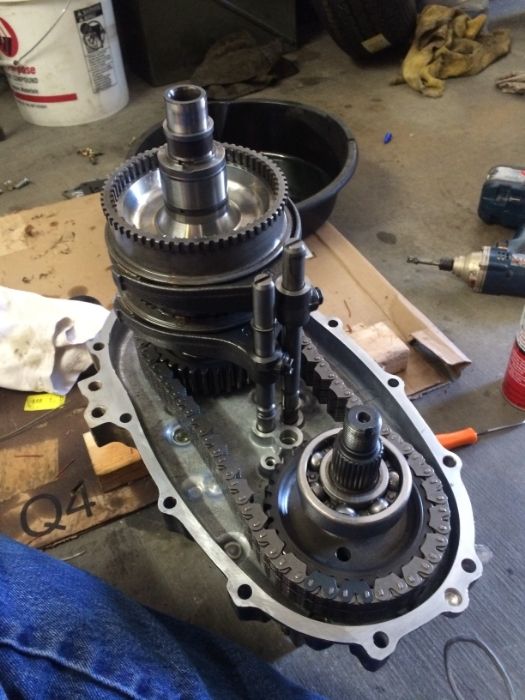
This is for a 2003 SR5 V8 4runner 4x4
Seals were purchased from toyota and rocket seal (please do a search cuz i don't remember) Sorry for the picture I did this about 12 times on and off and when i finally hit the jackpot i left it in there and im not going to pull it out just take pictures. I literally was on my last straw and about to buy a new actuator. Also I'd like to appologize for my piss poor description.
I had the transfer case out and the cover off as seen in the pictures. this allowed me to move in and out the actuator shafts to get to the different sections of the actuator.
I had the transfercase laying on its side with the actuator facing up at me. I had a block to support the transfercase shaft so it sat level.
First you must realize that the actuator comes in 2 sections. the section right under the cover is the portion that controls the center lock. when you pull the gears out and get to the bottom cover you'll notice another section of the actuator that controls the hi and lo portion of the transfer case. Now you can't pull the dividing section without sliding the center lock shaft into the transfer case. So first i slide back the locking shaft so I can get down to the hi lo portion of the actuator. (disclaimer: moving the shaft in and out can knick and tear the shaft seals. I put A BUNCH of grease and moved the shaft gingerly with light pressure and a light twisting back and forth motion. )
This is where i got the general layout of the actuator : 2004 v8 4x4 actuator replacement
Sorry this isn't a very scientific solution but I used this pictures
from this thread to position the gear in 4 Hi Unlocked. What this helped me solve was where the baseline spacing and travel of the actuators are allowed to move. I copied where the gear for the lhi-low shaft needed to be by matching the picture below. Assembling the gear that contact the teeth of the shaft i made sure that the hook in the gear sat in the shaft cut out when moving the gear to 4lo. After making sure the hook in the metal gear sat inside the shaft cutout I rotated the gear clockwise until the gearing in the transfercase went back to match the picture below to indicate that it is in 4hi.
( Fixing the transfer case shift motor leak from within..)

Just as important the white and blue small spider gear on the divider between section 1 and section that has a line on the exterior view indicates the timing. (see picture below) Its like a potentiometer that tells the ecu that the car is 4hi or is in 4lo. Make sure the the white indicator matches the picture below. This tells the ecu you are in 4hi to match the position on the transfercase gears. Now screw the center dividing cover down insuring all the gears mesh and the cover sits flush to the mounting post.

Now You can slide the center lock shaft back down and match the gear spacing on this picture
Now you can install the main gear that triggers a switch that turns off your VDC. It is the brownish largest spur gear. Take note of the line on the gear and make it point in the same direction lining it up the same way as this picture
the intermediate gear that connects the main largest spur gear to the motor pinion gear aren't important as far as timing. So place those gears back in I matched the picture above just to be safe.
Now place the cover that houses the timing assembly (white and blue gear) as seen in this picture

You want to make sure that the indicator is pointing in the same direction. bolt that plate down and put the cover back on and you're ready to rock.
Like I said its not very scientific nor precise, but out of the 12 times that I pulled this unit out to make sense of it, the most basic form of setting it up yielded the correct answer. The conclusion that I got from this is that the assembling manufacturer either has your typical non technical assembly line or an automated assembly line that requires indicators for robotics to know how to clock gears and set up the actuator, which explains why they have so many indicators on the gears, so that a person or machine can look at an assembly drawing or picture and assemble it without getting to the complexities of measuring the resistance from the timing assembly. ( yes if you read the output pins of the actuator and turn the timing assembly resistance changes which is how the ecu reads if the position is locked or not locked or is in hi or lo). anyways if you guys are planning to do this good luck my truck was down for a month (only because I did a lot of trial and error with the gear timing and i did it after work which was an hour away from my truck so it was a 2 day process every time i pulled it on and off )and it required me to have an extra set of hands to lift the sucker on and off the truck. But if I can do it anyone can.
Also, people reference the ih8mud post about doing the twist and crack method on a GX470 or fj cruiser. This does not pertain to us because like the tacoma we have 2 actuator rods that does not allow us to twist the actuator off of the pinion. Knowing what I know no I would have taken off the transfercase the first go around and go through the same method as i listed above.
Last edited by vvtisupra; 10-15-2015 at 08:32 PM.
|
|
|
Reply With Quote
|
|
10-16-2015, 06:30 AM
|
#9
|
|
Junior Member
|
|
Join Date: Oct 2015
Location: Sweet Valley, PA
Posts: 5
Real Name: Dave
|
|
|
Junior Member
Join Date: Oct 2015
Location: Sweet Valley, PA
Posts: 5
Real Name: Dave
|
Quote:
Originally Posted by vvtisupra
This is for a 2003 SR5 V8 4runner 4x4
Seals were purchased from toyota and rocket seal (please do a search cuz i don't remember) Sorry for the picture I did this about 12 times on and off and when i finally hit the jackpot i left it in there and im not going to pull it out just take pictures. I literally was on my last straw and about to buy a new actuator. Also I'd like to appologize for my piss poor description.
I had the transfer case out and the cover off as seen in the pictures. this allowed me to move in and out the actuator shafts to get to the different sections of the actuator.
I had the transfercase laying on its side with the actuator facing up at me. I had a block to support the transfercase shaft so it sat level.
First you must realize that the actuator comes in 2 sections. the section right under the cover is the portion that controls the center lock. when you pull the gears out and get to the bottom cover you'll notice another section of the actuator that controls the hi and lo portion of the transfer case. Now you can't pull the dividing section without sliding the center lock shaft into the transfer case. So first i slide back the locking shaft so I can get down to the hi lo portion of the actuator. (disclaimer: moving the shaft in and out can knick and tear the shaft seals. I put A BUNCH of grease and moved the shaft gingerly with light pressure and a light twisting back and forth motion. )
This is where i got the general layout of the actuator : 2004 v8 4x4 actuator replacement
Sorry this isn't a very scientific solution but I used this pictures
from this thread to position the gear in 4 Hi Unlocked. What this helped me solve was where the baseline spacing and travel of the actuators are allowed to move. I copied where the gear for the lhi-low shaft needed to be by matching the picture below. Assembling the gear that contact the teeth of the shaft i made sure that the hook in the gear sat in the shaft cut out when moving the gear to 4lo. After making sure the hook in the metal gear sat inside the shaft cutout I rotated the gear clockwise until the gearing in the transfercase went back to match the picture below to indicate that it is in 4hi.
( Fixing the transfer case shift motor leak from within..)
Just as important the white and blue small spider gear on the divider between section 1 and section that has a line on the exterior view indicates the timing. (see picture below) Its like a potentiometer that tells the ecu that the car is 4hi or is in 4lo. Make sure the the white indicator matches the picture below. This tells the ecu you are in 4hi to match the position on the transfercase gears. Now screw the center dividing cover down insuring all the gears mesh and the cover sits flush to the mounting post.
Now You can slide the center lock shaft back down and match the gear spacing on this picture
Now you can install the main gear that triggers a switch that turns off your VDC. It is the brownish largest spur gear. Take note of the line on the gear and make it point in the same direction lining it up the same way as this picture
the intermediate gear that connects the main largest spur gear to the motor pinion gear aren't important as far as timing. So place those gears back in I matched the picture above just to be safe.
Now place the cover that houses the timing assembly (white and blue gear) as seen in this picture
You want to make sure that the indicator is pointing in the same direction. bolt that plate down and put the cover back on and you're ready to rock.
Like I said its not very scientific nor precise, but out of the 12 times that I pulled this unit out to make sense of it, the most basic form of setting it up yielded the correct answer. The conclusion that I got from this is that the assembling manufacturer either has your typical non technical assembly line or an automated assembly line that requires indicators for robotics to know how to clock gears and set up the actuator, which explains why they have so many indicators on the gears, so that a person or machine can look at an assembly drawing or picture and assemble it without getting to the complexities of measuring the resistance from the timing assembly. ( yes if you read the output pins of the actuator and turn the timing assembly resistance changes which is how the ecu reads if the position is locked or not locked or is in hi or lo). anyways if you guys are planning to do this good luck my truck was down for a month (only because I did a lot of trial and error with the gear timing and i did it after work which was an hour away from my truck so it was a 2 day process every time i pulled it on and off )and it required me to have an extra set of hands to lift the sucker on and off the truck. But if I can do it anyone can.
Also, people reference the ih8mud post about doing the twist and crack method on a GX470 or fj cruiser. This does not pertain to us because like the tacoma we have 2 actuator rods that does not allow us to twist the actuator off of the pinion. Knowing what I know no I would have taken off the transfercase the first go around and go through the same method as i listed above. |
Wow! Awesome job. Glad to see someone finally cracked this. I can understand why you are not willing to redo the pictures for the sake of science! I assume you went after this to fix an oil leak as opposed to repairing an actuator?
Also, Did you know that you don't have to reinstall the case every time you want to test the actuator timing? I'll share details of my experience in the following post.
|
|
|
Reply With Quote
|
|
10-16-2015, 07:10 AM
|
#10
|
|
Junior Member
|
|
Join Date: Oct 2015
Location: Sweet Valley, PA
Posts: 5
Real Name: Dave
|
|
|
Junior Member
Join Date: Oct 2015
Location: Sweet Valley, PA
Posts: 5
Real Name: Dave
|
My 4 LO actuator motor never worked since I've owned the vehicle. I bought from a dealer and discovered after the 30 day warranty. 3 years later I decided to attempt to "fix" my actuator via the light tapping with the rubber mallet method. After being unsuccessful at the that method and without reading the warnings, I disassembled the actuator with the transfer case installed on the vehicle. Stupid move. I made the problem worse and now the lights would always flash and it disabled any use of the selector switch (even just for 4hi). So I took the simple, but somewhat risky route of buying a used T-case from eBay with the actuator installed ($850 shipped with 60k on it). Since the actuator was part of the 3 month warranty, I figured it was worth the risk. Sadly, UPS rolled the case around during shipment, so I found small pieces of the actuator electrical plug on the top of the box. The seller offered a full refund, but that would delay things by at least 8 days. They offered me a $50 refund for my hassle if I decided to repair it and use as is. The electrical pins were still intact, so I decided to test it last night before responding to the seller on my decision.
The T-case came out easy with the right flexible bits and an air ratchet. 1 hour of labor including jacking up 4 corners of the car.
The electrical plug and wire comes off the old T-case with 2 bolts on top of the T-case. Once this was freed up, I could have tested the new T-case motors without even dropping my old case. (I had already committed to remove the old T-case though).
Just plug the new case in while it is sitting on the floor or a jack, then have somebody turn the ignition to on. Cycle the T-case through its modes and check for the following indicators:
1. Lights on the dash are indicating as expected with no errors.
2. Noise of the electric motor when the switch is moved to 4Lo.
3. Ratio of the transmission output shaft to the rear shaft is as expected. When in 2hi and 4hi, this should be 1:1. When in 4lo, this will be something like 2:1 or 3:1. (This will be hard to determine if you have already installed the T-case on the vehicle, since the transmission shaft is no longer visible)
4. Repeat above steps for the transfer case lock button to test that motor as well. This won't change the ratio, but it will guarantee that the shafte going out to the front diff. will be locked in. (I got confused when mine was not spinning in 4HI - there is some slip in the T-case by design. The lock switch eliminates that slip.)
It was a beautiful thing when all my error messages went away and I was able to see the 4LO light solid with no beeping (first time since I owned the vehicle).
Since I knew buying a used actuator was a risk, and I just confirmed that this one works correctly, I have decided to just fix the damaged connector on the actuator motor with some silicone tape, and a zip tie to ensure the connection is tight and waterproof.
I'll be keeping my old T-case. In the event that I have issues with this one, I might attempt to repair my old actuator motor, replace the seal i damaged and time it correctly using vvtisupra advice.
Had to quit the project last night after the first hour due to both me and my friend working early today, but we should have the new case installed tonight. I will update.
Last edited by chemicalgutter; 10-16-2015 at 07:25 AM.
|
|
|
Reply With Quote
|
|
10-16-2015, 08:10 PM
|
#11
|
|
Junior Member
|
|
Join Date: Jan 2015
Location: Long Beach, Ca.
Posts: 10
|
|
|
Junior Member
Join Date: Jan 2015
Location: Long Beach, Ca.
Posts: 10
|
Quote:
Originally Posted by chemicalgutter
Wow! Awesome job. Glad to see someone finally cracked this. I can understand why you are not willing to redo the pictures for the sake of science! I assume you went after this to fix an oil leak as opposed to repairing an actuator?
Also, Did you know that you don't have to reinstall the case every time you want to test the actuator timing? I'll share details of my experience in the following post.
|
i did try playing with the transfer case outside the car but i was never successful. I made the mistake of starting the car with the transfercase out having some tranny oil splash out, so I told myself i probably shouldnt do that again.
Also you are correct i did all this work to chase down the leak. my initial mistake was pulling off the actuator with the transfercase still in the car.
My greatest advancement was when i lined up the timing gears to their marks thinking it was the indicator for 4 hi and unlocked. When i turned on the car the truck immediately worked the actuator and got a grinding noise before turning on the 4lo light while I was still physically in 4hi. At that point i realized lining up those timing marks were for 4lo and locked. So i went out on a limb and went based off those pictures and assumed the person who took those pictures of the actuator internals had the truck still in 4hi and unlocked. That was the ticket. I currently have a few thousand miles on it including towing. Knock on wood. Eventually I will pull off the cover and inspect to see if any of the transfercase gear oil leaked past the shaft seals. I bought a used transfercase that had that shaft seal leak and i believe the gear oil shorted the actuator motors causing the transfer case to get stuck in 4lo. i bought it for spare parts but knowing what i know now if i had a spare actuator i can probably have a fully repaired/resealled working transfer case. After all the work i put into it i still don;t think its worth the 2g's toyota wants. But i also don't trust a shop to do it for anything less than 1g. I got a quote from a buddy that works at toyota and his cost on the actuator alone was just above 900 after tax  I almost bit the bullet. Luckily the last straw was also the fix.
Honestly if you had me do it again i am not sure if i can make it work from the first try. But then again i am not sure what type of tolerance is built into the timing mechanism. I cant imagine being off by 1 tooth can really stop the actuator from working. Meh whatever I'm just rambling now.
Last edited by vvtisupra; 10-16-2015 at 08:15 PM.
|
|
|
Reply With Quote
|
|
07-11-2016, 08:35 PM
|
#12
|
|
Junior Member
|
|
Join Date: Jun 2016
Location: Oreana, IL
Age: 44
Posts: 2
Real Name: Jason
|
|
|
Junior Member
Join Date: Jun 2016
Location: Oreana, IL
Age: 44
Posts: 2
Real Name: Jason
|
Need a pic of the timed indicator
I know this is an old thread, but can anyone provide a pic of a working actuator still installed on the Tcase in 4HI with just the cover removed?
I am at my wits end on this thing. Thanks in advance for the help!!!
|
|
|
Reply With Quote
|
|
07-21-2016, 12:17 PM
|
#13
|
|
Member
|
|
Join Date: Mar 2015
Location: Sacramento CA
Posts: 683
|
|
|
Member
Join Date: Mar 2015
Location: Sacramento CA
Posts: 683
|
Quote:
Originally Posted by ARJMN
I know this is an old thread, but can anyone provide a pic of a working actuator still installed on the Tcase in 4HI with just the cover removed?
I am at my wits end on this thing. Thanks in advance for the help!!!
|
From another post. Its not really that hard to time the actuator:
So, I figured out the timing of the actuators on my 05 v8 case. It was really not that hard. I sunk my truck and the actuator filled with water, so I had to take it apart. I thought that is was going to explode with 30 small gears flying around, but no, there are only 4 gears for the center diff lock and a small blue timing gear which goes the opposite direction of the shaft. My 4lo-hi portion was not broken, so I didn't mess with that part. I only repaired the center diff lock portion.
My truck would not engage the center diff lock, and since an ounce of water came out of the actuator I figured that is was rusted. It was mostly rusted but I was able to recondition the motor by removing it, cleaning it and soldering it back on all while the actuator was on the truck. But then I had to make sure that it was in time and all the lights in the dash worked.
Here are the steps:
Be sure that your truck has the center diff unlocked.
Remove the inspection plate that has the blue indicator to tell you where the shaft should be.
Mark this position with a sharpie, it is the "diff unlocked position" If you are off by more than 10 degrees it wont work, you have to be right on with your mark.
remove actuator plastic bottom plate.
(gears may fall out)
Under the lowest gear which drives the shaft (the one with the spring), you will find the VSC pressure switch. There is an eccentric wheel on the gear which drives the shaft that is supposed to push down on this switch when the shaft is all the way out of the case (CDL engaged) and release this switch when the shaft is all the way in the case (CDL disengaged).
Simply place the lower gear which drives the shaft into the case in such a manner that when you spin the gear by hand to get the shaft to come out of the case, the eccentric wheel on the bottom of the gear engages the VSC switch during the last 20 degrees of rotation and disengages the switch when the gear is rotated the other direction and the shaft is FULLY pushed into the case.
You have now timed the VSC portion.
Now, spin the last gear by hand to get the shaft to be fully inside the case and verify that the VSC switch is not engaged. Next, find your external case with the mark you made on the indicator before you disassembled the unit and be sure that the wheel is rotated to exactly where you made the mark on the outside of the case. Install this onto the box and be SURE that the blue indicator did not move from your mark when the case is fully pressed together.
If the indicator is in the same spot, you have now timed the Center Diff portion.
Everything should work fine and you just saved $2700.
__________________
2005 Blue SR5 v8
3" suspension lift, 1" body lift, 315's, rear Elocker, on-board air system, slider air tanks, full skid plates, front Demello bumper, rear HMF plate/tube bumper, rear 9000lb hidden winch, front 10000lb winch, dual electric fans (in cab adjustable temp), rock lights, 25W LED projector lights.
|
|
|
Reply With Quote
|
|
07-22-2016, 09:13 PM
|
#14
|
 |
Elite Member
|
|
Join Date: Feb 2011
Location: Bend, OR
Posts: 9,902
|
|
|
Elite Member
Join Date: Feb 2011
Location: Bend, OR
Posts: 9,902
|
@ duffdog
Unfortunately I am more of a Visual Learner so I'd need pictures or diagrams to really memorize the procedure (I think a lot of members on this forum are) but I will ear mark this thread in my memory for when I have the opportunity to play with a transfercase and/or actuator again.
|
|
|
Reply With Quote
|
|
10-03-2017, 11:40 AM
|
#15
|
|
Junior Member
|
|
Join Date: Sep 2017
Posts: 2
|
|
|
Junior Member
Join Date: Sep 2017
Posts: 2
|
Quote:
Originally Posted by BlackWorksInc
@ duffdog
Unfortunately I am more of a Visual Learner so I'd need pictures or diagrams to really memorize the procedure (I think a lot of members on this forum are) but I will ear mark this thread in my memory for when I have the opportunity to play with a transfercase and/or actuator again. |
I was able to successfully reassemble and time the transfer case shift actuator without removing the transfer case. Photos here: DIY: Transfer Case Actuator Repair
Last edited by grubbab; 10-03-2017 at 11:42 AM.
|
|
|
Reply With Quote
|
 Posting Rules
|
You may not post new threads
You may not post replies
You may not post attachments
You may not edit your posts
HTML code is On
|
|
|
|


 Linear Mode


