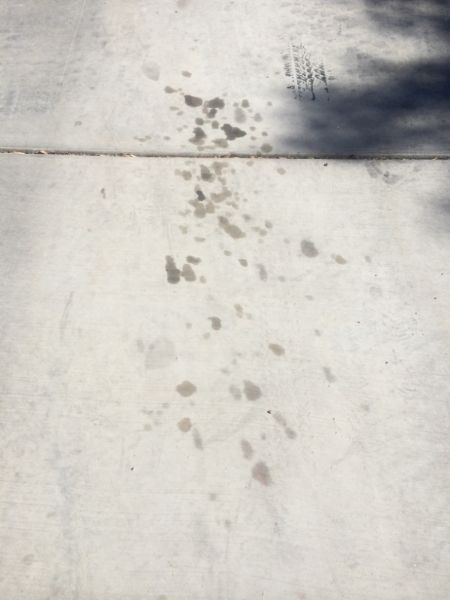
Well, I put it off long enough but the drips have been getting bigger and bigger, and now my driveway is a mess! On mine, it wasn’t the shaft seals that were leaking, but the large O-ring from the shift motor to the transfer case or T-case.
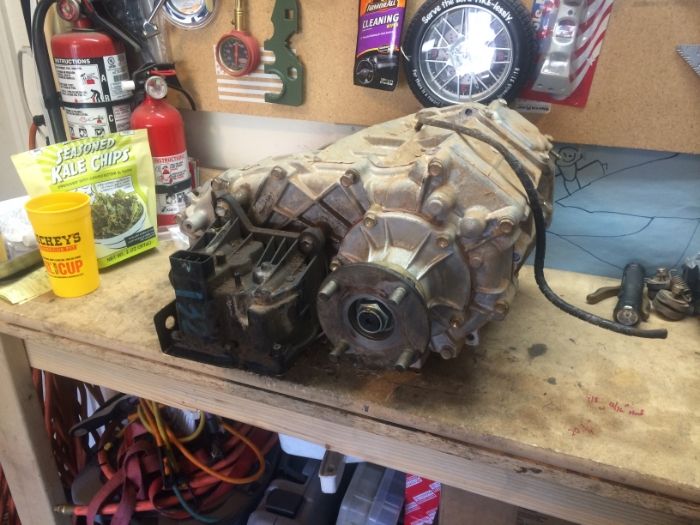
Finally decided to bite the bullet on this and get the leaking t-case shift motor fixed. I looked at all the threads of guys pulling the shift motor itself apart to avoid pulling and splitting the t-case, but honestly the thought of screwing around with all those little pieces, lying on my back under the truck, didn’t seem inviting at all. On top of that, I was afraid to not get the thing in “time” and having to replace the shift motor itself. For me, pulling the case and going from the inside was the way to go.
The following write up is an abbreviated version (and some of my own tips) of what the FSM says to do for a T-case tear down. I used it as a reference, but noticed that a lot of the steps in the FSM don’t apply. It shows you how to do a complete tear down, and we only need to get in far enough to remove the shift motor. I recommend 100% having a copy of the FSM to reference for pictures, torque specs, etc.
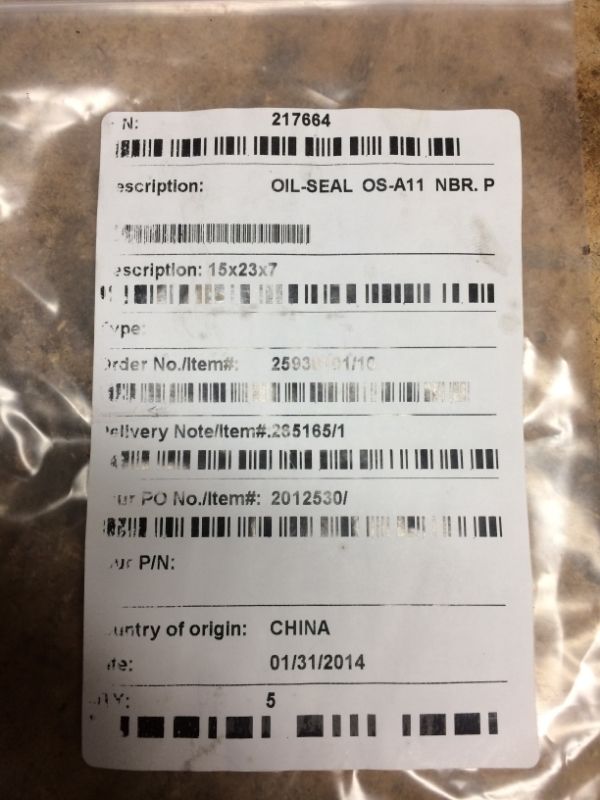
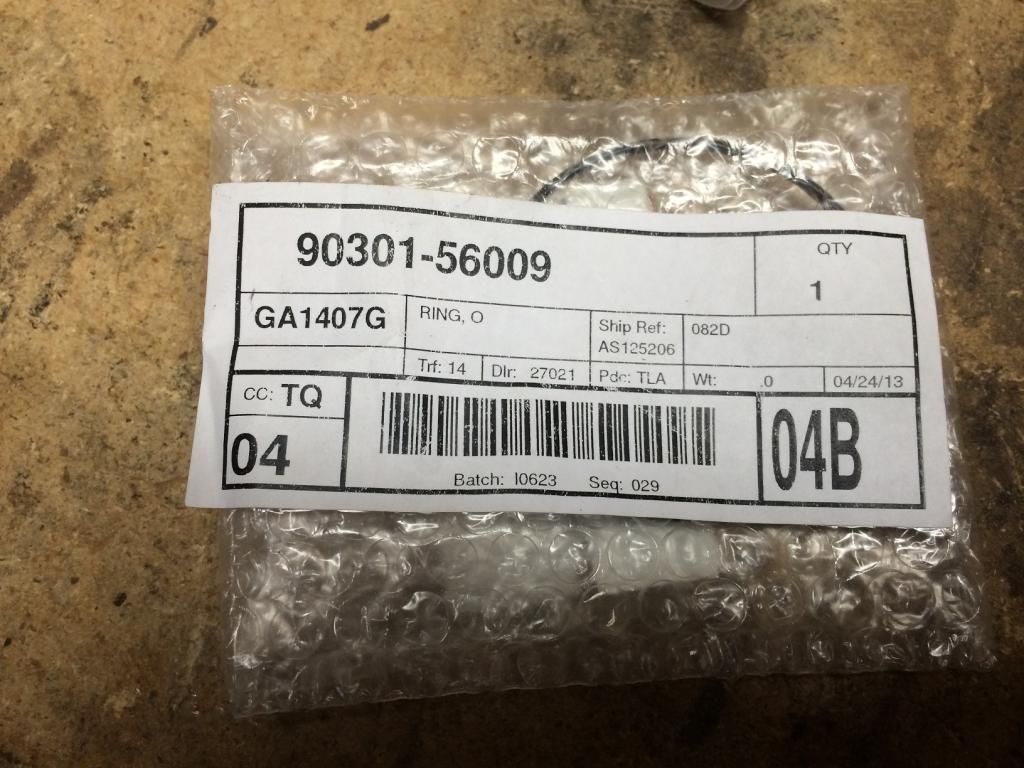
You’re going to need parts and some RTV to do the job. The large o-ring you can get from Toyota, the part number is 90301-56009 and it cost me a little under $8.00. The other 2 seals you will need are from Colonial Seal, they can’t be purchased through Toyota unless you buy the entire shift motor, ranging around the $1000 mark. The part description is “AS 15x23x7 NBR – Oil seal” and they were about $3.45 a piece when I purchased them. I ordered 5 of them just to have some spares. Check out this thread here…
HERE and special thanks to “
geurillawarfare” for posting up where to acquire these seals from.
I used Ultra Black RTV to reassemble the case. The only specialty tool I needed was a 3 jaw puller, a two would work also. Everything else was basic hand tools.
Pulling the transfer case was actually really easy; it literally took me 45 minutes to get it out once I had the runner up on jack stands. I used the FSM as a reference, but don’t follow it verbatim! It says you have to remove the transmission and the transfer case to pull the t-case; you DO NOT have to do this!
• Remove the rear drive shaft completely so you’re not trying to work around it.
• Just unhook the front driveshaft from the transfer case and let it hang out on the cross member.
• Drain the fluid from the T-case
• Unhook the breather line from up on top of the T-case and let it hang
• Unhook the electrical connector from the shift motor
• There are two brackets that hold the electrical harness for the t-case, one is held on by a t-case to trans bolt, and one is held on by a t-case bolt. I just pulled both these bolts and let the harness hang down by the transmission. The bolts had to be removed anyway.
• If you have a transmission jack, nows the time to put it under the transfer case, I didn’t, so I used a floor jack to hold the weight of the case. Remove the 8, 12mm bolts that hold the t-case to the transmission. Rock it back and forth a little bit and it should slide right out of tail end of the transmission. Be careful not to tear up the seal on the tail of the trans. An extra pair of hands would be helpful here; I had my wife run the jack while I steadied the transfer case down to the floor.
My workbench wasn’t really big enough to work on the t-case, so I did all the work on the floor on an old piece of cardboard to try to keep the mess to a minimum. The case comes apart pretty easily.
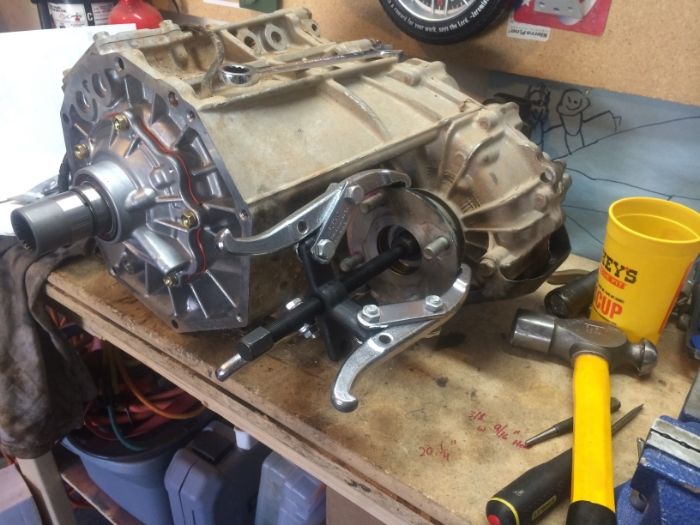
• Remove the front driveshaft drive flange nut. I just used my Ryobi impact and it took it right off.
• Use a 2 or 3 jaw puller to remove the drive flange.
• Remove 4, 12mm bolts and the factory “skid plate”.
• Remove the 12, 12mm bolts around the parameter of the T-case
• Now pry the two case halves apart to break the factory seal. I found a place to start it where I could pry without prying on the sealing surface.
NOTE: Take special care not to nick the sealing surface!
• Separate the two halves.
Note: the only loose pieces that may fall out when you separate the case, is the input shaft needle bearing, no big deal, I’ll show you where it goes later.
•
Take the front case half and sit it upside down on something to let all of the oil drain out of it, this will help you greatly later when you go to reassemble the case halves!

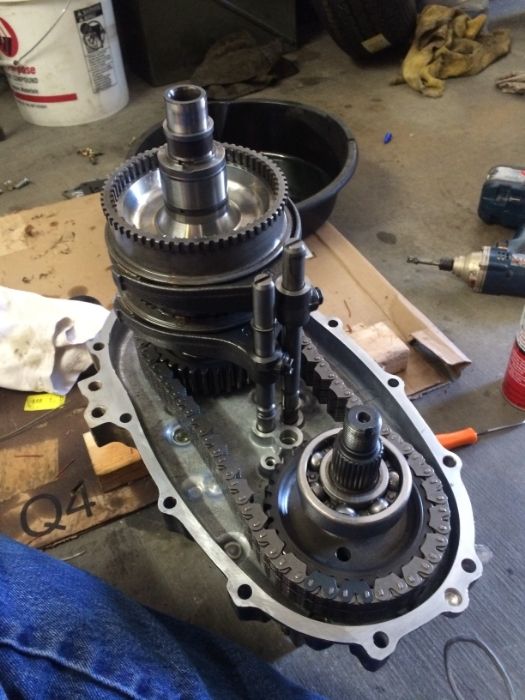
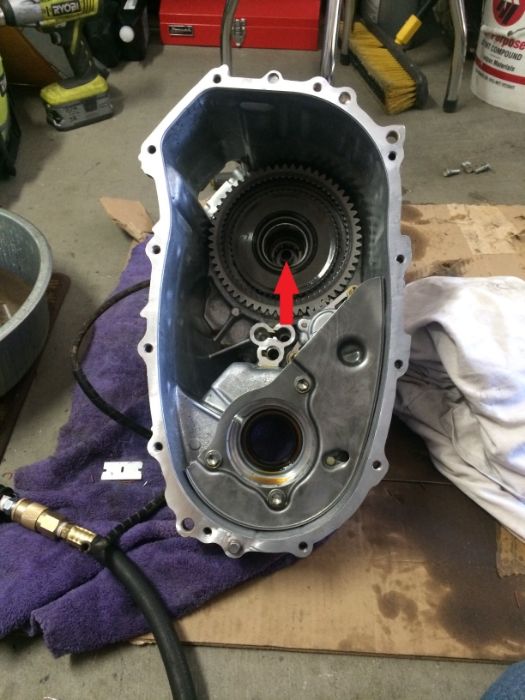
Now that you have the halves separated you can get into the case to remove the shift motor.
• Remove the 3 c-clips from the shift rails.
• Remove the 2, 12mm bolts from the shift forks
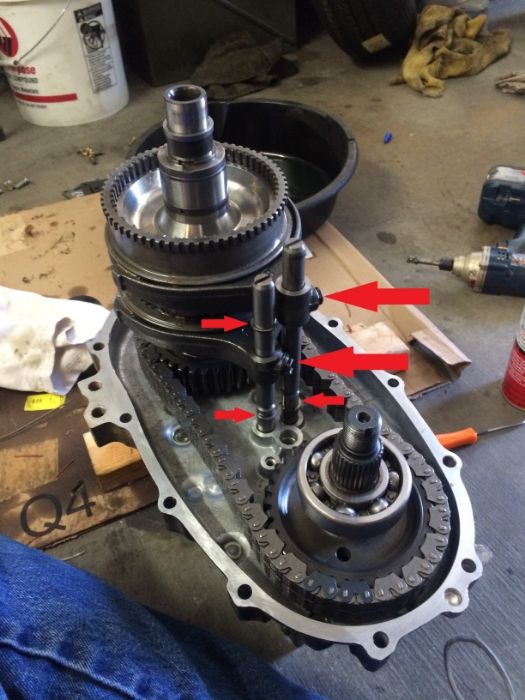
• Slide the shift forks and the corresponding shift assembly off the shafts and gears.
Note: not sure if it matters, but I marked the gear drums when I pulled them off to make sure they went back together the same way.
• The last step is to pull the 3, 12mm bolts that hold the shift motor to the t-case and remove the shift motor. I had to wiggle the shaft a little bit to get it out of the case, shouldn’t take too much though.
Once you have the shift motor out, you can replace the o-ring and 2 shaft seals.
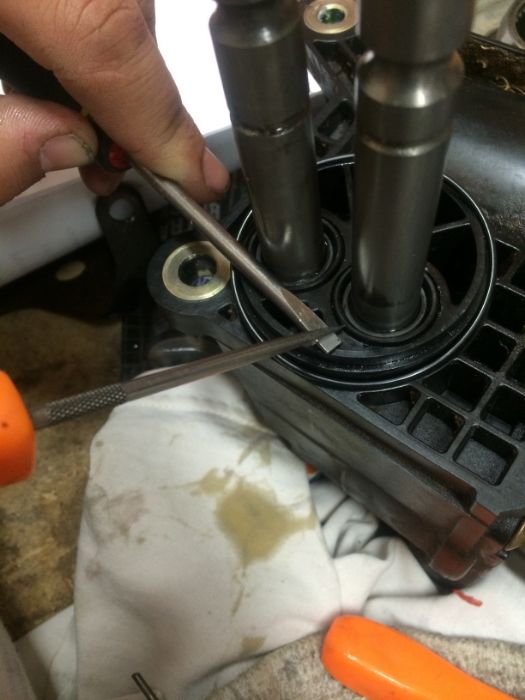
• Remove the single phillips screw on the top of the front of the shift motor where the 2 shift rods come out.
• Remove the old O-ring
• I used 2 sharp picks to pry up the two shaft seals, one to pry with and one to spread the load out, don’t pry against the plastic shift housing or you WILL dent it!
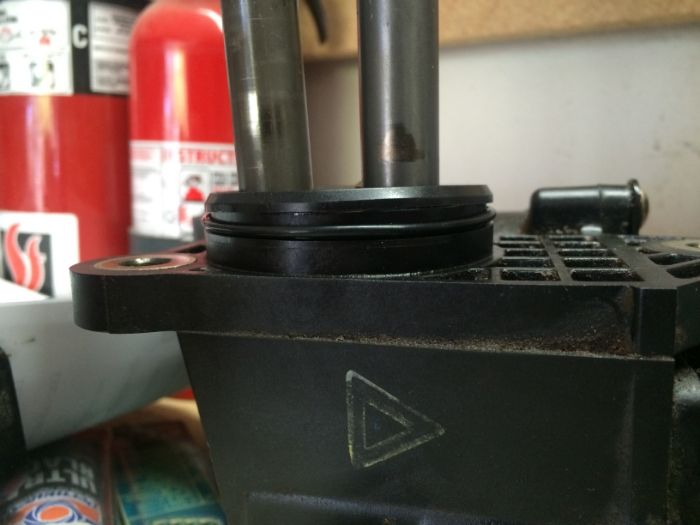
• There are a couple of detents on the shift shafts, wrap them in electrical tape, put some oil on the inside of the new seals, and slide them on being careful not to tear the new seal on the edges. (Electrical tape) should help with this. I was able to push the shaft seals into the shift motor housing most of the way. Then use a long pipe or a dull punch and work your way around the seal to finish seating it. Work slowly here so you don’t tear up the new seals.
• Install your new O-ring (I dipped it in oil first to help it slide into the T-case)
• Reinstall the plastic cover with the Philips screw.
Ready to go back in…
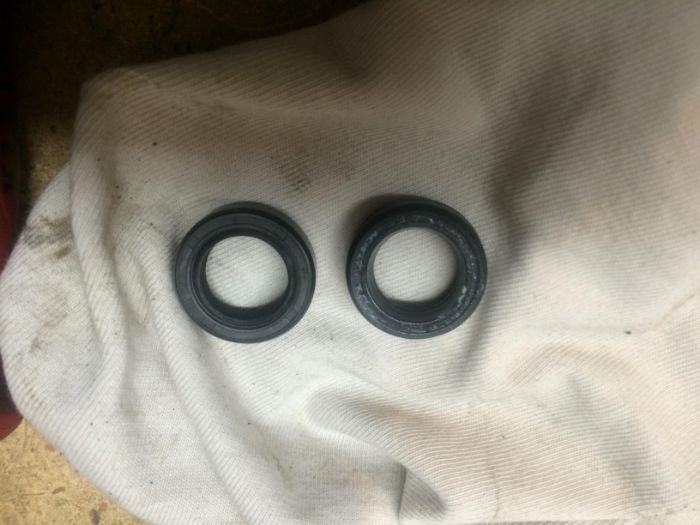
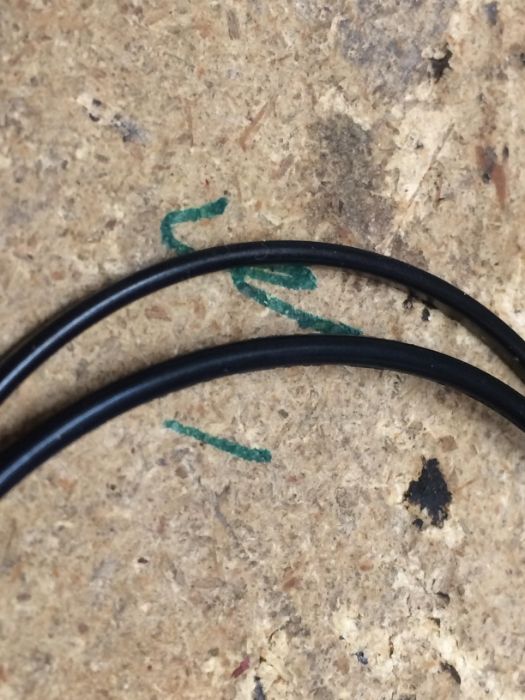
Here’s a look of the old shaft seals vs. the new. The new ones definitely looked a lot better. Also is a picture of the new vs. old outer o-ring, a huge difference between the two. The old one was flat and dried out.
Now you’re ready to reinstall everything, and installation really is reverse of removal!
• Reinstall the shift motor and 3, 12MM bolts. Make sure the o-ring slides into the housing easily.
• Reinstall the shift forks, gears, and the 3 c-clips.
• Sit the rear case upright for reassembly; I sat the rear drive flange on a 2x4 and the shift motor on the ground, puts the case in a nice level position to work with.
Before you put the cases back together you have to make sure the two mating surfaces are clean of all old RTV. I scrapped it with a razor blade and then wire brushed everything, taking special care not to get any of the old material down in the cases. Finally, wipe both sides with some brake clean or some type of non-residue cleaner.
Note: The last thing you need to be sure of before you reassemble the T-case, is that your input shaft needle bearings and spacer are sitting on the input shaft.
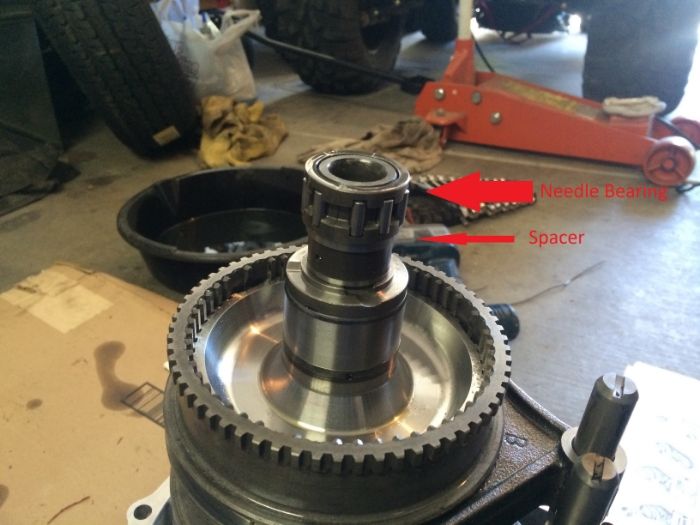
If the needle bearing didn’t fall out during disassembly, it could still be here in the case front:
• Then use RTV per RTV’s instructions and slide the case halves back together, listening to make sure you don’t knock the needle bearings off the input shaft. You’ll hear it fall if you do.
• Reinstall your 12, 12mm bolts and torque to spec.
• Reinstall your front drive flange, nut, and torque to spec. Re-stake the front flange nut.
No special tricks here, you’re ready to reinstall into the truck, add oil, and clean your driveway!
The entire job shouldn’t take more than 4 or 5 hours. Most of my time was spent cleaning up the case halves before reassembly, and letting the RTV cure some before I started handling it. I used less than 2 quarts of Mobil 1 full synthetic 75W-90 to refill.
Like I said at the beginning, have your FSM handy and reference it for most of the intermediate step pictures. Hope this helps someone else and gives you an idea of how to fix this problem without tearing the shift motor apart.
“MandAtaco”


 !
! 
 Linear Mode


