Home Menu

Site Navigation


User Tag List

Reply
 
Thread Tools Rate Thread Display Modes
Old 02-15-2015, 01:38 PM #16
Doc_Fry's Avatar
Doc_Fry Doc_Fry is offline
Member
 
Join Date: Dec 2014
Location: Cherry Log, GA
Age: 51
Posts: 581
Real Name: Steve Fry
Doc_Fry is on a distinguished road
Doc_Fry Doc_Fry is offline
Member
Doc_Fry's Avatar
 
Join Date: Dec 2014
Location: Cherry Log, GA
Age: 51
Posts: 581
Real Name: Steve Fry
Doc_Fry is on a distinguished road
Quote:
Originally Posted by drsus View Post
this sounds awesome man, project sounds like a lot of fun

oh yeah... thank you for your service ;) you're are part of a unique species of man that earned the right to always hold its head up high.
You should have seen my D90!
__________________
15 TRD Pro Build Thread - OIF 09-10 - Combat Disabled Army Veteran - Purple Heart - Combat Medical Badge

Note: Dont get all butthurt because my grammar is terrible. See above and consider this before you stick your foot in your mouth. Also, I do post from an i-Device so words tend to get garbled and misspelled. I cant believe I have to out this here.
Doc_Fry is offline   Reply With QuoteReply With Quote
Old 02-15-2015, 05:42 PM #17
transworldmoto's Avatar
transworldmoto transworldmoto is offline
Member
 
Join Date: Aug 2014
Location: San Jose, Ca
Posts: 232
Real Name: Ben
transworldmoto is on a distinguished road
transworldmoto transworldmoto is offline
Member
transworldmoto's Avatar
 
Join Date: Aug 2014
Location: San Jose, Ca
Posts: 232
Real Name: Ben
transworldmoto is on a distinguished road
Nice. The OPLATs (ABOT and KAOT) are something like 4 miles south of the exit/entrance of the Tigris/Euphrates River. We were actually in disputed Iranian Territory and had some interesting run-ins with the Iranian Navy and some terrorist fishing dhows. Good times.
transworldmoto is offline   Reply With QuoteReply With Quote
Old 02-15-2015, 06:21 PM #18
drsus's Avatar
drsus drsus is offline
Member
 
Join Date: Dec 2014
Location: los angeles
Age: 51
Posts: 184
Real Name: Nic
drsus is on a distinguished road
drsus drsus is offline
Member
drsus's Avatar
 
Join Date: Dec 2014
Location: los angeles
Age: 51
Posts: 184
Real Name: Nic
drsus is on a distinguished road
Quote:
Originally Posted by Doc_Fry View Post
You should have seen my D90!
oh i bet it was sweet man...i almost pulled the trigger on a td300 conversion 110 2 years ago but the guy wanted way too much
drsus is offline   Reply With QuoteReply With Quote
Old 02-15-2015, 08:15 PM #19
Doc_Fry's Avatar
Doc_Fry Doc_Fry is offline
Member
 
Join Date: Dec 2014
Location: Cherry Log, GA
Age: 51
Posts: 581
Real Name: Steve Fry
Doc_Fry is on a distinguished road
Doc_Fry Doc_Fry is offline
Member
Doc_Fry's Avatar
 
Join Date: Dec 2014
Location: Cherry Log, GA
Age: 51
Posts: 581
Real Name: Steve Fry
Doc_Fry is on a distinguished road
Quote:
Originally Posted by transworldmoto View Post
Nice. The OPLATs (ABOT and KAOT) are something like 4 miles south of the exit/entrance of the Tigris/Euphrates River. We were actually in disputed Iranian Territory and had some interesting run-ins with the Iranian Navy and some terrorist fishing dhows. Good times.

[Edit] If you read what I posted well disregard. Had to look at a map ha. I was correct. Just remember there special force guys coming in recruit insurgents and trying to blow us to hell. After they learned not to engage us with contact. Other than that lots of boarder skirmishes with them on the wrong side of the boarder. I absolutely despised the place and the people. You could not turn around without someone watching your six. So many lies so many criminals so many piece of dirt.
__________________
15 TRD Pro Build Thread - OIF 09-10 - Combat Disabled Army Veteran - Purple Heart - Combat Medical Badge

Note: Dont get all butthurt because my grammar is terrible. See above and consider this before you stick your foot in your mouth. Also, I do post from an i-Device so words tend to get garbled and misspelled. I cant believe I have to out this here.

Last edited by Doc_Fry; 02-16-2015 at 12:22 AM.
Doc_Fry is offline   Reply With QuoteReply With Quote
Old 02-21-2015, 12:46 AM #20
Doc_Fry's Avatar
Doc_Fry Doc_Fry is offline
Member
 
Join Date: Dec 2014
Location: Cherry Log, GA
Age: 51
Posts: 581
Real Name: Steve Fry
Doc_Fry is on a distinguished road
Doc_Fry Doc_Fry is offline
Member
Doc_Fry's Avatar
 
Join Date: Dec 2014
Location: Cherry Log, GA
Age: 51
Posts: 581
Real Name: Steve Fry
Doc_Fry is on a distinguished road
Console Vault

All but weary I ordered the console vault based off of the reviews of others. I had to call to order and everything went smoothly and was advised they offered .mil pricing I jumped on console vault with the rotary lock.

I received the vault it was well packaged. Very sturdy even though this was a concern before I ordered it, not many picture or reviews really explained how the box was made and the real quality. I would compare it to a beside safe a far a steel and strength the type that you find in Gander Mountain and the such.. The construction was well thought out no rough edges, the welds are well done. They did upgrade me at no cost to the 4 digit combo lock. A great surprise.


Doc's Build


I installed the console using the supplied bolts. I had no difficulty with the length of the bolts but would recommend getting two washers, one for each bolt. They are not supplied with the kit. You will need a 10mm socket with a long extension to effectively remove and install the bolts. You will first remove the piece of carpet at the bottom of the console. The proceed to remove the divider in the console as well. Make sure that all items are removed from the console.


Now would be the time to set the combination on the lock. Refer to the manual for how to proceed with this as it will change depending on your lock type. After you complete this remove all supplied items from the console and fit into the factory space. It should fit snugly but without difficulty. If there is a problem here stop and make sure nothing interferes. Apply the washers to the bolt and proceed to insert the bolts and hand tightens them. A tip here, you can lift on the factory console to help line up the bolt holes. After you get both holes hand tightened proceed to tighten them down with a wrench then you can torque them to the factory specs if you wish. Which I do not have. You can put in the rubber liner provided. I also reused the factory carpet as well. Bag and label your factory bolts and divider if you ever need them later and store. Test the function of the unit and enjoy.

Installed:


I plan on installing velcro on the sides to mount a holster for my G19 as well as the velcro type admin organizers for a few mags, a multi tool. I also plan on adding a Fenix rechargable light in there using the power source to charge it as well as a blow out mdical kit. On the other side will be a holster for my wifes G42 as well as a mag for when traveling or going into certain buildings.
__________________
15 TRD Pro Build Thread - OIF 09-10 - Combat Disabled Army Veteran - Purple Heart - Combat Medical Badge

Note: Dont get all butthurt because my grammar is terrible. See above and consider this before you stick your foot in your mouth. Also, I do post from an i-Device so words tend to get garbled and misspelled. I cant believe I have to out this here.

Last edited by Doc_Fry; 02-21-2015 at 08:45 PM.
Doc_Fry is offline   Reply With QuoteReply With Quote
Old 02-21-2015, 12:53 AM #21
Doc_Fry's Avatar
Doc_Fry Doc_Fry is offline
Member
 
Join Date: Dec 2014
Location: Cherry Log, GA
Age: 51
Posts: 581
Real Name: Steve Fry
Doc_Fry is on a distinguished road
Doc_Fry Doc_Fry is offline
Member
Doc_Fry's Avatar
 
Join Date: Dec 2014
Location: Cherry Log, GA
Age: 51
Posts: 581
Real Name: Steve Fry
Doc_Fry is on a distinguished road
Forgot to say that I picked the 4Runner up. Was going to take some pictures but having some issus with the dealer messing up the pant and wpider webbing it. I am getting the paint restored tommorrow since the dealer wants to play hard ball. Take lots of pictures bill there ass since the want to get SET involved when all it was was there guys washing it with a dirty rag stupidity. Now an extra $300 out of my pocket to get it right since I now dont trust them. And time here is very short. I will als Opti-Coat the vehicle when it comes back from the detailers. So I should have no further issues. I have done many other little things the past few days but will space out the posts a little bit.. Enjoy!
__________________
15 TRD Pro Build Thread - OIF 09-10 - Combat Disabled Army Veteran - Purple Heart - Combat Medical Badge

Note: Dont get all butthurt because my grammar is terrible. See above and consider this before you stick your foot in your mouth. Also, I do post from an i-Device so words tend to get garbled and misspelled. I cant believe I have to out this here.
Doc_Fry is offline   Reply With QuoteReply With Quote
Old 02-21-2015, 09:20 PM #22
Doc_Fry's Avatar
Doc_Fry Doc_Fry is offline
Member
 
Join Date: Dec 2014
Location: Cherry Log, GA
Age: 51
Posts: 581
Real Name: Steve Fry
Doc_Fry is on a distinguished road
Doc_Fry Doc_Fry is offline
Member
Doc_Fry's Avatar
 
Join Date: Dec 2014
Location: Cherry Log, GA
Age: 51
Posts: 581
Real Name: Steve Fry
Doc_Fry is on a distinguished road
Icon Lower Links

I purchashed these gently used off of the fj forum. I ended up replacing both bushings and teflon skid.

Install time about an hour
Difficulty if you can turn a wrench you can do this
Tools: Good set of Metric sockets and Wrench, Wrenches. Breaker Bar. Pliers
Optional: Torque Wrench

First you want to clean them up make sure they are serviceable. I found it easier to be on an even concreted surfice. First locate you Lower link attach to each sizde is a 10mm bolt holding various braking components. I next removed the bolt on the passenger side. Notice orentation of the bolt. You will need a breaker bar to remove an a 19mm Socket. At this time just remove the nut. We are going to do one side at a time. Now we need to go to the rear following the same directions. Yet, we can remove the bolt when finished. Note: Hold on to the link when removing the bolt and gently lower to the ground. Do the same for the front bolt. We will now install the Icons.

Before i mentioned something about bolt orientation, if you forgot take a look at the other side! Take the icon and set down the bushing end towards the axel the joint towards the frame.

This is the Joint end just in case there was any confusion


Now go ahead and put the bolt through. The orientaion is with the teflon skid on the bottom. Place the nut on and hand tighten.

Now go to the rear using the other side for reference and do the same. Making sure you have a nut on there. You can tighten this one down with the wrench, just dont torque it down yet. We will now need the plier to bend the tab on the bracket to properly fit the alignment hole on the lower link. Once this is done and the holes line up use the factory hardware to reinstall with the 10mm. Tighten down with the wrench.

Now we will go back to the front and tighten down with the wrench. Inspect then torque down all items. Toyota recommends 40flbs on the lower link bolts. Rinse and repeat for the other side enjoy.

If you need to adjuct the lower link refer to Icon directions it is pretty self explanitory as is this installation. You are just centering the axel.


__________________
15 TRD Pro Build Thread - OIF 09-10 - Combat Disabled Army Veteran - Purple Heart - Combat Medical Badge

Note: Dont get all butthurt because my grammar is terrible. See above and consider this before you stick your foot in your mouth. Also, I do post from an i-Device so words tend to get garbled and misspelled. I cant believe I have to out this here.
Doc_Fry is offline   Reply With QuoteReply With Quote
Old 02-21-2015, 09:41 PM #23
cd121082 cd121082 is offline
Member
 
Join Date: Aug 2013
Location: Washington
Posts: 603
cd121082 is on a distinguished road
cd121082 cd121082 is offline
Member
 
Join Date: Aug 2013
Location: Washington
Posts: 603
cd121082 is on a distinguished road
Quote:
Originally Posted by Doc_Fry View Post
All but weary I ordered the console vault based off of the reviews of others. I had to call to order and everything went smoothly and was advised they offered .mil pricing I jumped on console vault with the rotary lock.

I received the vault it was well packaged. Very sturdy even though this was a concern before I ordered it, not many picture or reviews really explained how the box was made and the real quality. I would compare it to a beside safe a far a steel and strength the type that you find in Gander Mountain and the such.. The construction was well thought out no rough edges, the welds are well done. They did upgrade me at no cost to the 4 digit combo lock. A great surprise.


Doc's Build


I installed the console using the supplied bolts. I had no difficulty with the length of the bolts but would recommend getting two washers, one for each bolt. They are not supplied with the kit. You will need a 10mm socket with a long extension to effectively remove and install the bolts. You will first remove the piece of carpet at the bottom of the console. The proceed to remove the divider in the console as well. Make sure that all items are removed from the console.


Now would be the time to set the combination on the lock. Refer to the manual for how to proceed with this as it will change depending on your lock type. After you complete this remove all supplied items from the console and fit into the factory space. It should fit snugly but without difficulty. If there is a problem here stop and make sure nothing interferes. Apply the washers to the bolt and proceed to insert the bolts and hand tightens them. A tip here, you can lift on the factory console to help line up the bolt holes. After you get both holes hand tightened proceed to tighten them down with a wrench then you can torque them to the factory specs if you wish. Which I do not have. You can put in the rubber liner provided. I also reused the factory carpet as well. Bag and label your factory bolts and divider if you ever need them later and store. Test the function of the unit and enjoy.

Installed:


I plan on installing velcro on the sides to mount a holster for my G19 as well as the velcro type admin organizers for a few mags, a multi tool. I also plan on adding a Fenix rechargable light in there using the power source to charge it as well as a blow out mdical kit. On the other side will be a holster for my wifes G42 as well as a mag for when traveling or going into certain buildings.
U mind posting a pic of how it looks inside after the vault was installed
__________________
2013 SR5 Toyota 4Runner Classic Silver Metallic| Line-X-Westin Grill Guard | KC 121 Spot Lights | Toyota Rock Warrior Shifter Knob | Chrome Tip | DeeZee Running Boards | Factory Crossbars | OEM Mud Guards | Weathertech Digifits Mats | OEM All Weather Cargo Mat | K&N Drop In | Interior LED Lights |
cd121082 is offline   Reply With QuoteReply With Quote
Old 02-21-2015, 09:57 PM #24
Doc_Fry's Avatar
Doc_Fry Doc_Fry is offline
Member
 
Join Date: Dec 2014
Location: Cherry Log, GA
Age: 51
Posts: 581
Real Name: Steve Fry
Doc_Fry is on a distinguished road
Doc_Fry Doc_Fry is offline
Member
Doc_Fry's Avatar
 
Join Date: Dec 2014
Location: Cherry Log, GA
Age: 51
Posts: 581
Real Name: Steve Fry
Doc_Fry is on a distinguished road
FJ Joel 4x4 Shifter

I had this part from my FJ and decided to put it on the 4Runner it is billet aluminum. Unfortunately he is no longer making them but he passed on his designs to someone else who will in the future. You will need to look around for more info.


I need to clean it up now I see!
__________________
15 TRD Pro Build Thread - OIF 09-10 - Combat Disabled Army Veteran - Purple Heart - Combat Medical Badge

Note: Dont get all butthurt because my grammar is terrible. See above and consider this before you stick your foot in your mouth. Also, I do post from an i-Device so words tend to get garbled and misspelled. I cant believe I have to out this here.
Doc_Fry is offline   Reply With QuoteReply With Quote
Old 02-24-2015, 11:18 PM #25
Doc_Fry's Avatar
Doc_Fry Doc_Fry is offline
Member
 
Join Date: Dec 2014
Location: Cherry Log, GA
Age: 51
Posts: 581
Real Name: Steve Fry
Doc_Fry is on a distinguished road
Doc_Fry Doc_Fry is offline
Member
Doc_Fry's Avatar
 
Join Date: Dec 2014
Location: Cherry Log, GA
Age: 51
Posts: 581
Real Name: Steve Fry
Doc_Fry is on a distinguished road
Dealer Induced Swirl Marks

A little update. As you can see from the pictures above I have know the status of the vehicle through every major step of the process. It left the port in tip top shape as my pictures show and brother inspected it before qc. So no issues. Anyways somewhere after that at the dealer someone screwed up pretty big and scratched up my paint pretty good. The dealer only offered to wax it and not correct the paint. I as for a Rep.

Over the weekend as I was frustrated with the dealer I ended up finding someone who could move appointments around and do it for me the next am. I had him correct the paint and it turned out great. The swirl marks in the Inferno paint are difficult to see unless in direct noon sunlight. At a bill to the tune of $300 I was happy with the result. But the dealer well you know you screwed up here bud reimburse me. More of a principle thing now.

After this I did Opti-Coat the Paint and will do a write up soon. So far great easy stuff to work with if the prep work is done correctly.

Anyway met with the rep talking to him and he looks at the paint and says man I dont see a thing. Well I hand him the receipt and some photos. He smiles and asks if I am happy with how everything looks, a yes and he says shoot an email with invoice here and I will get you reimbursed and will deal with the dealer.

Not a normal outcome so quickly. i would just let you know one avenue you can take if you properly document your issues and are tired of the dealer or are tome constraints as me and it lowers stress levels for sure to not deal with 50 people. That there are other ways of handling things. And whenever you pick up a new car make sure after you are handed the keys before you sign your final paperwork walkthrough and have them document everything as well as you. Remember it is a new car, no sense in getting a new car with year old looking paint or settling for wax that will wear off. Doesnt matter if the vehicle is dark or light it is not supposed to be that way! good luck and carry on!
Doc_Fry is offline   Reply With QuoteReply With Quote
Old 03-17-2015, 09:26 AM #26
BlacknTan's Avatar
BlacknTan BlacknTan is offline
Member
 
Join Date: Feb 2015
Location: NY
Posts: 398
Real Name: Bill
BlacknTan is on a distinguished road
BlacknTan BlacknTan is offline
Member
BlacknTan's Avatar
 
Join Date: Feb 2015
Location: NY
Posts: 398
Real Name: Bill
BlacknTan is on a distinguished road
Looking great so far!!

I'm jealous ...
BlacknTan is offline   Reply With QuoteReply With Quote
Old 03-17-2015, 09:32 PM #27
Doc_Fry's Avatar
Doc_Fry Doc_Fry is offline
Member
 
Join Date: Dec 2014
Location: Cherry Log, GA
Age: 51
Posts: 581
Real Name: Steve Fry
Doc_Fry is on a distinguished road
Doc_Fry Doc_Fry is offline
Member
Doc_Fry's Avatar
 
Join Date: Dec 2014
Location: Cherry Log, GA
Age: 51
Posts: 581
Real Name: Steve Fry
Doc_Fry is on a distinguished road
Thanks!

A quick update. Finally got in items to fully clean the ruck and protect it as I like with a spray type wax. Made it super easy to clean. Used a pressure washer, the plug in kind, to spray it off then the optimum car wash to was it with a microfiber wash mitt rag thingy with a bucket that I put in a screen on the bottom as to not pickup dirt. Afterwards I wiped the truck down with a microfiber rag, then I sprayed on the Optimum spray wax, tip do one area at a time, then wiped it down leaving it clean and super slick. I then cleaned off the windows with Invisible Glass. Afterwords i used a 3m tire dressing which is water based and a matte finish. Made the tires look new. I am super pleased so far with the system and how well the Opticoat has made clean up much easier to keep it looking pristine. I am not a professional by far but have had many years cleaning and maintaining vehicles and this by far is the most complete easiest system that I have used. If my broken ass can do the whole truck in two hours most should be able to do in about an hour or hour and a half. Not half bad for using about abuckets worth of water and the time that I did it one. And to reinterate i live down a forest road and had all kinds of dirt, mud, amd debrie on the vehicle. I plan on doinf the was part two to three times a year.

On another note I called Gobi today to check the status of my rack since I am at the 8 week mark. I was told that they where packaging it up and would have it shipped to me this week. I already ordered a 40" curved Led Light Bar that Gobi customized the rack for from Desert Runner. I also ordered a 32" light bar this week for behind the grill. After I cleaned the vehicle yesterday I applied clear bra behind the door handles. Came out very good. Still need to hit it with a heat gun to get out the bubbles, I plan on doing the door edges also as well as under the rack fairing. I ordered a light kit for under the hood as well. I already have on hand ready to install Icon billet UCAs and Toytec Baja spacers that compress the spring to help ofset weight added later on wi the winch that I still need to order. I did get in switches from otrattw and oba also. It will be quite an extensive install electrically that is being held up to make a electrical switching box with ten or so separate circuits and relays.

Sliders are ordered from Schroxworks, my wife liked the ones with the step the best. The finalists where from Bud Built, Shroxworks, and Metal Tech. The step won out.

I did get in my refurbished and updated Valentine One as well and will install when the circuit is complete. I will continue to take photos and install posts when I am able to get to them. For now I hope this wets many appetites.

I am working tomorrow on the FJ and may begin to remove the second battery for i stall on the FJ depending on how I feel. Look,for updates too in the near future on communication systems as I come down to a decision on a disaster/off road type setup on the cheap.
Attached Images
Doc's Build-1c27a7c0-8d13-4f78-ab7b-8261afc63bb3-jpg 
__________________
15 TRD Pro Build Thread - OIF 09-10 - Combat Disabled Army Veteran - Purple Heart - Combat Medical Badge

Note: Dont get all butthurt because my grammar is terrible. See above and consider this before you stick your foot in your mouth. Also, I do post from an i-Device so words tend to get garbled and misspelled. I cant believe I have to out this here.
Doc_Fry is offline   Reply With QuoteReply With Quote
Old 03-18-2015, 03:20 PM #28
Doc_Fry's Avatar
Doc_Fry Doc_Fry is offline
Member
 
Join Date: Dec 2014
Location: Cherry Log, GA
Age: 51
Posts: 581
Real Name: Steve Fry
Doc_Fry is on a distinguished road
Doc_Fry Doc_Fry is offline
Member
Doc_Fry's Avatar
 
Join Date: Dec 2014
Location: Cherry Log, GA
Age: 51
Posts: 581
Real Name: Steve Fry
Doc_Fry is on a distinguished road
Switch Install Lighting

Today I installed the switches to power my lights that I have planned to install.

Parts:

Six Position Switch Holder V-Series Switches Link

Switches Six of them. Link

Project Difficulty:
Medium

Tools Needed:
Panel Pry Bar
Phillips Screw Driver
Dremel with cutting blade (or other cutting instrument)
Sand Paper Fine Grit
File
Exacto Knife

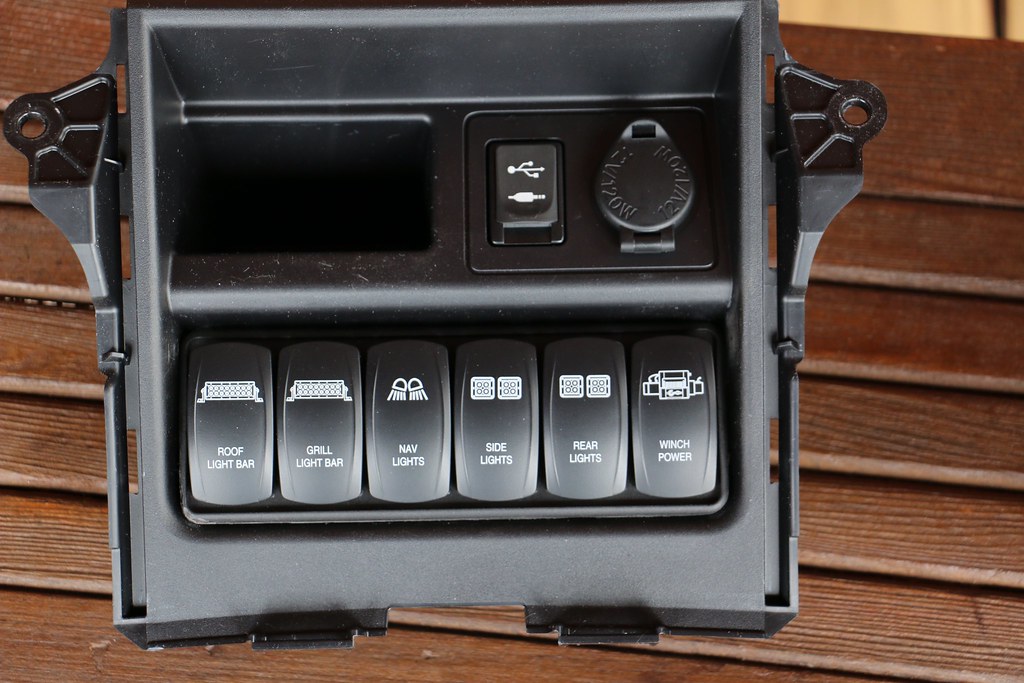
Here is the finished product:


Installation:

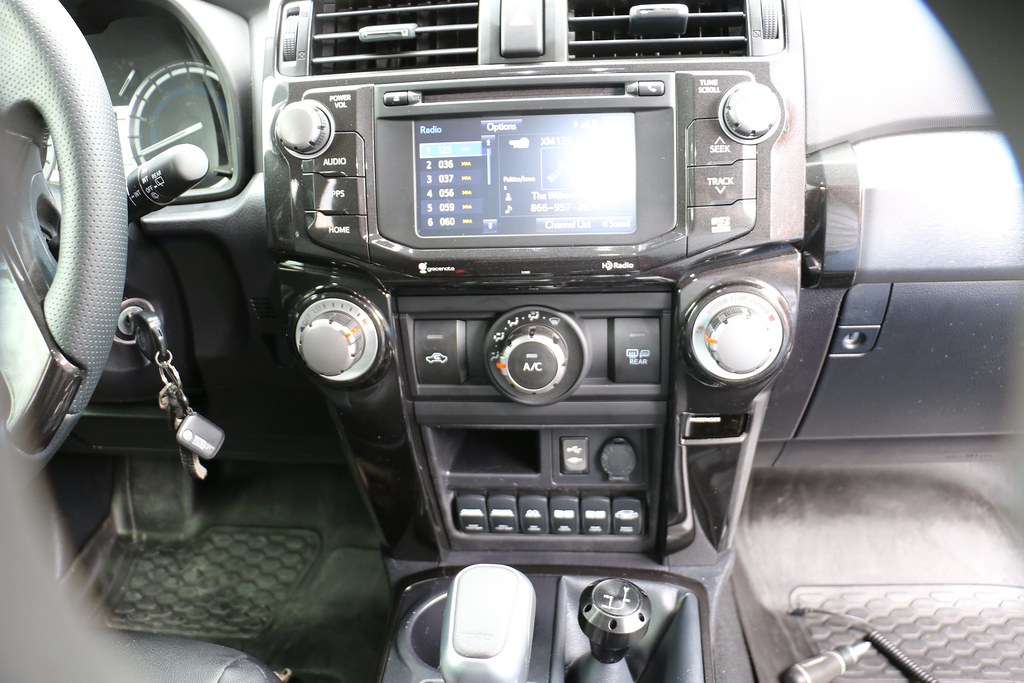
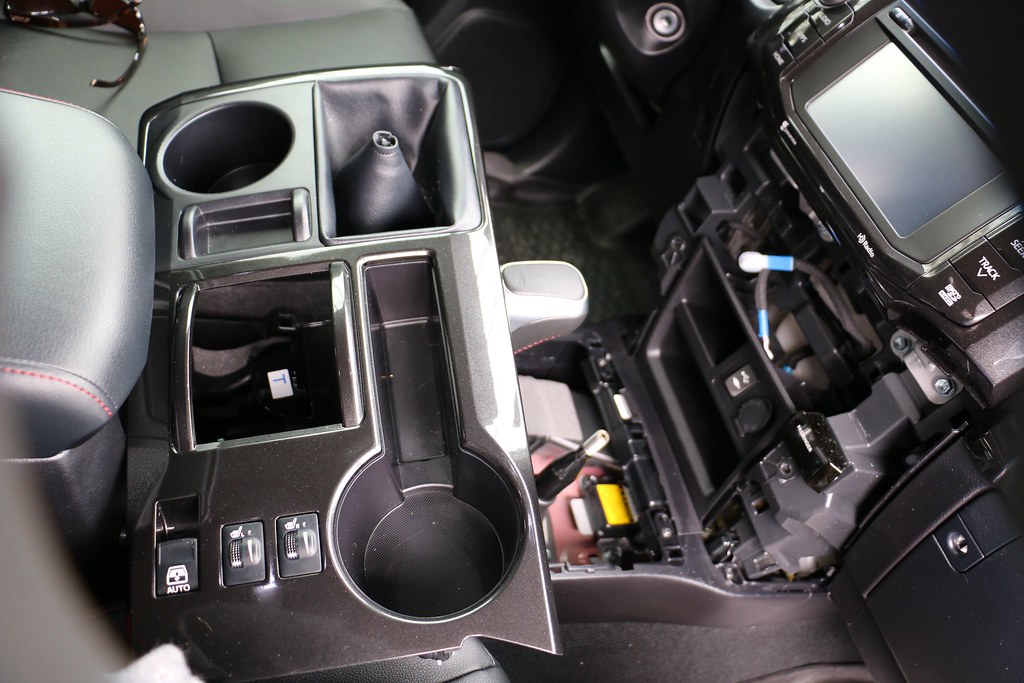
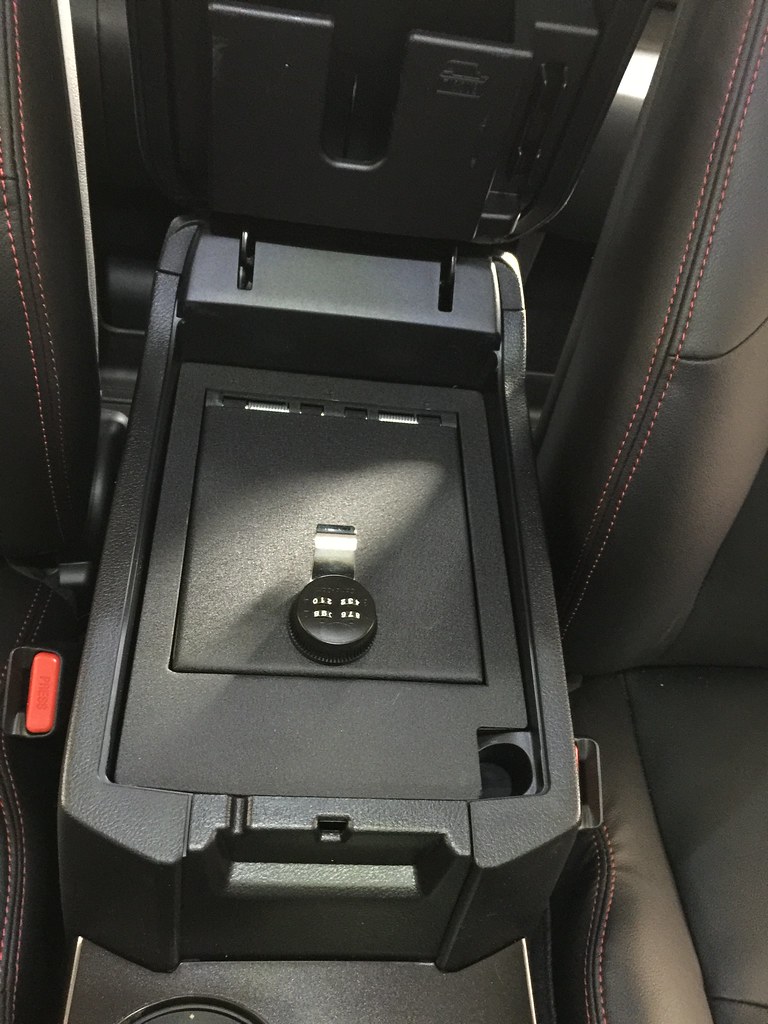
First we must remove all of the trim work to get to the part that we need to modify to fit the switches. Using a panel pry bar (can get at Harbor Freight or make your own) pry here to remove the lower panel:


The panel can now be removed by hand.

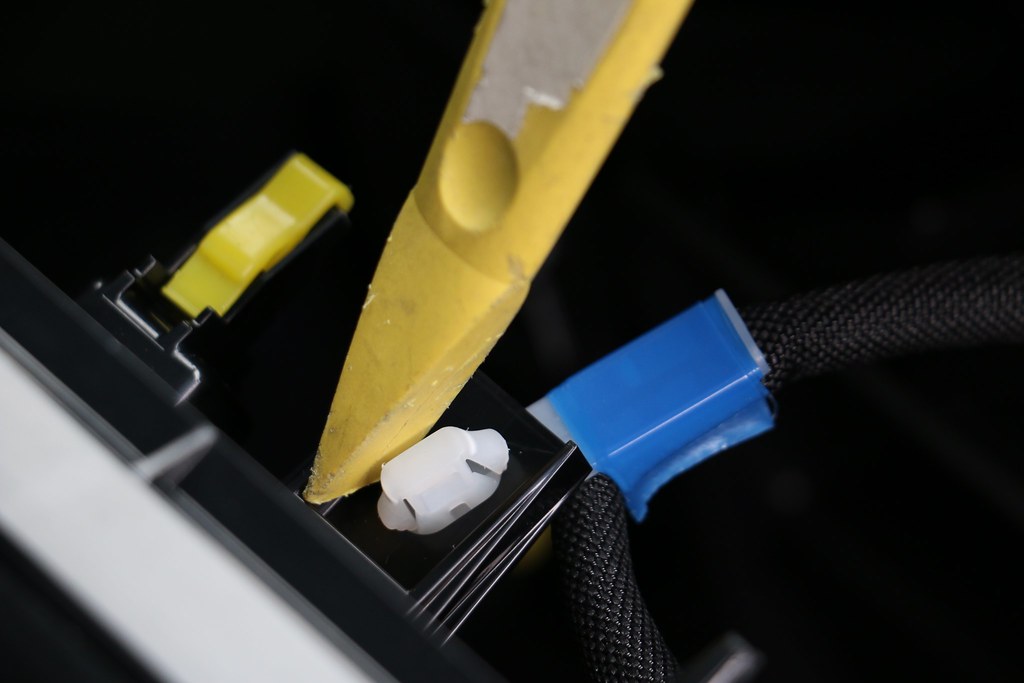
After you remove the panel use your tool to pry off the panel. You must remove the electrical connection to the panel. see the pictures below for what you need to remove. It does help using your tool to remove them.


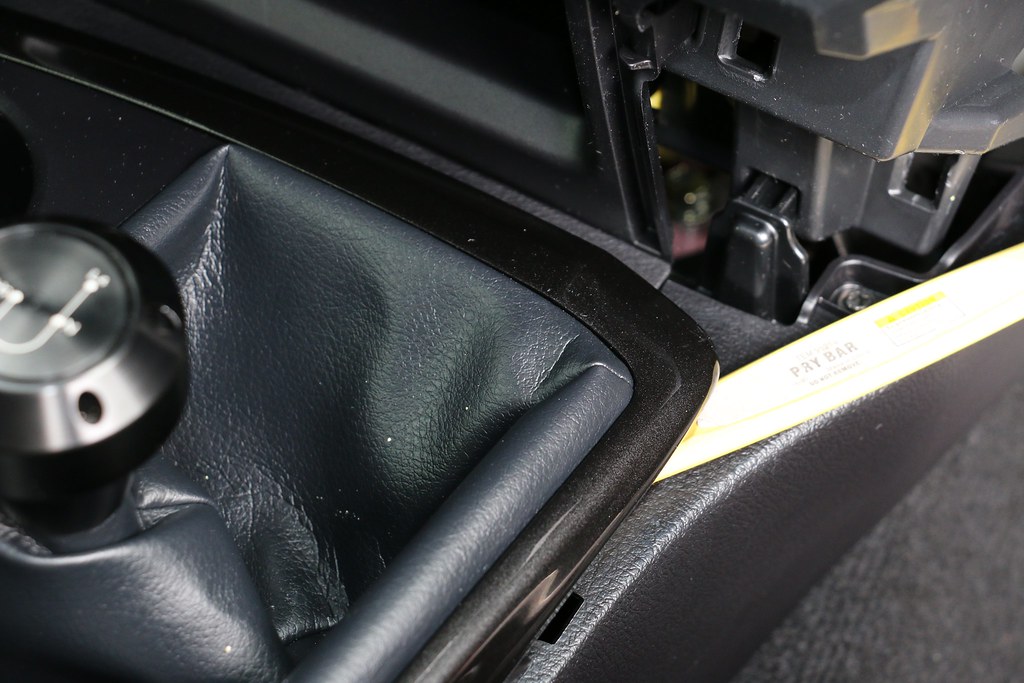
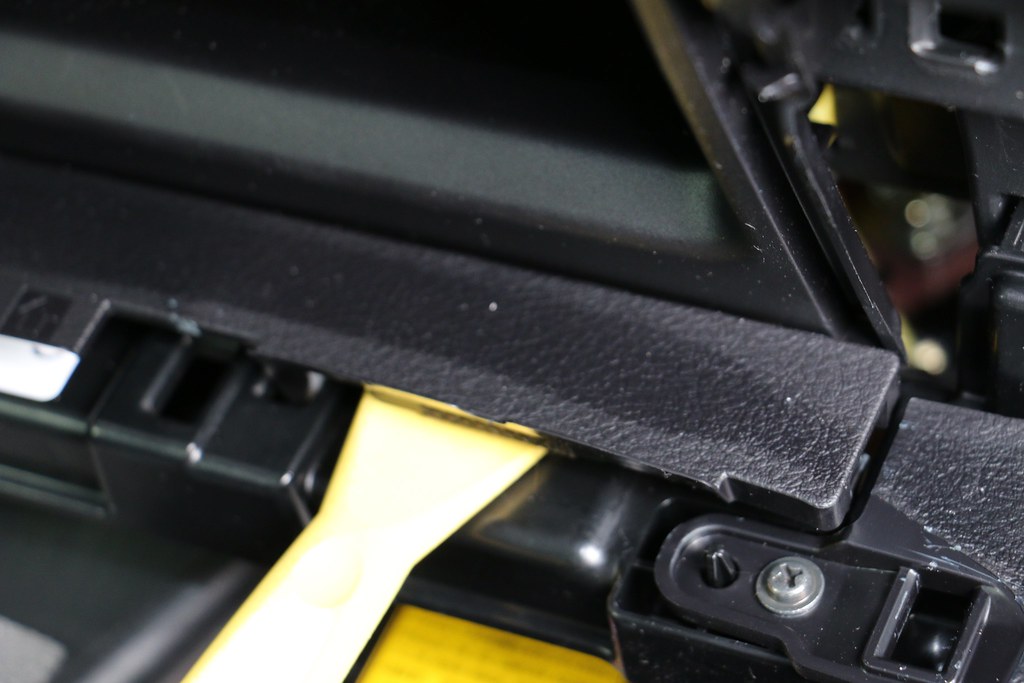
Now the panel can be set safely aside. Now we must remove the trim work around the shifter to be able to remove the panel we need. Using a pry tool lift here to begin to remove the panel at the front clip.


After you pull up you can turn the panel aside. You may need to shift the vehicle out of park to do so.


You can now remove the small trim panel shown.


After this is remove you must remove the two screws that hold on the panel. Using a phillips screw driver to do so.


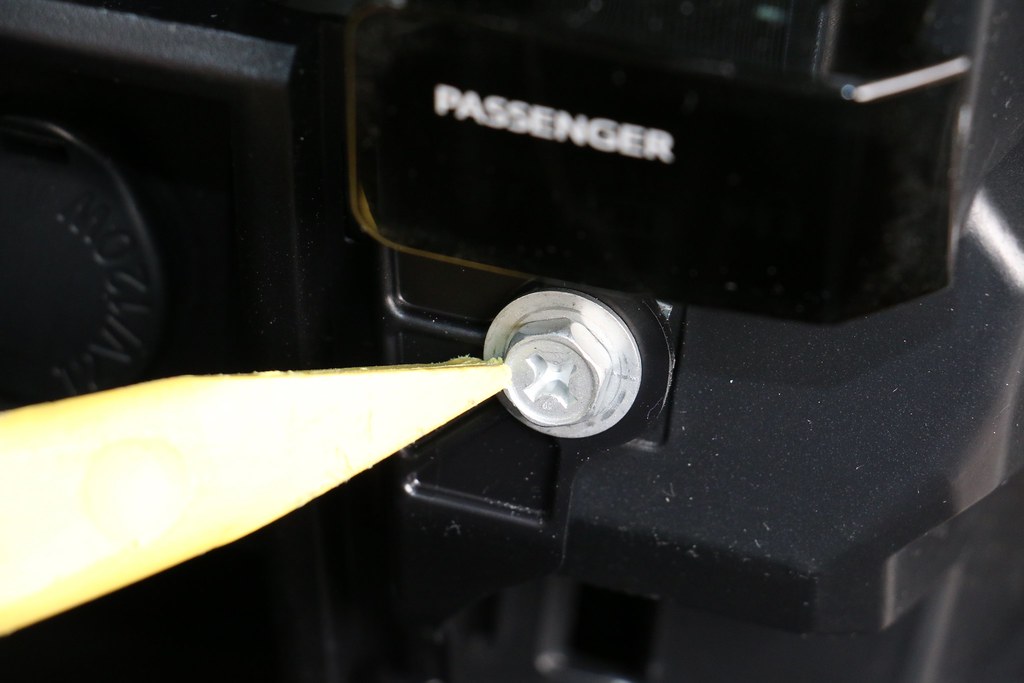
You can now use your hand to pull the panel out.


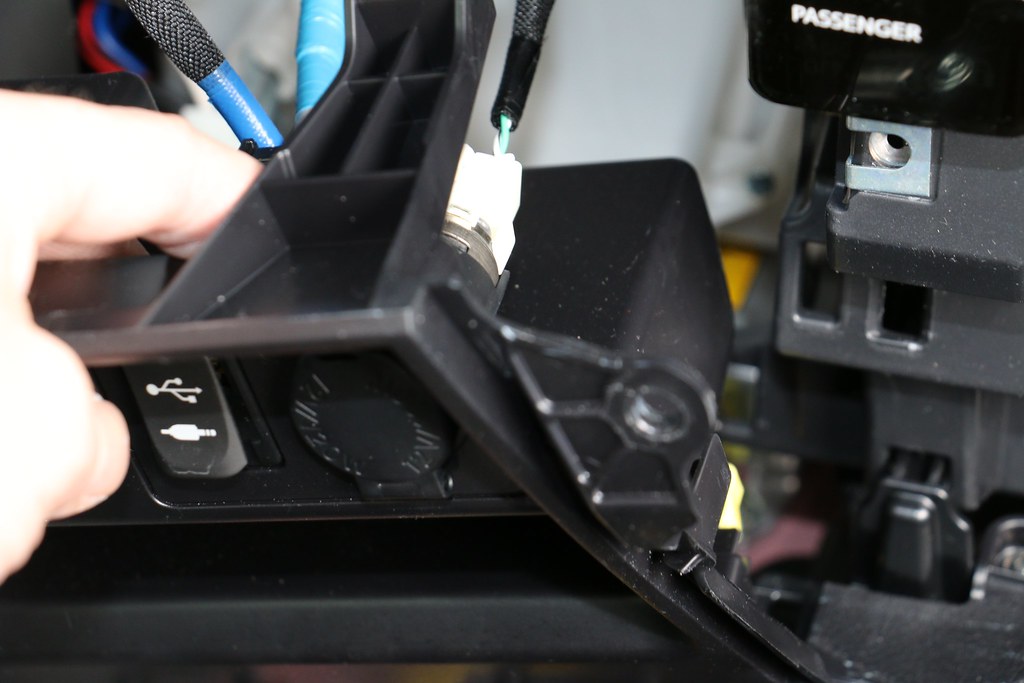
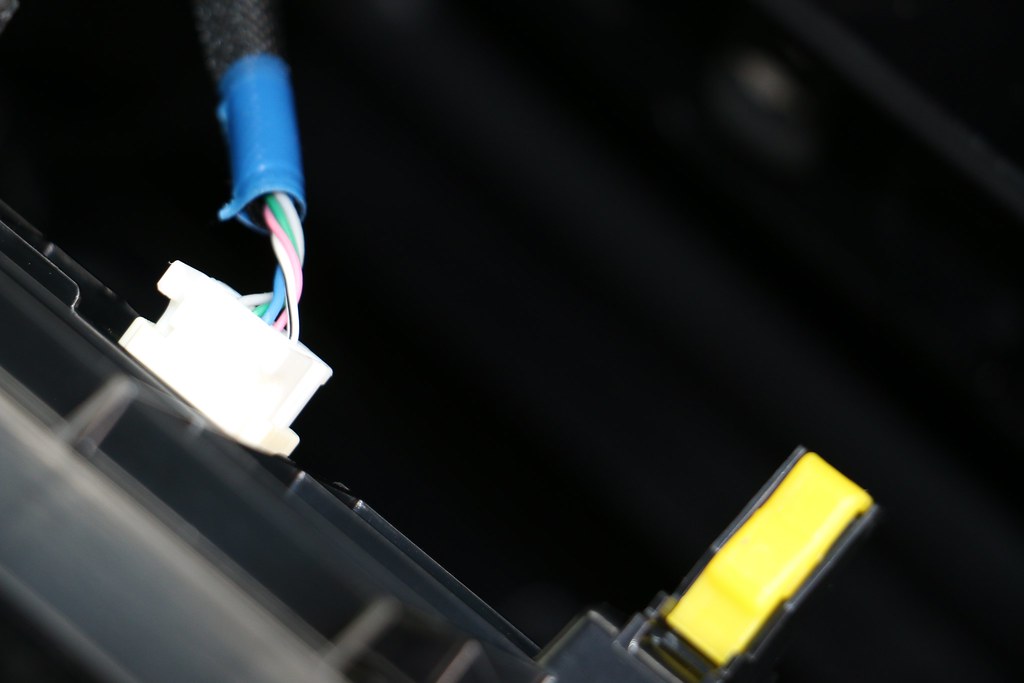
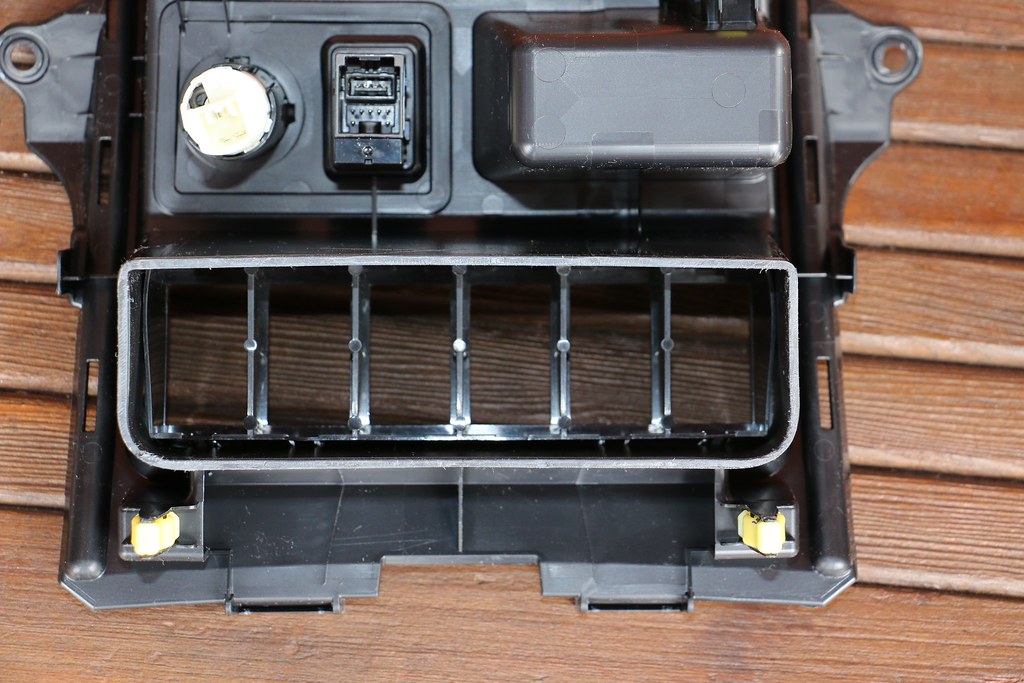
You must remove the electrical connections to the panel.


[IMGhttps://farm8.staticflickr.com/7625/16855427051_7d99561548_b.jpg/IMG]

After this is done pat yourself on the back you have done well without hurting your vehicle and can now take off the panels without causing any further damaging while doing mods in the future.

You must now trim the switch blank. I used sand paper to do so slowly. Using a dremel will melt the edges ad you will need a new piece. you could also file the edges if you would like. I would not recommend trimming with the switches in place.


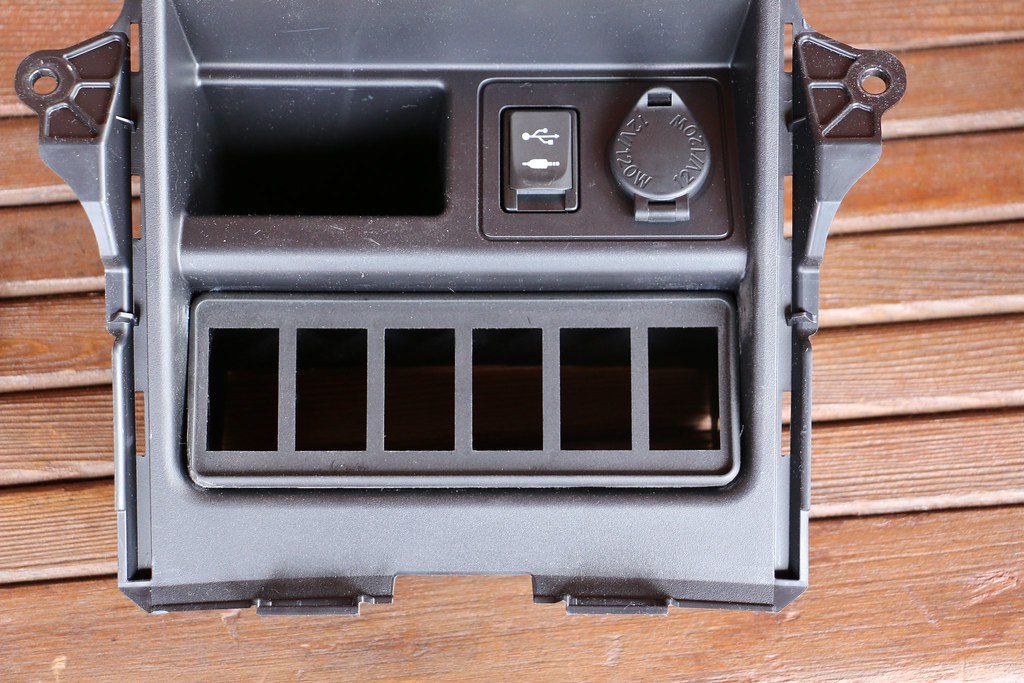
After you have tried it and test fitted it you will need to cut out the cubby for access to the switch wiring. I used a dermal cutting wheel to accomplish. Then I used a exacto knife and sandpaper to clean up the edges. Tape you cubby hole to prevent scratches. I did scotch mine and need to fix it.


Insert your switches to the blank. and fit into the panel. I have not wired them up at this time I will do so in a later post. You can do so if you would like. You can secure the switch panel with hot glue. I recommend getting High temperature black glue to secure the panel.


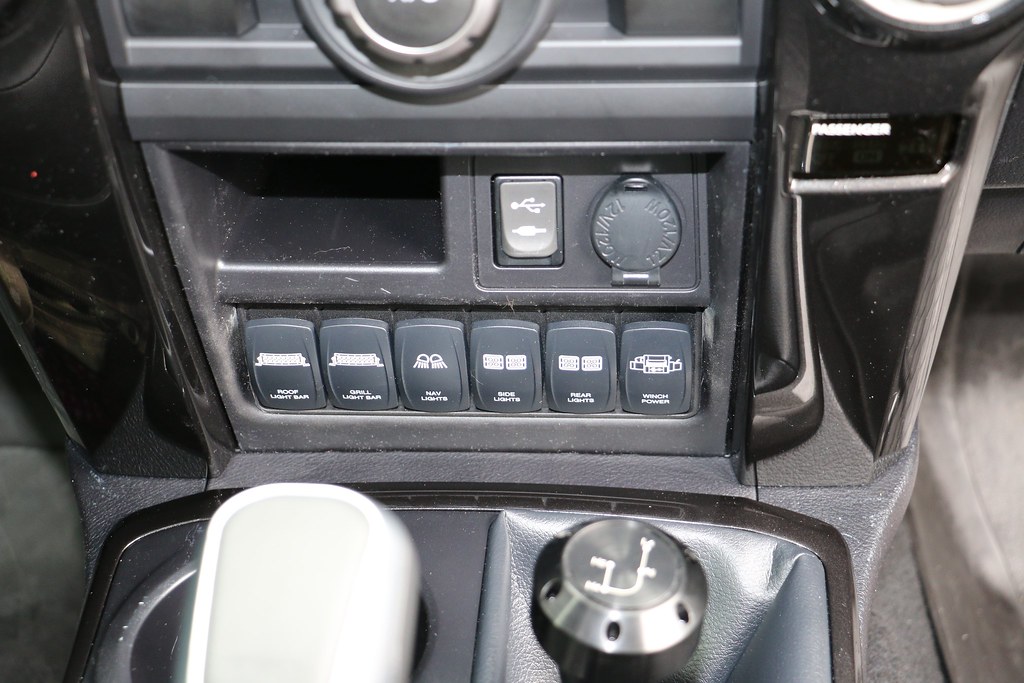
Installation of the panels are the reverse of removing them. In the end it should look something like this. I need to clean up the trim piece still when I finish wiring the switches and glue the panel in place.

__________________
15 TRD Pro Build Thread - OIF 09-10 - Combat Disabled Army Veteran - Purple Heart - Combat Medical Badge

Note: Dont get all butthurt because my grammar is terrible. See above and consider this before you stick your foot in your mouth. Also, I do post from an i-Device so words tend to get garbled and misspelled. I cant believe I have to out this here.

Last edited by Doc_Fry; 03-18-2015 at 05:25 PM.
Doc_Fry is offline   Reply With QuoteReply With Quote
Old 03-18-2015, 03:32 PM #29
Doc_Fry's Avatar
Doc_Fry Doc_Fry is offline
Member
 
Join Date: Dec 2014
Location: Cherry Log, GA
Age: 51
Posts: 581
Real Name: Steve Fry
Doc_Fry is on a distinguished road
Doc_Fry Doc_Fry is offline
Member
Doc_Fry's Avatar
 
Join Date: Dec 2014
Location: Cherry Log, GA
Age: 51
Posts: 581
Real Name: Steve Fry
Doc_Fry is on a distinguished road
Switch Install Part 2

Parts Needed:
Switches Link
Must have an open spot to put a switch.

Difficulty:
Easy

Tools:
None

Here is the finished Product:


Installation:

Using your hand reach up behind the panel and push out the blanks. Note you cannot move the switches to another location that are factory as they have cutouts for where they are positioned.

Replace the blank with the supplied switch from above. Wiring will be explained in a later article.

Finished Product:

__________________
15 TRD Pro Build Thread - OIF 09-10 - Combat Disabled Army Veteran - Purple Heart - Combat Medical Badge

Note: Dont get all butthurt because my grammar is terrible. See above and consider this before you stick your foot in your mouth. Also, I do post from an i-Device so words tend to get garbled and misspelled. I cant believe I have to out this here.

Last edited by Doc_Fry; 03-18-2015 at 05:27 PM.
Doc_Fry is offline   Reply With QuoteReply With Quote
Old 03-18-2015, 05:13 PM #30
Doc_Fry's Avatar
Doc_Fry Doc_Fry is offline
Member
 
Join Date: Dec 2014
Location: Cherry Log, GA
Age: 51
Posts: 581
Real Name: Steve Fry
Doc_Fry is on a distinguished road
Doc_Fry Doc_Fry is offline
Member
Doc_Fry's Avatar
 
Join Date: Dec 2014
Location: Cherry Log, GA
Age: 51
Posts: 581
Real Name: Steve Fry
Doc_Fry is on a distinguished road
Door Edge Protection Film

Every vehicle that I have owned at one time or another has had the door hit another car by my fault or a passenger. This product will help prevent the chipping of paint on the door edge.

Difficulty:
Easy

Parts:
Expel Door Edge Guard Link

Tools:
Window Cleaner
Scissors
Microfiber Towell
Finished Product:


Installation:

Installation begins with a clean vehicle. I would recommend doing this after you wax the truck or apply any paint protection. Don't worry if you mess up as you can always take it off. I was surprised by how easy this was and how good it does look.

Begin by measuring how long of a strip you need of the door edge. I always make it a bit longer.


Beginning with the rear passenger door while open notice on the inside edge that there is a welded seam. We will use this as our guide to install the product. Spray down the inside and outside of the door edge with Window Cleaner.


Remove part of the protective film from its backing. Starting from the top of the door begin applying the film on the inside of the door edge. Using you fingers to push out the window cleaner. There should be no bubbles while working your way down the door edge. When you reach the bottom of the seam you will need to trim the door edging to exact length.


Now that we got the back of the door finished we will spray the front of the door edge and product again with window cleaner.


Beginning at the top we will fold the edge of the product over using pressure pushing outwards towards the outside of the door. Making sure we have no bubbles while we work our way down.


When Finished you need to wipe of the excess window cleaner off of the door. Allow the door edge to remain in the sun for a few days so the adhesive can cure. You may return to the edging to remove any excess bubbles the next day. Rinse and repeat for every other door.
__________________
15 TRD Pro Build Thread - OIF 09-10 - Combat Disabled Army Veteran - Purple Heart - Combat Medical Badge

Note: Dont get all butthurt because my grammar is terrible. See above and consider this before you stick your foot in your mouth. Also, I do post from an i-Device so words tend to get garbled and misspelled. I cant believe I have to out this here.

Last edited by Doc_Fry; 03-18-2015 at 05:31 PM.
Doc_Fry is offline   Reply With QuoteReply With Quote
Reply


Posting Rules
You may not post new threads
You may not post replies
You may not post attachments
You may not edit your posts

BB code is On
Smilies are On
[IMG] code is On
HTML code is On

Forum Jump

Similar Threads
Thread Thread Starter Forum Replies Last Post
>BUILD THREAD< The4kbeast's 3rd-Gen 2000 T4R SR5 (Highlander Edition) 4x4 Build The4kbeast 3rd gen T4Rs 285 07-25-2018 09:37 PM
1998 T4R Build Thread/Rear bumper build 4running11191 4running11191 3rd gen T4Rs 3 09-19-2014 07:07 PM
Snow White build 2006 v8 adventure overland apocalypse build Dubs Chops 4th Gen T4Rs 24 04-25-2014 09:25 AM
Guyduebro's Surf build..De-build Guydudebro 3rd gen T4Rs 3 03-17-2013 08:27 PM

Powered by vBadvanced CMPS v3.2.2

All times are GMT -4. The time now is 07:44 AM.

Powered by vBulletin® Version 3.8.11
Copyright ©2000 - 2024, vBulletin Solutions Inc.
Search Engine Optimisation provided by DragonByte SEO (Pro) - vBulletin Mods & Addons Copyright © 2024 DragonByte Technologies Ltd.
Feedback Buttons provided by Advanced Post Thanks / Like (Lite) - vBulletin Mods & Addons Copyright © 2024 DragonByte Technologies Ltd.
User Alert System provided by Advanced User Tagging (Lite) - vBulletin Mods & Addons Copyright © 2024 DragonByte Technologies Ltd.
***This site is an unofficial Toyota site, and is not officially endorsed, supported, authorized by or affiliated with Toyota. All company, product, or service names references in this web site are used for identification purposes only and may be trademarks of their respective owners. The Toyota name, marks, designs and logos, as well as Toyota model names, are registered trademarks of Toyota Motor Corporation***Ad Management plugin by RedTyger
 
Copyright © 2020