DIY: Tubbing the firewall to clear 35" tires (3G4R)

willhaman21

Member
So you want to run 35" tires on your 3rd gen 4Runner, but you don't want to run a drop-bracket suspension or giant body lift? Here's how I fit 315s on my 4Runner.

Specs:
  • Tires: 315/75R16 Yokohama Geolandar M/T
  • Wheels: 16x8" Level 8 MK6, 4.110" BS (-10 offset)
  • Suspension: Icon/SPC mid travel, ~2.5" lift at ride height, SPC's set all the way forward
  • Body: 1/2" Fat Pat's body lift

Tools Needed:
  • Angle grinder
  • Sawzall
  • MIG welder
  • 6-ton jack stands
  • 3-ton floor jack & some wood blocks for extensions
  • Hand tools (pliers, sockets, wrenches, hammers, etc)

Materials Used:
  • (1x) 2x2' sheet of 20ga steel - Order more if you want practice pieces. (Link)
  • (4x) 2' sticks of 1/8" steel rod - You can also find it in 4' sticks at Home Depot. (Link)
  • (1x) 3M Seam Sealer - I ordered 3 cans but only used 1. (Link)
  • (2x) 3M Rubberized Undercoating - I ordered a 6 pack, only needed 2 cans. (Link)
  • Noico sound deadening mats (optional) - you only need a few pieces, I had a lot on hand. (Link)
  • Noico sound deadening foam (optional) - same as the mat, you only need a few pieces. (Link)

Teardown:
1) Get the truck in the garage, set the parking brake, crack the lug nuts with a breaker bar, and then jack the truck up with your floor jack. Set it on jack stands, just high enough so the tires spin free at full droop. Remove the front tires.

2) Remove the coilover & bump stops. Remove both factory and aftermarket bump stops if you have them.

3) Remove the fender. You'll have to pop out the corner light and the trim below the headlight first.

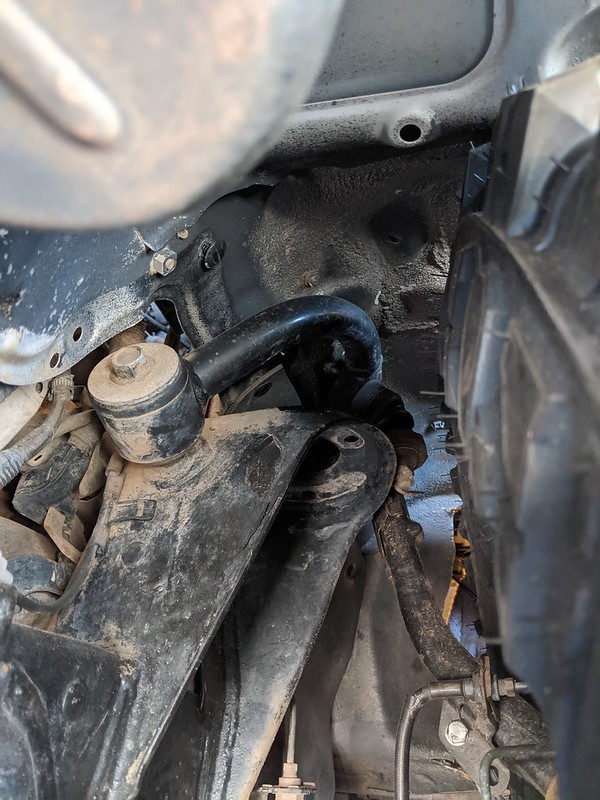
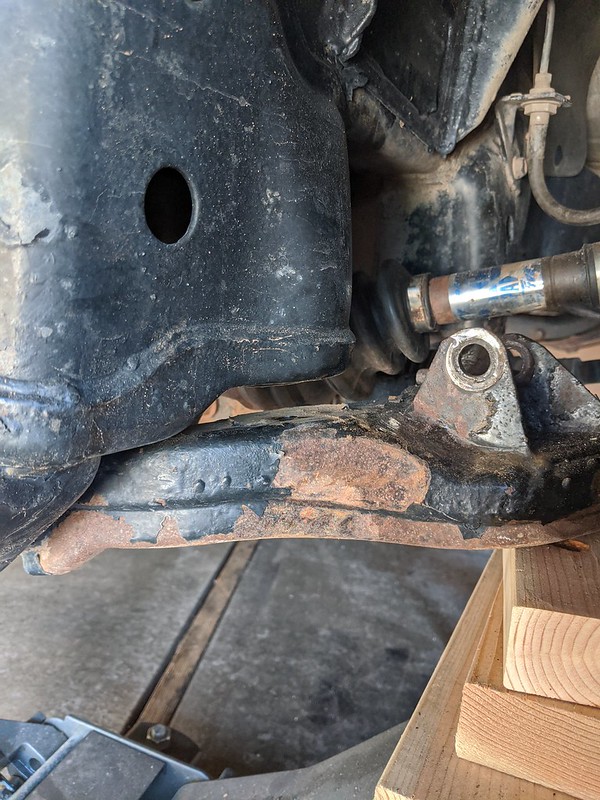
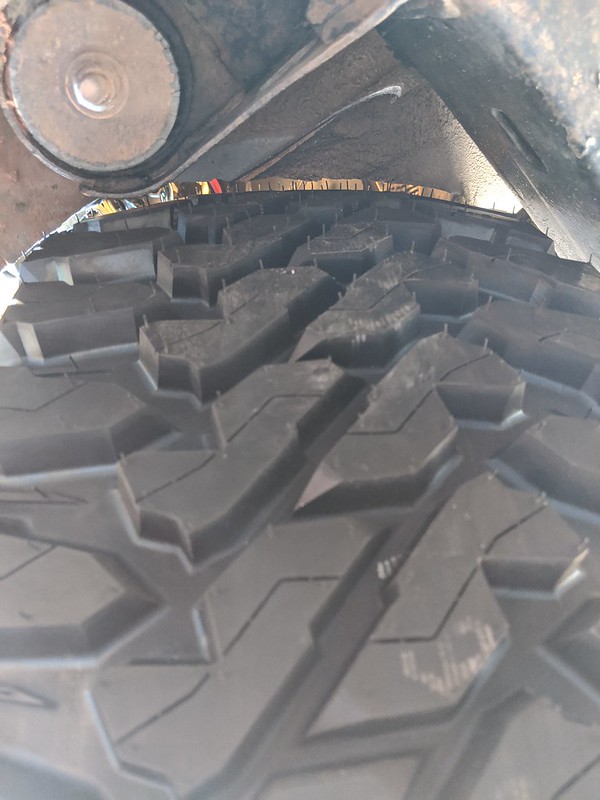
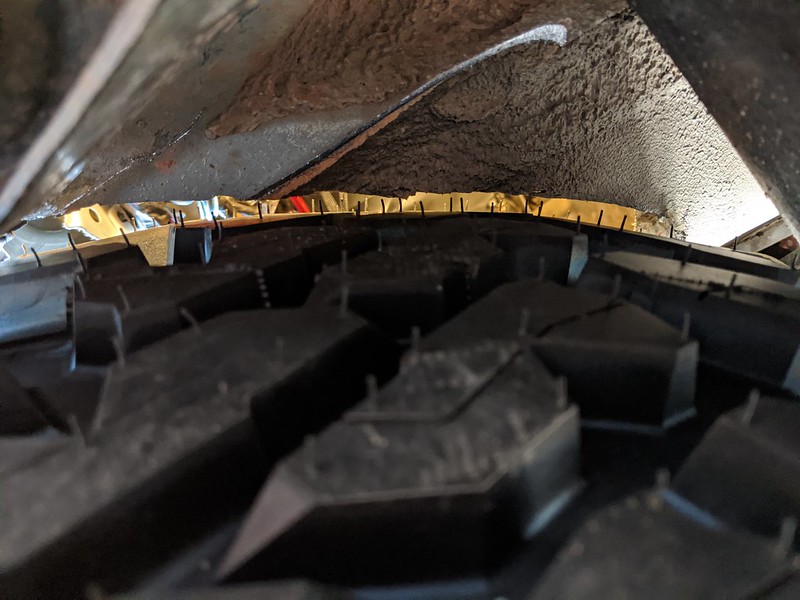
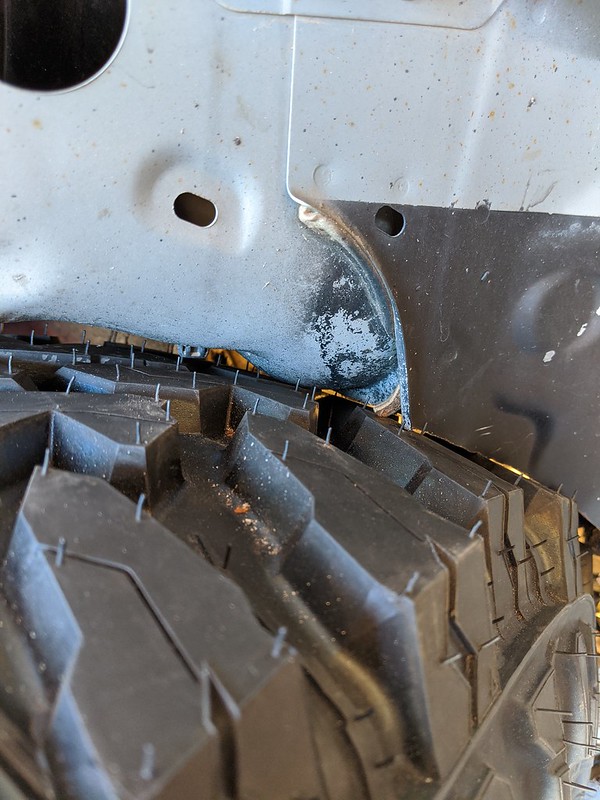
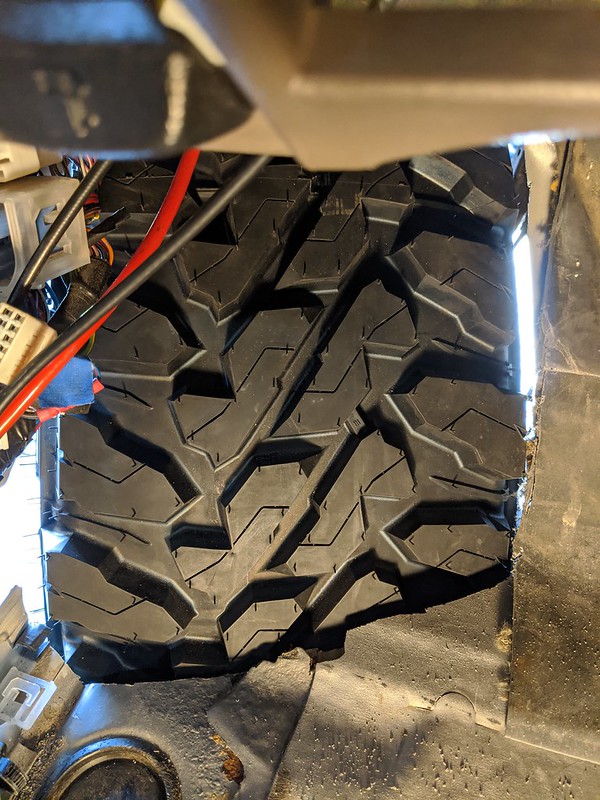
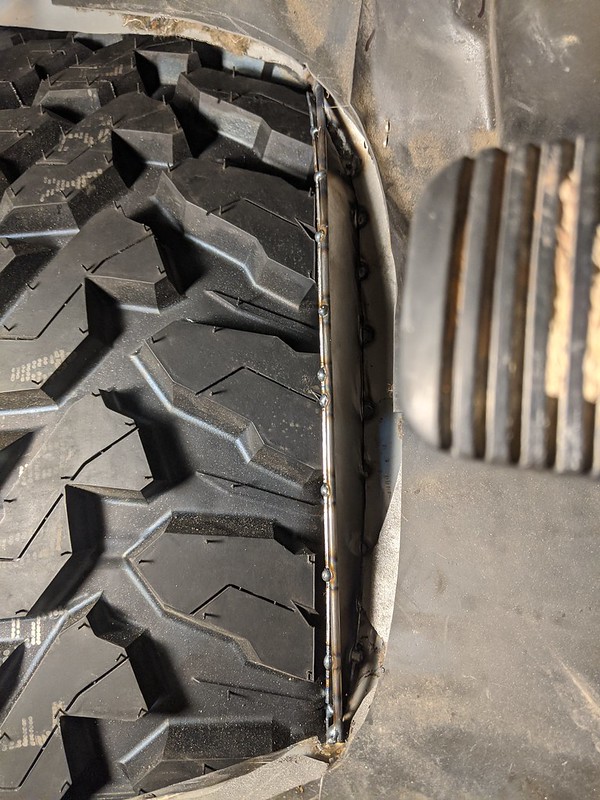
4) Reinstall the wheel & tire. Place the floor jack below the lower control arm with a wood block to space it up. Jack the tire as high as it will go and check clearances. Here's where mine hit before I started trimming.

Full bump, steering straight. I had already trimmed the fenders before I started this project.


Barely clearing the already hammered pinch weld. It rubbed like crazy the second you turn the wheel.
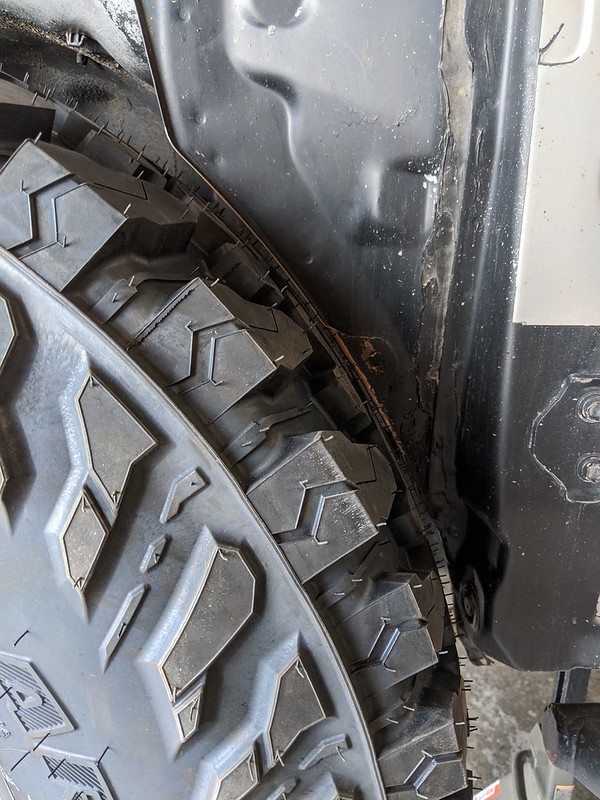


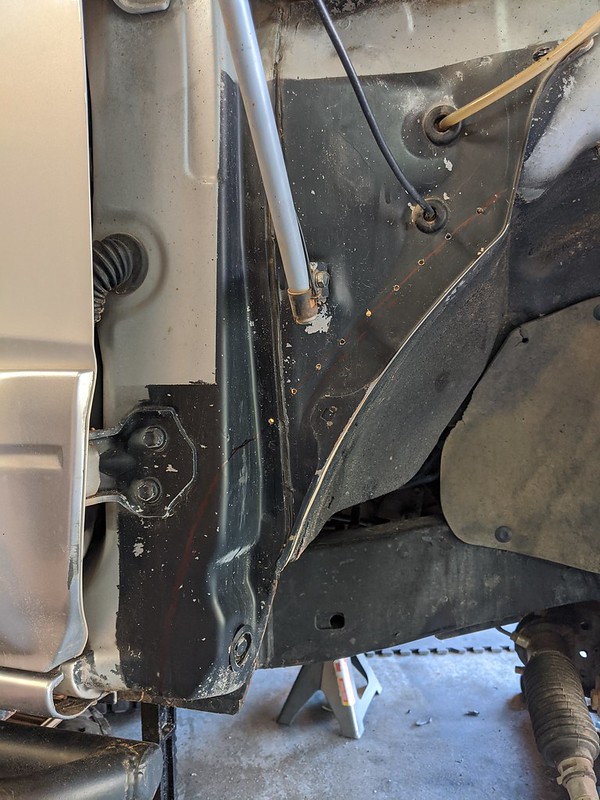
Rubbing the inner fender below the battery box:


5) Remove the interior trim. Start with the straight trim, remove 4 screws and pull straight up. Remove the kick panel by pulling straight back. Here's what the mess of wiring looks like behind the panel.


Pull back the carpet as far back as you can.

6) Move the wiring and computers. Zip ties and bungies come in handy here. Trim the plastic pieces where you think you'll cut.


7) Now the fun begins. Start by marking your initial cut line on the firewall (my first cut line was nowhere near enough). Using a drill & small bit, punch some holes along your cut line to verify you're clearing all the wiring on the inside of the truck.
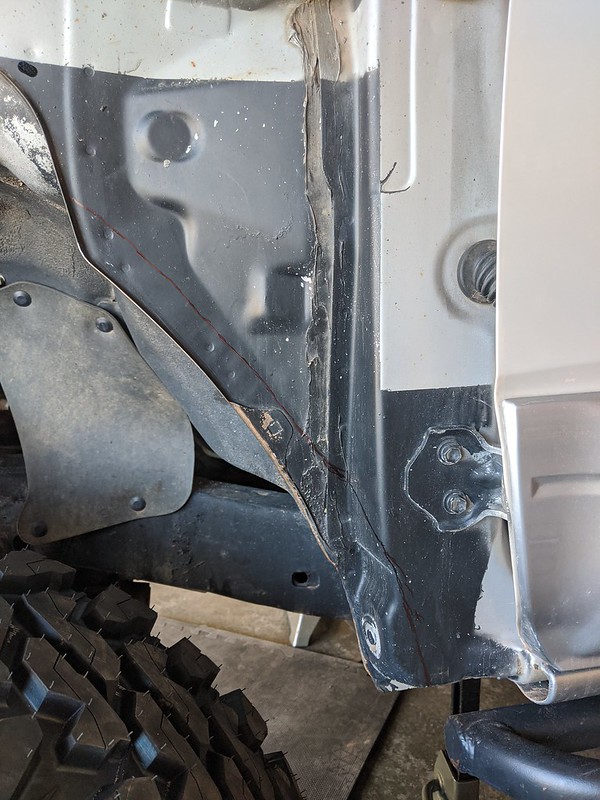


Speed holes:


8) Cut back the carpet and factory sound deadening.
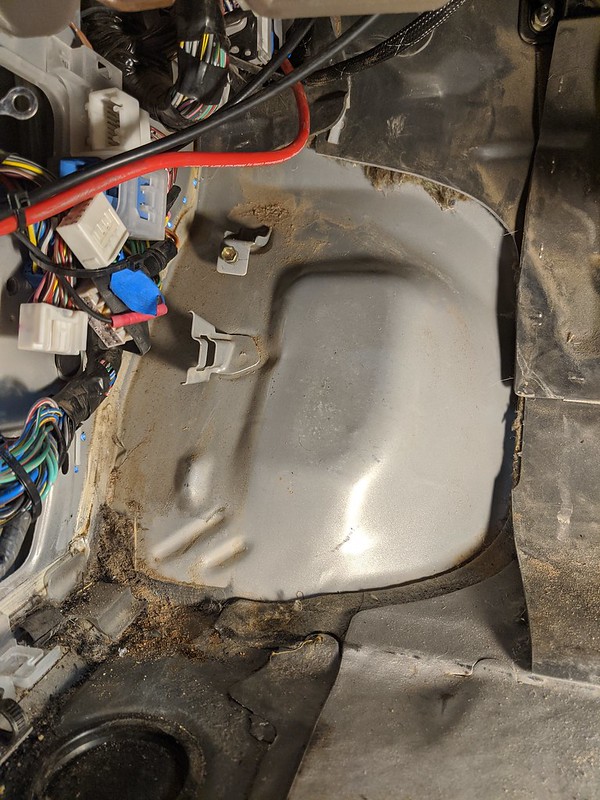


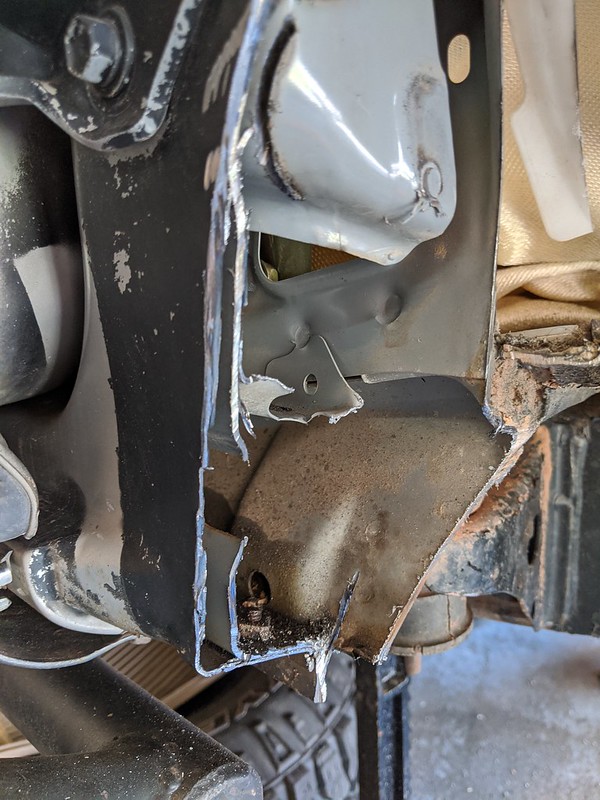
9) Bust out the grinder and a cutout wheel. Start cutting along your line you marked in step 7. Cut back just behind the pinch weld to remove the piece so you can see what you're doing.


I tried to hammer the remaining firewall material back and check clearance, but I was nowhere close on my trimming.


10) Cut the outer layer of the cab corner off. I used the grinder again. There are a couple spot welds in here that you'll have to break off. Rock the piece back and forth with a pair of pliers until it pops off.


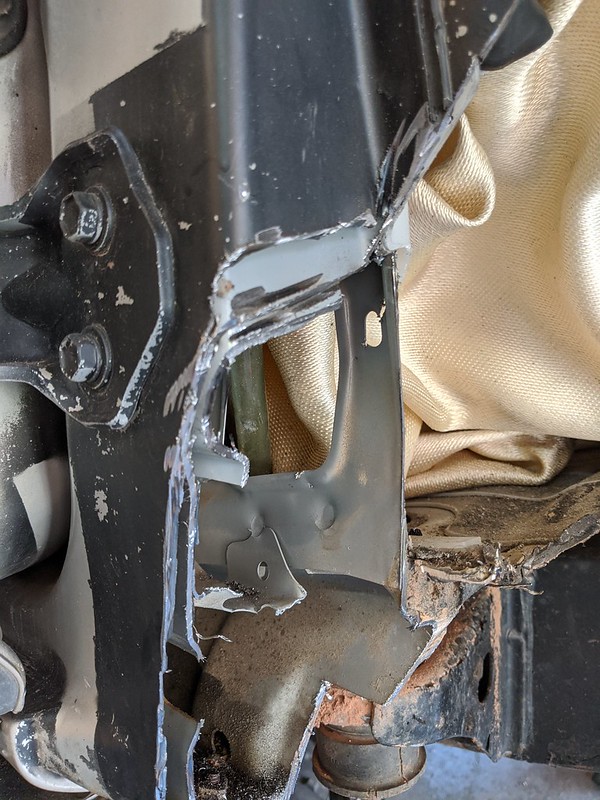
11) Cut out the pinch weld. I switched to the sawzall, and cut from the bottom up. A nice Diablo blade made short work of the material.

Pinch weld gone.


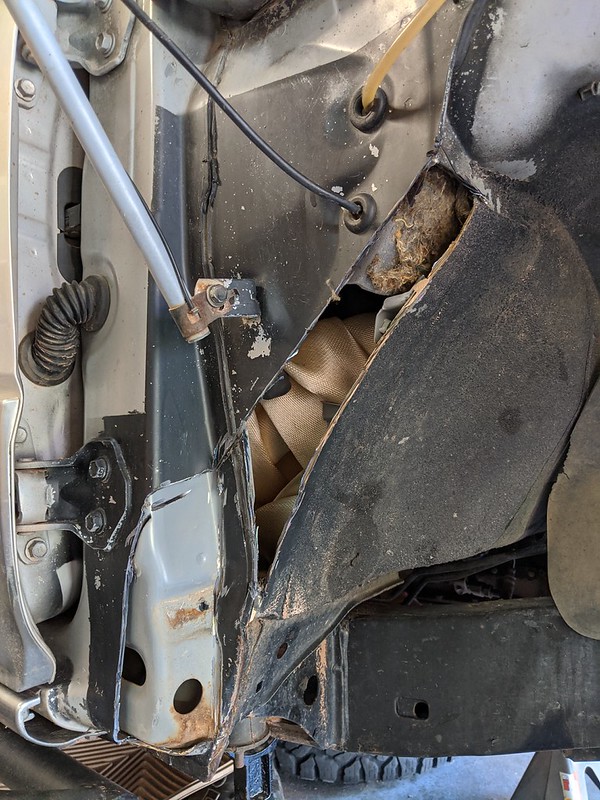
Inside the cab corner. There's a piece of foam back here. Definitely remove this before you catch the truck on fire!
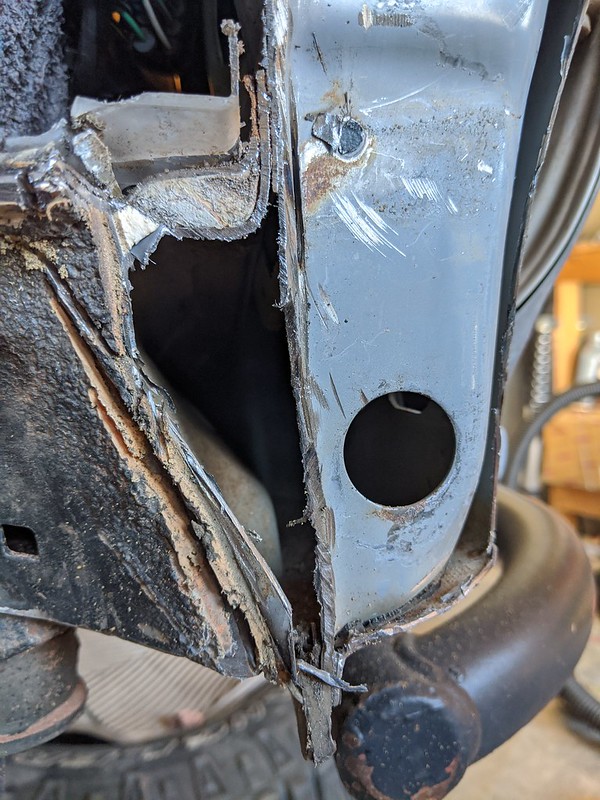


12) Check your clearance. You'll do this a bunch.


13) Draw out the new cut line & drill for clearance checks again. Continue cutting.


]

14) Now cut the big flap out of the center. None of this will stay.
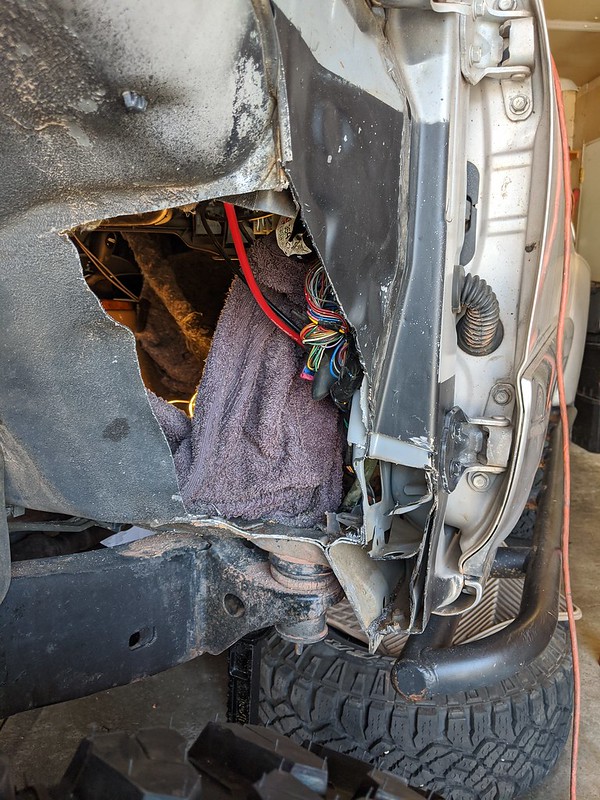


(Continued)
 
Last edited:
Register to hide this ad
(Continued)

15) Get out your BFH. Hammer the inner fender below the battery box. You could cut this out and patch with new metal if you are so inclined, but I felt like it wasn't worth the extra work. Hammer 'til she clears.


16) Check clearances again. Here's where everything sits at full bump.


The SPC upper control arms hit the inner fender above the coil tower at full bump. This is the mechanical limit point of the suspension's uptravel.


I removed the ABS line bracket, and zip tied the ABS wire to the UCA instead. This eliminated the possibility of the wire getting pinched between the UCA and the inner fender.


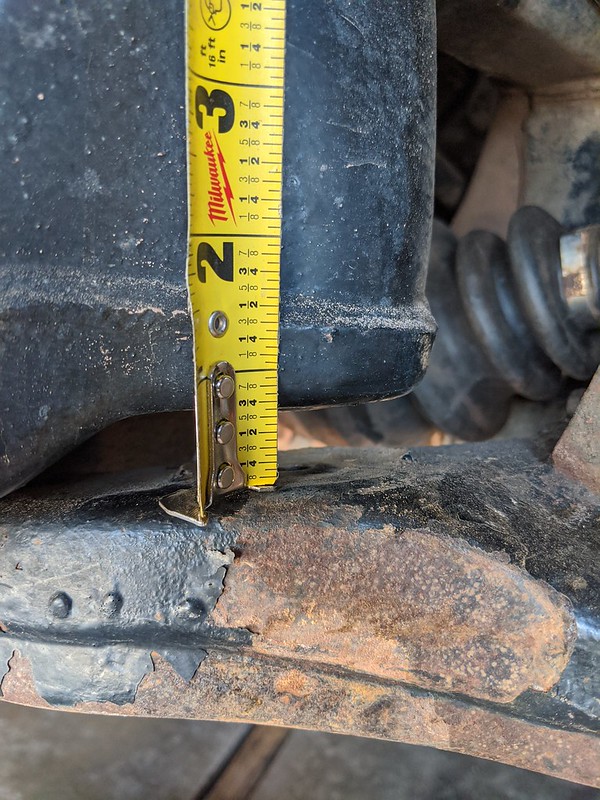
Here's where the lower control arm sat at full bump. ~ 5/8" clearance beneath the bump pad.


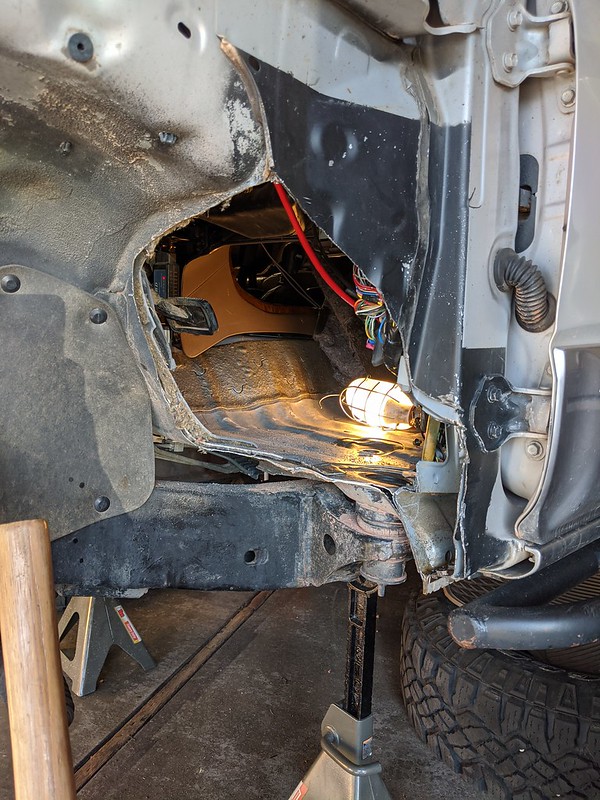
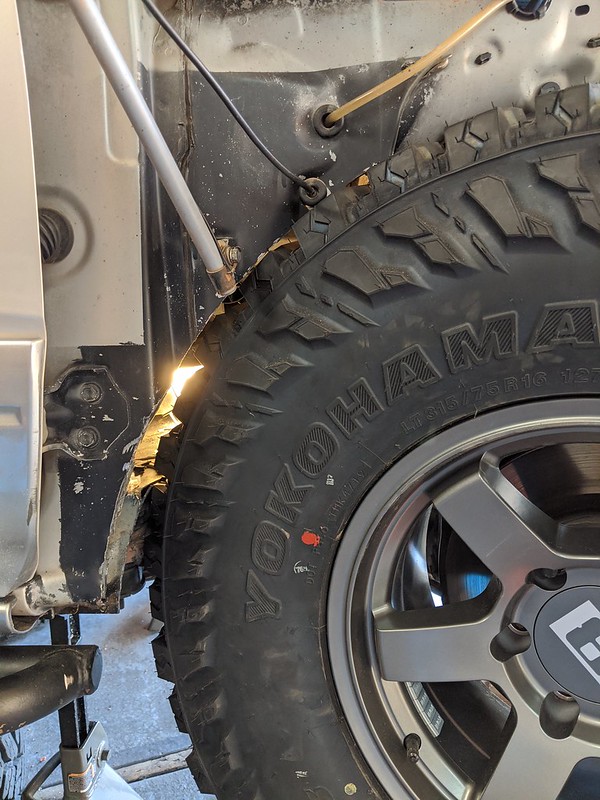
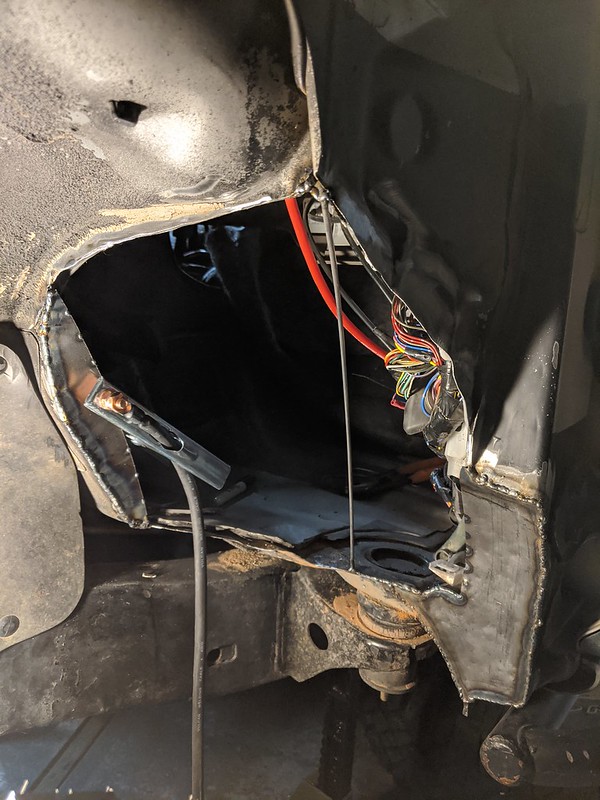
Here's where the cutout ended up at this point. IMPORTANT! You will know you have cut enough when the tire fully clears the sheet metal from lock to lock of the steering wheel while at full suspension bump. Note that it will rub the frame at the back of the tire, this is the mechanical limit of the big tires unless you wish to notch the frame.


Weight reduction...?


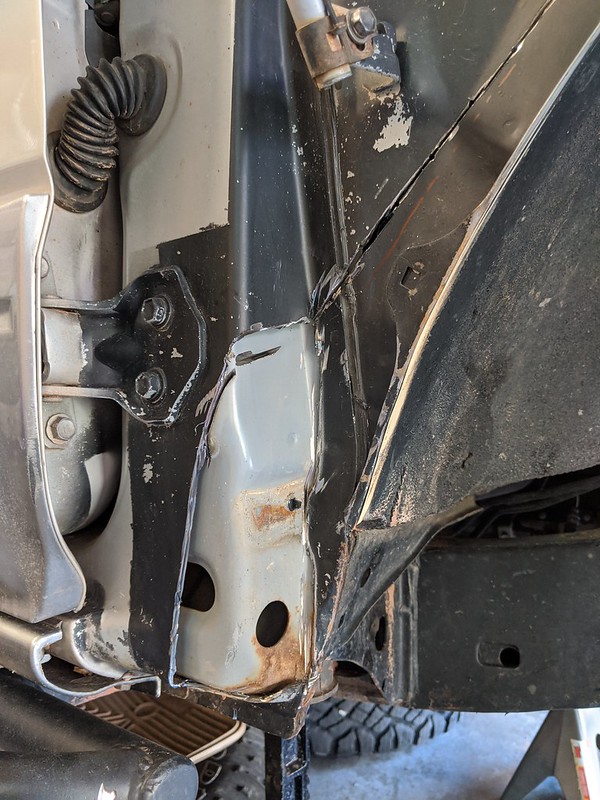
View from below.


Mocked the fender back on just to see what it looked like.


Final shape.


(Continued)
 
Last edited:
(Continued)


Cleaned up the metal and verified fitment for the thousandth time.


That's it for the driver side.

Passenger Side:

Draw your line and drill the clearance check holes.


View from the inside. Pull back wiring and remove fire starter before you start drilling.


Make the initial cut with the angle grinder. Start by making a light notch along your mark before cutting all the way through.


Remove the outer cab corner (note the spot welds):


Remove the upper pinch weld for a better view:


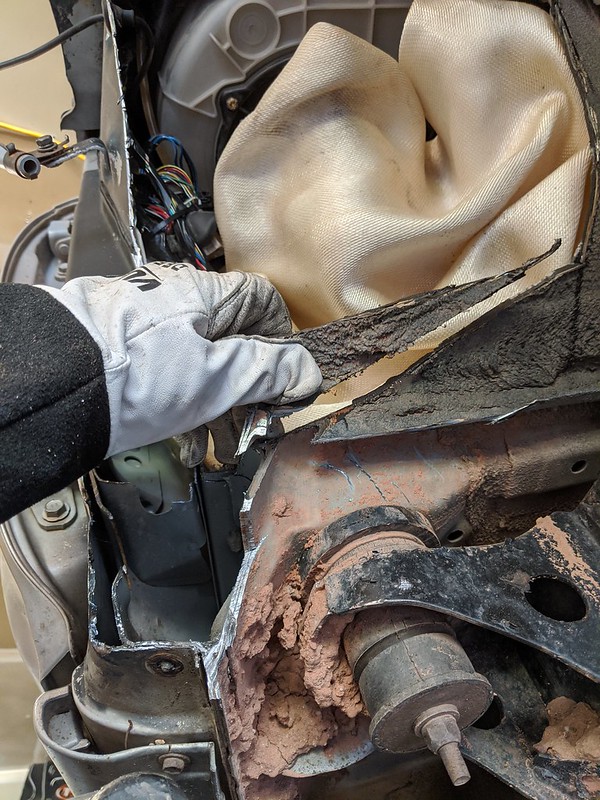
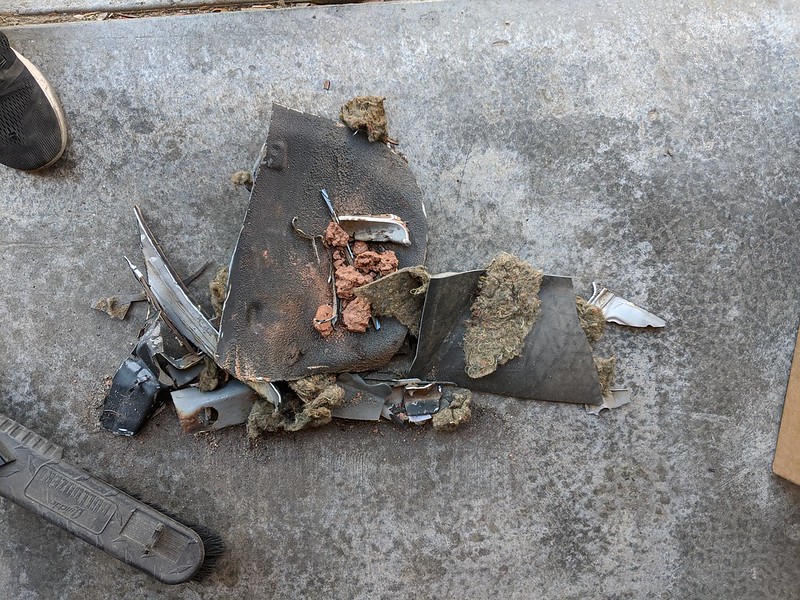
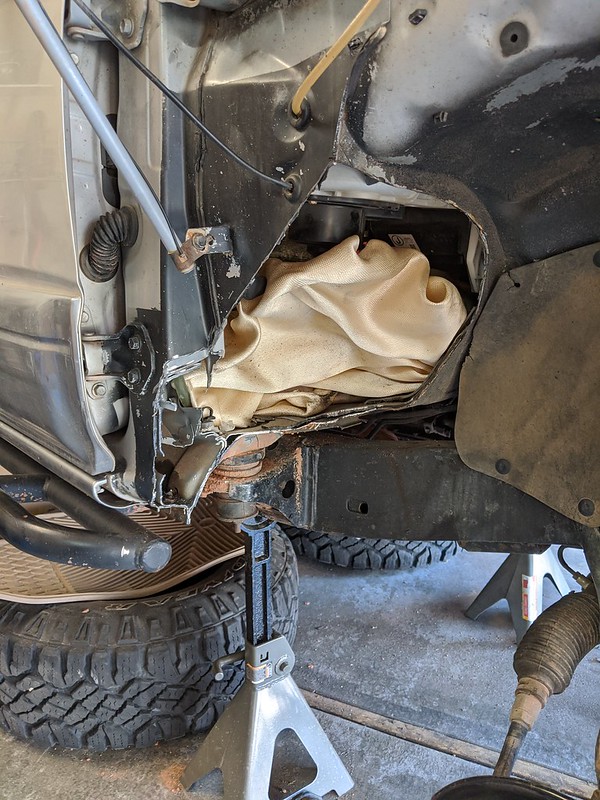
The big boy cut. Note the insulation hanging down, I should have cut this out first... it's definitely a fire danger. I had a fiberglass blanket covering the rest of the opening to protect the interior from sparks.


Now cut the remainder of the pinch weld out:


Cut the inner cab corner:


Peel back the inner cab corner, breaking the additional spot welds.


Cut out this triangle that shields the body mount, it needs to go.


Cut the rest of the inside of the cab corner out:


I cut up from the bottom with the sawzall here.


Remove the inner supports:


Continue cutting upwards:


Using the sawzall, cut in from the corner towards the 3-way joint in the. Remove the remaining triangle of material


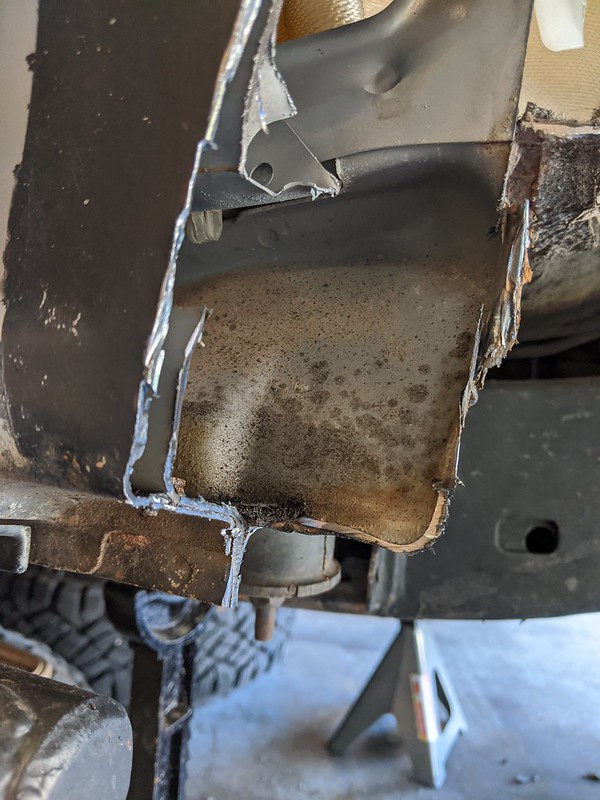
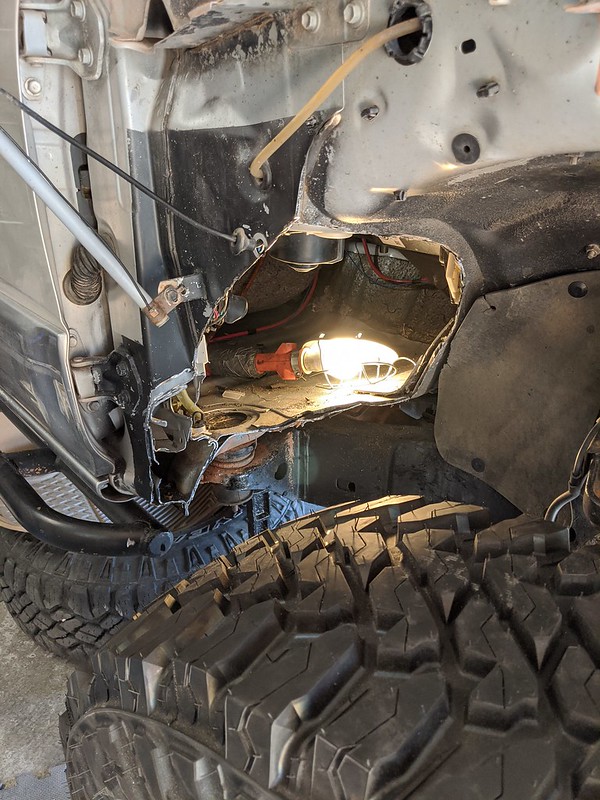
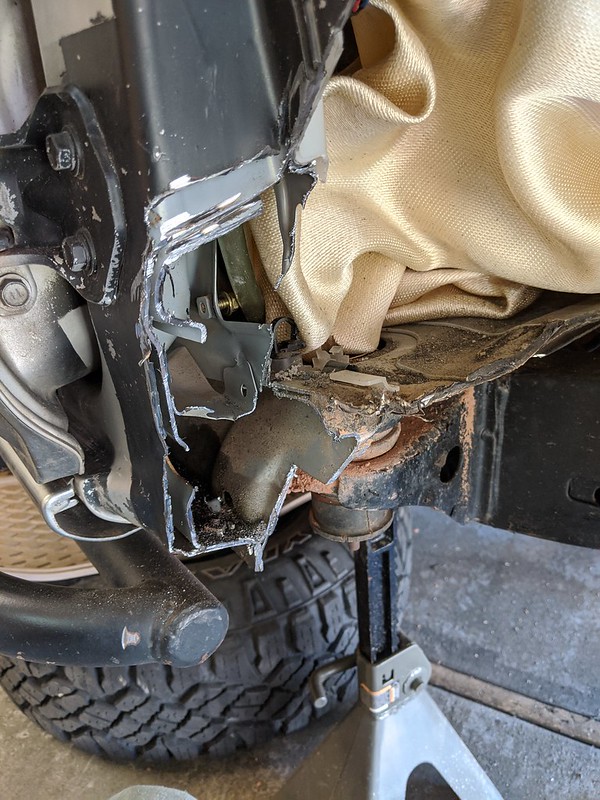
Final rough cut, before checking clearance and cleaning everything up.


(Continued):
 
Last edited:
(Continued)

More weight reduction:


The final shape:


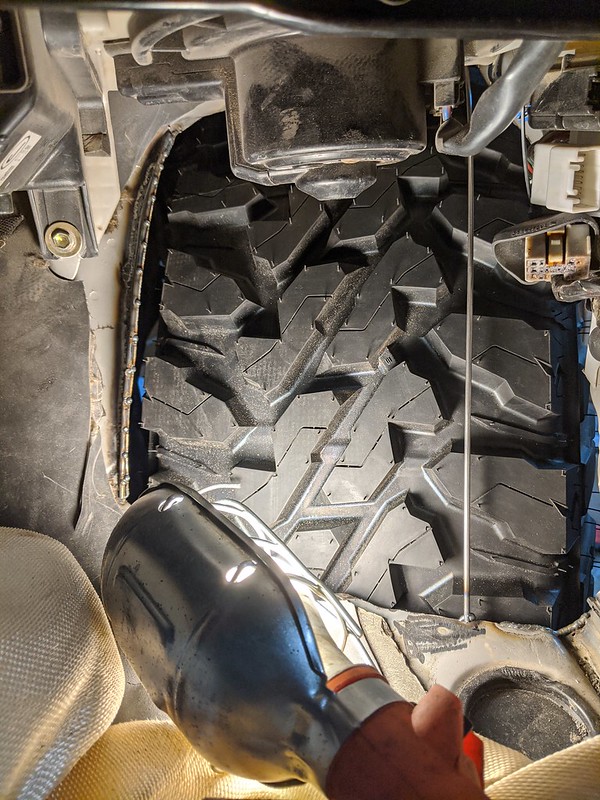
Check clearance. IMPORTANT! Turn the steering wheel lock to lock at full bump and verify it clears through the entire range. It will likely rub the frame at full turn.


That does it for the cutting. Next up, patch it all up!

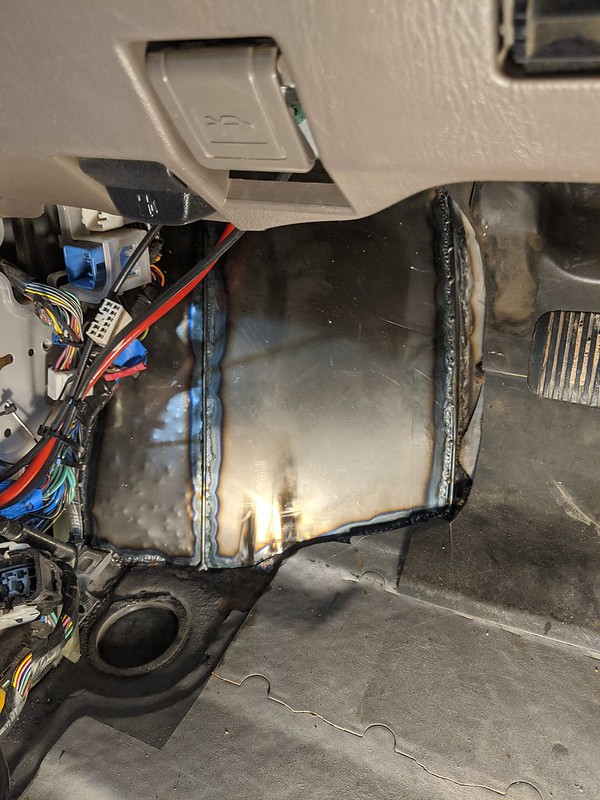
Patching the Driver Side:

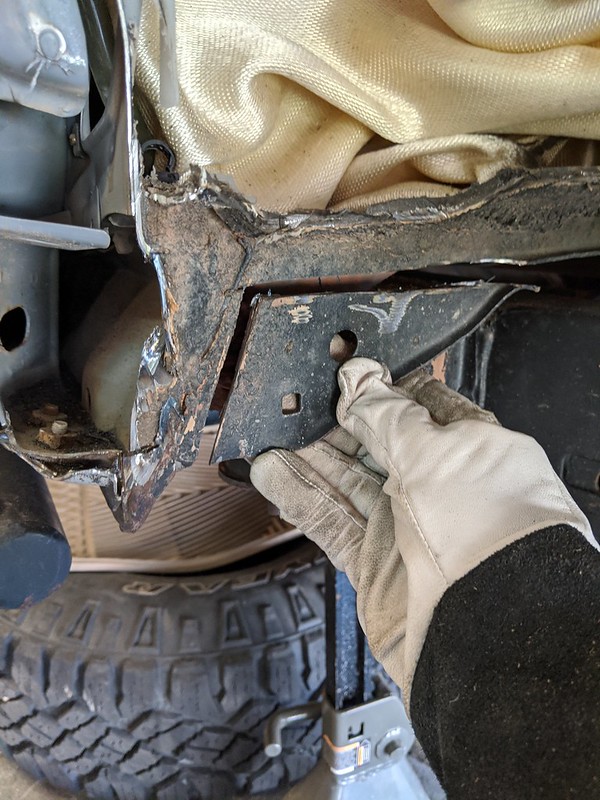
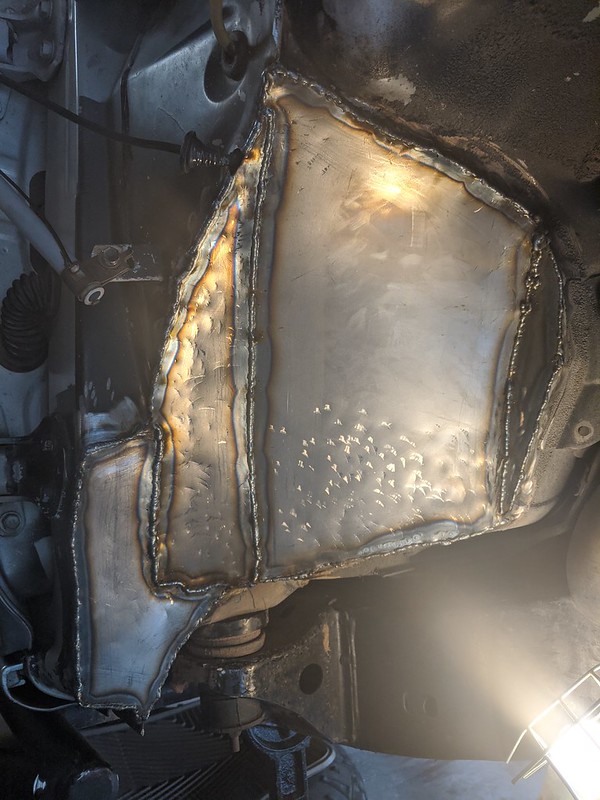
Start by welding in the 1/8" rod to create a support structure where you plan to join the sheet metal. I followed the inner support line where it naturally seemed to go.


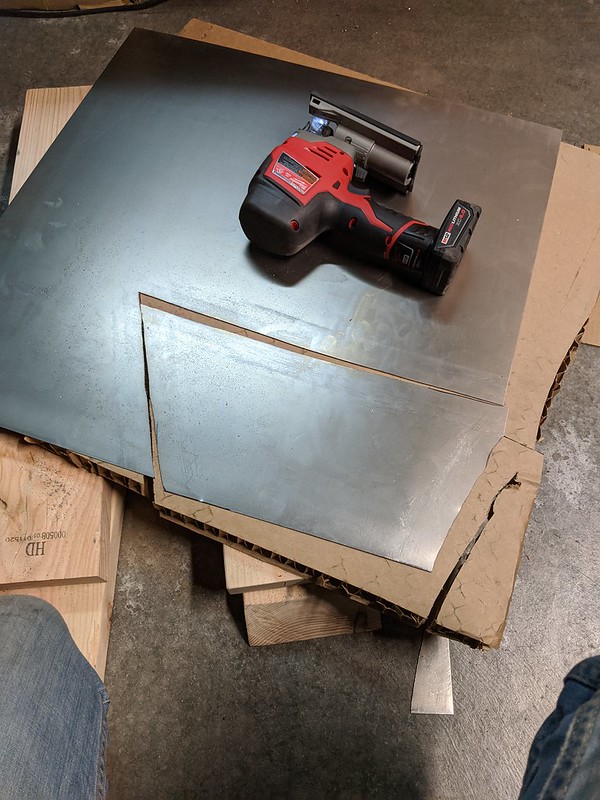
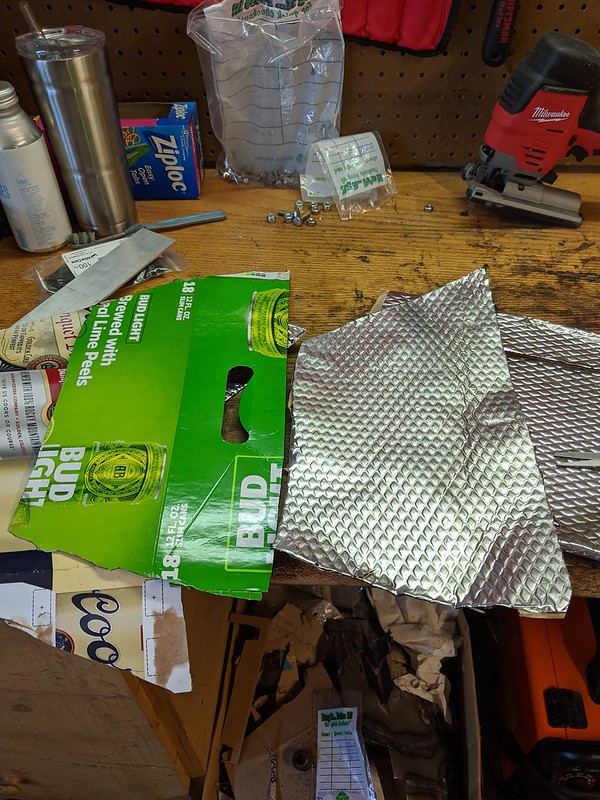
Create your template. I used a beer box and a sharp exacto knife to trace it out.


Translate the template to your sheet steel. I used a jig saw to cut the sheet, its not great but it works... a bench top band saw would be much better IMO.

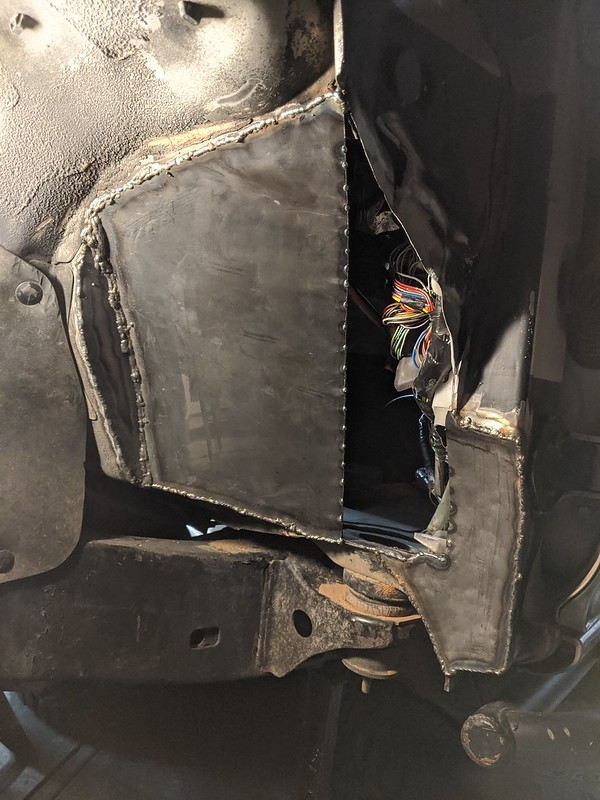
Tack it into place, hammering it to shape as you go.


My first welds in years. They were not great, but they did the job.


First piece welded in:


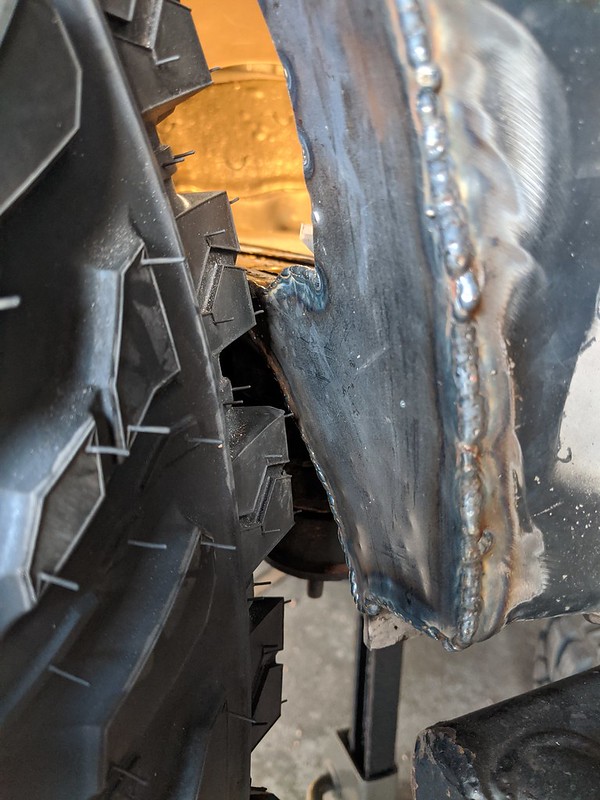
Verified clearance. I could fit a finger between the tire and the steel at full turn.


I switched gears and moved to the inside piece next. This will help drive the shape of the tub. Jack the tire all the way up and turn it to full lock. Bend your rod to match the curve of the tire, cut to length and tack into place:


Tacked into place:


View from inside at full turn:


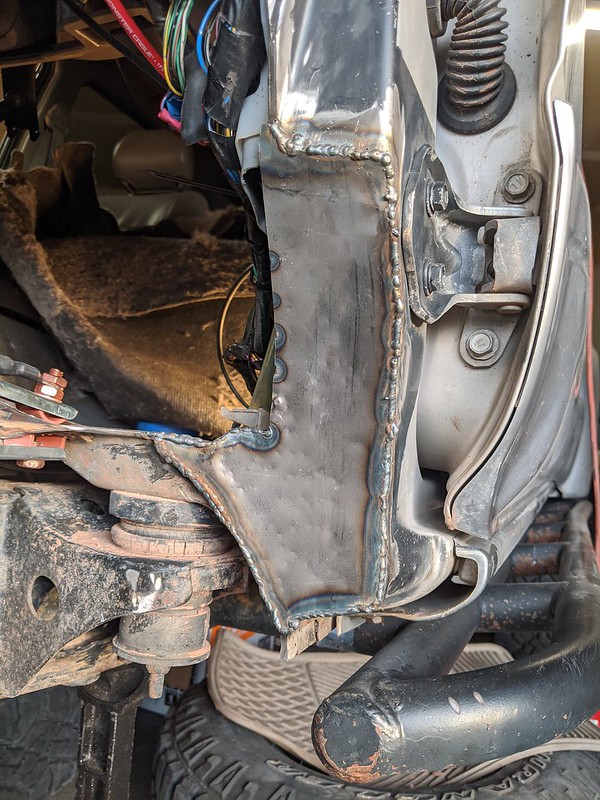
Fully welded:


Add the final support rod. Same process as the previous one. Jack tire up, bend rod to match tire radius, tack into place with adequate clearance from the tire.


Beer box template:


My cutting apparatus (slightly sketchy):


(continued)
 
Last edited:
(Continued)

Welded in. This piece was by far the worst one to template and to weld. My corner filets sucked, and the top seam with the body metal kept lighting on fire.


Last template on the driver side.


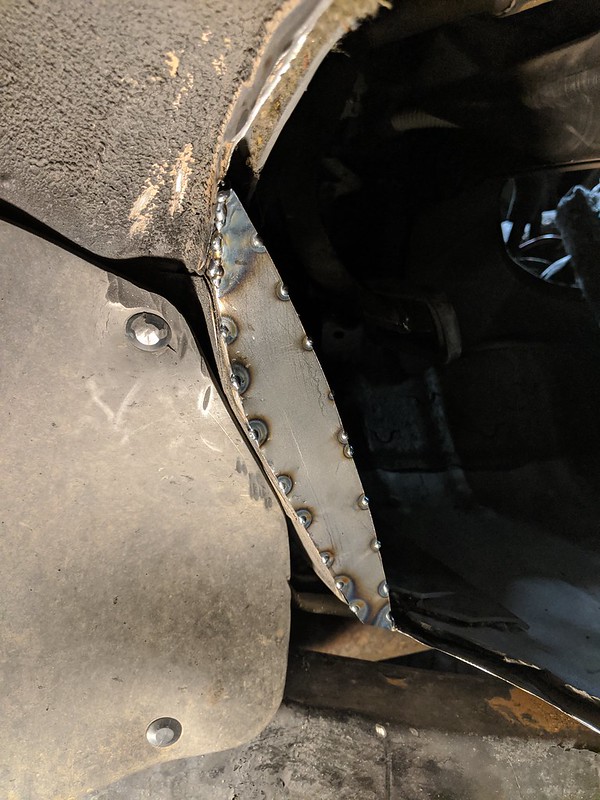
Welded in:


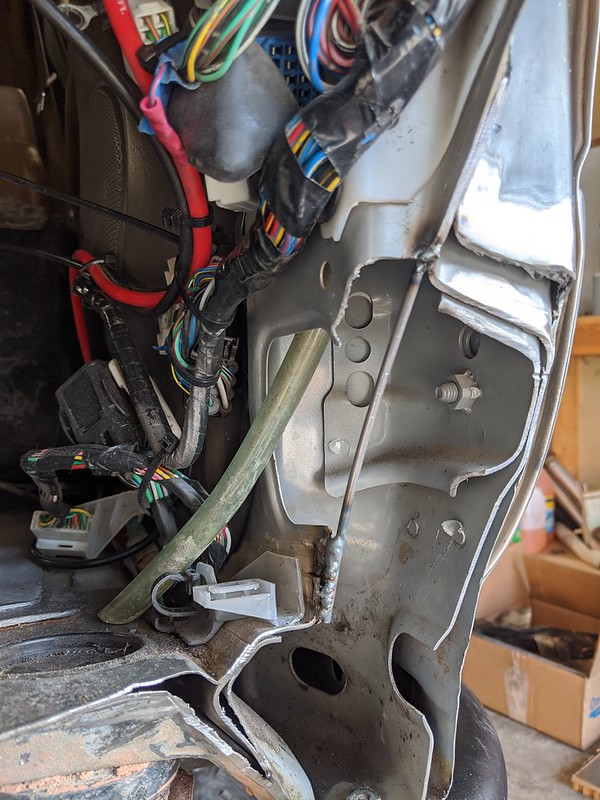
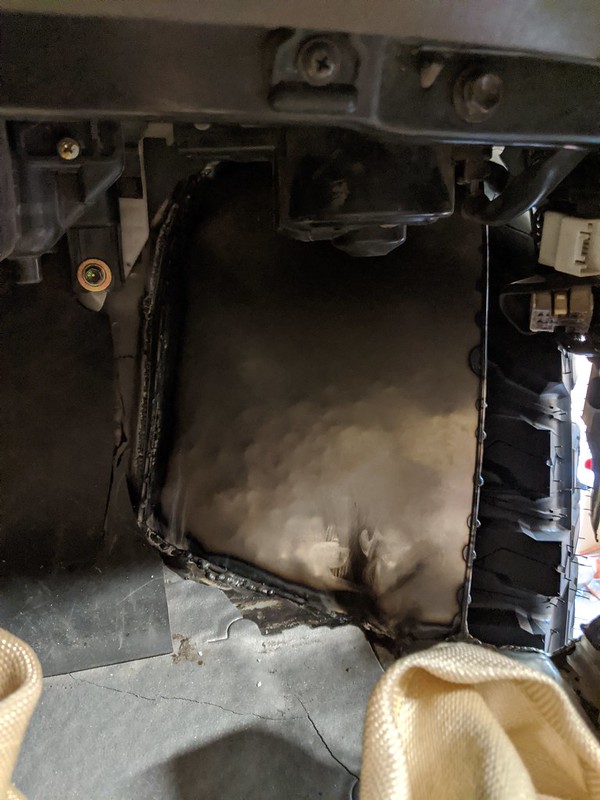
View from the inside. You can see the black marks from where it caught fire.


Passenger Side Patch:

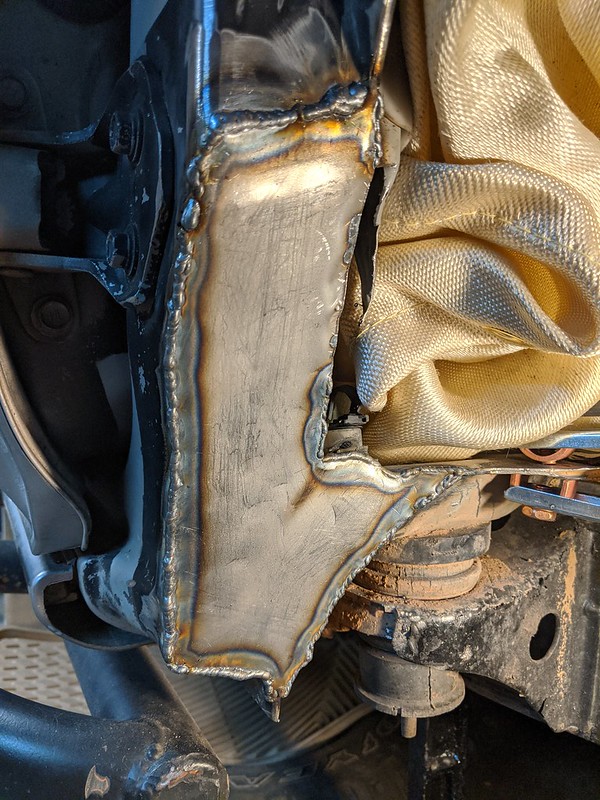
Repeat process on the passenger side. Here's the cab corner:


Inner support rod:


Template:


Welded:


Next support rod in place.


Welded in.


Fitment check once again.


More burn marks (same spot as the other side):


Final template:


Tack & hammer:


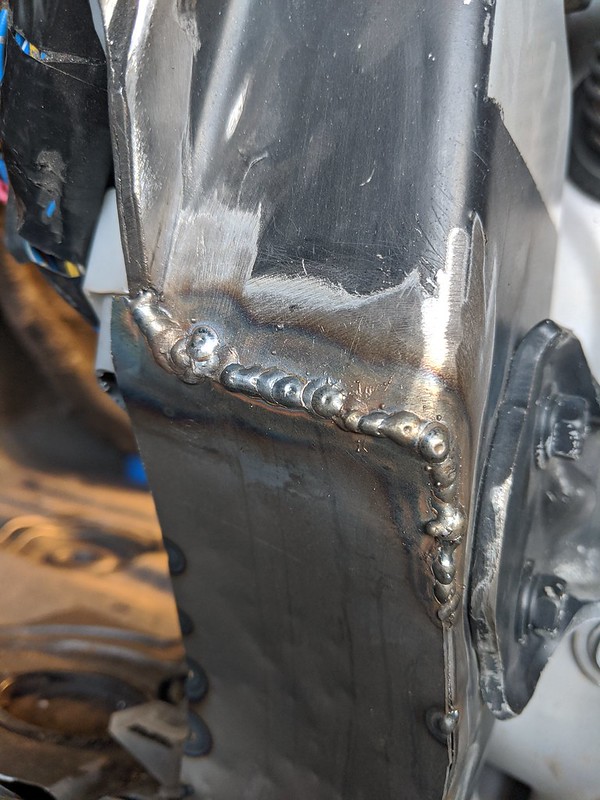
Fully welded!


Grind your welds and check for pin holes. Weld any holes shut and regrind. Here's the final prep before seam sealing:


Finish Work:

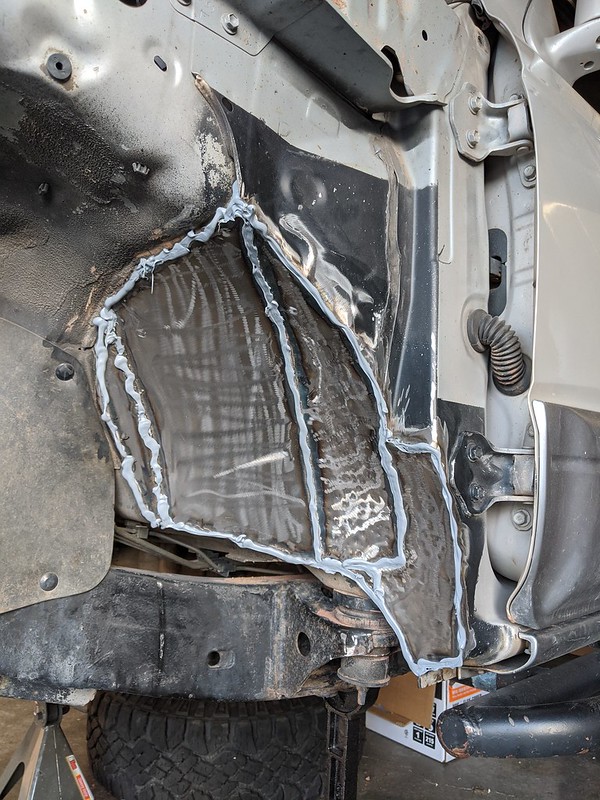
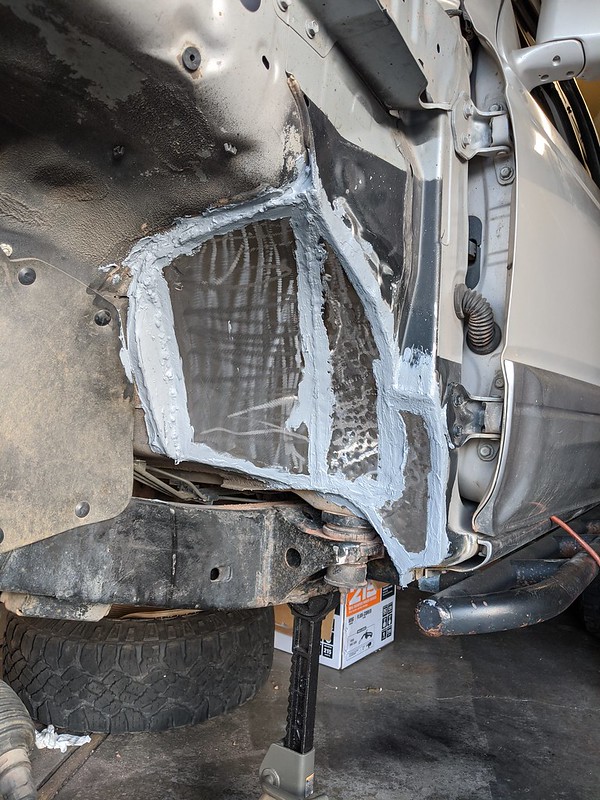
Apply seam sealer with caulk gun, spread it out with your fingers. It's messy.


I also applied seam sealer on the interior.

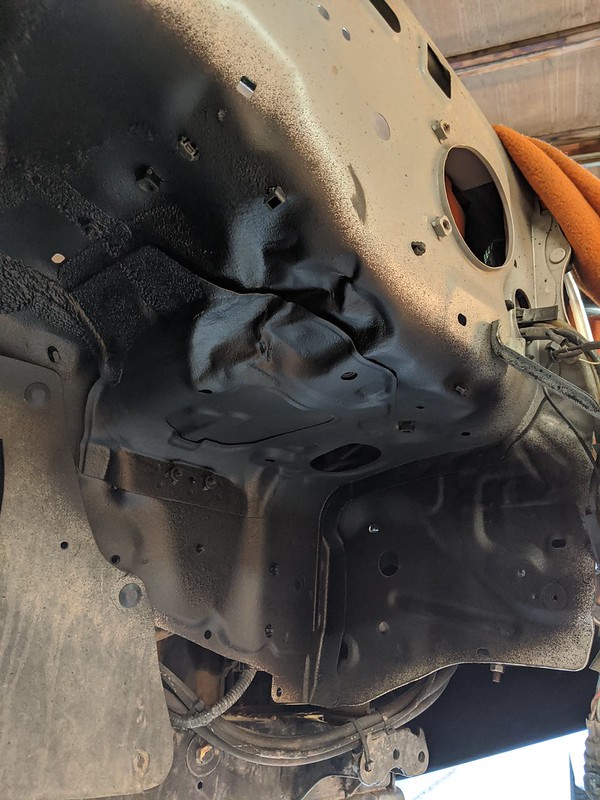
Once it cures, apply your undercoating. This stuff has a corrosion inhibitor built in, and is designed to be sprayed onto bare metal.


(Continued)
 
Last edited:
(Continued)

Passenger Side:


Sprayed the inner fender where I hammered below the air box:


If you saved your beer box template, duplicate the shape onto your sound deadening. Cut with a sharp box knife and apply.


All pieces in place and rolled down:


Repeat with the foam.


Now trim the bracket on the backside of the ABS computer, and install. Relocate wiring as needed:


Trim the plastic kick panel and install.


Driver side:


Wiring relocated:


Kick panel back in place.


I also moved the vacuum canister up a few inches. Throw some sheet metal screws in and call it a day. Spray 3M coating on top.


I trimmed the fenders back, leaving only one bolt hole. Replaced the factory spacer with a 1/2" spacer from the hardware store and new hardware.

 
Last edited:
Thanks for posting this and all the photos, I appreciate seeing the process. If I see enough of these I'll probably muster up enough courage to do it as well! :rockon:
 
DIY: Tubbing the firewall to clear 35" tires (3G4R)

has anyone done this on a 5spd? does the clutch pedal still clear?


Sent from my iPhone using Tapatalk Pro
 
has anyone done this on a 5spd? does the clutch pedal still clear?


Sent from my iPhone using Tapatalk Pro


this is awesome man. thanks for taking the time to take all those pictures. reference pictures is what I feel everyone needs before they start cutting so they have a general idea of how far they will need to go. like you experienced, and what I've seen over the years, everyone starts to cut thinking it would be enough and it always ends up not being enough.


I will def reference this thread when I'm ready to start cutting! sicmods bro
 
Nice Job man! I too upgraded from 32's to 35 with Yokohamas! need to tub mine and I must say lots of fun work for clearance. hah!
 
So you want to run 35" tires on your 3rd gen 4Runner, but you don't want to run a drop-bracket suspension or giant body lift? Here's how I fit 315s on my 4Runner.

Specs:
  • Tires: 315/75R16 Yokohama Geolandar M/T
  • Wheels: 16x8" Level 8 MK6, 4.110" BS (-10 offset)
  • Suspension: Icon/SPC mid travel, ~2.5" lift at ride height, SPC's set all the way forward
  • Body: 1/2" Fat Pat's body lift

Tools Needed:
  • Angle grinder
  • Sawzall
  • MIG welder
  • 6-ton jack stands
  • 3-ton floor jack & some wood blocks for extensions
  • Hand tools (pliers, sockets, wrenches, hammers, etc)

Materials Used:
  • (1x) 2x2' sheet of 20ga steel - Order more if you want practice pieces. (Link)
  • (4x) 2' sticks of 1/8" steel rod - You can also find it in 4' sticks at Home Depot. (Link)
  • (1x) 3M Seam Sealer - I ordered 3 cans but only used 1. (Link)
  • (2x) 3M Rubberized Undercoating - I ordered a 6 pack, only needed 2 cans. (Link)
  • Noico sound deadening mats (optional) - you only need a few pieces, I had a lot on hand. (Link)
  • Noico sound deadening foam (optional) - same as the mat, you only need a few pieces. (Link)

Whoa, nice work & great job on the write up. I really appreciate your thoroughness in explaining the process & the pictures helped visualize what you were describing. You also did a great job of sequencing the steps which made it really easy to follow.
 
Fantastic write up, Nice clean work.


When you cut into the rocker panels for example and then weld them back up, enclosing them, How do you properly prevent the bare metal inside from rusting? Seems like most people just don't worry about it but I assume the pros have a way of dealing with this. If anyone knows, I've been wondering
 
Fantastic write up, Nice clean work.


When you cut into the rocker panels for example and then weld them back up, enclosing them, How do you properly prevent the bare metal inside from rusting? Seems like most people just don't worry about it but I assume the pros have a way of dealing with this. If anyone knows, I've been wondering

There's weldable paint & primers offered by companies like steel it, SEM, seymour, eastwood etc. Speaking of pro's, the several times I've had something professionally welded, weld through paint/primer was never mentioned but I always brought it myself & asked that it be used. There's debate on the effectiveness of weldable paints/primers but something seems better than nothing.
 
There's weldable paint & primers offered by companies like steel it, SEM, seymour, eastwood etc. Speaking of pro's, the several times I've had something professionally welded, weld through paint/primer was never mentioned but I always brought it myself & asked that it be used. There's debate on the effectiveness of weldable paints/primers but something seems better than nothing.
You can probably get to access to the inside of most of that to spray some Fluid Film or similar on the back side... Or maybe some eastwood internal frame coating with its hose 360* sprayer thing.

-Charlie
 

Members online

Forum statistics

Threads
278,317
Messages
3,554,128
Members
248,016
Latest member
Advally Service

Trending content

Back
Top