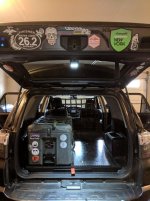
Cargo area "flat plate" mod bolt holes

This is correct but they are not to hard to find and drill out. I did that on mine and made a Goose Gear like panel that bolts down there.

What's the approach there? I imagine locating the nuts from underneath, then using a punch to set a location dimple to drill from the top? Or maybe starting a pilot hole from underneath, taking care not to chew up the threads?
 
What's the approach there? I imagine locating the nuts from underneath, then using a punch to set a location dimple to drill from the top? Or maybe starting a pilot hole from underneath, taking care not to chew up the threads?

Well I did mine this weekend and didn't attempt to find them. There are several holes available that I just put a 1/4-20 rivnut into. 4 along the back and 3 up front (circled in red in the pic). I put some spacers to get it up to the level of the black plastic (circled in blue in the pic). Set the 3/4" ply board on top and bolted it down.

pvilMtV.jpg
 
What's the approach there? I imagine locating the nuts from underneath, then using a punch to set a location dimple to drill from the top? Or maybe starting a pilot hole from underneath, taking care not to chew up the threads?

Yep, start with a pilot underneath, then use a step bit to widen them as safe as possible!
 
Does anyone happen to know the size of the bolts for the 4 mounting points? I forgot to measure them before the slide went away.

I think they're M14 x 1.50 x 60-65mm
 
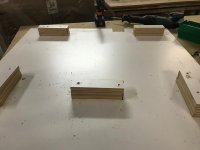
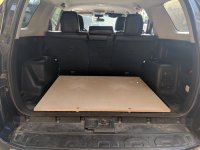
Started prototyping the plate system for the cargo area. Final design will have 4 sections of L track similar to [MENTION=129593]MTN4RNR[/MENTION] design.

Right now I only have the two front bolt holes cut, and will add more in the rear.

Looking for feedback on the support structure. Basing off of the images I was able to find for the goosegear plate, it looks like several different sizes of plywood and 2x2 were used.
 

Attachments

  • IMG_2844.jpg
    IMG_2844.jpg
    132.1 KB · Views: 1,332
What's the progress looking like on everyone custom floor plates? Going to be building one of my own. I know how these things go and I wanted everyone's mistakes brought to light before I make them myself lol.
 
What's the progress looking like on everyone custom floor plates? Going to be building one of my own. I know how these things go and I wanted everyone's mistakes brought to light before I make them myself lol.

Slowly. I had an issue with the supports spacing. I haven't had time to sit down and draw and sand it out yet. I'm considering contacting ARB or Dobinsons for their 10mm and 40mm drawer supports.
 
What's the progress looking like on everyone custom floor plates? Going to be building one of my own. I know how these things go and I wanted everyone's mistakes brought to light before I make them myself lol.

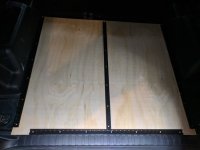
Here is mine. I used the existing holes in the 4Runner to install 1/4-20 rivnuts for the bolt holes. Then used a forstner bit to recess the bolt holes for a completely flat platform. I kept the carpet underneath as well so that there isn't any rattling or vibration. You can also use the 4 D-ring holes as well if you build wings out to the side.
 

Attachments

  • IMG_20180813_184504.jpg
    IMG_20180813_184504.jpg
    129 KB · Views: 1,422
I'm taking a slightly different approach. I am not planning on permanently mounting stuff to mine, just making it easier to securely load stuff when I do load it. Also, trying to kill 2 birds with one stone, making it level so I can sleep in the back and leave enough space underneath to put a table.
 
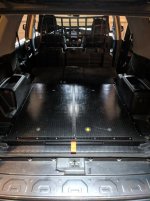
Hopefully adding some value to this thread, even if this is a REALLY long post - I saw a Goose Gear plate a little while back, and thought it was a neat idea. I had spent a lot of time making a nice drawer system, but the dog seemed to get around a lot easier in the back before the drawers, and there were times I would have liked to have a fully open cargo space with the seats down to haul random bulky items every once and a while.

Like many others, I thought the Goose Gear plate was quite expensive, and I thought I could improve upon it a little. Of course it got a bit out of hand, and I think I spent more making my own than I would have buying the GG, but hopefully gained some durability/usefulness. I spent a LOT of time searching the forum looking for mounting options, and tips from people who had already ripped out the flooring from their cargo area. Three folks I'd like to thank for informative/helpful posts are [MENTION=138432]Liquidmantis[/MENTION] [MENTION=129593]MTN4RNR[/MENTION] and of course [MENTION=65614]Antman[/MENTION] You guys saved me some headaches, for sure.

First I removed the carpet and foam underlayment and spent a lot of time thinking about the size of my template and mounting points. For those who may not have found this information already: There are existing threads in the floor for mounting the optional sliding cargo tray. These threads exist even in non tray-equipped models (like mine), but they are covered by sheet metal. I planned on finding these existing mounts, slapping down some Dynamat, and mounting my plate directly on top. Once I drove around without the factory foam underlayment and carpet, I quickly realized how much noise traveled through the bare sheet metal floor. I also thought it would be nice to at least have the option of changing back in the future if I desired, so I decided to make my template, identify mounting points, then reinstall the foam & carpet and mount my plate over it.


After some difficulty identifying the location of the existing mounts, I realized there was plenty of room underneath to just make my own connection points and not have to worry about drilling my bolt holes in just the right place with no room for error. I thought rivnuts would be a good fit here, then decided on 1/2" carriage bolts with extra wide washers on the under side since they would get me a little more spread on the thin sheet metal. I'm satisfied with how that worked out. I'm happy to share a sketch with anyone who wants it showing my dimensions for the plate and mounting points. A note about the mounting points: I have a 2016 Trail. No KDSS, no XREAS, no 3rd row, no factory sliding cargo tray. I can't be 100% certain that the easy access I had for my bolts will be as easy for someone with KDSS for example. Who knows if there's a bundle of cabling strapped to your floor pan where mine is bare.

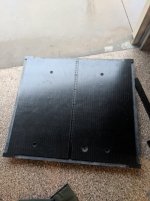
If I was going to spend this much time and effort on the project, I didn't want it to be plywood. I used to be a carpenter, and I know how wood (even high grade exterior finish marine plywood or high density exotic solid hardwoods) can react to heat, cold, impact, pressure, and moisture over time. I wanted to use something that would last basically forever without any maintenance or adjustment whatsoever, no matter what it was exposed to. I found a plastics warehouse and bought a partial sheet of 3/4" UHMW sheeting (Ultra-High Molecular Weight Polyethylene). It was expensive AF, but I kinda wanted to make the plate out of solid aluminum, so I justified it as being cheaper than that.

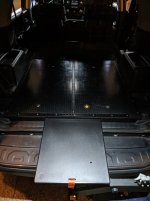
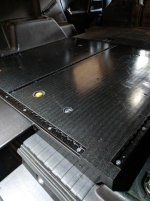
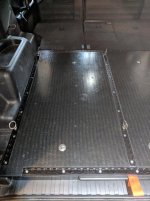
This post is getting excruciatingly long, so I'll stop with the detail and say that I knew I wanted flush mounted adjustable railing, but I stole (borrowed?-just like the light you see in the last photo with the switch in the hand hole...) the slide out tray idea from [MENTION=129593]MTN4RNR[/MENTION] I made mine without rails. It is all plastic, with a set pin (the yellow thing on top of the plate) that holds the shelf in either the open or closed position. I didn't want to cover the factory tie-downs, so I didn't make the fins that flare out behind the wheel wells. Ended up with a nice ultra heavy duty flush surface that sits even with the rear seats when folded down. I through-bolted all of the railing, so it's strong enough that I wouldn't hesitate to ratchet strap a 500lb weight to it and go off roading. Anyway, if you've read this far, thanks, and I hope this is useful for someone who wants to make theirs better the next time around.

Two final notes:
-The diagonal cut you see on the face plate on the right side of the close up picture is really not sloppy like it appears in the photo. Please don't call me out on a bad cut
-I have another one of the large cases that you see strapped down in the last photo. Made by Hardigg/Pelican. $100 if anyone wants it. It's bigger than I need for my camp kitchen.

 

Attachments

  • rsz_routed_2.jpg
    rsz_routed_2.jpg
    72.6 KB · Views: 3,618
  • rsz_routed_1.jpg
    rsz_routed_1.jpg
    133.1 KB · Views: 3,483
  • rsz_table_in.jpg
    rsz_table_in.jpg
    75.4 KB · Views: 3,494
  • rsz_table_out.jpg
    rsz_table_out.jpg
    114.7 KB · Views: 3,504
  • rsz_close_up.jpg
    rsz_close_up.jpg
    75.3 KB · Views: 3,424
  • rsz_final.jpg
    rsz_final.jpg
    78.7 KB · Views: 3,524
  • rsz_final_with_box.jpg
    rsz_final_with_box.jpg
    82.2 KB · Views: 3,576
Man, I haven't been on the forums in a while (it's been better for my wallet! Well, not really, just better for getting new guitars...)

Nice job, KingTaco!

I'm still running the same platform and it has served me very well for my multi-use needs. However... My family isn't really into trips, and my older son is going to be moving out before long, so I'm starting to consider doing a partial seat delete (hell, maybe I'll go nuts and remove the back altogether.) But that would let me build a sleeping platform for traveling when I don't want to deal with the ground tent overhead.
 
[MENTION=137810]KingTaco[/MENTION] there is nothing that looks home made about what you have done, very impressive.
 
I'm still running the same platform and it has served me very well for my multi-use needs. However... My family isn't really into trips, and my older son is going to be moving out before long, so I'm starting to consider doing a partial seat delete (hell, maybe I'll go nuts and remove the back altogether.) But that would let me build a sleeping platform for traveling when I don't want to deal with the ground tent overhead.
I know exactly what you mean. My kids are teenagers now, and nobody wants to go anywhere with me either :D There are things I really like about the seat delete idea; maybe some day. Not giving up hope yet.

[MENTION=137810]KingTaco[/MENTION] there is nothing that looks home made about what you have done, very impressive.
Thank you! It is nice every once and a while to do a mod that I don't second guess and want to change right away.


Nice! That looks SOLID!
Lots of us have gone the cheaper route and built our own with help of many @tr4.org

Here's what I did...... ARB Drawer install – 2011 TE with Sliding tray
Thanks! The link didn't work for me but yeah, cheaper is usually smarter. I don't get to build anything much anymore (not that I'm disappointed), and I think I just wanted to see if I was still capable of making something decent. :tea:
 
[MENTION=137810]KingTaco[/MENTION], looks excellent! Very good work, and I like your version of the slide out! Should serve you a very long time!
 
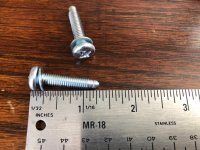
As long as you guys are tearing apart the backs of your trucks, I'm hoping you might be able to tell me where these screws came from. I emptied out the back of mine for a sound proofing project and these were left over after reassembly!? :confused:
 

Attachments

  • IMG_7636 (1).jpg
    IMG_7636 (1).jpg
    136.2 KB · Views: 3,382
Last edited:
As long as you guys are tearing apart the backs of your trucks, I'm hoping you might be able to tell me where these screws came from. I emptied out the back of mine for a sound proofing project and these were left over. :confused:

Are those the screws that secure the tie-down loops in the back corners?
 

Members online

Forum statistics

Threads
278,316
Messages
3,554,111
Members
248,016
Latest member
Advally Service

Trending content

Back
Top