01-13-2011, 07:59 PM
|
#16
|
 |
Member
|
|
Join Date: Jul 2010
Location: Charleston, SC
Posts: 714
|
|
|
Member
Join Date: Jul 2010
Location: Charleston, SC
Posts: 714
|
Quote:
Originally Posted by ryangab

Just noticed this and it looks great!! I have a 4th gen and this will be gettin put on soon. But when looking at the website. Why not just go with 1 or 2 of the flood LED lights. It would cost the same and you wont have to worry about wiring 4 lights together. Just a thought. Anyway. Thanks for the idea.
|
Well, I basically agree with you. I had originally planned on putting only two in there, but I it wasn't enough light, and I already had the other two modules, so I went for it because that was easier to wire up than waiting another five days for larger lights to come in the mail. I ended up liking how they are spaced out and it provides a cool light over everything...very few shadows.
__________________
2010 LTD 4x4, blk/sbl, nav, remote start MODS/ADDS: TE Conversion; ICON Stage 2 w/ LRUCAs; 285/70/17 DuraTracs; Baja Rack; SW Sliders, ARB CKMA12 onboard air; Fiamm horns; Tan Huskys; 30% tint; 5" mangowalk; LED lights in interior, puddle lights, license plate, engine compartment, and cargo area; small tool box under the hood; removed cargo tray stopper; reverse cam switch; 4-pin trailer light hookup relocation; K&N air filter; AVS bug deflector; 3m carbonfiber chrome coverup (except door handles); midland CB; Firestik 2' hood-mounted CB antenna.
|

|
 Reply With Quote Reply With Quote
|
|
01-13-2011, 08:08 PM
|
#17
|
 |
Member
|
|
Join Date: Feb 2010
Location: West Palm Beach, FL
Posts: 222
|
|
|
Member
Join Date: Feb 2010
Location: West Palm Beach, FL
Posts: 222
|
Quote:
Originally Posted by Snooperstyle
Well, I basically agree with you. I had originally planned on putting only two in there, but I it wasn't enough light, and I already had the other two modules, so I went for it because that was easier to wire up than waiting another five days for larger lights to come in the mail. I ended up liking how they are spaced out and it provides a cool light over everything...very few shadows.
|
I can see your point. You should know since you already have them up. I think I am going to stick to what you have done and get 4 lights instead of the flood light LED's. You can never have enough light especially when you need it. Thanks again!!
__________________
2005 V8 Limited, Titanium Sliver, Heated Seats, Leather, Full time 4WD, JBL NAV W/SUB, USA SPEC15 IPOD/AUX, 35% tint, SPIDER TRAX, Yakima Bike Rack, WeatherTech floor liners front & rear, Mag-light MOD, LED lic-plate mod,LED Running Boards, LED Interior Swap, 1" Daystar Leveling Kit, 1.5" Daystar Rear Spacer, SilverStar ULTRA 9006, LED Rear Tail Lights 06-09, Tacoma Skid-Plate, BFG AT/KO 265/70/17, TRD Valve Stems
|
|
|
Reply With Quote
|
|
01-14-2011, 10:41 AM
|
#18
|
|
Member
|
|
Join Date: Oct 2006
Location: Phoenix, AZ
Age: 45
Posts: 273
|
|
|
Member
Join Date: Oct 2006
Location: Phoenix, AZ
Age: 45
Posts: 273
|
Ive used a mercury switch for a hood light ive done before. I dont remember where i got it but it was just mounted to the hood and when its opened the lights turned on. No real moving parts to break and no big holes to drill. The switch i used was in a plastic housing and was mounted in a space i cut in the heat shield so it had some protection.
I really like your setup and may have to copy it for my 4th gen.
Thanks for posting this and the links.
__________________
2007 Limited 4Runner
4x4 V8
Last edited by blkexp98; 01-14-2011 at 10:44 AM.
|
|
|
Reply With Quote
|
|
01-14-2011, 10:59 AM
|
#19
|
 |
Elite Member
|
|
Join Date: Mar 2010
Location: Illinois
Posts: 6,045
Real Name: Um, Phil?
|
|
|
Elite Member
Join Date: Mar 2010
Location: Illinois
Posts: 6,045
Real Name: Um, Phil?
|
Quote:
Originally Posted by Snooperstyle
... it is a snap to turn it on...
|
It's a "snap" to turn on ... har har ..... get it, get it?
Good one Snoop.....
__________________
2010 Blizzard Pearl SR5/P - traded
2018 Superwhite SR5/P ... IS350 retrofit.
|
|
|
Reply With Quote
|
|
01-14-2011, 12:24 PM
|
#20
|
|
Member
|
|
Join Date: Jul 2010
Location: Charleston, SC
Posts: 714
|
|
|
Member
Join Date: Jul 2010
Location: Charleston, SC
Posts: 714
|
Quote:
Originally Posted by philsey
It's a "snap" to turn on ... har har ..... get it, get it?
Good one Snoop.....
|

__________________
2010 LTD 4x4, blk/sbl, nav, remote start MODS/ADDS: TE Conversion; ICON Stage 2 w/ LRUCAs; 285/70/17 DuraTracs; Baja Rack; SW Sliders, ARB CKMA12 onboard air; Fiamm horns; Tan Huskys; 30% tint; 5" mangowalk; LED lights in interior, puddle lights, license plate, engine compartment, and cargo area; small tool box under the hood; removed cargo tray stopper; reverse cam switch; 4-pin trailer light hookup relocation; K&N air filter; AVS bug deflector; 3m carbonfiber chrome coverup (except door handles); midland CB; Firestik 2' hood-mounted CB antenna.
|
|
|
Reply With Quote
|
|
05-25-2012, 11:15 PM
|
#21
|
 |
Junior Member
|
|
Join Date: May 2011
Location: Round Rock, TX
Posts: 28
|
|
|
Junior Member
Join Date: May 2011
Location: Round Rock, TX
Posts: 28
|
Thanks for the great idea.
I've got miles of led strip lights around (ok, not really miles--- but a whole bunch), so using you're brilliant Idea, I added them under my hood and the difference is like night and day... literally.
I went with a pin-switch to trigger them because I like trying to catch the lights coming on and going off-- like the light in the fridge when you were a kid, remember? Actually, I just didn't want to have to fumble around in the dark to find the switch, and thought it would just be more convenient to always come on when I open the hood.
I tend to be a bit anal at times, and spent entirely too much time trying to decide exactly where I wanted to mount the switch.
The dilemma I faced was that I didn't want to put the switch in a position where it could snag on something (me) if I happened to be careless enough to lean over it with a loose shirt, but I also wanted to make sure that the location I chose was reinforced well and made solid contact with the hood, so that I wouldn't have to worry about rubbing, or a poor connection over time.
My solution was to mount the pin-switch inside one of the rubber hood stops...
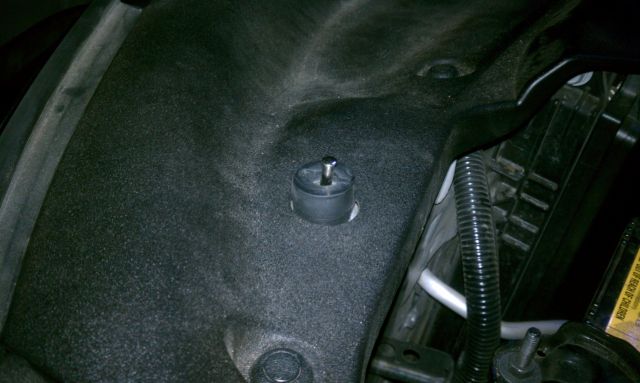
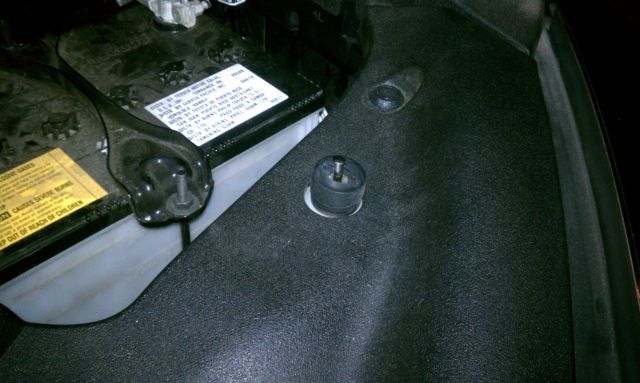
First, I had to drill a hole through the middle of the stopper so the switch could go all the way through and open/close without rubbing at all (since the switch has to move freely in order to complete the circuit when the switch springs up).
Since the pin-switch is normally grounded by the very nature of it being mounted securely to the bare metal, the fact that I was embedding it in a reasonably solid chunk of rubber meant I had to come up with some other way to ground it, or find some way to defy everything I knew about electricity.
I ended up taking the lazy way out (hint--- I didn't defy any principles of electricity).
To ground the switch, I ended up soldering a length of wire to the pin-switch housing using a propane torch then attached that wire to a pre-existing hole in the metal radiator support (but not yet).
With the Rubber stopper taken out (it unscrews-- it's actually designed to adjust the height of the hood when closed-- go figure!) I pushed the pin switch in so that the pin was a bit higher than the top of the bumper, but made sure that there was more travel left in the switch below the top of the bumper. I still wanted the bumper to support the weight of the hood when closed instead of the switch, to give the switch a chance to live to a ripe old age.
Ordinarily, the pin switch needs to be fixed to the vehicle with a lock washer and nut, but in this case those were unnecessary. Since the switch was firmly seated in the middle of the rubber bumper, by the time I had replaced the bumper in it's original location (by screwing it in), the rubber was being compressed around the switch keeping it firmly embedded in place.
Once the bumper was back in place, I made sure to readjust it's height so the hood would be level when closed, then finally, after all that was done, I secured the wire (remember the one soldered to the switch housing?) to an existing hole in the radiator support.
Of course I also ran the + side of things to a fused 12V feed, but that's boring, so I'm not going to waste time on that part-- since I'm lazy.
Anyway, I know this was way longer than it probably needed to be, and the real purpose of this thread was to show how brilliant Snooperstyle's mod was, but I thought this trick for mounting the switch might come in handy for others out there looking for switch placement ideas.
Thanks again for the light idea Snooperstyle-- it is was a great solution to an odd feature omission by Toyota.
__________________
2011 Mag Grey Trail Edition with KDSS that has spent entirely too much time on pavement.
Mods: N-fab nerf-step; Antman's Tailgater Cupholders; PIAA 510 Crystal Ion Fogs in lower grill (ala 7Harper); PIAA 520 ATP behind Satoshi Grill Mod; Hella Work Lamps installed as rock lights; Laser etched Contura V-series rockers installed below factory switches; Full time 12v outlet in passenger floorboard; Cooper Discoverer A/T3 265/70R17.
Coming soon: Engo E9000s on Budbuilt hidden winch mount; onboard air; dual batteries; lift/suspension upgrade; passenger eject 
Last edited by deejayshag; 05-25-2012 at 11:54 PM.
Reason: was being lazy in the original post
|
|
|
Reply With Quote
|
|
05-28-2012, 08:58 AM
|
#22
|
|
Member
|
|
Join Date: May 2011
Location: Chesterfield, VA
Posts: 85
|
|
|
Member
Join Date: May 2011
Location: Chesterfield, VA
Posts: 85
|
Where do you buy your LED strips?
__________________
2011 Toyota 4Runner Trail
2006 Ford Mustang GT Convertible
|
|
|
Reply With Quote
|
|
05-28-2012, 09:16 AM
|
#23
|
 |
Senior Member
|
|
Join Date: Nov 2010
Location: Mesa, AZ
Posts: 1,376
Real Name: Dave
|
|
|
Senior Member
Join Date: Nov 2010
Location: Mesa, AZ
Posts: 1,376
Real Name: Dave
|
Quote:
Originally Posted by Snooperstyle
Installed Oznium.com LEDs in the engine compartment today ...
|
I bought mine from Amazon: Amazon.com: LEDwholesalers 16.4 Feet 300 SMD LED Flexible Strip with Waterproof Sleeve,12 Volt Clear White LED Ribbon 5 Meter Reel, 2047WH: Home Improvement - just cut to length you want, solder, shrink wrap and you're good to go!
__________________
A human being should be able to change a diaper, plan an invasion, butcher a hog, conn a ship, design a building, write a sonnet, balance accounts, build a wall, set a bone, comfort the dying, take orders, give orders, cooperate, act alone, solve equations, analyze a new problem, pitch manure, program a computer, cook a tasty meal, fight efficiently, die gallantly. Specialization is for insects.
|
|
|
Reply With Quote
|
|
05-28-2012, 10:28 AM
|
#24
|
 |
Senior Member
|
|
Join Date: Feb 2005
Location: San Antonio, TX (4Runner sold 8-2018)
Posts: 1,448
|
|
|
Senior Member
Join Date: Feb 2005
Location: San Antonio, TX (4Runner sold 8-2018)
Posts: 1,448
|
Just be sure the light shines on the big motor ON-OFF switch.
Flipping it back ON is about the only thing you can do under the hood at night.
__________________

was: 2005 2wd V8 Limited, one owner (me), 155K miles
now: 2019 Kia Sorento SXL V6
|
|
|
Reply With Quote
|
|
05-30-2012, 09:34 AM
|
#25
|
|
Member
|
|
Join Date: Jul 2010
Location: Charleston, SC
Posts: 714
|
|
|
Member
Join Date: Jul 2010
Location: Charleston, SC
Posts: 714
|
Quote:
Originally Posted by deejayshag
Thanks again for the light idea Snooperstyle-- it is was a great solution to an odd feature omission by Toyota.
|
You are welcome! What you did is kinda what I was gonna do, and then I just couldn't find a switch like that, so I ended up using some old thing I had laying around in the garage. Even though I wanted a pressure switch originally, I ended up liking being able to turn it on and off manually because then it doesn't come on during the day, which is when I have the hood open 95% of the time...not that these LEDs really take up any juice...but still...
__________________
2010 LTD 4x4, blk/sbl, nav, remote start MODS/ADDS: TE Conversion; ICON Stage 2 w/ LRUCAs; 285/70/17 DuraTracs; Baja Rack; SW Sliders, ARB CKMA12 onboard air; Fiamm horns; Tan Huskys; 30% tint; 5" mangowalk; LED lights in interior, puddle lights, license plate, engine compartment, and cargo area; small tool box under the hood; removed cargo tray stopper; reverse cam switch; 4-pin trailer light hookup relocation; K&N air filter; AVS bug deflector; 3m carbonfiber chrome coverup (except door handles); midland CB; Firestik 2' hood-mounted CB antenna.
|
|
|
Reply With Quote
|
|
06-02-2012, 08:37 PM
|
#26
|
 |
Member
|
|
Join Date: Feb 2010
Location: Baton Rouge, LA
Posts: 390
|
|
|
Member
Join Date: Feb 2010
Location: Baton Rouge, LA
Posts: 390
|

Quote:
Originally Posted by Snooperstyle
Here ya go:
Tiny LED Modules : High brightness surface LEDs
I would caution that these are really small...so look at the exact measurements before you buy. I thought that they were gonna be a little bigger because I didn't look at the fine print...I still think they are great, but I had to use four of them instead of two, which actually turned out looking really awesome!
What I put in my hood is TWO of the round ones on the outer edges, and then TWO of the long ones for the middle ones. I got the white ones with black housing. All four of them put out the same amount of light roughly...if I had to say which one puts out more light, and it is really close, I would say it is the long ones...both have 6 HP LEDs in them...
More on the switch: The location of this switch that I mounted is right next to the rubber stopper, and it is flat under the hood right there, which should make for good contact with the right switch. This did involve me drilling a hole in the panel there, but only in the plastic, not in the metal underneath...there was already a hole there! It is very tight underneath it, and it might involve removing this switch to access the light housing but I AM NOT SURE...didn't try! |
Great feedback - thank you for taking the time to post.
This mod is one of the very next for me. May adjust LEDs (size), as you described, and add a switch vice a pin switch.
MOD is a must have (IMHO) as many of my others are "nice to have".
Good stuff.
Thanks again
S
__________________
Build thread
2010 Salsa SR5, 3rd row, 4x4
Locate, Close with, and Destroy the Enemy...Semper Fidelis, 90-Current
|
|
|
Reply With Quote
|
|
06-03-2012, 12:34 PM
|
#27
|
 |
Senior Member
|
|
Join Date: Sep 2011
Location: So Cal
Posts: 1,076
|
|
|
Senior Member
Join Date: Sep 2011
Location: So Cal
Posts: 1,076
|
__________________
~~~2011 4Runner Trail Edition w/KDSS~~~
Icon - Vision-X - Rigid - Gobi - Hi Lift - V-Leds - Bud Built - Shrockworks - Husky Liner - Viair - Odyssey - Total Chaos - Cobra - Hankook - Firestick - Contura - Intelligent Battery System - CDT - AFE - Yaesu - Line-X - ARB - MY BUILD THREAD! 
|
|
|
Reply With Quote
|
|
06-03-2012, 08:57 PM
|
#28
|
 |
Member
|
|
Join Date: Nov 2010
Location: CT
Posts: 280
|
|
|
Member
Join Date: Nov 2010
Location: CT
Posts: 280
|
I did the same thing as SOcalTRAIL. I also bought my led's from V-LEDS and installation was a snap. Used a relay and also mounted the switch right on the plastic radiator cover (right side - or near side in the picture below). 

__________________
'11 Mag Grey Limited
ICON Extended Remote Resi ~ ICON Rear 2.0 VS Shocks & Springs ~ LR UCA ~ Diff Drop Kit ~ HID 3000k Piaa 510's ~ Fogs Anytime Mod
H9 Lows and Fogs ~ 9011 HIR Highs ~ 275/60-20 AT3 ~ Black Dubs ~ 12v Anytime Mod ~ Satoshi Grill ~ Reverse Camera Anytime Mod
LED's in Rear Bumper ~ Husky Mats ~ LED's UnderHood ~ AVS Hood Protector ~ Plasti Dip Emblems ~ Factory Remote Start ~ CravenSpeed Antenna
LED's Everywhere ~ Fiamm Horns ~ GOBI Ladder ~ Ram Mount iPad Holder ~ Tailgating Cup Holders ~ Front Windows 20% ~ OEM Canadian Mud Flaps
|
|
|
Reply With Quote
|
|
06-08-2012, 12:51 PM
|
#29
|
 |
Member
|
|
Join Date: Feb 2012
Location: SoCal
Posts: 315
|
|
|
Member
Join Date: Feb 2012
Location: SoCal
Posts: 315
|
I know absolutely nothing about electrical wiring, but must have this mod. Can you please tell me exactly what items to buy for this mod? I already bought:
<> 16ft Waterproof 5050 300 smd lead strip in cool white
<> A green lighted on/off spst 12v 16 amp 3 pin dc switch
What else do I need to wire this and exactly how should I?
An inline fuse? what rating? Wire to run? what type? straight to battery or do I need a relay or something else?
Sorry for asking for the "baby steps" guys...I literally never wire anything, but want to do this myself. I still have the backup light mod to do and already bought the switches and lights and upgraded bulbs and still haven't installed them because I don't know how to run the wiring.
|
|
|
Reply With Quote
|
|
06-08-2012, 01:07 PM
|
#30
|
|
Senior Member
|
|
Join Date: Nov 2010
Location: Mesa, AZ
Posts: 1,376
Real Name: Dave
|
|
|
Senior Member
Join Date: Nov 2010
Location: Mesa, AZ
Posts: 1,376
Real Name: Dave
|
Quote:
Originally Posted by calikev
I know absolutely nothing about electrical wiring, but must have this mod. Can you please tell me exactly what items to buy for this mod? I already bought:
<> 16ft Waterproof 5050 300 smd lead strip in cool white
<> A green lighted on/off spst 12v 16 amp 3 pin dc switch
What else do I need to wire this and exactly how should I?
An inline fuse? what rating? Wire to run? what type? straight to battery or do I need a relay or something else?
Sorry for asking for the "baby steps" guys...I literally never wire anything, but want to do this myself. I still have the backup light mod to do and already bought the switches and lights and upgraded bulbs and still haven't installed them because I don't know how to run the wiring.
|
Wire is pretty important in wiring things, so start with that - 18 or 16 AWG primary wire should be fine; get one spool of red and one spool of black for easy designation when you wire it. If you have a 16ft section of LEDs you'll also need something to cut the LED strips to make them shorter (box knife should be fine for that) and the following items:
- Soldering Iron
- Rosin core solder
- Heat Shrink
- Heat Gun or Hair Dryer
- Electrical Tape
You don't need a relay for LEDs, and an inline fuse will work fine. Determine fuse size based on the gauge wire you're using (which is determined by the load you're putting through the wire), but for this purpose 5 amps should be plenty unless you keep your LEDs at 16ft...
__________________
A human being should be able to change a diaper, plan an invasion, butcher a hog, conn a ship, design a building, write a sonnet, balance accounts, build a wall, set a bone, comfort the dying, take orders, give orders, cooperate, act alone, solve equations, analyze a new problem, pitch manure, program a computer, cook a tasty meal, fight efficiently, die gallantly. Specialization is for insects.
|
|
|
Reply With Quote
|
 Posting Rules
|
You may not post new threads
You may not post replies
You may not post attachments
You may not edit your posts
HTML code is On
|
|
|
|


 Linear Mode