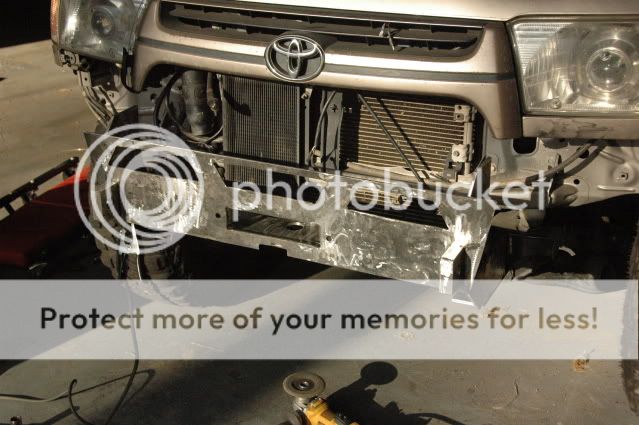
02 Bumper Build!!

wyorunner

New member
In October of last year I sold my old bumpers to buy a welder and build new ones. I started on the rear but it is not yet finished. The front however is. This was almost all cut out with an angle grinder. The holes were cut out with a plasma cutter at a shop down town.

Costs:

Steel: 300 with some left overs
Gas: 188.08 with buying a larger tank, would have only been 40 if i started with the larger tank and i used some for a set of sliders and the rear bumper
Disposables(grinding discs, flapper wheels, cutoff discs, tips, wire, drill bits): 148.07
Fasteners all Grade 10.9 M14: 40.88

Total: 677.03

Yea I feel its a little much but I'm ok with it for the first one. It turned out nice. It is held on with 5 bolts on each frame tube. Two in the bottom, two in the end cap, and one going through horizontally. The end cap mod goes into the frame about 5 inches, and is welded entirely around the front of the frame and through four holes in the side. On to the pictures!!!


My end cap mod:

From the beefed up same shape as the factory:
NJA_2134.jpg~original

NJA_2135.jpg~original

NJA_2136.jpg~original


NJA_2138.jpg~original

NJA_2140.jpg~original


Now cleaned frame
NJA_2142.jpg~original


This is the piece that goes into the frame.
NJA_2144.jpg~original

NJA_2146.jpg~original

NJA_2145.jpg~original


Welded in
NJA_2147.jpg~original

NJA_2148.jpg~original


Now onto the front bumper.

Bumper in pieces!!!!
Dirty
DSC_0159-1.jpg~original


Clean
DSC_0161-1.jpg~original

DSC_0162-1.jpg~original

DSC_0174-1.jpg~original


Bottom of mount, it attaches to the two factory bolts for the tow hooks.
DSC_0164-1.jpg~original

DSC_0165-1.jpg~original


Winch Plate
DSC_0166-1.jpg~original


Vertical mount top plate support
DSC_0167-1.jpg~original


1" Shackle mounts, drilled with a one inch hole saw
DSC_0168-1.jpg~original
 
Last edited:
Register to hide this ad
What thickness material are you using for this?

I think you may have been better off starting making a cross member, but I'll have see how this finishes out. Make sure you put a lot of thought into how you support that winch mount. There are usually more lives at stake than just your own when winching.

Be careful with the flapper on those large sections. The kind of marks you've already put on it usually don't come out without an assload of work and even then I seriously have my doubts judging by the pics. Save your finishing work for when all the primary welding and rough grinding is done down to a gnats ass from the finished surface. Then only finish (flap) what's necessary and closest to the weld joint as possible.

Not trying to bag on your work at all.
These 3rd gens are not a comparatively easy platform to make a strong, aesthetically pleasing bumper. Just wait till you get to the rear, haha...

I'll be interested in seeing how this one plays out.
 
Great start. Certainly looks like you have some good attention to detail. Can't wait to see the progress.
 
are those plates 3/16th? btw angle grinder? why? just get a portable bandsaw, but i love the idea so far, i respect people who build their own stuff.
 
What thickness material are you using for this?

I think you may have been better off starting making a cross member, but I'll have see how this finishes out. Make sure you put a lot of thought into how you support that winch mount. There are usually more lives at stake than just your own when winching.

Be careful with the flapper on those large sections. The kind of marks you've already put on it usually don't come out without an assload of work and even then I seriously have my doubts judging by the pics. Save your finishing work for when all the primary welding and rough grinding is done down to a gnats ass from the finished surface. Then only finish (flap) what's necessary and closest to the weld joint as possible.

Not trying to bag on your work at all.
These 3rd gens are not a comparatively easy platform to make a strong, aesthetically pleasing bumper. Just wait till you get to the rear, haha...

I'll be interested in seeing how this one plays out.

Big John,

I definitely should have posted the thickness, the entire mount is 1/4" and then the rest is 3/16, with 1/8" 1.75 tube. And its strong as hell, much strong than my older ones. As far as grinding and flapping goes, I put on a type of paint that filled all the gouge marks. I think I have more time in grinding and flapping than I do in cutting and welding. The bumper was cleaned in its entirety, TWICE, once before being welded, then once after being welded.

revenant, here is what im doing! I will be making a removable tire carrier for the rear again.
 
Now to fill it out!

DSC_0177-1.jpg~original

DSC_0178-1.jpg~original

DSC_0179-1.jpg~original

DSC_0182-1.jpg~original

DSC_0181-1.jpg~original


Bumper tacked together
DSC_0180-1.jpg~original


Winch that went in after being put back together(it was broken)
DSC_0183-1.jpg~original

All Welded Up
DSC_0184-1.jpg~original


My Welds
DSC_0185-1.jpg~original
 
Last edited:
95% Finished Product
NJA_2297.jpg~original

NJA_2296.jpg~original

NJA_2295.jpg~original


I will get some more pictures today. Some of the mounting bolts, and other bits that are not visible from the above pictures. I also put blinkers in it yesterday. I still have to weld on the side braces and fog light pipe and bracket.

Also, it would not be kind of me to not give credit where credit is due, I used Bandit Runners CAD design for this. He sells the plan as a you build it, however mine looks quite different and doesn't have as much steel removed.
 
Last edited:
nice work wyo. a couple finishing touches and that's a solid job. what kind of swing out for the rear? up and over like the last one? i could see that being slightly impractical. however any swingout is going to have its own clearance issues.
 
To be honest revenant, I never really had a hole lot of clearance issues. The only thing that ever hit on the last one was the steel cap on the end of the tire carrier piece that went into the receiver. Im actually going to try and do a swing out instead of a swing over. It is much easier to move when swinging out instead of over. My problem is with the swing out I have limited space issues between the body and bumper and receiver, if that makes sense. I will have a tire carrier though. I don't like carrying one on top, and one won't fit underneath, so my only option is a carrier. And I like haveing it removable.
 
Looks awesome! And whether you followed plans or not, you still had to put the pieces together. Tons of props there.
 
hey man it looks good! is it heavier than the last bumper?

NO WAY IN HELL!!!! I can still pick this one up with ease when the winch is not in it. With the winch in its heavy but I can still move it. The old one, could barely move with or with out the winch. The old one was built around a solid 1/2" piece, with a 3x8 box steel for the winch plate. It was a fatty!

Hepar, thanks. Im happy with the way it turned out.
 
The bumper is coming along very nicely! I am glad I could be of service to you. I was really happy with the way your bumper design came out. One of the nicest I've done, IMHO.

Please let me know if you have any issues with the build. Also, thanks for mentioning me.
 
Bandit, you rock the CAD, keep up the good work. Im more than satisfied with it. Except for some reason I couldn't manage to do it on the cheap. Thats ok. Thanks again.
 
Looks good Wyo. The only concerns I have left are how it's mounted since you really have no pics of the mounting. Other than that, for a guy with and angle grinder, you did a great job. I don't see anything that couldn't be fixed with another round of flapping.
For those who have never pieced something like this together, it's a painstaking job to do it and get both sides to look even remotely even. Especially after welding.
Prop's to Wyo for putting something together that doesn't look like the usual "hey I bought a welder Imma make a bumper" crap. Good job man!
 

Members online

Forum statistics

Threads
278,306
Messages
3,554,045
Members
248,016
Latest member
Advally Service

Trending content

Back
Top