08 V8 4x4 - El Camaleon Azul

man i wish i had your pockets for an epic build likes yours lol.

def a nice rig. i love your whole build. quality work and parts. and its beating the hell out of all. i love it!!!

Ha, thanks Bud! Its fun, I'm addicted to changing things up and seeing how to improve something if it breaks.
Im actually a super miezer! Look for deals/sales on things i want and don't buy till i find a killer deal. Also not afraid to buy used if things seem legit and not too abused (within my abilities to repair). That is the way to get things i normally can't afford.
Oh- most important is doing all the work myself. Once i pay someone to swing a wrench or glue some steel together, its going to get expensive. Bonus- learning something new.

Now- if i was smart. I would leave everything stock and just go enjoy :gun5:
 
Thats better than some blank holes :)

IMG_5488_zpsywj6ee1g.jpg~original


now to brush up on my switch and relay wiring skills!
 
Loaded up my front calipers finally

Bought the runner with these already installed in the front, 5th gen calipers.
but they had not been treated with anything, so had a nice coat of surface rust. wire wheeled them, then dipped them in Evaporust rust remover to seal the deal.
coated them with the Duplicolor Caliper Ceramic Kit https://www.amazon.com/Dupli-Color-BCP400-Red-Brake-Caliper/dp/B000B6AF80
So purdy!
New Akebono Ceramic pads and plenty of disc brake grease to stop the seizing!

Wanted to show pics of the spring clip and wear tab orientation. Wear indicator placement is at outside and bottom of caliper (bottom being when installed, bleeder up).

IMG_4130_zps5kcgi68s.jpg~original


IMG_4129_zps9pp4e6pd.jpg~original


can just barely see the Indicator Tab on upper rt. side of top pad in this pic. If you look at the pads all together, it will be obvious which 2 have the tabs.

IMG_4132_zpsccbgmxgr.jpg~original

Are those rear caliper pin boots on the front caliper pins?
 
Shew!! Finally was able to take some time and get the ARB compressor fully installed. Plumbed and wired up. Quite the pain in the ***, I'm gonna say, when all said and done.
Plumbed in 2 lockers, Solenoids mounted under the compressor and protected by an air valve limited at 100psi.
Compressor is mounted behind airbag using board members 4th gens specific mount [MENTION=125603]bandi[/MENTION] thanks Leroy!

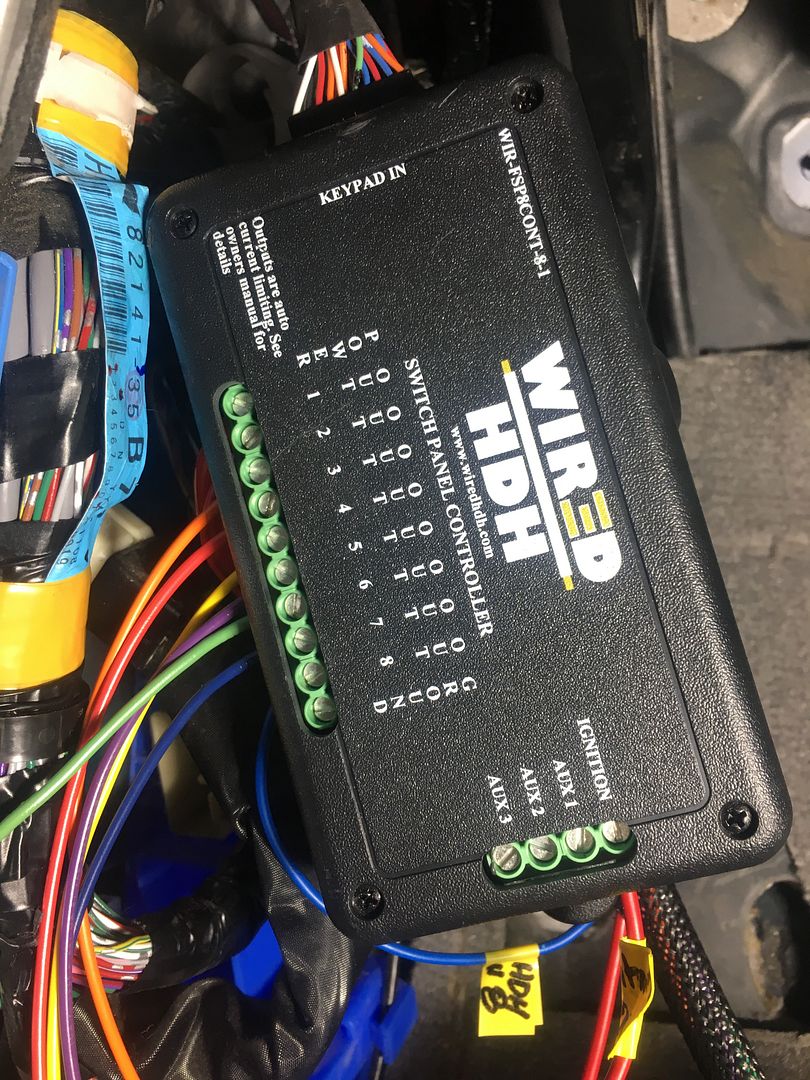
Wired in the compressor thru the Wired HDH switch panel. ARB locker switches, center console panel mounted, are triggered only when the compressor is engaged as failsafe.
Braided stainless lines are coiled up waiting for me to install the built ARB/4.88 thirds

F1793162-96A2-4277-A356-000B9A34FD21_zpske5kzhxo.jpg~original


B60CD0D4-261F-4A89-A463-CD280B342699_zps2ip2fmwz.jpg~original
 
Last edited:
under the DS kick panel. HDH wired accessory switch panel. Has 8 pre-wired switches, can reprogram anytime for ignition or constant powered accessories. Still have to add a relay if over 5amps load.

1A0EEDD3-AE13-45CE-8A35-831A9D059BAB_zps6timnvmb.jpg~original


velcro attached the switch panel to the overhead console next to the dome lights.

09E198DB-9FC7-4D53-B5A6-E71F00D044D2_zps3g6cfwix.jpg~original


console all in place

AFA88457-00AD-49C3-93A3-88EA7D1074B9_zpssyl3easu.jpg~original


Fabbed up my own mount for the Bussman relay/power box i purchased off site vendor. @Yotamac. Don't think he's doing his thing anymore, but was huge on Tacomaworld.com for long time. Quality goods for certain. It has plenty of prewired relays and fused power sources for a lifetime of upgrades, water resistant or proof? not planning to test it out that rigorously :) Added switched circuit breakers for the larger items- ARB compressor @80AMPs, stereo amp at 200AMPS(future :) ) , HDHWired @40amps, Anderson Plug on bumper at 100Amps, etc..... you get the idea.

6680E690-6F13-419C-A775-8B82773DF1F6_zpswdsvbyrq.jpg~original


My dog kicking ass and getting freaky on a 12 mile hike into the High Country yesterday

E5B321CB-EB28-4FC2-B012-14F51273CAB2_zpsfwdeqvqw.jpg~original


underside of the ARB engine bay mount, and the relays sitting behind it mounted to the firewall

7CD034B4-81BD-43B7-B2C1-FE994DBFA47F_zpspoccxjvh.jpg~original


3883E569-AC03-43D2-A749-CDA310DC949E_zpshlvhwvm9.jpg~original


purdy engine bay all ready to play. Or atleast waiting for me to install the Lockers. NO leaks!!!!

39ECD8DF-F02B-4FAC-8127-FD4D3918F9D4_zpsa5t6o3zs.jpg~original


Got inspired so i slapped in a couple Rigid D2's, wired them into the OEM foglight harness plugs. Couldn't wait for me to fab a bumper!!!
Simple and clean. Now i just need to bypass the highbeam cutoff so they work anytime needed. BRIGHT BTW!! So stoked. Makes the high beams look like fog lights.
Ill post a short video of lows, highs, D2s, then that ridiculous light bar.
Lighting is not an issue anymore ;)

80839B73-83F3-4785-8912-E49693E63BA6_zps241cyfat.jpg~original


if your keen on 4runners, maybe you'll notice something else in this pick that is out of the ordinary. Prepping.....
 
OK for bumper prep, i decided to go with an alum. washer fluid reservoir relocated into the engine compartment.
canton racing alum. catch can. Holds a of gallon fluid.

https://www.summitracing.com/int/parts/ctr-80-211/overview/

cut and bent up a scrap piece of 1/8" diamond plate to make a couple mounts.
drilled two holes in it same diameter as the OEM washer pumps use, 1-3/8" once i had it mounted in place. then slipped the rubber grommets in with a little extra sealing power of RTV grey. pumps popped right in nice and tight, buttoned it all back up and good to go.

0024FF5F-6C1A-49DF-8F05-4006D9EDAC1C_zpsezrstq3o.jpg~original


2F54125E-4B2F-4AB5-A6D4-BBB7F18AF0EE_zpsdfsu2pfz.jpg~original


80890278-4576-46EA-8913-E05E1B7CBB09_zpsulph5unw.jpg~original


05516A32-CADF-41B2-AA3D-AFA30BDD67CD_zpsy0uxjexz.jpg~original


9365476A-7F0B-4822-B1BA-0BB0A491C313_zpsoj10cvil.jpg~original


4536CF50-9563-4865-841F-2A4BDD38A8F7_zpst1sjrj4k.jpg~original


398BDA15-9DD6-4D27-A6FD-A5A2C150B400_zpsqoloh9sj.jpg~original


EFBA5B0A-7E8D-40F8-8726-6D5518BE7D08_zpsqanm3pue.jpg~original


have actually had this thing for a bit now, just never got around to taking the time to bust it out. Went quick and easy. BEST OF ALL- no more washer rezi. hanging under the bumper!! Bonus points for being shiny and sexy :)


now to slip in this locked thirds!!!
 
On jacks and thirds pulled.

6924AE64-1E78-4EFD-95EB-9E4D74FE3D78_zpst4ulufzm.jpg~original


Freaked the hell out when i peered into my OEM front clam after taking off the Longside axle shaft extension. Looked very different than the ARB/geared Diff i bought.

Stock AWD
80C35BEC-0262-4B69-8578-FF4C7F31F72B_zpspe52m8ka.jpg~original


Non-AWD with stubshaft

45D403D7-5D4B-49F3-A27F-DE42E6D80850_zpsbbth5dcx.jpg~original


After a small meltdown, and then pulling myself together. I got on the web and found info. ECGS has a wealth of knowledge, i thank them.

http://eastcoastgearsupply.com/files/PDF Files/toyota-clamshell-stub-shaft-removal.pdf

Stub shaft pops right out and then all looks good again (and fits)

9B0A75B4-8DCE-4BD7-A393-8887DB4B16DA_zpslchskpyr.jpg~original


BB0210D9-AE61-42AE-943C-7A6EA6C51CF1_zpsc1fbjoyc.jpg~original


Reinstalled everything, fresh seals and a full lube-down of course. Tested the front ARB before buttoning the hatches.

77EFB53F-F95D-4C1A-B841-63CE72812AB9_zpsu7z0ecew.jpg~original


F63AD10A-DEB6-40DC-8026-993AAC165CD7_zpssfs7at36.jpg~original


C4B4C5AD-FB17-4F37-91C5-82B3FF9E6E69_zpss0wlcmom.jpg~original


Front done!

Rear!!
Found another issue with the third i bought. Great shape, but the triple drilled output flange was not drilled for the later style 66x66mm driveshaft pattern. CRAP!!!!

wrong patterns

300941FA-85E9-4331-94F0-CC8C1E318B2B_zps5v9kaym8.jpg~original


LowRangeOffroad has the solution if your using an early model 27spline V6 third in later model 4runner/tacos (OEM third is 29spline pinion output).

Toyota Triple Drilled Pinion 27 Spline Flange for Early and Late Patterns (TDT-TDFP-LR)

Solid spacer pinion nut torque is estimated ~ #200 to get it back into proper bearing load without a full teardown. We shall see if i have issues with bearing preload. (found this common thought after searching all over 4xforums (pirates, ttora, Ih8mud, etc.)

Still wrapping up the rear install today. then test drive! then WHEEL!!
 
pic of the new rear flange.
can easily see the differences with the 66x66mm pattern and larger 11mm bolt holes for that specific pattern

A9C9815D-B5A1-4918-AB43-031F7E3397F7_zpsq8mxdlqz.jpg~original
 
Super-duper poser shots! Nice to be able to crawl up anything, including random rocks around the corner. Lockers rule.

IMG_6033_zpsopzq5qnn.jpg


IMG_6035_zpsnzjhcmxt.jpg


FullSizeRender_zpsdqpmrhdi.jpg


FullSizeRender_zps8pqth11v.jpg
 
that stub shaft caught me by surprise when i re-geared my tacoma LOL

Looks great man! Im anxiously waiting on finding the time to install my ECGS built third with a grizzly locker into my runner!
 
why the hell did all my pictures resize themselves to jumbo?

can a mod fix this? they were not like this when loaded
 
Been gettin some fun wheeling in lately. Shallow snow depths this year in the Sierras have made all our trails mostly accessible.

Did a run up Wheeler Crest on NYE! Fun
[MENTION=6380]wheel[/MENTION]everyweekend and @goldcountrytaco accompanied.

2CBC95ED-CDF7-47D0-B1EC-0F8521EF26D8_zpsuhcoabcs.jpg


EA2FB717-EBF0-4178-8D7A-C9941A869141_zpsbqznw1mm.jpg
 
All this shallow snow with fun rocks hidden under! Ive got Lockers, a V8, and 33's!!
Such a blast, why would i be wasting my time under the front end??

49B95206-94DB-411D-A0AF-936DBD55777E_zpshwrdemqq.jpg
 
All this shallow snow with fun rocks hidden under! Ive got Lockers, a V8, and 33's!!
Such a blast, why would i be wasting my time under the front end??

49B95206-94DB-411D-A0AF-936DBD55777E_zpshwrdemqq.jpg

to bring resolutuion! cuz i know you've all been on the edge of your keyboards awaiting :coffee:

We were up Wheeler Crest in the shallow snow playing, on the last hill before the Top. Some will recognize, those that have been here, that is about 5-6mi up the trail with some decent challenging terrain- no Rubicon, but I've got some scrapes on my skids and we used lockers and were aired down to 7psi for sure, esp. with the snow.
Was spinning up a hill in snow when my PS dropped into a little hole and then pounded against a nice big rock on the way out. FUN!!! except for the lack of forward motion resulting. Engaged the rear locker- nothing. Engaged the front locker and we had movement, except with a huge clunking and grinding outta the PS front. Guess what?? Shattered a CV outer.

pics from back at home-
IMG_6844_zpsi2lcpz2x.jpg


IMG_6845_zpsvovtymw8.jpg


IMG_6846_zpsnwpwdk2e.jpg


this CV does happen to NOT be OEM, and from an unknown source. Maybe THAT was the reason? Or maybe i was just doing things CV's aren't able to withstand :sombrero:
So atleast now i can correct that :)

So, prepared as i was- i had no spare. Luckily we had a pile of nylon tie downs and a couple large hose clamps. I repositioned the cv in its shattered basket, wrapped a tight bundle of tie down around the remnants of said basket and used a hose clamp around that to REALLY ;) secure it all in place.
the hack-job repair allowed me to cripple down the trail very slowly, trying not to turn so the cv wouldn't bind and catch on the straps. Every 15min. or so, strap would snag on the cv and tear itself apart, throwing the cv into a whirlybird. Stop, glove up, untangle, reset cv, rewind. Repeat!!!
Took me over 4 hours to go 35miles. but i made it down my driveway under my own power.

That said- if i wold have had a spare CV and gear oil, (did have an actual tool bag with adequate tools) i could have changed it out on the trail in easily less than 2hours.

At home i parked it and called up CVJ Axles - CV Axles & Steering Racks for all your needs for a couple of their remanufactured OEM CVs, with upgraded silicone inner boots and OEM outers.. Sexy and OEM. AND- now i have a spare :)

Cleaned up and ready to go!
minimal damage considering the whirlybird that was going on. I think the key was super slow speeds <10mph even on hwy, and stopping immediately when the CV jumped out of my strap basket.
Only scraped off a light layer of metal on the backside of the disc caliper and the shock post, did not snag the brake or ABS lines like it could have.

IMG_6849_zps8n4vnlci.jpg


IMG_6848_zpsbxbmi0uh.jpg


seal that is backside on spindle facing the CV. good to have in your CV repair kit.
IMG_6847_zpsow8qja5u.jpg


all buttoned up. Did the Driver side too

IMG_6852_zpslinlni7j.jpg


Dog days!

IMG_6854_zpswethf18t.jpg
 
Added a few items to the Prinsu rack.

Paddle board rack- Thule

Using Warrior Products Hi Lift mount. VERY solid mount and it locks. Fits great using 1/4-20 carriage bolts

IMG_7992_zpse6yu3kzw.jpg


IMG_7993_zpsfchrbxep.jpg


IMG_7994_zpsrqpadivb.jpg


IMG_7995_zpsnhudusad.jpg


Mounted up my TredPro mats using simple carriage bolts (1/4-20 at 2.5"long) and some rubber pads, bought some SS loop nuts off amazon(like the ones Prinsu sells) so it can be removed easily.

IMG_7996_zpssxvzfpf5.jpg


All is secure and solid. Have something somewhere up there rattling like hell on washboard that is driving me crazy! I "think" its the HiLift jack mechanism shaking around, but it "looks" like the rack itself is wobbling L/R thru my sunroof, and that could be the noise. Maybe it cant handle weight? Noise disappears with no hiLift. Don't hear it with 2 paddle boards and the Treds?
More investigation required!
 

Members online

Forum statistics

Threads
278,316
Messages
3,554,120
Members
248,016
Latest member
Advally Service

Trending content

Back
Top