Entry 3 - Suspension
So I was finally able to turn some bolts on the ol' runner (still working on coming up with a name - suggestions welcome). Before we get into it, my disclaimer is this. Yes, I bought a spacer lift. My reasons for doing so are these. I'm not a millionaire, and I'm trying to get this thing on a little road trip by the end of December. This means that I need my wheels, tires, rooftop tent, light bars etc. on the rig before then. My goal is to get a nice icon or similar long travel kit on the future, but dammit those setups are expensive, so I'm putting that on the backburner for the time being. The spacers will at least allow me to throw the wheels and tires under there, and make me feel less like a soccer mom

️. I would also rather not buy a toytec boss lift or similar as it's just not good enough, and I will end up pulling it out in 4 months.
Okay, so with that said, SINCE this was a spacer lift, I'm thinkin this would be a breeze to put on. It actually just plain sucked. Yes, we made a few mistakes that could have been righted by a little more research, but hell, that's what learning is right?
REAR SPACERS
We started with the rear. This went very smooth and was a great way to kick off the night. You DO need a spring compressor for the rear spacers, unless you want to pull off all of the brake lines. We rented one from O'reillys Auto Parts. For those that don't know, you can rent tools from O'reillys for free - you just pay a cover charge, (this was 45$) and you have the tool for 48hrs. Bring it back and they credit your card back all of the funds. Pretty rad little setup. What would have been great in afterthought is an impact gun, to compress the spring. But we think this was more fun

Also, while we were under the car, since I will not be using the stock spare storage, I decided to take the chain mount out. This was terrible. 4 bolts that took about 30 minutes, due to location :frusty: and no easy way around it.
FRONT SPACERS
As for the front. Where do I begin. So we watched a few videos here and there, but we are thinkin we will more just figure it out as we go. I mean, it can't be that hard right? We started with the drivers side and everything was going ok. Then I had the brilliant idea that we needed to compress the spring whilst still on the car (you don't need to do this). I put the compressor on with the bolt head at the top. Then, again, brilliant, used the closed end of a ratcheting end wrench on the compressor bolt.:frusty: The result was the spring tightening down on top of the wrench, locking the wrench onto the nut from the top. I didn't think too much of it, and found an alternate way of getting the shock out by removing the top control arm (you also don't need to do this) disconnected the lower control arm from the knuckle, sway bar etc. So, we have the shock out, and the wrench is still locked on there. And the wrench can only tighten... meaning can only get worse. So we decide if we compress with the other strut compressor on the opposite side, the spring should loosen and allow us to pull it off. Nope. Tightened. Worse. At this point we have this thing pretty damn compressed, and not only is it dangerous, but we have no idea how to get it off short of cutting the strut compressor. Well I REALLY don't want to pay 40$ for this thing, so we took a much needed dinner break to think about it. The only way was to compress the spring with the other compressor right next the the jammed up one but this thing was so compressed it was scary. We compressed the sh*t out of it, and finally it popped! The wrench literally slid off. We decompressed it and high fived thinking it was cake from here. We got the spacers on super easy, but then struggled getting the bottom bolt of the strut in. The shock was slightly turned (from putting the spacer on). We figured the bolt just needed a little more motivation (even though we knew the threads could be at risk) and hammered it in. Yep, the threads were at risk. We wrecked those, and at his point it's 1:30 am and we are apparently not making any good decisions so we turned it in for the night. Morning came and only one dealership in the whole Bay Area had that bolt. Phew, we got it. We took the strut off, and re-aligned the bolt hole, and the bolt literally pushed through. And since we failed this miserably on the drivers side, and learned everything we needed to, we had the passenger side done clean in 1/4 of the time.


All done.
So it was an interesting way to put a spacer lift on, but now we know how right? Now it sits (goofy as all hell), waiting for my wheels and tires to arrive. The wheels and tires come in on Monday, but I have a shoot in Hawaii for 2 weeks, so I'm left frothing at what it will look like when I get back. Can't wait.
So that's my rant for the day, and the stewardess is asking me what I want to drink. I'll take a sprite.




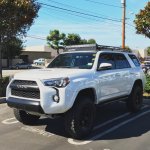



 out:
out:


