4Runner TRD Trail PRO Build Thread

What are those?

They are weather tech window guards.
They look awesome, they sit inside of the window seal instead of sticking on the outside of the paint, which I think is awesome.
I had some of the kind that stuck on the paint after being on my last truck for 4 years, and it was impossible to get all of the sticky residue off of the paint.
Really looking forward to putting these on tonight.
 
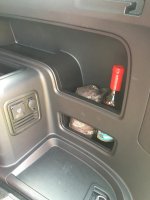
Literally the only thing I have found useful for this space...
What else can be placed here?
 

Attachments

  • image.jpg
    image.jpg
    134.4 KB · Views: 2,968
Today was the day to finish the look of the TRD PRO. I really wish we didn't have to have front licenses plate in VA
It might of been easier to take the valance off and then paint with plastic dip. When taking the tape off up top it started to peel some of the plastic dip off with it, you will see down below. I ended up doing a little re-tapping job and touched it up with a q-tip, it looks ok when looking up close, but since I am getting a new front bumper soon, I will probably just leave it as it. You can not even tell when standing back a few feet.
I used 3/4 can of plasti dip.
I don't know if it makes a difference or not , but I used a dip nozzle from dip your car, I order it awhile back to use it on another project, never used it and gave it a shot here. It worded great, wide spray pattern, and did didn't make the paint blotch or run. They only cost a dollar a piece I believe, so why not...
Nozzle can be found here

before_zpsxdhj3txc.jpg~original


taped_zpsdtvuipfe.jpg~original


nozzle_zpsjgmvx6xj.jpg~original


stratch_zps38rrpl8y.jpg~original


dipped%20front_zpsw5hn50cy.jpg~original
 
Also I put the TRD PRO badges up. I wasn't able to find measurements, or height to placed the badges so I just eye balled it and try to put it to what I felt "looked right".
First I used a 2 inch piece of paints tape to use as a base.
I used the bottom of the window seal of the rear doors to use as a starting point and a level to make sure it wouldn't look crooked.
You roughly have about 12 inches of space between the door and the rear window.
Measure 1 1/2 inches each side and then place a piece of painters tape vertical, this will be our starting point to place the "T" in trd, and the "O" in the pro.
Also make a mark at 3" and 5", then peel out the center down about an inch, this is so the "R" that sticks down won't stick to the painters tape.
Next put your badges up and hold them down for about a minute or so.

IMG_1244_zpsol6pz8fp.jpg~original


IMG_1245_zpsp512llvw.jpg~original
 
Last edited:
Nooo not a Faux Pro.... Should have done the "Trail" Badge man... Gotta represent!

Ride is still lookin nice though... Pretty awesome you scored free installation from your dealer.
 
My wife is out of town this week, so I decided to pack up my 4Runner and hit the road with the dogs. To be honest I got drunk the night before while I was home alone, and packed everything I needed for the trip. When I woke up in the morning, to my surprise, I found everything was in the 4R ready to go, sweet and I didn't even forget to pack anything.
I love Shenandoah National Park, and it is within driving range, right at 3 hours to the parkway entrance. I choose to hit the Blue Ridge Parkway, drive south pick somewhere to camp and take the south exit back home. Unfortunately my plan was ruin by a storm that just didn't want to leave, but we were still able to do a little hiking, and of course some trail riding.
I threw the dogs in the truck and we hit the road.
Does any one know how to shrink Pictures?
I averaged around 18.1 on the highway, that is with 2 dogs and very minimal camping gear.

799AB939-E1B3-48EE-9146-F8126DED98C7_zpscylfhm7i.jpg~original


E5250559-73AF-4738-8249-A3125D08EAE1_zps4cyddqjs.jpg~original


This is the first overlook that I stopped at, you will see that last picture on the way out how bad the weather set in.

80BE5958-E479-49F6-B8BF-7A6E426A4CA5_zpsewjnxksd.jpg~original


92C7BB08-5068-4B41-9B87-B0FC0375F6B4_zpsvhz4b5ti.jpg~original


The first trail I hit, actually only by luck was the Bald Mountain Jeep Trail. I have heard and seen of this trail in the past but have never been to it. It was really foggy and rainy at this point, and when I was driving by out of the corner of my eye was a fire / dirt road. Bam there it was and almost drove right by it, so I turned around and here we go. I did not do the entire thing, just a little, about 1-2 miles in it comes to a fork in the road, left takes you down the fire road, and right takes you 2 3 primitive camp sites. I was planing on staying here for the night, but it was still around 5, and I still wanted to explore not only this trail but the rest of the parkway. I started down the trail and boy it was tight!!!
I had one window scrap and that was enough for me, give me a break this thing is not even a month old, so I turned around when I could and headed back out.

DB022370-E822-485A-A4FF-3BABCF3BC27F_zpsgachuheu.jpg~original


B23403F7-E114-45A7-9C89-A195F07A6486_zpsysfrp0xg.jpg~original


346C23B2-E129-4FC2-A772-37702DAC623B_zpsvlrmuhyg.jpg~original


I got around 17.6 on the trail, not a bad drop considering
0390AF49-3321-4FA0-A447-10DCEA028780_zpsecgodmqh.jpg~original


Creepy The Walking Dead Field, I turned around and high tailed off of this dirt road.

1B60270D-DB25-4995-977B-454F522CEC71_zpscjwp971i.jpg~original


The weather broke just for a little bit, but I could still hear thunder in the distance, so instead of having a sweet potato and steak that I planed on having for dinner I settled for a sandwich and yogurt. I believe it was around 7-7:30, and at this point I decided that it would be best to head back home instead of camping. Being with both of the dogs, and one scared to death of thunder I was probably better to head out.
I really need to build a rear storage platform for this thing.

9F196C09-2078-4406-A991-544750768C52_zpstedxncov.jpg~original


This was heading north on the parkway, and the fog only got worst from here. At some points I could only see 10-15 feet in front of me.

0A2A100C-5C93-4394-9E21-3FC6E602EA99_zpsjxy33t9b.jpg~original


Same spot I stopped to take the first picture.
I would of loved to have stayed but there is always next time!

6053EB8B-8144-44A7-99E1-66D8216F29AA_zpstg1lleax.jpg~original
 
Last edited:
Thank you, and Yes we bought the extended warrenty. And honestly we were not going too, but it was 5 dollars more a month so we decided to go for it.
You are correct, the first year they released the renegades, the transmissions were junk, but 2016 got great reviews!
So we are hopeful.

Dont want to rain on your parade, but you got taken for a ride (no pun intended). $5 more per month at 75 months is $375. There is no warranty priced that low. You should never negotiate in the "finance" office in terms of monthly payment.
 
yah ok... bro. post the retail purchase agreement.
I really don't care to get into a back and forth match. This isn't the first times Ive bought a car, thank you for your insight. I am sorry if I displeased you.
Im here to post my journey about my new 4runner, that is it. Thank you.
 
I really don't care to get into a back and forth match. This isn't the first times Ive bought a car, thank you for your insight. I am sorry if I displeased you.

Im here to post my journey about my new 4runner, that is it. Thank you.


Good looking rig. Glad you seem to be happy with it. Keep sharing the journeys [emoji482]
 
Today I hit a mile stone, I hit 1000 miles on Stimpy as soon as a I pulled into my works parking lot, and boy did that go quick. Before to long I am going to need my first oil change! I also received some organization products in the mail. The over head visor and seat panel were both order from Blue Ridge Overland Gear, these two things seem like top notch products, and I am very glad that I purchased them.

The panel will be placed on the back seat, and for now will serve as a place to put First Aid Gear. I currently have a "3 tier set up". Everything will be labeled for ease of use, just incase anyone else needs to grab these items.
Tier 1, which is the small pouch with the red cross on it serves as basic first aid, boo-boo's and bandaids.
Tier 2, which is in the slightly larger pouch on the left will be for Gun Shot Wounds or GSW's. (Some may say I am getting a little to excessive, but in the line of work that I am in I see these things all too often. I would much rather have it on hand when I need it, then have someone close to me bleed out.)
Tier 3, is in a larger tan bag not shown. This is for major trauma out in the field or back country. This bag holds items for heavy bleeding and airway control.

The safe will be a further build here in a couple of days once I get time from work, Stay tune!

561B2636-4CA0-4C9C-9F93-2DDD64F8D825_zpsqipyhain.jpg~original

67FA462C-1941-4634-B41A-BB61D4CB405D_zpssazja5nw.jpg~original

0CE9D933-51A0-433F-8BD8-FE913469CC38_zpshv4ptd4a.jpg~original

E3AA06FF-D65D-4FA4-9103-F7C82D9C3730_zpsiix9faqg.jpg~original
 
Last edited:
A little update. I placed an order today for a GOBI roof rack!
I had all intentions on ordering a ladder and the struts for the rear hatch.
When I called and told them what I wanted they said currently they are throwing in a free ladder and rear hatch struts with every order!!! Wow, that is a huge savings, and coupled with free shipping, I am blown away!
Current production time is 8 weeks :(

Also I signed up for in a group buy for a set of C4 Fab sliders.
So hopefully in a few weeks I will be a proud owner of those.

Any one want to buy a mint set of rigid side rails?
I live in Hampton roads area and would be willing to travel ~200 miles to meet up...
 
Last edited:
H11: MORIMOTO ELITE HID SYSTEM, The Retrofit Source

I received new HIDS for the 4Runner today. They are sourced from The Retrofit Source (direct link)
The reviews were fantastic, and the system could with a 5 year warranty if you purchase the 35 watt system, or 3 year warranty for you buy the 55 watt ballast.

To make this easy for you want to buy the same thing here is the list of what I chose.
-35 watt Ballast ( believe me plenty bright)
-XB Igniter (no other choice)
-H11B 5500k (B is our bulb size, I choose 5500k because it is what "factories" usually choose)
-HD Relay H11
-We do not need the "anti-flicker" ( called the guys up there to confirm this)
-I did not get the carbon fiber bracket, it comes with one.


The package didn't come with instructions, but where you order that parts from on the same page is the instructions how to hook everything up.
The it was packed tight in the box, and everything was packaged very professional.
D811672E-F6F6-4011-814F-C19B711CEBAC_zpsrdrdbjlw.jpg~original


I did run into a slight problem in the beginning, some pieced were not connected together, for reasons I do not know. I called the retrofit source up and they were really helpful. It doesn't matter on our year which way they are plugged in, this is a universal kit and some times the plugs go different ways. You put the orange grommet over the wires and slip them into the plastic retainer till you feel a click.
E919F83B-9B17-4B48-BD91-F6913DF11DAC_zpsxcwb5owk.jpg~original


So the install was straight forward, and easy once I figured out where I wanted the wires to run.
First you need to remove the plastic cover on the back of the headlights and drill a hole. The instructions call for a 22mm drill bit, I didn't have one of those but I did have a 18mm drill bit. I drilled it and used a dermal to make it a little bigger, worked great, I am sure you could use a file or just buy the drill bit, up to you.
1997B95E-0FA8-461A-81A4-540FAF207D58_zpsqcsorupv.jpg~original


43743948-95F0-4614-B46A-32058FA20AD3_zpslhlxkls6.jpg~original


9E9B48FA-B8E2-4110-BE76-9F54087F0770_zpswkq3h9z2.jpg~original


Here you see a inside down picture ( it is really the best angle, I am afraid to say)
The bulb wire has a little notch that plugs straight into the bulb, also plug the other wire that the original bulb was hooked up to, and close everything up.
AAC7395A-2108-4BA6-AB7C-B685A9B1F22A_zpsxfg7gvdh.jpg~original


3539AB36-EADB-4C5B-B923-3F123B81AA8E_zpsgwnfb5qa.jpg~original


There really isn't anywhere to install the ballast, on the passenger side so I removed the plastic cover that covers the radiator. I will eventually be installing a second battery, so I did not want to clutter up the space behind the headlight. Pictures are horrible, but here is the best place to install the ballast, and relays. I am going to go to the hardware store and get a bolt and nut, the zip ties are just for the time being. The next step really is not necessary, but I tend to over do everything I work on. I cover the wires that ran across with some wire loom that I had laying around, then shot it across the front.
12E14A27-2216-4002-926C-5172EF855D3B_zpsjs8qcqoq.jpg~original


9BA9FCCD-F46C-47FF-90F2-27CC23C555CE_zpspghqoxur.jpg~original


A36F5A28-87AD-4DDD-84B6-151AC531C7D4_zpsqxuiz7ts.jpg~original


Onto the driver side. There is a bolt that is coming thru up beside the head light on the other side of the radiator. It is just a support for some wires, so nothing to worry about. There is a bolt underneath that looks like it should line up, but it doesn't. So for not it is just 1 bolt holding it together, I will add another one, but seems fine for now.
E9318F5A-5AB6-4024-B849-98203F5B17D9_zps5eogvsn0.jpg~original


Here is the top where the power wire is ran to. I wish the power wires were just a little it longer so I could make it a little bit cleaner, but once everything is buttoned up you can hardly tell.

F18B1B4F-9AB0-45BA-B891-4820618D542D_zpsx4kqmd8f.jpg~original


F25CD87B-45EE-457C-B095-1C4AC35F3EDB_zpspbq5dmdu.jpg~original


6509CF81-3020-4358-BACE-2941B4FB4753_zpsyt9a1nuc.jpg~original


ADEB4C60-2645-4B8F-92D7-204E08F46664_zps5rms2oq6.jpg~original
 
Last edited:

Members online

Forum statistics

Threads
278,306
Messages
3,554,046
Members
248,016
Latest member
Advally Service

Trending content

Back
Top