Break cable extension kit question?

pabst

Member
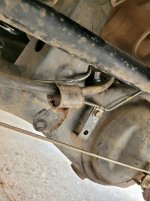
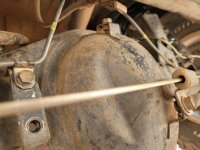
I finally got the Toyotech boss lift Installed by a shop. Notice that the brake bracket was ziptied. So I ordered the Toyotech brake proportioning valve extension kit. I'm confused On how to mount it The holes don't lineup with the differential holes And the hydraulic line It's tight It doesn't need to go up Does anyone have any Install pictures

 
Register to hide this ad
picture

here's a picture .hope this helps
 

Attachments

  • 20211003_144225_remastered.jpg
    20211003_144225_remastered.jpg
    130.4 KB · Views: 1,432
another picture

here's another picture where the top bracket is to high
 

Attachments

  • 20211003_144233.jpg
    20211003_144233.jpg
    130.7 KB · Views: 912
I finally got the Toyotech boss lift Installed by a shop. Notice that the brake bracket was ziptied. So I ordered the Toyotech brake proportioning valve extension kit. I'm confused On how to mount it The holes don't lineup with the differential holes And the hydraulic line It's tight It doesn't need to go up Does anyone have any Install pictures
Do you have a link to the product you are trying to install? I don't understand what you are trying to do based on your pictures and description
 
here's a picture .hope this helps

The rigid brake line should be attached to the lower hole, not the upper one. The lower hole of the extension bracket for the e-brake cable attaches to the upper hole (where your rigid brake line is now attached). The e-brake cable loop then gets attached to the upper end of the extension bracket.

I made my own extension bracket, but you can see below how things are supposed to mount up:

7qc3DYA.jpg


Edited - I found the Toytec extension bracket (BPV-K - Brake Proportioning Valve/Brake Cable extension Kit), looks like it's installed the same way as I installed mine, although the two holes in the Toytec may (?) line up with both holes in the axle, in which case you can use both fasteners:

bpv-k-2.jpg
 
Last edited:
thanks for the help

Thanks for the help Spiker Engineering. The picture definetley helped !! Yours looks super clean. Did you take it apart to paint the diff or paint it on your rig? what kind of paint did you Use? also did you do a pan hard bar drop bracket?
 
Thanks for the help Spiker Engineering. The picture definetley helped !! Yours looks super clean. Did you take it apart to paint the diff or paint it on your rig? what kind of paint did you Use? also did you do a pan hard bar drop bracket?
Just get a California 4Runner and clean up the underside... that's just what they look like out here.

Here's how I did mine:

GzMrqCjh.jpg


Notice I also slightly offset the upper hole to the side and used both the lower holes to keep the bracket aligned. Haven't bothered to paint it since it is aluminum.

If you have longer than stock rear shocks, you'll also want to run a longer rear brake line - or maybe just bend the upper (frame side) bracket a bit to make sure the rubber line isn't stressed at full droop. If you look carefully in my pic, you can see the aftermarket longer line on there too.

-Charlie
 

Members online

Forum statistics

Threads
278,308
Messages
3,554,060
Members
248,016
Latest member
Advally Service

Trending content

Back
Top