

D Farms
New member
FS: 3rd gen SR5 Flare extensions $80-$115
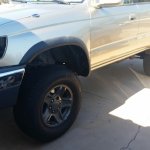
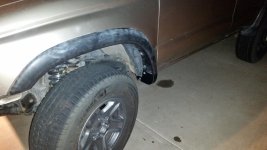
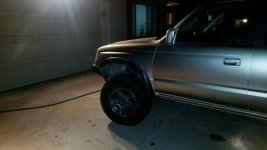
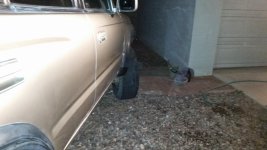
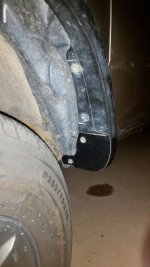
This is the 3d printed Flare end caps for the "SR5 flares" sale thread.
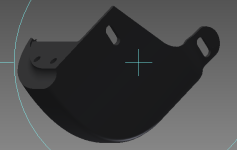
I prototyped these using Autodesk inventor and 3d printed 10 prototypes before finalizing my design, and am still tweaking it to make it better with customer feedback.
Then I used an open source cad modeling software to make the final design.
For $80 plus shipping you will get a set of 3d printed flare caps that will complete your front flares and provide a small amount of mud flap.
For $100 I will finish them to match the texture of the oem flares, and they are ready to bolt on.
They are printed out of abs plastic, which is what the grille on the truck is made from, it has a high temperature resistance and chemical resistance. most 3d printers use pla plastic which is biodegradable and from personal experience I know the stuff melts in the heat of the summer. The downside is the abs takes more energy to print, and requires a more refined machine.
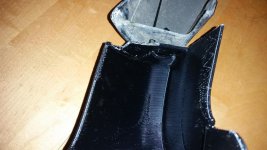
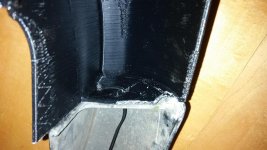
I will warn you that because of the 3d printing process the surface has ridges, and they are 0.4mm. As of right now im not offering the smoothed sets, I lost too many in the acetone treatment process, but Im working on a tutorial of how to apply filler/primer spray to make the finish smooth and consistent with the oem flares. I may offer some bolt on painted caps
How to get a set: I will make a post when caps are available, then you must post after that post to confirm that you want them and are ready to pay over paypal. Then I will send you a pm with the paypal information. then you go to paypal.com and make the transaction, making sure that you select goods or services and that the transaction has included your correct shipping adress.
Shipping is $15 for continental US, If outside of the US or alaska/hawaii make sure to include that in your post so we can figure out the shipping.
I live in Tempe AZ, so if your in the valley that's even better for both of us.
For mounting, I use the existing bolt holes in the fender, and I use a ziptie to secure the cap to the end of the flare, which means you need to take it off to ziptie them together. The mounting is as solid as the flare is mounted, which does flex slightly, but short of drilling into the rocker panel, its as secure as it can be. I reused my screws from my running boards, so hopefully you saved them. if not im sure you can find something that will work, just make sure it has a washer.
ONCE YOU RECIEVE THEM DO NOT: Overtighten the screws, or use a heatgun on the caps as they will crack and bubble.
HOW TO FINISH RAW CAPS: Coming Soon!
Also Please Please post pictures once you are done, I like to see customers that are happy with my products!
Thanks!
Dfarms
For the break I'm going to be doing a special price of $90 shipped for ready to bolt on sets. I am not going to be doing any raw sets as of right now. I have a new protocol to avoid long wait times after you have paid me.
This is the 3d printed Flare end caps for the "SR5 flares" sale thread.
If you are not familiar with the story on these here is a lot of information that Iv'e gathered by searching. These flares are black plastic, they came on 3rd gen 4runners from 1996-2000 as a dealer add on, usually on Sr5 packages but on some base models as well. the base models often did not come with running boards, which meant they had a front mud flap or guard. As many of us 4runner owners know, its very popular to remove the factory running boards. When you do this with the Sr5 flares there is a big gap in between the bottom of the truck and the end of the flare. On the limited flares the flare extends all the way down the truck, and there is no gap. Because of this there is a high demand for those front Mudflaps. My solution is better than the factory front mudflap. It follows the same lines as the limited flares, and it doesn't get in the way of ground clearance. My rear mud flaps are crushed in already so i can only imagine the same thing happens in the front. Oh yeah did I mention that Toyota is out of stock of the front drivers side mud flap.
I prototyped these using Autodesk inventor and 3d printed 10 prototypes before finalizing my design, and am still tweaking it to make it better with customer feedback.
Then I used an open source cad modeling software to make the final design.
For $80 plus shipping you will get a set of 3d printed flare caps that will complete your front flares and provide a small amount of mud flap.
For $100 I will finish them to match the texture of the oem flares, and they are ready to bolt on.
They are printed out of abs plastic, which is what the grille on the truck is made from, it has a high temperature resistance and chemical resistance. most 3d printers use pla plastic which is biodegradable and from personal experience I know the stuff melts in the heat of the summer. The downside is the abs takes more energy to print, and requires a more refined machine.
I will warn you that because of the 3d printing process the surface has ridges, and they are 0.4mm. As of right now im not offering the smoothed sets, I lost too many in the acetone treatment process, but Im working on a tutorial of how to apply filler/primer spray to make the finish smooth and consistent with the oem flares. I may offer some bolt on painted caps
How to get a set: I will make a post when caps are available, then you must post after that post to confirm that you want them and are ready to pay over paypal. Then I will send you a pm with the paypal information. then you go to paypal.com and make the transaction, making sure that you select goods or services and that the transaction has included your correct shipping adress.
Shipping is $15 for continental US, If outside of the US or alaska/hawaii make sure to include that in your post so we can figure out the shipping.
I live in Tempe AZ, so if your in the valley that's even better for both of us.
For mounting, I use the existing bolt holes in the fender, and I use a ziptie to secure the cap to the end of the flare, which means you need to take it off to ziptie them together. The mounting is as solid as the flare is mounted, which does flex slightly, but short of drilling into the rocker panel, its as secure as it can be. I reused my screws from my running boards, so hopefully you saved them. if not im sure you can find something that will work, just make sure it has a washer.
ONCE YOU RECIEVE THEM DO NOT: Overtighten the screws, or use a heatgun on the caps as they will crack and bubble.
HOW TO FINISH RAW CAPS: Coming Soon!
Also Please Please post pictures once you are done, I like to see customers that are happy with my products!
Thanks!
Dfarms
For the break I'm going to be doing a special price of $90 shipped for ready to bolt on sets. I am not going to be doing any raw sets as of right now. I have a new protocol to avoid long wait times after you have paid me.
Attachments
-
 20141011_113218-1.jpg103.1 KB · Views: 6,682
 -
 20141127_053411.jpg131.1 KB · Views: 5,969
 -
 20141127_053431.jpg135.5 KB · Views: 6,002
 -
 20141123_210401.jpg128.9 KB · Views: 5,826
 -
 20141127_053419.jpg133.9 KB · Views: 5,861
 -
 20141127_050538.jpg138.1 KB · Views: 5,803
 -
 20141127_050614.jpg135.8 KB · Views: 5,844
 -
 flare cad picture.png19.1 KB · Views: 5,832
Last edited:


