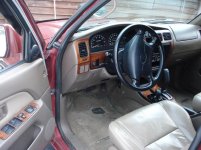
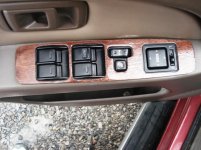
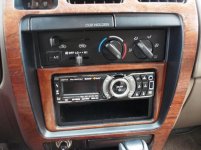
Has anyone removed or attempted to remove this awful fake wood trim?

Opi

New member
Mine kind of started coming off on the top right of the radio/vent surround, and im wondering if its relatively easy to do because I would much rather just have black plastic than crappy fake wood that looks bad and comes off.
 
Register to hide this ad
It's actually real wood trim if it id from Toyota. Get a heat gun and peel it off. You might have to sand the glue off and plastidip the console if it looks bad.
 
yep. i had the fake wood and i removed it all. get yourself some 3M adhesive remover and a putty knife. as mentioned, a heat gun should also make it easier. expect to get a couple scratches. the scratches were well worth in though IMO
 
The trick to getting it off is heat. In the summer, all you have to do is roll your windows up for about an hour while parked in the sun. Since It's now winter, you can roll up your windows and turn your heat up all the way and wait about an hour. In either case, a hair dryer helps a lot too while you are pulling it off.

Use a good pair of pliers and start pulling at one end while keeping the hair dryer pointed at that spot. It should start to slowly peel off as you pull with the pliers. Take your time and don't rush it. Don't worry about the glue residue until you are all done pulling off the fake wood. The glue will come off with either WD-40 or baby oil on a rag. DO NOT SAND!!!

Only the Limited models have real wood trim usually. Most of the time it's a semi-flexible vinyl type of material. The black under it looks way better.

Just as a friendly tip:

It would sure help out others trying to help you, if you had the year and model of your 4R and some of the important mods listed on your posts. To do that, just go to the User Control Panel (User CP) at the top left of the home page. Right below: Edit Avatar you will see:
Edit Signature. Click on Edit Signature and fill in the stats on your 4R
and hit submit. Every time you post, the year, model and mods of your rig will show up too. If everyone would do that, it would make life a lot easier on the forums. :D
 
I had bad luck getting mine off. The trim came off fine, but the residue stayed behind. Now I have ugly gouges in my dash.
 
What made the gouges? I had glue left on my dash also, but after soaking it with wd-40, the glue came right off. The glue was kind of like dried gum.

I think people get impatient and try to scrape or sand the glue off and end up damaging their dash. You also have to get the cab really hot so the glue will soften up and come off easier.
 
I have the Toyota wood trim on mine. The window control panels on mine started to delaminate so I took the heat gun and got rid of the awful heavy plastic laminate. I lightly sanded the underlying wood with progressively finer grades and then re-stained it (MinWax) and then added several coats of polyurethane. Looks great. MUCH better than new. I may do the rest some day if I have the time.

These are skills I learned on an '85 BMW 735i I used to have. Google "e23 wood trim restore" for lots of write-ups on Roadfly and other great forums.

If you just hate wood trim, ignore this post--save the flame.
 
The trick to getting it off is heat. In the summer, all you have to do is roll your windows up for about an hour while parked in the sun. Since It's now winter, you can roll up your windows and turn your heat up all the way and wait about an hour. In either case, a hair dryer helps a lot too while you are pulling it off.

Use a good pair of pliers and start pulling at one end while keeping the hair dryer pointed at that spot. It should start to slowly peel off as you pull with the pliers. Take your time and don't rush it. Don't worry about the glue residue until you are all done pulling off the fake wood. The glue will come off with either WD-40 or baby oil on a rag. DO NOT SAND!!!

Only the Limited models have real wood trim usually. Most of the time it's a semi-flexible vinyl type of material. The black under it looks way better.

Just as a friendly tip:

It would sure help out others trying to help you, if you had the year and model of your 4R and some of the important mods listed on your posts. To do that, just go to the User Control Panel (User CP) at the top left of the home page. Right below: Edit Avatar you will see:
Edit Signature. Click on Edit Signature and fill in the stats on your 4R
and hit submit. Every time you post, the year, model and mods of your rig will show up too. If everyone would do that, it would make life a lot easier on the forums. :D

i wlil do this haha. can you post up a picture of yours sans the fake wood?
 
Like TheDurk, I went after the delaminating wood. It took a long time and I scratched the living daylights out of my console; I couldn't NOT put the trim back on with all the damaged I caused.

In the end, I think it ended up looking better than the delaminating wood. I'm terrible with my hands and even with all the scarring I'm glad I did it.

Interior:
DSC09603.jpg

Close up (note the spot on the door I melted):
DSC09604.jpg

Close up of the only piece of trim I didn't take off (it wasn't delaminating and I didn't think I could get it off without destroying the head unit) next to the refinished wood:
DSC09605.jpg


It took me probably about 8 hours to get everything off, stripped of glue, and sanded. The stain/poly process is days long. The adhesive I used is coming up in a few places, I'd like to find something better.
 

Attachments

  • DSC09603.jpg
    DSC09603.jpg
    49 KB · Views: 8,103
  • DSC09604.jpg
    DSC09604.jpg
    48.1 KB · Views: 8,548
  • DSC09605.jpg
    DSC09605.jpg
    45.3 KB · Views: 8,199
If just the corners are lifting I recommend sticking a toothpick under the laminate, and then using a Q-Tip to dab a bit of acetone on the toothpick. The acetone goes under the laminate, and melts it back to the wood crap. Around my window buttons I had to take the trim off it was so bad, and it was a pain, but the little corners fixed on the dash make it look new.
 
lol, u have the same hole of missing carpet by the gas pedal. My husbands boat for feet did that to mine.
Like TheDurk, I went after the delaminating wood. It took a long time and I scratched the living daylights out of my console; I couldn't NOT put the trim back on with all the damaged I caused.

In the end, I think it ended up looking better than the delaminating wood. I'm terrible with my hands and even with all the scarring I'm glad I did it.

Interior:
View attachment 37381

Close up (note the spot on the door I melted):
View attachment 37382

Close up of the only piece of trim I didn't take off (it wasn't delaminating and I didn't think I could get it off without destroying the head unit) next to the refinished wood:
View attachment 37383


It took me probably about 8 hours to get everything off, stripped of glue, and sanded. The stain/poly process is days long. The adhesive I used is coming up in a few places, I'd like to find something better.
 
I went back and tried again with my heat gun and some Goo b Gon and it worked wonders. I only did the middle HVAC/radio piece for now.

This will give you an idea of the before:

IMG_20110224_121958.jpg


After:

IMG_20110224_122005.jpg


Damage:

IMG_20110224_122017.jpg
 
I really like the wood trim, but mines peeling too.
To all those who removed the trim and left teh balck backer, SPRAY PAINT IT THE SCRATCHES MAKE IT LOOK WORSE
Anyone who has the REAL wood like vte30 does, I'd be happy to take it off your hands :)
 
I can't help but think back when I bought my 2001. I really wanted the wood trim, but I ended up with one without it.

I am thinking now, not buying was a good decision. Remember when vinyl tops were the rage on new cars and then after a few years they all started peeling off, or the fake wood sides on vans and station wagons, after a few years the fake wood sidings started to fade really bad?
 

Members online

Forum statistics

Threads
278,315
Messages
3,554,123
Members
248,016
Latest member
Advally Service

Trending content

Back
Top