Headlight Assembly Replacement

cnl390

New member
I know this has been answered and answered again.
My head light assemblies are yellowed and fogged and I want to replace them.
Not looking for an upgrade or anything fancy. All I want is a quality replacement at a decent price.
Thanks
 
Register to hide this ad
I know this has been answered and answered again.
My head light assemblies are yellowed and fogged and I want to replace them.
Not looking for an upgrade or anything fancy. All I want is a quality replacement at a decent price.
Thanks

RockAuto for replacements. I had bad luck with them, so I went with OEM from Camelbak Toyota and they have been great, although they cost a fair bit more.
 
Hey,

I just replaced my old headlights with these:

I wanted a more aggressive and updates look so I went with the black and the HID installed. The give it much better look, I think. Pictures on here don't do it justice (I'd post pics but I don't have privileges yet).

They were really easy to do yourself. The hardest is the one bolt that is behind the fender sort of behind the side marker light. I read some post where the poster recommended not even putting it back on because it was so hard to get to. I believe he is right that the light is secure without it, but I found that if you spend the extra 4-5 minutes to take 3 more bolts from the fender, you can easily get to it for removal and installation, so I recommend doing it that way. If you go into with that plan, it is at most a 90 minute job.

You can probably get the lights a little cheaper if you go chrome and/or non-HID.

Good luck and let me know if I can be of help!
 
I had a really good luck with Rockauto headlights. Due to my constant retrofitting needs I buy new set of headlights every 6 years or so. The first set was cheapest option on Rockauto. They lasted 6 years without major problems. Recently I re-did my retrofit and this time I used TYC (CAPA Certified) headlights which are slightly more expensive (around $90 each) but offer top quality and virtually identical to OEM.

TYC Headlight - Rockauto

I blacked out this time for different look. No moisture or condensation gets inside as some others complain with cheaper options.

2015-11-27_00013.jpg~original


2015-11-27_00015.jpg~original
 
Last edited:
I just ordered some on AM Autoparts with a smoked bezel. They had a Cyber Monday offer (enter GRAVYTRAIN in coupon box) for extra 10% off. They have clear or smoked with a "10 YEAR WARRANTY"
 
+1 on Sylvania's Resotration kit. :thumb3:

I got it for $20 with "free" Prime shipping from Amazon. http://www.amazon.com/Sylvania-HRK-...49071039&sr=8-1&keywords=sylvania+restoration

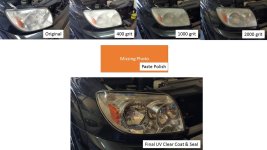
Attached is the progression of the restoration kit. My original headlights were not terrible but did have a moderate cloud haze going on. The kit has (1) old UV coat / yellow dissolve solution, (2) 400 grit sand paper, (3) 1000 grit sand paper, (4) 2000 grit sand paper, (5) refining polish paste and (6) hard UV clear coat. *Edit* You have to use a squirt bottle or something to apply water during sanding and when cleaning between stages.

Took about 1 hour total to complete both headlights. *Edit* Cure time to drive says 1 hour but recommends 6 hours for full cure. Very impressed with the results and anxious to see how long it lasts. Not bad for $20.
 

Attachments

  • Presentation2.jpg
    Presentation2.jpg
    90 KB · Views: 709
Last edited:
+1 on Sylvania's Resotration kit. :thumb3:

I got it for $20 with "free" Prime shipping from Amazon. http://www.amazon.com/Sylvania-HRK-...49071039&sr=8-1&keywords=sylvania+restoration

Attached is the progression of the restoration kit. My original headlights were not terrible but did have a moderate cloud haze going on. The kit has (1) old UV coat / yellow dissolve solution, (2) 400 grit sand paper, (3) 1000 grit sand paper, (4) 2000 grit sand paper, (5) refining polish paste and (6) heard UV clear coat.

Took about 1 hour total to complete both headlights. Very impressed with the results.

Can you do this barehand or need to use a polisher? No way you can just sand it with sandpaper?
 
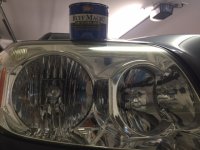
I use a product called Buff Magic. It is a product created for fiberglass/metals. It works great with my porter cable orbital buffer. I don't even seal them after polishing because it only take 5 min to get great looking lights.
 

Attachments

  • image.jpeg
    image.jpeg
    117 KB · Views: 655
Can you do this barehand or need to use a polisher? No way you can just sand it with sandpaper?

You don't need polisher to do this task but drill attachment that comes with some kits (like McGuire Heavy Duty Restoration kit) already comes with everything you need. Not sure about other kits on the market
 
How long does one of those kits last before it turn yellow again? I did a kit like that before and it only took 3-4 months before they yellowed again.
 
How long does one of those kits last before it turn yellow again? I did a kit like that before and it only took 3-4 months before they yellowed again.

Headlights will turn yellow within a year or so if you do not apply UV protection. It only cost like $10

81ayHt5ftWL._SL1500_.jpg
 
Thanks for all the input, suggestions & recommendations.
I think I am going to go with the TYC replacements. From reviews I have read they seem to be pretty good quality for the price.
 
Can you do this barehand or need to use a polisher? No way you can just sand it with sandpaper?

Yes, you can do this barehanded. This kit uses a wet sanding approach so you have to use a bit of water while sanding. When you apply the polish paste you do not apply water until you clean it off.

The final UV coat also hardens so you get some level of added protection, too.
 

Forum statistics

Threads
278,304
Messages
3,554,035
Members
248,016
Latest member
Advally Service

Trending content

Back
Top