Interior (re)Build Thread

Skykomish

Member
This should be fun.

PXL_20231123_230007871.jpg


Some of this I've had in my rig for a while, some I just bought and some I made myself.

Power
200Ah LiFePO battery
Redarc Manager 30
Renogy 1000W inverter
Tesota Overland APDS
Blue Sea battery disconnect switch
Generic 40A solar disconnect
MRBF fuse block
Bunch of Wago 221 connectors

Comms
Peplink MAX BR1 Pro 5G
Dishy Dualie DC Power Supply
SpaceX Square Dishy
Yaesu FTM-400DR
Midland MXT115 (might replace this)
weBoost Drive 4G-X OTR (might replace this)

Misc
Libre Computer Board AML-S905X-CC
ScanGauge II & mount from BlendMount
Travel Buddy Oven
Flojet 3.8L/min water pump
2x Powerwerx 75A USB chargers
Few other low power USB chargers, 12v outlets, etc

Since this is a rebuild I've already got a bunch of the wiring in place already. The USB charger is powered from the aux battery with the cabling run down through the dash, center console and back to the rear. Mic and radio head is run under the driver seat along with a whole mess of coax.

PXL_20231118_171837989.jpg


PXL_20231122_222225136.jpg


PXL_20231118_172016591.jpg


Peplink Mobility 42G antenna and more coax routed through the driver side of the firewall

PXL_20231123_230652262.jpg


PXL_20231123_231205736.jpg


PXL_20231118_172049200.jpg


Start battery and ground connections through the passenger side of the firewall

PXL_20231118_171909079.jpg


Dishy ethernet connection

PXL_20231118_172325366.jpg


PXL_20231118_172218876.jpg
 
Register to hide this ad
Man! That is quite the antenna!

Ethernet port to Starlink?! That's awesome! Do you work remote and "Go into the office" from the trail?

Why so much Coax?
 
Nice to see the Travel Buddy oven. That is a great oven. I cooked four Panko-breaded chicken drumsticks in mine, and they came out juicier than from my kitchen oven, maybe because the space in the Travel Buddy is so confined, keeping moisture in. The Pyrex 7212 glass food storage container fits in the oven perfectly, after removing the top tray of the oven.

The oven draws 10A, so it might be a little high for a 1000W inverter - maybe upgrade to 1200W or 1500W.
 
Man! That is quite the antenna!

Ethernet port to Starlink?! That's awesome! Do you work remote and "Go into the office" from the trail?

Why so much Coax?

The Peplink antenna looks kinda like a jellyfish when you take it out of the box. There are actually 7 antennas, each with a separate coax run - 4 cellular antennas, 2 WiFi antennas and a GPS antenna. The location on the hood was a compromise, really didn't have anywhere else I could put it where it wouldn't get damaged. In addition to that, I've got a GMRS antenna, 2m/70cm antenna, and both internal and external cel booster antennas...

I do work remote as a software engineer and have for many years. I lived in my rig full time for about 3 years and still travel for weeks/months at a time when I can. Starlink was a total game changer with the places I could get to and still have usable internet. The nicest thing about the Peplink router IMO is its dual SIM (I've got both Verizon and a MVNO SIM in there) and has a WAN port. When the WAN port comes up it will automatically switch over to that. So when I get into camp I just chuck Dishy on the ground, plug it in, flip a couple switches and that's it - now I'm talking to a satellite instead of a mobile tower. Between the two SIM cards and Starlink I rarely lose connectivity.

The oven draws 10A, so it might be a little high for a 1000W inverter - maybe upgrade to 1200W or 1500W.

The oven is 12V, as is almost all of my gear. These days I really only use the inverter for running a blender and charging a gaming laptop. I considered upgrading but it's not critical gear for me.
 
The oven is 12V, as is almost all of my gear. These days I really only use the inverter for running a blender and charging a gaming laptop. I considered upgrading but it's not critical gear for me.

Of course it is 12V. I've been doing a lot of quick calculations with various 120V devices for my 1200W inverter, to see if I need to upgrade, and I went there with the 12V oven when I shouldn't have.
 
Roof solar input under the TrailerVision port and 12V power for accessories, 10 AWG for both. I used a Scanstrut DS-Multi instead of a cable gland - low profile and plenty of room for expansion. Since I had the headliner out anyway the install was pretty straight forward, just cut/drill some holes and screw it in.

PXL_20231129_200349794.jpg


Roof power just goes to a connector on the RTT for now, at some point I'm going to rig up some camp lights and a few other items as well.

PXL_20231129_200403736.jpg


Getting a start on the gear platform. I'll be building this up into a full drawer/storage system but still playing with ideas. I would be curious to get some input from y'all on this. If you've DIY'd a platform and/or drawers was there anything unique you did that you really liked or hated?

I am also considering options to modify the rear trim I've left off in these pics. With a full drawer system they end up covered anyway so why keep all that plastic there...

PXL_20231129_200527883.jpg
 
Finally got around to drawing up some brackets and sending them out for fabrication today. I'll have four of these, one for each of the four bolts where the front of the rear seat brackets normally sit. The platform will rest on top and bolt into these for support and hopefully prevent things from moving too far if I roll the truck or get in a collision.

bracket1.png


Is there a vendor that makes a full platform that actually uses the seat bolt holes instead of just resting on the floor? The only ones I've found seem like they'd be super sketchy in a collision or rollover.
 
use sound deadening if you pulling all carpets to put in drawers. Otherwise, it is gonna get loud, tinny, and cold in there. One of my main regrets.

other than that, cool build so far.
 
Got busy with other stuff but finally made a bit of progress. Front support all bolted in. I'm recycling some bits from my previous Dobinsons drawer system for the platform supports.

frontbrackets.jpg


Rear support brackets. I think these were originally half of a RTT mounting bracket, easily modified with a press brake. These will also be used to support the drawers I'll be adding later.

rearbrackets.jpg


Looking in from the rear. I'm going to add some low profile strut channel as additional support before installing the platform. I've also got some L track that I plan to bolt through the platform and into the strut channel. Between my 75L fridge and the 4 x 20L water containers I carry this needs to support quite a bit of weight. If I ever wreck or roll this rig I really don't want that stuff going anywhere.

rearview-noplatform.jpg


Quick test fit of the front platform panels.

rearview-platform.jpg
 
Last edited:
Finally made some progress on this...

Ran power for my ham and GMRS radios under the driver seat. I still need to make a bracket and actually mount up the radios once my new GMRS rig is delivered this week.

ham-radio-power.jpg


Peplink MAX BR1 Pro 5G and weBoost mounted under the platform

router-booster.jpg

coax.jpg


Final installation of the platform:

rear-platform-installed.jpg

rear-platform-installed2.jpg


200Ah LiFePO battery is strapped down now, not sure if this is the final location quite yet.

battery.jpg


Testing placement for the DC-DC charger, current shunt, battery disconnect, etc

dcdc-test-fit.jpg

dcdc-test-fit2.jpg
 
Wire runs were getting a little out of hand, figured I should label this stuff before I get too much further

labeledwires.jpg


Red/white LED lights. I've had these for a few years but haven't bothered hard wiring them in before now.

light.jpg


New drawer system

strongbox.jpg


Half bolted in, will need to make a plate for the other side of this box

rearbolt1.jpg

rearbolt2.jpg
 
4 x 20L water cans fit in here pretty easily, though not sure the final orientation I'll end up going with. In any case I've got lots of flexibility to move things around as needed later.

watercans.jpg


Water quick connect and valve. I've got a bottle filler, hand/dish wash extension and a sprayer I can use here.

front-water-qc1.jpg


front-water-qc2.jpg


No valve in the rear so only for use with my sprayer

rear-water-qc.jpg
 
Mounted two 75W USB chargers and my Dishy Dualie power supply on the side of the drawers. I'm going to fabricate a panel to put over this area once I get the battery system back up and running again. I ended up using a small piece of plywood to get it all on there, is it just me or does nothing ever actually line up with molle pattern holes?

chargers-dishy-ps.jpg


Manager 30 remote head mounted up on this new panel. Panel is attached to the drawers with brackets on the inside.

divider.jpg


Another panel to prevent random stuff on top of the drawers from sliding forward and cover up some ugly carpet seams on the back side of the larger panel its mounted to.

headboard.jpg


Getting a better idea of how this is going to all fit in here

electrical.jpg
 
Last edited:
DC-DC, inverter, aux battery and solar panels are wired in!

apds1.jpg

apds2.jpg


First charge on the new build, bringing in just over 15A from the panels

solar-charging.jpg
 
Added a panel for the battery disconnect, this is permanently mounted to the platform and drawers.

switch-panel.jpg

switch-panel2.jpg


Battery box, no hinges or other hardware yet. Seems to stay in place pretty good on its own but will get something added before taking it off road.

battery-box.jpg

battery-box2.jpg


Just about done with this project for now... only things left are to extend the start battery cables a bit (the previous install left them a little short), do some final wire runs to switched equipment like my USB chargers and clean up that rats nest of wires. The APDS makes it super easy to connect and disconnect equipment so I went ahead and plugged most stuff up for the moment, just need to trim to length when I do the final cable management.
 
Got Starlink set up in bypass mode with the Peplink MAX BR1 router. The app still works but took some configuration on the router to set up. Thankfully this post had everything I needed to configure a static route: MAX BR1 MK2 + Starlink App Sleep Schedule not available - #2 by Jonathan_Pitts - Pepwave MAX - Peplink Community

starlink wan set mgmt ip to 192.168.100.100
Local DNS Records dishy.starlink.com -> 192.168.100.1
add two outbound rules
enforced to wan ip 192.168.100.1
enforced to wan domain dishy.starlink.com

dishy.jpg


Dishy Dualie seems to reduce power consumption significantly. With the Starlink router and my inverter it was running about 5-6A idle and 10-12A when active. With the POE injector I'm seeing 3-3.5A at idle and 6-7A when active, huge improvement for sure

dishy-power-draw.jpg


Rigged up these quickie side panels to get some mounting locations for switches and other items. Obviously this is a bit of a hack job. I have another side project that will remove the need for these switches altogether so making something that needs to last for more than a few weeks wasn't really a goal with these.

driver-wing.jpg

passenger-wing.jpg


Labeled and properly fused now. I mounted this up high because the fridge will only have a few inches clearance in front of the APDS.

labels.jpg


Shot of the full system with the battery box removed

full-system.jpg
 
Went for a drive last night to check for squeaks and rattles. The sunset was amazing and the ride was dead quiet, super happy with how this turned out so far.

full-system.webp

4runner1.jpg

4runner2.jpg


Got the fridge back in this morning. Very tight fit but its easy to loosen the tie downs and move the fridge if I need access.

fridge.jpg

fridge2.jpg
 
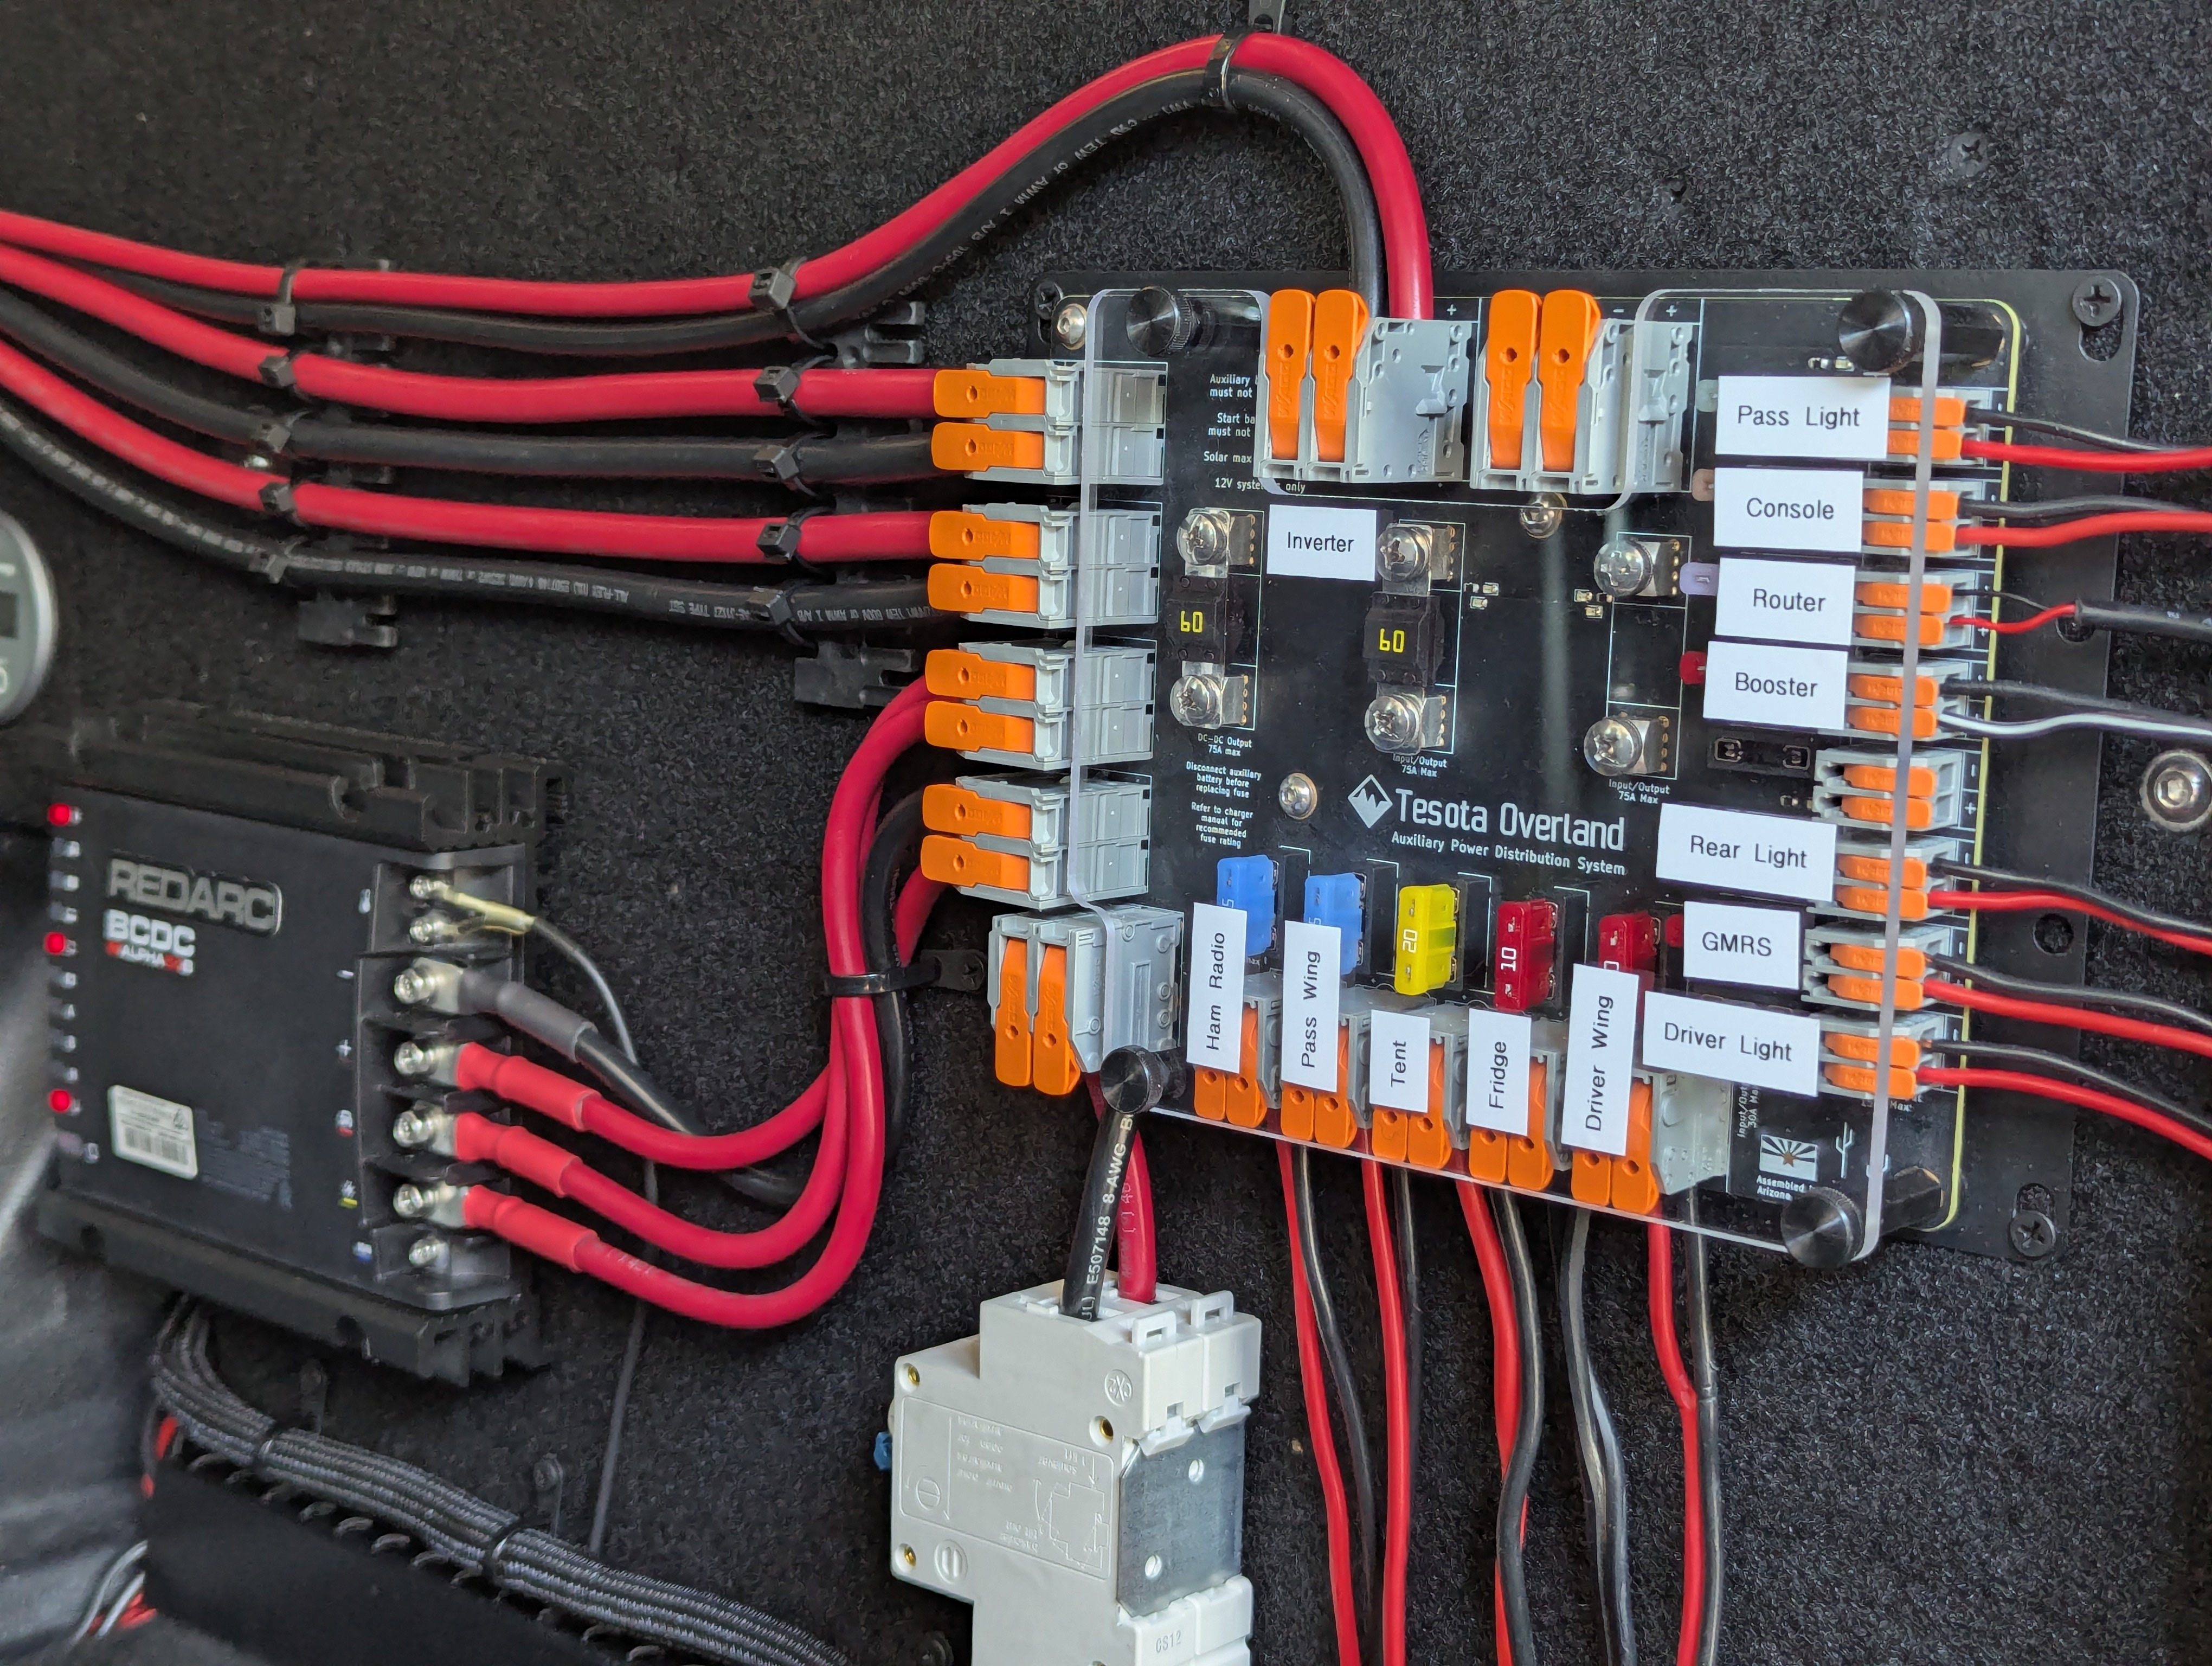
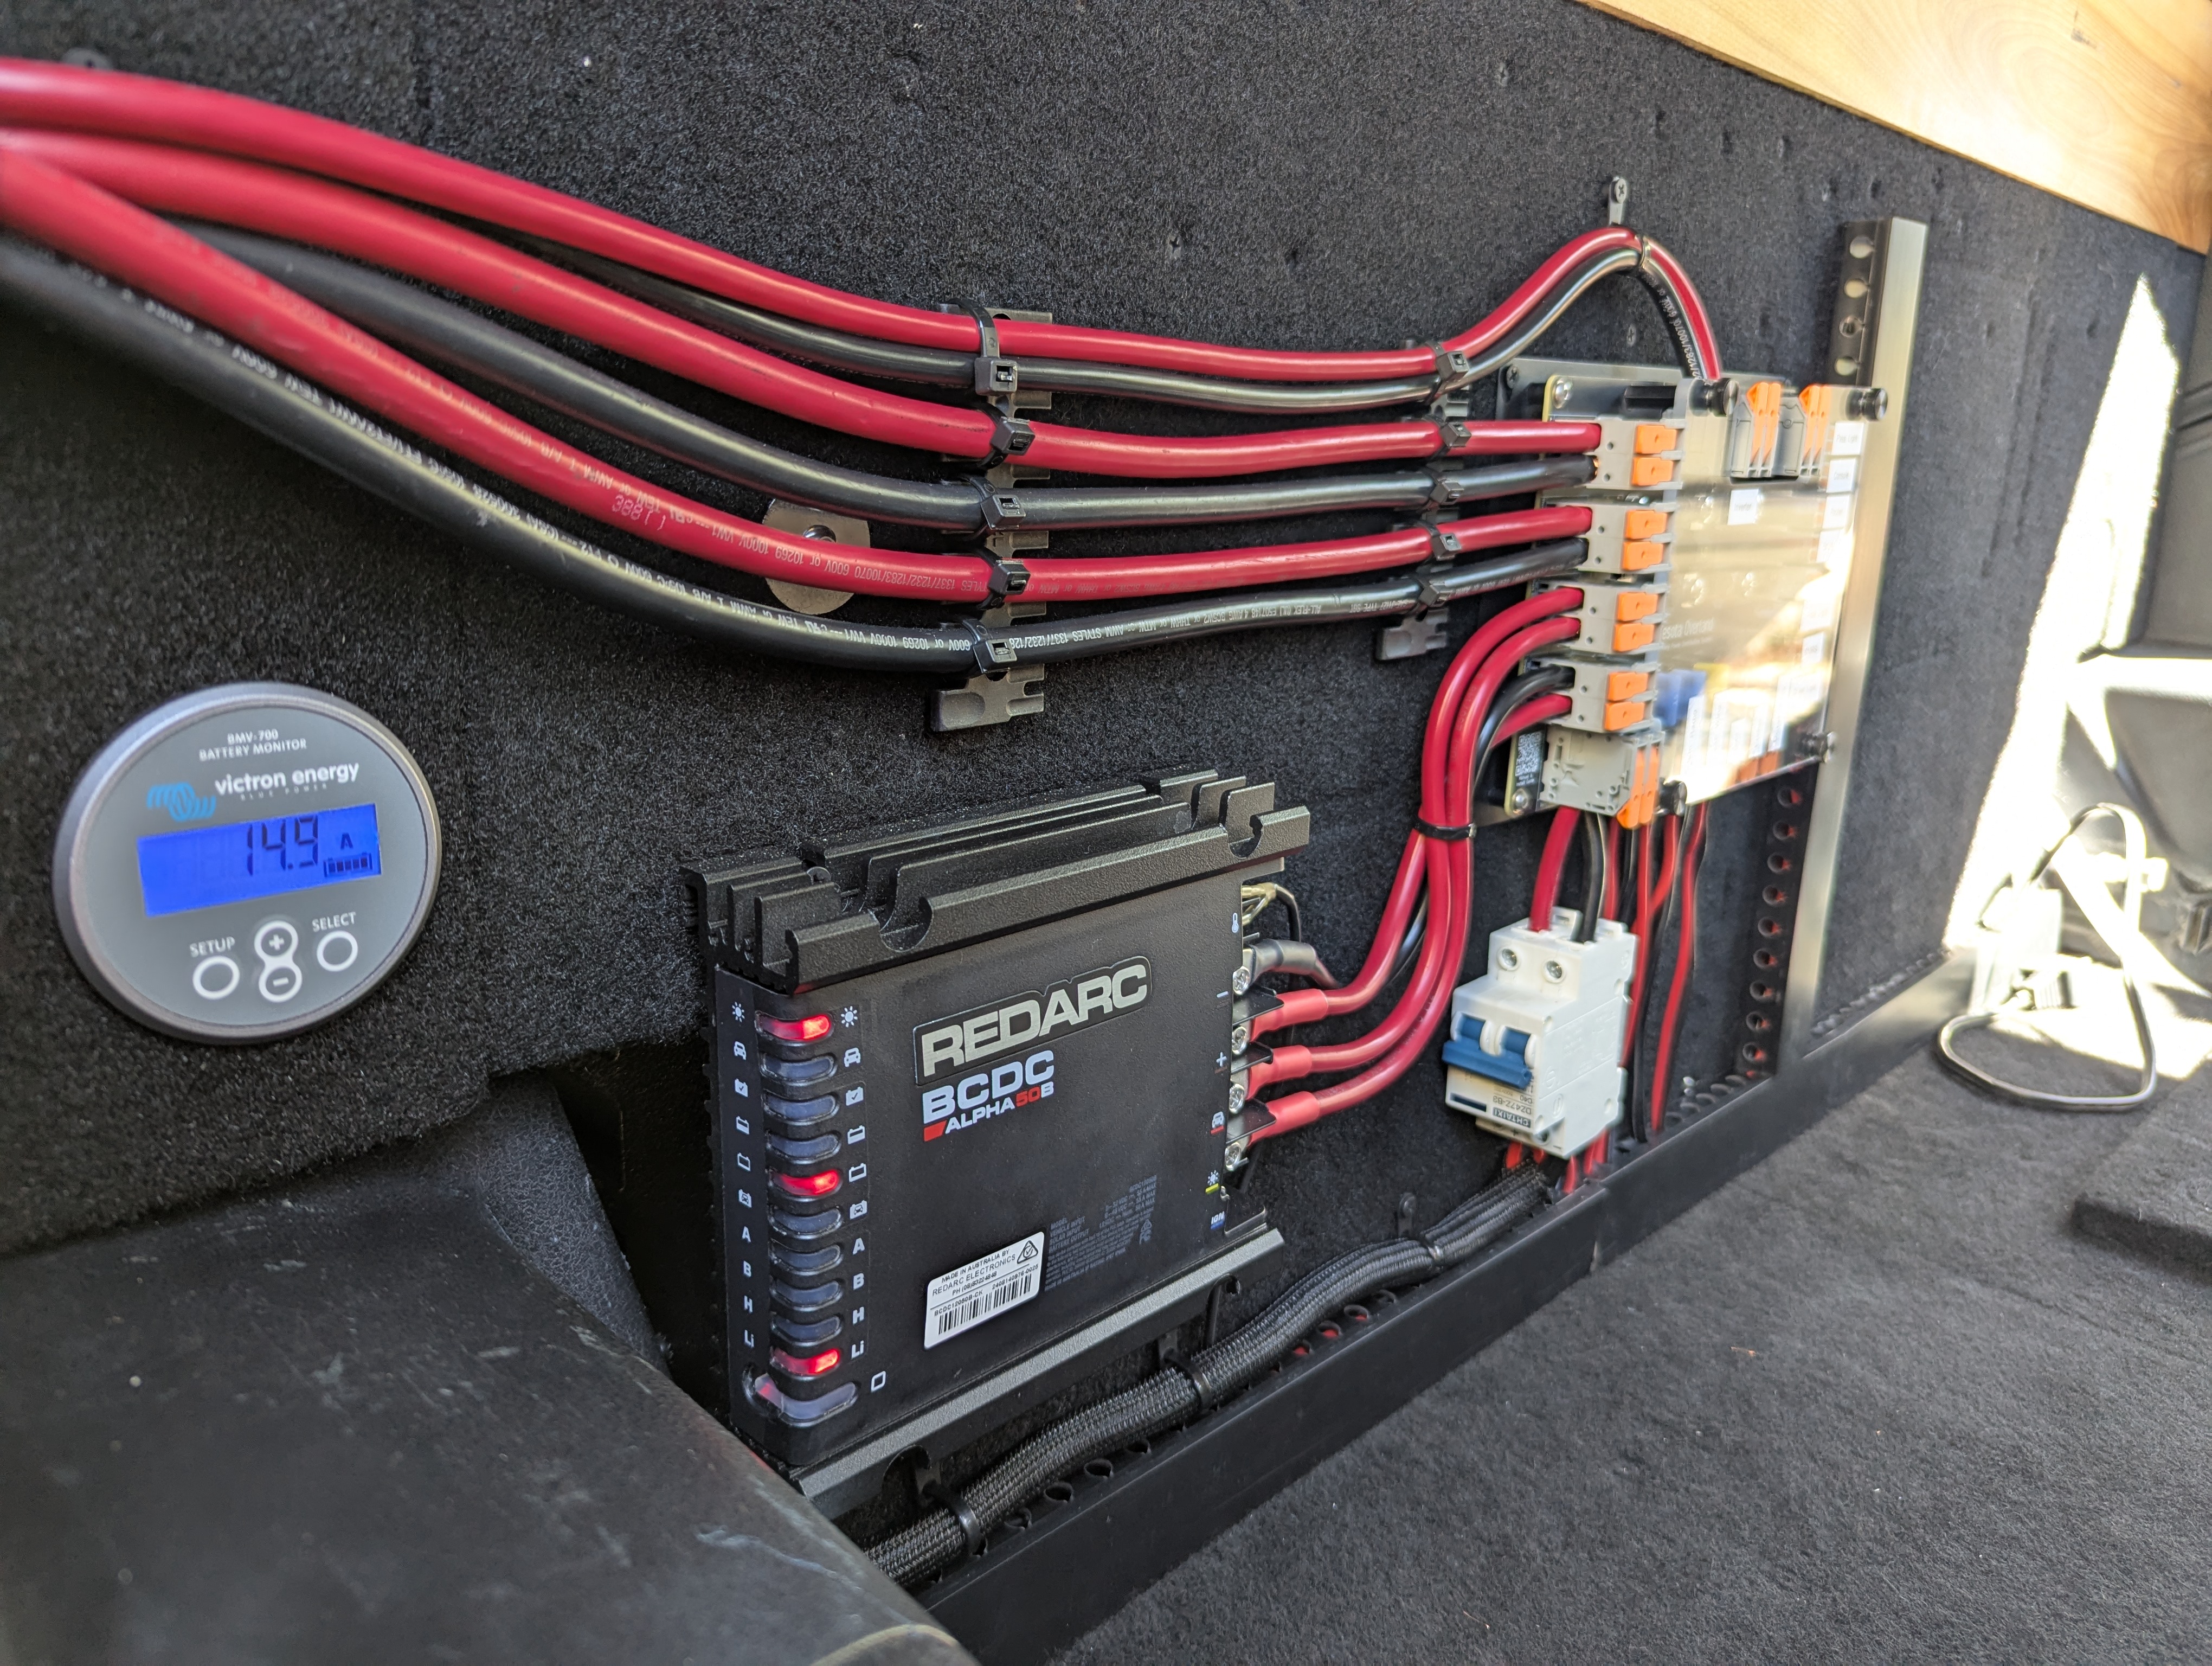
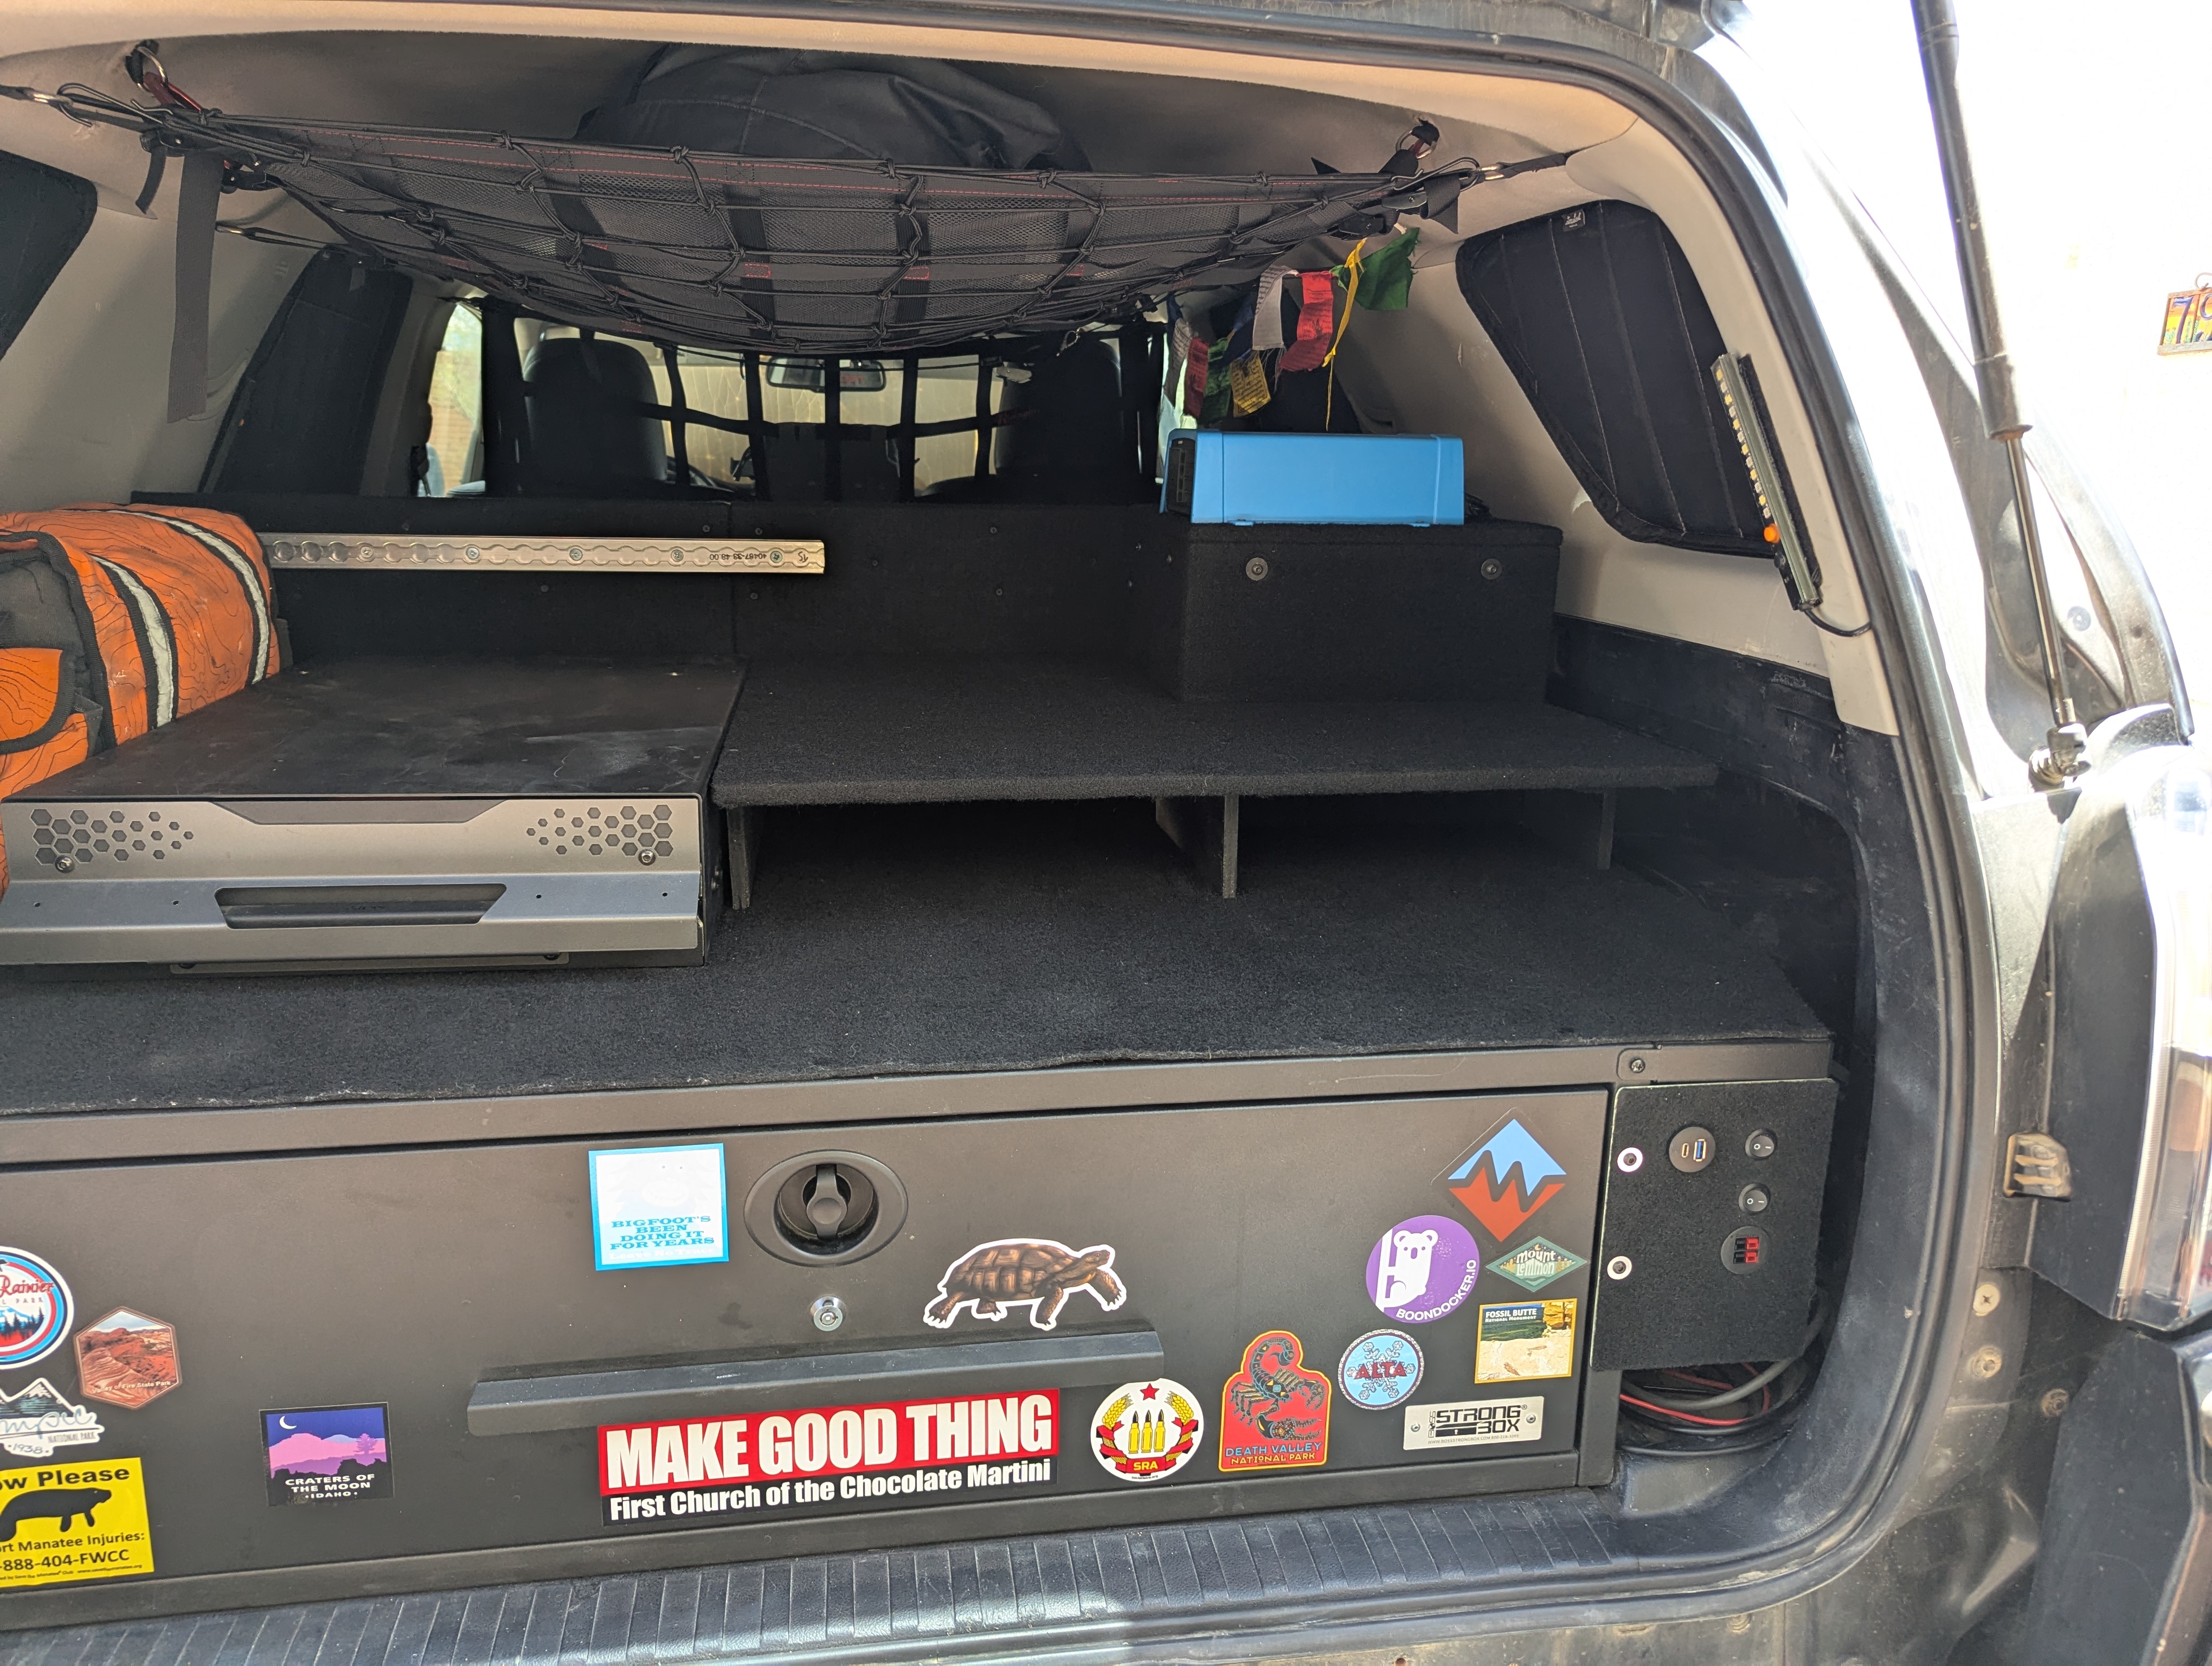
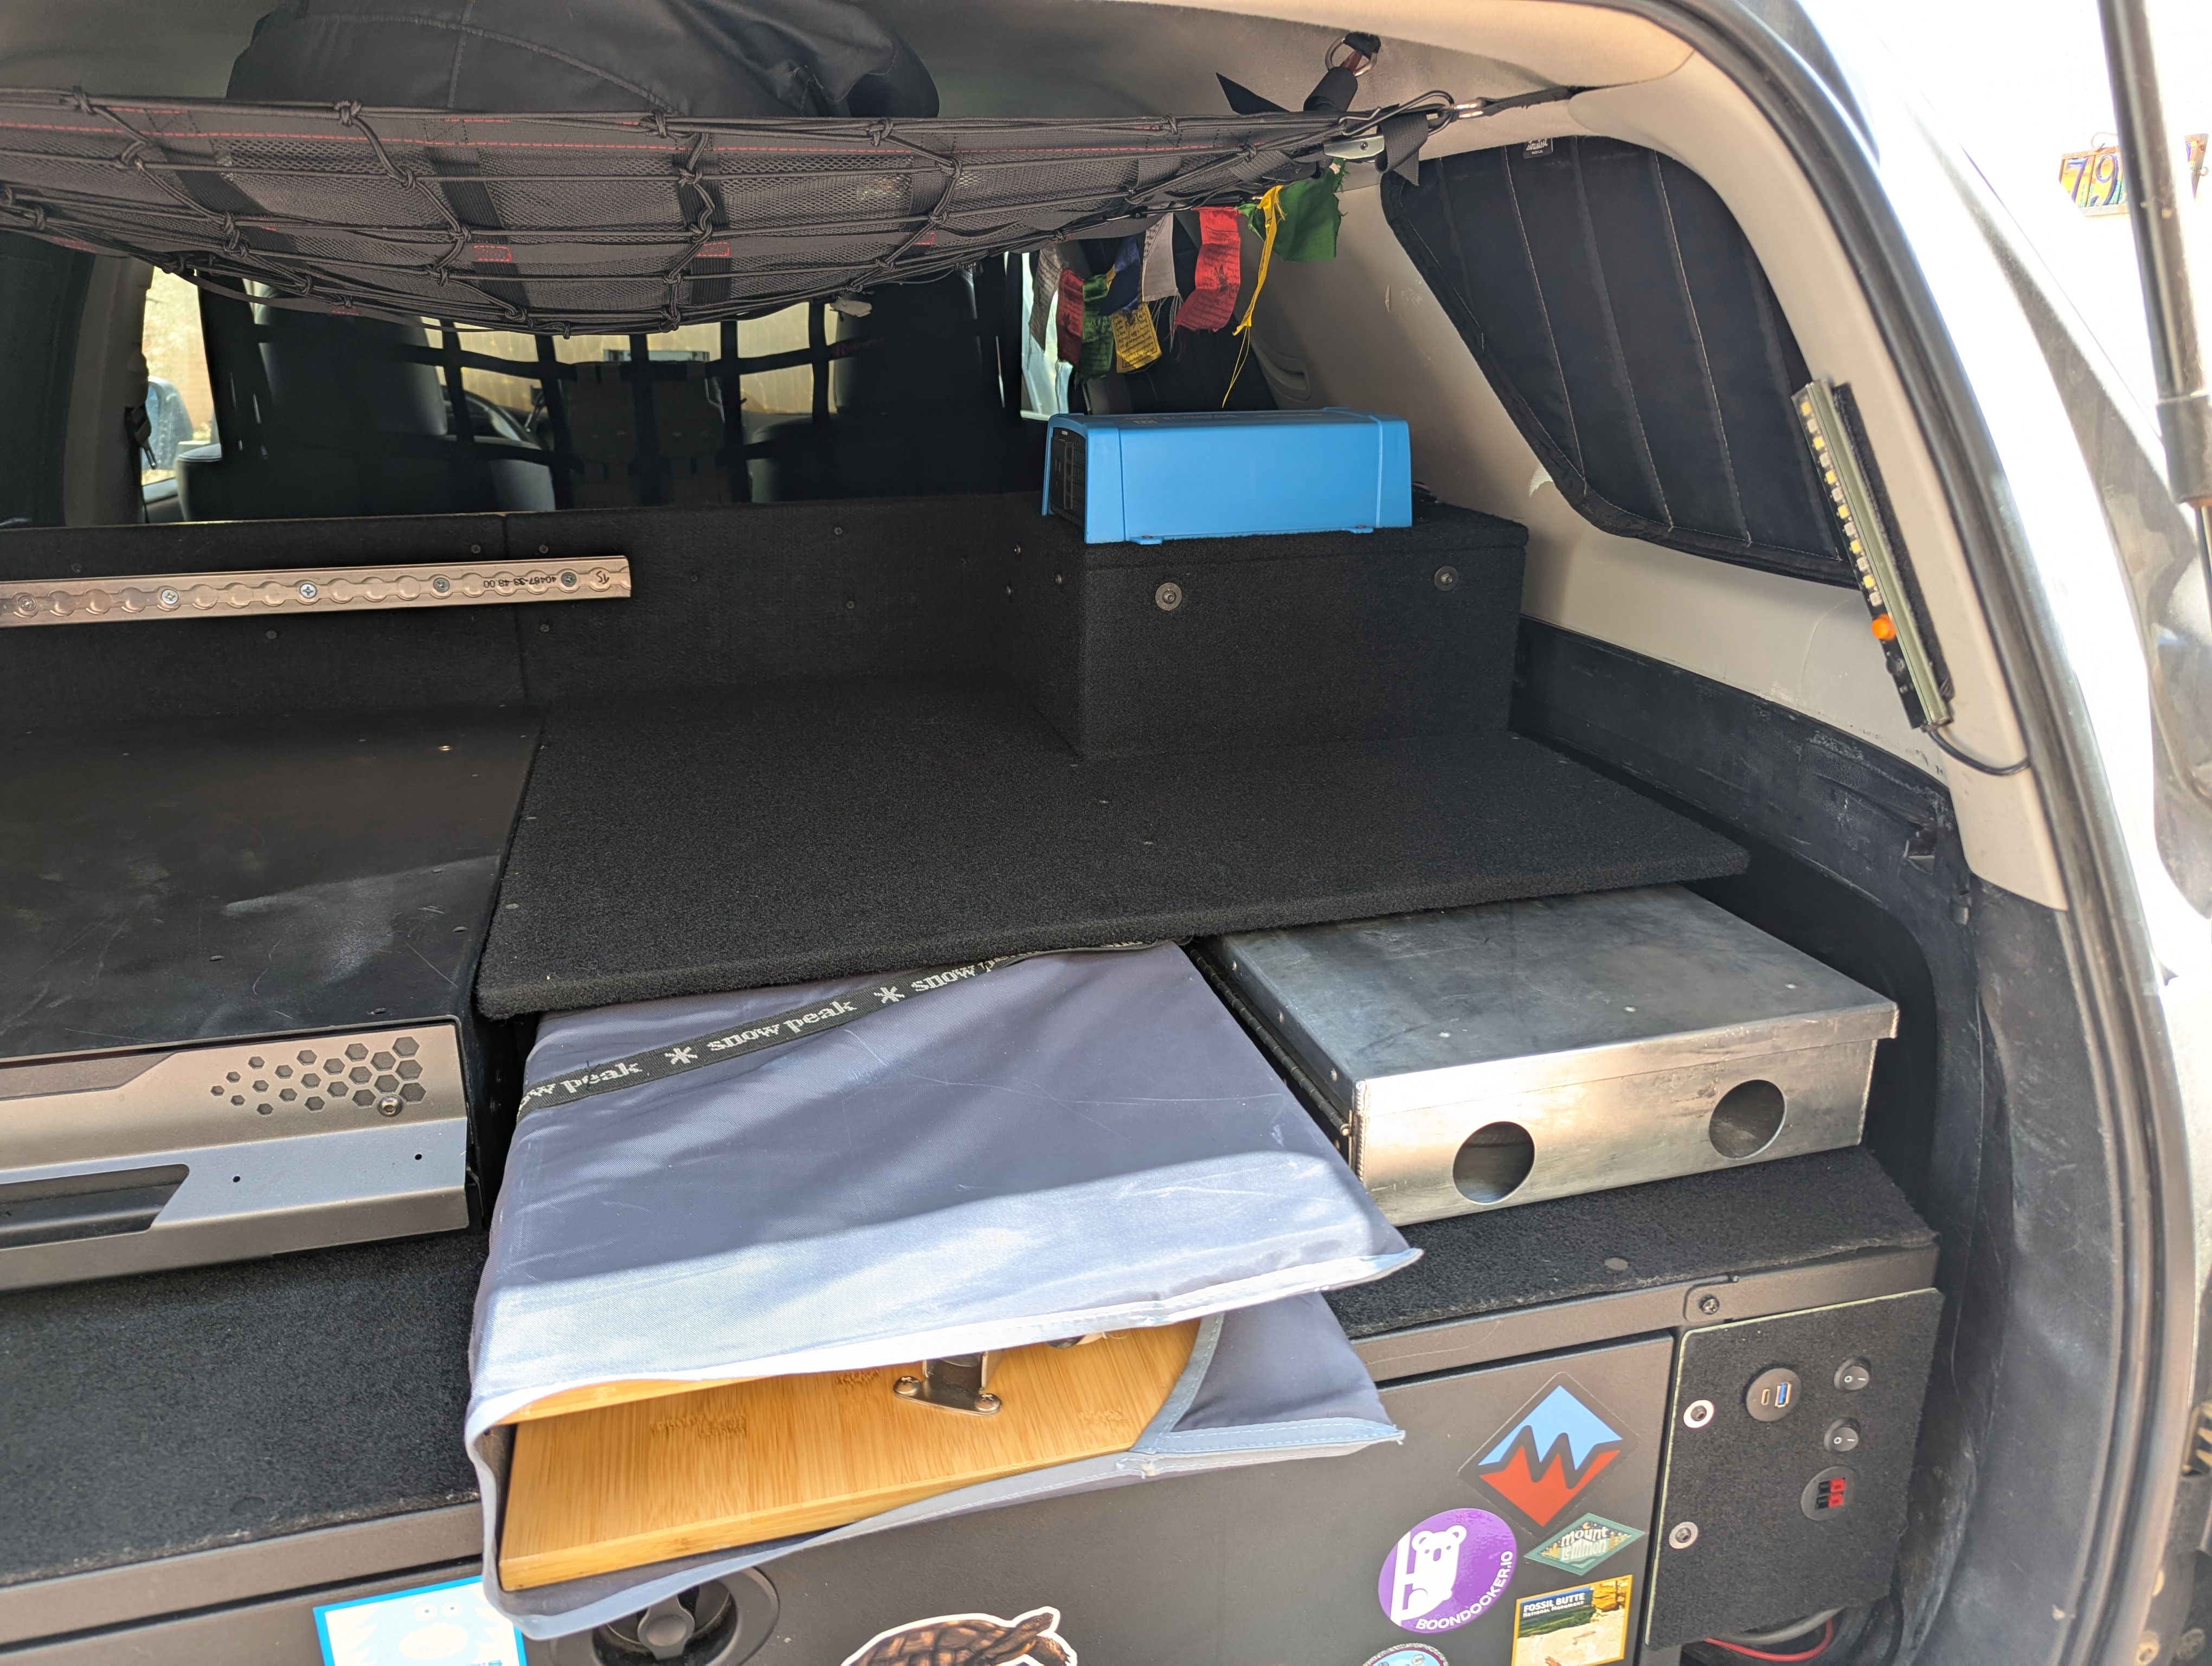
Seems I can't resist the urge to keep pulling this all apart. The battery was moved up on top of the drawer and electrical system rebuilt again with new equipment. I could have made the wiring much more compact but wanted to show it off a bit. The divider now extends up another 5" and is in line with the top of the new battery box. The small divider on top of the drawer just rests on top and can be removed easily if I'm not using my stove or table.

I'm pretty happy with these latest changes, only things left to do now are add a couple of switches for the router and cel booster and finally make some nice panels for the "wings" next to the large drawer.

PXL_20260508_164720410.jpg
PXL_20260508_164201876.jpg


PXL_20260507_194833786.jpg
PXL_20260507_195134851.jpg
 

Members online

Forum statistics

Threads
278,305
Messages
3,554,041
Members
248,016
Latest member
Advally Service

Trending content

Back
Top